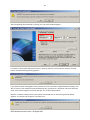
1
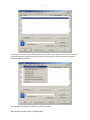
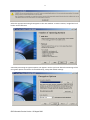
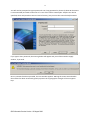
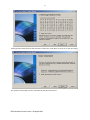
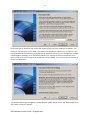
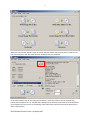
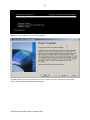
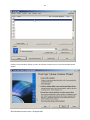
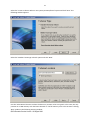
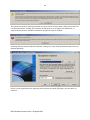
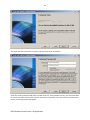
TrueCrypt – User Guide
TrueCrypt is a free open-source disk encryption software for Windows Vista/XP, Mac OS X, and Linux
and is available at http://www.truecrypt.org/.
This guide describes the use of TrueCrypt to perform three different encryption tasks:
1
Encrypting a Complete System Disk
2
Creating an encrypted volume in a file container
3
Creating an encrypted volume in a non-system partition or device, such as USB memory stick
TrueCrypt 5.1A software was used to perform the encryption tasks. Earlier or later versions may
possess a different look and feel, and may offer a different set of functionality.
There are quite a few screen shots to display, theretore the document and processes seem long. This
is a consequence of offering the user options at various stages of the encryption process and
ensuring that it is safe to proceed. In reality, the process does not take long: it is usually just a case
of accepting default settings, except in a few instances. The actual encryption process for a system
disk takes a lot longer to perform than the initial steps to set the process up.
1
Encrypting a Complete System Disk
Once the TrueCrypt program has been installed on a computer, execute the file TruCrypt.exe and a
window like this should appear. This is the main TrueCrypt window from which all encryption is
controlled. When encrypting a complete system disk, some suitability tests have to be performed
and the process ends up being executed in two stages.
Version 2 23/02/09
2
To encrypt a complete system disk, which may contain more than one partition, ensure it contains
no logical partitions and click the System option on the menu bar. The menu below will appear.
Select the highlighted option.
The warning below appears. Click OK if it is safe to proceed.
QUB Information Services Version 1 29 August 2008
3
Select the appropriate setting that appears in the next window. In most instances, 'Single-boot' will
be the normal selection.
A window presenting encryption options now appears. Unless you know about the meanings of the
encryption options and wish to choose differently, accept the default settings.
QUB Information Services Version 1 29 August 2008
4
You will now be prompted to type a password. Use a long password or phrase (at least 20 characters
is recommended) and make a safe note of it. Loss of this will be catastrophic. Keyfiles can also be
specified, which will provide a two-tier level of security, but you must also note the keyfile names.
If you type a short password, the warning below will appear and you will be invited to supply
another, if you wish.
Once a password has been provided, the next window appears. Moving the mouse around within
the window for about 30 seconds greatly improves the cryptographic strength of the encryption
keys.
QUB Information Services Version 1 29 August 2008
5
TrueCrypt then shows the first few characters of the keys. Click 'Next' to move on to the next stage.
The system now prompts you for a location for the ISO recovery file.
QUB Information Services Version 1 29 August 2008
6
Click 'Next' and an ISO file for the rescue disk will be created. The next window then appears. You
must burn the ISO file to a CD or DVD. If you have CD or DVD writer software, use it to do so. If not,
you can download the software specified in the link within the window, or use another free package
called ImgBurn. Normally, CD or DVD writer software has a facility to write an ISO file to a CD or
DVD. An ISO file is just an image to be copied to the output media, so its contents do not need to be
known or understood.
The window following is of ImgBurn in EZ-Mode Picker mode. Simply click on the 'Write image file to
disk' option to start the process.
QUB Information Services Version 1 29 August 2008
7
When the next window appears, click on the file selection button (where the hand is inside the red
box) and navigate to the ISO rescue file that TrueCrypt has just produced.
In the next window, click on the image at the bottom, within the red box, and the disk burning
process will commence. If a re-writable disk is being used, it will have to be erased if it contains data,
or formatted if this is its first use. Formatting a DVD takes many minutes, whereas formatting a CD
takes a few minutes.
QUB Information Services Version 1 29 August 2008
8
When the rescue disk has been burned, click the 'Next' button on the Rescue Disk Recording
window. The next window appears, verifying the successful creation of the rescue disk. Carefully
remove the disk, label it and store it away for future use.
Clicking 'Next' will cause the next window to appear. If you think someone may be able to recover
data from previously used portions of the disk, select a method to obliterate the data on such
QUB Information Services Version 1 29 August 2008
9
partitions, otherwise accept the default value. The default value will be much quicker, but you must
assess the chances of data being recovered, as explained in the window.
TrueCrypt is now ready to perform a number of system tests. Click the 'Test' button on the next
window.
After the pre-test completes, the computer restarts. You will now see the TrueType pre-boot
window, at which the TrueType password you set must be given to proceed. The other options
should be ignored.
QUB Information Services Version 1 29 August 2008
10
When the system reboots, the next screen appears.
Carefully read the warning message and then, if it is safe to proceed, click the 'Encrypt' button.
Shortly after that the next window should appear.
QUB Information Services Version 1 29 August 2008
11
From the text within the window you will see how to interrupt the encryption process if necessary.
Depending on the size of the disk, the power of the computer and the options selected, encryption
can take several hours to complete. The window shows, graphically and numerically, the progress of
the encryption process.
2
Create a Virtual Volume Within a File Container
This section shows the steps in creating a virtual volume that is contained within an ordinary-looking
file created for the purpose. This is called a file container. If an existing file is used, any data in an
existing file will be lost. To retain the file data, rename the file, use the original name to create a new
file and, when the virtual volume has been created and mounted, copy the original file into it and it
will be encrypted.
Carefully read the text in each window that appears, before clicking the 'Next' button.
When you start the TrueCrypt application the next window will appear.
QUB Information Services Version 1 29 August 2008
12
Click the 'Create Volume' button to reach the next window.
Select the 'Create a file container' option and click 'Next' to move to the next window.
QUB Information Services Version 1 29 August 2008
13
Select the 'Standard TrueCrypt volume' option and click 'Next'.
Type the name of the file to hold the volume. An existing file will lose all its data. Click 'Next'.
QUB Information Services Version 1 29 August 2008
14
Now provide the size for the new virtual volume and click 'Next'.
Select the filesystem type (normally NTFS) and move the mouse within the window for about 30
seconds, to generate strong cryptographic keys. Click 'Format'. When the process completes, which
normally takes a matter of seconds for a small volume, the volume can then be mounted for use.
In the standard TrueCrypt Window, select an unused drive letter, enter the path to the file
containing the virtual volume and click the 'Mount' button (see next window). A volume using that
drive letter will now be available to store encrypted files. When finished with the volume, select its
drive letter and the 'Mount' button will become a 'Dismount' button. Click it to release the volume.
QUB Information Services Version 1 29 August 2008
15
No longer is it possible to use the volume. To all intents and purposes, it is now simply another file,
until it is mounted as a volume again.
3
Create a Virtual Volume Within a Partition
The only time that TrueCrypt encrypts the data in an existing partition is when the system partition is
encrypted or when the disk containing the system partition is encrypted. For all other partitions,
whether on hard disk, USB disk or USB memory stick, the partition will be formatted when created,
thereby overwriting any data. If a partition to be encrypted contains data for retention, it must be
copied somewhere else before encrypting the partition, and then copied back to the encrypted
partition.
In this example, a USB memory stick will be encrypted, but it could equally well be a partition on a
hard disk that is not the system disk.
Start TrueCrypt, as before, to bring up the TrueCrypt main window.
QUB Information Services Version 1 29 August 2008
16
Click the 'Create Volume' button to start the volume creation process. The next window should
appear.
QUB Information Services Version 1 29 August 2008
17
Select the 'Create a volume within a non-system partition/device' option and click 'Next'. The
following window appears.
Select the 'Standard TrueCrypt volume' option and click 'Next'.
Use the 'Select Device' button to select the device or partition to be encrypted. In this case, the only
partition on a USB memory stick has been selected i.e. the full memory stick in this instance. Clicking
'Next' produces the following warning window.
QUB Information Services Version 1 29 August 2008
18
This appears because encrypting a partition can cause the loss of much data, if data preservation has
not been planned for. Clicking 'Yes' produces the following error message if the USB device, as
opposed to the partition, had been selected in the Volume Location window.
Assuming that the partition had been selected, clicking 'Yes' in the warning window leads to the next
window appearing.
Unless you have good reason for adjusting the encryption and hash algorithms, just click 'Next' to
continue.
QUB Information Services Version 1 29 August 2008
19
Just verify that the volume size is correct and then click 'Next' to continue.
Enter the volume password and make a careful note of it. If this password is lost, you will not be able
to recover any data stored on the volume. Click 'Next' to proceed. If you use too short a password or
phrase, a warning window will appear.
QUB Information Services Version 1 29 August 2008
20
After lengthening the password or clicking 'Yes', the next window appears.
It is better to select NTFS filesystem format in options (red box), instead of FAT. Click the 'Format'
button and the following warning appears.
If you wish to retain existing data in the partition and it has not been copied elsewhere already, click
'No' to return to the Volume Format window and copy your data to a safe place. Once this has been
done, click 'Format' again to continue and click 'Yes' in the window above.
Because a volume is likely to have a drive letter associated with it, the warning window below
appears. It is usually safe to ignore it and click 'Yes'.
QUB Information Services Version 1 29 August 2008
21
As formatting proceeds, the Volume Format Window will display progress. The 'Abort' button can be
used to stop formatting but that will not recover deleted data.
After formatting finishes, a message appears to remind you that the drive letter of the partition is
now not usable. It also tells how to mount the newly created encrypted volume.
Click the 'OK' and the final window appears.
QUB Information Services Version 1 29 August 2008
22
Click 'Exit' to finish or 'Next' to create another volume.
QUB Information Services Version 1 29 August 2008