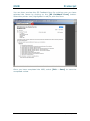
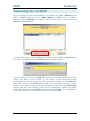
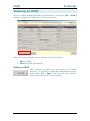
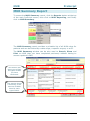
1
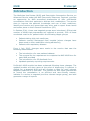
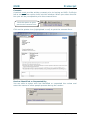
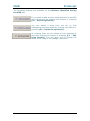
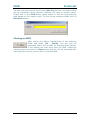
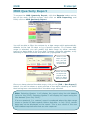
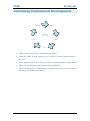
ProScript User Guide _________________________________________________________________________ Medicines Use Review (MUR) Version Release Date Author 3.0.5 01/07/2012 Rx Systems MUR ProScript Table of Contents Introduction ......................................................................... 3 Accessing the MUR Module ................................................... 4 New MUR .............................................................................. 6 Selecting Items for MUR Review ...................................................... 8 MUR Form ........................................................................... 10 Patient Demographic Details / Healthy Living Advice (Tab 1): ........... 11 Matters Identified During the MUR (Tab 2): .................................... 14 Action Taken / Outcome (Tab 3): .................................................. 16 GP Feedback (Tab 4).................................................................... 17 Printing MURs..................................................................... 19 Print Completed MURs .................................................................. 19 Printing Blank MUR Forms............................................................. 20 Searching for an MUR ......................................................... 21 Viewing an MUR ................................................................. 22 Editing an MUR............................................................................ 22 MUR Summary Report ........................................................ 23 Setting up Filters ......................................................................... 24 Searching for an MUR .................................................................. 24 Showing an MUR ......................................................................... 25 Printing MUR Reports ......................................................... 26 Next MUR Due Report ......................................................... 27 MUR Quarterly Report ........................................................ 28 Continuing Professional Development ................................ 30 2 Rx Systems © 2012 MUR ProScript Introduction The Medicines Use Review (MUR) and Prescription Intervention Service, an Advanced Service under the NHS Community Pharmacy Contract, provides an opportunity for MUR accredited pharmacists to offer confidential consultations with their patients to discuss their medications. The service aims to improve the patient’s knowledge and use of their medicines, identify and resolve any issues that may arise, and to report these issues and action plans to their General Practitioner (GP). In October 2011, three new targeted groups were introduced. Of the total number of MURs that pharmacists are required to provide, 50% of these conducted must be for patient within the following target groups: Patients taking high risk medicines; Patients recently discharged from hospital (where changes have been made to their medication during admission); Patients with respiratory disease. From 1 July 2012, changes were made to the service that saw the following amendments: The introduction of a new national dataset The removal for the requirement to complete the NHS MUR form for each MUR provided The introduction of a GP feedback form Updated quarterly reporting requirements. ProScript’s MUR module has been enhanced following these changes. The updated module will alert users at the point of dispensing if a patient is eligible for a targeted MUR and will produce a label for each relevant targeted medicine as a reminder. The module will also allow pharmacists to record the consultation in an efficient and user-friendly manner, indicate if a review is targeted (and the relevant target group), and also generate a range of reports. 3 Rx Systems © 2012 MUR ProScript Accessing the MUR Module The MUR Module can be accessed from within a patient’s PMR screen. Enter the PMR screen for the patient you wish to perform an MUR with, and click the MUR button as shown below. 4 Rx Systems © 2012 MUR ProScript Selecting the MUR button from a patient’s PMR screen will bring up the MUR History window. Here you will see a list of previously performed MURs for the patient in date order: You can view the number of reviews that the patient has had. These are divided into targeted and non-targeted, and whether it is an annual review or an intervention. This box shows the total number of MURs done for the selected patient. Tip: if you access the MUR module from a patient’s PMR who has never had an MUR before, the F2 and F3 buttons will be disabled as shown above. When accessing the MUR History from a patient’s PMR screen, you can perform any of the following functions by selecting the relevant key: Click this button to create a new MUR. Click this button to search for a particular MUR in the list. Click this button to view a previously performed MUR. These functions will be explained in detail later in this manual. 5 Rx Systems © 2012 MUR ProScript New MUR To create a new MUR select [F1 – New MUR] from the MUR History window shown above. You will then see the New MUR Entry window. You are required to enter your name, registration number, and the location of the review if it is held in a location other than the pharmacy (subject to PCT approval). To add or select the pharmacist who will be conducting the review, select the [F1 – Select Pharmacist] button. Highlight the chosen pharmacist from the list and select [F10 – Select]. Please note that the pharmacist must have the “MUR Accredited” box ticked in order to use the MUR module on ProScript (see below). Select [F10 – OK] in the New MUR Entry window to proceed with the review. 6 Rx Systems © 2012 MUR ProScript If your details are not listed, you will need to create a record before you can continue. This record will be saved so you can select it for the next MUR without having to re-type your information. To add yourself as a new pharmacist, select [F1 – Add New Pharmacist] from the Select Pharmacist window. This will then display the Add Pharmacist window. Simply fill in the fields above and select the “MUR Accredited” checkbox. If you have not selected this checkbox and attempt to conduct an MUR, you will be prompted with the following warning: If you select Yes, ProScript will automatically check the MUR Accredited box and you are able to proceed with the review. If you select No, you will be unable to proceed. Adding and Editing a Pharmacist can also be achieved by selecting Utilities > Maintenance > Edit Pharmacists from the main screen of ProScript. (This can be useful if you wish to add the information for all your pharmacists prior to using modules such as MUR, NMS, and Responsible Pharmacist). 7 Rx Systems © 2012 MUR ProScript Selecting Items for MUR Review The MUR Items screen lists all the dispensed items within a set date range (last 90 days by default) and requires the user to tick all the medicines to be included in this review. If the list is blank then it may be because the date range you have selected is within a period where no items were dispensed. If you want to see a list of the drugs dispensed within a different period of time, you can set the date range filter. Use the drop down list (highlighted in the red box) to quickly select from a list of pre-defined date ranges. Alternatively you can manually type the dates in the “From” and “To” boxes or use the icon beside the “From” and “To” text boxes. Select the type of review and whether it is “Targeted” or “NonTargeted” If the review is selected as Targeted, you can select the specific group that the review falls into (highlighted above in the blue box). Note: if a patient is prescribed a number of items which fall into two or more of the national target groups, you must use your professional judgement on which target group to select. The review will then need to cover all of the medicines the patient is taking. All items are automatically selected to be included in the MUR session by default as indicated by the tick icon on the left. To de-select an item, click on the tick icon and it will then display a cross icon (as shown on the left). 8 Rx Systems © 2012 MUR ProScript Use this button to select all items in the list. Use this button to de-select all items in the list. Once you have selected all the items click on the [F10 – OK] button and you will be presented with the MUR Details window as shown on next page. 9 Rx Systems © 2012 MUR ProScript MUR Form The following window (MUR Details) is an electronic template that has been designed to capture the new MUR dataset. It is similar to the old MUR form but with some specific changes which will be outlined below. The form is divided into four tabs where each tab is designed to group similar information. You can switch between tabs by simply clicking on the tab name (i.e. 2 Matters identified during the MUR) highlighted in the red circles. The following three buttons are available in all tabs but some other buttons are tab-specific. Saves the MUR form at any time so you can review it later. Shows a print preview of the MUR, and allows you to print it (this is discussed in detail under the heading Printing MURs) Closes the MUR form and you will be prompted to whether you want to save the review or not. The next few pages explain each tab in detail. 10 Rx Systems © 2012 MUR ProScript Patient Demographic Details / Healthy Living Advice (Tab 1): When accessing the MUR Details 2 window, the Patient Demographic Details / Healthy Living Advice tab will be selected by default. It will be pre-populated with patient, pharmacist and GP details. However, you can change these details by using following buttons: Use this button if you need to change/update the patient’s details while performing an MUR. Use this button if you need to change/update the GP’s details while performing an MUR. Use this button to edit the Pharmacist’s details. This will then display the Select Pharmacist window described earlier in the manual. All the patient details fields (except NHS number and telephone number) must be completed in order to fulfil the minimum patient demographic dataset. Note: currently, if you wish to edit the GP Details so that the GP Notification Form is updated, use [F5 – Edit Patient Details] and select [F1 – GP]. Once you have changed the GP details, select [F10 – Save]. 11 Rx Systems © 2012 MUR ProScript Consent: A patient must provide written consent prior to having an MUR. ProScript has a consent form option built into this window. When you select the tick box you will be prompted to print the consent form: Click this option to print preview the consent form Click on the printer icon (highlighted in red) to print the consent form. Review Identified or Requested By: You are able to select who has identified or requested the review and enter the names of other people present during the review: 12 Rx Systems © 2012 MUR ProScript Review Type and PCO Permission: If you did not select the review type in the initial MUR Items screen, you can do so here. Select whether the review is an Annual MUR or a Prescription Intervention and whether it is Targeted or Non-Targeted. You can choose the type of Targeted MUR from the drop down list. If you have been granted permission to conduct the MUR at a site other than the pharmacy, select the tick box. Healthy Living Advice Provided at MUR: You can select from the list below if you have provided any healthy living advice. You also have the option to specify if healthy living advice is “not applicable”: Next MUR Due: The Next Due Date is located at the top of the MUR Details window and is where you can set the date for the next MUR. By default it is set one year from today’s date as most MURs are done annually. If you need to change it, press the calendar icon and choose the date you require by double left-clicking on the date with the mouse. 13 Rx Systems © 2012 MUR ProScript Matters Identified During the MUR (Tab 2): This tab is where you engage your patient in a discussion about their medicine usage. Each item you have selected will be shown on a row. Select this box if the drug is an over-the-counter (OTC) or complementary therapy This column is selected by default. If you select any option highlighted by the red box, this tick is removed Identifies if a drug is targeted or non-targeted Note: the new MUR template in the ProScript module is designed to establish if a patient is non-adherent to their medicines regime. Therefore you should select the tick boxes in the above tab if: The patient is not using the medicine as prescribed There is a problem with the formulation or device Patient reports the need for more information Patient reports side effects or other concerns about a medicine Use the “Other” box to elaborate on any issues identified or to list any other issues. 14 Rx Systems © 2012 MUR ProScript The following buttons are available on the Matters Identified During the MUR tab: If you want to add an item whilst performing an MUR you can do this by clicking this button or pressing [F5 – Add Drug Details]. You can delete a drug from the list by first highlighting the drug and then clicking this button or pressing [F6 – Delete Drug Details]. An existing item can be edited by first selecting it and then clicking this button or pressing [F7 – Edit Drug Details]. This will allow you to change the name of the drug or the dosage instruction. 15 Rx Systems © 2012 MUR ProScript Action Taken / Outcome (Tab 3): This tab allows you to document any action taken, whether it is providing more information to the patient, submitting a Yellow Card report, or referring the patient to their GP or another primary health care provider. You can also document if, as a result of the MUR, the patient has a better understanding of their medicines. If any of the medicines requires a referral to the GP, you should select this tick box and you will be taken to the GP Feedback tab (shown later in the manual). 16 Rx Systems © 2012 MUR ProScript GP Feedback (Tab 4) This tab will only need to be completed if an issue has arisen which requires the GP’s involvement. Any medication which had the “Referral” box ticked in the Action Taken / Outcome tab will be “activated” in the GP Feedback tab and you will be able to select the relevant issue(s): Select this button to return to the Action Taken/Outcome tab If you select a medication in this list that was not marked as needing a referral to the GP, the medication would be inactive on this tab: 17 Rx Systems © 2012 MUR ProScript You can then preview the GP Feedback form for printing once you have selected the issues by clicking on the [GP Feedback Form] button. Select the printer icon (highlighted in red) to print the form: Once you have completed the MUR, select [F10 – Save] to save the completed review. 18 Rx Systems © 2012 MUR ProScript Printing MURs Print Completed MURs To print the MUR you have just completed, select [F3 – Print]. Please note you must save the MUR prior to printing so that the information you have entered is printed onto the form. The following screen will appear, displaying a print preview of the review you have just completed. Select this to send to a web based mail recipient Select this to print Please note that if you choose to email the MUR form, you must ensure that you use a secure email service, such as NHS mail, as you are sending patient sensitive information. In order to email the review forms securely, you will need to export the report to a PDF printer. If this functionality has not been installed, please contact our Service Desk. If you see a mistake in the preview and would like to amend it before printing, click the Close button in the bottom-right of the screen (shown above) to go back to the previous screen. Remember to save your changes again before pressing the print button. 19 Rx Systems © 2012 MUR ProScript When you click the Print button, the following window will appear: Make sure the correct printer is selected. If you have more than one printer installed use the drop-down menu (highlighted in red) and select the correct printer. It’s best to use a laser printer if you have one. Once you’ve viewed your MUR form in print preview mode and selected the correct printer, click on the button to print the MUR. This window will pop up a total of three times altogether (once for each page). This is normal. So remember to click this button three times. Printing Blank MUR Forms You are also able to print a blank MUR form by selecting the checkbox highlighted below. This option is available on all four tabs: 20 Rx Systems © 2012 MUR ProScript Searching for an MUR Once an MUR has been completed for a patient, the [F2 – Search] and [F3 – View] buttons on the MUR History window will be enabled allowing you to Search for a specific MUR (if more than a few exist) and View the selected MUR. To search through a list of MURs for a patient, select [F2 – Search] and you will be presented with the Find window shown below: Type a search word in the Look for text box. You can search by a GP’s name, the date of the review, or the name of the pharmacist who conducted the review. Once you have entered a search in the Look for text box, click on the Find button and it will highlight the first search result. If you want to go to the next matching result click the Find next button and the next search result will be highlighted. When you have found the MUR, close the Find window by pressing Esc on the keyboard, or by left-clicking on the X in the top-right of the window. 21 Rx Systems © 2012 MUR ProScript Viewing an MUR Once you have located the MUR you searched for, select the [F3 – View] button to display the MUR form in read-only mode: When you view an MUR you can perform any the following: Edit the MUR Print the MUR (see above) Editing an MUR After viewing an MUR you may notice you cannot amend it. If you wish to make any amendments to the MUR, select [F2 – Edit]. The form will then become active and you can edit it as required. 22 Rx Systems © 2012 MUR ProScript MUR Summary Report To access the MUR Summary report, click the Reports button at the top of the main ProScript screen, then click on MUR Reporting, and finally click on MUR Summary. The MUR Summary report provides a printable list of all MURs done for patients and can be filtered by a date range, a specific surgery or a GP. The MUR Summary window can be also used to Search, Show and Print an MUR that you have completed previously without having to access a patient’s PMR. This section will allow you to filter the types of MUR you have conducted: This section shows a summary of the amount of MURs done for each type of MUR. 23 Rx Systems © 2012 MUR ProScript Setting up Filters As previously mentioned, you can narrow your search criteria by applying the filters to view the specific MURs you want. As you change your filters the search result will be updated accordingly. For instance if you want to see MURs performed in the last 90 days, all the MURs will be shown but when you apply filters based on a Surgery Name/GP, then only MURs performed for that particular Surgery/GP in the last 90 days will be shown. Date Filter: You can search for a specific MUR by looking at the MURs performed within a specific period of time. You can either use the pre-defined date ranges by clicking on the drop-down menu (highlighted in red) or manually type the time period using the From and To boxes. Surgery or GP Filter: You can filter your search criteria further by using Surgery and GP filters. Simply type the Surgery and/or GP name manually in the boxes provided or select [F6 – Look-Up] or [F7 – Look-Up] to select from the list of Surgeries and GPs registered in your ProScript database: MUR Type Filter: Check or un-check the boxes below to specify which MUR types you wish to see in the list: Once you have set your filters on date, surgery and GP you will be presented with a list of matching MURs. You can perform the following tasks with the list of MURs: Search for an MUR in the list Show an MUR from the list Print the list of all the matching MURs Searching for an MUR After setting your filter, you will be presented with a list of matching MURs for all your patients. If you want to search for a particular patient in the list, use this search facility. You will then be presented with following window: 24 Rx Systems © 2012 MUR ProScript You can type your search word in the Look for text box: the search word can be a patient’s name, patient’s address, GP name or surgery name. Finally click on the Find button shown above to find the first matching MUR based on your search word. To find all the matching MURs click on Find next button. Showing an MUR After setting your filters, highlight any of the matching MURs and select [F1 – Show]. You will then be presented with a list of MURs for that particular patient. If the patient has had more than one MUR, select the relevant record and click on View button and you will be presented with main MUR form where you can edit or print the MUR. 25 Rx Systems © 2012 MUR ProScript Printing MUR Reports After setting your filters as described previously, selecting [F3 – Print] will allow you to print two different types of reports for all the matching MURs. These are: 1. MUR Summary Report: Prints a list of MURs based on filters used. 2. GP Notification Report: Prints a report which can then be sent to a patient’s GP to inform them that an MUR has taken place. Note: this requirement has been replaced with the GP Notification form. The Report Selection window shown below will be displayed when you select the [F3 – Print] button: Click here to select a pharmacist Tick this checkbox to make the patient details anonymous In the window above, select the appropriate report type and press [F10 – OK] to print the report. You will be presented with a preview of the report. If you are happy with the report preview, proceed to print the report by clicking the printer icon (highlighted in red). If you wish to make a change to the preview, press the Esc button on the keyboard to go back to the MUR Summary window. Note: If you are printing GP Notification Report you must select a pharmacist from the list of pharmacists. 26 Rx Systems © 2012 MUR ProScript Next MUR Due Report In the reports menu you can also create a Next MUR Due report. This report is useful if you wish to print a report in advance of the due date, so that you are prepared for upcoming MURs. You may also wish to use the Next MUR Due report to alert you to contact a patient who may not be aware that an MUR is due. This can allow you to arrange an appointment that is convenient for both the patient and the pharmacist. To access the Next MUR Due report, click the Reports button at the top of the main ProScript screen, scroll down and click on MUR Reporting, and finally click on the Next MUR Due report as shown below. You will now see the Next MUR Due window as shown below. You can set a date filter to see MURs due for a specific period of time and also print the report by selecting [F2 – Print]. You can also use the [F1 – Search] facility to search for a particular patient. 27 Rx Systems © 2012 MUR ProScript MUR Quarterly Report To access the MUR Quarterly Report, click the Reports button at the top of the main ProScript screen, then click on MUR Reporting, and finally click on MUR Quarterly Report You will be able to filter the reviews by a date range which automatically defaults to the last 90 days or by a specific quarter. If a Custom date range is selected, you can modify the date range by either manually typing in a date range in the From and To boxes, using the calendar, or by selecting an option from the drop down list (highlighted in red): Enter in the name of your PCT; you will only need to do this once Select this box to export the report to the Excel (or Open Office) format Once you have selected the date range, click on the [F10 – Run Report] button. You will be shown a print preview of the report detailing all MURs that having been conducted within the date range selected. Note: Selecting Quarter 1 will display the report using the old dataset (prior to July 2012). Selecting Quarter 2 will display the report using the new dataset (from July 2012). If a non–quarterly (i.e. custom) report is produced where the date range covers a period of data capture before and after 1st July 2012, certain data may not be displayed on the report. This is as a result of the new MUR dataset requirements that are now captured. 28 Rx Systems © 2012 MUR ProScript The contents of the report reflect the revised reporting requirements that are to be sent to the PCT from 1st July 2012. To print the ProScript report, select the printer icon highlighted in red: To view the report in the standardised template as required by the PSNC/NHS Employers, you will need to export the report to Excel (or Open Office). When you export the report, you will see a confirmation window to inform you that the file has been exported and if you wish to view the file. If you wish to view the file, click Yes: You are able to manually edit these numbers in this format if you wish. 29 Rx Systems © 2012 MUR ProScript Continuing Professional Development identify evaluate CPD plan record act What have I learnt from this training session? How will these things improve my current or future performance in my job? What opportunities do I have or need to practise what I have learnt? What help or support will I need and from whom? How and when will I (and others) measure how well I have put my learning into practice at work? 30 Rx Systems © 2012