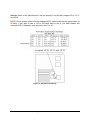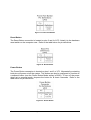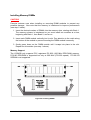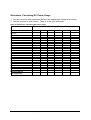
1
User Guide ® Great M inds Think C O M P U T E R S . N E T W O R K S . ® S O L U T I O N S Viglen LX245 Server Guide – MA-LX245-0A-01 Viglen, EMC and the ‘CE’ mark CE Marking As we begin the 21st century, European standards are being harmonised across borders. If products comply with the same standards in all European countries, product exporting and importing is made simple - paving our way to a common market. If you buy a product with a 'CE' mark on it (shown below), on the box, in the manual, or on the guarantee - it complies with the currently enforced directive(s). Introduction to EMC EMC (Electromagnetic Compatibility) is the term used to describe certain issues with RF (Radio Frequency) energy. Electrical items should be designed so they do not interfere with each other through RF emissions. E.g. If you turn on your microwave, your television shouldn't display interference if both items are CE marked to the EMC directive. If emitted RF energy is not kept low, it can interfere with other electrical circuitry - E.g. Cars Automatic Braking Systems have been known to activate by themselves while in a strong RF field. As this has obvious repercussions ALL electrical products likely to cause RF related problems have to be 'CE' marked from 1st January 1996 onwards. If a product conforms to the EMC directive, not only should its RF emissions be very low, but its immunity to RF energy (and other types) should be high. The apparatus has to resist many 'real world' phenomena such as static shocks and mains voltage transients. Viglen’s Environment laboratory To gain a 'CE' mark, the Viglen computer range has had to undergo many difficult tests to ensure it is Electromagnetically Compatible. These are carried out in the in-house 'Environment lab' at Viglen Headquarters. We have made every effort to guarantee that each computer leaving our factory complies fully with the correct standards. To ensure the computer system maintains compliance throughout its functional life, it is essential you follow these guidelines. Install the system according to Viglen’s instructions If you open up your Viglen System: Keep internal cabling in place as supplied. Ensure the lid is tightly secured afterwards Do not remove drive bay shields unless installing a 'CE' marked peripheral in its place The clips or ‘bumps' around the lips of the case increase conductivity - do not remove or damage. Do not remove any ferrite rings from the L.E.D cables. Only use your Viglen computer with 'CE' marked peripherals This system has been tested in accordance with European standards for use in residential and light industrial areasthis specifies a 10 meter testing radius for emissions and immunity. If you do experience any adverse affects that you think might be related to your computer, try moving it at least 10 meters away from the affected item. If you still experience problems, contact Viglen’s Technical Support department who will put you straight through to an EMC engineer - s/he will do everything possible to help. If modifications are made to your Viglen computer system, it might breach EMC regulations. Viglen take no responsibility (with regards to EMC characteristics) of equipment that has been tampered with or modified. Viglen LX245 Server User Guide 1 Copyrights and Trademarks Please note The material in this manual is subject to change without notice. Trademarks Microsoft, Windows, Windows XP, Windows 2000, Windows NT, Windows 95, MS-DOS and OS/2 are registered trademarks of Microsoft Corporation. i386, i486, Xeon, Pentium, Pentium Pro and MMX are registered trademarks of Intel Corporation. JACUP, Contender, Dossier, Vig, Viglen, and Envy are trademarks of Viglen Limited. Genie and Contender are registered trademarks of Viglen Limited. Copyright and Patents This manual and all accompanying software and documentation are copyrighted and all rights reserved. This product, including software and documentation, may not, in whole or in part, be copied, photocopied, translated or reduced to any electronic or machinereadable form, without prior written consent except for copies retained by the purchaser for backup. © Copyright 2002 Viglen Limited All Rights Reserved Viglen LX245 Server System – User Guide Version 2.1 Printed in the United Kingdom Liability No warranty or representation, either expressed or implied, is made with respect to this documentation, its quality, performance, merchantability or fitness for a particular purpose. As a result the documentation is licensed as is, and you, the licensee, are assuming the entire risk as to its quality and performance. The vendor reserves the right to revise this operation manual and all accompanying software and documentation and to make changes in the content without obligation to notify any person or organisation of the revision or change. In no event will the vendor be liable for direct, indirect, special, incidental or consequential damages arising out of the use or inability to use this product or documentation, even if advised of the possibility of such damages. In particular, the vendor shall not have liability for any hardware, software or data stored or used with the product, including the costs of repairing, replacing or recovering such hardware, software or data. 2 Viglen LX245 Server User Guide Contents 1. Overview 6 Introduction 6 2. LX245 Chassis Specifications Physical Specifications Chassis Features Front Panel Controls and Indicators Chassis Back I/O Ports and Features Chassis Feature Summary SCSI Hot-Swap Backplane Layout and Settings SCSI ID Jumper Setting List Chassis Error and Message Indicators 3. VIG340B Motherboard Specifications Server Board Features VIG340B Server Board Layout Back Panel Connectors Server Board Feature Overview Chipset Overview Microprocess Main Memory Super I/O Controller Serial Ports Parallel Ports Floppy Controller Keyboard and Mouse Interface Real-time Clock, CMOS SRAM, and Battery IDE Support LS-120 Support Expansion Slots VIG340B Server Board Special Features ACPI Features Power Supply 8 8 8 9 10 11 12 13 13 14 14 15 17 18 21 22 22 23 24 24 24 24 25 25 25 26 27 29 30 4. VIG340B Server Board Options 31 Overview of Jumper Settings 33 Viglen LX245 Server User Guide 3 Clear CMOS LAN1 Enabled/Disabled LAN2 Enabled/Disabled VGA Enabled/Disabled Power Supply Alarm Enabled/Disabled SCSI Enabled/Disabled SCSI Termination Enabled/Disabled CPU Chassis/CPU Fan Select Watchdog timer Enabled/Disabled Thermal Fan Enabled/Disabled PCI-X Bus Speed Settings Overview of Server Board Connectors Front Control Panel Connector ATX Power Connector PWR_SEC Connector Power LED Hard Disk LED NIC2 LED NIC1 LED Overheat LED (OH) Power Fail Button Reset Button Power Button Universal Serial Bus (USB 0/1) Extra Universal Serial Bus (USB 2/3/4) Chassis Intrusion Serial Ports ATX PS/2 Keyboard and PS/2 Mouse Ports Fan Headers Power LED/Speaker/NMI Third Power Supply Fail Header LAN1/2 (Ethernet Ports) Wake-On-LAN Wake-On-Ring Parallel Port, Floppy/Hard Disk Drive and SCSI Connectors Installing Memory DIMMs PGA Processor and Heatsink Installation Replacing the Clock/CMOS RAM Battery 34 35 35 36 36 37 37 38 38 39 40 44 44 45 45 46 46 46 47 47 47 48 48 49 49 49 50 50 51 51 52 52 53 53 54 57 59 61 5. Software Installation 62 6. System BIOS 63 4 Viglen LX245 Server User Guide Introduction Main BIOS Setup Menu Main Setup Menu Features Advanced Setup Menu Security Menu Power Menu Boot Menu Exit Menu Phoenix BIOS POST Messages Phoenix BIOS POST Codes Phoenix Error Beep Codes 7. Technical Information 63 64 65 68 75 77 79 83 85 91 95 96 SCSI Controller IDE Controller Network Controller Equipment Log and Worksheets Worksheet, Calculating DC Power Usage Connector Pin Signal Details Reliability Information 96 96 98 99 100 101 107 8. Glossary 108 9. Notes 114 10. Suggestions 118 Viglen LX245 Server User Guide 5 1. Overview Introduction This manual describes the Viglen LX245 system and the VIG340B motherboard. The motherboard is the most important part of your computer. It contains all of the CPU, memory and graphics circuitry that makes the computer work. The VIG340B motherboard contains the very latest in CPU design, the Intel Xeon processor, which includes dual processor support, Hyper-Threading technology, Intel NetBurst micro-architecture, Rapid Execution Engine, Streaming SIMD Extensions 2 (SSE2) and Advanced Dynamic Executions. Hyper-Threading technology has been developed to allow multi-processor server applications to execute more than one thread per processor. This in turn will increase the overall throughput of the Viglen server and enable you to scale with processor requirements to handle future workloads. Some of the immediate benefits include: • Increased number of transactions that can be processed by each CPU. • Enabling support for more users improving business productivity. • Providing faster response time for websites and e-Business applications therefore enhancing your customer's experience. Intel NetBurst micro-architecture provides the binary compatibility with previous generation Intel Architecture (IA-32) processors. Rapid Execution Engine means that the new Intel Xeon processors have two Arithmetic Logic Units (ALUs), which are clocked at twice the core processor frequency. This allows basic integer instructions such as Add, Subtract, Logical AND, Logical OR etc. to execute in ½ a clock cycle. For example, the Rapid Execution Engine on a 2.20GHz Intel Xeon processor runs at 4.40GHz. Intel’s SSE2 technology now extends the SIMD capabilities that MMX technology and SSE technology delivered by adding 144 new instructions. These instructions include 128-bit SIMD integer arithmetic and 128-bit SIMD double precision floating-point operations. These new instructions reduce the overall number of instructions required to execute a particular program task and as a result can contribute to an overall performance increase. This new technology can accelerate a broad range of applications, including video, speech, photo processing, encryption, engineering and scientific applications. Finally the Advanced Dynamic Execution engine is a very deep, out-of-order speculative execution engine that keeps the execution units executing instructions. The Intel Xeon processor can also view 126 instructions in flight and handle up to 48 loads and 24 stores in the pipeline. This manual contains technical information about the Viglen VIG340B motherboard and other hardware components inside your computer. If you are new to computers we 6 Viglen LX245 Server User Guide recommend that you read the user guide first. If you are an experienced computer user this manual should provide all the information you will need to perform simple upgrades and maintenance. We hope that this manual is both readable and informative. If you have any comments or suggestions about how we could improve the format then please fill out the form at the back of the manual and send it to us. Above all we hope that you enjoy using your Viglen LX245 Server. Viglen LX245 Server User Guide 7 2. LX245 Chassis Specification The LX245 chassis is designed to be either a pedestal unit or mounted in a 19” rack cabinet. If the server is bought as a Rackmount unit, then it will be supplied complete with a pair of industry standard 19” Rails, handles and all of the necessary nuts and bolts. Physical Specifications Table 1: Physical Specifications Specifications Height Width / Rackmount Height Depth Weight 449 mm 220 mm / 5U 622 mm 20 kg typical configuration Chassis Features The galvanised metal chassis minimises EMI and radio frequency interference (RFI). The removable access cover is attached to the chassis with two thumbscrews and provides easy access to the VIG340B Motherboard and power supply. 8 Viglen LX245 Server User Guide Chassis Front Controls and Indicators A B ! C D 1 2 3 4 5 6 E L F K G H J Figure 1: Chassis Front Controls and Indicators A B C D E F Power LED Error LED (Temperature & Fans) Local HD Access LED Hard Disk Access LED 5.25-inch Bays Power Button G H J K L Reset Button Hot-swap Hard Disk Caddy Chassis Feet Door Lock 3.5” Bay Viglen LX245 Server User Guide 9 Chassis Back I/O Ports and Features A B C PS1 D E PS2 FAN1 FAN2 F I/O Shield I/O Shield K G I I J Chassis with Single PSU Chassis with Redundant PSU Figure 2: Chassis Back I/O Ports and Features A B C D E 10 460W ATX PSU 337W ATX Redundant PSUs Screws for securing PSUs Thumb Screw Silent button for the alarm F G H J K Warning LEDs 12 cm fan for system cooling Padlock Plate Expansion Slot Blanking Plates I/O Shield (refer to Figure 6) Viglen LX245 Server User Guide H Chassis Feature Summary Table 2: Chassis Features Feature Description Drive Bays One 3.5-inch diskette drive bay, accessible from front. Three 5.25-inch-wide bays that are externally accessible, designed to hold half-height standard removable media devices; the bays can be converted into a single full-height bay. Hot-swap bay for 3.5-inch hard disk drives: space for up to six 1-inch-high drives. Baseboard Viglen VIG340B Server Motherboard. Power supply Single 460W PSU or optional 337W Dual Redundant ATX power supply, with integrated cooling fan. Hot-Swap Hot-Swap Backplane board is mini storage enclosure that provides a stable Backplane and safe environment for RAID array systems. The hot swap bay is capable of accepting drives that are 3.5 inches wide and 1 inch high. Drives can consume up to 17 watts of power and must be specified to run at a maximum ambient temperature of 50°C. Expansion slot covers Fan Module System cooling Fan Chassis Intrusion Switch The bay allows users to install either a JBOD (Just A Bunch Of Disks) or a RAID (Redundant Array of Independent Disks) system. Six fully functional expansions slots can be used: every slot opening that does not have an add-In board Installed must have a slot cover installed. Two 8 cm ball bearing cooling fans for Hot-Swap bay cooling. One 12 cm ball bearing cooling fan for system cooling. The chassis provides a micro toggle switch; It is a two-wire switch that is connected to the VIG340B motherboard for chassis intrusion detection. Viglen LX245 Server User Guide 11 SCSI Hot-swap Backplane Layout and Settings FAN2 FAN3 FAN4 SCSI IN FAN1 SCA0 DS1 J8 SW1 J10 J9 DS2 SCA1 BZ1 J11 JP8 DS3 SCA2 U2 DS4 SCA3 DS7 J12 DS5 SCA4 JP7 DS6 SCA5 U3~U5 Figure 3: SCSI Hotswap Backplane Layout Jumper/ Connector U2 U3~U5 FAN1 (Fan Failure) FAN2 (PSU Failure) FAN3 (Hard Disk Failure) FAN4 J8 J9 SW1 BZ1 J10~J12 JP7 DS1~DS6 DS7 12 Function Temperature detector Ultra 160 LVD/SE terminators Triggers the fault LED on the front panel if a fan fails Triggers the fault LED on the front panel if a PSU fails Triggers the fault LED on the front panel if a hard drive fails External Fan 4 (Connectors not used) Connector not used External Intrusion Switch (micro switch) ∗ Buzzer silent button Buzzer will sound if a failure is detected by the firmware Power input Front Panel LED connector Sets the hard disk drive 0~5 ID code Sets the drive spin up mode Viglen LX245 Server User Guide SCSI IN SCSI Connector SCA0~SCA5 SCA Hard Disk Connectors ∗ If J9 is not connected to the external intrusion switch a jumper must be inserted on this connector. SCSI ID Jumper Setting List The diagram below shows the different jumper settings to select the SCSI ID for the hot swap drive bays. ID JUMPER SETTING 0 2 3 4 5 6 7 1 1 1 1 1 1 1 1 2 2 2 2 2 2 2 2 3 3 3 3 3 3 3 3 4 4 4 4 4 4 4 4 ID JUMPER SETTING 1 8 9 A B C D E F 1 1 1 1 1 1 1 1 2 2 2 2 2 2 2 2 3 3 3 3 3 3 3 3 4 4 4 4 4 4 4 4 Figure 4: SCSI ID Jumper Settings Chassis Error and Message Indicators The table below explains the error messages for the chassis and hot swap bays, through the beeps and LED patterns. Table 3: Chassis Error and Message Indicators Error Message Explanation Continuous beep and flashing error LED Hot swap bay temperature has exceeded 42°C. A beep followed by a 7 second gap, at the back Power Supply Unit fan or PSU has failed (fan may of the chassis (server with redundant PSU) an be spinning at below 1200rpm). error LED will flash NOTE: The audible alarm can be made silent by pressing the red button below and to the side of the Power Supply Unit, to re-activate the beeping press the button again. Viglen LX245 Server User Guide 13 3. VIG340B Motherboard Specification Server Board Features Table 4: Server Board Features Feature Description Processor Up to two Intel® Xeon® processors in a new 603-Pin Micro-PGA Grid Array package. Memory (DRAM) Support for up to 16GB ECC registered DDR-266MHz memory in 8 DIMM slots (Two way interleaving) PCI bus Seven PCI slots: - Two 64-bit 100MHz PCI-X slots. - Four 64-bit 66MHz PCI slots. - One VXB (Virtual eXended Bus) 133MHz slot. Graphics Integrated onboard ATI Rage† XL 8MB 32-bit PCI SVGA controller. SCSI Adaptec† AIC-7899W dual channel Ultra160 SCSI, supporting onboard Ultra2 (LVD) wide, Ultra-wide and Ultra160 SCSI interfaces. Network Integrated dual onboard NICs, an Intel® 82550 PCI LAN controller for 10/100 Mbps TX Fast Ethernet networks. RJ-45 Ethernet connector at I/O back panel. System I/O PS/2†-compatible keyboard and mouse ports, 6 pin DIN. Advanced parallel port, supporting Enhanced Parallel Port (EPP), Compatible 25 pin. VGA video port, 15 pin. Two serial ports, two 9-pin connectors on the rear I/O. Two RJ-45 Ethernet. Two USB ports. Form Factor Server ATX form factor, ATX 2.03 compliant I/O. 14 Viglen LX245 Server User Guide VIG340B Server Board Layout Figure 5: VIG340B Motherboard Specification Jumper JBT1 JPA1/JPA2 JP3/JP27 JP4 JP9 JP10/JP21 JP22 JP33 JP37 JP38 Description CMOS Clear SCSI Channel A/B Termination LAN1/LAN2 Enabled/Disabled VGA Enabled/Disabled Power Fail Alarm Enabled/Disabled PCI-X Bus Speed Setting SCSI Enabled/Disabled CPU Chassis/CPU FAN Select Watchdog Enabled/Disabled Thermal Fan Enabled/Disabled Viglen LX245 Server User Guide Default Settings Pins 1-2 (Normal) Open (Enabled) Pins 1-2 (Enabled) Pins 1-2 (Enabled) Open (Disabled) Pins 1-2 (Enabled) Closed (CPU Fan) Open (Disabled) Open (BIOS Control) 15 Connector ATX PWR CONN DIMM#1A – DIMM#4B COM1/COM2 CPU/CHS/OH FAN J7 J9 J13/J14 J15 J2A/J2B JA1 JA4 JD1 JF2 JL1 JOH1 JP7 JP9 JP32 JP35 JP36 JWOR LAN1/2 SCSI LED Speaker USB 0/1, 2/3 VGA WOL Description Primary ATX Power Connector Memory (RAM) Slots COM1/COM2 Serial Port Connectors CPU/Chassis/ Overheat Fan Headers Parallel (Printer) Port PS/2 Keyboard/Mouse Ports USB 2/3 Headers Secondary ATX Power Connector IDE #1/#2 Hard Disk Drive Connectors Ultra 160 LVD SCSI Channel A Connector Ultra 160 LVD SCSI Channel B Connector Power LED/Speaker/NMI Header Front Control Panel Connector Chassis Intrusion Header Overheat LED Floppy Disk Drive Connector Third Power Supply Fail Header ACPI/Sleep Button Header Keylock Switch Connector Alarm Reset Switch Wake-on-Ring Header Ethernet Ports SCSI Active LED Header Onboard Speaker Header Universal Serial Bus Ports, Headers VGA Display (Monitor) Port Wake-on-LAN Header Jumpers that are not included are for Viglen test purposes only and must not be moved. 16 Viglen LX245 Server User Guide Back Panel Connectors The motherboard external I/O connectors are attached to a metallic I/O shield. This shield serves several purposes: • It protects the sensitive motherboard from any external EMC problems. • It stops the computer from interfering with other electrical devices. • It allows the motherboard to be easily upgraded in the future without having to resort to buying a whole new case. Simply change the I/O shield to match the motherboard. The I/O shield provides external access to PS/2 keyboard and mouse connectors as well as two serial ports, one parallel port, two RJ45 Local Area Network (LAN) connections and two Universal Serial Bus ports. Figure 6: Rear I/O Shield NOTE: The mouse and keyboard CANNOT be plugged into either of the PS/2 connectors while the system is powered on. Power to the system must be turned off before a keyboard or mouse is connected or disconnected. Viglen LX245 Server User Guide 17 Server Board Feature Overview The VIG340B server board supports single or dual 603-Pin Micro-PGA form factor processors running between 1.8GHz to 2.2GHz with 512K L2 Cache and a maximum bus speed support of 400MHz. Form Factor • ATX form factor of 12 inches x 13.05 inches. Chipset • Intel E7500 (Plumas) chipset. Microprocessor • Single or dual Intel Xeon processors using socket 603-Pin connectors. • 400MHz Front Side Bus speed. • 512KB second-level Advanced Transfer cache on the substrate. Main Memory • Eight 184-pin DDR DIMM sockets supporting up to 16GB of registered ECC PC266MHz DDR SDRAM. NOTE: Interleaved memory requires memory modules to be installed two at a time. When pairing the modules do not mix memory sizes and speeds. Expansion Slots • Two 64-bit, 133MHz PCI-X slots. • One 64-bit, 100 MHz PCI-X slots. • Three 64-bit, 66MHz PCI-X slots. BIOS 18 • 4MB Phoenix Flash ROM. • APM 1.2, DMI 2.1, PCI 2.2, ACPI 1.0, Plug and Play (PnP), SMBIOS 2.3 Viglen LX245 Server User Guide PC Health Monitoring • Onboard voltage monitors for CPU cores, chipset voltage, 3.3V, +5V, +12V and 3.3V standby. • Four-fan status monitor with firmware/software on/off control. • Three CPU/chassis temperature monitors. • Environmental temperature monitor and control. • CPU fan auto-off in sleep mode. • CPU slow-down on temperature overheat. • CPU overheat LED header. • Power-up mode control for recovery from AC power loss. • Auto-switching voltage regulator for CPU core. • System overheat LED and control. • Chassis intrusion detection. • System resource alert. • IPMI 1.5 compliant. Onboard I/O • AIC-7899 for dual channel Ultra160 SCSI. • Adaptec 2000S Zero-Channel RAID connector (green PCI-X slot). • Integrated ATI Rage XL 8MB graphics controller. • Two Intel PRO/100s (82550) 10/100 fast Ethernet controllers (two Ethernet ports). • Two EIDE Ultra DMA/100 bus master interfaces. • One floppy port interface (up to 2.88 MB). Viglen LX245 Server User Guide 19 20 • Two Fast UART 16550A compatible serial ports. • One EPP/ECP Parallel Port (Enhanced Parallel Port/Extended Capabilities Port). • PS/2 mouse and PS/2 keyboard ports. • Up to 5 USB (Universal Serial Bus) ports. Viglen LX245 Server User Guide Chipset Overview The Intel E7500 (Plumas) chipset is a high-performance chipset with a performance and feature-set designed for mid-range, dual processor servers. The E7500 chipset consists of four major components: the Memory Controller Hub (MCH), the I/O Controller Hub 3 (ICH3), the PCI-X 64-bit Hub 2.0 (P64H2) and the 82808AA Host Channel Adapter (VxB). The MCH has four hub interfaces, one to communicate with the ICH3 and three for high-speed I/O communications. The MCH employs a 144-bit wide memory bus for a DDR-266 memory interface, which provides a total bandwidth of 3.2 GB/s. The ICH3 interface is a 266 MB/sec point-to-point connection using an 8-bit wide, 66 MHz base clock at a 4x data transfer rate. The P64H2 interface is a 1 GB/s point-to-point connection using a 16-bit wide, 66 MHz base clock at an 8x data transfer rate. The ICH3 I/O Controller Hub provides various integrated functions, including a two-channel UDMA100 bus master IDE controller, USB host controllers, an integrated LAN controller, a System Management Bus controller and an AC'97 compliant interface. Each of the three P64H2 PCI-X Hubs provides a 16-bit connection to the MCH for highperformance IO capability and two 64-bit PCI-X interfaces. Figure 7: Intel E7500 Chipset system Block Diagram Viglen LX245 Server User Guide 21 Microprocessor The motherboard has two 603-pin sockets, which support Intel Xeon Micro-PGA processors. The processor’s VID pins automatically program the voltage regulator on the motherboard to the required processor voltage. The motherboard currently supports processors that run internally at 1.8GHz to a possible maximum of 2.2GHz with 400 MHz front side bus and 512KB second-level cache. These new Xeon processors include dual processor support, Hyper-Threading technology, Intel NetBurst microarchitecture, Rapid Execution Engine, Streaming SIMD Extensions 2 (SSE2) and Advanced Dynamic Executions (see Chapter 1 for an overview of these features). The processor’s numeric coprocessor significantly increases the speed of floating-point operations and complies with ANSI/IEEE standard 754-1985. Main Memory The motherboard has eight dual inline memory module (DIMM) sockets. The minimum memory size is 256MB and the maximum memory size is 16GB. The BIOS automatically detects memory type, size, and speed. The motherboard only supports the following memory features: • 184-pin DIMMS with gold-plated contacts. • 266MHz DDR SDRAM only. • ECC (72-bit) Registered memory only • Single or double-banked DIMMs in the following sizes: Table 5: DIMM Sizes DIMM Size 128 MB ECC Configuration 16 Mbit x 72 Unbuffered/Registered Registered Only 256 MB 32 Mbit x 72 Registered Only 512 MB 64 Mbit x 72 Registered Only 1 GB 128 Mbit x 72 Registered Only NOTE: Interleaved memory requires memory modules to be installed two at a time. When pairing the modules do not mix memory sizes and speeds. DDR DDR technology enables the data to be processed on both the upward and downward signal slopes. This results in twice the performance when compared to SDR where only a single process per signal slope is used. 22 Viglen LX245 Server User Guide SDRAM Synchronous DRAM (SDRAM) improves memory performance through memory access that is synchronous with the memory clock. This simplifies the timing design and increases memory speed because all timing is dependent on the number of memory clock cycles. ECC Memory Error checking and correcting (ECC) memory detects multiple-bit errors and corrects single-bit errors. Super I/O controller The disk drive adapter functions of the Super I/O chip include a floppy disk drive controller that is compatible with industry standard 82077/765, a data separator, write pre-compensation circuitry, decode logic, data rate selection, a clock generator, drive interface control logic and interrupt and DMA logic. The wide range of functions integrated onto the Super I/O greatly reduces the number of components required for interfacing with floppy disk drives. The Super I/O supports 360 K, 720 K, 1.2 M, 1.44 M or 2.88 M disk drives and data transfer rates of 250 Kb/s, 500 Kb/s or 1 Mb/s. It also provides two high-speed, 16550 compatible serial communication ports (UARTs), one of which supports serial infrared communication. Each UART includes a 16-byte send/receive FIFO, a programmable baud rate generator, complete modem control capability and a processor interrupt system. Each UART includes a 16-byte send/receive FIFO, a programmable baud rate generator, complete modem control capability and a processor inter-rupt system. Both UARTs provide legacy speed with baud rate of up to 115.2 Kbps as well as an advanced speed with baud rates of 250 K, 500 K, or 1 Mb/s, which support higher speed modems. The Super I/O supports one PC-compatible printer port (SPP), Bi-directional Printer Port (BPP), Enhanced Parallel Port (EPP) or Extended Capabilities Port (ECP). The Super I/O provides functions that comply with ACPI (Advanced Con-figuration and Power Interface), which includes support of legacy and ACPI power management through an SMI or SCI function pin. It also features auto power management to reduce power consumption. The IRQs, DMAs and I/O space resources of the Super I/O can flexibly adjust to meet ISA PnP requirements, which support ACPI and APM (Advanced Power Management). Viglen LX245 Server User Guide 23 Serial Ports Two compatible 9-pin D-Sub serial port connectors, both are located on the back IO panel see Figure 6. Each serial port has a 16-byte send/receive FIFO, a programmable baud rate generator; complete modem control capability and a processor interrupt system. Both ports provide legacy speed with baud rate of up to 115.2 Kbps as well as an advanced speed with baud rates of 250K, 500K, or 1 Mb/s, which support higher speed modems. Parallel Port The Super I/O supports one PC-compatible printer port (SPP), Bi-directional Printer Port (BPP), Enhanced Parallel Port (EPP) or Extended Capabilities Port (ECP). The connector for the multimode bidirectional parallel port is a 25-pin D-Sub connector located on the back panel. In the Setup program, the parallel port can be configured for the following: • • • • Compatible (standard mode) Bidirectional Extended Parallel Port (EPP) Levels 1.7 & 1.9 Enhanced Capabilities Port (ECP) Floppy Controller In the Setup program, the floppy interface can be configured for the following floppy drive capacities and sizes: • • • • • 360 KB, 5.25-inch 1.2 MB, 5.25-inch 720 KB, 3.5-inch 1.44 MB, 3.5-inch 2.88MB, 3.5-inch Keyboard and Mouse Interface PS/2 keyboard and mouse connectors are located on the back panel. The 5V lines to these connectors are protected with a PolySwitch circuit that, like a self-healing fuse, reestablishes the connection after an over-current condition is removed. The keyboard controller contains the AMI Megakey keyboard and mouse controller code, which provides the keyboard and mouse control functions, and supports password protection for power on/reset. A power on/reset password can be specified in Setup. 24 Viglen LX245 Server User Guide The keyboard controller also supports the hot-key sequence <Ctrl><Alt><Del> for a software reset. This key sequence resets the computer’s software by jumping to the beginning of the BIOS code and running the Power-On Self Test (POST). Real-time Clock, CMOS SRAM, and Battery The clock provides a time-of-day clock and a multicentury calendar with alarm features and century rollover. The time, date, and CMOS values can be specified in the Setup program. The CMOS values can be returned to their defaults by using the Setup program. An external coin-cell battery powers the real-time clock and CMOS memory. When the computer is not plugged into a wall socket, the battery has an estimated life of three years. When the computer is plugged in, the 3.3-V standby current from the power supply extends the life of the battery. The clock is accurate to ± 13 minutes/year at 25 ºC with 3.3V applied. IDE Support The motherboard has two independent bus-mastering PCI IDE interfaces. These interfaces support PIO Mode 3, PIO Mode 4, ATAPI devices (e.g., CD-ROM), and DMA mode transfers. The BIOS supports logical block addressing (LBA) and cylinder head sector (CHS) translation modes. The BIOS automatically detects the IDE device transfer rate and translation mode. Programmed I/O operations usually require a substantial amount of processor bandwidth. However, in multitasking operating systems, the bandwidth freed by bus mastering IDE can be devoted to other tasks while disk transfers are occurring. LS-120 Support LS-120 MB Diskette Technology enables you to store 120MB of data on a single, 3.5” removable diskette. LS-120 technology is backward (both read and write) compatible with 1.44MB and 720KB DOS-formatted diskette and is supported by the Windows NT operating system. The Newton board allows connection of an LS-120 compatible drive and a standard 3½” floppy drive. The LS-120 drive can be configured as a boot device before a floppy drive, if selected in the BIOS setup utility. Viglen LX245 Server User Guide 25 NOTE: If you connect an LS-120 drive to an IDE connector and configure it as the “A” drive and configure a standard 3.5” floppy as “B” drive, the standard floppy must be connected to the floppy drive cable’s “A” connector (the connector at the end of the cable). The BIOS setup utility can be configured to boot firstly from either the LS120 or standard 3½“ floppy drive. Expansion Slots The VIG340B server board has six full length PCI-X connectors, shown as slots in Figure 5. NOTE: If you install a PCI-33 card into one of the PCI-66/100 slots, the bus speed for that and it’s associated slots will have to be lowered to 33 MHz. 26 Viglen LX245 Server User Guide VIG340B Server Board Special Features ATi Graphics Controller The VIG340B has an integrated ATI video controller based on the Rage XL graphics chip. The Rage XL fully supports sideband addressing and AGP texturing. This onboard graphics package can provide a bandwidth of up to 512 MB/sec over a 32-bit graphics memory bus. BIOS Recovery The BIOS Recovery function allows you to recover your BIOS image file if the BIOS flashing procedure fails (see Chapter XXX). Recovery from AC Power Loss The BIOS provides a setting for you to determine how the system will respond when AC power is lost and then restored to the system. You can choose for the system to remain powered off (in which case you must hit the power switch to turn it back on) or for it to automatically return to a power-on state. See the Power Lost Control setting in the Advanced BIOS Setup section (Peripheral Device Configuration) to change this setting. The de-fault setting is Always On. PC Health Monitoring This section describes the PC health monitoring features of the Viglen VIG340B Server Board. The motherboard has an onboard System Hardware Monitor chip that supports PC health monitoring. Onboard Voltage Monitors for the CPU Cores, Chipset Voltage, +3.3V, +5V, +12V and +3.3V Standby. An onboard voltage monitor will scan these voltages continuously. Once a voltage becomes unstable, a warning is given or an error message is sent to the screen. Users can adjust the voltage thresholds to define the sensitivity of the voltage monitor. Fan Status Monitor with Firmware/Software On/Off Control The PC health monitor can check the RPM status of the cooling fans. The onboard 3pin CPU and chassis fans are controlled by the power management functions. The thermal fan is controlled by the overheat detection logic. Viglen LX245 Server User Guide 27 Environmental Temperature Control The thermal control sensor monitors the CPU temperature in real time and will turn on the thermal control fan whenever the CPU temperature exceeds a user-defined threshold. The overheat circuitry runs independently from the CPU. It can continue to monitor for overheat conditions even when the CPU is in sleep mode. Once it detects that the CPU temperature is too high, it will automatically turn on the thermal control fan to prevent any overheat damage to the CPU. The onboard chassis thermal circuitry can monitor the overall system temperature and alert users when the chassis temperature is too high. CPU Fan Auto-Off in Sleep Mode The CPU fan activates when the power is turned on. It continues to operate when the system enters Standby mode. When in sleep mode, the CPU will not run at full power, thereby generating less heat. CPU Overheat LED and Control This feature is available when the user enables the CPU overheat warning function in the BIOS. This allows the user to define an overheat temperature. When this temperature is exceeded, both the overheat fan and the warning LED are triggered. System Resource Alert This feature is available when used with Intel's LANDesk Client Manager (optional). LDCM is used to notify the user of certain system events. For example, if the system is running low on virtual memory and there is insufficient hard drive space for saving the data, you can be alerted of the potential problem. Hardware BIOS Virus Protection The system BIOS is protected by hardware that prevents viruses from infecting the BIOS area. The user can only change the BIOS content through the flash utility provided by SuperMicro. This feature can prevent viruses from infecting the BIOS area and destroying valuable data. Auto-Switching Voltage Regulator for the CPU Core The auto-switching voltage regulator for the CPU core can support up to 20A current and auto-sense voltage IDs ranging from 1.4V to 3.5V. This will allow the regulator to run cooler and thus make the system more stable. 28 Viglen LX245 Server User Guide ACPI Features ACPI stands for Advanced Configuration and Power Interface. The ACPI specification defines a flexible and abstract hardware interface that provides a standard way to integrate power management features throughout a PC system, including its hardware, operating system and application software. This enables the system to automatically turn on and off peripherals such as CD-ROMs, network cards, hard disk drives and printers. This also includes consumer devices connected to the PC such as VCRs, TVs, telephones and stereos. In addition to enabling operating system-directed power management, ACPI provides a generic system event mechanism for Plug and Play and an operating systemindependent interface for configuration control. ACPI leverages the Plug and Play BIOS data structures while providing a processor architecture-independent implementation that is compatible with both Windows 98 and Windows NT 5.0. NOTE: To utilise ACPI, you must reinstall Windows 98. To reinstall Windows 98 with ACPI, enter DOS and type "setup /pj" at the CDROM prompt (usually D:\) with the Windows 98 CD loaded. (Make sure you include the spaces after "setup" and "p".) Then hit <Enter>. You can check to see if ACPI has been properly installed by looking for it in the Device Manager, which is located in the Control Panel in Windows. Microsoft OnNow The OnNow design initiative is a comprehensive, system-wide approach to system and device power control. OnNow is a term for a PC that is always on but appears to be off and responds immediately to user or other requests. Slow Blinking LED for Suspend-State Indicator When the CPU goes into a suspend state, the chassis power LED will start blinking to indicate that the CPU is in suspend mode. When the user presses any key, the CPU will wake-up and the LED will automatically stop blinking and remain on. Main Switch Override Mechanism When an ATX power supply is used, the power button can function as a system suspend button to make the system enter a SoftOff state. The monitor will be suspended and the hard drive will spin down. Depressing the power button again will cause the whole system to wake-up. During the SoftOff state, the ATX power supply provides power to keep the required circuitry in the system alive. In case the system malfunctions and you want to turn off the power, just depress and hold the power button for 4 seconds. This option can be set in the Power section of the BIOS Setup routine. Viglen LX245 Server User Guide 29 External Modem Ring-On Wake-up events can be triggered by a device such as the external modem ringing when the system is in the SoftOff state. Note that external modem ring-on can only be used with an ATX 2.01 (or above) compliant power supply. Wake-On-LAN (WOL) Wake-On-LAN is defined as the ability of a management application to remotely power up a computer that is powered off. Remote PC setup, up-dates and asset tracking can occur after hours and on weekends so that daily LAN traffic is kept to a minimum and users are not interrupted. The motherboards have a 3-pin header (WOL) to connect to the 3-pin header on a Network Interface Card (NIC) that has WOL capability. Wake-OnLAN must be enabled in BIOS. Note that Wake-On-LAN can only be used with an ATX 2.01 (or above) compliant power supply. Power Supply As with all computer products, a stable power source is necessary for proper and reliable operation. It is even more important for processors that have high CPU clock rates. The Viglen VIG340B Server Board accommodates ATX power supplies. Although most power supplies generally meet the specifications required by the CPU, some are inadequate. You should use one that will supply at least 460W of power and includes the additional +12V, 8-pin power connector - an even higher wattage power supply is recommended for high-load configurations. It is strongly recommended that you use a high quality power supply that meets ATX power supply Specification 2.02 or above. It must also be SSI compliant (info at http://www.ssiforum.org/). Additionally, in areas where noisy power transmission is present, you may choose to install a line filter to shield the computer from noise. It is recommended that you also install a power surge protector to help avoid problems caused by power surges. 30 Viglen LX245 Server User Guide 4. VIG340B Server Board Options The VIG340B Server Board is capable of accepting 1.8GHz to a possible maximum of 2.2GHz Intel Xeon processors. Main memory (RAM) can also be upgraded to a maximum of 16GB using registered ECC DDR SDRAM DIMMs. WARNING & CAUTIONS WARNING! Unplug the system before carrying out the procedures described in this chapter. Failure to disconnect power before you open the system can result in personal injury or equipment damage. Hazardous voltage, current, and energy levels are present in this product. Power switch terminals can have hazardous Voltages present even when the power switch is off. The procedures assume familiarity with the general terminology associated with personal computers and with the safety practices and regulatory compliance required for using and modifying electronic equipment. Do not operate the system with the cover removed. Always replace the cover before turning on the system. As the colours of the wires in the mains lead of this computer may not correspond with the coloured markings identifying the terminals in your plug precede as follows: The wire that is coloured green-and-yellow must be connected to the terminal in the plug, which is marked by the letter E or coloured green or green-and-yellow. The wire that is coloured blue must be connected to the terminal, which is marked with the letter N or coloured black. The wire that is coloured brown must be connected to the terminal, which is marked with the letter L or coloured red. Viglen LX245 Server User Guide 31 CAUTION! The Viglen Newton motherboard and associated components are sensitive electronic devices. A small static shock from your body can cause expensive damage to your equipment. Make sure you are earthed and free of static charge before you open the computer case. If you are unsure about upgrading your computer, return it to Viglen so a qualified engineer can perform the upgrade. STEPS TO TAKE TO PREVENT STATIC DISCHARGE: 1. The best way to prevent static discharge is to buy an anti-static strap from your local electrical shop. While you are wearing the strap and it is earthed, static charge will be harmlessly bled to ground. 2. Do not remove the component from its anti-static protective packaging until you are about to install it. 3. Hold boards by the edges - try not to touch components / interface strips etc. NOTE: We recommend that you return your computer to the service department for upgrading. Any work carried out is fully guaranteed. Upgrades should only be carried out by persons who are familiar with handling PC's, as incorrect installation will invalidate the guarantee. 32 Viglen LX245 Server User Guide Overview of Jumper Settings The system motherboard inside your computer contains headers and jumpers. Different pin and jumper configurations make it possible to change how the computer functions. This section of the manual should give you all the information you will require making any changes. Changes you can make, in this way, are as follows: • • • • • Reset the CMOS RAM settings to the default values. Setting the Front Side Bus Speed Enabling or disabling SCSI termination Enabling or disabling the onboard Network Connector Selecting PCI 64-Bit bus speed CAUTION! Never remove jumpers using large pliers as this can damage the pins. The best way to remove a jumper is to use a small pair of tweezers or fine needle-nosed pliers. Never remove a jumper when the computer is switched on. Always switch the computer off first. Jumper Explanation To modify the operation of the motherboard, jumpers can be used to choose between optional settings. Jumpers create shorts between two pins to change the function of the connector. Pin 1 is identified with a square solder pad on the printed circuit board. See the motherboard layout pages for jumper locations. NOTE: On two pin jumpers, "Closed" means the jumper is on and "Open" means the jumper is off the pins. Figure 8: Server Board Jumpers Viglen LX245 Server User Guide 33 Clear CMOS Refer to the table on the right for the JBT jumper settings to clear CMOS. Always remove the AC power cord from the system before clearing CMOS. NOTE: For an ATX power supply, you must completely shut down the system, remove the AC power cord and then use JBT to clear CMOS. Replace JBT back to the pin 1-2 position before powering up the system again. Do not use the PW_ON connector to clear CMOS. Figure 9: Clear CMOS Jumper 34 Viglen LX245 Server User Guide LAN1 Enabled/Disabled Change the setting of jumper JP3 to enable or disable the onboard LAN1 or NIC (Network Interface Card) on the motherboard. See the below for jumper settings. The default setting is pins 1-2. Figure 10: LAN1 Enabled/Disabled LAN2 Enabled/Disabled Change the setting of jumper JP27 to enable or disable the onboard LAN2 or NIC (Network Interface Card) on the motherboard. See the table below for jumper settings. The default setting is pins 1-2. Figure 11: LAN2 Enabled/Disabled Viglen LX245 Server User Guide 35 VGA Enabled/Disabled JP4 allows you to enable or disable the VGA port. The default position is on pins 1 and 2 to enable VGA. See the table below for jumper settings. Figure 12: VGA Enabled/Disabled Power Supply Alarm Enabled/Disabled The system will notify you in the event of a power supply failure. This feature assumes that three power supply units are installed in the chassis, with one acting as a backup. If you only have one or two power supply units installed, you should disable this (the default setting) with JP9 to prevent false alarms. See the table below for jumper settings. Figure 13: Power Supply Alarm Enabled/Disabled 36 Viglen LX245 Server User Guide SCSI Enabled/Disabled The SCSI Termination jumper at JP22 allows you to enable or disable the onboard SCSI controller. The normal (default) position is on pins 1-2 to enable SCSI termination. See the table below for jumper settings. Figure 14: SCSI Enabled/Disabled SCSI Termination Enabled/Disabled Jumpers JPA1 and JPA2 allow you to enable or disable termination for the individual SCSI channels. Jumper JPA1 controls SCSI channel A and JPA2 controls SCSI channel B. The normal (default) setting is open to enable (terminate) both SCSI channels. If you wish to connect external SCSI devices, you should disable termination for the channel(s) you will be connecting them to. See the table below for jumper settings. Figure 15: SCSI Termination Enabled/Disabled Viglen LX245 Server User Guide 37 CPU Chassis/CPU Fan Select JP33 allows you to select to use either the CPU fan or the Chassis fan. The default position is open to select the CPU fan. The CPU Chassis fan is intended for use with SuperMicro chassis. See the table below for jumper settings. Figure 16: CPU Chassis/CPU Fan Select Watchdog Timer Enabled/Disabled Jumper JP37 allows you to enable or disable the Watchdog feature. The normal (default) position is open to disable the Watchdog timer. See the table below for jumper settings. Figure 17: Watchdog Timer Enabled/Disabled 38 Viglen LX245 Server User Guide Thermal Fan Enabled/Disabled JP38 allows you to enable or disable the thermal fan. When enabled, the fan will operate continuously. When disabled, it will operate only when a predefined temperature threshold has been exceeded. See the table on the right for jumper settings. Figure 18: Thermal Fan Enabled/Disabled Viglen LX245 Server User Guide 39 PCI-X Bus Speed Settings Jumpers JP10 through JP21 are used to set the speed for the PCI-X buses. The Viglen VIG340B Server Board has two P64DH2 PCI Bridge chips, each of which has two buses. Each of the following settings corresponds to a single bus. Slot #6: Refer to the table below to set the speed of slot #6 with jumpers JP14, JP15 and JP13. Figure 19: Slot #6 PCI-X Settings 40 Viglen LX245 Server User Guide Slot #5: Refer to the table below to set the speed of slot #5 with jumpers JP10, JP11 and JP12. Figure 20: Slot #5 PCI-X Settings Viglen LX245 Server User Guide 41 Slot #4: Refer to the table below to set the speed of slot #4 with jumpers JP16, JP17 and JP18. NOTE: Slot 4 shares its bus with the onboard SCSI, which pulls the slot speed down to 66 MHz. If you wish to use a 133 or 100 MHz card in slot 4, you must disable the onboard SCSI. (Otherwise, use the card in slot 5 or 6.) Figure 21: Slot #4 PCI-X Settings 42 Viglen LX245 Server User Guide Slot #1, #2 and #3: Refer to the table below to set the speed of slots #1, #2 and #3 with jumpers JP20, JP21 and JP19. NOTE: If two cards are used in slots 1 through 4 they will operate as 66 MHz (max.) PCI cards. You may run a single 66 MHz PCI-X card in slots 1-4 only if the other three slots remain empty. Figure 22: Slot #1, #2 & #3 PCI-X Settings Viglen LX245 Server User Guide 43 Overview of Server Board Connectors Front Control Panel Connector JF2 contains header pins for various buttons and indicators that are normally located on a control panel at the front of the chassis. See Figure 23 for the descriptions of the various control panel buttons and LED indicators. Refer to the following section for descriptions and pin definitions. Figure 23: JF2 Front Control Panel Header Pins 44 Viglen LX245 Server User Guide ATX Power Connection The power supply connector meets the SSI (Superset ATX) 24-pin specification; however it also supports a 20-pin power supply connector. Make sure that the orientation of the PS connector is correct. See the table below for pin definitions. Figure 24: ATX Power Connection PWR_SEC Connection For high-load configurations, it is recommended that you also provide secondary power to the motherboard with the 8-pin connector at J15. See the table below for pin definitions. Figure 25: PWR_SEC Connection Viglen LX245 Server User Guide 45 Power LED The Power LED connection is located on pins 15 and 16 of JF2. Refer to the table below for pin definitions. Figure 26: Power LED Hard Disk LED The HDD LED (IDE) connection is located on pins 13 and 14 of JF2. Attach the IDE hard drive LED cable to these pins to display disk activity. Refer to the table below for pin definitions. Figure 27: Hard Disk LED NIC2 LED The NIC2 (Network Interface Controller) LED connection is located on pins 9 and 10 of JF2. Attach the NIC2 LED cable to display network activity. Refer to the table below for pin definitions. Figure 28: NIC2 LED 46 Viglen LX245 Server User Guide NIC1 LED The NIC1 (Network Interface Controller) LED connection is located on pins 11 and 12 of JF2. Attach the NIC1 LED cable to display network activity. Refer to the table below for pin definitions. Figure 29: NIC1 LED Overheat LED (OH) Connect an LED to the OH connection on pins 7 and 8 of JF2 to provide advanced warning of chassis overheating. Refer to the table below for pin definitions. Figure 30: Overheat LED (OH) Power Fail Button The Power Fail Button connection is located on pins 5 and 6 of JF2. Refer to the table below for pin definitions. Viglen LX245 Server User Guide 47 Figure 31: Power Fail Button Reset Button The Reset Button connection is located on pins 3 and 4 of JF2. Attach it to the hardware reset switch on the computer case. Refer to the table below for pin definitions. Figure 32: Reset Button Power Button The Power Button connection is located on pins 1 and 2 of JF2. Momentarily contacting both pins will power on/off the system. This button can also be configured to function as a suspend button (see the Power Button Mode setting in BIOS). To turn off the power when set to suspend mode, de-press the button for at least 4 seconds. Refer to the table below for pin definitions. Figure 33: Power Button 48 Viglen LX245 Server User Guide Universal Serial Bus (USB 0/1) Two Universal Serial Bus ports are located beside the PS/2 keyboard/mouse ports. USB0 is the bottom connector and USB1 is the top connector. See the table below for pin definitions. Figure 34: Universal Serial Bus (USB 0/1) Extra Universal Serial Bus Header (USB 2/3/4) The USB2/USB3 headers are located at J13/J14 for front side USB access. You will need a USB cable (not included) to use either connection. Refer to the tables on the right for pin definitions. An additional header (USB4) designated J27 is also provided. Figure 35: Extra Universal Serial Bus Header (USB 2/3/4) Chassis Intrusion A Chassis Intrusion header is located at JL1. Attach the appropriate cable to inform you of a chassis intrusion. Viglen LX245 Server User Guide 49 Serial Ports The COM1 serial port is located under the parallel port (see Figure 6). See the table below for pin definitions. The COM2 connector is a header located near the PCI-X #1 slot on the motherboard. Figure 36: Serial Port ATX PS/2 Keyboard and PS/2 Mouse Ports The ATX PS/2 keyboard and the PS/2 mouse are located on J9. See the table below for pin definitions. (The mouse port is above the keyboard port, See Figure 6.) Figure 37: ATX PS/2 Keyboard and PS/2 Mouse Ports 50 Viglen LX245 Server User Guide Fan Headers The motherboard has six CPU and chassis fan headers. These are designated CPU Fan1, CPU Fan2, CPU1 Chassis Fan, CPU2 Chassis Fan, Chassis Fan1, Chassis Fan2 and Overheat Fan. See the table below for pin definitions. Figure 38: Fan Headers Power LED/Speaker/NMI On the 9-pin JDI header, pins 1-3 are for a power LED, pins 4-7 are for the speaker and pins 8-9 are for the NMI connection. See the table below for speaker pin definitions. NOTE: The speaker connector pins are for use with an external speaker. If you wish to use the onboard audio, you should close pins 6-7 with a jumper. Figure 39: Power LED/Speaker/NMI Viglen LX245 Server User Guide 51 Third Power Supply Fail Header Connect a cable from your power supply to the JP8 header to provide warning of power supply failure. This warning signal is passed through the PWR_LED pin on JF2 to provide indication of a power failure on the chassis. See the table below for pin definitions. Figure 40: Third Power Supply Fail Header LAN1/2 (Ethernet Ports) Two Ethernet ports (designated LAN1 and LAN2) are located beside the VGA port on the IO backplane. These ports accept RJ45 type cables. Figure 41: LAN ½ (Ethernet Ports) 52 Viglen LX245 Server User Guide Wake-On-LAN The Wake-On-LAN header is designated as WOL. See the table below for pin definitions. You must enable the LAN Wake-Up setting in BIOS to use this feature. You must also have a LAN card with a Wake-on-LAN connector and cable. Figure 42: Wake-On-LAN Wake-On-Ring The Wake-On-Ring header is designated JWOR. This function allows your computer to receive and "wake-up" by an incoming call to the modem when in suspend state. See the table below for pin definitions. You must have a WOR card and cable to use this feature. Figure 43: Wake-On-Ring Viglen LX245 Server User Guide 53 Parallel Port, Floppy/Hard Disk Drive and SCSI Connections Note the following when connecting the floppy and hard disk drive cables: • The floppy disk drive cable has seven twisted wires. • A red mark on a wire typically designates the location of pin 1. • A single floppy disk drive ribbon cable has 34 wires and two connectors to provide for two floppy disk drives. The connector with twisted wires always connects to drive A, and the connector that does not have twisted wires always connects to drive B. The parallel port is located on J7. See the table below for pin definitions. Figure 44: Parallel Port Pin Definitions 54 Viglen LX245 Server User Guide The floppy connector is located on JP7. See the table below for pin definitions. Figure 45: Floppy Connector Pin Definitions There are no jumpers to configure the onboard IDE#1 and #2 connectors (J2A and J2B, respectively). See the table below for pin definitions. Figure 46: IDE Connector Pin Definitions Viglen LX245 Server User Guide 55 Refer to the table below for the pin definitions of the Ultra160 SCSI connectors located at JA1, JA2 and JA4. Figure 47: Ultra 160 SCSI Connector 56 Viglen LX245 Server User Guide Installing Memory DIMMs CAUTION! Exercise extreme care when installing or removing DIMM modules to prevent any possible damage. Also note that the memory is interleaved to improve performance (see step 1 below). 1. Insert the desired number of DIMMs into the memory slots, starting with Bank 1. The memory scheme is interleaved so you must install two modules at a time, beginning with Bank 1, then Bank 2, and so on. 2. Insert each DIMM module vertically into its slot. Pay attention to the notch along the bottom of the module to prevent inserting the DIMM module incorrectly. 3. Gently press down on the DIMM module until it snaps into place in the slot. Repeat for all modules (see step 1 above). Memory Support The VIG340B only supports ECC registered PC1600 (200 MHz DDR-RAM) memory. PC2100 DDR-RAM is supported but only at 200 MHz (PC1600 speed). PC100/133 SDRAM is not supported. Figure 48: Installing DIMMs Viglen LX245 Server User Guide 57 To Install: Insert module vertically and press down until it snaps into place. attention to the notches. Pay Figure 49: Removing DIMMs To Remove: Use your thumbs to gently push near the edge of both ends of the module. This should release it from the slot. 58 Viglen LX245 Server User Guide PGA Processor and Heatsink Installation CAUTION! When handling the processor package, avoid placing direct pressure on the label area of the fan. Also, do not place the motherboard on a conductive surface, which can damage the BIOS battery and prevent the system from booting up. IMPORTANT: Always connect the power cord last and always remove it before adding, removing or changing any hardware components. Make sure that you install the processor into the CPU socket before you install the CPU heat sink. Upgrading the CPU The new Intel Xeon processor uses a new 603-pin core package technology Micro Pin Grid Array, or Micro-PGA. This package utilises a 603-pin zero insertion force socket (PGA-603). Thermal solutions are attached directly to the back of the processor core package with the use of a thermal plate or heat spreader. When the processor is mounted in the socket 603 connector, it is secured by the ZIF (Zero Insertion Force) socket. The design of the VIG340B Motherboard makes it a simple job to replace or upgrade the processors. Follow the instructions below for instructions on how to upgrade the processors: 1. Before commencing any work inside your Viglen system please read the warnings and cautions section. 2. Remove the lid from the computer by removing the screws at the rear of the case. 3. Locate the Micro-PGA processors covered with a heat sink by referring to Figure 5 if necessary. 4. Carefully remove the heat sink by pushing down an out the retention mechanism, to free it from the socket. 5. The CPU is clamped into place using a lever. Gently lift this lever, which is located at the side of the socket 603. This will free the CPU and allow you to lift it clear of the socket. Do not attempt to remove the CPU with the lever in the down position. 6. You can now fit the additional or replacement processor and heatsink into the socket 603 interface. Viglen LX245 Server User Guide 59 Figure 50: Socket 603 Interface Figure 51: Xeon Micro-PGA 603-Pin Processor (Installed) NOTE: If the CPU will not easily fit into the socket you are trying to plug it in the wrong way around. 60 Viglen LX245 Server User Guide Replacing the Clock/CMOS RAM Battery A lithium battery is installed in a socket on the system board. The battery has an estimated life expectancy of seven years. When the battery starts to weaken, it loses voltage; when the voltage drops below a certain level, the system settings stored in CMOS RAM (for example, the date and time) may be wrong. If the battery fails, you will need to replace it with a VARTA CR2032 battery or an equivalent. As long as local ordinance permits, you may dispose of individual batteries as normal rubbish. Do not expose batteries to excessive heat or any naked flame. Keep all batteries away from children. CAUTION! Danger of explosion if the battery is incorrectly replaced. Replace only with the same or equivalent type recommended by Viglen. Discard used batteries according to manufacturer’s instructions. The battery is shown as ‘Battery’ on the motherboard layout Figure 5. It is located on the middle left hand side of the motherboard. To replace the battery, carry out the following: 1. Before commencing any work inside your Viglen system please read the warnings and cautions section. 2. Turn off all peripheral devices connected to the system. 3. Turn off the system. 4. Figure 5 shows the battery location on the motherboard. 5. Remove any components that are blocking access to the battery. 6. Gently pry the battery free from its socket, taking care to note the "+" and "-" orientation of the battery. 7. Install the new battery in the socket. Viglen LX245 Server User Guide 61 5. Software Installation After all the hardware has been installed you must install the software drivers. The necessary drivers are all included on the SuperMicro CD that comes packaged with your Viglen Server. After inserting this CD into your CDROM drive, the display shown in Figure 52 should appear. (If this display does not appear, click on the My Computer icon and then on the icon representing your CDROM drive. Finally, double click on the S "Setup" icon.) Figure 52: Driver/Tool Installation Display Screen Click the icon showing a hand writing on paper to view the ‘readme’ file for each item. The bottom icon with a CD on it allows you to view the entire contents of the CD. 62 Viglen LX245 Server User Guide 6. System BIOS Introduction This chapter describes the PhoenixBIOS™ Setup utility for the VIG340B Server Board. The Phoenix ROM BIOS is stored in a flash chip and can be easily upgraded using a floppy disk-based program. NOTE: Due to periodic changes to the BIOS, some settings may have been added or deleted and might not yet be recorded in this manual. Please visit the Viglen Support website for any changes to BIOS that may not be reflected in this manual. www.viglen.co.uk System BIOS The BIOS is the Basic Input Output System used in all IBM ® PC, XT™, AT ®, and PS/2 ® compatible computers. The PhoenixBIOS flash chip stores the system parameters, such type of disk drives, video displays, etc. in the CMOS. The CMOS memory requires very little electrical power. When the computer is turned off, a back-up battery provides power to the BIOS flash chip, enabling it to retain system parameters. Each time the computer is powered-on the computer is configured with the values stored in the BIOS ROM by the system BIOS, which gains control at boot-up. How to Change the Configuration Data The CMOS information that determines the system parameters may be changed by entering the BIOS Setup utility. This Setup utility can be accessed by pressing the <Delete> key at the appropriate time during system boot, see below. Starting the System Utility Normally, the only visible POST (Power On Self Test) routine is the memory test. As the memory is being tested, press the <Delete> key to enter the main menu of the BIOS Setup utility. From the main menu, you can access the other setup screens, such as the Security and Power menus. Running Setup NOTE: Default settings are in bold text unless otherwise noted. The BIOS setup options described in this section are selected by choosing the appropriate text from the main BIOS Setup screen. All displayed text is described in Viglen LX245 Server User Guide 63 this section, although the screen display is often all you need to understand how to set the options. When you first power on the computer, the PhoenixBIOS™ is immediately activated. While the BIOS is in control, the Setup program can be activated in one of two ways: 1. By pressing <Delete> immediately after turning the system on, or 2. When the message shown below appears briefly at the bottom of the screen during the POST (Power On Self-Test), press the <Delete> key to activate the main Setup menu: Press the <Delete> key to enter Setup Main BIOS Setup Menu All main Setup options are described in this section. The main BIOS Setup screen is displayed below. Use the Up/Down arrow keys to move among the different settings in each menu. Use the Left/Right arrow keys to change the options for each setting. Press the <Esc> key to exit the CMOS Setup Menu. The next section describes in detail how to navigate through the menus. Items that use submenus are indicated with the ► icon. With the item highlighted, press the <Enter> key to access the submenu. 64 Viglen LX245 Server User Guide Figure 53: Main BIOS Setup Menu Main Setup Menu Features System Time To set the system date and time, key in the correct information in the appropriate fields. Then press the <Enter> key to save the data. System Date Using the arrow keys, highlight the month, day and year fields and enter the correct data. Press the <Enter> key to save the data. Viglen LX245 Server User Guide 65 Legacy Diskette A This setting allows the user to set the type of floppy disk drive installed as diskette A. The options are Disabled, 360Kb 5.25 in, 1.2MB 5.25 in, 720Kb 3.5”, 1.44/1.25MB, 3.5” and 2.88MB 3.5”. Legacy Diskette B This setting allows the user to set the type of floppy disk drive installed as diskette B. The options are Disabled, 360Kb 5.25”, 1.2MB 5.25”, 720Kb 3.5”, 1.44/1.25MB, 3.5” and 2.88MB 3.5”. ►Primary Master/Primary Slave/Secondary Master/Secondary Slave These settings allow the user to set the parameters of the IDE Primary Master/Slave and IDE Secondary Master/Slave slots. Hit <Enter> to activate the following sub-menu screen for detailed options of these items. Set the correct configurations accordingly. The items included in the sub-menu are: Figure 54: Primary Master/Primary Slave/Secondary Master/Secondary Slave 66 Viglen LX245 Server User Guide Type Selects the type of IDE hard drive. The options are Auto (allows BIOS to automatically determine the hard drive's capacity, number of heads, etc.), a number from 1-39 to select a predetermined type of hard drive, CD-ROM and ATAPI Removable. Multi-Sector Transfers Select the number of transfer sectors. Options are 2, 4, 6, 8 and 16 Sectors. LBA Mode Control This item determines whether Phoenix BIOS will access the IDE Primary Master Device via LBA mode. The options are Enabled and Disabled. 32-Bit I/O Selects 32-bit I/O operation. Options are Enabled and Disabled. Transfer mode Selects the transfer mode. Options are Standard, Fast PIO1, Fast PIO2, Fast PIO3, Fast PIO4, FPIO3/DMA1 and FPIO4/DMA2. Ultra DMA Mode Selects Ultra DMA Mode. Options are Disabled, Mode 0, Mode 1, Mode 2, Mode 3, Mode 4 and Mode 5. Viglen LX245 Server User Guide 67 Advanced Setup Menu Choose Advanced from the Phoenix BIOS Setup Utility main menu with the arrow keys. You should see the following display. The items with a triangle beside them have sub menus that can be accessed by highlighting the item and pressing <Enter>. Options for PIR settings are displayed by highlighting the setting option using the arrow keys and pressing <Enter>. All Advanced BIOS Setup options are described in this section. Figure 55: Advanced Setup Menu Installed OS This setting allows you to choose which operating system you are using to run the system. Options are Other, Win95, Win98, WinMe and Win2000. 68 Viglen LX245 Server User Guide Quick Boot Mode If enabled, this feature will speed up the POST (Power On Self Test) routine after the computer is turned on. The settings are Enabled and Disabled. If Disabled, the POST routine will run at normal speed. Legacy USB Support This setting allows you to enable support for Legacy USB devices. The settings are Enabled and Disabled. Reset Configuration Data Options are Yes and No. Choosing Yes will clear the Extended System Configuration Data (ECSD). ►Cache Memory Access the submenu for this item to specify one of the following actions for various sections of cache memory: Uncache, Write Protect, Write Back, Write Through or Disable. See the "Item Specific Help" window for details. ►I/O Device Configuration Access the submenu to make changes to the following settings. Power Loss Control This setting allows you to choose how the system will react when power returns after an unexpected loss of power. Options are Stay Off, Power On and Last State. Serial Port A This setting allows you to assign control of serial port A. The options are Enabled (user defined), Disabled, Auto (BIOS controlled) and OS Controlled. Base I/O Address Select the base I/O address for serial port A. The options are 3F8, 2F8, 3E8 and 2E8. Interrupt Select the IRQ (interrupt request) for serial port A. Options are IRQ3 and IRQ4. Viglen LX245 Server User Guide 69 Serial Port B This setting allows you to assign control of serial port B. The options are Enabled (user defined), Disabled, Auto (BIOS controlled) and OS Controlled. Mode Specify the type of device that will be connected to serial port B. Options are Normal and IR (for an infrared device). Base I/O Address Select the base I/O address for serial port B. The options are 3F8, 2F8, 3E8 and 2E8. Interrupt Select the IRQ (interrupt request) for serial port B. Options are IRQ3 and IRQ4. Parallel Port This setting allows you to assign control of the parallel port. The options are Enabled (user defined), Disabled and Auto (BIOS controlled). Base I/O Address Select the base I/O address for the parallel port. The options are 378, 278 and 3BC. Interrupt Select the IRQ (interrupt request) for the parallel port. Options are IRQ5 and IRQ7. Mode Specify the parallel port mode. Options are Output Only, Bi-directional, EPP and ECP. DMA Channel Specify the DMA channel. Options are DMA1 and DMA3. Floppy Disk Controller This setting allows you to assign control of the floppy disk controller. The options are Enabled (user defined), Disabled and Auto (BIOS controlled). 70 Viglen LX245 Server User Guide Base I/O Address Select the base I/O address for the parallel port. Secondary. The options are Primary and Large Disk Access Mode This setting determines how large hard drives are to be accessed. The options are DOS or Other (for Unix, Novell NetWare and other operating systems). Local Bus IDE Adapter Use this setting to enable the integrated local bus IDE adapter. Options are Disable, Primary, Secondary and Both. ►Advanced Chipset Control Access the submenu to make changes to the following settings. Graphics Aperture Use this setting to specify the size of the graphics aperture for the AGP video device. Options are 4 MB, 8 MB, 16 MB and 32 MB. Enable Memory Gap This setting allows you to turn off system RAM to free up address space. The options for this setting are Disabled and Extended. ECC Configuration This setting lets you enable or disable ECC (Error Correction and Checking). The options are ECC and Disabled. ECC Error Type This setting lets you select which type of interrupt will be activated as a result of an ECC error. The options are None, NMI (Non-Maskable Interrupt), SMI (System Management Interrupt) and SCI (System Control Interrupt. SERR Signal Condition This setting specifies the conditions required to qualify as an ECC error. Options are None, Single Bit, Multiple Bit and Both. Viglen LX245 Server User Guide 71 ►Advanced Processor Options Access the submenu to make changes to the following settings. CPU Speed This is a display that indicates the speed of the installed processor. Frequency Ratio This setting allows you to specify the value of the internal frequency multiplier of the processor, which is used to determine the processor speed. Options are x8, x16, x17, x18, x19 and x20. Fast String Operations This setting allows you to Enable or Disable fast string operations. Compatible FPU Code This setting allows you to Enable or Disable the compatible FPU code. Split Lock Operations This setting allows you to Enable or Disable split lock operations. Hyper-threading This setting allows you to Enable or Disable hyper-threading. Enabling hyper-threading results in increased CPU performance. L3 Cache This setting allows you to Enable or Disable the L3 cache. ►DMI Event Logging Access the submenu to make changes to the following settings. Event Log Validity This is a display, not a setting, informing you of the event log validity. 72 Viglen LX245 Server User Guide Event Log Capacity This is a display, not a setting, informing you of the event log capacity. View DMI Event Log Highlight this item and press <Enter> to view the contents of the event log. Event Logging This setting allows you to Enable or Disable event logging. Event Logging This setting allows you to Enable or Disable ECC event logging. Mark DMI Events as Read Highlight this item and press <Enter> to mark the DMI events as read. Clear All DMI Event Logs Highlight this item and press <Enter> to clear all DMI event logs. ►Console Redirection Access the submenu to make changes to the following settings. COM Port Address Specifies to redirect the console to On-board COMA or On-board COMB. This setting can also be Disabled. BAUD Rate Select the BAUD rate for console redirection. Console Type Choose from the available options to select the console type for console redirection. COM Port Address Specifies to redirect the console to On-board COMA or On-board COMB. This setting can also be Disabled. Viglen LX245 Server User Guide 73 BAUD Rate Choose from the available options to select the BAUD rate for console redirection. Flow Control Choose from the available options to select the flow control for console redirection. Console Connection Select the console connection: either Direct or Via Modem. Continue CR after POST Choose whether to continue with console redirection after the POST routine. Options are On and Off. # of Video Pages to Support Choose the number of video pages to allocate for redirection when video hardware is not available. Options are 1, 2, 3, 4, 5, 6, 7 and 8. 74 Viglen LX245 Server User Guide Security Menu Choose Security from the Phoenix BIOS Setup Utility main menu with the arrow keys. You should see the following display. Security setting options are displayed by highlighting the setting using the arrow keys and pressing <Enter>. All Security BIOS settings are described in this section. Figure 56: Security Menu Supervisor Password Is: This displays whether a supervisor password has been entered for the system. Clear means such a password has not been used and Set means a supervisor password has been entered for the system. User Password Is: This displays whether a user password has been entered for the system. Clear means such a password has not been used and Set means a user password has been entered for the system. Viglen LX245 Server User Guide 75 Set Supervisor Password When the item "Set Supervisor Password" is highlighted, hit the <Enter> key. When prompted, type the Supervisor's password in the dialogue box to set or to change supervisor's password, which allows access to BIOS. Set User Password When the item "Set User Password" is highlighted, hit the <Enter> key. When prompted, type the user's password in the dialogue box to set or to change the user's password, which allows access to the system at boot-up. Password on Boot This setting allows you to require a password to be entered when the system boots up. Options are Enabled (password required) and Disabled (password not required). Fixed Disk Boot Sector This setting may offer some protection against viruses when set to Write Protect, which protects the boot sector on the hard drive from having a virus written to it. The other option is Normal. 76 Viglen LX245 Server User Guide Power Menu Choose Power from the Phoenix BIOS Setup Utility main menu with the arrow keys. You should see the following display. Power setting options are displayed by highlighting the setting using the arrow keys and pressing <Enter>. All Power BIOS settings are described in this section. Figure 57: Power Menu ACPI Mode Use the setting to determine if you want to employ ACPI (Advanced Configuration and Power Interface) power management on your system. Power Savings This setting sets the degree of power saving for the system. The options are Disabled, Customised, Maximum Power Savings and Maximum Performance. Customised allows you to alter the other two modes. Viglen LX245 Server User Guide 77 Auto Suspend Timeout Use this setting to specify the period of system inactivity to transpire before entering the suspend state. Options are Off, 5 min, 10 min, 15 min, 20 min, 30 min, 40 min and 60 min. Resume on Time Select either Off or On, which will wake the system up at the time specified in the next setting. Resume Time Use this setting to specify the time you want the system to wake up (the above setting must be set to On). Enter the time with the number keys. Resume on Modem Ring Use this setting to enable or disable the WOR (Wake-on Ring) feature. Options are On and Off. Standby Timeout Use this setting to specify the period of system inactivity to transpire before entering the standby state. Options are Off, 16 sec, 32 sec, 48 sec, 1 min, 2 min, 4 min and 8 min. 78 Viglen LX245 Server User Guide Boot Menu Choose Boot from the Phoenix BIOS Setup Utility main menu with the arrow keys. You should see the following display. Highlighting a setting with a + or – will expand or collapse that entry. See details on how to change the order and specs of boot devices in the Item Specific Help window. All Boot BIOS settings are described in this section. Figure 58: Boot Menu +Removable Devices Highlight and press <Enter> to expand the field. See details on how to change the order and specs of removable devices in the item Specific Help window. CD-ROM Drive See details on how to change the order and specs of removable devices in the Item Specific Help window. Viglen LX245 Server User Guide 79 +Hard Drive Highlight and press <Enter> to expand the field. See details on how to change the order and specs of hard drives in the Item Specific Help window. Network Boot See details on how to change the order and specs of network boot devices in the Item Specific Help window. Intel UNDI, PXE-2.0 See details on how to change the order and specs of Intel UNDI devices in the Item Specific Help window. 80 Viglen LX245 Server User Guide PIR Menu Choose PIR from the Phoenix BIOS Setup Utility main menu with the arrow keys. You should see the following display. The items with a triangle beside them have sub menus that can be accessed by highlighting the item and pressing <Enter>. PIR stands for Processor Info ROM", which allows BIOS to read certain information from the processors. Options for PIR settings are displayed by highlighting the setting option using the arrow keys and pressing <Enter>. All PIR BIOS Setup options are described in this section. Figure 59: PIR Menu Select the Processor's PIR Selects the processor PIR. Options are A0h/A1h, A2h/A3h, A4h/A5h, A6h/A7h, A8h/A8h, AAh/ABh, ACh/ADh and AEh/AFh. Select the Thermal Unit Selects the thermal unit. Options are 30h/31h, 32h/33h, 34h/35h, 52h/53h, 54h/55h, 56h/57h, 98h/99h, 9Ah/9Bh and 9Ch/9Dh. Viglen LX245 Server User Guide 81 ►Processor Info ROM Data Highlight this and hit <Enter> to see PIR data on the following items: • • • • • • • • • • Header Info Processor Data Processor Core Data L3 Cache Data Package Data Part Number Data Thermal Reference Data Feature Data Other Data OEM Data ►Hardware Monitor Logic Highlight this and hit <Enter> to see monitor data for the following items: • • • • • • • • • • • • • • 82 CPU1 Temperature CPU2 Temperature System Temperature CPU Fan1/CPU1 Chassis Fan CPU Fan2/CPU2 Chassis Fan Chassis Fan 1 Chassis Fan 2 Processor Vcore 3.3V Standby 3.3V Vcc 5V Vcc 12V Vcc 1.8V Vcc -12V Vcc Viglen LX245 Server User Guide Exit Menu Choose Exit from the Phoenix BIOS Setup Utility main menu with the arrow keys. You should see the following display. All Exit BIOS settings are described in this section. Figure 60: Exit Menu Exit Saving Changes Highlight this item and hit <Enter> to save any changes you made and to exit the BIOS Setup utility. Exit Discarding Changes Highlight this item and hit <Enter> to exit the BIOS Setup utility without saving any changes you may have made. Load Setup Defaults Highlight this item and hit <Enter> to load the default settings for all items in the BIOS Setup. These are the safest settings to use. Viglen LX245 Server User Guide 83 Discard Changes Highlight this item and hit <Enter> to discard (cancel) any changes you made. You will remain in the Setup utility. Save Changes Highlight this item and hit <Enter> to save any changes you made. You will remain in the Setup utility. 84 Viglen LX245 Server User Guide Phoenix BIOS POST Messages During the Power-On Self-Test (POST), the BIOS will check for problems. If a problem is found, the BIOS will activate an alarm or display a message. The following is a list of such BIOS messages. Failure Fixed Disk Fixed disk is not working or not configured properly. Check to see if fixed disk is attached properly. Run Setup. Find out if the fixed-disk type is correctly identified. Stuck key Stuck key on keyboard. Keyboard error Keyboard not working. Keyboard Controller Failed Keyboard controller failed test. May require replacing keyboard controller. Keyboard locked - Unlock key switch Unlock the system to proceed. Monitor type does not match CMOS - Run SETUP Monitor type not correctly identified in Setup Shadow Ram Failed at offset: nnnn Shadow RAM failed at offset nnnn of the 64k block at which the error was detected. System RAM Failed at offset: nnnn System RAM failed at offset nnnn of in the 64k block at which the error was detected. Extended RAM Failed at offset: nnnn Extended memory not working or not configured properly at offset nnnn. Viglen LX245 Server User Guide 85 System battery is dead - Replace and run SETUP The CMOS clock battery indicator shows the battery is dead. Replace the battery and run Setup to reconfigure the system. System CMOS checksum bad - Default configuration used System CMOS has been corrupted or modified incorrectly, perhaps by an application program that changes data stored in CMOS. The BIOS installed Default Setup Values. If you do not want these values, enter Setup and enter your own values. If the error persists, check the system battery or contact your dealer. System timer error The timer test failed. Requires repair of system board. Real time clock error Real-Time Clock fails BIOS hardware test. May require board repair. Check date and time settings BIOS found date or time out of range and reset the Real-Time Clock. May require setting legal date (1991-2099). Previous boot incomplete - Default configuration used Previous POST did not complete successfully. POST loads default values and offers to run Setup. If the failure was caused by incorrect values and they are not corrected, the next boot will likely fail. On systems with control of wait states, improper Setup settings can also terminate POST and cause this error on the next boot. Run Setup and verify that the wait state configuration is correct. This error is cleared the next time the system is booted. Memory Size found by POST differed from CMOS Memory size found by POST differed from CMOS. Diskette drive A error/Diskette drive B error Drive A: or B: is present but fails the BIOS POST diskette tests. Check to see that the drive is defined with the proper diskette type in Setup and that the diskette drive is attached correctly. 86 Viglen LX245 Server User Guide Incorrect Drive A type - run SETUP Type of floppy drive A: not correctly identified in Setup. Incorrect Drive B type - run SETUP Type of floppy drive B: not correctly identified in Setup. System cache error - Cache disabled RAM cache failed and BIOS disabled the cache. On older boards, check the cache jumpers. You may have to replace the cache. See your dealer. A disabled cache slows system performance considerably. CPU ID: CPU socket number for Multi-Processor error. EISA CMOS not writeable ServerBIOS2 test error: Cannot write to EISA CMOS. DMA Test Failed ServerBIOS2 test error: Cannot write to extended DMA (Direct Memory Access) registers. Software NMI Failed ServerBIOS2 test error: Cannot generate software NMI (Non-Maskable Interrupt). Fail-Safe Timer NMI Failed ServerBIOS2 test error: Fail-Safe Timer takes too long. Device Address Conflict Address conflict for specified device. Allocation Error for: device Run ISA or EISA Configuration Utility to resolve resource conflict for the specified device. Viglen LX245 Server User Guide 87 CD ROM Drive CD ROM Drive identified. Entering SETUP ... Starting Setup program Failing Bits: nnnn The hex number nnnn is a map of the bits at the RAM address which failed the memory test. Each 1 (one) in the map indicates a failed bit. See errors 230, 231, or 232 above for offset address of the failure in System, Extended, or Shadow memory. Fixed Disk n Fixed disk n (0-3) identified. Invalid System Configuration Data Problem with NVRAM (CMOS) data. I/O device IRQ conflict I/O device IRQ conflict error. PS/2 Mouse Boot Summary Screen: PS/2 Mouse installed. nnnn KB Extended RAM Passed Where nnnn is the amount of RAM in kilobytes successfully tested. nnnn Cache SRAM Passed Where nnnn is the amount of system cache in kilobytes successfully tested. nnnn kB Shadow RAM Passed Where nnnn is the amount of shadow RAM in kilobytes successfully tested. nnnn kB System RAM Passed Where nnnn is the amount of system RAM in kilobytes successfully tested. 88 Viglen LX245 Server User Guide One or more I2O Block Storage Devices were excluded from the Setup Boot Menu There was not enough room in the IPL table to display all installed I2O block-storage devices. Operating system not found Operating system cannot be located on either drive A: or drive C:. Enter Setup and see if fixed disk and drive A: are properly identified. Parity Check 1 nnnn Parity error found in the system bus. BIOS attempts to locate the address and display it on the screen. If it cannot locate the address, it displays ????. Parity is a method for checking errors in binary data. A parity error indicates that some data has been corrupted. Parity Check 2 nnnn Parity error found in the I/O bus. BIOS attempts to locate the address and display it on the screen. If it cannot locate the address, it displays ????. Press <F1> to resume, <F2> to Setup, <F3> for previous Displayed after any recoverable error message. Press <F1> to start the boot process or <F2> to enter Setup and change the settings. Press <F3> to display the previous screen (usually an initialisation error of an Option ROM, i.e., an add-on card). Write down and follow the information shown on the screen. Press <F2> to enter Setup Optional message displayed during POST. Can be turned off in Setup. PS/2 Mouse: PS/2 mouse identified. Run the I2O Configuration Utility One or more unclaimed block storage devices have the Configuration Request bit set in the LCT. Run an I2O Configuration Utility (e.g. the SAC utility). System BIOS shadowed System BIOS copied to shadow RAM. Viglen LX245 Server User Guide 89 UMB upper limit segment address: nnnn Displays the address nnnn of the upper limit of Upper Memory Blocks, indicating released segments of the BIOS which can be reclaimed by a virtual memory manager. Video BIOS shadowed Video BIOS successfully copied to shadow RAM. 90 Viglen LX245 Server User Guide Phoenix BIOS POST Codes This section lists the POST (Power On Self Test) codes for the PhoenixBIOS. POST codes are divided into two categories: recoverable and terminal. Recoverable POST Errors When a recoverable type of error occurs during POST, the BIOS will display a POST code that describes the problem. BIOS may also issue one of the following beep codes: 1 long and two short beeps - video configuration error 1 continuous long beep - no memory detected Terminal POST Errors If a terminal type of error occurs, BIOS will shut down the system. Before doing so, BIOS will write the error to port 80h, attempt to initialise video and write the error in the top left corner of the screen. The following is a list of codes that may be written to port 80h. Table 6: Phoenix BIOS POST Codes POST Code Description 02h 03h 04h 06h 07h 08h 09h 0Ah 0Bh 0Ch 0Eh 0Fh 10h 11h 12h 13h 14h 16h 17h 18h 1Ah 1Ch 20h 22h 24h Verify Real Mode. Disable Non-Maskable Interrupt (NMI). Get CPU type. Initialise system hardware. Disable shadow and execute code from the ROM. Initialise chipset with initial POST values. Set IN POST flag. Initialise CPU registers. Enable CPU cache. Initialise caches to initial POST values. Initialise I/O component. Initialise the local bus IDE. Initialise Power Management. Load alternate registers with initial POST values. Restore CPU control word during warm boot. Initialise PCI Bus Mastering devices. Initialise keyboard controller. 1-2-2-3 BIOS ROM checksum. Initialise cache before memory Auto size. 8254 timer initialisation. 8237 DMA controller initialisation. Reset Programmable Interrupt Controller. 1-3-1-1 Test DRAM refresh. 1-3-1-3 Test 8742 Keyboard Controller. Set ES segment register to 4 GB. Viglen LX245 Server User Guide 91 28h 29h 2Ah 2Ch 2Eh 2Fh 32h 33h 36h 38h 3Ah 3Ch 3Dh 41h 42h 45h 46h 47h 48h 49h 4Ah 4Bh 4Ch 4Eh 4Fh 50h 51h 52h 54h 55h 58h 59h 5Ah 5Bh 5Ch 60h 62h 64h 66h 67h 68h 69h 6Ah 6Bh 6Ch 6Eh 70h 72h 76h 7Ch 7Dh 7Eh 92 Auto size DRAM. Initialise POST Memory Manager. Clear 512 KB base RAM. 1-3-4-1 RAM failure on address line xxxx*. 1-3-4-3 RAM failure on data bits xxxx* of low byte of memory bus. Enable cache before system BIOS shadow. Test CPU bus-clock frequency. Initialise Phoenix Dispatch Manager. Warm start shut down. Shadow system BIOS ROM. Auto size cache. Advanced configuration of chipset registers. Load alternate registers with CMOS values. Initialise extended memory for RomPilot. Initialise interrupt vectors. POST device initialisation. 2-1-2-3 Check ROM copyright notice. Initialise I20 support. Check video configuration against CMOS. Initialise PCI bus and devices. Initialise all video adapters in system. QuietBoot start (optional). Shadow video BIOS ROM. Display BIOS copyright notice. Initialise MultiBoot. Display CPU type and speed. Initialise EISA board. Test keyboard. Set key click if enabled. Enable USB devices. 2-2-3-1 Test for unexpected interrupts. Initialise POST display service. Display prompt “Press F2 to enter SETUP”. Disable CPU cache. Test RAM between 512 and 640 KB. Test extended memory. Test extended memory address lines. Jump to UserPatch1. Configure advanced cache registers. Initialise Multi Processor APIC. Enable external and CPU caches. Setup System Management Mode (SMM) area. Display external L2 cache size. Load custom defaults (optional). Display shadow-area message. Display possible high address for UMB recovery. Display error messages. Check for configuration errors. Check for keyboard errors. Set up hardware interrupt vectors. Initialise Intelligent System Monitoring. Initialise coprocessor if present. Viglen LX245 Server User Guide 80h 81h 82h 83h 84h 85h 86h 87h 88h 89h 8Ah 8Bh 8Ch 8Fh 90h 91h 92h 93h 95h 96h 97h 98h 99h 9Ah 9Ch 9Dh 9Eh 9Fh A0h A2h A4h A8h AAh ACh AEh B0h B1h B2h B4h B5h B6h B7h B9h BAh BBh BCh BDh BEh BFh C0h C1h C2h Disable onboard Super I/O ports and IRQs. Late POST device initialisation. Detect and install external RS232 ports. Configure non-MCD IDE controllers. Detect and install external parallel ports. Initialise PC-compatible PnP ISA devices. Re-initialise onboard I/O ports. Configure Motherboard Configurable Devices (optional). Initialise BIOS Data Area. Enable Non-Maskable Interrupts (NMIs). Initialise Extended BIOS Data Area. Test and initialise PS/2 mouse. Initialise floppy controller. Determine number of ATA drives (optional). Initialise hard-disk controllers. Initialise local-bus hard-disk controllers. Jump to UserPatch2. Build MPTABLE for multi-processor boards. Install CD ROM for boot. Clear huge ES segment register. Fix up Multi Processor table. 1-2 Search for option ROMs. One long, two short beeps on checksum failure. Check for SMART Drive (optional). Shadow option ROMs. Set up Power Management. Initialise security engine (optional). Enable hardware interrupts. Determine number of ATA and SCSI drives. Set time of day. Check key lock. Initialise typematic rate. Erase F2 prompt. Scan for F2 key stroke. Enter SETUP. Clear Boot flag. Check for errors. Inform RomPilot about the end of POST. POST done - prepare to boot operating system. 1 One short beep before boot. Terminate QuietBoot (optional). Check password (optional). Initialise ACPI BIOS. Prepare Boot. Initialise SMBIOS. Initialise PnP Option ROMs. Clear parity checkers. Display MultiBoot menu. Clear screen (optional). Check virus and backup reminders. Try to boot with INT 19. Initialise POST Error Manager (PEM). Initialise error logging. Viglen LX245 Server User Guide 93 C3h C4h C5h C6h C7h C8h C9h CAh CBh CCh CDh CEh D2h Initialise error display function. Initialise system error handler. PnPnd dual CMOS (optional). Initialise note dock (optional). Initialise note dock late. Force check (optional). Extended checksum (optional). Redirect Int 15h to enable remote keyboard. Redirect Int 13h to Memory Technologies Devices such as ROM, RAM, PCMCIA, and serial disk. Redirect Int 10h to enable remote serial video. Re-map I/O and memory for PCMCIA. Initialise digitiser and display message. Unknown interrupt. The following are for boot block in Flash ROM Table 7: Boot Block in Flash ROM POST Codes POST Code Description E0h E1h E2h E3h E4h E5h E6h E7h E8h E9h EAh EBh ECh EDh EEh EFh F0h F1h F2h F3h F4h F5h F6h F7h Initialise the chipset Initialise the bridge Initialise the CPU Initialise system timer Initialise system I/O Check force recovery boot Checksum BIOS ROM Go to BIOS Set Huge Segment Initialise Multi Processor Initialise OEM special code Initialise PIC and DMA Initialise Memory type Initialise Memory size Shadow Boot Block System memory test Initialise interrupt vectors Initialise Run Time Clock Initialise video Initialise System Management Manager Output one beep Clear Huge Segment Boot to Mini DOS Boot to Full DOS * If the BIOS detects error 2C, 2E, or 30 (base 512K RAM error), it displays an additional word-bitmap (xxxx) indicating the address line or bits that failed. For example, “2C 0002” means address line 1 (bit one set) has failed. “2E 1020" means data bits 12 and 5 (bits 12 and 5 set) have failed in the lower 16 bits. The BIOS also sends the bitmap to the port-80 LED display. It first displays the checkpoint code, 94 Viglen LX245 Server User Guide followed by a delay, the high-order byte, another delay, and then the low order byte of the error. It repeats this sequence continuously. Phoenix Error Beep Codes This section lists the PhoenixBIOS Error Beep Codes. Table 8: Phoenix BIOS Error Beep Codes Beep Code Error Message Description 1 long continuous beep 1 long + 2 short + 1 long + 2 short 1 long + 3 short 1 long + 9 short Long beeps Long beeps No memory detected No video VGA error Keyboard error ROM error Memory module error Viglen LX245 Server User Guide 95 7. Technical Information NOTE: This chapter is indented for experienced users only, and only to be used as a reference. Changes to or modify any of the components/ connectors listed herein can and will seriously damage your system, including the motherboard, CPU and/or any other hardware. SCSI Controller The embedded Adaptec AIC-7899 SCSI controller incorporates an advanced multimode I/O cell that supports Ultra2, Ultra3, and Ultra160 SCSI LVD devices, as well as singleended (SE) devices. The AIC-7899 SCSI controller is coupled with an Adaptec AIC3860 transceiver chip to bridge the signaling discontinuity. By dividing the SCSI bus into independent single-ended and LVD segments, the AIC-3860 supports legacy devices without limiting performance. The SCSI bus is terminated on the server board with active terminators that cannot be disabled. The onboard device must always be at one end of the bus. The device at the end of the cable must be terminated. LVD devices generally do not have termination capabilities. Non-LVD devices generally are terminated through a jumper or resistor pack. The SCSI cable included with your server board has been modified to include active termination. The cable is capable of supporting both Ultra-2 and non-Ultra-2 SCSI devices. Proper termination of the SCSI bus is required for stable operation of SCSI devices. When attaching any SCSI device to the cable, verify that they are not terminated. This is usually a configurable option using a jumper or terminator block on the device. Check the documentation that came with your SCSI device to verify this option. Termination of the SCSI bus is implemented using the active termination on the server board along with the active termination at the end of the SCSI cable. IDE Controller IDE is a 16 bit interface for intelligent disk drives with disk controller electronics onboard. The device controls: • • • • • • 96 PIO and IDE DMA/bus master operations Mode 4 timings Transfer rates up to 33 MB/s Buffering for PCI/IDE burst transfers Master/slave IDE mode Up to two devices per channel; two channels, IDE0 and IDE1 Viglen LX245 Server User Guide NOTE: 18 inch maximum length of IDE cable on each channel: You can connect an IDE signal cable, up to a maximum of 18 inches each, to each IDE connector on the server board. Each cable can support two devices, one at the end of the cable and one 6 inches from the end of the cable. Operating Systems and IDE hard drives Standard CHS is the translation that has been used for years. Its use limits IDE capacity to maximum of 528MB regardless of the size of the drive used. Logical Block mode overcomes the 528MB maximum size limitation imposed by the Standard CHS mode. It should be used only when the drive supports LBA (Logical Block Addressing), and the OS supports LBA, or uses the BIOS to access the disk. Extended CHS mode also overcomes the 528MB maximum size limitation imposed by Standard CHS mode. It can be used with drives, which are larger than 528MB that do not support LBA. Auto Detected allows the BIOS to examine the drive and determine the optimal mode. The first choice is to utilise Logical Block mode if it is supported by the drive. The second choice is to utilise Extended CHS mode if the drive topology allows. If neither of the above methods is possible, the Standard CHS mode is used. Different operating systems have different abilities regarding IDE translation mode. UNIX operating systems (as currently implemented) do not support either LBA or ECHS and must utilise the standard CHS method. UNIX can support drives larger than 528MB, but does so in its own way. OS/2 2.1 and OS/2 Warp can support LBA, ECHS or standard CHS methods. Note that LBA support may require a switch setting on an OS/2 driver in order to operate in that mode. OS/2 2.0 & Novel NetWare can support either ECHS or standard CHS methods. In order to use LBA with NetWare a driver that supports current parameters must be used. OS/2 2.0 does not support LBA. DOS & Windows can use LBA, ECHS or standard CHS methods. The '32-bit Disk Access' driver built into Windows WDCTRL.386 can only be used with the standard CHS method, to use either LBA or ECHS method and '32-bit Disk Access' an alternative .386 driver must be installed; this combination will also provide the best performance. If this driver is not installed and the drive fitted to the system supports Type F DMA on the ISA interface or Mode 3 on the PCI interface then higher performance will be achieved by NOT using '32-bit Disk Access'. Viglen LX245 Server User Guide 97 Network Controller The VIG340B motherboard includes a 10BASE-T/100BASE-TX network solution based on the Intel 82550 single chip Fast Ethernet PCI Bus Controller. As a PCI bus master, the controller can burst data at up to 132 MB/s. The controller contains two receive and transmit FIFO buffers that prevent data overruns or underruns while waiting for access to the PCI bus. The controller has the following: • • • • • • • • 32 bit PCI bus master interface (direct drive of bus), compatible with PCI Bus Specification, Revision 2.1 Chained memory structure with improved dynamic transmit chaining for enhanced performance Programmable transmit threshold for improved bus utilisation Early receive interrupt for concurrent processing of receive data Onchip counters for network management Autodetect and autoswitching for 10 or 100 Mbps network speeds Support for both 10 Mbps and 100 Mbps networks, capable of full or half duplex, with back-to-back transmit at 100 Mbps Support for IP Security The network status LEDs on the server board indicate: • • • Transmit/receive activity on the LAN Valid link to the LAN 10/100 Mbps transfer mode Use Only for Intended Applications This product was evaluated as Information Technology Equipment (ITE) that may be installed in offices, homes, schools, computer rooms and similar locations. The suitability of this product for other Product Categories and Environments other than ITE applications, (such as medical, industrial, alarm systems, and test equipment) may require further evaluation. When you integrate this subassembly, observe all warnings and cautions in the Installation Guide. To avoid injury, be careful of: • • • • • 98 Sharp pins on connectors Sharp pins on printed circuit assemblies Rough edges and sharp corners on the chassis Hot components (like processors, voltage regulators, and heat sinks) Damage to wires that could cause a short circuit Viglen LX245 Server User Guide Equipment Log and Worksheets Use the blank equipment log provided here to record information about your LX245 Server. Table 9: Equipment Log and Worksheet Item Manufacturer Name & Model Number Serial Number Date Installed Chassis Main board Processor speed and cache Memory Video display Keyboard Mouse Diskette drive A CD-ROM drive Additional 5.25” Peripheral IDE hard disk drive SCSI hard disk drive 1 SCSI hard disk drive 2 SCSI hard disk drive 3 SCSI hard disk drive 4 SCSI hard disk drive 5 SCSI hard disk drive 6 Viglen LX245 Server User Guide 99 Worksheet, Calculating DC Power Usage 1. List the current for each board and device in the appropriate voltage level column. 2. Add the currents in each column. Then go to the next worksheet. Table 10: Worksheet, Calculating DC Power Usage Current (maximum) at voltage level: Device Baseboard, front panel board and fans Processor(s) Memory 3.5-inch diskette drive CD-ROM drive Second 5.25-inch device Third 5.25-inch device 1st hard drive 2nd hard drive 3rd hard drive 4th hard drive 5th hard drive 6th hard drive SCSI backplane Power share board Expansion board 1 Expansion board 2 Expansion board 3 Expansion board 4 Expansion board 5 Expansion board 6 Expansion board 7 Total Current Maximum Ratings (for comparison) 100 +3.3 V +5 V –5 V +12 V Viglen LX245 Server User Guide –12 V 5V standby Connector Pin Signal Details Fan Connector Table 11: Fan Connector Pin-out (Thermal, CPU and Chassis Fans Pin Signal Name 1 Ground (black) 2 +12 V (red) 3 Tachometer Keyboard and Mouse The PS/2-compatible connectors share a common housing; they are functionally equivalent. Table 12: PS/2 Keyboard/Mouse Connectors Pin Signal Name Description 1 KEYDAT / MSEDAT Data 2 NC No connect 3 GND Ground 4 FUSED_VCC +5 V (fused) 5 KEYCLK / MSECLK Clock 6 NC No connect Serial Ports COM1 and COM2 Table 13: Serial Port Connectors Pin Signal Name 1 DCD 2 DSR 3 Serial In 4 RTS 5 Serial Out 6 CTS 7 DTR Viglen LX245 Server User Guide 101 8 9 RI Ground Parallel Port Table 14: Parallel Port Connector Pin Signal Name 1 Strobe# 2 Data bit 0 3 Data bit 1 4 Data bit 2 5 Data bit 3 6 Data bit 4 7 Data bit 5 8 Data bit 6 9 Data bit 7 10 ACK# 11 Busy 12 PE 13 Select Pin 14 15 16 17 18 19 20 21 22 23 24 25 Signal Name Auto Feed# Error# INIT# SLCT IN# Ground Ground Ground Ground Ground Ground Ground Ground Floppy Drive Table 15: Floppy Drive Connector Pin-out Pin Signal Name Pin 1 Ground 2 3 Ground 4 5 Key 6 7 Ground 8 9 Ground 10 11 Ground 12 13 Ground 14 15 Ground 16 17 Ground 18 19 Ground 20 21 Ground 22 23 Ground 24 25 Ground 26 102 Signal Name FDHDIN Reserved FDEDIN Index# Motor Enable Drive Select B Drive Select A Motor Enable DIR STEP Write Data Write Gate Track 00 Viglen LX245 Server User Guide 27 29 31 33 Ground Ground Ground Ground 28 30 32 34 Write Protect Read Data Side 1 Select Diskette Pin 2 4 6 8 10 12 14 16 18 20 22 24 26 28 30 32 34 36 38 40 Signal Name Ground Data 8 Data 9 Data 10 Data 11 Data 12 Data 13 Data 14 Data 15 Key Ground Ground Ground BALE Ground IOCS 16# ground Address 2 Chip Select 1# Ground IDE Table 16: IDE Connectors Pin Signal Name 1 Reset IDE 3 Data 7 5 Data 6 7 Data 5 9 Data 4 11 Data 3 13 Data 2 15 Data 1 17 Data 0 19 Ground 21 DDRQ3 23 I/O Write# 25 I/O Read# 27 IOCHRDY 29 DDACK3# 31 IRQ 14 33 Address 1 35 Address 0 37 Chip Select 0# 39 Activity# ATX Power Supply Table 17: Main Power Supply Connector Pin Signal Name Pin 1 3.3V 11 2 3.3V3 12 3 Ground 13 4 5V 14 5 Ground 15 6 5V 16 7 Ground 17 8 PW-OK 18 9 5VSB 19 10 12V 20 Signal Name 3.3V -12V Ground PS-ON Ground Ground Ground -5V 5V 5V Viglen LX245 Server User Guide 103 Universal Serial Bus (USB) Table 18: USB Connector Pinout Pin 1 2 3 4 5 Signal Name +5V POPO+ Ground N/ A Pin 11 12 13 14 15 Signal Name +5V POPO+ Ground Key 50- Pin Legacy SCSI Connector Table 19: 50-pin SCSI Pinout Pin 1 2 3 4 5 6 7 8 9 10 11 12 13 14 15 16 17 18 19 20 21 22 23 24 25 104 Signal Name Ground Ground Ground Ground Ground Ground Ground Ground Ground Ground Reserved Open Reserved Ground Ground Ground Ground Ground Ground Ground Ground Ground Ground Ground Ground Pin 26 27 28 29 30 31 32 33 34 35 36 37 38 39 40 41 42 43 44 45 46 47 48 49 50 Signal Name -DB (0) -DB (1) -DB (2) -DB (3) -DB (4) -DB (5) -DB (6) -DB (7) -DB (P) Ground Ground Reserved Termpwr Reserved Ground -ATN Ground -BSY -ACK -RST -MSG -SEL -C/D -REQ -I/O Viglen LX245 Server User Guide Ultra Wide SCSI Connector Table 20: 68-Pin SCSI Pinout Pin 1 2 3 4 5 6 7 8 9 10 11 12 13 14 15 16 17 18 19 20 21 22 23 24 25 26 27 28 29 30 31 32 33 Signal Name Ground Ground Ground Ground Ground Ground Ground Ground Ground Ground Ground Ground Ground Ground Ground Ground Termpwrd Termpwrd Ground Ground Ground Ground Ground Ground Ground Ground Ground Ground Ground Ground Ground Ground Ground Pin 35 36 37 38 39 40 41 42 43 44 45 46 47 48 49 50 51 52 53 54 55 56 57 58 59 60 61 62 63 64 65 66 67 Signal Name -DB (12) -DB (13) -DB (14) -DB (15) Parity H -DB (0) -DB (1) -DB (2) -DB (3) -DB (4) -DB (5) -DB (6) -DB (7) Parity L Ground Termpwrd Termpwrd Termpwrd NC Ground -ATN Ground -BSY -ACK -RST -MSG -SEL -C/D -REQ -I/O -DB (8) -DB (9) -DB (10) 34 Ground 68 -DB (11) Viglen LX245 Server User Guide 105 Ultra 160 SCSI Connector Table 21: Ultra160 SCSI Pinout Pin 1 2 3 4 5 6 7 8 9 10 11 12 13 14 15 16 17 18 19 20 21 22 23 24 25 26 27 28 29 30 31 32 33 34 106 Signal Name +DB (12) +DB (13) +DB (14) +DB (15) +DB (P1) +DB (0) +DB (1) +DB (2) +DB (3) +DB (4) +DB (5) +DB (6) +DB (7) +DB (P) Ground DIFFSENS TERMPWR TERMPWR Reserved Ground +ATN Ground +BSY +ACK +RST +MSG +SEL +C/D +REQ +I/O +DB (8) +DB (9) +DB (10) +DB (11) Pin 35 36 37 38 39 40 41 42 43 44 45 46 47 48 49 50 51 52 53 54 55 56 57 58 59 60 61 62 63 64 65 66 67 68 Signal Name -DB (12) -DB (13) -DB (14) -DB (15) -DB (P1) -DB (0) -DB (1) -DB (2) -DB (3) -DB (4) -DB (5) -DB (6) -DB (7) -DB (P) Ground Ground TERMPWR TERMPWR Reserved Ground -ATN Ground -BSY -ACK -RST -MSG -SEL -C/D -REQ -I/O -DB (8) -DB (9) -DB (10) -DB (11) Viglen LX245 Server User Guide Other Information Reliability The mean time between failures (MTBF) prediction is calculated using component and subassembly random failure rates. The calculation is based on the Bellcore Reliability Prediction Procedure, TR-NWT-000332, Issue 4, September 1991. The MTBF prediction is for: • Redesigning the motherboard for alternate components if failure rates exceed reliability expectations • Estimating repair rates and spare parts requirements MTBF data is calculated from predicted data @ 35 °C. The MTBF prediction for the motherboard is 120,402 hours. Viglen LX245 Server User Guide 107 8. Glossary A Ampere, This is a term of measurement for electric current. AC Alternating Current used to describe the mains voltage. Ampere This is a term of measurement of electric current. Analog Pertaining to data in the form of continuously variable quantities. Contrasts with Digital. ANSI American National Standards Institute. ASCII American Standard Coded for Information Interchange. This is a special 7/8 bit code that is given to identify characters. Asynchronous A method of transmission of data in which the bits included in a character or block of characters occur during a specific time interval. The start of each character block can occur at any time during this interval. Contrasts with synchronous. AUTOEXEC.BAT A special batch file, which contains a series of commands that are to be executed when the computer is started up. BASIC Beginner’s All-purpose Symbolic Instruction Code. This is a simple programming language. Battery-Backed RAM A type of memory that holds information even when the computer is switched off. Baud A term used to measure modem data rates. Binary Involving a choice of two conditions, such as "yes" or "no", "1" or "0", base-2 mathematics. BIOS Basic Input Output System. This is the program held in the computer's ROM which handles all the input and output functions. Bit Synonym for Binary digit. A single unit of information which can hold a value of 0 or 1. 108 Viglen LX245 Server User Guide Boot The name given to the program that runs on the computer when it is first switched on. Can also be a verb related to running the program. BSI British Standards Institute. Bps Bits per second. Buffer An area of temporary storage. Bus One or more conductors used for transmitting signals. Byte A unit of data made up of eight Bits. C / C++ A programming language. Cache A small area of high-speed memory. Cathode Ray Tube (CRT) Normally referred to as a monitor or VDU. Character A symbol on the screen or same as a Byte. CMOS Complementary Metal Oxide Semiconductor. A logic circuit family that uses very little power. COM1, COM2 COM3, COM4 The names given to the serial communications ports in DOS. CONFIG.SYS A special purpose file which has the configuration details for the computer to set itself to when powered up. CPS Characters per second. CSA Canadian Standards Association. Cursor A bar on the screen that indicates where the input from the keyboard will be displayed. DC Direct current. Normally associated with battery current. Digital Pertaining to data in the form of binary digits. Contrasts with Analogue. DIN Deutsche Industrie Norm, specifies major connector types. Viglen LX245 Server User Guide 109 DIP Dual In-Line Package. ICs that have two parallel rows of connections. DMA Direct Memory Access. A method of transferring data between main storage and I/O devices without processor intervention. Disk See Floppy Disk. DOS or MS-DOS® Disk Operating System or Microsoft Disk Operating System. This is a low-level program that instructs the computer on basic file handling.# DRAM Dynamic RAM. A type of RAM that requires a periodic refresh to maintain data. DVD Digital Versatile Disk EMC ElectroMagnetic Compatibility EMI ElectroMagnetic Interference. EPROM Erasable Programmable Read-Only Memory. ESDI Enhanced Small Device Interface, which specifies a fast hard disk interface. FCC Federal Communications Commission. Firmware A program that is resident in Read Only Memory (ROM). Floppy Disk A storage device consisting of a flexible magnetic disk inside a protective cover. G A symbol used to represent the prefix Giga. i.e. GB (Giga Byte). GB Gigabyte, represents 1,073,741,824 bytes (1024MB). Hard Disk A disk of rigid magnetic material used for mass storage. Hardware The physical equipment which makes up the computer system. Hertz (Hz) A unit of measurement of frequency amounting to one 110 Viglen LX245 Server User Guide cycle per second. Hex Hexadecimal. Base-16 mathematics. IC Integrated Circuit. Icon A graphical symbol. IDE Integrated device interface. An AT bus specification for a fast hard disk. IEC International Electrotechnical Commission. Specifies standards of safety. I/O Input/Output. Refers to data being sent to or received from a computer. K Symbol used to represent Kilobyte which is 1024 bytes. KB Abbreviation for Kilobyte, i.e. 1024 bytes. Kb Abbreviation for Kilo bit, i.e. 1024 bits. Keylock A locking device which can deactivate a keyboard. KHz KiloHertz. 1000 Hertz. LIM Lotus/Intel/ Microsoft Expanded Memory Manager specification. LED Light Emitting Diode. These are normally used as the lights on a computers front panel. LPT1, LPT2, LPT3 Names given to the printer ports by DOS. M Prefix mega. Equivalent to 1024K. mA Milliampere. 0.001 Ampere. MB Abbreviation for Mega Byte i.e. 1024K Bytes. Mb Abbreviation for Mega Bits, i.e. 1024K bits. Memory An electronic component which remembers data stored in it. Viglen LX245 Server User Guide 111 MHz Mega Hertz. 1,000,000 Hertz. ns Nano Second 0.000 000 001 second. Pixel The smallest displayable unit on a monitor or picture tube. POST Power-On Self Test. RAM Random Access Memory. Fast Read/Write memory. RFI Radio Frequency Interface. ROM Read Only Memory. RS-232C A standard for asynchronous serial communication. SCSI Small Computer Systems Interface. A multimedia bus and interface specification for fast Hard Disks, Tape Backup Units, CD ROMs and other Devices. SIMM Single In-Line Memory Module. Software Another name for a computer program. SRAM Static RAM. Synchronous Transmission of data between devices which are maintaining the same frequency relationship. Contrasts with asynchronous. TPI Tracks Per Inch. TTL Transistor Transistor Logic. TUV Technischer Uberwachungs-Verein. Organisation which tests and certifies electronic equipment. UL Underwriter Laboratories. American Organisation specifying standards for safety of electronic equipment. USB Universal Serial Bus V Volt. Unit of measurement of potential difference. VAC Volts (Alternating Current). 112 Viglen LX245 Server User Guide VDE Verband Deutscher Electrotechniker. German organisation specifying EMI suppression. Video Computer data or graphics displayed on a monitor or screen. W Watt. Watt Basic unit of measurement of electrical power. Word A number of bits or bytes making up an entity used in the transfer and calculation of data in the computer architecture. Word=16 bits (2 bytes), long word= 32bits (4 bytes). Viglen LX245 Server User Guide 113 9. Notes 114 Viglen LX245 Server User Guide Viglen LX245 Server User Guide 115 116 Viglen LX245 Server User Guide Viglen LX245 Server User Guide 117 10. Suggestions Viglen is interested in continuing to improve the quality and information provided in their manuals. Viglen has listed some questions that you may like to answer and return to Viglen. This will help Viglen help to keep and improve the standard of their manuals. 1. Is the information provided in this and other manuals clear enough? 2. What could be added to the manual to improve it? 3. Does the manual go into enough detail? 4. Would you like an on-line version of this manual? 118 Viglen LX245 Server User Guide 5. How do you rate the Viglen Technical support and Service Departments? 6. Are there any technological improvements that could be made to the system? 8. Other points you would like to mention? Please return this slip to: Product Development Department Viglen Ltd Viglen House Alperton Lane Alperton Middlesex HA0 1DX Viglen LX245 Server User Guide 119