1
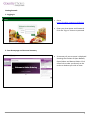
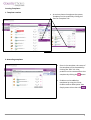
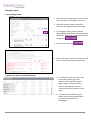
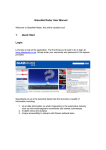
Online Ordering User Guide Country Choice Online Ordering – An Introduction: Simple, Quick, Convenient All products and information are at your fingertips. You can search by product code or name or browse by category – whichever you find easiest. Save order templates, shop using past or recurring orders or place a new order from scratch – the choice is yours! Online Promotions As well as displaying your normal price, our online system will highlight all our regular promotions. Complete Flexibility Whatever the time of day our online ordering system is always open. Orders are confirmed via email and you can amend your order either online or via Telesales right up to the normal cut‐off time. Your delivery schedule remains unchanged. 1 Getting Started… 1. Logging In Go to https://enabler.conexa.co.uk/Online Enter your User Name and Password. Click the “Sign In” button to proceed. A summary of your account is displayed showing the number of Open Baskets, Open Orders and Recent Orders. Click these links to take you directly to the orders or baskets you wish to view. 2. Your Homepage and Account Summary 2 How to order… 1. Selecting an Account Select the account you wish to use from the account drop down box. Click the to begin. Then use the calendar to choose the required delivery date. When you are happy with your selection click 2. Starting an Order button to continue. 3. Add product to the basket using ‘Quick Add’ If you know the product codes, simply key the product code into the quick entry box at the top of the basket followed by the quantity, and then click the button. This can also be done using the keyboard alone. Step between the fields using the ‘Tab’ key, entering the codes and quantities, and then using the ‘Return’ key when on the button. 3 4. Add products to the basket using ‘Recent Purchases’ 5. Add products to the basket using ‘Recent Orders’ Select the ‘Recent Purchases’ sub menu in ‘Orders’ to view your recent purchases. When in the ‘Recent Purchases’ submenu, simply adjust the quantities by keying them in or using the & buttons in each row. Use the basket. Select the ‘Recent Orders’ sub menu in ‘Orders’ to view your recent orders. From the list of orders, choose a specific order by clicking the Order Number to display the products. Add products to the basket by adjusting button to add the products to the quantities and clicking the button. To quickly add products, simply tick the tick box at the end of each product line, 6. Add products to the basket using ‘Templates’ and then click the button. Select the ‘Templates’ sub menu in ‘Orders’ to view the list of templates that have been created. Click one of the templates to display the products. Add products to the basket by adjusting the quantities and clicking the button. If you wish to remove a product simply click . 4 Creating Templates… 1. Template creation At various places throughout the system, Templates can be created by clicking the ‘Save as Template’ link. 2. Amending templates Once in the template, the name of the template can be amended by clicking the ‘Edit’ link. Also, products can be removed from the template by clicking the button Products can be added to templates by using the ‘Enter Product code or description’ box. Simply enter either then click . 5 Finding Products… 1. Product Search Search for products at any stage by using the product search box. Simply enter a product code or keyword in the search box and click the button. Take care to use the correct search terms. For example, when looking for “Stilton”, search for “Stilton”, not “Cheese”. You will then have the choice to refine your search by using the filter functions. Click on the box to filter by attribute. Amending the Basket… 1. Amending the Basket The Basket will remain the right hand side of the screen allowing you to amend it at any time. You can add a product to your basket at any time by using ‘Quick Add’. The quantity can then be increased or decreased using the & buttons, If you wish to remove a product simply click . Once a product has been added to the basket, it can still be amended or removed. Click the button against the product in the basket to expand it. 6 Submitting the Order… 1. Checking out the basket 2. Placing the order NB Orders must be placed before the usual cut‐ off times. Orders past cut‐off can not be submitted Once the basket is complete, click the button to go onto submitting your order. If you have several baskets, choose the basket you wish to submit as an order from the list on the right. Check the ‘Order Placed By’ field along with the requested delivery date. At this stage the products in the basket can still be amended. Once happy with the order, click the button 3. Order Submitted To continue shopping, simply enter a new search term or use the ‘Browse’ sub menu. Once the order has been submitted, you will see a ‘”Waiting for Confirmation” message. You can either wait for the confirmation or click the ‘Don’t wait for Confirmation’ option. The status of the order can be checked by selecting the ‘Open Orders Status’ sub menu in ‘Orders’. Once confirmed, an email confirmation will be sent to the user. 7 Managing Orders… 1. Amending an Order Once you have submitted an order you still have the chance to change or cancel it. Select the order number you wish to amend in the ‘Open Order Status’ page. To change an order, simply continue adding/deleting products and adjusting the quantities. Once you are satisfied with the change click . To cancel an order click . Once confirmed, an email confirmation will be sent with the updated amendments. 2. Review the status of submitted orders To review the status of recent and past orders placed, go to the ‘Orders’ menu and chose either Order History or Recent Orders. Click on the order you wish to view to display the products in the order. A summary of the baskets, open orders and recently placed orders can also be viewed on the Homepage. 8 Promotions... 1. How to find promotions Latest promotions will be displayed on the Promotions tab. 2. Promotions A special price will only be shown against an account if the special price is LESS than the current contract price. When in the ‘special price’ section, simply adjust the quantities by keying them in or using the & buttons in each row. Use the button to add the promoted products to the basket. Once successfully added into basket the selected promotion will be shown above the item. In this case be shown. will 9