1
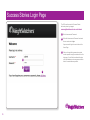
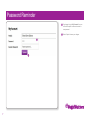
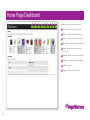
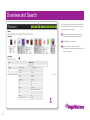
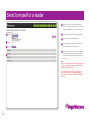
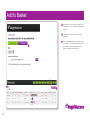
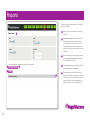
Weight Watchers Success Stories User Guide
Contents
Overview
Page 3
Success Stories: An Overview
Page 4
Page 5
Using a Success Story
Story Usage Policy / Questions & Queries
Page 6
Page 7
Success Stories Login Page
Password Reminder
Page 8
Home Page Dashboard
Page 9
Page 10
Overview and Search
Search Results
Stories
Page 11Stories
Page 12
Stories continued
Page 13
View Story
Page 14
Send to myself or a leader
Page 15
Add to Basket
Reports
Page 16Reports
Help
Page 17Help
2
Success Stories: An Overview
Our Members are our best advocates. They have lived and breathed the Weight Watchers plan and have seen first-hand the profound
effect their weight loss has had on their life.
Their stories can prove incredibly inspiring for other Members and the UK public and we want to shout about as many of them as we can.
The Success Stories database is designed to help facilitate this, by letting Members upload their story and photographs online in four
simple steps. They’ll receive a thank you email to confirm we’ve received it and their Leader will also receive a copy of the story with
guidance on how to promote it locally via local PR and social media.
The Success Story database is designed to help make it even easier for the Weight Watchers channels that use success stories (such as
PR, content and marketing) to celebrate success as often as possible.
The system allows us to search for stories using various criteria, keep track of where we are using stories and what we are saying and
also make notes of any changes to the Member’s story, stats, whether it’s been published etc.
3
Using a Success Story
As a Success Story database user, we need your help to ensure that the system runs to its full potential and that everyone knows where
stories are being used, so there is no double up or confusion.
Please follow these three steps when using a Success Story:
01
If you plan to use a story, please mention where you are planning to use it (and when) in the notes section of the story page.
02
When you have sent a story (or it has been confirmed for use via a communications channel), tick the sent to media box and tell us
where it has gone and when it is due to appear.
03
If the story has run, please click published and include the title and date of publish. Where possible, please also upload a copy of the
piece using the Coverage button at the bottom of the page.
By doing these things, we will be able to keep track of where stories are used – both on an Area and National level. If you create any
photos or extra content at any time, please also include these at the bottom of the story.
Note:
Under no circumstances should a story be sent to media straight from the system. Please only send the story to yourself or a leader first.
Once you have sent the story on to the media from your email, please record this on the view story page. Details on how to do this are
on page 13 (instructions 04 & 05) and page 14.
4
Story Usage Policy
To ensure Member privacy and that all stories reflect the Weight Watchers ethos, please ensure you always follow the Success Story
usage policy:
•At no time should you give your Success Story database login and password to others. If you need another login and password for any
reason, please speak to the PR team.
•Always contact the Member to sense check their story and ensure they are happy for their story to be placed. A Member’s story should
never run without their prior knowledge.
•All stories should have a healthy, sustainable weight loss of no more than 2lb per week average.
•If the Member’s story has any elements which you are concerned about – for example, excessive exercise, a gastric band/weight loss
surgery etc. – please discuss with the PR team prior to usage.
•Please ensure all success stories have gone through the online process at www.weightwatchersstories.co.uk and as such, have
agreed to the terms and conditions.
•Never give out personal Member details without checking with them first.
•Please do not promise a Member that their story will definitely get used – but once you know it is being used, please inform them.
Questions & Queries
For more information, please visit the Success Story section of LINK Online or the ‘Help’ button on the Success Story database. For any
other queries, please speak to the PR team or email [email protected]
5
Success Stories Login Page
The URL used to access the Success Stories
back-end system login page is
www.weightwatchersstories.co.uk/admin
01 Enter Username and Password
02 When the Username and Password is entered
the user must select Login.
Upon successful login the user is taken to the
Home Page.
03 If the user forgets their password a reminder
can be requested using the reminder link on the
login page. You will then be redirected to enter
your email address and a new password will be
sent to the email address provided.
01
02
03
6
Password Reminder
01 Once logged in, go to My Account, then you
will have the option to enter and re-enter a
new password.
02 Select ‘Update’ to save your changes.
01
02
7
Home Page Dashboard
01
02
03
04
05
06
07
08
09
Appearing on the Home Page are the following:
01 Overview – Summary of stories & search
02 Stories - All stories submitted by Members
03 Search – Search and filter function for Stories
04 My Account – Update login and account details
05 Users – Add and edit system users (Admin
access only)
06 Reports – Reports view and export functionality
07 Basket – Real time basket for shopped Stories
08 Help – User guides
09 Logout – Returns user to login screen
8
Overview and Search
03
The Overview provides the user with a view of all the
latest stories that have been submitted as well a the
functionality to search all stories.
01 To search a specific criteria, make selections
from the different fields to narrow the search.
02 Select Search to yield results.
03 Stories can also be searched from the
Search page accessed from the toolbar menu at
the top of the page.
01
02
9
Search Results
The search results are shown at the
top of the page.
01
01 View: allows the user to view the Member
submitted information, before and after
images, coverage images and user notes.
There is also an option available for you to
send the story to yourself or a leader.
Please refer to pages 13 & 14 for instructions
on sending the story to yourself or a leader.
10
Stories
On the main toolbar there is an option
named Stories. All stories submitted by members
are listed here. Stories are categorised within 5 tabs:
01
02
03
04
05
01 All – lists all stories submitted.
02 Distributed – sent to yourself or a leader.
03 Pending – sent to Media with no
response to date.
04 Published – appeared in Press.
05 Favourites – chosen by yourself as a
favourite (Favourites are specific to
each user).
11
Stories continued
There are several features on this page to assist
ease of use:
01 Show – allows user to select a number
of stories to be displayed per page.
03
01
02 Refine – allows the user to search by keyword.
06
02
04
05
07
03 Headings – can be filtered by selecting the
heading and the stories below will be
re-ordered by the field selected.
04 Favourite – a full star indicates that the story
has been saved as a favourite.
05 A highlighted basket indicates the story
is in the basket.
06 Stories can be filtered by status using the drop
down menu.
07 View - allows you to view the individual story in
more detail and opens up options to distribute
the story. Further details on how to do this is
highlighted on pages 13 & 14.
12
View Story
By clicking view, you can review an individual story in
more detail. You will also have the subsequent options
for each story:
01
02
01 Add or remove from Favourites.
11
02 Add to Basket (for onward supply).
03
03 Update the status of the story Available appears
in all searches and is fully active, Archived is when
story has been dormant for a long period of time,
Suspended is unavailable. Please note: if a story
has been archived or suspended by an Admin user,
you will not be able to send this story out.
04
05
06
07
04 Tick the published box and enter the name and
date of the publication when a story has already
been published.
05 Tick the sent to media box and enter the name and
date of the publication when a story has been sent
to media and being considered for publishing.
06 Expand to view the previously recorded
publications and media titles pending and
published.
07 A summary of the information submitted by the
member.
08 View the images submitted by the member, you
08
can upload more images. You are encouraged to
capture coverage images once the story has
been published and upload them here under
Coverage Images.
09
09 Add notes to the story for other users to view.
10
10 Add keywords to a story which will then be
Please review notes before you send out a story in
case there are any important notes you may need
to consider.
searchable for all users, hit save.
11 Send the story to yourself or a leader. Further
details on how to do this can be seen on page 14.
13
Send to myself or a leader
01 Select a synopsis. You can use the default
option, or create your own summary of the story.
This will automatically save for all users to use.
01
02
02 Edit - Allows you to edit the default synopsis.
03 Enter your name and email address
03
04
05
04 Preview and confirm allows you to view the
email and send the story to yourself.
05 The four panels here allow you to refer back to
the original story information, before and after
photos and also view the promotion history of
the story
Note:
Under no circumstances should a story be sent straight
to media from this page. Please only send the story to
yourself or a leader from here.
Once you have sent the story on to media from your
email, please record this on the view story page.
Details on how to do this are on page 13 (instructions
04 and 05).
14
Add to Basket
01 Add a selection of stories to your basket via the
view option (page 10) or highlighting the basket
(page 9).
02 The Basket page shows all stories added to
the basket.
03 You can distribute/send these stories to yourself
via this button. This will send the recipient a link
to the system where the recipient can look at
the story information in further detail.
01
02
15
03
Reports
The reports page can be accessed via the Reports
button on the toolbar.
01 Select your report criteria from the selections
provided.
01
02 The generate report button generates a CSV
file containing summary information based
on the criteria you entered on the form. This
is generally the total number of submissions,
number of stories sent to media and the number
published.
03 The download button will only appear after you
have pressed generate report. Please select
this to download your report.
02
04 The export stories button generates a CSV file
containing all data from all stories.
03
04
05
16
05 The abandoned survey statistics shows the
number of incomplete submissions by members
on the front-end. As all data is tracked from one
step to the next, this enables identification if a
member started a survey and didn’t finish it.
Help
User guides will be available to download from this page, please refer to these for help with using the system and for details on PR
etiquette and using Success Stories in the correct manner.
For more information, please visit the Success Story section of LINK Online or the Help button on the Success Story database. For any
other queries, please speak to the PR team on 07900 494736 or email [email protected]
17