1
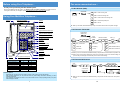
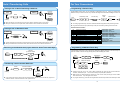
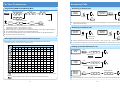
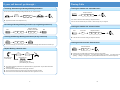
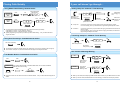
Hard of Hearing Options Volume Controls You can increase the volume of the ringing by pressing the VOL.S button while your phone is ringing or when the phone is idle by pressing SPK and dialling 829. Ensure your phone is set to RING mode. See Answering an Intercom Call in this guide. You can increase the volume of the handset earpiece by pressing the VOL.S button when the handset is off hook. There are three volume settings (Low - Med - High). Intelligent Hybrid System Visual indications The indicator lamp at the top corner of the XN120 Vision and Talk phone will flash RED to indicate various call types: • Intercom Call. Your phone is ringing, the CALL key is flashing red and the display will show FROM and the callers name/number. • Outside Call. Your phone is ringing, the display may show the callers name/number or RINGING. • Message Waiting. See Message Waiting in this guide. • You may have a new Voice Mail Message. See the separate Voice Mail and Voice Response System User Guide. The LCD display of the XN120 Vision phone will show the callers name and number for internal calls and also where available for outside calls. Hearing Aid Compatibility The earpiece within the handset of the XN120 Vision and Talk handset has a built in inductive coupler and is compatible with hearing aids that have the ‘T’ setting. Additional Options The ringing tone/pitch can not be changed on the XN120 Vision or Talk phones. Consult the system supplier/installer for additional volume settings or equipment that may help. In the European Union The symbol depicted here has been affixed to your product in order to inform you that electrical and electronic products should never be disposed of as municipal waste. Electrical and electronic products including the cables, plugs and accessories should be disposed of separately in order to allow proper treatment, recovery and recycling. These products should be taken to a designated facility where the best available treatment, recovery and recycling techniques are available. Separate disposal has significant advantages: valuable materials can be re-used and it prevents the dispersion of unwanted substances into the municipal waste stream. This contributes to the protection of human health and the environment. Please be informed that a fine may be imposed for illegal disposal of electrical and electronic products via the general municipal waste stream. In order to facilitate separate disposal and environmentally sound recycling, NEC Infrontia has made arrangements for local recycling in all member states of the European Union. In case your electrical and electronic products need to be disposed of please refer to the contractual agreements that your company has made upon acquisition of these products. Should this information not be available, please contact us at [email protected]. For countries outside the European Union Disposal of electrical and electronic products in countries outside the European Union should be done in line with local regulations. If no arrangement has been made with NEC Infrontia or your supplier, please contact the local authorities for further information. Regulatory Notice. Refer to the Getting Started Guide (991409-5) supplied with the XN120 Main Unit for the Declaration of Conformity related to the product. Nothing contained in this manual shall be deemed to be, and this manual does not constitute, a warranty of, or representation with respect to, any of the equipment covered. This manual is subject to change without notice and NEC Infrontia Ltd has no obligation to provide any updates or corrections to this manual. Further, NEC Infrontia Ltd also reserves the right, without prior notice, to make changes in equipment design or components as it deems appropriate. No representation is made that this manual is complete or accurate in all respects and NEC Infrontia Ltd shall not be liable for any errors or omissions. In no event shall NEC Infrontia Ltd be liable for any incidental or consequential damages in connection with the use of this manual. This document contains proprietary information that is protected by copyright. All rights are reserved. No part of this document may be photocopied or reproduced without prior written consent of NEC Infrontia Ltd. Copyright © 2004 by NEC Infrontia Ltd All Rights Reserved. www.neci.co.uk Issue 1.5 October 2006 991405-5 XN120 Vision and XN120 Talk Telephone User Guide Before using Your Telephone… For more convenient use… Thank you for purchasing the NEC XN120 system. Due to the flexibility built into the system, your Dialling Codes and Feature Capacities may differ from those in this guide. Check with your Supplier / System Administrator and make a note of any differences. Alphanumeric Display DND/CONF (On-Hook) Using Your Multiline Telephone… Handset Do Not Disturb (DND) Indicator CHECK Key 1 DND : Trunk Incoming Call 2 DND : Intercom Incoming Call 3 DND : Trunk & Intercom Incoming Call 4 DND : Transferred (CFW) Call 0 DND : Cancel When you set DND, the DND/CONF Key’s lamp is lit and the Internal Dial Tone pattern changes. CLEAR Key Programmable Function Keys Call Forward / Follow Me Call Forward (Select) Key LND (Last Number Dial) Key OPAC (Operation Access) Key DC (Dial Control) Key (SC.851+16) CFW Condition CALL 8 CALL Key 8 8 Extension Number ? ? ? CFW Type ? SPK ? FLASH Key TRFR (Transfer) Key 2 Busy / No Answer 6 No Answer 2 FWD All Calls SPK (Speaker) Key 3 Follow Me 7 Dual Ring 3 FWD Outside Calls only 4 Immediate 0 Cancel 4 FWD Intercom Calls only DND/CONF Key (Do Not Disturb / Conference) HOLD Key Speaker VOL (Volume Control) Key Functions XN120 Vision XN120 Talk Programmable Keys Additional Prg. Keys Display CHECK/CLEAR Keys Handsfree Accept DLS Console Wall Mount Kit 12 10 Yes Yes Yes Yes Yes (Built-in) 12 10 No No No (Talkback) No Yes (Built-in) Microphone When you set a Call Forward, the DND/CONF Key’s lamp flashes and Internal Dial Tone pattern changes. MIC (Microphone) Key When using a Call Forward (Select) Key, press the key and wait to cancel a Call Forward setting, then press the key and wait again to restore the previous Call Forward setting. Dial Keys Handsfree Options - Call Forward Off-Premise Telephone Number CALL 7 1 3 Call Forward (Device) Key 6 0 To Cancel ? ? ? HOLD ? SPK (SC.851+17) Handsfree lets you place and answer calls by pressing “SPK” instead of using the handset. With Automatic Handsfree, you can press the CALL Key without lifting the handset. Normally, you have Automatic Handsfree. Use Handsfree Answerback to answer a voice-announced Intercom call by speaking toward your phone without lifting the handset. 1 When you set a Call Forward, the DND/CONF Key’s lamp flashes and the Internal Dial Tone pattern changes. 10 Hold / Transferring Calls For Your Convenience Placing a Call on Hold / Retrieving a Held Call Hold Programming a Function Key Trunk Key Retrieve Programmable Function Keys can be assigned as Appearance Keys (e.g. Trunks) or General Keys (e.g. DSS/One-Touch). Press the Function Key to activate the assigned function without dialling the Service Code. (Flashing) HOLD CALL General Key Code CALL 8 (Talking) 5 Service Code Function Key ? 1 Additional Data ? SPK ? (Flashing) When an Intercom call is placed on hold, the call is held as “Exclusive Hold” on your phone. While your outside call is on System Hold, other extension users can take the call off Hold. An existing Appearance Key cannot be overwritten without the Appearance Key first being erased. Programmable Function Keys (General Key Code) can be erased by entering Service Code 00. Common Service Codes: Placing a Call on Exclusive Hold Hold Trunk Key Retrieve (Flashing) Exclusive Hold Key CALL (SC.851+45) (Talking) (Flashing) System programming is required to use Exclusive Hold. Ask your NEC Authorised Supplier for details. While your outside call is on Exclusive Hold, other extension users can not take the call off Hold. Retrieving a Held Outside Call (if your extension doesn’t have trunk keys) 7 7 2 ? DSS/One-Touch Key DND Key Background Music (ON/OFF) Headset Key Incoming Caller ID List External Zone Paging External All Call Paging Internal Zone Paging Internal All Call Paging Abbreviated Dial – Common/Personal Abbreviated Dial – Group Directory Dialling 10 11 12 13 14 15 16 17 29 30 31 Call Forward – Immediate Call Forward – Busy Call Forward – No Answer Call Forward – Busy/No Answer Call Forward – Dual Ring Call Forward – Follow Me Call Forward – Select Option Call Forward – Device Repeat Redial Saved Number Redial Memo Dial Programming a DSS/One-Touch Key Programmable Function Keys can be assigned as DSS (Direct Station Selection) or One-Touch Keys. You can place an Outside or Intercom call by pressing this key without dialling the number. Trunk No. you want to retrieve CALL 01 03 04 05 08 19 20 21 22 27 28 85 ? Function Key CALL TRFR 8 5 0 1 1 (To answer own held Trunk) Trunk 9 Transferring a Call to another Extension Telephone Number ? HOLD SPK ? Extension Number HOLD Extension Number ? ? ? ? ? ? (Talking) (Announce) TRFR If your phone has a DSS or One-Touch key for the extension user who is to receive the call, just press it instead of “HOLD + Extension Number” in the operation above. 9 Function Keys with one or two colour LEDs programmed as DSS keys will provide extension status indication, Idle=Off, Busy=lit. This is known as Busy Lamp Field (BLF) indication. When storing an outside telephone number, the Trunk Access Code (normally 9) must be added to the start of the number. Up to 36 digits can be stored. To program another key, press the next Programmable Function Key instead of the SPK Key to finish. 2 For Your Convenience Answering Calls Answering an Outside Call Programming Abbreviated Dialling Bins (Common/Personal Abbv.) CALL 8 5 Telephone Number Bin No. 3 ? ? ? ? Ringing Extension ? (Group Abbv.) 8 5 (Ringing) 4 Name (12 characters) HOLD Non-Ringing Extension ? HOLD SPK Trunk Key (Flashing) SPK SPK Confirm status of the MIC Key if you want to answer Handsfree [MIC On = Light On, MIC Off = Light Off]. (XN120 Vision Phones Only) ? Common/Personal Abbreviated Dialling Bins are numbered as follows (by default): 2-digit dialling: Common = 00-79, Personal = 80-99, or 3-digit dialling: Common = 000-899, Personal = 990-919. Answering an Intercom Call System programming is required to allow Group Abbreviated Dialling. Ask your NEC Authorised Supplier. Up to 36 digits dialling can be stored in each abbreviated dialling bin. To clear an abbreviated dialling bin (number & name), press the “CLEAR” key after dialling the Bin No.. Voice Mode Extension Applicable to XN120 Vision Phones only. Ring Mode Extension (Voice) (Ringing) Speak toward your phone Entering a Name into an Abbreviated Dialling Bin Intercom Call Mode can be set at your phone as follows: “Ring” = CALL + 823, When entering a name, use the Dial Pad Keys on your telephone to enter letters as shown below. For example, press the “2” key once for “A”, twice for “B”, etc… 2 3 4 5 6 7 8 9 1 1 @ [ ¥ ] ^ _ ‘ { 2 A B C a b c 2 3 D E F d e f 3 4 G H I g h i 4 5 J K L j k l 5 6 M N O m n o 6 7 P Q R S p q r 8 T U V t u v 8 9 W X Y Z w x 0 0 ! “ # $ + , - . # DND/CONF 10 11 12 “Voice” = CALL + 821. Confirm status of the MIC Key if you want to answer Handsfree [MIC On = Light On, MIC Off = Light Off]. Number of Key Presses 1 SPK 13 Picking up another Extension’s Call } In same Group CALL 8 6 7 6 9 Call Pickup Key (SC.851+24) In other Groups s 7 y z 9 % & ‘ ( ) / : ; < = CALL 8 Call Pickup for other Group Key (SC.851+25) > ? Accepts a character and move the cursor one place to the right. Press twice to insert a “space”. Clear the character entry to the left, one character at a time (Backspace Key). 3 Pickup for Specified Extension Extension Number CALL 7 1 5 ? ? ? System programming is required to allow Group Call Pickup. Ask your NEC Authorised Supplier for details. 8 If your call doesn’t go through… Placing Calls Checking & Answering a Message Waiting Indication Placing an Outside Call <Quick Access> You can check who left a message waiting indication for you, and then answer. Telephone Number Trunk Key CHECK VOL 8 4 ? 1 ? ? ? (Check Name) (On-Hook) Listen for Dial Tone before dialling a Telephone Number. Applicable to XN120 Vision Telephones only. You can have function keys for Trunks or Trunk Groups. Ask your Supplier. Cancelling a Message Waiting Indication (at originating extension) Placing an Outside Call <Access Code> Extension Number you want to cancel MW CALL 8 7 1 ? ? SPK ? Clearing All Message Waiting Indications (at any extension) CALL CALL Trunk Code Telephone Number ? 9 ? ? ? Listen for Dial Tone before dialling the Telephone Number. SPK 8 7 3 Placing an Intercom Call <Dial Access> Clears all messages you have left for other extensions and messages other extension have left for you. CALL Repeat Dialling <Outside Call> DC Extension Number ? LND ? ? Pressing CALL key after dialling an extension number is also possible. Your call will ring or voice-announce. If you hear ringing, wait for an answer. If you hear a beep, begin speaking. Dialling “1” changes voice/ring mode (where the destination is an XN120 Telephone). (Hear Busy Tone or No answer) Repeat Dial Key (SC.851+29) [Flashes red when set.] [Press flashing key to cancel.] The system periodically redials the call. Repeat duration is programmable. Ask your NEC Authorised Supplier for details. You should lift the handset when the called party answered. You can cancel this function by pressing “DC” and “LND” during idle condition. Does not reserve line. Will select other available line when original line is in use. 7 4 Placing Calls Quickly If your call doesn’t go through… Using Abbreviated Dialling <Outside Calls> Common /Personal Abbv. CALL Common/Personal Abbv. Bin No. DC ? ? 8 ? Group Abbv. Bin No. CALL Group Abbv. Setting Camp On / Callback / Trunk Queuing 8 1 4 ? ? (Hear Busy Tone, No Answer, or Trunk Unavailable) 5 0 Camp On Key <Camp On> Wait without hanging up <Callback> Wait for the system to call you back (SC.851+35) [Lit Red when set] ? Group Abbv. Key <Camp On> For Intercom Call, when you hear ringing, wait for the called party to answer. For Trunk Queuing, when you hear Dial Tone, begin dialling the telephone number. <Callback> For Intercom Call, when your phone starts the ringing, lift handset and wait for the called party to answer. For Trunk Queuing, when your phone starts the ringing, lift handset, hear Dial Tone and begin dialling the telephone number. (SC.851+28) Common/Personal Abbreviated Dialling Bins are numbered as follows (by default): 2-digit dialling: Common = 00-79, Personal = 80-99, or 3-digit dialling: Common = 000-899, Personal = 900-919. System programming is required to provide Group Abbreviated Dialling. Supplier for details. Ask your NEC Authorised Cancelling Camp On / Callback / Trunk Queuing Using One-Touch Keys <Outside/Intercom Calls> 8 One-Touch / DSS Key 7 0 When Camp On set Camp On Key Or press the Camp On Key (SC.851+35) The Telephone / Extension Number shall be pre-registered to a One-Touch / DSS Key (refer to Page 2). Trunk Access Code (Dial “0”) should be added as the first digit of the Telephone Number. Set / Answer a Message Waiting Last Number Redial < Outside/Intercom Calls> Set 8 CALL Hear Intercom Busy Tone or No Answer Redial List 4 1 LND The system retains the last 10 numbers dialled which can be viewed and dialled. (XN120 Vision Phones Only) LND VOL Answer Your phone’s Indicator is flashing in Red MW Key (SC.851+38) 8 4 1 MW Key (On-Hook) (Find desired number) (SC.851+38) Intercom numbers can also be stored under Last Number Redial. details. 5 Ask your NEC Authorised Supplier for When you set a MW, the called party’s MW Indicator starts to flash, and your MW Indicator is lit Red. When you answer a MW, the MW Indicator will automatically go off when the called party answers. 6