1
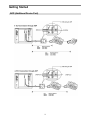
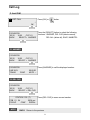
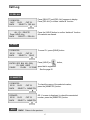
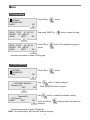
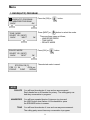
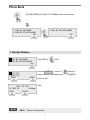
Important Safety Information
3
Important Safety Information
4
Important Safety Information
5
Table of Contents
Getting Started
LDP-7000 Series Model 7016D & 7024D
Input / Output Devices and Button
Cable Connection
ADP (Additional Device Port)
8
8
9
11
12
Placing or answering a call
1. Placing a call
2. Answering a call
14
14
14
3 Soft Button & Navigation Button
15
Basic Function
1. Idle
1.1 Pickup
1.2 Conference
1.3 Redial
2. Off Hook
3. Intercom Dialing
4. Intercom Ring Back
5. Intercom Busy
6. Intercom Do Not Disturb
7. Intercom Dialing Error
8. Intercom Receiving
9. Intercom Talk
10. CO Line Busy
11. CO Dialing / CO Talk
12. Checking messages
13.Paging
16
16
16
17
18
18
18
19
19
19
19
19
20
20
20
21
21
Call Log
1. Received Call
2. Dialed Call
3. Lost Call
3.1 Answer
3.2 Del Cur (Delete Current)
3.3 Del All (Delete All)
3.4 Save
3.5 Name/Tel
22
22
23
24
24
24
25
25
25
6
Table of Contents
Menu
1. Basic Program
1.1 Station name program
1.2 Ring program
1.2.1 Select Ring
1.2.2 Select melody
1.3 Mode (H/T/P) Program
1.4 Password Program
1.4.1 Password Register
1.4.2 Password Change
1.5 Language Program
1.6 ENBLOCK Mode Program
2. Advanced Program
2.1 Wake up Program
2.1.1 Setting
2.1.2 Canceling
2.2 Pre-selected MSG PGM
2.2.1 Select the MSG PGM
2.2.2 Canceling/ Changing
2.3 Station COS Program
2.3.1 COS Down Mode
2.3.2 Restoring COS Mode
2.3.3 Walking COS Mode
2.4 SPK/Headset Program
2.5 EAR MIC Program
3. Speed Program
4. Mobile Extension PGM
4.1 Mobile-EXT. NUM PGM
4.2 Mobile-EXT Enable
5. Conference Room PGM
5.1 Create CONF Room
5.2 Delete CONF Room
6. Hot Desk Program
6.1 Hot Desk Log in
6.2 Hot Desk Log out
26
27
27
28
29
29
30
31
31
32
33
33
34
34
34
35
36
36
37
38
38
39
40
41
41
42
43
43
43
44
44
44
45
45
46
Phone Book
1. Dial By ICM Name
2. Dial By STA SPD name
3. Dial By SYS SPD Name
47
47
48
48
Entering characters
49
Glossary of Terms
50
7
Getting Started
LDP-7000 Series, Model 7016D & 7024D
LDP-7016D/7024D are advanced, user-friendly digital keysets, offering the convenience
of 3 soft buttons and a navigation key.
• Features
-.Trendy and Stylish LDP Family design
-.Multi Level 3 Line LCD (3 x 24)
-.16 or 24 Flexible buttons with dual-color LED’s
-.Additional Device Port (ADP) for SLT or FAX
-.Call Log Feature
-.Call Recording Feature – 7024D only (Optional USB Module).
-.Hands-Free Solution – 7024D only (Optional Blue- Tooth Module).
-.Wall Mountable (Bracket Optional)
LDP-7016D
LDP-7024D
8
Getting Started
Input / Output Devices and Buttons
1
2
8
9
10
3
4
5
11
12
13
6
7
14
15
16
17
1
Handset
10
Visual Ring LED
2
11
Trans/Pgm Button
3
Headphone
(Ear/Mic Mode)
Speaker
12
Flexible Button (Loop Button)
4
Speed Button
13
Call back Button
5
Dnd/Fwd Button
14
Volume Button
6
Speaker Button
15
Handsfree Microphone
7
Hold/Save Button
16
Menu Button
8
3 Soft Button
17
Phonebook Button
(Same operate as ‘Speed’)
9
LCD Display
9
Getting Started
1
Handset
2
Headphone Socket
3
Speaker
4
Speed Button
Used to access speed dialing, speed programming, save number redial,
and last number redial.
5
Dnd/Fwd Button
The DND (Do Not Disturb) feature blocks all incoming calls. When DND
is active, the red LED in this button is illuminated.
Used for handset call.
Used to connect optional headset to the phone.
Outputs tones and voice.
It is also used to activate call forward, e.g. to another station or
voicemail. When call forward is activated, the red LED flashes.
6
Speaker Button
7
Hold/Save Button
8
3 Soft Buttons
Used in conjunction with fixed and flexible features, and the function
changes in relation to call progress, as indicated on the LCD display.
9
LCD Display
Displays information about telephone status, dialing directories,and test
message information.
10
Visual Ringing LED
11
Trans/PGM Button
12
Flexible Button
13
Call back Button
14
Volume Button
15
Handsfree
Microphone
16
Menu Button
The menu button is used to move to the desired option(Dial, MSG,
Program), and to select the next screen when indicated by an arrow on
the LCD display.
17
Phonebook Button
Used to access speed dialing, save number redial, and last number
redial, and to access flexible button programming.
Speaker toggles the speakerphone state, and the red LED is
illuminated when the speakerphone is active.
This button is used to put a call on hold or save information when
programming.
Illuminates when the phone is ringing.
This button is used to initiate a call transfer (TRS) or to enter
programming mode (PGM)
Some flexible buttons are pre-programmed in the system for line
appearances, loop functions etc. The remaining flexible buttons can be
user-programmed.
A station can initiate a call back request to a busy station. Once that
station becomes idle, the initiating station is signaled.
The volume button adjusts the audio levels for ringing, handset and
speakerphone functions.
Microphone is used for hands-free speakerphone function.
10
Getting Started
Cable Connection
C
B
A
Cable connections
A - Connect the telephone cord (curly cord) to the handset and the other end to the
handset jack at the bottom of the telephone.
B - Connect the line cable to the port at the bottom of telephone and the other end to the
wall socket.
C - Connect the Headphone to the headphone jack on the left side of the telephone.
(As viewed from the front.)
11
Getting Started
ADP (Additional Device Port)
12
Getting Started
ADP (Additional Device Port)
13
Getting Started
1. Placing a Call
ICM Line
▶
or
Lift handset
▶
talk
Enter the extension number
CO Line
Dial 9 or select
▶ CO line flexible
button.
or
Lift handset
▶
▶
talk
Enter the desired phone number
2. Answering an Outside Call
ICM Line
or
▶
or
▶
talk
Lift handset
CO Line
Press flashing
CO line button or
loop key.
Lift handset
14
▶
talk
3 Soft Buttons & Navigation Button
3 Soft Button
The 3 Soft Buttons are located on the bottom of the LCD display. The function of each button
changes, subject to call status and progress. The current functions are displayed on the LCD
screen, directly above each button. For example, if the user calls a busy extension, busy tone will
be heard and the busy status displayed. The LCD screen will display the busy message along with
the different options available - “Message Wait”, “Camp-On” and “Flash”. By pressing the relevant
button the desired feature is activated.
※ Note : In the descriptions following, the symbol ₪ indicates that the same LCD display icon
changes (or toggles) on activation.
BUSY : STA 100
[CALLBK] CAMP(*)
STEP
MSG
CAMP-ON
FLASH
Navigation Button
In some instances, more than 3 current functions are available to the user, and this is indicated by
the appearance of a left (I) or right (J) arrow in the LCD screen, (see below). By pressing the
navigation key (located below the volume button), in the direction corresponding to the arrow, any
additional functions will be displayed.
STATION 100 (T)
FEB 01 04
05:34 pm
FWD
CONF
REDIAL →
STATION 100 (T)
FEB 01 04
05:34 pm
← ICM
15
Basic Function
By pressing one of the 3 soft buttons you are able to select the indicated function. For instance, if
you want to select call pickup (as shown below), press the first button on the left. If there are more
than three functions available at any point, an arrow will be displayed on the LCD display. Use the
navigation key to move the next or previous screen to display additional functions.
1. Idle
3 Soft Buttons are located below the LCD display.
STATION 100 (T)
FEB 01 04
05:34 pm
PICKUP
CONF
REDIAL
PICKUP : press to pickup a call ringing within the same pickup
group.
CONF : press to initiate & activate a conference.
REDIAL : press to redial last number called.
1.1 Pickup
A station can pickup a call ringing to an unattended station within the same pickup group by using
the pickup procedure.
* Refer to Aria IP system & Aria system programming manual.
STATION 100 (T)
FEB 01 04
05:34 pm
PICKUP
CONF
REDIAL
Press [PICKUP] button.
CALL TO STA 104
FROM 100
TRANS
CONF
Talk
05:37pm
MUTE
16
Basic Function
1.2 Conference
CALL TO STA 100
FEB 01 04
MSG
FLASH
CALL TO STA 100
FEB 01 04
TRANS
CONF
05:34 pm
Dial the desired station number.
(e.g.100)
Station 100 answers the call.
Press [CONF] button.
05:34 pm
MUTE
CONFERENCE
FEB 01 04
05:34 pm
FWD
CONF
REDIAL →
Dial the phone number of the next desired station.
(e.g.104)
CALL TO STA 104
FEB 01 04
MSG
FLASH
Station 104 answers the call.
CALL TO STA 104
FEB 01 04
TRANS
CONF
05:34pm
Press the [CONF] button twice.
05:34 pm
MUTE
CONFERENCE
FEB 01 04
05:34 pm
CONF
MUTE
A 3-party conference is now established.
17
Basic Function
1.3 Redial
STATION 100 (T)
FEB 01 04
05:34 pm
PICKUP
CONF
REDIAL
Press the [REDIAL] button.
>123456789
Press the [NEXT] button and repeat until the Desired
number appears, then press [SEND] button to call.
BACK
NEXT
123456789
LINE 008
TRANS
SEND
Talk
00:00:10
CONF MUTE →
2. Off Hook
FWD
: Press the [FWD] button to forward calls to another
STATION 100 (T)
station, Voicemail etc.
FEB 01 04
05:34 pm CONF : Press the [CONF] button to initiate a conference call.
FWD
CONF
REDIAL→ REDIAL : Press the [REDIAL] button to call last number dialed.
STATION 100 (T)
FEB 01 04
05:34 pm
← ICM
ICM
: If, while on a call, ICM call is received, press the [ICM]
button to place 1st call on hold and answer 2nd call.
3. Intercom Dialing
STATION 100 (T)
FEB 01 04
05:34 pm
FLASH
FLASH : If you wish to terminate an ICM call and make another
call, press [FLASH] to re-seize dial tone.
18
Basic Function
4. Intercom Ring Back
CALL TO STA 100
FEB 01 04
MSG
FLASH
05:34 pm
MSG
FLASH
: Press to leave a your station number or message.
: Press to disconnect the line and re-seize.
5. Intercom Busy
BUSY : STA 100
[CALLBK]
CAMP ( * ) STEP
MSG
CAMP-ON
FLASH
MSG
: Press to leave your station number or message.
CAMP-ON : Press to send a call waiting tone to a busy station
(indicating that they have a call waiting).
FLASH
: Press to disconnect the line and re-seize.
6. Intercom Do Not Disturb
DO NOT DISTURB STA 100
CALLBK
CALLBK : Press leave a call back request or message.
FLASH : Press to disconnect the line and re-seize.
FLASH
7. Intercom Dialing Error
INVALID
FEB 01 04
FLASH
FLASH
: Press to disconnect the line and re-seize.
DND
: press to block all incoming calls. (Do Not Disturb)
05:34 pm
8. Intercom Receiving
CALL FROM STA 104
FEB 01 04
05:34 pm
DND
19
Basic Function
9. Intercom Talk
CALL FROM STA 104
FEB 01 04
05:34 pm
TRANS
CONF
MUTE
TRANS : Press to transfer an incoming call to another station.
CONF : Press to initiate a conference call.
MUTE : Press to mute the handset, speakerphone, or headset
microphone. Press the [SPEAK] button to re- activate
microphone.
10. CO Line Busy
CO LINE 001 BUSY
QUEUING ([CALLBK])
CALLBK
CALLBK : If, after dialing ‘9’ for a CO line, busy tone indicates
no lines are available, press [CALLBK] to reserve a CO
line.
11. CO Dialing/CO Talk
123456789
LINE 125
TRANS
CONF
123456789
LINE 125
← RECORD FLASH
00:00:03
MUTE →
00:00:03
ACNR
TRANS : Press to transfer an incoming call to another station.
CONF : Press to initiate a conference call.
MUTE : Press to mute the handset, speakerphone, or headset
microphone. Press the [SPEAK] button to re- activate
microphone.
RECORD : Press to record the current conversation. (if fitted)
FLASH : Press to disconnect the line and re-seize.
ACNR
: Press to set automatic called number redial.
20
Basic Function
12. Checking messages
VMIB MSG FROM EXTERNAL
NEXT
REPEAT DELETE →
VMIB MSG FROM EXTERNAL
← ADD
REWIND
CALLBK
NEXT
: Press to move to the next message.
REPEAT : Press to repeat the current message.
DELETE : Press to erase the current message.
ADD
: press to tag the current message with your comment
before forwarding. Record your comments & then dial
the required station number to complete the transfer.
REWIND : press momentarily to repeat part of current message.
CALLBK : press to leave a call back request.
13. Paging
MEET ME : press to answer a paging request.
PAGE FROM STA 103
20 AUG 04
11:51am
MEET ME
21
Call Log
Call Log Button PGM : PGM + Flexible + PGM ’57’
Press the [Call Log] button.
1 RECEIVED CALL
1.
2. DIALED CALL
RECEIVED CALL : Received call list *
DIALED CALL
: Dialed call list
OK
1 LOST CALL
3.
LOST CALL : Missed call list*
∧
* CLI (Calling Line ID) mandatory.
OK
1. Received Call
1 RECEIVED CALL
1.
2. DIALED CALL
Press [OK] or
button.
Press [OK] or
button.
OK
123456789
02/01 09:02
BACK
OK
123456789
LINE 125
TRANS
CONF
NOTE
BACK
00:00:03
MUTE →
Return to the previous
22
Call Log
2. Dialed Call
1. RECEIVED CALL
2.
2 DIALED CALL
Press [OK] or
button.
Press [OK] or
button.
OK
123456789
02/01 09:02
BACK
OK
123456789
LINE 125
TRANS
CONF
NOTE
BACK
00:00:03
MUTE →
Return to the previous
23
Call Log
3. Lost Call
3. LOST CALL
Press [OK] or
button.
∧
OK
0123456789
03/10
16:02
CNT :01
BACK
SELECT> ANSWER
Press the [SELECT] button to select the following
functions : ANSWER, DEL CUR (delete current),
DEL ALL (delete all), SAVE, NAME/TEL
3.1 ANSWER
0123456789
03/10
16:02
CNT :01
BACK
SELECT > ANSWER
0123456789
LINE XXX
TRANS
CONF
Press [ANSWER] to call the displayed number.
00:00:03
MUTE →
3.2 DEL CUR
0123456789
03/10
16:02
CNT :01
BACK
SELECT > DEL CUR
STATION 100 (T)
FEB 01 04
05:34 pm
PICKUP
CONF
REDIAL
NOTE
BACK
Press [DEL CUR] to erase current number.
Return to the previous
24
Call Log
3.3 DEL ALL
0123456789
14/07
16:02
CNT :01
BACK
SELECT > DEL ALL
Press [SELECT] until [DEL ALL] appears in display.
Press [DEL ALL] to initiate ‘delete all’ function.
ALL CLI DELETE
Press HOLD Key
BACK
SELECT > DEL ALL
Press the [HOLD] button to confirm ‘delete all’ function.
All numbers are erased.
3.4 SAVE
0123456789
03/10
16:02
CNT :01
BACK
SELECT > SAVE
To save CLI, press [SAVE] button.
Press [HOLD] or
button,
ENTER SPD BIN NO (000)
CLI MSG USED
speed dial is registered.
PAUSE
FLASH
D-TONE
※ See the page 42.
3.5 NAME/TEL
0123456789
To check the name of the selected number,
03/10
16:02
CNT :01
press the [NAME/TEL] button.
BACK
SELECT > NAME/TEL
OR if a name is displayed, to check the associated
EDWARD
number, press the [NAME/TEL] button.
03/10
16:02
CNT :01
BACK
SELECT > NAME/TEL
NOTE
BACK
Return to the previous
25
Menu
1. BASIC PROGRAM
2. ADVANCED PROGRAM
OK
Press the [Menu] button.
1. BASIC PROGRAM
2.
2 ADVANCED PROGRAM
OK
Press the [Navigation] button.
3. SPEED PROGRAM
4. MOBILE EXTENSION PGM
OK
Press the [Navigation] button.
3. SPEED PROGRAM
4.
4 MOBILE EXTENSION PGM
OK
Press the [Navigation] button.
5. CONFERENCE ROOM PGM
6. HOT DESK PROGRAM
OK
Press the [Navigation] button.
5. CONFERENCE ROMM PGM
6 HOT DESK PROGRAM
6.
∧
OK
Press the [Navigation] button.
NOTE
BACK
Return to the previous
※ CONFERENCE ROOM is not available in Aria-24ip.
26
Menu
1. BASIC PROGRAM
1. BASIC PROGRAM
2. ADVANCED PROGRAM
OK
Press the [MENU] button.
Press [OK] or
button.
1.1 STATION NAME PROGRAM
1. STATION NAME PROGRAM
2. RING PROGRAM
BACK
OK
Press [OK] or
button.
Enter the name.
ENTER
BACK
NAME ( )
OK
※ For detailed information about entering
name, see the page 49.
27
Menu
1.2 RING PROGRAM
1. STATION NAME PROGRAM
12. RING PROGRAM
BACK
OK
Press [OK] or
button.
1. ICM RING
2. ICM MELODY
BACK
OK
1. ICM RING
2 ICM MELODY
2.
BACK
OK
3. CO RING
4. CO MELODY
BACK
∧
OK
3. CO RING
4 CO MELODY
4.
BACK
∧
OK
Press [Navigation] button.
Press [Navigation] button.
Press [Navigation] button.
Press [Navigation] button.
28
Menu
1.2.1 Select Ring
1 ICM RING
1.
2. ICM MELODY
BACK
Press [OK] or
button.
OK
RING TYPE : 01 (01-15)
SELECT BY [NEXT]
BACK
NEXT
OK
Step using [NEXT] or
RING TYPE : 02 (01-15)
SELECT BY [NEXT]
BACK
NEXT
OK
Press [OK] or
button to select the ring.
button. The selected ring type is
saved.
※ Use same procedure to select CO Ring type.
1.2.2 Select Melody
1. ICM RING
1 ICM MELODY
2.
BACK
Press [OK] or
button.
OK
Use
button to select category.
CATEGORY SEARCH
← Pleasure (10)
→
EXIT
OK ※ Press the [EXIT] button to cancel.
Pleasure(10)
← [01] Cancan
BACK
EXIT
Use
→
OK
button to select the desired melody.
Press the [OK] or
changed.
※ Use same procedure to select CO Melody.
Note : To set the melody, MFU and MU board is required.
29
button and then the melody is
Menu
1.3 MODE(H/T/P) PROGRAM
13. MODE(H/T/P) PROGRAM
4. PASSWORD PROGRAM
BACK
OK
TONE MODE
SELECT BY [NEXT]
BACK
NEXT
PRIVATE MODE
SELECT BY [NEXT]
BACK
NEXT
Press the [OK] or
Press [NEXT] or
OK
button.
button to select the mode.
※ There are three types as follows;
-. HANDSFREE MODE
-. TONE MODE
-. PRIVATE MODE
Press [OK] or
button.
OK
STATION 100 (P)
FEB 01 04
05:34 pm
PICKUP
CONF
REDIAL
The selected mode is saved.
NOTE
PRIVATE
HANDSFREE
TONE
You will hear three bursts of tone and an announcement.
Reply hands-free or lift handset for privacy. The calling party can
hear any conversation in progress.
You will hear repeated bursts of intercom ring tone and
the HOLD button slow flashes. Lift the handset or press
the SPEAKER button to answer.
You will hear three bursts of tone and one-way announcement.
The calling party cannot hear any conversation in progress
30
Menu
1.4 PASSWORD PROGRAM
3. MODE(H/T/P) PROGRAM
1 PASSWORD PROGRAM
4.
BACK
OK
Press [OK] or
button.
1.4.1 PASSWORD REGISTER
> PASSWORD REGISTER
SELECT BY [NEXT]
BACK
NEXT
OK
Use [Next] or
password register.
button to select the
ENTER PASSWORD :
Enter password. (5 digits)
e.g.) 55555
Then press [OK] or
button.
BACK
Press [OK] or
PRESS OK KEY
BACK
OK
31
button.
Menu
1.4.2 PASSWORD CHANGE
> PASSWORD CHANGE
SELECT BY [NEXT]
BACK
NEXT
OK
Use [Next] or
change.
ENTER CURRENT PASSWORD
Enter the current password. (5 digits)
e.g.) 55555
Then press [OK] or
button to select the password
button.
BACK
Enter the new password. (5 digits)
e.g.) 33333
ENTER PASSWORD :
BACK
Press [OK] or
PRESS OK KEY
BACK
OK
32
button.
Menu
1.5 LANGUAGE PROGRAM
51. LANGUAGE PROGRAM
6. ENBLOCK MODE
∧
BACK
OK
Press [OK] or
button.
> ENGLISH
LCD LANGUAGE
BACK
NEXT
Use [NEXT] or
button to select language.
Press [OK] or
button.
> KOREAN
LCD LANGUAGE
BACK
NEXT
OK
OK
1.6 ENBLOCK MODE PROGRAM
5. LANGUAGE PROGRAM
1 ENBLOCK MODE
6.
∧
BACK
OK
ENBLOCK MODE
> OFF
BACK
NEXT
ENBLOCK MODE
> ON
BACK
NEXT
Press [OK] or
button.
Use [NEXT] or
button to select ON/OFF.
Press [OK] or
button.
OK
OK
33
Menu
2. ADVANCED PROGRAM
1. BASIC PROGRAM
1 ADVANCED PROGRAM
2.
OK
Press [MENU] button.
Press [OK] or
button.
2.1 WAKE UP PROGRAM
2.1.1 Setting
1. WAKE UP PROGRAM
2. PRESELECTED MSG PGM
BACK
OK
Press [OK] or
button.
ENTER YOUR WAKEUP TIME
HH:MM
10:10 am
BACK
ERASE
OK
Enter the time and select single time or every day.
-S:Single (once only - Default)
-C:Every Day ( # )
* Set the time : 24 hr format
• e.g. :7am = 07:00
:7pm = 19:00
ENTER YOUR WAKEUP TIME
07:00-C
10:00am
BACK
ERASE
OK
Press [OK] or
button.
Flashing [*] preceding time indicates alarm set.
STATION 100 (T)
FEB 01 04
*10:34 pm
PICKUP
CONF
REDIAL
WAKEUP RING
FEB 01 05
*07:00 am
The alarm will sound at the pre-set time.
34
Menu
2.1.2 Canceling
1. WAKE UP PROGRAM
2. PRESELECTED MSG PGM
BACK
OK
Press [OK] or
ENTER YOUR WAKEUP TIME
07 : 00-S
*10:34 pm
BACK
ERASE
OK
Press [ERASE] button.
ERASED WAKEUP TIME
07 : 00-S
*10:34 pm
BACK
ERASE
OK
Press [OK] or
35
button.
button.
Menu
2.2 PRESELECTED MSG PGM
2.2.1 Select the MSG PGM
1. WAKE UP PROGRAM
1 PRESELECTED MSG PGM
2.
BACK
OK
Press [OK] or
SELECT BY UP/DOWN KEY
Use
BACK
OUT OF OFFICE
RETURN AT TIME XX:XX
BACK
OK
button.
or
button
to select the desired type.
Press [OK] or
button.
ENTER TIME
HH:MM
BACK
Enter the time (24 hr format)
ENTER TIME
07:30 PRESS OK KEY
BACK
P.DVU
OK
Press [OK] or
OUT OF OFFICE
RETURN AT TIME 07:30
PICKUP
CONF
REDIAL
The selected message is displayed.
e.g.) 07:30 am Î enter 0730.
07:30 pm Î enter 1930.
36
button.
Menu
2.2 PRESELECTED MSG PGM
2.2.2 Canceling / Changing
1. WAKE UP PROGRAM
2. PRESELECTED MSG PGM
BACK
OK
OUT OF OFFICE
RETURN AT TIME XX:XX
BACK
ERASE
OK
SELECT BY UP/DOWN KEY
Press [OK] or
button.
Press [ERASE] button to cancel the pre-selected
message and return to the[Message select mode].
※ Press [BACK] button to return to the previous LCD
screen.
※ Press [OK] button to return to the [enter time mode].
[Message select mode]
BACK
THE PRESELECTED MESSAGE TYPE
0 0 USER CUSTOM MSG 00
0 1 LUNCH RETURN AT XX:XX
0 2 ON VACATION / RETURN AT DATE XX:XX
0 3 OUT OF OFFICE/ RERURN AT TIME XX:XX
0 4 OUT OF OFFICE/ RETURN AT DATE XX:XX
0 5 OUT OF OFFICE/ RETURN UNKNOWN
0 6 CALL TO (PHONE NO : Max. 17 digits)
0 7 IN OFFICE STA ***
0 8 IN A MEETING / RETURN AT TIME XX:XX
0 9 AT HOME
1 0 AT BRANCH OFFICE
37
Menu
2.3 STATION COS PROGRAM
1. STATION COS PROGRAM
3
4. SPK/HEADSET PROGRAM
BACK
OK
Press [OK] or
button.
※ To activate STA COS (Station Class Of Service), password is required.
2.3.1 COS DOWN MODE
> COS DOWN MODE
SELECT BY [NEXT]
BACK
NEXT
Use [NEXT] or
OK
button to select the
COS DOWN MODE.
Press [OK] or
button.
※ There are three types as follows;
-. COS DOWN MODE
-. RESTORE COS MODE
-. WALKING COS MODE
> COS DOWN MODE
ICM ONLY MODE
BACK
Press [OK] or
changed.
OK
38
button and then the mode is
Menu
2.3.2 RESTORING COS MODE
> RESTORE COS MODE
SELECT BY [NEXT]
BACK
NEXT
OK
Use [NEXT] or
button to select
the RESTORE COS MODE.
Press [OK] or
button.
ENTER CURRENT PASSWORD Enter the password (5 digits)to change
RESTORE COS MODE.
BACK
ORIGINAL COS RESTORED
PRESS OK KEY
BACK
OK
Press [OK] or
39
button.
Menu
2.3.3 WALKING COS MODE
> WALKING COS MODE
SELECT BY [NEXT]
BACK
NEXT
OK
Use [NEXT] or
COS MODE.
button to select the WALKING
Press [OK] or
button.
ENTER COS OVERRIDE CODE
Enter the COS Override code
(Password - 5 digits)
e.g.- 12345
BACK
ENTER COS OVERRIDE CODE
PRESS OK KEY
BACK
OK
Press [OK] or
40
button.
Menu
2.4 SPK/HEADSET PROGRAM
3. STATION COS PROGRAM
14. SPK/HEADSET PROGRAM
BACK
OK
Press [OK] or
SPEAKER MODE
SELECT BY [NEXT]
BACK
NEXT
Use [NEXT] or
SPEAKER MODE
SELECT BY [NEXT]
BACK
NEXT
OK
button.
button to toggle the mode.
※ There are two types as follows;
-. SPEAKER MODE
-. HEADSET MODE
Press [OK] or
button to save selected mode.
Press [OK] or
button.
OK
2.5 EAR MIC PROGRAM
15. EAR MIC PROGRAM
∧
BACK
EAR-MIC HEADSET
> ON
BACK
NEXT
EAR-MIC HEADSET
> OFF
BACK
NEXT
OK
Use [NEXT] or
button to select the ON/OFF.
OK
Press [OK] or
OK
41
button.
Menu
3. SPEED PROGRAM
3
1. SPEED PROGRAM
4. MOBILE EXTENSION PGM
OK
Press [MENU] button.
ENTER SPD BIN NO(000)
BACK
Press [OK] or
Enter the speed bin number.
e.g.)007
>
ENTER CO-BTN/DIGIT (007)
BACK
DELETE
Enter the phone number.
e.g.)123456789
>123456789
SPEED 007
BACK
Then press [OK] or
>
ENTER NAME (SPD 007)
BACK
> ABC
ENTER NAME (SPD 007)
BACK
button.
Press [DELETE] button
to delete speed bin number.
button.
OK
Enter the name.
OK
※ See page 49 for details.
Then press [OK] or
OK
42
button.
Menu
4. MOBILE EXTENSION PGM
3. SPEED PROGRAM
1 MOBILE EXTENSION PGM
4.
OK
Press [OK] or
Press [MENU] button.
button.
* Refer to Aria IP system & Aria system programming manual.
4.1 MOBILE-EXT. NUM PGM
1. MOBILE-EXT. NUM PGM
2. MOBILE-EXT. ENABLE
∧
BACK
OK
Press [OK] or
button.
> 123456789
MOBILE EXT TEL NO.
BACK
Enter the mobile number.
e.g.)2222222
OK
Press [OK] or
button.
1. MOBILE-EXT. NUM PGM
2. MOBILE-EXT. ENABLE
∧
BACK
OK
Press [OK] or
button.
MOBILE EXT. USAGE
> OFF
BACK
NEXT
Use [NEXT] or
button to toggle ON/OFF.
Press [OK] or
button.
> 2222222
MOBILE EXT TEL NO.
BACK
OK
4.2 MOBILE-EXT ENALBLE
MOBILE EXT. USAGE
> ON
BACK
NEXT
OK
OK
43
Menu
5. CONFERENCE ROOM PGM
※ CONFERENCE ROOM is not available in Aria-24ip.
1. CONFERENCE ROOM PGM
5
6. HOT DESK PROGRAM
∧
OK
Press [MENU] button.
Press [OK] or
button.
5.1 CREATE CONF ROOM
1. CREATE CONF ROOM
2. DELETE CONF ROOM
BACK
Press [OK] or
∧
OK
DIAL NO(1-9) AND PASSWD
BACK
button.
OK
Enter conference room number
and password.
e.g.) 9 + 12345
Press [OK] or
button.
1. CREATE CONF ROOM
2. DELETE CONF ROOM
∧
BACK
OK
Press [OK] or
button.
DIAL NO(1-9) AND PASSWD
Enter conference room number
and password.
e.g.) 9 + 12345
PRESS OK KEY
BACK
OK
5.2 DELETE CONF ROOM
BACK
OK
Press [OK] or
PRESS OK KEY
BACK
OK
44
button.
Menu
6. HOT DESK PROGRAM
5. CONFERENCE ROOM PGM
1 HOT DESK PROGRAM
6.
∧
OK
Press [MENU] button.
Press [OK] or
button.
* Refer to Aria IP system & Aria system programming manual.
6.1 HOT DESK LOG IN
1. HOT DESK LOG IN
2. HOT DESK LOG OUT
BACK
Press [OK] or
button.
∧
OK
DUMMY STATION 100
ENTER PASSWORD :
Enter password.(5 digits)
e.g.)55555
STATION 217 (T)
06 SEP 04
04:00pm
PICKUP
CONF
REDIAL
45
Menu
6.2 HOT DESK LOG OUT
1. HOT DESK LOG IN
2. HOT DESK LOG OUT
BACK
Press [OK] or
button.
∧
OK
AGENT LOGOUT WITH
NO FORWARD SET ?
Use
button or
button to select
forward type and then Press [OK] or
※ Forward type
- NO FORWARD SET
- FORWARD TO VMIB
- FORWARD TO NM…
- FORWARD TO SPD000
- FORWARD TO MOBILE-EXT
- FORWARD TO STA…
DUMMY STATION 222
09 SEP 04
10:43am
PICKUP
CONF
REDIAL
46
button.
Phone Book
[PHONE BOOK] and [DIAL: BY NAME] are the same feature.
1. DIAL BY ICM NAME
2. DIAL BY STA SPD NAME
OK
3. DIAL BY SYS SPD NAME
∧
OK
1. Dial By ICM Name
11. DIAL BY ICM NAME
2. DIAL BY STA SPD NAME
OK
Press [OK] or
11:CCC (105)
2:DDD (107)
BACK
Use the
button or
button to
select the desired number and press the [SEND]
SEND
CALL TO CCC
06 SEP 04
04:06pm
MSG
FLASH
NOTE
button.
BACK
button to call.
Talk.
Return to the previous
47
Phone Book
2. Dial By STA SPD Name
1. DIAL BY ICM NAME
2.
2 DIAL BY STA SPD NAME
OK
Press [OK] or
button.
To check the number of the selected name, press the
[NAME/TEL] button.
1:ABC(001)
2:DEF(002)
BACK
NAME/TEL
SEND Use the
button or
button to select
the desired number and press [SEND] button to call.
Talk.
123456789
LINE 008
TRANS
CONF
00:00:03
MUTE →
3. Dial By SYS SPD Name
Press [OK] or
3. DIAL BY SYS SPD NAME
button.
∧
OK
1. TEAM1(2000)
2. TEAM2(2001)
BACK
NAME/TEL
To check the number of the selected name, press the
[NAME/TEL] button.
SEND
Use the
button or
button to select the
desired number and press [SEND] button to call.
123456789
LINE 008
TRANS
CONF
NOTE
BACK
Talk.
00:00:03
MUTE →
Return to the previous
48
Entering characters
A
+
N
+
B
+
O
+
C
+
P
+
D
+
Q
+
E
+
R
+
F
+
S
+
G
+
T
+
H
+
U
+
I
+
V
+
J
+
W
+
K
+
X
+
L
+
Y
+
M
+
Z
+
49
Glossary of Terms
1
2
ICM Intercom – describes internal calls within the telephone system
CO Line Central Office Line – also known as a trunk line, exchange line or
outside line
3
Speed Dial A commonly used number stored in a speed bin for easy access
4
DND Do Not Disturb – the station is blocked toall incoming calls
5
FWD Forward – calls can be sent to another location such a voicemail
or another station
6
DDI or DID Direct Dial Inwards or Direct Inwards Dialing – ISDN lines can be
provided with multiple telephone numbers which are each routed
to individual stations or Hunt Groups
7
8
DKTU Digital Key Telephone Unit – an LG digital telephone
SLT Single Line Telephone – an analogue telephone
9
ISDN Integrated Services Digital Network. Digital CO lines that come in
multiples of 2 channels or more
10
VMIB Voice Message Interface Board – LG’s integral Voice Processing
card
11
CONF Conference – where you can talk to 2 or more internal or external
parties
50