1
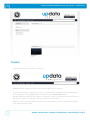
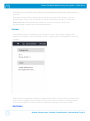
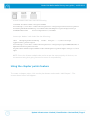
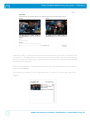
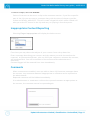
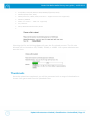
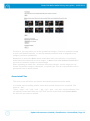
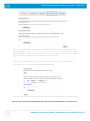
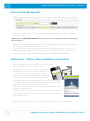
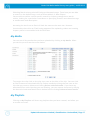
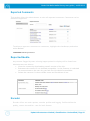
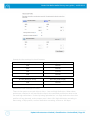
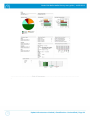
Bucks PSN Helix Media Library user guide | 16/05/2013 Bucks PSN – Helix Media Library User Guide External Updata Document Version 1.1 17th May 2013 Bucks PSN Helix Media Library user guide | 16/05/2013 Contents Introduction ............................................................................................. 3 Homepage............................................................................................... 3 Toolbar .................................................................................................. 4 Sidebar ................................................................................................ 5 Playback and Embedding .............................................................................. 6 Copy URL ................................................................................................ 7 Copy Code ............................................................................................... 7 Using the chapter points feature ................................................................... 9 Inappropriate Content Reporting .................................................................. 11 Comments.............................................................................................. 11 Adding Media ........................................................................................... 12 File Selection .......................................................................................... 12 Thumbnails ............................................................................................ 13 Associated Files ...................................................................................... 14 User Content Management ........................................................................... 16 Mobile Sites – iPhone, iPad, BlackBerry and Android ............................................. 16 My Media ............................................................................................... 17 My Playlists ............................................................................................ 17 Viewing a playlist ..................................................................................... 19 My Stats................................................................................................. 20 My Preferences ........................................................................................ 20 Reported Comments................................................................................... 21 Reported Media ....................................................................................... 21 Encoder ................................................................................................. 21 Disable Real: .......................................................................................... 23 Statistics Pages ........................................................................................ 23 Updata Infrastructure Limited | Classification: Unclassified | Page 2 Bucks PSN Helix Media Library user guide | 16/05/2013 Introduction The Helix Media Library [HML] is designed to make it easy for you to upload existing media content like AVI, MPEG, QuickTime, WAV etc., and for these to be encoded for streaming delivery, currently RealMedia, H.264/AAC and MP3 in a Flash player. The content can be viewed from within the HML site, or embedded into external sites (a Virtual Learning Environment for example) so users are not required to login directly to the Library and from mobile devices such as the iPhone. Homepage To access Video library go to: http://videolibrary.bucksgfl.org.uk Enter your login details (use your Office365 credentials): When you have successfully logged into the HML you will be presented with the home screen, similar to the image shown below. The home screen is made up of the toolbar, latest media, random viewable content and category listing. Updata Infrastructure Limited | Classification: Unclassified | Page 3 Bucks PSN Helix Media Library user guide | 16/05/2013 Toolbar The toolbar offers a number of options: Home icon will bring you back to the main page from any point. If you have media to add to the service and have been granted sufficient privileges to the system, clicking Upload will take you to the Add Media wizard. My Account holds within it a number of options, those of which are discussed later in this guide under the heading “Using the My Account Section”. Help will offer basic guidelines to the use of the system, plus any specifics added by your administration team. Updata Infrastructure Limited | Classification: Unclassified | Page 4 Bucks PSN Helix Media Library user guide | 16/05/2013 The search box will allow you to discover items based on media title, description or keyword. The login section allows registered users greater access to the system, such as upload rights. Enter your credentials in the provided fields as shown. Selecting Remember Me will avoid this procedure on return to the site. This is not recommended on publically accessible machines. Sidebar The sidebar shows all categories you are able to view. Selecting a category will display a list similar to the one shown below. Simply select a thumbnail to view the content. With iTunes U integration enabled, categories that offer the function will show a link to the iTunes U page of the institution for quick access to content via that program. To view the media in iTunes U click the link at the bottom of the list of clips. Updata Infrastructure Limited | Classification: Unclassified | Page 5 Bucks PSN Helix Media Library user guide | 16/05/2013 Playback and Embedding At the home screen, clicking on a thumbnail (or double clicking on the Latest Media carousel) will take you through to the media playback page. Similarly, selecting a category will bring up the media list for that section, again click the thumbnail or title brings up the viewing page. 1. Video playback, in either RealPlayer or Flash Player (shown) 2. Copy URL: Displays a link to this page allowing you to highlight and copy the link. 3. Copy Code: Displays the code required to embed media into another web page. 4. Player size adjustment: Below the embed code you can select from 3 different sizes which will alter the embed code accordingly. 5. Quality: Select high or low quality dependant on your bandwidth. Relates to both audio and video playback. Updata Infrastructure Limited | Classification: Unclassified | Page 6 Bucks PSN Helix Media Library user guide | 16/05/2013 6. Download: When enabled, offers users the option to download the media clip. 7. Rate this media: You can click on the star you like to give the media a rating out of 5. 8. Inappropriate Content: Report the media clip to the system administrator. The clip will be hidden from view until approved by the administrator. 9. Related Clips: Links to video within the same category or related metadata. 10. Related Resources: This displays any associated files that have been uploaded with the clip 11. Tags: Lists the metadata tags used by the current media clip 12. Comments: Read and enter comments about the current media clip. Offensive content can be reported, and will be hidden from view until approved or deleted by an administrator. 13. Chapters: This section contains any chapter points that have been created, and allows you to create new ones. Copy URL The Copy URL function provides a link to the media player page itself. Just highlight the URL and press CTRL + C or right--‐click and select Copy to place it in the clipboard. The URL can be pasted into Facebook to automatically embed the media item as long as it is available publically in the HML. Copy Code RealMedia The Copy Code function generates HTML code that allows you to embed the media player into and external page or Virtual Learning Environment course. This applies to both audio and video; we will cover video in this section. The code is generated based on the current settings of the media playback page. For example, in the above screen shot a High Quality Real video is currently selected; this would generate the following code: <OBJECT ID=RVOCX CLASSID="clsid:CFCDAA03-8BE4-11cf-B84B-0020AFBBCCFA" WIDTH=320 HEIGHT=240> <PARAM <PARAM <PARAM <PARAM NAME="SRC" VALUE="rtsp://helix_server/media/12345678_hi.rm"> NAME="CONTROLS" VALUE="ImageWindow"> NAME="CONSOLE" VALUE="12345678"> NAME="AUTOSTART" VALUE="false"> <EMBED type="audio/x-pn-realaudio-plugin" SRC="rtsp://helix_server/media/12345678_hi.rm" WIDTH=320 HEIGHT=240 NOJAVA=true CONTROLS=ImageWindow CONSOLE=12345678 AUTOSTART=false> </OBJECT> <br> <OBJECT ID=RVOCX CLASSID="clsid:CFCDAA03-8BE4-11cf-B84B-0020AFBBCCFA" WIDTH=320 HEIGHT=75> <PARAM NAME="CONTROLS" VALUE="All"> <PARAM NAME="CONSOLE" VALUE="12345678"> Updata Infrastructure Limited | Classification: Unclassified | Page 7 Bucks PSN Helix Media Library user guide | 16/05/2013 <EMBED type="audio/x-pn-realaudio-plugin" SRC="rtsp://helix_server/media/12345678_hi.rm" HEIGHT=75 NOJAVA=true CONTROLS=All CONSOLE=12345678> </OBJECT> WIDTH=320 Three types of embed code are available: Legacy Flash – This can be used to support flash only playback iframe and javascript – This will support playback across all devices Javascript ‘Modes’ – Sometimes certain applications won’t accept the iframe embed code, so this embed code can be used instead To use the code within your own embed page, click anywhere in the Copy Code text--‐ box and press CTRL + C or right--‐click and select Copy. This will place the code within the clipboard. Within the <body></body> tags of your webpage or blank work area of a VLE course, press CTRL + V or right--‐click and select Paste, to place the code. As you can see, emphasized within the code as WIDTH and HEIGHT attributes. These are the only areas you should change in general use. Where width and height are highlighted, change both accordingly, usually no higher than 640x480. Where width only is highlighted, change the value to match that of the previous changes. When embedding audio you can ignore the width and height requirements in most cases, unless you are specifying an image to display in the Flash player. Flash MP4 The embed code for the Flash player is far simpler, with one caveat on the playback size of the video. The code below shows a typical embed object that can as before be pasted into a web page or VLE module. <embed src=http://medialibraryserver.com/player.swf width="320" height="260" allowscriptaccess="always" allowfullscreen="true" flashvars="height=260&width=320&file=http://helix.server.com/flash/12345678_hi.mp4&searchbar=false&autostart= false&image=http://server.com/thumbnails/12345678.jpg" /> Again the emphasized section shows the width and height attributes that can be modified. As before, it is inadvisable to set the video size above 640 [width] x 480 [height]. In this example to set the video playback window at 640x480 change both width attributes to 640, but you must change the height attribute to 505. This is required to allow room for the player controls (start/stop etc) to be displayed correctly. In all instances of changing the default sizes always add 25 pixels to the height of your chosen video size. The predefined aspect ratio options can be clicked to automatically change these values. Updata Infrastructure Limited | Classification: Unclassified | Page 8 Bucks PSN Helix Media Library user guide | 16/05/2013 iframe embed code looks like the following. <iframe width="320" height="260" src="http://vls.dev.videolibraryserver.com/player?autostart=y&full screen=y&width=320&heig ht=260&videoId=9&quality=hi&captions=y" frameborder="0" scrolling="no"></iframe> Javascript ‘Modes’ code looks like the following: <div id="player9">Loading Video Player....</div><script type="text/javascript" src="http://vls.dev.videolibraryserver.com/player/getJsEmbedCode.a spx?autostart=y&fullscree n=y&width=320&height=260&videoId=9&quality=hi&captions=y"></scr ipt> NOTE: Since the iframe embed code works across the vast majority of devices, we recommend using this going forward in terms of compatibility Using the chapter points feature To create a chapter point, click on the plus button underneath ‘Add Chapter’. The screen shown below will appear. Updata Infrastructure Limited | Classification: Unclassified | Page 9 Bucks PSN Helix Media Library user guide | 16/05/2013 Clicking on play on each clip lets you watch to the point you want to start and end the chapter, clicking pause to set the time in the box below. You can seek through the clip to the point you want, or alternatively using the format 00:00:00 populate the time boxes yourself. A title and description must be provided, and then the chapter can be created by clicking Add Chapter. The chapter will appear on the right-hand side. To view it, click on the title of the chapter. Updata Infrastructure Limited | Classification: Unclassified | Page 10 Bucks PSN Helix Media Library user guide | 16/05/2013 To remove a chapter, click on the red cross. Points of interest can be set on a clip in the comments section. If you like a specific part of the clip you can enter a comment along with the time of the part you like written as follows: @00:00:35. This will create a hyperlink which when clicked will take you to the 35t second in the clip and carry on playing it from that point. Inappropriate Content Reporting Selecting Flag as Inappropriate will display the below screen. From here you may select the subject of your concern from a drop down list. Enter a message describing your concern and the reasons you wish the media to be removed. A system administrator, who can fulfil your request or reinstate the content, will moderate this. You will be notified of the outcome at the administrator’s discretion. Content flagged will be removed from view immediately. Comments When comments are enabled, users are able to leave 100 character messages about the content. Any comments deemed inappropriate or offensive can be reported to the administrator. Reported comments will be hidden immediately. If an administrator or moderator confirms the reported comment as appropriate to the content, the comment cannot be reported again. Updata Infrastructure Limited | Classification: Unclassified | Page 11 Bucks PSN Helix Media Library user guide | 16/05/2013 Adding Media Clip Metadata Click on the Upload tab. Users with standard access rights will be shown the below screen. You will need to provide a title and description; these are compulsory fields. Dependent on your upload rights, you will be able to select a number of categories to upload to, in most cases it will default to the corresponding faculty/school/department you are in. Provide an email address to be notified when your media is ready. Tagging media uploads allows you to relate content to certain areas. For example, adding a Sport tag to a number of uploads will group that content in a relationship that can be easily searched. You may be asked to agree to a disclaimer in some circumstances when uploading media. This will be dependent on rules set by the site administrator. Selecting Next will bring up the file selection screen. File Selection Click Upload Media to choose a file to upload. Depending on the file types allowed by your system administrator, you are able to upload: Updata Infrastructure Limited | Classification: Unclassified | Page 12 Bucks PSN Helix Media Library user guide | 16/05/2013 AVI (Indeo, Cinepak, Motion JPEG, MPEG1/2/4,DiVX, XViD) MPEG4 (DiVX, XViD, 3iVX) MOV (Sorenson, H263, H264, animation – Apple LossLess not supported) MPEG1 / MPEG2 WMV (all versions - DRM not supported) DV / DVCPro MP3, Windows Media Audio, WAV Selecting the file and clicking Open will start the file upload process. The file size allowed will be limited to 1GB, 500MB, 250MB, or 100MB. Your system administrator sets this limit. Thumbnails Once the upload has completed, you will be presented with a range of thumbnails to choose from generated from the uploaded video. Updata Infrastructure Limited | Classification: Unclassified | Page 13 Bucks PSN Helix Media Library user guide | 16/05/2013 From here, you can select one of the predefined images, choose to upload an image of your own (640x204 pixels), or use the default thumbnail that is assigned to the category you have uploaded to. Remember to select the Next button associated with your selection, for example underneath the thumbnail preview images, or Next under Use Default Thumbnail if you wish to continue without a custom image. When uploading an audio file, thumbnail selection changes. At this stage you can choose the default category thumbnail, or upload your own as no thumbnails will be generated from an audio upload. Associated Files This next screen will allow you attach associated documents to the media. In a similar style to adding media, select browse and choose a file to upload. File types of *.doc, *.docx, *.pptx, *.xls, *.pdf, *.swf, *.jpg, *.gif, *.htm, *.txt, and *.zip are allowed. You can upload 3 associated files per clip. Give the file a title and click Upload Media, for each file you want to upload. Updata Infrastructure Limited | Classification: Unclassified | Page 14 Bucks PSN Helix Media Library user guide | 16/05/2013 There is also the option of uploading a captions file. The following file extensions can be uploaded: *.smi, *.rt, *.ssf, *.srt, *.ttxt, *.sub, *.txt, *.xml. Please be aware that to upload .srt files the .srt extension needs to be specified as an allowed MIME type in IIS. See the bottom of this guide for how to do this. When you have uploaded a file it will be listed as below. You can delete it by checking the box and clicking Delete selected file(s). Click the Next button further down the page to continue through to the final screen: That's it! The content has been uploaded and you will soon be notified when it is ready to view. Updata Infrastructure Limited | Classification: Unclassified | Page 15 Bucks PSN Helix Media Library user guide | 16/05/2013 User Content Management With the My Videos section; media listing, search, and editing are made available. Clicking on a file name will download the original file uploaded, useful if ever a local file is lost. Edit brings up the Media Upload Wizard shown previously, but retaining all information added during the initial upload. Videos can be moved between categories, titles changed, descriptions edited and associated files replaced, deleted or added to. To delete a video completely from the system, tick the box next to it, and click Delete selected media. If you want to delete any associated files, tick the box to Include associated files in delete before clicking Delete selected media. Mobile Sites – iPhone, iPad, BlackBerry and Android When navigating the Helix Media Library from an Apple iPhone, iPod Touch, Android or BlackBerry, the site will render specifically for that device (if site is enabled, see the end of this section on how to enable). When public access to the Media Library is enabled, your first visit to the site will show a list of videos available to unauthenticated users, such as the image. From here selecting the play icon that appears over the video thumbnail will play the media immediately. The home screen offers Most Played, Latest Added and Random video selections. If guest access is not enabled, you will be asked to log in. These credentials will be the same as used for the main Helix Media Library site. Selecting the Title of a clip will bring up the information for that media. Updata Infrastructure Limited | Classification: Unclassified | Page 16 Bucks PSN Helix Media Library user guide | 16/05/2013 Selecting Search at any point will bring up the search page. From here you are able to search on the default tags, such as Latest Added, or Most Played. You are able to define a more specific search by choosing categories to search within, looking for a particular contributor or specifying a search term based on tags or media name and description. Accessing the site from an iPad will look the same as the main site. However functionality that relies on Flash being supported like uploading videos and creating chapter points is not enabled with the iPad site. My Media You can see all the media that you have uploaded by clicking on My Media. When you do this you will see the screen below. To preview the clip click on the play icon next to the title of the clip. You can click on the Filename to download the clip. Delete media by ticking the box next to the clip that you want to delete and clicking Delete selected media. If you have any associated files with clips that you are deleting, you can remove them too by ticking the box to Include associated files in delete before clicking Delete selected media. My Playlists Clicking on My Playlists will show any playlists that you have created, and allow you to create new ones. Updata Infrastructure Limited | Classification: Unclassified | Page 17 Bucks PSN Helix Media Library user guide | 16/05/2013 To remove a playlist check the box and click below to delete it. To create a new playlist, click Add Playlist from the menu on the left and the Add Playlist screen will appear. Enter the name, any info that you want to add and then click Save to create it. Once the playlist is created, clips can be added to it. To add a clip to a playlist, navigate back to the homepage and click on the thumbnail of a clip as you would to view it. You can now use the drop--‐down box to select the playlist that you would like to add the clip to, and click the plus button to add it. Another option that is available when editing a playlist is to view the contents of the playlist in XML format. You can use this link to subscribe to the content in a browser as an RSS feed. Updata Infrastructure Limited | Classification: Unclassified | Page 18 Bucks PSN Helix Media Library user guide | 16/05/2013 When you have populated the playlist with some clips, you can click here to remove clips that you no longer wish to appear in it. To remove media, check the box next to each clip you want to remove and click Delete selected media. If you have more than 10 clips in the playlist, you can navigate through them using the Next and Prev buttons at the bottom. Viewing a playlist To view a playlist, click on the double up arrows in the bottom right-hand corner of your browser. Select the playlist you wish to view by clicking on the up arrow by Current Playlist and click on the one you want to view. The bar will show thumbnails for each of the clips you have added, and to play one just click on the thumbnail. Alternatively, use the arrows next to Current playlist to navigate through the clips. Updata Infrastructure Limited | Classification: Unclassified | Page 19 Bucks PSN Helix Media Library user guide | 16/05/2013 My Stats Clicking on My Stats brings up a mini stats page relating just to your activities on the HML. It will display your last login time, how many uploads you have done in the current month, how many comments you have posted and how many clips you have rated. There is also a graph which will display an uploader leader board. It will show how many clips you have uploaded, along with others that have access to the same groups as you do. My Preferences In the My Preferences section you can specify whether you would like the playlist functionality to be available. You can also choose the default player that you wish to use. This will be used every time you log on to the HML, but can be changed at any time in this section. Updata Infrastructure Limited | Classification: Unclassified | Page 20 Bucks PSN Helix Media Library user guide | 16/05/2013 Reported Comments This section allows the administrator to view all reported comments. Comments can be deleted or approved. To delete or approve a comment or comments, highlight the checkbox(s) and select either Delete or Reinstate from the process list. Reported Media Any content flagged by users as being inappropriate for display will be listed here. Administrators are able to: View the content by downloading a small version of the clip. Reinstate the content if it is deemed acceptable. In this instance it is advised to communicate to the user why you feel the clip should be available. Delete the content if it does violate terms and conditions of use. Encoder Encoder offers two main options; encoder profiles and logging. Profiles define the quality, screen size and bit--‐rate for both formats Updata Infrastructure Limited | Classification: Unclassified | Page 21 Bucks PSN Helix Media Library user guide | 16/05/2013 Standard video settings for both formats: Bit-Rate (Kilobits per second) Frame Size (width x height) 256K 320x240 384K 384x288 512K 512x384 768K 640x480 Bit-Rate (Kilobits per second) Frame Size (width x height) 256K 320x240 Additional video settings for Flash: There is the option to encode clips in ultra--‐low and High Definition. When these options are checked it will encode the clips in the standard profiles but also in the low and high definitions. If the clip being uploaded isn’t in high definition then this profile will not be used, as the output won’t be in HD. High definition encoding is done using a 720p profile, and low definition encoding is done at 100 kbps. Updata Infrastructure Limited | Classification: Unclassified | Page 22 Bucks PSN Helix Media Library user guide | 16/05/2013 Available audio settings are: RealAudio MP3 44K 44K 128K 192K These profiles are the default available to the system. In relation to video, all will maintain the correct aspect ratio of the source material. For example, a video with the dimensions of 1280x720 would be encoded at 640x360 with the 768K profile. Disable Real: This option can be checked if Real encoding is not required. Any existing Real files with remain on the system, but any new uploads will not be encoded into Real format. If Real playback is not going to be used then turning this of can be advantageous to reduce encoding times. The Logs section keeps track of how many files have been encoded. Statistics Pages In the upload site of the Helix Media Library there are statistics pages to show various information on how the HML is being used. There is a page under each of the headings that displays information pertaining to the menu Heading. Below is an example from the Home section which displays an overview of the Helix Media Library. Updata Infrastructure Limited | Classification: Unclassified | Page 23 Bucks PSN Helix Media Library user guide | 16/05/2013 -----------------------------------End of Document--------------------------------------------------------- Updata Infrastructure Limited | Classification: Unclassified | Page 24