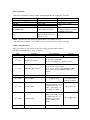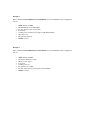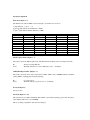
1
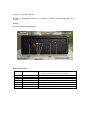
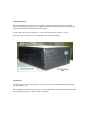
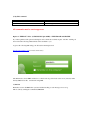
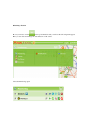
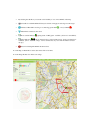
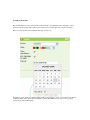
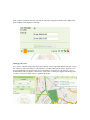
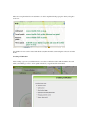
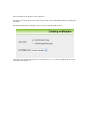
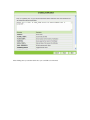
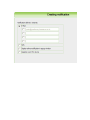
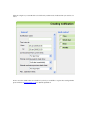
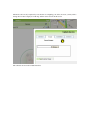
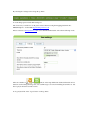
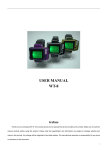
from
PawTrax. co.uk
USER GUIDE
V2.0 10/4/09
Thank you for purchasing The-PAT.
The-PAT uses GSM/GPRS and GPS technology enabling you to FIND, TRACK and SECURE your pet
24/7/365
General
Let’s have a quick look at The-PAT
What the LED’s mean.
RED
GREEN
BLUE
YELLOW
Flashing Quickly
Flashing Slowly
Permanently on
Permanently on
Flashing
Flashing Quickly
Flashing Slowly
On
1) Unit is in Start Up Mode
2) Fixing position following a geo-fence request
Normal
Start up failed – press off and then on
No GPS fix
GPS Position fixed
Searching for GSM signal
GSM network found
Charging
Charging the battery
Before using The-PAT for the first time you will need to fully charge the battery. Plug the mini USB
charger into the charging socket. The Yellow LED will illuminate indicating that it is being charged. The
Yellow LED will turn off when The-PAT is fully charged.
To fully charge the battery may take approx. 8 hours. Subsequent charges will take 3 -4 hours.
It is better, but not essential, to power off The-PAT before and during charging.
Switching On
Carefully press the on button using the point of a pen or pencil – the Red LED will flash quickly during
start up and then slowly.
Place The-PAT outside where it will be able to obtain an initial GPS fix. The Green LED will flash when it
has successfully obtained a fix. This may take a few minutes.
Placing in Pouch
To ensure the very best operational performance The-PAT should be placed inside the pouch with the
internal antenna facing out and away from the dog.
This is done by ensuring that the LED’s//Buttons are at the bottom and the charging socket is top right.
The PAW logo on the PAT should be facing away from the dog (or skywards if used in other applications)
Quick Start
Request a Position (GSM/SMS)
Just send an SMS to The-PAT. The-PAT will return a location SMS.
W
SMS Command
W,******
Function
Request Location
Authorised numbers only
Non authorised numbers must also input pin
code. ****** = 000000 default pin – this can
be changed using the USB/PC software
The received location SMS can be sent back in 2 formats:
1) NORMAL: You receive the location by coordinates.
After receiving the coordinates, manually input them into Google Maps (www.maps.google.com) or the
PawTrax website at free.pawtrax.co.uk or Google mobile maps on your web/wap enabled mobile phone.
Note: The coordinates will be received in the following format N, Lat: 5123.1763, W, Lon: 00012.4896,
but when you input them you should use this format N22 33.0361, E114 04.9644 – There is a space
between N51 and 23.1763 etc
2) GOOGLEMAP: You will receive the location in the form of a web link.
If you have a suitable mobile phone just click on the link and a Google map will automatically be displayed.
The mode can be configured by sending the following SMS
SMS Command
S,LF:NORMAL
S,LF:GOOGLEMAP
Function
Location report SMS is received in coordinates
Location report SMS is received as a link
to Google Maps
Click on the link on your mobile
to open map.
Auto SMS Sending
Auto SMS sending allows you to request The-PAT to send you a location SMS at user defined intervals.
This interval is set at every 1 minute by default but can be changed by SMS. (See other
commands/functions) – The auto sms will be sent to the authorised number.
SMS Command
S,SON
S,SOFF
Function
Turns auto report via sms on
Turns auto report via sms off
Setting up a Geo-Fence
A geo-fence is an ‘invisible – fence’ around The-PAT. Should The-PAT move outside of this area an SMS
alert will be received.
By default the radius of the geo-fence is set at 100m but can be changed by SMS. (See other
commands/functions)
The geo-fence can be switched on/off in 2 ways.
1) Using the button on The-PAT
2) By SMS command.
1) Using the Button on The-PAT.
Press the geo-fence button the Red light will start to flash quickly. This indicates that The-PAT is locking
onto its present location. If The-PAT has a GPS fix at this time this will be the centre of the geo-fence. If it
hasn’t it will use the first fix it obtains as the centre point.
To turn off the geo-fence press the geo-fence button.
2) By SMS command
SMS Command
S,GEOFENCEON
S,GEOFENCEOFF
Turn on the Geo-fence
Turn off the geo-fence
Function
All commands must be sent in uppercase
Option 2 - THE PAT™ Plus - (GSM/SMS/GPS plus GPRS) – FIND/TRACK and SECURE
If you have purchased the optional subscription service all the above functions plus ‘real time’ tracking via
the web and the following enhancements will be available to you.
Login to the following URL using your allocated username/password
http://locate.pawtrax.co.uk (no need to enter www)
The-PAT needs to have GPRS switched on so that it sends its position back to the server (website) rather
than by SMS. TO do this, send the following SMS.
S,GPRSON
Remember to turn off GPRS when you have finished tracking, as each message sent costs 1p.
This is dome by sending the command S,GPRSOFF
Obtaining a Position
Hover your mouse over the
at the top left hand side and you will see the following menu appear.
Here you can select and manage all of the functions of the service.
Select the Monitoring option
•
By selecting the checkbox you can turn on/off visibilty of one or more PATS on the map.
•
- select this box and The-PAT will always be visible on map upon receiving a new messages
•
- indicates if The-PAT is moving or not. Moving (green mark
•
- The-PAT is connected to the server
•
(shows vertical indicator
•
•
) or not (red mark
).
) giving status of GPS (green - available, yellow-red - unavailable).
vertical indicators
, but for current device position in time (green - device sent data last 23 minutes, yellow - last hour, orange - device seen data last day, red - time information at least 1
day ago).
- button for deleting The-PAT from current view.
To centre map on The-PAT’s location just mouse click on its name.
You can change the Paw icon in the user setings
Tracking in ‘Real Time’
By selecting Tracks you can view real-time or historic tracks. Your PAT has been configured to send a
position every 60 seconds. These will be plotted and recorded on the map/server, see previous image.
Dates etc can be readily selected from the date drop down boxes.
If tracking a pet we would recommend turning off the ‘lock messages to roads’ option. This is best suited to
tracking a vehicle. This can be achieved simply by placing The-PAT in the glove box or door pockets
(where it can obtain a GPS signal)
Once you have selected the date range just click the add track to map button and the track, complete with
dates and times will be displayed on the map
Setting up a Geo-zone
A geo-zone is a virtual boundary that can be drawn directly onto the map. If The-PAT should enter or leave
any of these geo-fences depending on your preference you will be either sent an email or alerted via an on
screen alarm. Emails and onscreen alerts are free. The facility to send alerts as a sms message to up to 4
mobile numbers will be available soon. However, as this relies on a third party supplier each message will
cost 35p. Contact us for details on how to purchase sms credits.
These are set up from the Geozone tab. How to do this is explained in the pop up box when you begin to
create one.
Any number of zones can be created and edited at anytime from this screen using the various icons in the
menu.
Creating a Notification
After creating a geozone you will then need to associate a notification with it. This determines how and
when you want the geo-zone to be in operation and how you get alerted if it is breached.
Select ‘Notification’ tab and then ‘create notification’
Select Geozone control (other options will be used for other services that PawTrax will be providing in the
near future.
Select Next and then choose which geo-zone you wish to set up the notification for.
Select Next, you can then create the text you want the alert to say – it could be something like ‘Rover has
escaped from the Garden’ etc.
After clicking Next you can then decide how you would like to be informed.
After choosing how you want the alert to be delivered you then need to indicate when you want it to be
active.
In most cases the default values are suitable. If you feel you would like to explore these settings further
please email us at [email protected] for detailed explaination.
The Device tab is mostly completed by us at the time of configuring your device, however you may wish to
change the icon that is displayed on the map, and this can be done from this screen.
The other tabs are reserved for future functions.
By selecting the ‘settings section along the top menu
You can change password and email settings etc.
The ‘Access key to mobile site’ is the password used when accessing the mapping platform from a
PDA/Smartphone – via the URL http://mobile.pawtrax.co.uk
Please contact us at [email protected] if you would like further details on how the mobile map works.
and
symbols on the map which when clicked will enable various
There are a number of
functions such as change the map view, view each message as it comes in including street names etc. Just
have a play around and see what it can do.
To Logout just click on the ‘logout’ button on the top menu
Authorised Numbers
An authorised number is a number that is stored in The-PAT’s sim card or phonebook.
Only numbers in this phonebook can request a position without the need for password/pin (just by sending
the command W)
Only numbers in this phone book can send commands to The-PAT
There can be up to 4 numbers stored in the phonebook as authorised numbers.
1 is stored under the name of TIMER. This is the number that will receive timed sms position messages.
This number also receives the ‘battery low’ alert.
3 numbers can be stored as SOS1, SOS2 and SOS3. These will respond to any commands or position
requests.
The numbers can be set or changed using the following command
N,TIMER:number (to save 01234567890 as the TIMER number send N,TIMER:01234567890)
To set up additional numbers send
N,SOS1:01234567890 or N,SOS2:01234567890
You can check which numbers are saved by sending the following commands
N,TIMER:?
N,SOS1:?
Other Commands
SMS Command
S,SET:xxxxxxxxxxppppppxxxx
S,?
S,ROFF
S,RON
Function
Change parameters
Check status
Turn off GPS
Turn on GPS
N,TIMER:number
Defines authorized number
I,?
Check IMEI number, battery
level*, hardware version and
software version
See below
See below
Can be used to conserve
battery
To save number 01234567890
as authorized number send sms
N,TIMER:01234567890
NOTE – The-PAT will send an acknowledgment SMS to all commands sent to it.
* The-PAT will automatically send an SMS to advise you when the battery requires recharging
S,SET Command in detail
There are a number of other parameters that can be changed using the SET command.
The SET command includes a ‘string’ of 26 digits.
Digit
1st – 5th
Time Zone
6th – 7th
GPS Reception Timer
00: constantly receive GPS
01-99 receive GPS every 1 minute to 99 mins
SMS/GPRS Report Timer
00: do not auto report location
01-99: report location via sms (TIMER) or GPRS
every 1 min to 99 mins (TIMER = authorized
number)
th
8 – 9th
10th
11th – 16th
th
17 – 18th
19th – 20th
21st – 26th
Definition
Not used
Value & Function
GMT+12:00 to GMT-13:00
Must be 0
Comments
GMT = 00000
Password (PIN)
6 digit password
Pre-configured as
last 6 digits of ThePAT phone number
Geofence Radius
Ranges between 00 – 99 and
is calculated this way ** x
50m (** is the value) – eg.
03 = 150m, 14 is 700m
00 = geofence off
Speeding Alarm
Ranges between 00 – 99 and
is calculated this way ** x
10km/h (** is the value) –
eg. 04 = 40km/h, 08 is
8km/h
00 = speeding alarm
off
Not used
Must be 0
Example 1
If the command: S,SET:00000000501234560000000000 is sent to The-PAT it will be configured as
follows:
•
•
•
•
•
•
•
•
00000: Time Zone GMT
00: Permanently receive GPS signal
05: Auto report position every 5 mins
0: not used
123456: password (always last 6 digits of The-PATs number)
00 geofence off
00: speeding alarm off
000000: not used
Example 2
If the command: S,SET:00000050001234560308000000 is sent to The-PAT it will be configured as
follows:
•
•
•
•
•
•
•
•
00000: Time Zone GMT
05: Receive GPS every 5 mins
00: Do not auto report
0: not used
123456: password
03: geofence set at 150m
08: alert will be sent by sms if speed exceeds 80 km/h
000000: not used
Parameters Explained
Time Zone (Digits 1 - 5)
The-PAT receives time in GMT. It can be changed to local time zone as follows:
1st digit indicates ‘+’ (0) or ‘-‘ (1)
2nd and 3rd digits indicate hour difference to GMT.
4th and 5th digits indicate minute difference to GMT.
Time Zone
GMT-12:00
GMT-11:00
GMT-10:00
GMT-9:00
GMT-8:00
GMT-7:00
GMT-6:00
GMT-5:00
GMT-4:00
GMT-3:00
GMT-3:30
Value
11200
11100
11000
10900
10800
10700
10600
10500
10400
10300
10330
Time Zone
GMT-2:00
GMT-1:00
GMT
GMT+1:00
GMT+2:00
GMT+3:00
GMT+3:30
GMT+4:00
GMT+4:30
GMT+5:00
GMT+5:30
Value
10200
10100
00000
00100
00200
00300
00330
00400
00430
00500
00530
Time Zone
GMT+5:45
GMT+6:00
GMT+6:03
GMT+7:00
GMT+8:00
GMT+9:00
GMT+9:30
GMT+10:00
GMT+11:00
GMT+12:00
GMT+13:00
Value
00545
00600
00630
00700
00800
00900
00930
01000
01100
01200
01300
GPS Reception Timer (Digits 6 - 7)
This value controls the GPS reception time. The-PAT will fix its GPS position according to this time
00
01-99
Always receiving GPS data
The-PAT will turn on to receive GPS data every 1 – 99 minutes
SMS/GPRS Report Timer (Digits 8 - 9)
This value controls the auto location report time for SMS – SMS is sent to TIMER (Authorised number)
(and/or GPRS to tracking platform in plus package)
00
01-99
no location report
The-PAT will report position every 1 – 99 minutes
Not Used (Digit 10)
Always set at 0
Password (Digits 11 – 16)
This is the Password or PIN of The-PAT. This number is used when requesting a position from a phone
other than the authorized or set as TIMER.
This is set during configuration and cannot be changed.
Geo-fence radius (Digits 17 – 18)
Geofence defines a circular ‘invisible fence’. This ‘fence’ is a radius defined by this value. After geofence
is set up, if breached, The-PAT will send an SMS (with distance and location) to authorized number in the
TIMER parameter. It is suggested that this is set above 50m.
Speeding Alarm (Digits 19 – 20)
This may be found useful in some circumstances. This value defines a spped limit. If The-PAT exceeds this
value an alert SMS will be sent. It is suggested that this is set above 50 km/h.
Not Used (Digits 21 – 26)
Always set to 0
SIM CARD
Every PAT has a built in mobile phone SIM card in order to communicate via the GSM network.
This must be in credit in order for your PAT to function. ASDA terms and conditions apply.
How to check SIM card Credit
Call 0845 303 2732 and follow the prompts.
How to top-up your SIM card
There are a number of ways to top up your SIM card.
a)
Using the supplied swipe card (this has already been partnered with your SIM). This can be used
at any ASDA and shops that display the top-up symbol
b) Obtaining a top up voucher from any ASDA and calling 0845 303 2732
Water Resistance
The-PAT is water resistant. The-PAT will continue to function when subjected to splashes of water, when
placed inside the pouch.
It is not water proof and will not function if immersed in water. DO NOT allow your dog to swim while
wearing it.
We can offer advice and suggestions on how to waterproof The-PAT.
Warranty Limitations
PawTrax warrants that The-PAT shall be free from defects for a period of 12 months. We cannot accept
any liability under the 12 month warranty if The-PAT is modified, opened or tampered with by you or any
third party. Misused or damaged in an accident, as a result of unreasonable use or as a result of your
negligence.
Declaration of Compliance
PawTrax declares that The-PAT is in compliance with all the necessary CE requirements and is also RoHS
compliant.
Technical Specification
GSM/GPRS Module
Simcom 300 Tri Band GSM Module (GSM900/1800/1900)
GPS Module
SIRF III 20 Channels
Accuracy
1 – 5m
Start Time
Cold – 42s, Warm 35s, Hot 1s
Operating Voltage
3.3V
Charge Voltage
4.5 – 5V
Standby
15mA
Operating
80mA
Battery
Rechargeable Lithium Poly
Time between charges
14 hours – 36 hours (depending on configuration)
Size
60mm x 44mm x 22mm
Battery Life
dependant on configuration (approx 14 hours if set to collect, but not
send, position all the time – approx 36 hours in GPS OFF, approx 7
hours if sending GPS position every 60 seconds)
Notes and Cautions
•
•
•
•
•
•
•
•
•
•
•
For best results always make sure that The-PAT is placed in the pouch with the buttons/leds at the
bottom and the mini usb top right with the Velcro tab towards the dog
Do not open The-PAT
Do not let your pet chew The-PAT
Don’t let The-PAT operate in temperatures above 50 degrees.
Performance maybe limited depending on GSM and GPS signal
May not always work indoors.
Complies with CE/RoHS/WEEE requirements
Should the device stop operating at anytime press the off button and then press start button
The-PAT uses the Vodafone network, for coverage maps please visit the Vodafone website
Keep checking the website www.the-pat.net for updates to this guide
We reserve the right to change the specification/functions at anytime without prior notice
E&OE
Please keep checking the website for
updates to this userguide