1
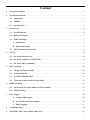
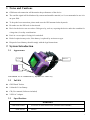
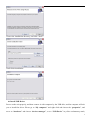
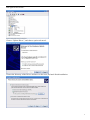
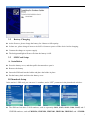
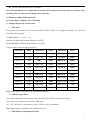
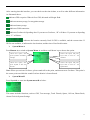
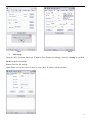
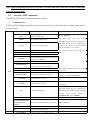
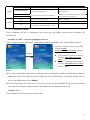
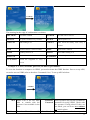
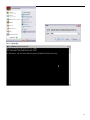
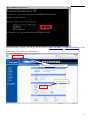
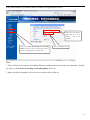
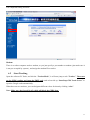
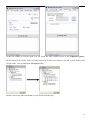
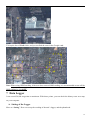
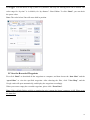
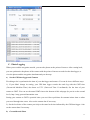
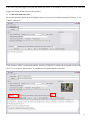
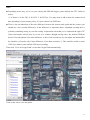
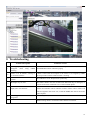
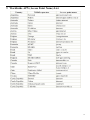
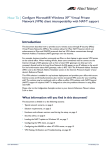
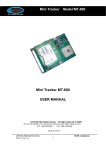
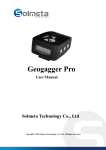
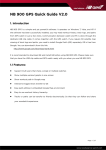
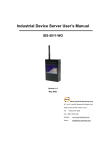
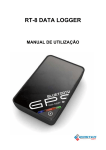
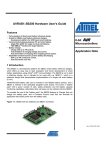
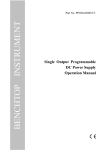
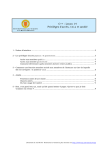
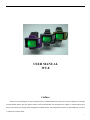
USER MANUAL
WT-8
Preface
Thank you for purchasing WT-8. This manual shows how to operate the device smoothly and correctly. Make sure to read this
manual carefully before using this product. Please note that specification and information are subject to changes without prior
notice in this manual. Any change will be integrated in the latest release. The manufacturer assumes no responsibility for any errors
or omissions in this document.
1
Content
1
Notes and Cautions………………………………...………………….………...……………………...3
2
System Introduction…………………………..…………………….………………………………….3
3
2.1
Appearance…………………..………………………………………..…..……..…………….…3
2.2
Full Kit……………………….……………………………………………………….………..…3
2.3
Specifications……………………………………………………….……………………...……..3
Get Started………………………………………………………….…………….…………………..…4
3.1
Install Software…………………………………………………...………....................................4
3.2
Battery Charging……………..……………………………………………………………….….7
3.3
SIM Card Setup…………………………………………………………………………………..7
A. Installation……………………………………………………….……………….………...….7
B. Phonebook Setup…………….……………………………………………...…..………….….8
3.4
4
5
6
7
SET Parameter Instructions……………………………………...……..…………………...….8
Set Up……………………………………………...…………………………….……………………..10
4.1
Set up on Watch Screen……………...…………………...…………..…………………….......10
4.2
Set up on computer via USB Cable………....……………………….……….………………...14
4.3
Set up by SMS Commands…….………………………………...…….…….……………...….17
SMS Tracking……………………………………………...………………………………………….20
5.1
Change the Inquiry Mode……………...………………………...…………..………………....20
5.2
In Normal Mode…………………………....……………………….……..…….……………...20
5.3
In GOOGLEMAP Mode…….……………………………………...…….…….…………..….21
5.4
Track on Google Earth & Google Map…………………………………………………..……22
GPRS Tracking………………………..….…………………..………………………………….……23
6.1
Check APN, Set up IP Address & Port Number…….…………………..………………...….23
6.2
Start Tracking……………………………………………………………..…….…………...…27
Data Logger………………….……………………………………………….….…………………….29
A. Setting of the Logger………..…………….…………………………………….……………29
B. View the Recorded Waypoints…………………..…………………………….…………....30
C. Photo Logging…………………………………..…………………………………………....31
8
Troubleshooting………………………………………………………………………………….……34
9
Worldwide APN (Access Point Name) List………………………….………………………………35
2
1 Notes and Cautions
z
GSM network connection will determine the performance of the device.
z
The satellite signal will be blanketed by cement and metallic material, so it’s recommended to use it in
an open field.
z
To keep the best connection, please make sure the GPS antenna looks skywards.
z
Do make sure the PIN code is deactivated.
z
Don’t let the device run at or above 50 degrees by, such as, exposing the device under the sunshine for
a long time, for safety consideration.
z
Put it in a covert place if using it for anti-theft.
z
Risk of explosion may exist, if the battery is replaced by an incorrect type.
z
Disposal of used battery should comply with the legal instructions.
2 System Introduction
2.1
Appearance
Joystick
Button A
Mic
Note: Button A is the “backward” key; Joystick is the “enter” key.
2.2
Full Kit
z
GPS Watch Tracker
z
1100mAh Li-ion Battery
z
CD (User manual, Software included)
z
2 PIN AC Adapter
2.3
Specifications
GSM/GPRS
GSM/GPRS module
GSM Antenna
Sincom300 Tri-Band GSM module (GSM900/1800/1900MHz)
Build-in
3
GPS
GPS module
Protocol
GPS Antenna
SRIF III 20 channels
NMEA-0183 compliant protocol
Build-in active high sensitivity antenna
Accuracy
1-5m
Update rate
1 HZ
Cold start: 42s
Start time
Warm start: 35s
Hot start : 1s
Electrical
Operating Voltage
3.3V
Charge voltage
4.5~5V
Standby
15mA
Operating
80mA
Battery
Li-ion 1100mAh
other
Size
Weight
59mm*38mm*18mm
45g(including battery)
3 Get Started
3.1
Install Software
Before installing the GPS Tracker Server software, you should install dotnetfx.exe and Google Earth.exe.
To configure the unit on computer, you also need install a driver. All are included in the CD.
z Install WT-8
Find the “Setup.exe” and click to install on the computer.
4
Choose the installation directory, and click “Next”:
Until finish installation:
z Install USB Driver
Power on the unit properly, and then connect it with computer by the USB able, and the computer will ask
you to install the driver. Please go to “My computer” and right click and choose the “properties”, and
move to “hardware” and choose “devices manager”, to see “USB Device” in yellow exclamatory mark,
5
and right click as below:
Choose “Update Driver”, and choose option advanced:
Choose the directory of the Driver and move to the next, and until finish installation:
6
3.2
Battery Charging
z At the first use, please charge the battery for 8 hours to full capacity.
z In later use, please charge 4 hours to its full. It is better to power off the device before charging.
z Connect the charger to a power supply
z The background light will turn off when the battery is full.
3.3
SIM Card Setup
A. Installation
z Press the battery cover, and then pull it downwards to open it.
z Remove the battery
z Insert the SIM card into the holder and place the holder in place.
z Put the battery back and close the battery cover
B. Phonebook Setup
In the tracker’s SIM card, you can store 11 numbers, and a “SET” parameter in the phonebook as below:
z The SIM card can have 5 SOS numbers, such as separately SOS1, SOS2, SOS3, SOS4, SOS5, and 5
FRIEND numbers, such as FRIEND1, FRIEND2, FRIEND3, FRIEND4, FRIEND5, and 1 TIMER.
7
Only SOS numbers can receive the reports when the panic button is pressed, and only TIMER will get
the auto location report defined by SMS/GPRS Sending Timer, and Geofence alert & Speeding alert.
z “SET” parameter defines the working of tracker. You can define the Time Zone, GPS Reception,
SMS/GPRS Location Report etc by it. (For its information in detail, please refer to Clause 3.4)
z Please set them up in CAPITALS.
3.4
SET Parameter Instructions
To use the tracker, please first define the “SET” parameter. You can set it up by SMS command on mobile
phone or USB cable on computer. It consists of 26 digits. Please store it in the name of “SET”. As below is
the definition in detail:
Digit
Definition
1st-5th
Time Zone
GPS
6th-7th
Reception
Timer
SMS/GPRS
8th-9th
Location
Report Timer
10th
11th-16th
17th-18th
19th-20th
21st
22nd-26th
Battery
Monitor
Device
Password
Geofence
Speeding
alarm
Logging mode
Logging
Interval
Value& Meaning
GMT+12:00(01200) to GMT -13:00(11300)
00: keep receiving GPS.
01-99: turn on to receive GPS data in every 1 minute to 99 minutes.
Remarks
GMT+00:00(00000)
00: keep receiving GPS.
00: device doesn’t auto report location.
01-99: device auto reports to mobile phone in every 1 minute to 99
minutes
0: device doesn’t check the battery level.
1-9: device will check the battery in every 1-9 minutes and alarm in SMS
when the battery level is too low.
Set a 6 digits password as from 000000-999999.
It ranges between “00”-“99”, and is calculated this way: **×50m(** is
the value.), say, 03 is 150m, 14 is 700m.
Default value is 000000.
“00”, Geofence is off.
It ranges between “00”-“99”, and is calculated this way: **×10km/h(**
“00”, Speeding alarm is
is the value.), say, 04 is 40km/h, 08 is 80km/h.
off.
“0” means to record by time; “1” means to record by distance.
Other input is invalid.
By time, it is “1-99999”s; By distance, it is “50-65000”meter.
Distance below 50m will
cause drift in position.
For example: To take off the tracker’s SIM card and put it on mobile phone, you can check out its “SET” parameter in
the “contacts” as below:
z
z
z
z
z
z
z
00800: China’s Time zone: GMT+8:00.
00: The tracker keeps receiving GPS signal.
01: The tracker auto reports the location in every 1 minute.
0: The tracker will not check the battery level.
654321: The password is 654321.
05: Geofence district is formed on a 250 meters radius (5×50m).
06: The speed limit is 60km/h (6×10km/h).
z
0: The waypoints are recorded by time.
8
z
00030: The time interval is 30 seconds.
Note: This parameter is very important. It controls all the actions of our unit, such as Geofence alert,
Speeding alert etc. The user can change those values by:
a). Remotely sending SMS commands
b). Connecting to computer via a USB cable
c). Setting it up directly on the screen.
¾ Time Zone
The device receives the time in Greenwich Mean Time (GMT). It is suggested setting it by the local
TimeZone when using it.
1st digit indicates ‘+’ (0) or ‘-’ (1)
2nd and 3rd digits indicate hour difference to GMT.
4th and 5th digits indicate minute difference to GMT.
Values of time zones are shown as below:
Time Zone
Value
Time Zone
Value
Time Zone
Value
GMT-12:00
11200
GMT-2:00
10200
GMT+5:45
00545
GMT-11:00
11100
GMT-1:00
10100
GMT+6:00
00600
GMT-10:00
11000
GMT
00000
GMT+6:30
00630
GMT-9:00
10900
GMT+1:00
00100
GMT+7:00
00700
GMT-8:00
10800
GMT+2:00
00200
GMT+8:00
00800
GMT-7:00
10700
GMT+3:00
00300
GMT+9:00
00900
GMT-6:00
10600
GMT+3:30
00330
GMT+9:30
00930
GMT-5:00
10500
GMT+4:00
00400
GMT+10:00
01000
GMT-4:00
10400
GMT+4:30
00430
GMT+11:00
01100
GMT-3:00
10300
GMT+5:00
00500
GMT+12:00
01200
GMT-3:30
10330
GMT+5:30
00530
GMT+13:00
01300
Note: Other input is regarded as the default value (00000).
¾ GPS Reception Timer
This value controls the GPS reception. The unit will fix the GPS according to this timer.
“00”: the device is always on, to receive GPS data;
“01”-“99”: the device will turn on to receive GPS in every 1-99 minutes.
Note: Other input is regarded as the default value (00).
¾ SMS/GPRS Location Report Timer
9
This value controls the auto location report in SMS as well as in GPRS.
“00”: there is no auto location report;
“01”-“99”: the unit will auto report according to the timer.
Note: Other input is regarded as the default value (00).
¾ Battery Monitor
The unit will check the battery level at a predefined interval. When the battery runs away to a low level, it
will send an alarm.
Note: The normal battery level ranges from 3400mv to 4200mv.
¾ Geofence
Geofence defines a circular district. This circular district forms on a radius predefined by this value. When
Geofence is set at a place, on breach of it, the unit will send two alerts to TIMER.
¾ Speeding Alarm
This value defines the speed limit. When the tracker moves over the limit, it will send two alerts to TIMER.
It is suggested the speed limit be set no less than 50km/h. The limit below 50km/h may cause inaccurate
alert, for GPS signal may be affected.
¾ Logging Mode
The unit can record the waypoints by time or distance. “0” means it records by time. “1” means it records
by distance.
¾ Logging Interval
Recording by time, the value can be defined in the range of “1s-99999s”; Recording by distance, the value
can be defined in the range of “50m-65000m”.
Note: Input out of the range is invalid. You can define the distance by below 50m, but this may cause drift
in position
4 Set up
4.1
¾
Set up on Watch Screen
Primary Menu
Memory
GPS indicator: it will
flash
when
having
fixed GPS.
Last fixed location
Battery usage
GSM
Geofence
Speeding
Current Speed
Geofence
Time of last fixed
10
After entering into this interface, you can check out the time & date, as well as other different information.
As illustrated above:
indicates GPS reception. When it fixes GPS, this mark will begin flash.
indicates memory usage, for waypoints storage.
indicates battery usage.
indicates GSM connection.
indicates Geofence & Speeding alert. If you turn on Geofence, “D” will show. If you turn on Speeding
alert, “V” will show.
indicates the location currently fixed if GPS is available, and the current time. If
GPS is not available, it indicates the last location, and the time of last fixed location.
¾
System Menu A
Press Button A, to switch to System Menu A, and then scroll down / up to choose the option.
Choose this option, and
Choose this option, and press
press Joystick to send SOS
Joyce stick, to turn on / off
message.
Geofence.
Choose this option, and
Choose this option, and press
press Joystick to turn off
Joyce stick, to turn on / off
the unit.
Speed Alarm.
Note: When you activate Geofence, please stand still at the point, and then turn on Geofence. This point is
the center point on which the round Geofence district is formed based.
¾
System Menu B
Press Joystick, to enter into System menu B as below.
This menu includes functions, such as GPS, Text message, Track Friends, Sports, Call out, Phone Book,
Alarm Clock & System Settings.
11
z GPS
Check NMEA
Turn on / off GPS reception.
Determine at what interval
it receives GPS.
Determine at what radius it
forms Geofence circle.
Determine at what speed
limit it activates a Speeding
alert.
Check Data logging status,
and set by it records the
waypoints by time or
distance, and at what value.
z Friends (also called “Track Friends”)
If A wears this watch, and B, C, D, E, F wears another 5 watches. A can track down the others
directly on the screen by distance & direction. It is set this way: on B, C, D, E, F’s SIM card phonebook,
A’s number must be saved. Also, A should save B, C, D, E, F’s numbers into its phonebook.
Choose “Tracking”
Show all the “friends”
in the phonebook.
12
z Settings
Set up Time Zone, so
that the tracker adjusts
to the local time.
If GSM mode is off,
no data can send out.
This setting decides how frequently the tracker
sends the text location report & GPRS location
report, and its “ON/OFF” status.
Normal: text location report is coordinates.
GMaps: text location report is a link to google
maps web. It requires the mobile phone able to
browse internet, and GPRS activated.
Those not listed in the phonebook will add a
password, when requesting location report.
Command: W,******(password)
Restore to factory setting.
Check software version, and device’s IMEI
code.
Note: In the GPRS setting:
APN: at the end of this user manual, there is an APN table list.
User Name & Password: for GPRS service, the operators of different countries may provide a User Name
& Password.
IP Address: set up the public IP (the router or the modem IP) here. For details, please refer to Clause 6.1.
Port Number: set up Port Number here. For details, please refer to Clause 6.1.
13
z Phone Book
the phone book specifies only 11 numbers in names of TIMER, SOS1-5, FRIEND1-5 as follows:
The numbers can be delete, stored here, and you can make a callout here.
z Text Message
you can send / read text message here.
z Call Out
you user can make a callout here.
z Sports
you user can turn on / off “Stop Watch”, specify the activity “at Running or Cycling”, and input the
weight on which the calorie is calculated based.
z Alarm Clock
you can turn on / off alarm, set up the alarm time as well as a beep once every hour.
4.2
Set up on Computer via USB Cable
You can set up most of the functions by USB cable, except “Sports”, “Alarm Clock”.
¾
Build up Connection
First, turn on the tracker, until the unit is rebooted, then connect the unit to computer by USB cable, and
click open the unit’s software.
14
Pull down to choose “Vid:0x0471 Pid:0x000” and click “Open” to build up this connection between the
computer and the unit. And then you can check the system information by clicking “Information”.
Note:
1. When all the settings are done, please return to “USB” option, and turn off the connection by
clicking “Close”. Otherwise, it may cause malfunction at later use.
2. Please make a note of the IMEI code.
¾
Setting of the Phonebook (PIC 1)
Move to tab “Setting”. Here can set up the numbers of the phonebook. You can save / delete / read numbers
in the phonebook here.
¾
Setting of Tracking Status (PIC 2)
You can set up the unit’s tracking status. All the values comply with “SET” parameter. Input all the values
properly, and tick up to set up in the right small box and at last click “confirm” to confirm.
Read: Check the old setting.
Restore: Click here to restore the default settings.
Note: The Time zone consists of 5 digits. The 1st digit indicates ‘+’ (0) or ‘-’ (1), e.g. if the time zone
is 00800, you input only 0800, while for 11200, you need input -1200, which must include the “-“.
15
PIC 1
¾
PIC 2
APN Setup
Input the APN, Username, Password, IP address, Port Number accordingly, and click “Setting” to confirm.
Read: Read the old settings.
Erase: Erase the old settings.
Note: Please refer to the below for how to set up APN, IP address and Port number.
16
Note: When configuring the unit via USB cable, you can’t send SMS to the unit, for the GSM module
is turned off at the time.
4.3
Set up by SMS commands
You can set up the tracker by SMS commands as below.
¾
Commands List
This list includes all the commands. It will tell you how to set up / check the unit’s working status, get the
location reports.
Working
Command
Definition
S,SET:xxxxxxxxxxpppp
Establish/Change the “SET” parameter, to set up
ppxxxx
the unit’s working status.
S,SOFF
Turn off the Auto SMS sending.
Remarks
Refer to the below.
Auto
SMS
report
relates
with
Location
SMS/GPRS Report Timer It is suggested you
turn off this function, if you do not want the auto
S,SON
Turn on the Auto SMS sending.
location report, otherwise, it will keep sending
your location SMS, to cost you much.
S,ROFF
Turn off the GPS reception.
GPS reception relates with GPS Reception
S,RON
Turn on the GPS reception.
Timer.
S,SPDOFF
S,SPDON
S,GEOFENCEOFF
S,GEOFENCEON
Turn off the Speeding Alarm.
Turn on the Speeding Alarm to get alerted when
the speed limit is breached.
Turn off the Geofence.
Turn on the Geofence to get alerted when the
tracker moves outside the round district.
S,GPRSOFF
Turn off the auto GPRS location report.
Auto GPRS Sending relates with Location
S,GPRSON
Turn on the auto GPRS location report.
Report Timer.
N,NAME:number
Save the number and define the NAME.
Setup
N, NAME: D
Delete the number of Name’s.
N, NAME:?
Check the number of Name’s.
E.g. to save number 13714742568 as SOS2, the
command is “N, SOS2:13714742568”.
E.g. to delete SOS2, the command is “N, SOS2:
D”.
E.g. to check SOS2’s number, the command is
“N, SOS2:?”.
Default Setting:
Auto SMS Sending ON; Auto GPRS Sending
S,F
Restore the default setting.
OFF; GPS Reception ON; Speeding Alarm ON;
Geofence
ON;
Location
Report
in
COORDINATES; Password 000000.
POWER OFF,IMEI
Power off the unit.
A,APN,username,passwo
rd,IP address, port
Set up the APN for GPRS tracking on computer.
Refer to the below.
number
Location
A,CLR
Clear APN setting.
D,E
Clear Recorded Waypoints data.
S,LF:NORMAL
Location
report
on
mobile
phone
is
in
17
coordinates.
Inquiry
S,LF:GOOGLEMAP
W
Location report on mobile phone is a link,
To open the link, you can view the real location
connecting with Google Map.
on mobile phone.
Numbers not in the phonebook have to input the
Inquire the location by these two commands.
password to inquire the location.
W,******(password)
Check
S,?
Check the unit’s working status.
A,?
Inquiry APN status.
Check IMEI number, battery level, and memory
I,?
¾
Refer to the below.
level, hardware version and software version
Commands in detail
Every command will get a confirmation after being sent. Hereunder presents several examples for
clarifications:
Example 1: S,SET: xxxxxxxxxxppppppxxxxxxxxxx
“SET” parameter can be established via this SMS command and changed later via this SMS command.
Confirm
Establish or change the “SET” by this SMS
command S, SET:
xxxxxxxxxxyyyyyyxxxxxxxxxx” (26digits
without space).
z If the command is incorrect in format, it
will reply: SET! SET data format
error!
z If “SET” is not replaced successfully, it
will reply: SET! SET data save error!
Please try again.
Notes:
z For safety consideration, the device’s password can’t be changed by SMS command; these 6 digits in
SMS must be the same with the old one which is pre-set on mobile phone. If the SIM card isn’t pre-set
before, the default value will be 000000.
z In case of accident (such as the unit is in process of power-off when the SMS is sent out), this operation
may cause the parameter setting returns to the default value (including the password).
Example 2: S,?
This command can check the unit’s working status.
18
Confirm
The meaning for the reply of confirmation is as below:
GMT:+08:00
Time Zone is 00800
GPS RT:00
Fix GPS with no interval
SMS ST:01
To report a location every 1 minute
GPS R:on
GPS reception is on
S Timer: off
SMS sending is off
B Alarm:9
Auto check the battery level every 9
minutes
Geo:05
Geofence district is 250m in radius
SPD:07
Speed limit is 70km/h
SPD:ON
Speeding Alarm is on
GPRS:on
Auto GPRS sending is on
Geofence:off
Geofence function is off
LF:NORMAL
Location report is in coordinates
Save by time:1s
Record the waypoints in every 1
second.
Example 3: A, APN, username, password, IP address, port number
To view the location on computer via GPRS, you need activate the GPRS function: first to set up APN;
second to turn on GPRS (refer to the above Commands List.). To set up APN as below:
Confirm
APN Please refer to the last APN
table or consult with the
operator if not available in the
table.
IP address
Router’s
IP
address
OR
Username/ Some operators may ask the username &
Password password for using GPRS. Check with
the operator if being asked. If they are
not asked, you can leave two commas
“,” in their places.
Port Number In correspondence with the computer’s
19
modem’s IP address.
IP address.
Note:
z If APN, username, password do not change when you re-set unit, you can leave three commas in their places. In fact, as
long as any index of the command does not change, you can send the command this way.
z The IP address in this command should be WAN IP address, say Router’s / Modem’s IP address. (WAN IP address is
assigned by the ISP (Internet Service Provider). You can check the IP address here: http://www.getipaddress.com OR
http://192.168.1.1/ ) (Refer to the below.)
z The Port number should be in correspondence with LAN IP address, say the computer’s IP address. Please set it up on
the router. ( LAN IP address is the local IP. You can check it on your computer by DOS command: winipcfg
(Windows98) OR ipconfig (Windows2000/XP)。) (Refer to the below.)
5 SMS Tracking
There are two inquiry modes:
NORMAL: The user can check the location by coordinates.
GOOGLEMAP: The user can check the real location with a mobile phone. The mobile phone must be able
to browse the internet.
5.1
Change the Inquiry Mode
The user can send a SMS command to change the inquiry mode. The SMS command is as below:
Confirm
The user can send “S, LF: NORMAL” to the tracker to switch to NORMAL mode.
5.2
In Normal mode
By SMS
20
Reply
Note: Any number can send “W+Password” to check the location, while only numbers in the tracker’s
SIM card can send “W” to check the location.
By Phone Call
Note: Only numbers in the tracker’s SIM card can dial up the device. When they call in, the tracker will
hang up and return a location SMS as above.
5.3
In GOOGLEMAP mode
By SMS
Reply
Check
By Phone Call
21
Check
5.4
Track On Google Earth & Google Map
After having received the coordinate, manually input it to Google Earth (download from earth.google.com)
or Google Maps (maps.google.com), then you can find the real location on the map.
Note: The received coordinate is this: N, Lat: 2233.0361, E, Lon: 11404.9644, but when we input it, we
should use this format: N22 33.0361, E114 04.9644. There is a space between N22 and 33.0361; E114 and
04.9644.
22
Select “Satellite” or “Hybrid”.
6 GPRS Tracking
Before getting GPRS tracking to work, please set up APN, IP address, Port number. For APN, the user can
refer to the list table at the end of this manual. For IP address, Port number, it is instructed as below:
6.1
¾
Check APN, Set up IP Address & Port Number
APN
There is a list table for APN all around the world. Please refer to it for APN. We don’t guarantee its validity,
so if it doesn’t work, please consult your service operator for information.
¾
Set up IP Address & Port Number
There are two ways for internet: Router & Modem. The setup will vary accordingly. Modem is easy of
setup comparatively.
Router:
Under a router, there can be several computers connected. To lead the GPRS location data to the specified
computer, you should assign the location to tracker, and do some settings on the router.
First check out the computer’s IP under the router as below:
23
Input “ipconfig”:
24
Set up the router. Usually, you can log into the router by http://192.168.1.1 or http://192.168.0.1 or refer
to the router’s user manual for information.
Input http://192.168.1.1/ to log into router.
This is the router IP.
25
Enter your computer’s IP Address and Port Number into appropriate text box.
Set up the Port Number.
Make sure of it not to
conflict
with
your
computer.
Then you find Port Forwarding OR Forwarding
This is the computer’s IP.
Rules or the like. Click in and Set up the Port to
have it in compliance with computer’s IP.
Note:
1. There will be several options for making different configurations. Please choose the right place. Usually,
the place is called Port Forwarding / Forwarding Rules and so on.
2. Make sure the port number will not be pre-occupied, such as 8080 etc.
26
The completed setting as below:
Modem:
There is no other computer under a modem, so you just specify a port number at random (just make sure it
is not pre-occupied by system.), and assign the modem IP to tracker.
6.2
Start Tracking
Open the software PC Suite, and tick the “TrackerMode”, it will auto jump to tab “Tracker”. Then turn
on the GPRS sending and input the IMEI code, and at last tick up “Start/Stop GPS Track Server” to
open the Google earth automatically.
When there are two trackers, you can designate different colors for them by clicking “color”.
Note: Make sure the firewall is off, which will block the GPRS data.
27
In the left column on Google earth, you can found the GPS Tracker Server in the Temporary places.
Please extend it by clicks. After receiving data from Tracker, the software can add a place mark in the
Google earth. You can find them in Position folder.
Double click at any place mark that you can find it from the map.
28
Tick up the box of Trail folder, and you can find the route in the Google earth.
Note: When using GPRS tracking, if the user does not need SMS sending, it is recommended to turn off the
SMS sending by “S, SOFF”.
7 Data Logger
It can record 54,000 waypoints at maximum. With those points, you can check the history route on a map
on your computer.
A. Setting of the Logger
Move to “Setting”. Here can set up the working of the unit’s logger, and the phonebook.
29
For Logger: You can choose to log by time or by distance, but only one working mode can be chosen. The
value range for “by time” is 1s-99999s, for “by distance” 50m-65000m. To click “Read”, you can check
the preset value.
Note: The value below 50m will cause drift in position.
B. View the Recorded Waypoints
First click “Read” to download all the waypoints to computer, and then choose the “date filter” and the
“speed filter” to view the specified waypoints. After choosing the filter, click “View Map”, and the
Google earth will open automatically, and display the waypoints accordingly.
When you want to empty the recorded waypoints, please click “Erase Data”.
Note: If the red light flashes quickly on starting the unit, it means the logger’s memory is full. Please erase
the data first!
30
C. Photo Logging
When you record the waypoints outside, you can take photos at the points of interest. After coming back,
you can synchronize the photos of the camera with the points of interest recorded on the data logger, to
view the photos and the waypoints simultaneously on the map.
a) Set the GPS data logger and Camera
First thing to do is synchronize the time of your data logger and camera. You can do in two different ways:
1). If you didn’t change its setting, your GPS data logger records the track log with the GMT time
(Greenwich Meridian Time) also know as UTC (Universal Time Co-ordinated). Set the time of your
camera to GMT. You can see the actual GMT time at the bottom of this webpage (be precise at the second
level): http://wwp.greenwichmeantime.com
Setting your camera to GMT is practical since you won’t have problems for summer/winter time or when
you travel through time zones. Also set the camera date if necessary.
2). Set the local time of the camera precisely to the same local time indicated by the GPS data logger. Also
set the camera date if necessary.
b) Go outside and Shoot
31
Take your GPS data logger with you and make sure that it is recording a track log. Keep your GPS data
logger ON during all the time you take pictures.
c) Come back home and sync
Please download the photos from the digital camera, and save the recorded waypoints in format: **.txt.
Launch “GipcSync”:
Click “Pictures folder” to import the photos, and click “GPS file” to import the waypoints saved in the
file:**.txt. And press “Synchronise” to synchronize the photo and the waypoints:
32
Note:
z Depending on the way you’ve set your camera and GPS data logger, please indicate the UTC Offset as
below:
+1 in France, 0 in the UK, -8 for PST, -5 for EST,etc, You may need to add an hour for summer local
time depending of your country policy. 0 if your camera is at GMT time.
z There’s also an indication of the time difference between the nearest track point and the picture (you
should see a few seconds difference). If this difference is important (above a hundred seconds) there’s
probably something wrong in your time setting. In particular check that you’ve indicated the right UTC
offset (and maybe add an hour if you are in a summer daylight saving zone). By default GPicSync
doesn’t Geocode photos if the time difference is above 300 seconds but you can adjust this threshold in
the interface (“Geocode only if time difference is less than (seconds)=”). This could be useful on some
GPS if you make a pause and the GPS stops recording.
Then click “View in Google Earth” to start the Google Earth automatically:
Click on the icon to view the photo:
33
8 Troubleshooting
Troubles Description
Solution & Causes
1
The popup stays still, doesn’t
disappear when using GPRS
tracking.
GPRS transmission is not stable. It builds up the connection, but doesn’t
send GPRS data. Please cancel the popup.
2
There is an IP address existing in
“Connected Clients”.
It doesn’t relate with the computer or the tracker. It is assigned by GPRS
service provider. It doesn’t affect tracker’s working.
3
Tracker doesn’t work on Vista
system.
The USB driver is for XP operation system only.
4
Red light stays on still.
The tracker doesn’t read out its SIM card. SIM card may be damaged, or
there is an AD to be confirmed as it is used on mobile phone.
There are more than 1 routers
deployed in tree structure.
The IP address set on tracker’s SIM card will be the outermost router’s one,
and the Port Number will be coherent in all the routers. Above router’s IP
will be assigned to the lower one, so that the GPRS data will be led to the
right computer.
The logger
waypoints.
The memory is full, and the user should erase the recorded data manually.
5
6
7
can’t
record
more
GPRS tracking doesn’t work with wireless internet connection.
34
9 Worldwide APN (Access Point Name) List
35
36
37
38
39