1
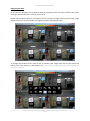
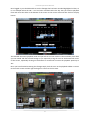
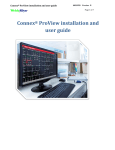
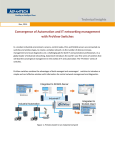
Proview User Guide
Basic Operations Manual
Proview Operation Manual V1.1
Proview Operation Manual
2
Proview Operation Manual
Operating the DVR
All of the basic operations on the DVR are done by using the mouse, left click will select any option
and right click will take you in and out of any menu.
Below is the standard view from a 4 channel system. To bring any single camera up full screen simply
double click on the camera, double click again to return to the previous view.
To change the standard 4 way camera view to another view simply right click on the screen and
choose one of the options on the bottom row. (If you have a larger system you will be presented
with more options)
3
Proview Operation Manual
Sequencing Images
If you would like to set your machine to cycle through a set of images in a sequence rather than
viewing a single camera or a split screen image right click on the screen and select the ‘Automatic
sequence button’ which is highlight in the image below.
Choose the cameras you wish to sequence and set the interval time to the amount of seconds you
want each camera to stay on the screen for if you then leave the mouse still for a few second the
machine will begin to sequence.
If you require to cancel the sequence right click on the screen and click the green arrow in the
sequence box shown below.
4
Proview Operation Manual
Listening to Audio
Not all CCTV systems use audio however if you do have microphones connected listening to the
audio is straight forward, when you are in either live or playback mode simply click on the picture of
the speaker to the relevant camera you would like to hear.
When you click the icon as shown below the speaker symbol should appear simply click the same
icon again to turn the audio off
5
Proview Operation Manual
Playback
If you require to playback any recorded footage on the DVR right click on the screen to bring up the
menu and click on the time search option.
If you haven’t yet logged into the DVR you will be presented with the password box below. If you
click on the text box a keyboard will pop up for you to enter your password. If you are unsure of the
password or if one hasn’t been set on your machine the default is ‘123456’ once you have entered
the password simply click on the return button in the bottom right hand side to login to the
machine.
6
Proview Operation Manual
Once logged in you should be able to see the footage that has been recorded highlighted in blue, so
in our example below the 18th – 25th has been recorded. Select the day that you need to playback
from and move the slider at the bottom of the screen to the correct time and then click on the play
button.
The DVR will then enter playback mode and you will see a screen similar to the one below, from here
you can rewind and fast forward footage as you require by using the icons in the bottom left corner
of the screen, repeatedly clicking on fastforward or rewind will increase the playback speed up to
32x.
Once you have finished reviewing the footage simply click the cross in the playback toolbar to return
to the search screen and the right click again to return to the live view.
7
Proview Operation Manual
Backup
If you need to retrieve any footage off the machine to use as evidence or keep as a record right click
on the main screen and click on the backup option shown below.
If you have not already done so you will be asked to enter the password for your DVR. Once you
have entered it you should see the screen shown below.
From here you can choose the footage you require to backup from the machine, select the time and
date you need to backup from and to by simply clicking on the dates and choosing the required
times. Then tick the channels you require to backup, if you require every channel simply tick the ‘all’
box.
If you then click on the calculate button the DVR will tell you how much space is required on either
your DVD or USB drive to backup your required footage. If you insert your DVD or USB drive you
should now be able to click the backup to start the backup.
Once it has finished you can remove the USB drive or DVD and play the footage back by putting it in
a PC.
8