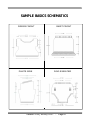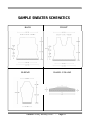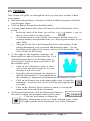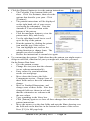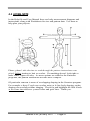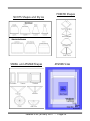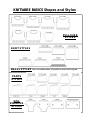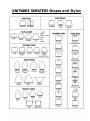
1
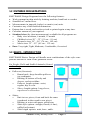
Version 2.50.2
Getting Started
Guide
January 2007
Copyright notice
The KNITWARETM program, help files, Getting Started Guide and any accompanying
documentation are copyright ©2006-2007 Lai Associates, Inc.
All rights reserved. Information in this document is subject to change without
notice. No part of this publication may be reproduced or transmitted in any
form without prior written permission of Lai Associates, Inc..
For information, contact:
Great Knit Designs
c/o Lai Associates, Inc.
P.O. Box 1888
South San Francisco, CA 94083-1888
USA
Tel.: (650) 491-3852
Fax: (650) 873-3331
Windows 2000 and XP are trademarks of Microsoft Corporation.
BOND is a registered trademark of Bond Knitting Systems Ltd.
Knitware graphics copyright by Eryn Tombu and Carol Haigh.
System Requirements
IBM PC or compatible 486 or higher
Windows 2000 or XP
5 MB hard disk space
CD-ROM, Printer (optional)
Table of Contents
1. INTRODUCTION___________________________________2
1.1 IN THE BEGINNING_____________________________2
1.2 KNITWARE DESIGN FEATURES___________________3
1.3 BASICS - INTRODUCTION_______________________3
1.4 SWEATERS - INTRODUCTION____________________4
1.5 SKIRTS & SHAWLS - INTRODUCTION______________5
1.6 DESIGN A NEW PATTERN - INTRODUCTION_________6
1.7 DESIGN NOTES_______________________________6
1.8 CAUTION____________________________________7
SAMPLE BASICS SCHEMATICS__________________________8
SAMPLE SWEATERS SCHEMATICS_______________________9
SAMPLE SKIRTS & SHAWLS SCHEMATICS________________10
2. INSTALLATION___________________________________11
2.1 KNITWARE INSTALL___________________________11
2.2 INSTALLING KNITWARE UPDATES________________11
2.3 KNITWARE UNINSTALL________________________11
2.4 CONVERT EXISTING DATA_____________________12
3. RUNNING THE PROGRAM___________________________13
3.1 WELCOME TO KNITWARE DESIGN________________13
3.2 KNITWARE MAIN MENU________________________14
3.3 DATA ENTRY________________________________15
3.4 HELP FILE / USER MANUAL____________________16
3.5 TUTORIAL_________________________________17
4. TECHNICAL ISSUES______________________________20
4.1 PROBLEMS ________________________________20
4.2 ERROR MESSAGES___________________________20
4.3 A FINAL NOTE_______________________________21
5. CONTACT_______________________________________22
Version 2.50 January 2007 - Page 1
1. INTRODUCTION
This Getting Started Guide serves as an introduction to the Knitware Design
programs.
It covers all three programs (Basics, Sweaters, Skirts & Shawls), although you
may have purchased only one of them. Further information can be found in
the Knitware program Help file, User Manual and on our web site.
1.1 IN THE BEGINNING
The KNITWARE Design programs have been written by a knitter for knitters.
I knit both by hand and using a BOND knitting frame. I was frustrated by the
continual need to convert patterns for different yarns or sizes, for changing a
neckline or lengthening a sleeve. The KNITWARE Design programs were the
eventual outcome of this frustration.
These programs will print pattern instructions for you to use in knitting or
crocheting a customized garment, using the data that you give it, and tables of
standard body measurements. The program uses your measurements, your
style selections, your gauge and your yarn information to create a unique
pattern. This pattern also gives you a permanent record of what you have
knit, and when.
Pattern instructions can be generated for hand knitters, machine knitters and
crocheters. The machine knitting instructions are very simplified, assuming
you are using a basic knitting frame, with or without a ribber. There are no
specific instructions for punchcard or electronic machines.
Version 2.50 January 2007 - Page 2
1.2 KNITWARE DESIGN FEATURES
KNITWARE Design Programs have the following features:
• Work garment in plain stitch by knitting machine, hand knit or crochet
• Standard or Custom Sizes.
• Measurements in imperial (inches) or metric (cm) units.
• Customize any of the finished dimensions.
• Pattern data is saved, and can be revised or printed again at any time.
• Calculate amount of yarn required.
• Standard sizes (by chest measurement) available for all programs are:
Ÿ
Baby sizes newborn, 6 month, 12 month
Ÿ
Children's sizes 20” - 32” (51 cm - 81 cm)
Ÿ
Women's sizes 30” - 56” (76 cm - 142 cm)
Ÿ
Men's sizes 32” - 52” (81 cm - 132 cm)
· Ease: Very tight, Tight, Moderate, Comfortable, Oversized
1.3 BASICS - INTRODUCTION
KNITWARE Basics Design will handle most combinations of the style components shown for each of the garments below.
For People, Dolls and Stuffed Animals (Seated
or Standing):
• Pullovers (Sweaters):
Ÿ
Round neck, drop shoulder pullover
(no cardigans).
Ÿ
Ribbing at bottom of body and
sleeves, and at neckline.
Ÿ
Pullover length options: waist,
regular, hip or coat.
Ÿ
Sleeve length options: long sleeve,
cap sleeve or sleeveless.
• Skirts:
Ÿ
Knit in two pieces, front and back the same
(crocheted in the round in one piece).
Ÿ
Ribbing at waist with garter stitch hem.
Ÿ
Skirt style options: straight, flared (A-line),
ruffled (at bottom).
Ÿ
Skirt length options: mini, knee, ankle.
Version 2.50 January 2007 - Page 3
• Dresses:
Ÿ
Worked from waist to neck for the top, then pick up sts and worked
from waist to hem for skirt.
Ÿ
Lace holes at waist.
Ÿ
Combination of skirt and pullover styles.
• Pants (Trousers):
Ÿ
Worked in two side pieces, sewn together at center
front and back.
Ÿ
Ribbing at waist, with garter stitch or folded hem.
Ÿ
Pant leg style options: straight, flared (bell-bottom), wide flare, legging (tight fitted), slim.
Ÿ
Pant length options: pantie, shorts, knee, capri,
ankle.
Ÿ
Optional suspenders.
For Pets (Live animals) or stuffed animals that stand on four legs:
• Dog Sweaters:
Ÿ
Four basic styles: simple (no sleeves), pullover (square at back end),
tuxedo (shaped back end) or back opening
pullover.
Ÿ
Worked in one flat piece with center front seam
(except back opening).
Ÿ
Ribbing at neck, at end of sleeves and to finish
around the back end.
Ÿ
Sleeve length options: short, medium, long.
Ÿ
Front length options: short, medium, long.
1.4 SWEATERS - INTRODUCTION
KNITWARE Sweater Design will handle most combinations of the following
style components:
• Construction: Flat Bottom-Up, Circular Bottom-Up,
Circular Top-Down
• Body Style: Pullover, Cardigan
• Body Shape: Straight, Fitted Waist, A-line
• Shoulder Style: Drop (T-square), Raglan, Set-in
(Classic, Gathered or Pleated Cap), Modified Drop,
Saddle, Round Yoke
• Body length: Cropped, Waist, Regular (between waist
and hips), Hip, Thigh, Above Knee, Knee, Calf, Ankle
Version 2.50 January 2007 - Page 4
• Neckline (front or back): Round (crew), High Round, Keyhole, V, Scoop,
Ballet, Square, Boat (butted or overlapped), Flat, Shallow; Also Backless.
• Collar: Single band, Double band, Rolled edge, Shirt, Cowl, Turtleneck,
Funnel, Shawl, Hood (simple or shaped)
• Sleeve Style: Narrow Taper, Moderate Taper, Lantern, Modified Lantern,
Bishop, Bell, Dolman.
• Sleeve length: Full, Three-Quarter, Half, Short, Cap, Sleeveless.
• Body and Sleeve Hems: Ribbing, Moss Stitch, Garter Stitch, Folded Band,
Frill, Crochet Edge, No Hem
• Cardigan Front Bands: Vertical Rib, Horizontal Rib, Picot, Moss Stitch,
Garter Stitch, None.
1.5 SKIRTS & SHAWLS - INTRODUCTION
Skirts:
• Styles: straight, A-line, flared, swing
• Construction: top down, bottom up, sideways
• Waist to hip shaping: gathered, side shaping, tiered
• Waistband: ribbing, elastic casing, drawstring,
herringbone, crochet
• Hem: ribbing, moss or garter stitch, ruffle, folded
band, crochet
• Length: mini, above knee, knee, calf, ankle, floor
Shawls:
• Shape: circle, half-circle, rectangle, square, Shetland,
triangle, Faroese
• Border: marathon, sprint, fringe, crochet
• Construction: top down, bottom up, sideways, diagonal,
center out - wedges or rings
Ponchos:
• Construction: Two Rectangles, Four Triangles, Closed/
Open Circle Sideways/Top-Down
• Size: Chest, Waist, Hip, Thigh, Knee, Calf, Ankle
Afghans:
• Shape: circle, half-circle, rectangle, square
• Border / construction: as for shawls
• Size: Queen bed, double bed, single bed, throw, lap, crib, baby blanket, dish
towel, pot holder
Version 2.50 January 2007 - Page 5
1.6 DESIGN A NEW PATTERN - INTRODUCTION
Before you start running the program, you need to know a few things. You
should have:
• An idea of the garment design that you want to make.
• The recipient’s size, and approximate finished dimensions required (or at
least an idea as to how your recipient varies from the "average").
• The yarn information (from the manufacturer's ball-band or from the
spinner, if it is homespun).
• A test swatch of the yarn worked
on the needles (or hook or
machine) using the stitch pattern
that is to be used for the body of
the garment. The test swatch
should be laundered before
measuring. From this, the gauge
over 4 inches (10 cm) for
rows and stitches should be
calculated.
AN ACCURATE TEST GAUGE IS CRUCIAL to designing and knitting or
crocheting a garment that will fit well.
The program is run from the main menu. In a typical session you would
design a pattern and then print it. After checking the printed measurements,
you may decide to change the pattern, then print it again.
This is where it all starts. You have some wool, a test swatch, some
ideas as to the size and style of garment that you want. Here, all your information is entered and the program calculates the number of stitches, rows,
decreases and cast-offs to make this one-and-only custom garment.
1.7 DESIGN NOTES
The program gives you a pattern for a plain garment tailored to your selected
size and specifications. You can easily add stripes, intarsia, lace holes, cables,
etc. If you are adding cables (or anything else that will change the stitch
gauge), remember to either knit a test swatch with the cables (if there is a lot
of it), or to adjust the ease a bit (for a small amount).
Version 2.50 January 2007 - Page 6
You can specify an all-over stitch
(texture) pattern such as lace,
checks or twists and Knitware will
adjust for the stitch repeat.
If you are using two or more
different yarns (e.g. body in a
multi-coloured nubbly yarn, ribbing
in a plain yarn) it is a good idea to
make a test swatch with each yarn,
and run the program twice, once
with each stitch gauge. You will
have to manually combine the two
patterns, or decide which bits to use, but it will give you a better-looking
finished garment.
To create fair-isle, lace or intarsia designs, you
can use the schematics with overlaid grid
option or save your schematics and then
import them into a graphics, paint or stitch
design program. Check the help file for more
information.
1.8 CAUTION
The patterns created by the KNITWARE programs will produce wearable,
well-fitting garments in most cases. However, just as for off-the-shelf patterns, knitting with the wrong needles, or to a different gauge will give
unpredictable results.
With the KNITWARE programs, you have an even greater possibility of error
since you can also change any of the finished dimension data. There are far
too many possibilities for the program to check them all; I assume that you
will use common sense. Also, if you do change any dimension data, re-check
your measurements and the pattern instructions for reasonableness BEFORE
starting to knit or crochet.
Version 2.50 January 2007 - Page 7
SAMPLE BASICS SCHEMATICS
DRESS FRONT
PANTS SIDE
SKIRT FRONT
DOG SWEATER
Version 2.50 January 2007 - Page 8
SAMPLE SWEATER SCHEMATICS
BACK
SLEEVE
FRONT
SHAWL COLLAR
Version 2.50 January 2007 - Page 9
SAMPLE SKIRTS & sHAWLS SCHEMATICS
SWING SKIRT PANEL (1 of 6)
OPEN CIRCLE PONCHO
RECTANGLE AFGHAN
FAROESE SHAWL
Version 2.50 January 2007 - Page 10
2. INSTALLATION
2.1 KNITWARE INSTALL
Knitware programs must be installed to your
hard drive before they can be run. Once you
have installed the program, keep the original
media in a safe place as a backup.
Please see the Knitware Installation Guide for
instructions on installing your software.
Notes:
• KNITWARE files will install by default to the c:\Program Files\Knitware\
Sweaters 2.50 folder for Sweaters, ...\Basics 2.50 folder for Basics or
...\Skirts 2.50 folder for Skirts and Shawls, which it will create if it does not
already exist. (You may change the default folder by following the
instructions on the screen). If you copy or move files manually (e.g. using
Windows Explorer) ensure that all the KNITWARE files remain together in
the same folder.
2.2 INSTALLING KNITWARE UPDATES
Knitware updates are full versions of the current program release, not add-ons
to previous versions. Therefore, they are installed exactly as for new programs
as described above. They will install to a different folder from your current
version of Knitware, so that your old data and program files will still be
available after the new version is installed. There is no need to uninstall the
old version, except if you do not have enough disk space.
Version 2.50 January 2007 - Page 11
2.3 KNITWARE UNINSTALL
If you wish to remove KNITWARE from your computer, use the unInstallShield as follows.
For Windows 95/98/ME/2000/XP:
• launch Add/Remove Programs out of the Control Panel
• highlight the application name
• click on the [Add/Remove] button ([Change/Remove for WinXP)
• Windows will launch unInstallShield
For Windows NT:
• launch unInstallShield by double-clicking on its icon in the KNITWARE
program group.
2.4 CONVERT EXISTING DATA
If you have a previous version of KNITWARE, you may want to use some of
your old pattern or custom size data with this new version. There is a utility
provided for converting pattern data from version 2.10 - 2.40 to 2.50, but the
rest must be done manually. You can look at it as an opportunity to clean up
your files. Which of those custom sizes do you really use any more, and
which patterns are current?
KNITWARE 2.50 will install in a separate folder and use different files than
older versions of KNITWARE, so the old version (and its data files) will still
be accessible after the new one is installed. For more information check the
Convert Old Knitware Data and the Convert Pattern Data sections in the Help
file or User Manual.
Version 2.50 January 2007 - Page 12
3. RUNNING THE PROGRAM
3.1 WELCOME TO KNITWARE DESIGN
Welcome! I hope that you will enjoy the program and have many hours of fun
designing and knitting or crocheting garments of all shapes and sizes.
KNITWARE allows several different knitters or crocheters (or one person in
several different guises) to use the program. Since we all have different
preferences and ways of doing things, KNITWARE stores these preferences on
a “Designer Defaults” file, keyed by designer name. For example, Mary may
knit by hand and work in metric measurements, while Elaine knits with a
Singer machine and uses imperial measurements and Harry crochets with US
hooks. Every time that you use the program you will select your designer
name, and these defaults will be used for all subsequent calculations (note,
however, that all these fields can be changed individually for each pattern that
you design).
The first time that you use the program, you must enter initial values for the
Designer Defaults. However, as you use the program more, or as your needs
change, you may want to change some of these default values. To change the
designer defaults select Add/Change from the Designer Defaults option on the
Main Menu.
To start on the Designer Defaults Form:
•
Type your name in the DESIGNER NAME field.
•
Select values for MEASUREMENT UNITS, WORKING METHOD,
NEEDLE/HOOK TYPE, MACHINE TYPE, RIB FIRST/LAST and
PLAIN WORK.
•
Move from one field to the next with the [Tab] key.
•
Explanations of these fields is available by pressing [F1] for help when
the cursor is over a particular field.
•
When you have completed your selections, press [Save] to store this data.
Next press [Close] to close the form.
•
You will be returned to the Designer Name Form, where your name will
be highlighted in the DESIGNER NAME box. Click on [OK] to accept
this name and close the form.
If you have not already done so, I would suggest that before you create your
first pattern, read the "Introduction" section of the "Designing a KNITWARE
Garment" chapter in the Help File or User Manual.
Version 2.50 January 2007 - Page 13
3.2 KNITWARE MAIN MENU
The KNITWARE Main Menu is the control center for your KNITWARE
program. It will offer you the following selections:
• Designer Defaults
Ÿ
Select
Ÿ
Add/Change
• Size Data
Ÿ
View/Print Size Data
Ÿ
Custom Sizes
• Pattern Design
• Calculator
Ÿ
Gauge Equivalents
Ÿ
Inc/Dec Sts evenly
Ÿ
Magic Formula
Ÿ
Round Yoke Shaping
Ÿ
Hat Calculator
• Utilities
Ÿ
Graph Paper
Ÿ
Colour / Font Settings
Ÿ
Convert Pattern Data
Ÿ
Backup Data Files
• Help
Ÿ
Contents
Ÿ
Topics
Ÿ
Register
Ÿ
About...
Ÿ
Windows version
Click on an option to select it, or from the keyboard use [Alt] and the underlined letter (e.g. to select Pattern Design, press [Alt] and the letter P together).
To
•
•
•
exit from the program, either:
click the X in the upper right corner, or
click the program icon in the top left corner, and select Close, or
press [Alt] [F4]
Version 2.50 January 2007 - Page 14
3.3 DATA ENTRY
All data entry for this program follows a few simple rules:
•
Default (displayed) values will be used unless you
change them.
•
Use the mouse to click on a field that you want to change, or use the
[Tab] key to move through the fields in order. The [Enter] key can be
used interchangeably with the [Tab] key.
•
The [Backspace] and [Delete] keys can be used to change data as it is
being entered in a field.
•
‘Insert’ is always on. To change data (type over, rather than insert),
highlight the old data with the mouse, then type in the new data.
•
When you place the mouse cursor over a field, a HELP HINT will appear
in the Status Bar (lower left of the screen) and over the data field.
•
Press the [F1] key on a form or field for more detailed HELP.
•
Numeric fields will not accept non-numeric characters.
•
Dimension data (on pattern data form) that has been changed in the
current editing session is shown in red instead of the default colour
(usually black).
Many data values are entered by a drop-down list selection: e.g. UNITS,
SHOULDER STYLE, EASE STYLE.
•
•
Click the [q] button to display the selection list, use the mouse to
highlight a line, then click the left mouse button to select.
Optionally, you can use the cursor keys to change the selection without
displaying the entire list.
File records (for pattern data file and size data file) are manipulated using the
Navigator Bar, which allows you to scan through the file, add new records or
delete selected records. For more information, read the Navigator Bar section
in the Help File.
There are two major types of data to be entered: mandatory and optional.
•
Mandatory data fields are those that will be used to calculate the pattern
data. Some examples are: stitch and row gauge, size, sleeve length. If
the required data values are not accurate, the garment will, in all
probability, not fit.
•
Optional data is for information purposes only. It is printed on the
pattern to help you remember when, or with what, the garment was
created. Some examples of optional data are: the date finished, for
whom the garment is made, the yarn colour.
Version 2.50 January 2007 - Page 15
The program checks all data as it is entered. If it is found to be incorrect or
questionable, a message is displayed and the data must be corrected before
proceeding further.
However, not all possibilities can be checked by the program.
•
You should verify that what you have entered on the screen is what you
want, before you [SAVE] your data.
•
You should also check the printed pattern thoroughly (especially the
Finished Dimensions section) BEFORE starting to knit or crochet the
garment.
3.4 HELP FILE / USER MANUAL
Brief one line hints for most buttons and data fields are provided in the Status
Bar, at the bottom left of the main window, and over the data field.
The main help file can be accessed
in two ways: from the main
window Help (Contents or Topics)
selection, or by pressing [F1] from
any form or data field. The help
file has all the information in this
user guide, plus much more. It
describes all the processes and data
required to run the program, lists
and explains error and warning
messages, provides pattern and
custom size worksheets, and
clarifies some of the terms, abbreviations and instructions used by
the Knitware design programs.
Knitware also provides an optional printable User Manual which contains the
same material as the Help File. To print the User Manual:
- insert your Knitware CD in your CD-ROM drive
- in My Computer, select your CD-ROM drive (usually d:)
- double click on the file name "KWManual250.pdf"
- print from Acrobat
If you have problems, check the Help file for full instructions.
Version 2.50 January 2007 - Page 16
3.5 TUTORIAL
This section will guide you through the first easy first steps to make a Knitware pattern.
• Start the Knitware Basics, Sweaters or Skirts & Shawls program, and select
your Designer Name.
• Click on Pattern Design from the Main Menu.
• A nearly blank Pattern Data form will show on the left hand side of the
screen.
Ÿ
In the top center of the form, you will see a
button. Click on
this to create (add) your first pattern.
Ÿ
A default pattern is created using your designer default values for
working method, measurement units, etc., and program defaults for all
other fields.
Ÿ
The panel to the left is the Pattern Data form, and contains all the
pattern information, style selections and dimension data. Use the
scroll bar on the right of the form to look at all the data fields. The
Notes field is at the bottom.
• To the right are the schematic drawings (for
Basics pullovers and all Sweaters there are 3 or 4
individual pattern pieces, for all others there is
just one piece, drawn as large as possible to fill
the available space).
Ÿ
Click on one schematic to select it, then
click on the maximize button to view the
drawing at full screen size.
Ÿ
Note that when maximized, the drawing is
labeled and annotated. Each dimension on
the schematic is annotated with dimensions and stitches or rows.
Ÿ
Click on the Printer icon in the upper right corner to print the
schematics. From the next screen, select the print options that
you want.
Ÿ
Click on the ‘Restore Down’ button to return to viewing the
pattern data form and all the schematics.
• On the pattern data form, click the [Schematic] button at
any time to redraw the schematics with current values.
Ÿ Click the grid button to change the
labeling (dimensions, sts/rows or both) and grid (none, centre,
left, right) options on the maximized view of the schematics.
Version 2.50 January 2007 - Page 17
• Click the [Pattern] button to view the pattern instructions.
Ÿ
The Calculate Yarn Amount form will
show. Click Yes:Estimate, then select the
options that describe your yarn. Click
[Continue].
Ÿ
The pattern instructions will be displayed
on the right hand side of your screen,
overlaying the schematics. Note the
Amount of Yarn calculation at the
bottom of the pattern.
Ÿ
Click the maximize button to view the
pattern more fully and clearly.
Ÿ
Use the right hand scroll bar to scroll
up to the top of the pattern.
Ÿ
Print the pattern by clicking the printer
icon near the top of the screen.
Ÿ
You can highlight text, and use the
editing functions to change fonts. The
margins can also be adjusted.
Ÿ
Restore the instructions to normal size again.
• Try customizing the pattern. Think about how the pattern you might want to
design would look, what kind of yarn you might use, what size you need.
On the Pattern Data form:
Ÿ
Give the pattern a name.
Ÿ
Change the size (note that the schematics are redrawn automatically).
Ÿ
Enter values for yarn information,
needle size and gauge.
Ÿ
Move down the form to the Style
Components section. Change some of
these fields and see how the schematics
change.
Ÿ
Move to Finished Dimensions, and
change some of these fields. Note that
changed fields are shown in red and
that the schematics are redrawn with
the new values.
Ÿ
Type something in the Notes box.
Ÿ
Click [Pattern] again to see how all these changes have affected the
pattern instructions.
Ÿ
Move the mouse over the data fields and note the Hints showing over
the field and on the hint line in the bottom left corner of the screen.
Press [F1] for full page help.
Version 2.50 January 2007 - Page 18
• Click [Save] to save the pattern data. This saves all the
information on the pattern data form, and allows you to
retrieve it later, to reprint or revise.
You have just created a Knitware pattern!
This is just a brief overview. There is so much more to Knitware: read the
help file, experiment and try things out. Use [Add] or [Copy] to create more
new patterns. Enjoy!
3.5.1 BASICS TUTORIAL - continued
• Try different garment types.
Ÿ
Return to the top of the Pattern Data form, and select from Pullover,
Skirt, Dress, Pants or Dog Sweater from the Garment Type field.
Ÿ
Try a dog sweater. In the Size
Data, select Dog (Pet) from the
Type list and a breed name from
the Size Name list.
• If the size you want is not available in
the Standard size table, then you can measure your person, doll, bear or pet
and add those measurements to the Custom Size table. To add custom sizes,
select Size Data then Custom Sizes from the main menu.
3.5.2 SKIRTS & SHAWLS TUTORIAL - continued
• Try different garment types.
Ÿ
Return to the top of the Pattern Data form, and
select from Skirt, Shawl, Poncho or Afghan/
Blanket from the Garment field.
Ÿ
Note the difference in style options between
skirts, shawls and ponchos.
Ÿ
Note the difference in size options between shawls and afghans.
Ÿ
Try different construction methods, and note the changes in the
schematics.
• Skirts: Try different skirt styles, then change the number of panels.
• Shawls: Read the hints and help file to understand the difference between
Marathon and Sprint borders.
• Ponchos: Try different poncho styles and lengths; for circular ponchos note
the difference between top-down and sideways, and between open and
closed.
• Afghans: Note that no ‘body size’ is shown for afghans. Sizing is controlled
solely through the Size Style Component and the finished dimensions.
Version 2.50 January 2007 - Page 19
4. TECHNICAL ISSUES
4.1 PROBLEMS
If you have a problem, first note (on paper), the exact
nature of the problem. If it is a message on the screen,
try to print it, using [Alt] [Print Scrn].
Next, read the Knitware help file and other documentation thoroughly. If you are still confused, then get help.
For the install, Windows commands, file recovery, or
start-up, you need someone who knows a bit of Windows
and how computers work.
If it is something that has always worked fine before, try
resetting your system, and starting again.
If it is a problem with the way the program works, the results it gives you, or
the data it uses, describe it fully (a copy of your pattern schematics and/or
instructions is usually helpful) and e-mail, mail, phone or fax it to us. Be sure
to include a phone number or e-mail address where we can reach you.
4.2 ERROR MESSAGES
There are several types of messages that may appear on your
screen. Usually the beep will
sound and the message will
appear in a message box in the
center of the screen.
Most of the messages require acknowledgment (press any key), and a change
in the input data. Fatal errors will exit from the program, and may require a
change to the system environment before the program can be re-run.
Most messages are self-explanatory, but if you have trouble, check the Problems and Messages section of the Help file, which contains a list of most
messages and their explanations.
Version 2.50 January 2007 - Page 20
4.3 A FINAL NOTE
In the Help file and User Manual there are body measurement diagrams and
instructions, along with Worksheets for size and pattern data. Use them to
help plan your projects.
Please, please! take the time to read through the pattern instructions completely before starting to knit or crochet. If something doesn’t look right or
make sense, figure out why. As more options are added to the Knitware
programs, the pattern instructions become more complex.
Of particular concern is areas of overlapping shaping in the Sweaters program.
For example: a deep V neck can overlap waist or A-line body shaping, raglan
shaping can overlap neckline shaping. Check for and highlight the little words
at the same time and save yourself time and grief later. Thank you.
Version 2.50 January 2007 - Page 21
5. CONTACT
For the latest information about KNITWARE, check our website at
http://www.greatknitdesigns.com
To discuss Knitware projects, problems, ideas, puzzles and triumphs,
join the Knitware Users group at:
http://groups.yahoo.com/group/knitwareusers/
Version 2.50 January 2007 - Page 22
NOTES:
Version 2.50 January 2007 - Page 23
SKIRTS Shapes and Styles
SHAWL and AFGHAN Shapes
PONCHO Shapes
AFGHAN Sizes
Version 2.50 January 2007 - Page 24
KNITWARE BASICS Shapes and Styles
PULLOVER
STYLES
SKIRT STYLES
DRESS STYLES are a combination of pullover and skirt styles.
PANTS
STYLES
DOG
SWEATER
STYLES
KNITWARE SWEATERS Shapes and Styles