1
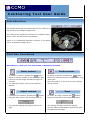
Contouring Tool User Guide Introduction The CCMO contouring tool allows the user to create up to five contours on multiple image slices. The contours are separate structures on isolated screenshots, unlike clinical contouring software. There is no relationship between contours of the same colour on different image slices. Tool bar functions Note that you can hover over any button to display its function. Insert contour Delete contour To create a contour, activate the button. To delete a contour, activate the button. Select a contour number in the dropdown box. Select the relevant contour number in the drop Left-click on the image around the region of -down box. Only the contour on the slice you are viewing interest. To close the contour, click on the starting will be erased. square. Adjust contrast Zoom To adjust the contrast, activate the button. To zoom an image, activate the button. Drag the slider bar to the required position. Drag the slider bar to the required position. The contrast setting will apply to all the images. The setting will apply to all the images. Use the sliders at the bottom and to the right to reposition the image. Page 1 Tool bar functions Slice indicator The slice indicator indicates the number of images in the exercise and the current image. Use the slice indicator to scroll through the slices. Alternatively, you can scroll through the slices using the mouse wheel. The active contour will remain highlighted as you scroll through the images. View sagittal image Select this button to view a sagittal image with reference lines showing the position and orientation of the axial images. This option is not available in some exercises. Reset Select this button to delete all the contours and start again. View reference contours Select this button to compare your outlines with the reference contours. Scroll to view the reference contours. The most inferior reference contour will be displayed initially. Help The Help box can be displayed during contouring. To move the open Help box out of the way, left-click on the box and drag. Page 2