1
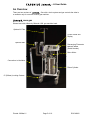
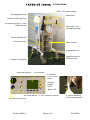
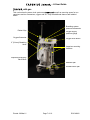
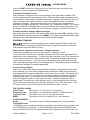
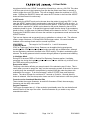
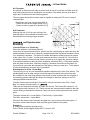
Tafonius Junior
J2
A USERS GUIDE
v10Mar2011
Tafonius Junior – A User Guide
Notes:
Printed: 28/Mar/11
Page 2 of 19
DOCA4962
Tafonius Junior – A User Guide
Table of Contents
An Overview .........................................................................................................................5
Junior sans gas ..............................................................................................................5
Junior with gas ...............................................................................................................7
Controller Boot Up Sequence............................................................................................9
INITIALISING DRIVE CONTROL ..............................................................................9
CHECKING DRIVE VOLTAGE: 27.9 14.0 13.9.....................................................9
VOLTAGES ALL OK..................................................................................................9
APPLYING POWER TO VIX DRIVE:.........................................................................9
SETTING COMMUNICATIONS TO DRIVE ...............................................................9
SETTING COMS RATE TO 19200 ............................................................................9
COMMS - SET AT 19200 BAUD - OK ...................................................................9
NOW TESTING VIX DRIVE INTEGRITY ...................................................................9
INITIAL DRIVE CHECK OK .......................................................................................9
INITIALISATION COMPLETE ...................................................................................9
CHECKING FOR PC CONNECTION ......................................................................10
Manual Leak Testing .......................................................................................................11
Initialising the Piston .......................................................................................................11
The Control Screen .........................................................................................................12
1) Status and message information .............................................................................12
2) Piston Graphic and Information ...............................................................................12
MWPL .....................................................................................................................12
ASSIST ...................................................................................................................12
3) Resultant Ventilation values ....................................................................................13
4) Patient Ventilator settings & Measured values.........................................................13
Ventilator Controls...........................................................................................................13
Setting Values using the control knobs – Change & Commit .......................................13
Control setting validation .............................................................................................13
THE CONTROL KNOBS .........................................................................................13
Tidal Volume: The range is 0.1L to 20.0L in 0.1L increments...........................13
Respiratory Rate: The range is 1 to 30 breaths per minute in 1 BPM increments.
13
Inspiratory Time: The range is 0.5 to 4.0 in 0.1 second increments..................13
MWPL:
The range is 10cm H2O to 80cm H2O in 1 cm increments. .................13
OTHER CONTROLS ...............................................................................................13
Assist: The range is 1 lpm to 200 lpm inspiratory flow, 1 lpm increments. ........13
In STANDBY mode..............................................................................................13
In IPPV mode ......................................................................................................14
CPAP/PEEP The range is 0 to 50 cmH2O. in 1 cmH2O increments.................14
In Standby Mode .................................................................................................14
In Ventilator Mode ...............................................................................................14
Dump valve button...............................................................................................14
Controls on the Anesthesia Machine Side ...................................................................14
Oxygen Flowmeter ..................................................................................................14
Air Flowmeter ..........................................................................................................15
N2O Flowmeter ........................................................................................................15
Junior and Spontaneous Breathing ..............................................................................15
View the Piston as a “Virtual bag .................................................................................15
Dictating the size of the “Virtual Bag”...........................................................................15
Ventilation measurements during Spontaneous Mode.................................................16
Junior and IPPV ...........................................................................................................16
Printed: 28/Mar/11
Page 3 of 19
DOCA4962
Tafonius Junior – A User Guide
Warning Messages – Alerts and Alarms..........................................................................17
Alerts...........................................................................................................................17
BATTERY1 LOW VOLTAGE and/or ........................................................................17
BATTERY2 LOW VOLTAGE ...................................................................................17
MAX PRESSURE EXCEEDED LIMIT......................................................................17
LOW SYSTEM RESERVE VOLUME.......................................................................17
CYLINDER EMPTY/OUT OF RESERVE .................................................................17
SYSTEM FULL ........................................................................................................17
PISTON POSITION INFO ERROR ..........................................................................17
Alarms.........................................................................................................................18
* LOW BREATHING SYSTEM PRESSURE *........................................................18
* OXYGEN SUPPLY PRESSURE LOW * ..............................................................18
* BATTERY 1 CRITICALLY LOW * and/or.............................................................18
* BATTERY 2 CRITICALLY LOW *........................................................................18
* ENCODER BOARD HAS FAILED *.....................................................................18
* CHECK POSITION SENSORS * .........................................................................18
* RD VACUUM FAILURE * ....................................................................................18
Technical Specifications:.................................................................................................19
Printed: 28/Mar/11
Page 4 of 20
DOCA4962
Tafonius Junior – A User Guide
An Overview
There are two versions of Junior . One with a circle system and gas controls the other is
a ventilator only for use with another gas machine.
Junior sans gas
Shown here with a Matrx by Midmark VML gas machine head.
Optional IV Pole
Control Panel and
Display
Optional VML
Scavenging Flowmeter
Machine Name
(Serial Number)
Servo Motor
Connection to Ventilator
Piston Cylinder
8” (200mm) Locking Casters
Printed: 28/Mar/11
Page 5 of 19
DOCA4962
Tafonius Junior – A User Guide
RCD / GFCI mains breaker
Scavenging flowmeter
Mains fuses
Vacuum / EVAC gas fitting
Cuff inflation syringe / ET tube
holding bracket
Power cord / Gas
hose hanging straps
Vacuum Sensing Port
Vacuum Inlet Port
Piston Cylinder
Single Bottom Pan
Lighted mains plug
(USA type only)
Locking Front Casters
Dump Valve button
qVGA Display
Assist button
CPAP / PEEP
button
Ventilate /
Standby
button
Name / SN
Soft Power Switch TV, RR, It & MWPL controls
Not used on this model
Printed: 28/Mar/11
Page 6 of 19
2” (54mm) Breathing
Circuit connection port
DOCA4962
Tafonius Junior – A User Guide
Junior with gas
This version has the same circle system as Tafonius as well as mounting space for two
vaporizers and two flowmeters, oxygen and air. Only the additional features are labelled
below.
Breathing system
pressure manometer
Patient Wye
Oxygen supply
pressure gauge
Oxygen flowmeter
Oxygen flush button
2” (54 mm) Breathing
tubes
Vaporizer mounting
locations
Inspiratory/Expiratory
Valve Block
Absorber pan
Double bottom pan
Printed: 28/Mar/11
Page 7 of 19
DOCA4962
Tafonius Junior – A User Guide
Turning Junior On
Press the soft ON/OFF control button (1). The Control screen (2) and the soft ON/OFF
button immediately illuminate. There is a single output (beep) from the speaker and the
2
1
Control screen shows “PUSH ANY KNOB FOR PRESSURE SENSOR SETUP”. The user
has 2 seconds to push any of the rotary knobs to enter the Pressure Sensor setup screen.
Experience over the last 4 years has indicated that this feature will very rarely be needed or
used. If there is a discrepancy between the two offset values seen on the screen below, it
usually indicates some problem other that pressure sensor drift. Most frequently you’ll find
water in the pressure sampling line. It is recommended that you blow out the pressure
sensing line on a regular basis. To do this remover the sensing line from the underside of
the main control box and flush the line out with a syringe.
You will need a female coupler or you could
use a stopcock to connect the syringe to the
sampling line as shown here.
Printed: 28/Mar/11
Page 8 of 19
DOCA4962
Tafonius Junior – A User Guide
Should one chooses to enter the Pressure Sensor Setup routine there are two options:
•
•
Pressing any of the four control knobs will use the factory default value as shown.
Pressing the RUN / IPPV button will use the actual current measured value, which is
constantly being updated on the screen.
The chosen value is stored in the non-volatile memory and will remain unchanged until the
Pressure Sensor Setup routine is run again.
Use the Pressure Sensor setup routine if there is piston movement when no patient is
attached the wye piece is not capped AND you have flushed the sensing line.
The initialisation procedure continues with the boot-up sequence.
Controller Boot Up Sequence
After providing the option for pressure sensor setup, the following sequence occurs:
INITIALISING DRIVE CONTROL
At this stage the servomotor drive, the ViX Drive, is presumed un-initialised and its
initialisation begins. The software version is displayed at the bottom left hand corner of the
screen. The 24 volt supply line feeding the motor drive as well as the individual battery
voltages are measured and its value displayed on the screen e.g.
CHECKING DRIVE VOLTAGE:
27.9 14.0 13.9
If the supply voltage, 27.9 above, is less than 16.0 volts, then the shutdown procedure starts
as there is insufficient battery power to safely run the system. In this instance you should
connect the mains power and re-start the system.
If the voltages are sufficient one beep is heard as the screen displays the following.
VOLTAGES ALL OK
APPLYING POWER TO VIX DRIVE:
The power to the servomotor drive is applied and tested. Then after successful
communications have been established with the ViX drive, two beeps are heard and the
following is displayed.
SETTING COMMUNICATIONS TO DRIVE
SETTING COMS RATE TO 19200
COMMS - SET AT 19200 BAUD - OK
The servomotor drive is then initialised. The next stage checks the motor drive Integrity as
the following is displayed
NOW TESTING VIX DRIVE INTEGRITY
Assuming all is well then the message
INITIAL DRIVE CHECK OK
is displayed, followed by a string of ones and zeros on the screen. If at any time during this
initialisation procedure an error is detected then an error message is displayed and the
whole system shuts down. If everything is as it should be then the screen shows
INITIALISATION COMPLETE
Printed: 28/Mar/11
Page 9 of 19
DOCA4962
Tafonius Junior – A User Guide
At this stage the Control Screen looks like the screen below.
The controller next displays
CHECKING FOR PC CONNECTION
and waits while it checks for the presence of a USB attached device. If the USB device is
detected the display changes (below left) to offer you the chance to do a manual leak test.
The operator has two seconds to push any of the four control knobs to enter the leak test
routine. After two seconds the display changes to (below right) ) and waits for the
Tafonius software to boot up and take over control. Should the Tafonius software
not claim control within two minutes auxiliary controller proceeds with piston initialisation and
displays instructions to DISCONNECT THE PATIENT AND PUSH THE RUN BUTTON.
If the USB device is not detected, as is the case when running without a PC monitor the
auxiliary controller will again change the
display (to below left) offering to enter the
leak test routine. After two seconds elapses
without any button being touched the display
goes directly to the DISCONNECT THE
PATIENT AND PUSH THE RUN BUTTON
screen seen on the next page.
Printed: 28/Mar/11
Page 10 of 19
DOCA4962
Tafonius Junior – A User Guide
Manual Leak Testing
Should one press a control button within the two-second window in either of the scenarios
above the machine will display the screen below right.
Follow the instructions on the screen. Turn on
the gas flow to bring the breathing system
pressure up to 20 cmH2O. Adjust the flow rate to hold the pressure steady at 20 cmH2O.
The flow observed on the flowmeter is the leak rate at that pressure.
Initialising the Piston
Before Junior can be used the system needs to locate the zero position, the bottom of
travel, of the piston.
The RUN button will be flashing, after the boot sequence, while waiting for the user. Make
sure there is nothing attached to the Y-piece before pushing RUN the button. Once the
button is pushed the screen shows the message MOVING PISTON TO ZERO. During this
piston movement the airway pressure is monitored. If there is a patient attached or an
obstruction to airflow then the following message appears:
ERROR. PRESSURE TOO HIGH
DISCONNECT PATIENT
THEN PUSH RUN BUTTON
Clear the obstruction or remove the patient before continuing. There are 2 other possible
reasons why the initialisation procedure may be interrupted: The first is that the cylinder is
not closed properly. The second is that the vacuum surrounding the piston is too low. In
either of these instances warning messages will appear alerting you to the cause and
remedy of the interruption. Once the piston reaches the bottom of its travel, a zero reading
is taken and ZEROING PISTON POSITON is displayed briefly. Three beeps are heard and
the control screen is displayed, see below. The piston is at the very bottom waiting for the
user to pre-fill the system with oxygen and anaesthetic for induction. Junior is ready for
use.
Printed: 28/Mar/11
Page 11 of 19
DOCA4962
Tafonius Junior – A User Guide
The Control Screen
1
2
3
4
1)
2)
3)
4)
Status and message information
Piston Graphic and information
Resultant Ventilation values
Patient Ventilator settings &
Measured values
Before continuing here is an explanation of what you see on the Control screen. It is divided
into 4 main regions:
1) Status and message information
Area 1 shows status information on the system batteries, whether the machine is running on
mains or battery power, the software version, the vacuum level around the piston and also
displays any error or warning messages. The battery information shows the actual voltages
of the two batteries used in Junior and whether or not they are being charged. When
there are no warning or error messages, the name junior is displayed in this area.
2) Piston Graphic and Information
Area 2 shows a representation of the piston. The dark area represents the volume of gas
under the piston and the numerical value at the top of the list to the right displays the
amount in litres. See the photo above right as the piston in the photo above left is at the
bottom with 0.0 litres under it. The piston position and volume are constantly updated
showing the position of the piston at all times. Two asterix (* *) will appear at the top of the
piston area whenever the Dump Valve, the electric pop-off valve, is open.
Below the volume display in litres are three settings that are not otherwise always display on
the screen.
MWPL
The Maximum Working Pressure Limit in cmH2O is generally seen above the right most
control knob used to set its value however it will not be displayed there when using the
Assist Mode. The MWPL is set as a high pressure safety limit the value of which is
continuously compared to the breathing system pressure. Junior is a volume or time
cycled ventilator so the MWPL does NOT set how high the pressure will go but if the
pressure should reach the set level the machine will alarm immediately, terminate inspiration
and switch to the expiratory phase of the breathing cycle.
ASSIST
The ASSIST function is a mechanism that detects a patient’s efforts to breathe then gives
an assisted breath if that effort meets or exceeds a user set minimum level. The value next
Printed: 28/Mar/11
Page 12 of 19
DOCA4962
Tafonius Junior – A User Guide
to the text ASST is the level of inspiratory flow, in liters per minute, the patient must
generate or exceed to trigger and assisted breath.
3) Resultant Ventilation values
Area 3 shows the values that result from the settings of the independent variables Tidal
Volume, Respiratory Rate and Inspiratory Time. The dependent variables displayed in this
area are Minute Volume (MV) in liters per minute (lpm), Inspiratory Flow Rate (IF) in lpm, I:E
ratio and expiratory time (ET) in seconds. These are updated whenever a ventilation
parameter is changed. This feature allows the user to see how other parameters are
affected by the change being made. One can also “set” a dependent variable. For example
you can set the MV by changing the TV and or the RR and watch the resulting effect on the
MV display. Similarly one could “set” the I:E Ratio by changing the RR and or the I-time.
4) Patient Ventilator settings & Measured values
Area 4 shows the set values for Tidal Volume (TV), Respiratory Rate (RR), Inspiratory Time
(IT) and Maximum Working Pressure Limit (MWPL). The values in parentheses above these
settings are the measured values taken during spontaneous breathing.
Ventilator Controls
Junior’s ventilator is controlled via the 4 control knobs below the Control screen, the
RUN/IPPV button, Assist button, CPAP/PEEP button, Oxygen Flush button, Dump Valve
button and the soft power ON/OFF switch.
Setting Values using the control knobs – Change & Commit
The process of setting any value uses the concept of “Change & Commit”
Turning the Tidal Volume knob for example will change the value and a small asterisk will
appear next to the changed value. To commit this new value push in the Tidal Volume knob
(or any of the 4 knobs) until a single beep is heard. The asterisk disappears and the new
value is held on the screen. If the value is not committed by pressing a control knob then
after 4 seconds the setting will revert to the original value. This process prevents accidental
or inadvertent changing of ventilation parameters.
Control setting validation
There are 4 control knobs sitting directly beneath the display of the parameter they control.
When adjusting any of the values comparisons are made with existing settings to ensure
that settings which exceed the capabilities of the machine are not made. For example if the
Inspiratory Time is set to 1.0 seconds then it will be impossible to set the Tidal Volume to
anything greater than 17.3L since this would otherwise exceed the machines capacity to
deliver the inspiratory stroke at 1000 litres per minute. Similarly a Respiratory Rate of
greater than 17 cannot be set if the Inspiratory time is 3.0 seconds and the tidal volume is
17.3L because this would require an expiratory flow rate of over 1000L per minute – if the
RR was more than 15 then the Expiratory time would be less than 1 second.
THE CONTROL KNOBS
Tidal Volume:
The range is 0.1L to 20.0L in 0.1L increments.
Respiratory Rate:
The range is 1 to 30 breaths per minute in 1 BPM increments.
Inspiratory Time:
The range is 0.5 to 4.0 in 0.1 second increments.
MWPL:
The range is 10cm H2O to 80cm H2O in 1 cm increments.
OTHER CONTROLS
Assist:
The range is 1 lpm to 200 lpm inspiratory flow, 1 lpm increments.
In STANDBY mode
In STANDBY mode, spontaneous breathing, this effort level can be set but is not active until
the IPPV/RUN button is pushed. To use the ASSIST function, press the ASSIST button
once, the ASSIST button will flash slowly and the MWPL legend on the Control screen will
Printed: 28/Mar/11
Page 13 of 19
DOCA4962
Tafonius Junior – A User Guide
be replaced with the text “SENS” for sensitivity followed by a value e.g. 60 LPM. This value
of 60 litres per minute is the inspiratory flow rate that the patient must meet or exceed in
order to trigger the next IPPV stroke. This will not happen unless the ventilator is in IPPV
mode. Pressing the RUN/IPPV button will cause the IPPV button to be lit and the ASSIST
button will then remain lit continuously.
In IPPV mode
Alternatively the ASSIST mode can be chosen when the patient is receiving IPPV. In this
case the ASSIST mode will be lit continuously to show that the ASSIST mode is active. In
this state the ventilator is waiting for an effort from the patient. If this effort level is not met
within the time required for 3 breath cycles based on the period dictated by the set RR a
mandatory breath is given. If the patient triggers a breath then the timing of the mandatory
breath is reset. In either case, the delivered breath will be based on the set TV and I-time.
Pressing the RUN/IPPV button will return the ventilator to spontaneous mode and cancel the
ASSIST function.
This is a new feature and we currently have no guidelines on values to set. The software
offers a range of between 1 LPM and 200 LPM as trigger values. We would welcome
feedback on the settings found useful or normal in practice.
CPAP/PEEP
The range is 0 to 50 cmH2O. in 1 cmH2O increments
In Standby Mode
CPAP or Continuous Positive Airway Pressure can he applied during spontaneous
breathing. With CPAP patients inspire and expire normally with no added effort, although
the end expiratory pressure is elevated to the CPAP setting. This aids in maintaining open
alveoae. The airway pressure is held constant during all phases of spontaneous breathing.
In Ventilator Mode
During IPPV the term PEEP or Positive End Expiratory Pressure applies. Ventilating
pressures rise during the Inspiratory phase as normal, but are allowed only to fall as far as
the PEEP setting during expiration.
Dump valve button
The dump valve button affords you manual control of the electronic pop-off valve. This is
useful when you want to empty the “bag” into the scavenging system at the end of a case or
to quickly drop the anaesthetic concentration by replacing the gas under the piston with
anaesthetic free oxygen. To do this first apply 2 cmH2O of PEEP then push the dump
button. The valve will open for a minimum of 1 second or if held for 1 second after the
button is released. After the dump valve closes use the O2 flush button to refill the cylinder.
Controls on the Anesthesia Machine Side
These include the oxygen flowmeter, air and N2O flowmeters if fitted, the scavenging
flowmeter and the dump valve switch.
Oxygen Flowmeter
The oxygen flowmeter has a 0 -10 lpm scale but considerably more flow can be delivered
when the ball is off the top of the scale. Use this flowmeter as you would on any other
anaesthesia machine.
Printed: 28/Mar/11
Page 14 of 19
DOCA4962
Tafonius Junior – A User Guide
Air Flowmeter
An optional air flowmeter with either a yellow knob for the US or a black and white knob for
most other countries may be installed on your machine. This allows the user to be able to
adjust the FiO2 delivered to the breathing system.
The nomogram shown below can be used as a guide for setting the FiO2 but it is easy to
remember that:
Equal flows of air and oxygen yields 60% O2
3 times as much air as oxygen yields 40% O2
3 times as much oxygen as air yields 80% O2
N2O Flowmeter
Although the use of N2O is much a thing of the
past this option is still available but should never
be used without a working oxygen analyzer.
Junior and Spontaneous
Breathing
View the Piston as a “Virtual bag
When the ventilator is idle and a patient is
connected, the system behaves like a ‘perfect’ bag. By a perfect bag we mean that when the
patient breathes out there is no expiratory resistance and when the patient breathes in there
is no inspiratory resistance. This action is possible because the airway pressure is sensed
at the centre of the Y-piece. As soon as a pressure deviation in excess of 0.5 cmH2O from
the ambient pressure is detected the piston is moved so as to negate this pressure change.
If the patient breathes out then the piston withdraws, effectively filling. If the patient inspires
then the piston moves down, effectively emptying. Because a motor drives the piston it is
the motor that overcomes the resistances of any piping, valving or soda lime. To the patient
it feels like breathing to room air with no resistance.
Dictating the size of the “Virtual Bag”
The size bag you use on your anaesthesia machine depends on the size of the patient. The
breathing bag must be large enough to hold the largest size breath the patient may take.
But it should not be overly large because the excess volume increases the time constant of
the breathing system making it take longer for changes in vaporizer settings or the FiO2
setting equilibrate and take effect.
The tidal volume and the concept of fixed buffer volumes control the size of the “Virtual
Bag”, the volume under the piston, in Junior .
There are two fixed buffer volumes; an upper and a lower. The lower buffer volume is 1.5L
and the upper buffer volume is 1.0L. These volumes are constant and are added to the tidal
volume setting to determine the minimum “Bag” size and to create upper and lower volume
limits.
The upper volume limit = Lower Buffer + Tidal Volume + Upper Buffer.
The lower volume limit = Lower Buffer
Whenever the piston volume exceeds the upper limit, gas is removed from the system. If
the piston volume falls below the lower limit then gas is added to the system.
Example 1:
A 300kg patient breathing spontaneously
Rule of thumb would suggest setting the TV control to 3.0L
Printed: 28/Mar/11
Page 15 of 19
DOCA4962
Tafonius Junior – A User Guide
The upper limit of the piston volume is then 1.5 + 3.0 + 1.0 L = 5.5L
The lower limit of the piston volume is 1.5L (it is always 1.5L)
If the patient has just been induced, initial gas flow rates may be of the order of 5-10L per
minute. This will tend to fill the system.
Whenever the piston volume exceeds the 5.5L limit the piston stops rising and some gas will
be discharged from the system through the electronically controlled Dump Valve. Whenever
the piston volume falls below 1.5L, say with a big inspiratory effort from the patient, then an
extra 1.0L of oxygen will be added to the system through the vaporiser automatically. In this
manner the system is kept at a fairly constant volume of around 5.5L.
If the breathing of the patient is erratic and the piston repeatedly enters the upper and lower
limits then it would be appropriate to increase the tidal volume setting until the patient
settled, this would increase the “Bag” size temporarily. The tidal volume must be returned to
the desired setting when IPPV is required otherwise the extra volume will be delivered to the
patient.
Example 2:
A 300kg patient being ventilated with IPPV
Tidal volume set to 3.0L.
The upper and lower limits are the same as before: 5.5L and 1.5L respectively.
The tidal volume setting is then increased to 4.0. This increases the upper limit to 6.5L so
the piston is allowed to rise to that level by virtue of the continuously flowing fresh gas flow
into the system.
Ventilation measurements during Spontaneous Mode
In Spontaneous or Standby mode the piston position is constantly monitored and will display
patient breathing parameters when regular cyclic movements are detected. The values are
updated at the beginning of each expiratory phase and show the values for the last breath
cycle. The values in parentheses above the Tidal Volume, Respiratory Rate and Inspiratory
Time legends are measurements of the respective parameter. The value above the MWPL
legend is the maximum airway pressure measured during the last breath cycle. The
dependant parameters such as minute volume, inspiratory flow etc are not affected by these
measurements and reflect only the settings of the control values.
Junior and IPPV
Changing between spontaneous breathing mode (standby) and ventilation mode is very
simple and can be done at any time. As soon as the IPPV / RUN switch is pressed it will
illuminate to indicate machine is in IPPV mode and immediately an inspiratory phase begins
delivering the tidal volume as set by the TV control. To stop IPPV at any time, simply press
the IPPV / RUN switch again. The switch light will go out and the unit will return to standby
mode.
In IPPV mode the tidal volume is delivered in the time set by the Inspiratory Time setting
(see Control Setting Validation for an explanation of how settings are restricted). After the
tidal volume has been delivered the expiratory phase begins. In the expiratory phase the
piston immediately behaves like a “Bag” and allows the patient to breathe out raising the
piston as it does. The piston stays in this state until the end of the expiratory time when the
inspiratory phase begins again and the piston is driven downwards delivering gas to the
patient again.
At all times the piston image on the screen shows the position and actual volume under the
piston.
Printed: 28/Mar/11
Page 16 of 19
DOCA4962
Tafonius Junior – A User Guide
Warning Messages – Alerts and Alarms
There are two levels of warning messages alerts and alarms.
Alerts
These messages are accompanied by an initial 2-second audible beep but are then silent.
A flashing text message will appear on the screen in Area 1, where the junior logo is
normally displayed. Alerts are non-critical events encountered during normal operation.
To clear an alert manually press and hold any of the 4 control knobs until two beeps are
heard. Here is a list of the alerts.
BATTERY1 LOW VOLTAGE and/or
BATTERY2 LOW VOLTAGE
The indicated battery has a low voltage. This is normally because the machine is being
operated without the mains connected. Connect the mains supply and make sure the RCD
or GFCI switch at the back of the machine is on.
The alert will stay on screen until cleared. Unless the problem has been resolved the alert
will return.
MAX PRESSURE EXCEEDED LIMIT
The airway pressure exceeded the setting of the Maximum Working Pressure Limit. The
Alert will stay on screen until cleared manually.
LOW SYSTEM RESERVE VOLUME
The piston has entered the lower buffer volume of 1.5L. If this is during an active inspiratory
phase then gas will automatically be added through the vaporiser. If the vaporiser is off then
gas will still be added, but without agent.
When the piston moves out of the lower buffer zone then the alert will self clear.
CYLINDER EMPTY/OUT OF RESERVE
The piston is at the lower most position, i.e. zero volume. If this is during the inspiratory
phase then the full tidal volume will not have been delivered.
When the piston moves away from the zero point the alert will self clear.
SYSTEM FULL
The piston is at the most full position i.e. maximum volume. The Dump Valve will be opened
to allow gas to escape and prevent pressure building up.
When the piston moves away from the top point the alert will self clear.
PISTON POSITION INFO ERROR
The piston position reported from the motor is incorrect. This is usually transient and is selfcorrecting. Any permanent loss of position information will result in an alarm condition.
The alert will stay on screen until cleared manually.
Printed: 28/Mar/11
Page 17 of 19
DOCA4962
Tafonius Junior – A User Guide
Alarms
These messages are accompanied by a repeating intermittent beep of approximately one
second duration. A flashing text message will appear on the screen in area 1, where the
Junior logo normally sits. Alarms are critical events that have serious implications for
the efficient ventilation or support of the patient. Each alarm that is shown on the screen will
have an asterisk at each end of the text, e.g.:
* OXYGEN SUPPLY PRESSURE LOW *
To clear an alarm manually press and hold any of the 4 control knobs until two beeps are
heard. Here is a list of the alarms.
* LOW BREATHING SYSTEM PRESSURE *
This Alarm occurs when, at the end of an inspiratory phase during IPPV or Assist, a
maximum pressure of 2 cmH2O has not been reached. This can occur when the patient has
become disconnected from the system. It can also occur when the patient takes a breath at
the same time as the ventilator delivers a breath.
The Alarm will continue until either a pressure in excess of 2cm H2O is registered during an
inspiratory phase OR the alarm is cleared manually.
* OXYGEN SUPPLY PRESSURE LOW *
The piped oxygen pressure, whether it is from the hospital supply Line, or from the Ecylinders has fallen below 40 psi. This alarm can only be cleared by connecting a source of
oxygen with a pressure greater than 40psi.
* BATTERY 1 CRITICALLY LOW * and/or
* BATTERY 2 CRITICALLY LOW *
Either one of the batteries voltage has reached the critical level. Below this level ventilator
function may be severely compromised, particularly with regard to piston movement and the
action of the Dump Valve. The ventilator must be connected to the mains supply
immediately.
* ENCODER BOARD HAS FAILED *
The circuit board for the front control knobs has failed to respond to the main controller. It
will not be possible to change any of the ventilation settings. This is a critical error and the
patient should be changed to manual ventilation.
* CHECK POSITION SENSORS *
The lower or upper position sensor has been moved or is faulty. Check the alignment marks
of the position sensors on the piston actuator. Without a lower position sensor the ventilator
cannot be initialised and will not run. The patient should be changed to manual
ventilation.
* RD VACUUM FAILURE *
The vacuum level in the double diaphragm has fallen below a critical level. Continued use of
the ventilator will result in severe damage to the piston assembly. The vacuum level must be
restored before ventilation is re-enabled. Check the connections of the hose at the vacuum
port on the ventilator cylinder. Until the vacuum has been restored the patient should be
changed to manual ventilation.
Printed: 28/Mar/11
Page 18 of 19
DOCA4962
Tafonius Junior – A User Guide
Technical Specifications:
GENERAL
Size:
Weight:
Construction:
51” x 30” x 24” , height x depth x width
???kg sans gas, ???kg with gas
Powder-coated stainless steel and aluminium
ELECTRICAL
Power Input:
Power consumption:
Operational voltage:
Battery Charging:
Printed: 28/Mar/11
90-240v AC 50/60Hz Universal input
400W max
12v/24v DC Sealed Lead Acid (SLA) Batteries
In-built lead-acid chargers @ max 5A charge
Page 19 of 19
DOCA4962