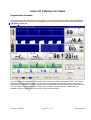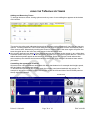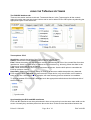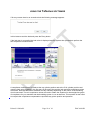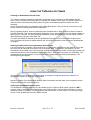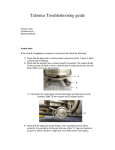
1
USING THE Tafonius SOFTWARE Before the Tafonius software can be used to control the ventilator, the ventilator needs to be i ni t i al i s ed.Thi si ni t i al i s at i onpr oc essi sc ov er edi nt hes ec t i on“ Get t i ngSt ar t edwi t hTafonius” Once initialised, there are some common steps to take when preparing for a patient: Pre-filling the system Entering patient information Choosing a Preset Starting a Session ..................................................................................................................................6 The Finalise Recording procedure........................................................................................................7 Entering initial patient information .......................................................................................................8 The Ventilator controls.........................................................................................................................12 Tidal Volume: ....................................................................................................................................13 Respiratory Rate: ..............................................................................................................................13 Inspiratory Time:...............................................................................................................................13 Inspiratory Pause:.............................................................................................................................13 Maximum Working Pressure Limit (MWPL)....................................................................................14 CPAP/PEEP .......................................................................................................................................14 Validating entries ..................................................................................................................................14 Dependant Values: ...............................................................................................................................15 The System button............................................................................................................................16 System Tab....................................................................................................................................16 System Errors ...............................................................................................................................16 Windows Event Viewer.................................................................................................................17 Leak/Compliance ..........................................................................................................................17 Piston Initialisation .......................................................................................................................17 Leak & Compliance.......................................................................................................................17 Running the Leak & Compliance procedure ......................................................................................18 The Patient Data button........................................................................................................................21 Data Logging .....................................................................................................................................21 Finalise Recording............................................................................................................................21 Data Storage Locations....................................................................................................................21 Viewing Recorded Data ........................................................................................................................22 Viewing Recorded data during a recording....................................................................................22 Viewing the instantaneous value using Data View ....................................................................22 Printed: 10/Mar/09 Page 2 of 61 DOCA4941B USING THE Tafonius SOFTWARE Viewing Recorded data from the Tafonius Shell ...........................................................................23 Exporting Data ......................................................................................................................................23 The Configure button ...........................................................................................................................24 Presets ...............................................................................................................................................24 Initial Settings ...................................................................................................................................25 User settings .....................................................................................................................................25 Changing Presets .............................................................................................................................26 Save As New..................................................................................................................................26 Save Active....................................................................................................................................26 Rename ..........................................................................................................................................26 Switch To .......................................................................................................................................26 Delete .............................................................................................................................................26 Reset Factory Default ...................................................................................................................26 Gas Monitoring..................................................................................................................................27 Gas monitoring tab with the IRMA Gas Analyser: .....................................................................27 Gas monitoring tab with the Artema AION Gas Analyser: ........................................................28 IRMA Setup........................................................................................................................................29 Pre-Use check ...................................................................................................................................31 IRMA Monitor: General Description ................................................................................................31 Calibration, self-test and reset ........................................................................................................31 Oxygen Recalibration ...................................................................................................................31 CO2, Nitrous and Agent Calibration (Zero reference calibration) .............................................32 Using the ARTEMA AION Gas Analyser .........................................................................................33 Display of Measured Values ............................................................................................................33 Other Control buttons: Alarm Silence & Freeze Traces....................................................................35 Alarm Silence ....................................................................................................................................35 Freeze Traces ....................................................................................................................................35 The countdown time for Freeze Traces is determined by the Countdown value set in the Initial settings attribute panel. .......................................................................................................................35 Monitoring Software .............................................................................................................................36 Monitoring options ...........................................................................................................................36 Organisation of traces......................................................................................................................37 Adding and Removing Traces .....................................................................................................38 Controlling the appearance of traces .............................................................................................38 The ECG/IBP Attribute tab ...........................................................................................................40 The CO2 Attribute tab...................................................................................................................43 The Airway Pressure (AP) Attribute tab......................................................................................44 The Oxygen Attribute tab .............................................................................................................45 Printed: 10/Mar/09 Page 3 of 61 DOCA4941B USING THE Tafonius SOFTWARE The SPO2 Attribute tab.................................................................................................................46 The Agent Attribute tab ................................................................................................................47 The N2O Attribute tab...................................................................................................................48 The Temperature Attribute tab ....................................................................................................49 The Traces/Trends Attribute tab..................................................................................................50 Alarms, Alerts and Critical Error Messages .......................................................................................51 Creating an Anaesthetic Record Chart ...........................................................................................52 Altering the Start Time of the Anaesthetic Record chart ..........................................................52 Viewing the Anaesthetic Record chart ...........................................................................................52 Data Recording using the Slow Data File ...................................................................................53 Changing the interval for Periodic Data in the Slow Data File..................................................53 Effect of the Logging Interval on the Slow Data entries............................................................53 The Tafonius Shell ................................................................................................................................56 Tafonius .............................................................................................................................................56 View Data ...........................................................................................................................................56 Export Data........................................................................................................................................58 Touch Screen Alignment..................................................................................................................59 Recover Anaesthetic Records .........................................................................................................59 Company Name.................................................................................................................................59 Shutdown...........................................................................................................................................59 Appendix A : SLOW DATA INFORMATION.........................................................................................60 Printed: 10/Mar/09 Page 4 of 61 DOCA4941B USING THE Tafonius SOFTWARE Pre-filling the system After Tafonius has been initialised the piston is left at the bottom of the cylinder ready for filling. Make sure the Y-piece is capped, turn the vaporizer to the required pre-fill concentration and turn on the manual oxygen flow meter to fill the cylinder with gas. The cylinder icon on the left of the screen indicates the volume of gas in litres in the cylinder. Fi l l t hec yl i ndert oal ev el equal t ot hemaxi mum ex pect edpat i ent ’ st i dalv ol umePLUS2. 5Li t r es. e.g. 500kg horse. Average tidal volume predicted is 5.0L so a larger breath of 7.5L can reasonably be expected. Then add 2.5L, which is the buffer volume used by the ventilator. Total pre-fill volume = 10L. When the cylinder graphic shows it is at the required volume, turn off the oxygen flow. Thi ss et st hev ol umeoft he“ Vi r t ual Bag”f ors pont aneousbr eat hi ng.Thec oncept of the Virtual Bag is central to how Tafonius operates. This action of the ventilator maintains a minimum system volume thereby reducing anaesthetic and oxygen consumption as well as decreasing the system’ s time constant. ThePi st onasa“ Vi r t ualbag” Whent hev ent i l at ori si nst andbymodeandapat i enti sc onnect ed,t hesy st em behav esl i kea‘ per f ec t ’ bag. When the patient breathes out there is no expiratory resistance and when the patient breathes in there is no inspiratory resistance. This ideal performance is accomplished with the Airway Servo System employed by Tafonius. The airway pressure is sensed at the centre of the Y-piece. As soon as a pressure deviation in excess of 0.5cm H2O from the ambient pressure is detected then the piston is moved so as to negate this pressure change. If the patient breathes out then the piston withdraws upwards,ef f ect i v el yf i l l i ng“ t hebag” .I ft hepat i enti nspi r est hent hepi s t onmov esdown,ef f ect i v el y emptying. Because the piston is driven by a motor it is the motor that overcomes the resistances of any piping, valve or soda lime. To the patient if feels like breathing into room air albeit through and ET tube. Di ct at i ngt hesi z eoft he“Vi r t ualBag” With varying sizes of patients it is beneficial to keep the size of any reservoir bag in the system to a minimum. This then allows rapid responses to changes in anaesthetic or oxygen concentrations. The setting of the Tidal Volume and the concept of fixed buffer vol umesc ont r ol t hesi z eoft he“ Vi r t ual Bag” in Tafonius. tafonius employs two fixed buffer volumes; an upper and a lower. The lower buffer volume is 1.5L and the upper buffer volume is 1.0L. These volumes are constant and are added to the set Tidal Volume to determine the virtual “ Bag”si z et hereby creating upper and lower volume limits. The upper volume limit = Lower Buffer + Tidal Volume + Upper Buffer. The lower volume limit = Lower Buffer Whenever the piston volume exceeds the upper limit, gas is removed from the system. When the piston volume falls below the lower limit then gas is added to the system. Printed: 10/Mar/09 Page 5 of 61 DOCA4941B USING THE Tafonius SOFTWARE Starting a Session Tafonius uses the concept of anaesthetic or procedure Sessions for the collection and recording of data. As soon as the Tafonius software starts then information begins to be stored in the Slow Data file and the Session is started. This storage of data continues until a session is Finalised. A session may be Finalised by one of the following: Clicking or touching the Finalise Recording button in the Data Logging tab Exiting the program through the System and then Exit buttons Exiting the program by pressing and holding the Mains Control button An abrupt program closure such as power loss, closure of Windows without closing Tafonius (non-controlled shutdown) In all but the last procedure, the data will be saved and associated with all the patient information. In the event of a non-controlled shutdown there will be NO DATA LOSS, although the patient information will not be associated with the data. In this instance the Files associated with the session will be s av edwi t ht hewor d“ Pat i ent s”asapr ef i xandt heSl owDat aandAnaeat het i cRec or dwi l l use only the date as identifiers. For example, a session interrupted by a non-controlled shutdown on January 7th 2009wi l l hav ear ec or dnamed“ Pat i ent s 2009J an07”with Slow Data and Anaesthetic Records named AR2009Jan7-8_50_56 and SD2009Jan7-8_50_56 respectively. The suffix 8_50_56 indicates that the session began at 08:50:56 on the morning of January 7th. Formor ei nf or mat i ononent er i ngPat i entandc as ei nf or mat i on,s eet hes ec t i onent i t l ed“ Ent er i ngI ni t i al Patient Information”l at eri nt hi smanual For more information on the production of an Anaesthetic Record see the section entitl ed“ Creating An Anaest het i cRec or dChar t ”l at eri nt hi smanual Printed: 10/Mar/09 Page 6 of 61 DOCA4941B USING THE Tafonius SOFTWARE The Finalise Recording procedure Using any of the first three Finalising methods listed above will cause the following dialog to appear This dialog presents the current information associated with the recording session. If these are all correct then click or touch the Accept button. To edit any feature shown, click or touch the Change button. This will take you to back to the Patient Data edit region, where any of the details can be changed. If all of the details are correct, then clicking or touching the Accept button will cause the following to happen automatically: The Session is ended. The patient details are used to create the appropriately named Slow Data and Anaesthetic Record files. A new Session is started using, either the next set of patient information in the Case list, or the default Patient/Anonymous details. Recording for the new Session is started Printed: 10/Mar/09 Page 7 of 61 DOCA4941B USING THE Tafonius SOFTWARE Entering initial patient information Touch the Patient Data button A new window appears in the information area Enter the Hospital Number (if used) and then use the tab key to move to the next data entry field. Fields that take numerical data entry will bring up the small on-screen numerical key-pad which can be used instead of a keyboard. Bydef aul tt hepat i ent ’ snamei s“ Anonymous” . Edit this to enter your own pat i ent ’ sname.When the details have been entered t ouc ht he“ AtPr es ent at i on”t ab. Fill in the procedure details along with the rest of the presenting clinical information. Printed: 10/Mar/09 Page 8 of 61 DOCA4941B USING THE Tafonius SOFTWARE Entries can be left blank. The Anaesthetist, Surgeon and Procedure fields are used when an Anaesthetic Record chart is produced. The Anaesthetist, Surgeon and Procedure entries are all taken from a Drop-Down list. To view the list click or touch the down arrow in the blue box next to the field you wish to enter details for. If the item you require appears on the list click or touch it to select it. This provides a quick way to enter commonly used information. If the item does not appear on the list then it may be added by touching or clicking on the ellipse button Clicking or touching the Ellipse button opens an editor. Here the Anaesthetist Drop-Down list has been opened for editing: Items in the list may be ordered using the Up & Down buttons. The Add, Edit and Delete buttons allow standard editing of the entries in the list. When editing is complete, click or touch the Close button to r et ur nt ot he“ AtPr es ent at i on”t ab. Notes Tab: Any notes that you want to enter relating to the case can be entered as free text in the Notes tab. These notes will appear in the Anaesthetic Record chart in the area under the Header of general information. Printed: 10/Mar/09 Page 9 of 61 DOCA4941B USING THE Tafonius SOFTWARE Cases Tab: Details relating to cases can be pre-entered as a list of patients. Associated case data can be entered and then recalled when required. By default, when the software is started details appear for a patient called Anonymous with a patient ID of 000000. The green arrow next to the patient name shows that these patient details are in use. Patient details cannot be deleted if they are in use: you must first select another patient. Touching or clicking the New button opens the Patient details tab ready for new patient information. To change patients, click or touch the patient name or ID and then click or touch the Select button. The selected patient information is then used for the current recording session. When the monitoring/recording session is finalised, the Patient details in use at that time will be the ones used to create the recording files. During the Finalising procedure a dialog box will appear to check that the Patient details to be saved are correct. The patient name and ID is always shown at the bottom of the Tafonius screen. Click or touch either of these two screen areas to open the Patient attribute dialog. Printed: 10/Mar/09 Page 10 of 61 DOCA4941B USING THE Tafonius SOFTWARE Data Logging Tab: In this tab the options for Slow Data Recording and Anaesthetic Record chart heart rate can be set. Because Tafonius has 3 means of monitoring heart rate (ECG, IBP & Pulse-Ox) it is necessary to select one to be used for the Anaesthetic Record chart. Unless you have specific reasons for changing the Slow Data Logging time, leave this set at 5 seconds. When all the patient information has been entered, cl i ckort ouc ht he“ Cl ose”but t on. Printed: 10/Mar/09 Page 11 of 61 DOCA4941B USING THE Tafonius SOFTWARE The Ventilator controls The ventilator controls consist of Tidal Volume, Respiratory Rate, Inspiratory Time, Maximum Working Pressure Limit and a CPAP (or PEEP) setting. These are the only controls that can be set for ventilation. The main controls (Tidal Volume, Respiratory Rate & Inspiratory Time) have two sets of numbers associated with them. These numbers change depending on whether the system is in Standby (spontaneous breathing) mode or Ventilate mode. In Standby mode, the large blue numbers are the measured values derived from the patient’ s respiratory efforts. The Airway Servo System is working as a respiratory monitor. The smaller black numbers are the ventilator settings that will be used in Ventilate mode. If no breathing is detected after 60 seconds the blue values are all set to zero. When you touch a button it changes colour and becomes ready to accept a new value. A numeric keypad appears in the lower right hand corner of the screen where you can enter a new value. Or the value may be changed by means of the UP/DOWN arrows. When the new value has been entered do one of the following: Touch the body of the button again, Touch t he“ Ent er ”but t onont he numeric keypad or Touch the body of the next button whose value you want to change. Printed: 10/Mar/09 Page 12 of 61 DOCA4941B USING THE Tafonius SOFTWARE Tidal Volume: In Standby mode: The set Tidal Volume is indicated by the smaller black number and is the volume that will be delivered per breath when the switch is made to Ventilate mode. It also sets the volume of the Virtual Bag used by the patient. The blue value indicates the breath-by-breath tidal volume of the spontaneously breathing patient In Ventilate Mode: Sets the actual volume delivered to the patient. Tafonius uses automatic compliance compensation so the volume received by the patient is the volume entered. The volume displaced by the cylinder will be more than the set value to compensate for the volume lost to the compliance of the system. The patient actually receives the TV you set regardless of the length of the breathing systems tubes. This is very helpful when 20 or 30 ft tubes are connected to reach a patient in an MRI. Tidal Volume units are Litres Respiratory Rate: In Standby mode: The blue figures show the measured respiratory rate, recalculated every 10 seconds on a rolling 1 minute basis. This gives a true reflection of respiratory rate. The smaller black figure shows the respiratory rate that will be used in Ventilate mode. In Ventilate Mode: The large black number shows the respiratory rate in use. Respiratory Rate units are Breaths per Minute Inspiratory Time: The Inspiratory Time button controls the total length of the Inspiratory phase. There is also a smaller sub-button located within the Inspiratory Time button that allows a pause to be included in the Inspiratory time. This inspiratory pause is limited to 40% of the I time. It can be displayed in either seconds or percent of I time, by repeated touches of the sub-button. In Standby Mode: The blue figures show the measured inspiratory time, recalculated after every breath i.e. on a breath to breath basis. The smaller black figure shows the total Inspiratory Time that will be used in Ventilate mode. In Ventilate Mode: The large black figure indicates the total time for inspiration. This may not be the same as the Inspiratory flow time, depending on the setting for Inspiratory Pause. Inspiratory Pause: In Standby Mode: Has no action In Ventilate Mode: Controls the portion of the Inspiratory phase that is held as a pause. The maximum pause is limited to 40% of the total Inspiratory time. Increasing the Pause time will increase the time the inspiratory volume is held at the end of the Inspiration stroke. The total Inspiratory Time is unaffected so Inspiratory Flow rates will increase as more Pause time is added. Touch the Pause button to activate it and open the numeric keypad. Touch it again to toggle between setting the pause as a % of Inspiratory time, or as a finite time. Enter the actual time or percentage r equi r ed.Pr ess“ Ent er ”ont henumer i ck ey padwhendone. In general, as with the ventilator settings above, any button shaded green on the display is a value you can set. These include the following. Printed: 10/Mar/09 Page 13 of 61 DOCA4941B USING THE Tafonius SOFTWARE Maximum Working Pressure Limit (MWPL) The Maximum Working Pressure Limit control sets a level, above which ventilation is prevented. This is particularly useful when dealing with neonates or during open-chest surgery when lung expansion is not restricted by a closed thorax. The Maximum Working Pressure Limit is an absolute value and is unaffected by any settings of PEEP or CPAP. If the MWPL value is reached during an Inspiratory phase then the ventilator immediately sounds an alarm and changes to the expiratory phase, where once again the cylinder behaves as a Virtual Bag. The MWPL setting can be useful for patients that are “ f i ght i ng”t hev ent i l at ort opr ev entex c es si v epr es s ur esdev el opi ng. CPAP/PEEP In Standby Mode: CPAP or Continuous Positive Airway Pressure can he applied during spontaneous breathing. . With CPAP patients inspire and expire normally with no added effort, although the end expiratory pressure is elevated to the CPAP setting. This aids in maintaining open alveoae. The airway pressure is held constant during all phases of breathing. In Ventilator Mode: PEEP or Positive End Expiratory Pressure applies during IPPV. Ventilating pressures rise during the Inspiratory phase as normal, but are allowed only to fall as far as the PEEP setting during expiration Validating entries All entries are validated once complete. This means that any invalid entries that would exceed minimum or maximum settings that Tafonius is capable of delivering will not be accepted. When this occurs a warning sound is issued and a description of the input error is shown at the bottom of the screen as a black on yellow text message. In most circumstances the limiting factor preventing the input is also shown. Here, for example a value of 1.0 second has been entered as a Pause Time during an Inspiration Time of 2.0 seconds. This represents 50% of the Inspiratory Time, thus exceeding the maximum of 40% and so is disallowed. The maximum allowable entry of 0.8 seconds is used. Increasing the It to 2.5 seconds would allow a 0.5 second pause. The Pause Time box is outlined in red to indicate the source of the error. Printed: 10/Mar/09 Page 14 of 61 DOCA4941B USING THE Tafonius SOFTWARE Dependant Values: The four buttons below the ventilator controls show the derived values for Minute Volume, Inspiratory Flow, I:E Ratio and Expiratory Time. They are dependent upon the settings of TV, RR and Itime In Standby Mode: The large blue figures show the values calculated from the measurements made during normal inspiration and expiration. Respiratory rate is calculated on a rolling minute average that is updated every 10 seconds. The measured minute volume is an integral of the ventilated volume over the last minute. Again this is updated every 10 seconds. If no respiration is detected during a period of 60 seconds then these blue values are all reset to zero. The smaller black figures show the calculated values based on the values set for the three independent ventilator settings (TV, RR & IT). In Ventilate Mode: The large black figures show the calculated values based on the values set for the 3 independent controls (TV, RR & IT). Printed: 10/Mar/09 Page 15 of 61 DOCA4941B USING THE Tafonius SOFTWARE Control buttons: Controlling the Software There are three buttons that control the look, feel and behaviour of the Tafonius software. These three buttons –System, Patient Data & Configure are located at the bottom right hand side of the screen. The System button The System button opens a two-tab screen that contains a System and a Configuration tab. The Conf i gur at i ont abc anbeent er eddi r ect l yf r om t he“ Conf i gur e”but t onont hel owerr i ghthandsi deoft he screen. System Tab The System tab contains buttons for System Errors, Leak/Compliance test settings, Language and User Manual options. Currently the Language is set to English only. Other language options will become available in due course. The User Manual button also presents options which at the time of writing are not yet available. System Errors Any error or fault condition that occurs in the Tafonius software is reported in this System Errors list. An error is indicated by the flashing of the border of the System button in red and an audible alarm. The purpose of the list is to indicate the source of an unexpected alarm or fault condition and to assist with trouble-shooting. Some errors are transient and will self-clear, in which case no action is Printed: 10/Mar/09 Page 16 of 61 DOCA4941B USING THE Tafonius SOFTWARE necessary. Some errors will not self-clear or will remain for example after a device has been removed. I nt hes ei nst anc es,s el ectt heer r orandt henc l i ckort ouc hont he“ Res ol ve”but t on.I ft heer r ori sno longer present then it is resolved and disappears from the list. Windows Event Viewer This is reserved for use as a trouble-shooting tool. A field service engineer or someone from technical support may ask you to use this button to view any error sequences that have arisen during the use of Tafonius. Do not use this button during normal use as there may be an effect on the performance and behaviour of the Tafonius software. Leak/Compliance A leak test and Compliance measurement is offered whenever the Tafonius software is launched. However sometimes it is convenient or necessary to run either utility without having to close the program and start again. Clicking on the Leak/Compliance button starts a sequence of events that proceeds in the following order: (If the piston is not initialised then Piston Initialisation must be done before either leak testing or compliance measurement. ) Piston Initialisation This involves making sure that there is nothing attached to the Y-piece before the piston is sent to the bottom of the cylinder to identify and reset its zero position. If the piston has not been initialised since turn-on then the cylinder representation on the screen will have a hatched background. Once the piston has been initialised this changes to a solid green background. Leak testing and compliance values can then be measured. Uninitialised piston background is hatched. Image also has a red flashing border Initialised piston background is green and shows piston volume in litres Leak & Compliance This button begins the process of first leak testing and then measuring the compliance of the system. For leak testing the piston is taken to the mid-point of the cylinder and then the piston produces a pressure of 20cm H2O. During this pressure phase the piston movement and hence leak is measured. The measured leak should be below 1500mls/min and in normal circumstances is less than 500 mls/minute. Values above or around 1500 mls/minute represent a serious leak and should be investigated. However, due to the way Tafonius maintains pressures and controls piston movement, even leaks of 1500mls/minute are unlikely to affect ventilator performance. They do however represent a loss of gas and agent. Printed: 10/Mar/09 Page 17 of 61 DOCA4941B USING THE Tafonius SOFTWARE Running the Leak & Compliance procedure Press the Leak/Compliance button on the System tab to begin the procedure A dialog appears announcing that it is establishing a connection with the Auxiliary controller. This can take 5-10 seconds. After that a second dialog appears asking that any patient be removed from the circuit. When the breathing circuit is ready, press the Leak & Compliance button At this point a stopper must be applied to the Y-piece to seal the system. Then press the Leak & Compliance button. The piston is moved to the mid-point and then stops briefly before establishing a system pressure of 20cm H2O. Printed: 10/Mar/09 Page 18 of 61 DOCA4941B USING THE Tafonius SOFTWARE If for any reason there is an excessive leak the following message appears: In this instance seal the leak and press the Retry button. If the leak test is successful the leak value is displayed and the system then proceeds to perform the two compliance measurements. A compliance measurement is made at the top cylinder position and at the 5.0L cylinder position and uses the leak value obtained in the first test. At the end of the test the leak and both compliance values are shown. Note that the values obtained will vary markedly depending on the nature of the breathing circuit connected. The two compliance values are used to obtain the equation for the straight-line graph of compliance for your machine and the breathing system in use at that time. This equation is then used to compute the compliance compensation required at any piston position and pressure. Printed: 10/Mar/09 Page 19 of 61 DOCA4941B USING THE Tafonius SOFTWARE Pr es s“ Fi ni s h”t ol eav et heLeak&Compl i anc et estpr oc edur e. Printed: 10/Mar/09 Page 20 of 61 DOCA4941B USING THE Tafonius SOFTWARE The Patient Data button Ent er i ngpat i entdat ahasbeendes cr i bedundert hes ect i on“ Ent er i ngI ni t i alPat i entI nf or mat i on” .Thi s c ov er st he“ Pat i entDet ai l s”and“ AtPr es ent at i on”t absf oundoncet he“ Pat i entDat a”but t oni spr es s ed. Al s of oundher ear et he“ Dat aLoggi ng”and“ Dat aVi ew”t abs. Data Logging All physiological data and many automatic events are recorded in a file called the Slow Data (SD) file. How often data is entered in this SD file is dictated by the setting in the Data Logging tab. The default value is 5 seconds. A range between 1 second and several minutes can be entered. Some natural events such as inspiration and expiration can be entered into the SD file. This however can fill the file with information that may not necessarily be required. Spontaneous breaths or ventilated breaths can be selected or deselected for entry in the SD file by checking or un-checking the respective tick-boxes. The time that a particular recording session began and its duration are also shown in this tab. Finalise Recording As soon as the Tafonius software starts, data is recorded in the SD file. When a patient session is endedt her ecor di ngs houl dbef i nal i sed.Todot hi spus hont he“ Fi nal i s eRec or di ng”but t on.Adi al og box may appear asking to save the current Preset (see the section on User Presets) and then a further dialog box will appear stating that the data will be committed and that no further changes can be made. Click or touch OK to commit the data and begin a new session. When a session is Finalised, those patient details are removed from the Patient List in the Cases tab. Data Storage Locations Where the data is stored will depend whether any Patient Information has been entered. If no Patient data has been entered then the data is stored in a folder that is named using the word “ Pat i ent s” ,t hec al endarmont handt heday.Sev er al pat ients or sessions may be held in this folder if no pat i enti nf or mat i oni sent er eddur i nganyoft heday’ soper at i ons . e.g. An operation on September 12th 2008 where no patient information was entered will be stored in a f ol derc al l ed“ Pat i ent s 2008Sep12” I fpat i entdat ahasbeenent er edt hent hef ol dernamewi l l beder i v edf r om t hePat i ent ’ snameandt he patients ID. e.g. Wild Billy , ID 1786394 will have a session folder created called WildBilly_1786394. If there is more than one session recorded for Wild Billy on that day then all sessions will be stored in this folder. Recorded data can be easily viewed and or exported using the utilities supplied with the Tafonius s of t war e.Seet hes ect i ons“ Vi ewi ngRec or dedDat a”and“ Ex por t i ngDat a” Printed: 10/Mar/09 Page 21 of 61 DOCA4941B USING THE Tafonius SOFTWARE Viewing Recorded Data Recorded data can be viewed by two methods: During a recording session in the ventilator control software or after a session in a spreadsheet viewer. Viewing Recorded data during a recording To view data on-the-fly, cl i ckort ouc hon“ Pat i entDat a”andt hent he“ Data View”tab. A trend viewer pops up showing the trend of the selected parameter from the beginning of the recording session to the current time. This data is constantly updated at a rate set by the Slow Data logging period. Use the drop-down list to select a different parameter. Viewing the instantaneous value using Data Drop View Down List Click or touch a point in the graph area of the Data View tab. A line appears at the point of touch. At the bottom of the line on the x-axis of the graph is the time at which that point of data was recorded. Along the right hand side of the line are the instantaneous value(s) of the associated data. Printed: 10/Mar/09 Page 22 of 61 DOCA4941B USING THE Tafonius SOFTWARE Viewing Recorded data from the Tafonius Shell Cl i ckort ouc hont he“ Vi ewDat a”but t onin the Tafonius Shell screen. This opens a Record Picker box to choose the Data Record to view. Data is presented in date order with the most recent at the top. Pick ar ec or dt ov i ewandt hencl i ck / t ouc ht he“ Sel ect ”but t on.Af i l eorl i stoff i l eswi l l beshown that begin with SD. These are the Slow Data files recorded during a session. Touch or click or touch on the one r equi r edandt henpr esst he“ Sel ect ”but t on.As pr eads heetvi eweropenst odi s pl ayt her ec or deddat a. Touching a cell within a column representing measured physiological data will display that data automatically as a trend graph. To create graphs for other parameters that are not physiological such as the set Tidal Volume or Compliance Compensated Tidal Volume it is necessary to export the data to a spreadsheet viewer of your choice. This is easily done from the Tafonius Shell. Exporting Data From the Tafonius Shel l ,cl i ckort ouc hont he“ Ex por tDat a”but t on.An“ Expor tDat a”di al ogbox opens listing the recorded data on the Tafonius computer. Data is presented in date order with the mostr ec entatt het op.Choos et heRec or df ol derr equi r edandt hencl i ckort ouc hont he“ Next ”but t on. Then choose the destination for your exported data. Typically this will be a USB flash drive inserted in t hehubatt hef r ontoft hes cr een.Whent hedest i nat i onhasbeens et ,cl i ckort ouc hont he“ Ex por t ” button to copy the data across to the selected device. Data is exported as a Comma Separated Value (CSV) file. The Anaesthetic Record chart in pdf format will be exported at the same time. Printed: 10/Mar/09 Page 23 of 61 DOCA4941B USING THE Tafonius SOFTWARE The Configure button The“ Conf i gur e”but t oni sus edt oacc es st hef ol l owi ng:Pr es et s,I ni t i al Set t i ngs,GasMoni t or i ngand SPO2s et up.The“ Sec ur i t y”but t oni nt heConf i gur ewi ndowi snotact i v eatt hi st i me. Presets Presets are a means of individually saving Tafonius software layouts and initial settings that suit a par t i c ul arpur pos e.Forex ampl ey oumayhav eapr es etc al l ed“ Foal s”orapr esetc al l ed“ Col i cs”or ev en“ Seni orAnaest het i st ” . Each Preset saves the way the screen is configured including how the traces are arranged as well as all the initial values used when the program starts, as well as all the alarm settings and whether they are enabled or not. There are two ways in which Presets are used to load values at the start of a procedure. There are the Initial Settings, which describe the preferred initial values for such items as Tidal Volume, Respiratory rate etc and there are the user settings which remember the preferred settings for e.g. ECG speed and trace position. The values for Initial Settings can be changed by clicking on the Configure button at the bottom right hand side of the screen. A new smaller window area appears below the traces area. Choose the preset you want to change by clicking on it in the Presets list. If it is already in use it will have the word Active after the preset name. If not, then click or touch on the required Preset and then c hoos et he“ Swi t c hTo”but t on.Thes el ect edPr es etwi l l bel oaded.Thencl i ckort ouc hon the Initial Settings button on the left hand side. Printed: 10/Mar/09 Page 24 of 61 DOCA4941B USING THE Tafonius SOFTWARE Initial Settings Using the keyboard or the on-screen keypad enter the initial values you would like in each of the named fields. The fields have the following meanings: TV: Tidal Volume in litres. RR: Respiratory rate in breaths per minute It: Total Inspiratory time MWPL: Maximum Working Pressure Limit IP: Inspiratory Pause in seconds Show IP as % : Shows the Inspiratory pause as a percentage of the It. CPAP: Continuous Positive Airway Pressure in cm H2O FiO2: Desired initial oxygen fraction. (not available in software version 1.0) APNOEA: Length of time allowed between breaths before Apnoea alarm sounds Countdown: Length of countdown timer before pop-up menus close automatically, in seconds Countdown : Enable the countdown timer for closing pop up menus Mouse : Enable the mouse cursor on the screen Whendone,cl i ckort ouchont hePr es ett abagai nandt henc hoos e“ Sav eActive” .Thenextt i methis Preset is loaded these new initial values will be used. User settings During the course of using the Tafonius program you may make changes to the screen appearance or to the appearance of a certain monitor trace. When changes such as these are made, that affect the personal way that the screen is viewed the Preset will be marked as altered and an asterisk will appear next to the name in the title bar. At any time or at the end of a procedure this unique set up of Tafonius can be saved by again choosing to save the Preset. If this is not done explicitly during use then you will be prompted to save the Preset when finalising a patient session. You can choose to change the active preset by touching SAVE or you may save the current setup as a new setup by touching SAVE AS NEW and renaming it as desired. Note that you will not be prompted to save a changed Preset when you shut down the Program using the main ON/OFF switch. Printed: 10/Mar/09 Page 25 of 61 DOCA4941B USING THE Tafonius SOFTWARE Changing Presets When the Tafonius software starts it uses, by default, the last Preset in use. To change a Preset, click ort ouc hon“ Conf i gur e” . The Preset list is displayed. Along the bottom of the Preset Window are 5 buttons, used to control how Presets are created, named, selected and deleted plus two other buttons to Reset Factory Defaults or Close the Configuration dialog. The Preset currently in use is indicated by the word Active in brackets after the Preset name. This name is also displayed at the top of the screen in the title bar. Save As New This buttoncr eat esac opyoft heAc t i vePr es etandnamesi t“ Cust om Pr es et ” .Us et heRenamebut t on to change the name to one of your choice. If you have made changes to the stored active preset the new stored preset will include those changes. Save Active This button saves any changes made to the Active Preset Rename This button allows a Preset to be renamed. Type the new name in the edit box that appears and click or t ouch“ OK” . Switch To Use this button to change to a different Preset from the Active one. To use this button, click or touch on t hePr es ety ouwi s ht ous eandt hencl i ckort ouc hont he“ Swi t chTo”but t on. Delete This button removes the highlighted Preset. Note that it is not possible to delete an active preset. Reset Factory Default This button will apply all the default factory settings to the Active Preset. Note that the Preset must be Active for the changes to be made to it. A confirmation dialog box appears stating which Preset will be changed. If this is the Preset that you wish to Reset, thencl i ckort ouch“ OK” . Printed: 10/Mar/09 Page 26 of 61 DOCA4941B USING THE Tafonius SOFTWARE Gas Monitoring This tab displays all of the status and diagnostic information for the current Gas Monitor in use. At the current time a mainstream device called IRMA or a sidestream device called Artema AION is used for CO2, O2, N2O and Agent monitoring. Your machine will be fitted with one or other of these units. Gas monitoring tab with the IRMA Gas Analyser: Clicking on the Gas Monitoring tab reveals a Window with 5 further tab options: Status, Sensor, Errors, Config & Data Status tab Used for fault diagnostic information only Sensor tab Used for fault diagnostic information only Errors tab Used for fault diagnostic information only Config tab Used for fault diagnostic information only Data tab Location of theZer oopt i onf ort heI RMAmoni t or .Seet hes ect i onon“ Us eoft heI RMAMoni t or ”f orf ul l i nf or mat i ononwhenandhowt ous et he“ Zer o”opt i onf oundi nt hi st ab. In most situations it is only necessary for users to use the Data tab. Information from the other tabs may be requested by a service engineer or a technical support person during fault diagnosis. Printed: 10/Mar/09 Page 27 of 61 DOCA4941B USING THE Tafonius SOFTWARE Gas monitoring tab with the Artema AION Gas Analyser: Modes/Status Used for fault diagnostic information only Status Used for fault diagnostic information only Alarms Used for fault diagnostic information only Cmds Used for fault diagnostic information only Demo Used for demonstration purposes only. Calib Used for fault diagnostic information only In most situations it is only necessary for users to use the Cmds tab for performing a zero calibration. Information from the other tabs may be requested by a service engineer or a technical support person during fault diagnosis. Printed: 10/Mar/09 Page 28 of 61 DOCA4941B USING THE Tafonius SOFTWARE Using the PHASEIN IRMA Monitor Important Note: The IRMA mainstream multi-gas probe is intended to be connected to a patient breathing circuit for monitoring of inspired/expired gases of patients in intensive care, anaesthesia and emergency care. It is not intended to be used as the only means of monitoring a patient. It shall always be used in combination with other vital signs monitoring devices and/or professional human judgements of patient condition. The IRMA multi-gas analyser is intended to be used by trained and authorised veterinary professionals only. It is not intended to be used in outdoor transport applications such as in cars or in aircrafts. IRMA Setup Plug the IRMA device into the IRMA socket located on the bulkhead behind and below the utility drawer, on the Right Hand Side of the machine. Snap the IRMA sensor head on top of the IRMA airway adaptor. It will click into place when properly seated A green LED indicates that the IRMA sensor is ready to use Printed: 10/Mar/09 Page 29 of 61 DOCA4941B USING THE Tafonius SOFTWARE Connect the 15mm male IRMA/Airway adaptor connector to the breathing circuit. When used with a foal 22mm circuit connect the IRMA device as shown in the next 2 images. Connect the 15mm female I RMA/ Ai r wayadapt orconnect ort ot hepat i ent ’ sendot r achealt ube When used with a 50mm mainstream adaptor the IRMA adaptor is integrated into the Large airway adaptor as shown: Printed: 10/Mar/09 Page 30 of 61 DOCA4941B USING THE Tafonius SOFTWARE Always position the IRMA sensor with the O2 cell (or top) pointing upwards Pre-Use check Before connecting the IRMA adaptor to the breathing circuit, verify the O2 calibration by checking that t heO2r eadi ngont hemoni t ori sc or r ect( 21%) .Seet hef ol l owi ngs ect i on“ Oxygen Recalibration”on how to perform room air calibration. IRMA Monitor: General Description The IRMA breath monitor unit is a small cube-shaped unit housing a replaceable Airway Adaptor and Oxygen sensor. The main housing for the unit has an LED in one corner which indicates the status of the sensor. These states are described in detail in the section "IRMA Status & Error Messages" The IRMA unit connects to the Tafonius monitoring system via a 9-Way Female D Type connector. When the unit is connected and the unit powered ON, the IRMA device runs through a self-test sequence. This is indicated by the LED on the main housing changing alternately through GREEN, RED, BLUE a number of times. Once the initialisation sequence is complete the LED stays GREEN. If the IRMA unit has the capability of detecting anaesthetic agents then the LED will turn BLUE in the presence of these agents. IRMA units may be connected/disconnected while powered without any problems. Calibration, self-test and reset The IRMA unit is self-calibrating and does not require scheduled calibration on a monthly or even annual basis. Calibration is achieved in a number of ways but must be done while the unit is plugged in and powered ON. ALL CALIBRATION MUST BE DONE WITH THE UNIT IN FREE AIR AND NOT WHILST CONNECTED IN A PATIENT CIRCUIT Oxygen Recalibration For calibration of the Oxygen sensor, removal of the Airway adaptor forces an automatic recalibration to 21%. For this reason it is important that the removal and refitting of the airway adaptor is done in conditions where the airway concentration is at 21% such as in a well ventilated room. 1. 2. 3. 4. 5. Remove the Airway Adaptor by pulling the white plastic connector away from the main housing. Wait until the LED flashes RED and the alarm sounds on the monitor. Replace the Airway Adaptor. Check that the LED turns green Check that the O2 reading on the Monitor is 21% Printed: 10/Mar/09 Page 31 of 61 DOCA4941B USING THE Tafonius SOFTWARE CO2, Nitrous and Agent Calibration (Zero reference calibration) These can all be reset from the Windows software via the Configure/Gas Monitoring/Data tab route. Only perform this function when asked to do so by the Windows program or when indicated by the following conditions: 1) Ar epeat ed“ GasConc ent r at i onoutofRange”er r ormes s aget hatappear swhenmeas ur i ng room air and is not cleared by disconnecting and re-connecting the IRMA device. 2) Incorrectly reported high Inspiratory CO2 concentrations ALL CALIBRATION MUST BE DONE WITH THE UNIT IN FREE AIR AND NOT WHILST CONNECTED IN A PATIENT CIRCUIT THE IRMA UNIT MUST BE ALLOWED TO WARM UP AND BE RUNNING FOR AT LEAST 15 MINUTES BEFORE A ZERO REFERENCE CALIBRATION IS PERFORMED To RESET the IRMA device, cl i c kort ouc ht he“ Zer o”but t oni nt heData tab of the Gas Monitoring Window found in the Configuration Setup. A warning dialog box will appear with the following message: Make sure the conditions for re-calibration are correct before continuing, then click or touch Yes. If you are uns ur eaboutt hec ondi t i onsr equi r edf orc al i br at i on,cl i c kort ouc h“ No”andr eadt heabov e par agr aphsc ar ef ul l ybef or er unni ngt he“ Zer o”opt i onagai n. Printed: 10/Mar/09 Page 32 of 61 DOCA4941B USING THE Tafonius SOFTWARE Using the ARTEMA AION Gas Analyser The Artema AION Gas Analyser is a sidestream gas analyser, drawing the sampled gas from the Y-piece. Other than the physical differences and the inherent latency between breathing and waveform display, the reporting and display of all gas parameters is the same as with the IRMA Gas Analyser. Sidestream sampling port (capped) The sidestream sampling line connects to the sampling catheter that enters the Y-piece as shown. The sampling catheter extends down into the ET tube for optimum sampling. Display of Measured Values THE Gas Anlayser (IRMA or AION) will continuously display and update the numerical and trace information for the patient. The trace region shows the capnogram as either a line or filled trace. The main numerical data region associated with the trace shows the inspired and expired values of CO2. The larger figure represents the expired value and the smaller figure shows the inspired value. The third value to the right is the respiratory rate in breaths per minute. If a period of apnoea occurs then the alarm will sound and the respiratory rate will be replaced by a red box, which displays the number of seconds elapsed since the last breath. Printed: 10/Mar/09 Page 33 of 61 DOCA4941B USING THE Tafonius SOFTWARE Clicking or touching this red box will silence the Apnoea alarm. The box will remain red and continue to count the seconds since the last recorded breath. A fresh breath will clear the Apnoea state and return to displaying Respiratory Rate (RR). During periods of Apnoea, the inspired values are constantly updated indicating the gas concentrations in the breathing circuit. Printed: 10/Mar/09 Page 34 of 61 DOCA4941B USING THE Tafonius SOFTWARE Other Control buttons: Alarm Silence & Freeze Traces Alarm Silence Press the button once for a 5-second silence of all alarms. After 5 seconds the alarms, if active, will again sound. Press and hold the Alarm Silence button until it shows thel egend“ Lock ed” . The audio portion of all current alarms are then suppressed. Any new alarm condition will override the locked out condition and again sound the alarm. Freeze Traces Use this button to freeze all trace information on the screen. All other monitoring activities continue as normal. The button will change colour to indicate that it is active. Also a countdown timer will begin showing on the button. At the end of the countdown period the freeze option will be lifted. Alternatively simply clicking or touching the Freeze button once more will release the freeze option. The countdown time for Freeze Traces is determined by the Countdown value set in the Initial settings attribute panel. Printed: 10/Mar/09 Page 35 of 61 DOCA4941B USING THE Tafonius SOFTWARE Monitoring Software Monitoring options Tafonius has the options of monitoring the following parameters via its in-built software: Single Channel ECG Single Channel Invasive (Direct) Blood Pressure Breath Analysis: Inspired/Expired CO2 Inspired/Expired O2 Inspired/Expired N2O Inspired/Expired Anaesthetic Agent: Halothane Isoflurane Sevoflurane Desflurane Enflurane Single Channel Pulse-Oximeter Dual Channel Temperature with delta Airway Pressure Printed: 10/Mar/09 Page 36 of 61 DOCA4941B USING THE Tafonius SOFTWARE Organisation of traces The monitoring screen consists of 3 main regions –a trace region where all time-traces are displayed, a numerical region where all values are displayed and a status region where status information about Tafonius is displayed. The trace region is centralised on the screen and in the picture above contains the ECG, CO2, Airway Pressure and Pulse-Oximetry trace. This area can be organised as required by placing any trace or combination of traces here. The trace region itself is divided into three horizontal areas each of which is one trace high. It is possible to place a trace in any of these 3 horizontal areas. Additionally it is possible to have multiple traces in any one of these horizontal areas. Printed: 10/Mar/09 Page 37 of 61 DOCA4941B USING THE Tafonius SOFTWARE Adding and Removing Traces To change the trace screen viewing options touch any trace. A new editing box appears at the bottom of the screen The text in the yellow strip indicates the trace that has been touched (selected). Here the user has two options: Touching inside the Trace/Trend dialog box will remove the trace from the screen and place it in the reserve area. Alternatively touching the screen in another area of the trace region will place that trace alongside and to the left of any other traces in that horizontal area. Any monitor that has been placed in the reserve area can be put back on the screen in any of the three hor i z ont al ar easatanyt i me.Todot hi st ouc hany“ numberbox”e. g.t heECG hear tr at ebox.Thes etof tabbed attribute panels appear at the bottom of the screen. Select the Traces/Trends tab and then select and drop the desired monitort r ac ebackont hescr een.“ Pi ckandput ”t hedesi r edt r ac ewher e you want it. Controlling the appearance of traces All traces have various attributes associated with them that determine for example their height, speed, shift and alarm options amongst others. To access these options for any monitor touch the number panel associated with the monitor. For example to access the options for the ECG monitor, touch the left hand side of the ECG/IBP panel at the top right of the screen. Touch here Printed: 10/Mar/09 Page 38 of 61 DOCA4941B USING THE Tafonius SOFTWARE The monitoring attribute panels appear at the bottom of the screen opened at the ECG tab. Note that the ECG attribute tab shares its place with the IBP attribute tab as they are both located on this common ECG/IBP tab. When the left hand side of the ECG/IBP panel is touched, the ECG attributes are shown. If the right hand side of the ECG panel is touched, which has the IBP values, then the attribute tab will be opened with the IBP attributes showing. To change between ECG and IBP attributes touch the appropriate radio button at the left hand side of the ECG/IBP tab All alarm settings and trace settings are particular to any given Preset and so the Preset should be saved after making adjustments to any of the controls in the monitoring attribute panels. Printed: 10/Mar/09 Page 39 of 61 DOCA4941B USING THE Tafonius SOFTWARE The ECG/IBP Attribute tab There are two active sections to this tab: Traces and Alarms. In the Traces section all the controls relate to how the trace can be viewed. Values can be set for either ECG or IBP options by selecting the appropriate option in the Select box. Trace options: ECG Sensitivity: controls the height of the ECG trace seen on the screen Sweep: Controls the screen sweep speed in rates of mm/second. Filter: Allows the setting of a digital filter to remove unwanted signal noise. Use a notch filter for mains interference. Use a Low-pass filter for tremors due to movement e.g. shivering. Move the slider in the Filter box to control the degree of filtering. Shift: Shifts the base-line of the ECG up and down the screen. Use the shift option to centralise the ECG for optimum viewing. Heart Rate: Sel ec tt heboxnextt o“ BeeponECG”t opr oduc eanaudi bl ebeepwi t hev er ydet ec t ed ECG complex. Since Tafonius only has one audio output device, only one monitor can be made to beep at any time. Selecting ECG for example, will mean that any previous selection is overridden. To change between ECG and IBP attributes touch the appropriate radio button at the left hand side of the ECG/IBP tab Synchronising the ECG and IBP waveforms ECG and IBP waveforms can be synchronised in time as long as they have the same trace width on the screen. Normally they would be placed one above the other so that a visual association between the Printed: 10/Mar/09 Page 40 of 61 DOCA4941B USING THE Tafonius SOFTWARE t wot r acesc anbemade.I ft het wot r ac esar enots y nc hr oni s edt hens el ectt he“ Sy nc hr oni s e”opt i oni n the ECG/IBP tab. If the two traces do not have the same width they cannot be synchronised and the option will be greyed. Trace options: IBP Sensitivity Moving this slider will change the full scale height of the IBP trace in accordance with the legend on the right hand side of this scale. Note that there is an automatic levelling feature in the IBP trace that means that the bottom of the IBP trace is adjusted after every sweep to lie on the base line. This will always keep the IBP trace in view even if the blood pressure values are slowly changing. Sweep Selecting one of the radio buttons will set the sweep speed for the IBP trace. Note that this option may be further controlled or changed depending on the state of the Synchronise check box and, or the presence of ECG and IBP traces on the Tafonius screen. If the ECG and IBP signals are not synchronised then the sweep speed of ECG and IBP traces can be different. If the traces are synchronised then the IBP sweep speed will be set to and follow the ECG sweep speed. Shift The Shift slider alters the position of the baseline of the IBP trace. Heart Rate Sel ectt heboxnextt o“ BeeponI BP”t opr oduceanaudi bl ebeepwi t hev er ydet ec t edpul sewav ef or m. Since Tafonius only has one audio output device, only one monitor can be made to beep at any time. Selecting Beep On IBP for example, will mean that any previous beep selection is overridden. Zero IBP: When a direct arterial sampling line has been placed and the sensor positioned at the level of the pat i ent ’ shear t( butwi t hc onnect i ont oambi entpr es s ur enotar t er i al pr ess ur e)t he“ Zer oI BP”but t oni s used to set the current output to zero. Printed: 10/Mar/09 Page 41 of 61 DOCA4941B USING THE Tafonius SOFTWARE Alarm options: ECG & IBP Click or touch the Alarms button on the ECG/IBP tab to show the alarm options for ECG and IBP monitors. Because the monitor is intended for use with only one animal at a time there are potentially several sources of heart rate data, not least of which are ECG and IBP. When setting a heart rate alarm it is possible to choose to derive the heart rate from either ECG or IBP depending which is in use or which is more reliable in the current circumstances. Alarm Limits This group of alarms includes alarms for Heart Rate, Systolic, Diastolic and Mean Arterial Pressure. To set any alarm value, click or touch the associated edit box. The numerical keypad will appear on the right of the screen. Use this or the main keyboard to enter the numerical value and then click or touch Enter. Heart Rate Upper and lower alarm values can be set for the heart rate and these can be independently enabled by touching or clicking the Enable box next to the appropriate Alarm edit box. Systolic Set high and low limits for the systolic blood pressure value. High and Low alarms can be independently enabled. Diastolic Set high and low limits for the diasystolic blood pressure value. High and Low alarms can be independently enabled. Mean Arterial Pressure Set high and low limits for the mean arterial blood pressure value. High and Low alarms can be independently enabled. Printed: 10/Mar/09 Page 42 of 61 DOCA4941B USING THE Tafonius SOFTWARE The CO2 Attribute tab Properties Units: Set the displayed units as Volume %, millimetres of mercury (mmHg) or as kilopascals (kPa). When units are changed, there is an automatic change in the units applied to alarms so that the corresponding value in the new units is used. Trace: Select whether to display the Capnogram as a filled trace or as a simple line curve. Scale: Fixes the vertical scale of the CO2 trace. Beep on Breath: Select this tick box to produce an audible beep with every detected breath. Alarm Options To set Alarms associated with CO2 measurement, click or touch the Alarms button To set an alarm, place a tick in the enable box and then enter the appropriate alarm value. Printed: 10/Mar/09 Page 43 of 61 DOCA4941B USING THE Tafonius SOFTWARE The Airway Pressure (AP) Attribute tab Sensitivity This slider sets the scales of the Airway Pressure trace. The value next to the pointer represents the maximum positive height of the trace window. Sweep This slider sets the sweep speed of the Airway Pressure trace, which is the speed at which the trace is drawn across the screen. Airway Pressure Alarms To access the Airway Pressure Alarms, click or touch the Alarms button The CPAP alarm allows an alert condition when the measured CPAP pressure deviates outside of the required CPAP value. Alarm units are in percentage values of the set CPAP value. Printed: 10/Mar/09 Page 44 of 61 DOCA4941B USING THE Tafonius SOFTWARE The Oxygen Attribute tab Sweep Use this slider control to set the sweep speed of the Oxygen trace across the screen. Scale Use this control to set the full scale height of the Oxygen trace window. Note that there is no shift feature with this trace. To view Oxygen values in excess of 50%, the 0-100% scale range must be used. Alarm Options Click or touch the Alarms button to show the Alarm options for Oxygen. The Oxygen Alarm options allow the alarm limits for Inspired and Expired oxygen to be set. Alarms can be set for High and Low Inspired and Expired values. Click or touch the Enable box to enable the alarm and then enter the alarm value by clicking or touching the appropriate alarm edit box. FiO2 - This option is not yet implemented and will be available in the future. Printed: 10/Mar/09 Page 45 of 61 DOCA4941B USING THE Tafonius SOFTWARE The SPO2 Attribute tab Sweep Use the Sweep slider control to change the speed at which the SpO2 trace moves across the screen Sound Click or touch the box next to “ Beep On SpO2 Pulse”to enable audible beeps associated with each detected pulse waveform. This will over-ride any other beep selection. Alarm Options Click or touch the Alarms button to show the Alarm options for SpO2. Alarm Limits Click or touch the enable box to enable the alarm and then enter the appropriate value. Sound Click or touch the tick box to select audible beeps every time a pulse wave on the SPO2 monitor is detected. Printed: 10/Mar/09 Page 46 of 61 DOCA4941B USING THE Tafonius SOFTWARE The Agent Attribute tab In Use: The IRMA OR detector used for agent monitoring does not have automatic agent ID so it is necessary to set the agent being used. Select the appropriate radio button next to the agent in use. This change will be reflected in the Agent button on the screen. Sweep Use the Sweep slider control to change the speed at which the Agent trace moves across the screen Scale Use this control to set the full scale height of the Agent trace window. Note that there is no shift feature with this trace. To view Agent values in excess of 5%, the 0-10% scale range must be used. Alarm Options Click or touch the Alarms button to show the Alarm options for Agent. Alarm Limits: Set the alarm limits required for a particular agent here. Note that different alarm limits can be set for each and every agent. Click or touch the Enable box to enable the alarm and then enter the appropriate value. Printed: 10/Mar/09 Page 47 of 61 DOCA4941B USING THE Tafonius SOFTWARE The N2O Attribute tab Alarm Options Click or touch the Alarms button to show the Alarm options for N2O. Alarm Limits: This tab allows the alarm limits to be set. Alarms can be set for High Inspired and Expired values. Click or touch the Enable box to enable the alarm and then enter the alarm value by clicking or touching the appropriate alarm edit box. Printed: 10/Mar/09 Page 48 of 61 DOCA4941B USING THE Tafonius SOFTWARE The Temperature Attribute tab Time Selecting an option here sets the amount of data displayed in the trace window. By selecting a long Time period, trends can easily be visualised. By choosing a short time period, details in trace changes are more easily observed. Temperature Scales: Choose to use either Fahrenheit or Celsius as the temperature scale. Alarm values change accordingly. Alarm Options Click or touch the Alarms button to show the Alarm options for Temperature. Alarm Limits: There are 3 alarm options: Alarms for T1 temperature probe, Alarms for T2 temperature probe and Alarms for the Delta temperature. (The Delta temperature is the difference in temperature between the two temperature readings of T1 and T2). Click or touch the enable box to enable the alarm and then enter the appropriate value. Printed: 10/Mar/09 Page 49 of 61 DOCA4941B USING THE Tafonius SOFTWARE Alarm –Silence: Use this button to silence a temperature alarm. An alarm will sound when a temperature probe is discovered to be absent. When starting the software if no temperature sensors are present an alarm may sound and the border of the temperature gauge will flash red. Touch the temperature gauge to open this Attribute tab and use the Silence button to silence the alarm. The Traces/Trends Attribute tab For a detailed description of how traces are managed and moved around the screen, see the section entitled “ Adding and Removing Traces”att hes t ar toft hes ect i onabove. Printed: 10/Mar/09 Page 50 of 61 DOCA4941B USING THE Tafonius SOFTWARE Alarms, Alerts and Critical Error Messages Printed: 10/Mar/09 Page 51 of 61 DOCA4941B USING THE Tafonius SOFTWARE Creating an Anaesthetic Record Chart The Tafonius software creates an automatic record that can be viewed as an Anaesthetic Record Chart. Every 5 minutes monitoring data is recorded and entered on the chart in a similar manner to a manual record. Information about the patient, surgeon, anaesthetist and other details can all be recorded. All non-clinical information is entered via the Patient Data button. This process is covered fully in the section entitled “ Ent er i ngI ni t i al Pat i entI nf or mat i on” During a patient Session, there are effectively two recorded sets of data. One set of data is saved as the Slow Data file. This records periodically (default is every 5 seconds) all of the information relating to the running of Tafonius. For a more details explanation of the Slow Data files see the section entitled “ Dat aRec or di ngusi ngt heSl owDat aFi l e” . The other set of data is data saved as the Anaesthetic Record file. This file consists of data saved every 5 minutes as plotted or tabled data as well as header information such as name of Anaesthetist or Surgeon. Altering the Start Time of the Anaesthetic Record chart It is not uncommon to prepare Tafonius some time in advance of connection to the patient. During this time there will be continual recording of non-meaningful data. To avoid this, the Start time for the Anaesthetic Record data can be set using the Anaesthetic Record Start button. Pressing this button will reset the start time for the Anaesthetic Record data ONLY. Slow data information is not affected. The Anaesthetic Record Start button is found in the Data Logging tab of the Patient Data dialogs. The following dialog will appear: This procedure can be repeated as many times as required, noting that each time, data prior to selecting this option will no longer be available. After this creation of the Anaesthetic Record chart is automatic and the chart can be viewed from the Tafonius Shell via the View Data button. Viewing the Anaesthetic Record chart The Anaesthetic Record chart can only be viewed from the Tafonius Shell, whilst Tafonius is NOT running. Click or touch the View Data button in the Tafonius Shell. Use the Record Picker to select a patient and then click Select. Then highlight the AR file and click or touch Select. This will open a pdf version of the Anaesthetic Record in Adobe Viewer. Printed: 10/Mar/09 Page 52 of 61 DOCA4941B USING THE Tafonius SOFTWARE Data Recording using the Slow Data File The Slow Data file is an automatically generated file that records all information gathered during a Session. Data contained in this file includes all the monitoring information in terms of numerical and trend data. This periodic data (Default is every 5 seconds) also contains all events that occur during use. If an alarm condition occurs this is recorded in the Slow Data file. Similarly a change of anaesthetic agent type or the level of the MWPL setting is recorded in the Slow Data file. This raw file is noneditable so that the user can be sure that all events that occurred are recorded. For a full description of the data saved in the Slow Data file, see Appendix A, Slow Data Information. The Slow Data file can be exported to a Flash disk using the Export data function accessed from the Tafonius shell. Seet hes ec t i onent i t l ed“ Ex por tDat a”l at eri nt hi smanual . In addition to automatic events, user events can be added to the Slow Data file. These can be added by clicking or touching the Events button at the bottom right hand side of the Tafonius screen. These events will appear in the Slow Data file as well as being used for the events shown in the Anaesthetic Record chart. Formor ei nf or mat i ononent er i ngmanual Ev ent ss eet hes ect i onent i t l ed“ Addi ng Events Dur i ngaPr oc edur e”l at eri nt hi smanual . Changing the interval for Periodic Data in the Slow Data File The interval for periodic data can be changed in the Data Logging tab of the Patient Data dialog. Click or touch the Patient Data button and then select the Data Logging tab. In the Slow Data Logging edit box enter the value in seconds to be used as the logging interval. Note that this value will have an effect on the final file size. Logging every second will create a substantially larger file than every 5 seconds. Note also the effect of the logging interval as explained below. Effect of the Logging Interval on the Slow Data entries Whatever the interval period between logging of entries, automatic event entry will always be logged. For example, if the Ventilate button is pressed an automatic event will be generated and added to a temporary list of events. When the next logging episode occurs, all events stored since the previous logging event will be entered into the SD file. This is different from the physiological monitoring data which is simply grabbed at the instant of the periodic logging. Care should be used when interpreting periodic logged data because events that appear at the same logging could be separated by up the periodic logging interval. Printed: 10/Mar/09 Page 53 of 61 DOCA4941B USING THE Tafonius SOFTWARE Adding Events during a procedure Events can be added to the Slow Data (SD) record during a procedure. Events can be pre-existing in a dr opdownl i stormaybeaddedasanewt extent r y.Toaddanev ent ,cl i ckort ouc hont he“ Ev ent s” button at the bottom right hand side of the screen. This will open a new editor panel at the bottom of the screen. Cl i ckort ouc hont he“ Add”but t onandt hencl i ckort ouc hont hear r owoft heStandard Events drop down box. In the example below, Anaesthetic Induction has been chosen from the Drop Down List. Printed: 10/Mar/09 Page 54 of 61 DOCA4941B USING THE Tafonius SOFTWARE Standard Events can be added or removed from the Drop Down List by using the “ Add/Remove Standard Events”button. Clicking or touching this button opens a new editor which lists all the current Standard Events. These can be Edited or Deleted using the Edit/Delete buttons. To add new items to the Standard Event list, click or touch the Add button and then type your new Event title. Once a new Event has been entered it will appear last on the list. To change the position of this new item in the list, use the UP and Down buttons to move the item. Once the new Event and the order of Events has been set, click ort touch the Close button to leave the Standard Events editor. To add your own entry click or touch in the Event Details box and start typing Cl i ckort ouc h“ Acc ept ”t oaddi tt ot heSDf i l e. Us et he“ Cl ear ”but t ont or emov eanent r yf r om t heEv entDet ai l sedi tbox. Printed: 10/Mar/09 Page 55 of 61 DOCA4941B USING THE Tafonius SOFTWARE The Tafonius Shell The Tafonius Shell is the starting point for using the Tafonius Ventilator software and also the starting point for various related utilities. The buttons: Tafonius Launches the Tafonius ventilation and monitoring software View Data This opens a browser for selecting a patient. All data records are shown in date order with the most recent data at the top of the list. Choose the Patient Record you would like to View and click or touch the Select button. Each patient will have a Slow Data file (SD file) and an Anaesthetic Record file (AR file). Printed: 10/Mar/09 Page 56 of 61 DOCA4941B USING THE Tafonius SOFTWARE To view the Slow Data information, highlight the appropriate file and then touch or click the Select button. The Slow Data is viewed in a spreadsheet format and can be used to show monitoring trends. By touching any of the measured parameter columns (e.g. ECG heart rate, Pulse-Ox saturation) a trend view of the data over the course of the procedure is shown at the bottom of the screen. Touching the column again hides the trend view. For greater versatility, export the data to a USB stick and view the data in a commercial spreadsheet of your choice. All Slow Data files are saved as CSV or comma separated value files. To view the Anaesthetic Record chart, highlight the desired AR file and then touch or click Select. A new window opens to show the Anaesthetic Record pdf file. For printing and archiving of either the Slow Data or the Anaesthetic Record use the Export Data button from the Tafonius Shell to save the data to a USB flash drive and then open the files in your host computer. Printed: 10/Mar/09 Page 57 of 61 DOCA4941B USING THE Tafonius SOFTWARE Export Data This button opens a browser to allow you to choose the data to export. All data in the browser is listed in date order with the most recent files at the top of the browser. First select the patient that you wish to export data for and then click or touch the Next button. Then choose your destination drive (usually a USB flash drive named D:\) and touch or click the Export button. The Slow Data and the Anaesthetic Record data will be copied to your chosen destination. Printed: 10/Mar/09 Page 58 of 61 DOCA4941B USING THE Tafonius SOFTWARE Options This opens a small window with 3 facilities. Touch Screen Alignment Touching or clicking this button starts a utility to align the touch screen to your computers screen. Simply touch the red circles in the way you would normally use the touch screen and follow the prompts to reset the alignment. If you make a mistake simply wait and the utility will time out and be cancelled. You can then try again. Recover Anaesthetic Records Touching or clicking this button will create a new Anaesthetic Record chart if the original has been destroyed or corrupted for some reason. Company Name Enter your practice or company name here. This will appear on the Tafonius shell as well as at the top of the Anaesthetic Record chart. Shutdown This will shut down the PC and put the PC in an off condition. The PC can be started again by either turning on the Tafonius ventilator or by pressing the large ON/OFF button on the side of the PC. Printed: 10/Mar/09 Page 59 of 61 DOCA4941B USING THE Tafonius SOFTWARE Appendix A : SLOW DATA INFORMATION Monitoring data recorded in the Slow Data File includes the following: User control settings CPAP/PEEP TV TVcc RR IT IP Maximum PEEP or CPAP reading cm H2O Set Tidal Volume L Compliance compensated tidal volume L Respiratory Rate –breaths per minute Inspiratory Time in milliseconds Inspiratory Pause time in milliseconds Resultant parameters calculated from user settings MV Minute Volume L I Flow Inspiratory Flow L/min I:E Ratio Inspiratory:Expiratory ratio Exp Time Expiratory time in milliseconds Measured during Standby TV Insp Time Exp Time Spontaneous breath Tidal Volume in mls Inspiratory time in ms Expiratory time in ms Resultant parameters calculated from MEASURED values during Standby RR Respiratory rate in breaths per minute MV Minute Volume in litres Iflow Inspiratory flow rate in L/min I:E Ratio Inspiratory:Expiratory ratio Airway Pressure Measurements CPAP/PEEP PIP CPAP(Standby) or PEEP(Ventilate) values in cm H2O Peak Inspiratory Pressure in cm H2O Gas analysis Measurements Insp CO2 Exp CO2 Resp Rate Insp Agent Exp Agent Insp O2 Exp O2 Atmospheric Pressure Fractional %Volume measurement of inspired CO2 Fractional %Volume measurement of expired CO2 Breathing rate in breaths per minute Inspired Agent Fractional %Volume measurement Expired Agent Fractional %Volume measurement Inspired Oxygen %Volume measurement Expired Oxygen %Volume measurement Current Atmospheric pressure in mm Hg Nonin SpO2 Measurements SPO2 HR Saturation Heart rate from pulse-oximeter device Percentage oxygen saturation of arterial blood Printed: 10/Mar/09 Page 60 of 61 DOCA4941B USING THE Tafonius SOFTWARE IBP Measurements Mean Systolic Diastolic Heart Rate Temperatures T1 T2 Mean arterial blood pressure (mean 4 average) Systolic blood pressure (mean 4 average) Disatolic blood pressure (mean 4 average) Patient heart rate from blood pressure device o o Temperature from Thermometer 1 in either C or F o o Temperature from Thermometer 2 in either C or F ECG HR Heart rate from ECG monitoring device Battery Data Batt1 Current1 Batt2 Current2 Voltage level of battery 1 (lower 12v battery) Charging rate of battery 1 in amps Voltage level of battery 2 (upper 12v battery) Charging rate of battery 2 in amps Piston Position Units Shows the piston position in absolute units In addition to these headings in the file, there will be additional events recorded. The table below shows some typical events that have been recorded. [08:09:33.21 - Preset Loaded: Custom Preset] [08:09:33.191 - Leak 600.0, Compliance Low 27.4, Compliance High 63.3] [08:09:33.201 - MWPL: 35] [08:09:33.311 - Cylinder Open] [08:09:33.702 - FMSO ON: 65535ms] [08:09:33.722 - Init Requested] [08:09:35.695 - Auxiliary Controller - No Watchdog] [08:09:35.705 - Auxiliary Controller - No Position data] [08:09:35.895 - Auxiliary Controller - Watchdog data established] [08:09:37.237 - FMSO ON: 65535ms] [08:09:37.247 - Init Requested] [08:09:37.778 - Auxiliary Controller - Position data established] [Thursday, March 27, 2008 08:09:38] Records Started - Tafonius Version 0.1.1092.0. Every entry has a time associated with it and describes the event that occurred. Printed: 10/Mar/09 Page 61 of 61 DOCA4941B USING THE Tafonius SOFTWARE Before the Tafonius software can be used to control the ventilator, the ventilator needs to be i ni t i al i s ed.Thi si ni t i al i s at i onpr oc essi sc ov er edi nt hes ec t i on“ Get t i ngSt ar t edwi t hTafonius” Once initialised, there are some common steps to take when preparing for a patient: Pre-filling the system Entering patient information Choosing a Preset Starting a Session ..................................................................................................................................6 The Finalise Recording procedure........................................................................................................7 Entering initial patient information .......................................................................................................8 The Ventilator controls.........................................................................................................................12 Tidal Volume: ....................................................................................................................................13 Respiratory Rate: ..............................................................................................................................13 Inspiratory Time:...............................................................................................................................13 Inspiratory Pause:.............................................................................................................................13 Maximum Working Pressure Limit (MWPL)....................................................................................14 CPAP/PEEP .......................................................................................................................................14 Validating entries ..................................................................................................................................14 Dependant Values: ...............................................................................................................................15 The System button............................................................................................................................16 System Tab....................................................................................................................................16 System Errors ...............................................................................................................................16 Windows Event Viewer.................................................................................................................17 Leak/Compliance ..........................................................................................................................17 Piston Initialisation .......................................................................................................................17 Leak & Compliance.......................................................................................................................17 Running the Leak & Compliance procedure ......................................................................................18 The Patient Data button........................................................................................................................21 Data Logging .....................................................................................................................................21 Finalise Recording............................................................................................................................21 Data Storage Locations....................................................................................................................21 Viewing Recorded Data ........................................................................................................................22 Viewing Recorded data during a recording....................................................................................22 Viewing the instantaneous value using Data View ....................................................................22 Printed: 10/Mar/09 Page 2 of 61 DOCA4941B USING THE Tafonius SOFTWARE Viewing Recorded data from the Tafonius Shell ...........................................................................23 Exporting Data ......................................................................................................................................23 The Configure button ...........................................................................................................................24 Presets ...............................................................................................................................................24 Initial Settings ...................................................................................................................................25 User settings .....................................................................................................................................25 Changing Presets .............................................................................................................................26 Save As New..................................................................................................................................26 Save Active....................................................................................................................................26 Rename ..........................................................................................................................................26 Switch To .......................................................................................................................................26 Delete .............................................................................................................................................26 Reset Factory Default ...................................................................................................................26 Gas Monitoring..................................................................................................................................27 Gas monitoring tab with the IRMA Gas Analyser: .....................................................................27 Gas monitoring tab with the Artema AION Gas Analyser: ........................................................28 IRMA Setup........................................................................................................................................29 Pre-Use check ...................................................................................................................................31 IRMA Monitor: General Description ................................................................................................31 Calibration, self-test and reset ........................................................................................................31 Oxygen Recalibration ...................................................................................................................31 CO2, Nitrous and Agent Calibration (Zero reference calibration) .............................................32 Using the ARTEMA AION Gas Analyser .........................................................................................33 Display of Measured Values ............................................................................................................33 Other Control buttons: Alarm Silence & Freeze Traces....................................................................35 Alarm Silence ....................................................................................................................................35 Freeze Traces ....................................................................................................................................35 The countdown time for Freeze Traces is determined by the Countdown value set in the Initial settings attribute panel. .......................................................................................................................35 Monitoring Software .............................................................................................................................36 Monitoring options ...........................................................................................................................36 Organisation of traces......................................................................................................................37 Adding and Removing Traces .....................................................................................................38 Controlling the appearance of traces .............................................................................................38 The ECG/IBP Attribute tab ...........................................................................................................40 The CO2 Attribute tab...................................................................................................................43 The Airway Pressure (AP) Attribute tab......................................................................................44 The Oxygen Attribute tab .............................................................................................................45 Printed: 10/Mar/09 Page 3 of 61 DOCA4941B USING THE Tafonius SOFTWARE The SPO2 Attribute tab.................................................................................................................46 The Agent Attribute tab ................................................................................................................47 The N2O Attribute tab...................................................................................................................48 The Temperature Attribute tab ....................................................................................................49 The Traces/Trends Attribute tab..................................................................................................50 Alarms, Alerts and Critical Error Messages .......................................................................................51 Creating an Anaesthetic Record Chart ...........................................................................................52 Altering the Start Time of the Anaesthetic Record chart ..........................................................52 Viewing the Anaesthetic Record chart ...........................................................................................52 Data Recording using the Slow Data File ...................................................................................53 Changing the interval for Periodic Data in the Slow Data File..................................................53 Effect of the Logging Interval on the Slow Data entries............................................................53 The Tafonius Shell ................................................................................................................................56 Tafonius .............................................................................................................................................56 View Data ...........................................................................................................................................56 Export Data........................................................................................................................................58 Touch Screen Alignment..................................................................................................................59 Recover Anaesthetic Records .........................................................................................................59 Company Name.................................................................................................................................59 Shutdown...........................................................................................................................................59 Appendix A : SLOW DATA INFORMATION.........................................................................................60 Printed: 10/Mar/09 Page 4 of 61 DOCA4941B USING THE Tafonius SOFTWARE Pre-filling the system After Tafonius has been initialised the piston is left at the bottom of the cylinder ready for filling. Make sure the Y-piece is capped, turn the vaporizer to the required pre-fill concentration and turn on the manual oxygen flow meter to fill the cylinder with gas. The cylinder icon on the left of the screen indicates the volume of gas in litres in the cylinder. Fi l l t hec yl i ndert oal ev el equal t ot hemaxi mum ex pect edpat i ent ’ st i dalv ol umePLUS2. 5Li t r es. e.g. 500kg horse. Average tidal volume predicted is 5.0L so a larger breath of 7.5L can reasonably be expected. Then add 2.5L, which is the buffer volume used by the ventilator. Total pre-fill volume = 10L. When the cylinder graphic shows it is at the required volume, turn off the oxygen flow. Thi ss et st hev ol umeoft he“ Vi r t ual Bag”f ors pont aneousbr eat hi ng.Thec oncept of the Virtual Bag is central to how Tafonius operates. This action of the ventilator maintains a minimum system volume thereby reducing anaesthetic and oxygen consumption as well as decreasing the system’ s time constant. ThePi st onasa“ Vi r t ualbag” Whent hev ent i l at ori si nst andbymodeandapat i enti sc onnect ed,t hesy st em behav esl i kea‘ per f ec t ’ bag. When the patient breathes out there is no expiratory resistance and when the patient breathes in there is no inspiratory resistance. This ideal performance is accomplished with the Airway Servo System employed by Tafonius. The airway pressure is sensed at the centre of the Y-piece. As soon as a pressure deviation in excess of 0.5cm H2O from the ambient pressure is detected then the piston is moved so as to negate this pressure change. If the patient breathes out then the piston withdraws upwards,ef f ect i v el yf i l l i ng“ t hebag” .I ft hepat i enti nspi r est hent hepi s t onmov esdown,ef f ect i v el y emptying. Because the piston is driven by a motor it is the motor that overcomes the resistances of any piping, valve or soda lime. To the patient if feels like breathing into room air albeit through and ET tube. Di ct at i ngt hesi z eoft he“Vi r t ualBag” With varying sizes of patients it is beneficial to keep the size of any reservoir bag in the system to a minimum. This then allows rapid responses to changes in anaesthetic or oxygen concentrations. The setting of the Tidal Volume and the concept of fixed buffer vol umesc ont r ol t hesi z eoft he“ Vi r t ual Bag” in Tafonius. tafonius employs two fixed buffer volumes; an upper and a lower. The lower buffer volume is 1.5L and the upper buffer volume is 1.0L. These volumes are constant and are added to the set Tidal Volume to determine the virtual “ Bag”si z et hereby creating upper and lower volume limits. The upper volume limit = Lower Buffer + Tidal Volume + Upper Buffer. The lower volume limit = Lower Buffer Whenever the piston volume exceeds the upper limit, gas is removed from the system. When the piston volume falls below the lower limit then gas is added to the system. Printed: 10/Mar/09 Page 5 of 61 DOCA4941B USING THE Tafonius SOFTWARE Starting a Session Tafonius uses the concept of anaesthetic or procedure Sessions for the collection and recording of data. As soon as the Tafonius software starts then information begins to be stored in the Slow Data file and the Session is started. This storage of data continues until a session is Finalised. A session may be Finalised by one of the following: Clicking or touching the Finalise Recording button in the Data Logging tab Exiting the program through the System and then Exit buttons Exiting the program by pressing and holding the Mains Control button An abrupt program closure such as power loss, closure of Windows without closing Tafonius (non-controlled shutdown) In all but the last procedure, the data will be saved and associated with all the patient information. In the event of a non-controlled shutdown there will be NO DATA LOSS, although the patient information will not be associated with the data. In this instance the Files associated with the session will be s av edwi t ht hewor d“ Pat i ent s”asapr ef i xandt heSl owDat aandAnaeat het i cRec or dwi l l use only the date as identifiers. For example, a session interrupted by a non-controlled shutdown on January 7th 2009wi l l hav ear ec or dnamed“ Pat i ent s 2009J an07”with Slow Data and Anaesthetic Records named AR2009Jan7-8_50_56 and SD2009Jan7-8_50_56 respectively. The suffix 8_50_56 indicates that the session began at 08:50:56 on the morning of January 7th. Formor ei nf or mat i ononent er i ngPat i entandc as ei nf or mat i on,s eet hes ec t i onent i t l ed“ Ent er i ngI ni t i al Patient Information”l at eri nt hi smanual For more information on the production of an Anaesthetic Record see the section entitl ed“ Creating An Anaest het i cRec or dChar t ”l at eri nt hi smanual Printed: 10/Mar/09 Page 6 of 61 DOCA4941B USING THE Tafonius SOFTWARE The Finalise Recording procedure Using any of the first three Finalising methods listed above will cause the following dialog to appear This dialog presents the current information associated with the recording session. If these are all correct then click or touch the Accept button. To edit any feature shown, click or touch the Change button. This will take you to back to the Patient Data edit region, where any of the details can be changed. If all of the details are correct, then clicking or touching the Accept button will cause the following to happen automatically: The Session is ended. The patient details are used to create the appropriately named Slow Data and Anaesthetic Record files. A new Session is started using, either the next set of patient information in the Case list, or the default Patient/Anonymous details. Recording for the new Session is started Printed: 10/Mar/09 Page 7 of 61 DOCA4941B USING THE Tafonius SOFTWARE Entering initial patient information Touch the Patient Data button A new window appears in the information area Enter the Hospital Number (if used) and then use the tab key to move to the next data entry field. Fields that take numerical data entry will bring up the small on-screen numerical key-pad which can be used instead of a keyboard. Bydef aul tt hepat i ent ’ snamei s“ Anonymous” . Edit this to enter your own pat i ent ’ sname.When the details have been entered t ouc ht he“ AtPr es ent at i on”t ab. Fill in the procedure details along with the rest of the presenting clinical information. Printed: 10/Mar/09 Page 8 of 61 DOCA4941B USING THE Tafonius SOFTWARE Entries can be left blank. The Anaesthetist, Surgeon and Procedure fields are used when an Anaesthetic Record chart is produced. The Anaesthetist, Surgeon and Procedure entries are all taken from a Drop-Down list. To view the list click or touch the down arrow in the blue box next to the field you wish to enter details for. If the item you require appears on the list click or touch it to select it. This provides a quick way to enter commonly used information. If the item does not appear on the list then it may be added by touching or clicking on the ellipse button Clicking or touching the Ellipse button opens an editor. Here the Anaesthetist Drop-Down list has been opened for editing: Items in the list may be ordered using the Up & Down buttons. The Add, Edit and Delete buttons allow standard editing of the entries in the list. When editing is complete, click or touch the Close button to r et ur nt ot he“ AtPr es ent at i on”t ab. Notes Tab: Any notes that you want to enter relating to the case can be entered as free text in the Notes tab. These notes will appear in the Anaesthetic Record chart in the area under the Header of general information. Printed: 10/Mar/09 Page 9 of 61 DOCA4941B USING THE Tafonius SOFTWARE Cases Tab: Details relating to cases can be pre-entered as a list of patients. Associated case data can be entered and then recalled when required. By default, when the software is started details appear for a patient called Anonymous with a patient ID of 000000. The green arrow next to the patient name shows that these patient details are in use. Patient details cannot be deleted if they are in use: you must first select another patient. Touching or clicking the New button opens the Patient details tab ready for new patient information. To change patients, click or touch the patient name or ID and then click or touch the Select button. The selected patient information is then used for the current recording session. When the monitoring/recording session is finalised, the Patient details in use at that time will be the ones used to create the recording files. During the Finalising procedure a dialog box will appear to check that the Patient details to be saved are correct. The patient name and ID is always shown at the bottom of the Tafonius screen. Click or touch either of these two screen areas to open the Patient attribute dialog. Printed: 10/Mar/09 Page 10 of 61 DOCA4941B USING THE Tafonius SOFTWARE Data Logging Tab: In this tab the options for Slow Data Recording and Anaesthetic Record chart heart rate can be set. Because Tafonius has 3 means of monitoring heart rate (ECG, IBP & Pulse-Ox) it is necessary to select one to be used for the Anaesthetic Record chart. Unless you have specific reasons for changing the Slow Data Logging time, leave this set at 5 seconds. When all the patient information has been entered, cl i ckort ouc ht he“ Cl ose”but t on. Printed: 10/Mar/09 Page 11 of 61 DOCA4941B USING THE Tafonius SOFTWARE The Ventilator controls The ventilator controls consist of Tidal Volume, Respiratory Rate, Inspiratory Time, Maximum Working Pressure Limit and a CPAP (or PEEP) setting. These are the only controls that can be set for ventilation. The main controls (Tidal Volume, Respiratory Rate & Inspiratory Time) have two sets of numbers associated with them. These numbers change depending on whether the system is in Standby (spontaneous breathing) mode or Ventilate mode. In Standby mode, the large blue numbers are the measured values derived from the patient’ s respiratory efforts. The Airway Servo System is working as a respiratory monitor. The smaller black numbers are the ventilator settings that will be used in Ventilate mode. If no breathing is detected after 60 seconds the blue values are all set to zero. When you touch a button it changes colour and becomes ready to accept a new value. A numeric keypad appears in the lower right hand corner of the screen where you can enter a new value. Or the value may be changed by means of the UP/DOWN arrows. When the new value has been entered do one of the following: Touch the body of the button again, Touch t he“ Ent er ”but t onont he numeric keypad or Touch the body of the next button whose value you want to change. Printed: 10/Mar/09 Page 12 of 61 DOCA4941B USING THE Tafonius SOFTWARE Tidal Volume: In Standby mode: The set Tidal Volume is indicated by the smaller black number and is the volume that will be delivered per breath when the switch is made to Ventilate mode. It also sets the volume of the Virtual Bag used by the patient. The blue value indicates the breath-by-breath tidal volume of the spontaneously breathing patient In Ventilate Mode: Sets the actual volume delivered to the patient. Tafonius uses automatic compliance compensation so the volume received by the patient is the volume entered. The volume displaced by the cylinder will be more than the set value to compensate for the volume lost to the compliance of the system. The patient actually receives the TV you set regardless of the length of the breathing systems tubes. This is very helpful when 20 or 30 ft tubes are connected to reach a patient in an MRI. Tidal Volume units are Litres Respiratory Rate: In Standby mode: The blue figures show the measured respiratory rate, recalculated every 10 seconds on a rolling 1 minute basis. This gives a true reflection of respiratory rate. The smaller black figure shows the respiratory rate that will be used in Ventilate mode. In Ventilate Mode: The large black number shows the respiratory rate in use. Respiratory Rate units are Breaths per Minute Inspiratory Time: The Inspiratory Time button controls the total length of the Inspiratory phase. There is also a smaller sub-button located within the Inspiratory Time button that allows a pause to be included in the Inspiratory time. This inspiratory pause is limited to 40% of the I time. It can be displayed in either seconds or percent of I time, by repeated touches of the sub-button. In Standby Mode: The blue figures show the measured inspiratory time, recalculated after every breath i.e. on a breath to breath basis. The smaller black figure shows the total Inspiratory Time that will be used in Ventilate mode. In Ventilate Mode: The large black figure indicates the total time for inspiration. This may not be the same as the Inspiratory flow time, depending on the setting for Inspiratory Pause. Inspiratory Pause: In Standby Mode: Has no action In Ventilate Mode: Controls the portion of the Inspiratory phase that is held as a pause. The maximum pause is limited to 40% of the total Inspiratory time. Increasing the Pause time will increase the time the inspiratory volume is held at the end of the Inspiration stroke. The total Inspiratory Time is unaffected so Inspiratory Flow rates will increase as more Pause time is added. Touch the Pause button to activate it and open the numeric keypad. Touch it again to toggle between setting the pause as a % of Inspiratory time, or as a finite time. Enter the actual time or percentage r equi r ed.Pr ess“ Ent er ”ont henumer i ck ey padwhendone. In general, as with the ventilator settings above, any button shaded green on the display is a value you can set. These include the following. Printed: 10/Mar/09 Page 13 of 61 DOCA4941B USING THE Tafonius SOFTWARE Maximum Working Pressure Limit (MWPL) The Maximum Working Pressure Limit control sets a level, above which ventilation is prevented. This is particularly useful when dealing with neonates or during open-chest surgery when lung expansion is not restricted by a closed thorax. The Maximum Working Pressure Limit is an absolute value and is unaffected by any settings of PEEP or CPAP. If the MWPL value is reached during an Inspiratory phase then the ventilator immediately sounds an alarm and changes to the expiratory phase, where once again the cylinder behaves as a Virtual Bag. The MWPL setting can be useful for patients that are “ f i ght i ng”t hev ent i l at ort opr ev entex c es si v epr es s ur esdev el opi ng. CPAP/PEEP In Standby Mode: CPAP or Continuous Positive Airway Pressure can he applied during spontaneous breathing. . With CPAP patients inspire and expire normally with no added effort, although the end expiratory pressure is elevated to the CPAP setting. This aids in maintaining open alveoae. The airway pressure is held constant during all phases of breathing. In Ventilator Mode: PEEP or Positive End Expiratory Pressure applies during IPPV. Ventilating pressures rise during the Inspiratory phase as normal, but are allowed only to fall as far as the PEEP setting during expiration Validating entries All entries are validated once complete. This means that any invalid entries that would exceed minimum or maximum settings that Tafonius is capable of delivering will not be accepted. When this occurs a warning sound is issued and a description of the input error is shown at the bottom of the screen as a black on yellow text message. In most circumstances the limiting factor preventing the input is also shown. Here, for example a value of 1.0 second has been entered as a Pause Time during an Inspiration Time of 2.0 seconds. This represents 50% of the Inspiratory Time, thus exceeding the maximum of 40% and so is disallowed. The maximum allowable entry of 0.8 seconds is used. Increasing the It to 2.5 seconds would allow a 0.5 second pause. The Pause Time box is outlined in red to indicate the source of the error. Printed: 10/Mar/09 Page 14 of 61 DOCA4941B USING THE Tafonius SOFTWARE Dependant Values: The four buttons below the ventilator controls show the derived values for Minute Volume, Inspiratory Flow, I:E Ratio and Expiratory Time. They are dependent upon the settings of TV, RR and Itime In Standby Mode: The large blue figures show the values calculated from the measurements made during normal inspiration and expiration. Respiratory rate is calculated on a rolling minute average that is updated every 10 seconds. The measured minute volume is an integral of the ventilated volume over the last minute. Again this is updated every 10 seconds. If no respiration is detected during a period of 60 seconds then these blue values are all reset to zero. The smaller black figures show the calculated values based on the values set for the three independent ventilator settings (TV, RR & IT). In Ventilate Mode: The large black figures show the calculated values based on the values set for the 3 independent controls (TV, RR & IT). Printed: 10/Mar/09 Page 15 of 61 DOCA4941B USING THE Tafonius SOFTWARE Control buttons: Controlling the Software There are three buttons that control the look, feel and behaviour of the Tafonius software. These three buttons –System, Patient Data & Configure are located at the bottom right hand side of the screen. The System button The System button opens a two-tab screen that contains a System and a Configuration tab. The Conf i gur at i ont abc anbeent er eddi r ect l yf r om t he“ Conf i gur e”but t onont hel owerr i ghthandsi deoft he screen. System Tab The System tab contains buttons for System Errors, Leak/Compliance test settings, Language and User Manual options. Currently the Language is set to English only. Other language options will become available in due course. The User Manual button also presents options which at the time of writing are not yet available. System Errors Any error or fault condition that occurs in the Tafonius software is reported in this System Errors list. An error is indicated by the flashing of the border of the System button in red and an audible alarm. The purpose of the list is to indicate the source of an unexpected alarm or fault condition and to assist with trouble-shooting. Some errors are transient and will self-clear, in which case no action is Printed: 10/Mar/09 Page 16 of 61 DOCA4941B USING THE Tafonius SOFTWARE necessary. Some errors will not self-clear or will remain for example after a device has been removed. I nt hes ei nst anc es,s el ectt heer r orandt henc l i ckort ouc hont he“ Res ol ve”but t on.I ft heer r ori sno longer present then it is resolved and disappears from the list. Windows Event Viewer This is reserved for use as a trouble-shooting tool. A field service engineer or someone from technical support may ask you to use this button to view any error sequences that have arisen during the use of Tafonius. Do not use this button during normal use as there may be an effect on the performance and behaviour of the Tafonius software. Leak/Compliance A leak test and Compliance measurement is offered whenever the Tafonius software is launched. However sometimes it is convenient or necessary to run either utility without having to close the program and start again. Clicking on the Leak/Compliance button starts a sequence of events that proceeds in the following order: (If the piston is not initialised then Piston Initialisation must be done before either leak testing or compliance measurement. ) Piston Initialisation This involves making sure that there is nothing attached to the Y-piece before the piston is sent to the bottom of the cylinder to identify and reset its zero position. If the piston has not been initialised since turn-on then the cylinder representation on the screen will have a hatched background. Once the piston has been initialised this changes to a solid green background. Leak testing and compliance values can then be measured. Uninitialised piston background is hatched. Image also has a red flashing border Initialised piston background is green and shows piston volume in litres Leak & Compliance This button begins the process of first leak testing and then measuring the compliance of the system. For leak testing the piston is taken to the mid-point of the cylinder and then the piston produces a pressure of 20cm H2O. During this pressure phase the piston movement and hence leak is measured. The measured leak should be below 1500mls/min and in normal circumstances is less than 500 mls/minute. Values above or around 1500 mls/minute represent a serious leak and should be investigated. However, due to the way Tafonius maintains pressures and controls piston movement, even leaks of 1500mls/minute are unlikely to affect ventilator performance. They do however represent a loss of gas and agent. Printed: 10/Mar/09 Page 17 of 61 DOCA4941B USING THE Tafonius SOFTWARE Running the Leak & Compliance procedure Press the Leak/Compliance button on the System tab to begin the procedure A dialog appears announcing that it is establishing a connection with the Auxiliary controller. This can take 5-10 seconds. After that a second dialog appears asking that any patient be removed from the circuit. When the breathing circuit is ready, press the Leak & Compliance button At this point a stopper must be applied to the Y-piece to seal the system. Then press the Leak & Compliance button. The piston is moved to the mid-point and then stops briefly before establishing a system pressure of 20cm H2O. Printed: 10/Mar/09 Page 18 of 61 DOCA4941B USING THE Tafonius SOFTWARE If for any reason there is an excessive leak the following message appears: In this instance seal the leak and press the Retry button. If the leak test is successful the leak value is displayed and the system then proceeds to perform the two compliance measurements. A compliance measurement is made at the top cylinder position and at the 5.0L cylinder position and uses the leak value obtained in the first test. At the end of the test the leak and both compliance values are shown. Note that the values obtained will vary markedly depending on the nature of the breathing circuit connected. The two compliance values are used to obtain the equation for the straight-line graph of compliance for your machine and the breathing system in use at that time. This equation is then used to compute the compliance compensation required at any piston position and pressure. Printed: 10/Mar/09 Page 19 of 61 DOCA4941B USING THE Tafonius SOFTWARE Pr es s“ Fi ni s h”t ol eav et heLeak&Compl i anc et estpr oc edur e. Printed: 10/Mar/09 Page 20 of 61 DOCA4941B USING THE Tafonius SOFTWARE The Patient Data button Ent er i ngpat i entdat ahasbeendes cr i bedundert hes ect i on“ Ent er i ngI ni t i alPat i entI nf or mat i on” .Thi s c ov er st he“ Pat i entDet ai l s”and“ AtPr es ent at i on”t absf oundoncet he“ Pat i entDat a”but t oni spr es s ed. Al s of oundher ear et he“ Dat aLoggi ng”and“ Dat aVi ew”t abs. Data Logging All physiological data and many automatic events are recorded in a file called the Slow Data (SD) file. How often data is entered in this SD file is dictated by the setting in the Data Logging tab. The default value is 5 seconds. A range between 1 second and several minutes can be entered. Some natural events such as inspiration and expiration can be entered into the SD file. This however can fill the file with information that may not necessarily be required. Spontaneous breaths or ventilated breaths can be selected or deselected for entry in the SD file by checking or un-checking the respective tick-boxes. The time that a particular recording session began and its duration are also shown in this tab. Finalise Recording As soon as the Tafonius software starts, data is recorded in the SD file. When a patient session is endedt her ecor di ngs houl dbef i nal i sed.Todot hi spus hont he“ Fi nal i s eRec or di ng”but t on.Adi al og box may appear asking to save the current Preset (see the section on User Presets) and then a further dialog box will appear stating that the data will be committed and that no further changes can be made. Click or touch OK to commit the data and begin a new session. When a session is Finalised, those patient details are removed from the Patient List in the Cases tab. Data Storage Locations Where the data is stored will depend whether any Patient Information has been entered. If no Patient data has been entered then the data is stored in a folder that is named using the word “ Pat i ent s” ,t hec al endarmont handt heday.Sev er al pat ients or sessions may be held in this folder if no pat i enti nf or mat i oni sent er eddur i nganyoft heday’ soper at i ons . e.g. An operation on September 12th 2008 where no patient information was entered will be stored in a f ol derc al l ed“ Pat i ent s 2008Sep12” I fpat i entdat ahasbeenent er edt hent hef ol dernamewi l l beder i v edf r om t hePat i ent ’ snameandt he patients ID. e.g. Wild Billy , ID 1786394 will have a session folder created called WildBilly_1786394. If there is more than one session recorded for Wild Billy on that day then all sessions will be stored in this folder. Recorded data can be easily viewed and or exported using the utilities supplied with the Tafonius s of t war e.Seet hes ect i ons“ Vi ewi ngRec or dedDat a”and“ Ex por t i ngDat a” Printed: 10/Mar/09 Page 21 of 61 DOCA4941B USING THE Tafonius SOFTWARE Viewing Recorded Data Recorded data can be viewed by two methods: During a recording session in the ventilator control software or after a session in a spreadsheet viewer. Viewing Recorded data during a recording To view data on-the-fly, cl i ckort ouc hon“ Pat i entDat a”andt hent he“ Data View”tab. A trend viewer pops up showing the trend of the selected parameter from the beginning of the recording session to the current time. This data is constantly updated at a rate set by the Slow Data logging period. Use the drop-down list to select a different parameter. Viewing the instantaneous value using Data Drop View Down List Click or touch a point in the graph area of the Data View tab. A line appears at the point of touch. At the bottom of the line on the x-axis of the graph is the time at which that point of data was recorded. Along the right hand side of the line are the instantaneous value(s) of the associated data. Printed: 10/Mar/09 Page 22 of 61 DOCA4941B USING THE Tafonius SOFTWARE Viewing Recorded data from the Tafonius Shell Cl i ckort ouc hont he“ Vi ewDat a”but t onin the Tafonius Shell screen. This opens a Record Picker box to choose the Data Record to view. Data is presented in date order with the most recent at the top. Pick ar ec or dt ov i ewandt hencl i ck / t ouc ht he“ Sel ect ”but t on.Af i l eorl i stoff i l eswi l l beshown that begin with SD. These are the Slow Data files recorded during a session. Touch or click or touch on the one r equi r edandt henpr esst he“ Sel ect ”but t on.As pr eads heetvi eweropenst odi s pl ayt her ec or deddat a. Touching a cell within a column representing measured physiological data will display that data automatically as a trend graph. To create graphs for other parameters that are not physiological such as the set Tidal Volume or Compliance Compensated Tidal Volume it is necessary to export the data to a spreadsheet viewer of your choice. This is easily done from the Tafonius Shell. Exporting Data From the Tafonius Shel l ,cl i ckort ouc hont he“ Ex por tDat a”but t on.An“ Expor tDat a”di al ogbox opens listing the recorded data on the Tafonius computer. Data is presented in date order with the mostr ec entatt het op.Choos et heRec or df ol derr equi r edandt hencl i ckort ouc hont he“ Next ”but t on. Then choose the destination for your exported data. Typically this will be a USB flash drive inserted in t hehubatt hef r ontoft hes cr een.Whent hedest i nat i onhasbeens et ,cl i ckort ouc hont he“ Ex por t ” button to copy the data across to the selected device. Data is exported as a Comma Separated Value (CSV) file. The Anaesthetic Record chart in pdf format will be exported at the same time. Printed: 10/Mar/09 Page 23 of 61 DOCA4941B USING THE Tafonius SOFTWARE The Configure button The“ Conf i gur e”but t oni sus edt oacc es st hef ol l owi ng:Pr es et s,I ni t i al Set t i ngs,GasMoni t or i ngand SPO2s et up.The“ Sec ur i t y”but t oni nt heConf i gur ewi ndowi snotact i v eatt hi st i me. Presets Presets are a means of individually saving Tafonius software layouts and initial settings that suit a par t i c ul arpur pos e.Forex ampl ey oumayhav eapr es etc al l ed“ Foal s”orapr esetc al l ed“ Col i cs”or ev en“ Seni orAnaest het i st ” . Each Preset saves the way the screen is configured including how the traces are arranged as well as all the initial values used when the program starts, as well as all the alarm settings and whether they are enabled or not. There are two ways in which Presets are used to load values at the start of a procedure. There are the Initial Settings, which describe the preferred initial values for such items as Tidal Volume, Respiratory rate etc and there are the user settings which remember the preferred settings for e.g. ECG speed and trace position. The values for Initial Settings can be changed by clicking on the Configure button at the bottom right hand side of the screen. A new smaller window area appears below the traces area. Choose the preset you want to change by clicking on it in the Presets list. If it is already in use it will have the word Active after the preset name. If not, then click or touch on the required Preset and then c hoos et he“ Swi t c hTo”but t on.Thes el ect edPr es etwi l l bel oaded.Thencl i ckort ouc hon the Initial Settings button on the left hand side. Printed: 10/Mar/09 Page 24 of 61 DOCA4941B USING THE Tafonius SOFTWARE Initial Settings Using the keyboard or the on-screen keypad enter the initial values you would like in each of the named fields. The fields have the following meanings: TV: Tidal Volume in litres. RR: Respiratory rate in breaths per minute It: Total Inspiratory time MWPL: Maximum Working Pressure Limit IP: Inspiratory Pause in seconds Show IP as % : Shows the Inspiratory pause as a percentage of the It. CPAP: Continuous Positive Airway Pressure in cm H2O FiO2: Desired initial oxygen fraction. (not available in software version 1.0) APNOEA: Length of time allowed between breaths before Apnoea alarm sounds Countdown: Length of countdown timer before pop-up menus close automatically, in seconds Countdown : Enable the countdown timer for closing pop up menus Mouse : Enable the mouse cursor on the screen Whendone,cl i ckort ouchont hePr es ett abagai nandt henc hoos e“ Sav eActive” .Thenextt i methis Preset is loaded these new initial values will be used. User settings During the course of using the Tafonius program you may make changes to the screen appearance or to the appearance of a certain monitor trace. When changes such as these are made, that affect the personal way that the screen is viewed the Preset will be marked as altered and an asterisk will appear next to the name in the title bar. At any time or at the end of a procedure this unique set up of Tafonius can be saved by again choosing to save the Preset. If this is not done explicitly during use then you will be prompted to save the Preset when finalising a patient session. You can choose to change the active preset by touching SAVE or you may save the current setup as a new setup by touching SAVE AS NEW and renaming it as desired. Note that you will not be prompted to save a changed Preset when you shut down the Program using the main ON/OFF switch. Printed: 10/Mar/09 Page 25 of 61 DOCA4941B USING THE Tafonius SOFTWARE Changing Presets When the Tafonius software starts it uses, by default, the last Preset in use. To change a Preset, click ort ouc hon“ Conf i gur e” . The Preset list is displayed. Along the bottom of the Preset Window are 5 buttons, used to control how Presets are created, named, selected and deleted plus two other buttons to Reset Factory Defaults or Close the Configuration dialog. The Preset currently in use is indicated by the word Active in brackets after the Preset name. This name is also displayed at the top of the screen in the title bar. Save As New This buttoncr eat esac opyoft heAc t i vePr es etandnamesi t“ Cust om Pr es et ” .Us et heRenamebut t on to change the name to one of your choice. If you have made changes to the stored active preset the new stored preset will include those changes. Save Active This button saves any changes made to the Active Preset Rename This button allows a Preset to be renamed. Type the new name in the edit box that appears and click or t ouch“ OK” . Switch To Use this button to change to a different Preset from the Active one. To use this button, click or touch on t hePr es ety ouwi s ht ous eandt hencl i ckort ouc hont he“ Swi t chTo”but t on. Delete This button removes the highlighted Preset. Note that it is not possible to delete an active preset. Reset Factory Default This button will apply all the default factory settings to the Active Preset. Note that the Preset must be Active for the changes to be made to it. A confirmation dialog box appears stating which Preset will be changed. If this is the Preset that you wish to Reset, thencl i ckort ouch“ OK” . Printed: 10/Mar/09 Page 26 of 61 DOCA4941B USING THE Tafonius SOFTWARE Gas Monitoring This tab displays all of the status and diagnostic information for the current Gas Monitor in use. At the current time a mainstream device called IRMA or a sidestream device called Artema AION is used for CO2, O2, N2O and Agent monitoring. Your machine will be fitted with one or other of these units. Gas monitoring tab with the IRMA Gas Analyser: Clicking on the Gas Monitoring tab reveals a Window with 5 further tab options: Status, Sensor, Errors, Config & Data Status tab Used for fault diagnostic information only Sensor tab Used for fault diagnostic information only Errors tab Used for fault diagnostic information only Config tab Used for fault diagnostic information only Data tab Location of theZer oopt i onf ort heI RMAmoni t or .Seet hes ect i onon“ Us eoft heI RMAMoni t or ”f orf ul l i nf or mat i ononwhenandhowt ous et he“ Zer o”opt i onf oundi nt hi st ab. In most situations it is only necessary for users to use the Data tab. Information from the other tabs may be requested by a service engineer or a technical support person during fault diagnosis. Printed: 10/Mar/09 Page 27 of 61 DOCA4941B USING THE Tafonius SOFTWARE Gas monitoring tab with the Artema AION Gas Analyser: Modes/Status Used for fault diagnostic information only Status Used for fault diagnostic information only Alarms Used for fault diagnostic information only Cmds Used for fault diagnostic information only Demo Used for demonstration purposes only. Calib Used for fault diagnostic information only In most situations it is only necessary for users to use the Cmds tab for performing a zero calibration. Information from the other tabs may be requested by a service engineer or a technical support person during fault diagnosis. Printed: 10/Mar/09 Page 28 of 61 DOCA4941B USING THE Tafonius SOFTWARE Using the PHASEIN IRMA Monitor Important Note: The IRMA mainstream multi-gas probe is intended to be connected to a patient breathing circuit for monitoring of inspired/expired gases of patients in intensive care, anaesthesia and emergency care. It is not intended to be used as the only means of monitoring a patient. It shall always be used in combination with other vital signs monitoring devices and/or professional human judgements of patient condition. The IRMA multi-gas analyser is intended to be used by trained and authorised veterinary professionals only. It is not intended to be used in outdoor transport applications such as in cars or in aircrafts. IRMA Setup Plug the IRMA device into the IRMA socket located on the bulkhead behind and below the utility drawer, on the Right Hand Side of the machine. Snap the IRMA sensor head on top of the IRMA airway adaptor. It will click into place when properly seated A green LED indicates that the IRMA sensor is ready to use Printed: 10/Mar/09 Page 29 of 61 DOCA4941B USING THE Tafonius SOFTWARE Connect the 15mm male IRMA/Airway adaptor connector to the breathing circuit. When used with a foal 22mm circuit connect the IRMA device as shown in the next 2 images. Connect the 15mm female I RMA/ Ai r wayadapt orconnect ort ot hepat i ent ’ sendot r achealt ube When used with a 50mm mainstream adaptor the IRMA adaptor is integrated into the Large airway adaptor as shown: Printed: 10/Mar/09 Page 30 of 61 DOCA4941B USING THE Tafonius SOFTWARE Always position the IRMA sensor with the O2 cell (or top) pointing upwards Pre-Use check Before connecting the IRMA adaptor to the breathing circuit, verify the O2 calibration by checking that t heO2r eadi ngont hemoni t ori sc or r ect( 21%) .Seet hef ol l owi ngs ect i on“ Oxygen Recalibration”on how to perform room air calibration. IRMA Monitor: General Description The IRMA breath monitor unit is a small cube-shaped unit housing a replaceable Airway Adaptor and Oxygen sensor. The main housing for the unit has an LED in one corner which indicates the status of the sensor. These states are described in detail in the section "IRMA Status & Error Messages" The IRMA unit connects to the Tafonius monitoring system via a 9-Way Female D Type connector. When the unit is connected and the unit powered ON, the IRMA device runs through a self-test sequence. This is indicated by the LED on the main housing changing alternately through GREEN, RED, BLUE a number of times. Once the initialisation sequence is complete the LED stays GREEN. If the IRMA unit has the capability of detecting anaesthetic agents then the LED will turn BLUE in the presence of these agents. IRMA units may be connected/disconnected while powered without any problems. Calibration, self-test and reset The IRMA unit is self-calibrating and does not require scheduled calibration on a monthly or even annual basis. Calibration is achieved in a number of ways but must be done while the unit is plugged in and powered ON. ALL CALIBRATION MUST BE DONE WITH THE UNIT IN FREE AIR AND NOT WHILST CONNECTED IN A PATIENT CIRCUIT Oxygen Recalibration For calibration of the Oxygen sensor, removal of the Airway adaptor forces an automatic recalibration to 21%. For this reason it is important that the removal and refitting of the airway adaptor is done in conditions where the airway concentration is at 21% such as in a well ventilated room. 1. 2. 3. 4. 5. Remove the Airway Adaptor by pulling the white plastic connector away from the main housing. Wait until the LED flashes RED and the alarm sounds on the monitor. Replace the Airway Adaptor. Check that the LED turns green Check that the O2 reading on the Monitor is 21% Printed: 10/Mar/09 Page 31 of 61 DOCA4941B USING THE Tafonius SOFTWARE CO2, Nitrous and Agent Calibration (Zero reference calibration) These can all be reset from the Windows software via the Configure/Gas Monitoring/Data tab route. Only perform this function when asked to do so by the Windows program or when indicated by the following conditions: 1) Ar epeat ed“ GasConc ent r at i onoutofRange”er r ormes s aget hatappear swhenmeas ur i ng room air and is not cleared by disconnecting and re-connecting the IRMA device. 2) Incorrectly reported high Inspiratory CO2 concentrations ALL CALIBRATION MUST BE DONE WITH THE UNIT IN FREE AIR AND NOT WHILST CONNECTED IN A PATIENT CIRCUIT THE IRMA UNIT MUST BE ALLOWED TO WARM UP AND BE RUNNING FOR AT LEAST 15 MINUTES BEFORE A ZERO REFERENCE CALIBRATION IS PERFORMED To RESET the IRMA device, cl i c kort ouc ht he“ Zer o”but t oni nt heData tab of the Gas Monitoring Window found in the Configuration Setup. A warning dialog box will appear with the following message: Make sure the conditions for re-calibration are correct before continuing, then click or touch Yes. If you are uns ur eaboutt hec ondi t i onsr equi r edf orc al i br at i on,cl i c kort ouc h“ No”andr eadt heabov e par agr aphsc ar ef ul l ybef or er unni ngt he“ Zer o”opt i onagai n. Printed: 10/Mar/09 Page 32 of 61 DOCA4941B USING THE Tafonius SOFTWARE Using the ARTEMA AION Gas Analyser The Artema AION Gas Analyser is a sidestream gas analyser, drawing the sampled gas from the Y-piece. Other than the physical differences and the inherent latency between breathing and waveform display, the reporting and display of all gas parameters is the same as with the IRMA Gas Analyser. Sidestream sampling port (capped) The sidestream sampling line connects to the sampling catheter that enters the Y-piece as shown. The sampling catheter extends down into the ET tube for optimum sampling. Display of Measured Values THE Gas Anlayser (IRMA or AION) will continuously display and update the numerical and trace information for the patient. The trace region shows the capnogram as either a line or filled trace. The main numerical data region associated with the trace shows the inspired and expired values of CO2. The larger figure represents the expired value and the smaller figure shows the inspired value. The third value to the right is the respiratory rate in breaths per minute. If a period of apnoea occurs then the alarm will sound and the respiratory rate will be replaced by a red box, which displays the number of seconds elapsed since the last breath. Printed: 10/Mar/09 Page 33 of 61 DOCA4941B USING THE Tafonius SOFTWARE Clicking or touching this red box will silence the Apnoea alarm. The box will remain red and continue to count the seconds since the last recorded breath. A fresh breath will clear the Apnoea state and return to displaying Respiratory Rate (RR). During periods of Apnoea, the inspired values are constantly updated indicating the gas concentrations in the breathing circuit. Printed: 10/Mar/09 Page 34 of 61 DOCA4941B USING THE Tafonius SOFTWARE Other Control buttons: Alarm Silence & Freeze Traces Alarm Silence Press the button once for a 5-second silence of all alarms. After 5 seconds the alarms, if active, will again sound. Press and hold the Alarm Silence button until it shows thel egend“ Lock ed” . The audio portion of all current alarms are then suppressed. Any new alarm condition will override the locked out condition and again sound the alarm. Freeze Traces Use this button to freeze all trace information on the screen. All other monitoring activities continue as normal. The button will change colour to indicate that it is active. Also a countdown timer will begin showing on the button. At the end of the countdown period the freeze option will be lifted. Alternatively simply clicking or touching the Freeze button once more will release the freeze option. The countdown time for Freeze Traces is determined by the Countdown value set in the Initial settings attribute panel. Printed: 10/Mar/09 Page 35 of 61 DOCA4941B USING THE Tafonius SOFTWARE Monitoring Software Monitoring options Tafonius has the options of monitoring the following parameters via its in-built software: Single Channel ECG Single Channel Invasive (Direct) Blood Pressure Breath Analysis: Inspired/Expired CO2 Inspired/Expired O2 Inspired/Expired N2O Inspired/Expired Anaesthetic Agent: Halothane Isoflurane Sevoflurane Desflurane Enflurane Single Channel Pulse-Oximeter Dual Channel Temperature with delta Airway Pressure Printed: 10/Mar/09 Page 36 of 61 DOCA4941B USING THE Tafonius SOFTWARE Organisation of traces The monitoring screen consists of 3 main regions –a trace region where all time-traces are displayed, a numerical region where all values are displayed and a status region where status information about Tafonius is displayed. The trace region is centralised on the screen and in the picture above contains the ECG, CO2, Airway Pressure and Pulse-Oximetry trace. This area can be organised as required by placing any trace or combination of traces here. The trace region itself is divided into three horizontal areas each of which is one trace high. It is possible to place a trace in any of these 3 horizontal areas. Additionally it is possible to have multiple traces in any one of these horizontal areas. Printed: 10/Mar/09 Page 37 of 61 DOCA4941B USING THE Tafonius SOFTWARE Adding and Removing Traces To change the trace screen viewing options touch any trace. A new editing box appears at the bottom of the screen The text in the yellow strip indicates the trace that has been touched (selected). Here the user has two options: Touching inside the Trace/Trend dialog box will remove the trace from the screen and place it in the reserve area. Alternatively touching the screen in another area of the trace region will place that trace alongside and to the left of any other traces in that horizontal area. Any monitor that has been placed in the reserve area can be put back on the screen in any of the three hor i z ont al ar easatanyt i me.Todot hi st ouc hany“ numberbox”e. g.t heECG hear tr at ebox.Thes etof tabbed attribute panels appear at the bottom of the screen. Select the Traces/Trends tab and then select and drop the desired monitort r ac ebackont hescr een.“ Pi ckandput ”t hedesi r edt r ac ewher e you want it. Controlling the appearance of traces All traces have various attributes associated with them that determine for example their height, speed, shift and alarm options amongst others. To access these options for any monitor touch the number panel associated with the monitor. For example to access the options for the ECG monitor, touch the left hand side of the ECG/IBP panel at the top right of the screen. Touch here Printed: 10/Mar/09 Page 38 of 61 DOCA4941B USING THE Tafonius SOFTWARE The monitoring attribute panels appear at the bottom of the screen opened at the ECG tab. Note that the ECG attribute tab shares its place with the IBP attribute tab as they are both located on this common ECG/IBP tab. When the left hand side of the ECG/IBP panel is touched, the ECG attributes are shown. If the right hand side of the ECG panel is touched, which has the IBP values, then the attribute tab will be opened with the IBP attributes showing. To change between ECG and IBP attributes touch the appropriate radio button at the left hand side of the ECG/IBP tab All alarm settings and trace settings are particular to any given Preset and so the Preset should be saved after making adjustments to any of the controls in the monitoring attribute panels. Printed: 10/Mar/09 Page 39 of 61 DOCA4941B USING THE Tafonius SOFTWARE The ECG/IBP Attribute tab There are two active sections to this tab: Traces and Alarms. In the Traces section all the controls relate to how the trace can be viewed. Values can be set for either ECG or IBP options by selecting the appropriate option in the Select box. Trace options: ECG Sensitivity: controls the height of the ECG trace seen on the screen Sweep: Controls the screen sweep speed in rates of mm/second. Filter: Allows the setting of a digital filter to remove unwanted signal noise. Use a notch filter for mains interference. Use a Low-pass filter for tremors due to movement e.g. shivering. Move the slider in the Filter box to control the degree of filtering. Shift: Shifts the base-line of the ECG up and down the screen. Use the shift option to centralise the ECG for optimum viewing. Heart Rate: Sel ec tt heboxnextt o“ BeeponECG”t opr oduc eanaudi bl ebeepwi t hev er ydet ec t ed ECG complex. Since Tafonius only has one audio output device, only one monitor can be made to beep at any time. Selecting ECG for example, will mean that any previous selection is overridden. To change between ECG and IBP attributes touch the appropriate radio button at the left hand side of the ECG/IBP tab Synchronising the ECG and IBP waveforms ECG and IBP waveforms can be synchronised in time as long as they have the same trace width on the screen. Normally they would be placed one above the other so that a visual association between the Printed: 10/Mar/09 Page 40 of 61 DOCA4941B USING THE Tafonius SOFTWARE t wot r acesc anbemade.I ft het wot r ac esar enots y nc hr oni s edt hens el ectt he“ Sy nc hr oni s e”opt i oni n the ECG/IBP tab. If the two traces do not have the same width they cannot be synchronised and the option will be greyed. Trace options: IBP Sensitivity Moving this slider will change the full scale height of the IBP trace in accordance with the legend on the right hand side of this scale. Note that there is an automatic levelling feature in the IBP trace that means that the bottom of the IBP trace is adjusted after every sweep to lie on the base line. This will always keep the IBP trace in view even if the blood pressure values are slowly changing. Sweep Selecting one of the radio buttons will set the sweep speed for the IBP trace. Note that this option may be further controlled or changed depending on the state of the Synchronise check box and, or the presence of ECG and IBP traces on the Tafonius screen. If the ECG and IBP signals are not synchronised then the sweep speed of ECG and IBP traces can be different. If the traces are synchronised then the IBP sweep speed will be set to and follow the ECG sweep speed. Shift The Shift slider alters the position of the baseline of the IBP trace. Heart Rate Sel ectt heboxnextt o“ BeeponI BP”t opr oduceanaudi bl ebeepwi t hev er ydet ec t edpul sewav ef or m. Since Tafonius only has one audio output device, only one monitor can be made to beep at any time. Selecting Beep On IBP for example, will mean that any previous beep selection is overridden. Zero IBP: When a direct arterial sampling line has been placed and the sensor positioned at the level of the pat i ent ’ shear t( butwi t hc onnect i ont oambi entpr es s ur enotar t er i al pr ess ur e)t he“ Zer oI BP”but t oni s used to set the current output to zero. Printed: 10/Mar/09 Page 41 of 61 DOCA4941B USING THE Tafonius SOFTWARE Alarm options: ECG & IBP Click or touch the Alarms button on the ECG/IBP tab to show the alarm options for ECG and IBP monitors. Because the monitor is intended for use with only one animal at a time there are potentially several sources of heart rate data, not least of which are ECG and IBP. When setting a heart rate alarm it is possible to choose to derive the heart rate from either ECG or IBP depending which is in use or which is more reliable in the current circumstances. Alarm Limits This group of alarms includes alarms for Heart Rate, Systolic, Diastolic and Mean Arterial Pressure. To set any alarm value, click or touch the associated edit box. The numerical keypad will appear on the right of the screen. Use this or the main keyboard to enter the numerical value and then click or touch Enter. Heart Rate Upper and lower alarm values can be set for the heart rate and these can be independently enabled by touching or clicking the Enable box next to the appropriate Alarm edit box. Systolic Set high and low limits for the systolic blood pressure value. High and Low alarms can be independently enabled. Diastolic Set high and low limits for the diasystolic blood pressure value. High and Low alarms can be independently enabled. Mean Arterial Pressure Set high and low limits for the mean arterial blood pressure value. High and Low alarms can be independently enabled. Printed: 10/Mar/09 Page 42 of 61 DOCA4941B USING THE Tafonius SOFTWARE The CO2 Attribute tab Properties Units: Set the displayed units as Volume %, millimetres of mercury (mmHg) or as kilopascals (kPa). When units are changed, there is an automatic change in the units applied to alarms so that the corresponding value in the new units is used. Trace: Select whether to display the Capnogram as a filled trace or as a simple line curve. Scale: Fixes the vertical scale of the CO2 trace. Beep on Breath: Select this tick box to produce an audible beep with every detected breath. Alarm Options To set Alarms associated with CO2 measurement, click or touch the Alarms button To set an alarm, place a tick in the enable box and then enter the appropriate alarm value. Printed: 10/Mar/09 Page 43 of 61 DOCA4941B USING THE Tafonius SOFTWARE The Airway Pressure (AP) Attribute tab Sensitivity This slider sets the scales of the Airway Pressure trace. The value next to the pointer represents the maximum positive height of the trace window. Sweep This slider sets the sweep speed of the Airway Pressure trace, which is the speed at which the trace is drawn across the screen. Airway Pressure Alarms To access the Airway Pressure Alarms, click or touch the Alarms button The CPAP alarm allows an alert condition when the measured CPAP pressure deviates outside of the required CPAP value. Alarm units are in percentage values of the set CPAP value. Printed: 10/Mar/09 Page 44 of 61 DOCA4941B USING THE Tafonius SOFTWARE The Oxygen Attribute tab Sweep Use this slider control to set the sweep speed of the Oxygen trace across the screen. Scale Use this control to set the full scale height of the Oxygen trace window. Note that there is no shift feature with this trace. To view Oxygen values in excess of 50%, the 0-100% scale range must be used. Alarm Options Click or touch the Alarms button to show the Alarm options for Oxygen. The Oxygen Alarm options allow the alarm limits for Inspired and Expired oxygen to be set. Alarms can be set for High and Low Inspired and Expired values. Click or touch the Enable box to enable the alarm and then enter the alarm value by clicking or touching the appropriate alarm edit box. FiO2 - This option is not yet implemented and will be available in the future. Printed: 10/Mar/09 Page 45 of 61 DOCA4941B USING THE Tafonius SOFTWARE The SPO2 Attribute tab Sweep Use the Sweep slider control to change the speed at which the SpO2 trace moves across the screen Sound Click or touch the box next to “ Beep On SpO2 Pulse”to enable audible beeps associated with each detected pulse waveform. This will over-ride any other beep selection. Alarm Options Click or touch the Alarms button to show the Alarm options for SpO2. Alarm Limits Click or touch the enable box to enable the alarm and then enter the appropriate value. Sound Click or touch the tick box to select audible beeps every time a pulse wave on the SPO2 monitor is detected. Printed: 10/Mar/09 Page 46 of 61 DOCA4941B USING THE Tafonius SOFTWARE The Agent Attribute tab In Use: The IRMA OR detector used for agent monitoring does not have automatic agent ID so it is necessary to set the agent being used. Select the appropriate radio button next to the agent in use. This change will be reflected in the Agent button on the screen. Sweep Use the Sweep slider control to change the speed at which the Agent trace moves across the screen Scale Use this control to set the full scale height of the Agent trace window. Note that there is no shift feature with this trace. To view Agent values in excess of 5%, the 0-10% scale range must be used. Alarm Options Click or touch the Alarms button to show the Alarm options for Agent. Alarm Limits: Set the alarm limits required for a particular agent here. Note that different alarm limits can be set for each and every agent. Click or touch the Enable box to enable the alarm and then enter the appropriate value. Printed: 10/Mar/09 Page 47 of 61 DOCA4941B USING THE Tafonius SOFTWARE The N2O Attribute tab Alarm Options Click or touch the Alarms button to show the Alarm options for N2O. Alarm Limits: This tab allows the alarm limits to be set. Alarms can be set for High Inspired and Expired values. Click or touch the Enable box to enable the alarm and then enter the alarm value by clicking or touching the appropriate alarm edit box. Printed: 10/Mar/09 Page 48 of 61 DOCA4941B USING THE Tafonius SOFTWARE The Temperature Attribute tab Time Selecting an option here sets the amount of data displayed in the trace window. By selecting a long Time period, trends can easily be visualised. By choosing a short time period, details in trace changes are more easily observed. Temperature Scales: Choose to use either Fahrenheit or Celsius as the temperature scale. Alarm values change accordingly. Alarm Options Click or touch the Alarms button to show the Alarm options for Temperature. Alarm Limits: There are 3 alarm options: Alarms for T1 temperature probe, Alarms for T2 temperature probe and Alarms for the Delta temperature. (The Delta temperature is the difference in temperature between the two temperature readings of T1 and T2). Click or touch the enable box to enable the alarm and then enter the appropriate value. Printed: 10/Mar/09 Page 49 of 61 DOCA4941B USING THE Tafonius SOFTWARE Alarm –Silence: Use this button to silence a temperature alarm. An alarm will sound when a temperature probe is discovered to be absent. When starting the software if no temperature sensors are present an alarm may sound and the border of the temperature gauge will flash red. Touch the temperature gauge to open this Attribute tab and use the Silence button to silence the alarm. The Traces/Trends Attribute tab For a detailed description of how traces are managed and moved around the screen, see the section entitled “ Adding and Removing Traces”att hes t ar toft hes ect i onabove. Printed: 10/Mar/09 Page 50 of 61 DOCA4941B USING THE Tafonius SOFTWARE Alarms, Alerts and Critical Error Messages Printed: 10/Mar/09 Page 51 of 61 DOCA4941B USING THE Tafonius SOFTWARE Creating an Anaesthetic Record Chart The Tafonius software creates an automatic record that can be viewed as an Anaesthetic Record Chart. Every 5 minutes monitoring data is recorded and entered on the chart in a similar manner to a manual record. Information about the patient, surgeon, anaesthetist and other details can all be recorded. All non-clinical information is entered via the Patient Data button. This process is covered fully in the section entitled “ Ent er i ngI ni t i al Pat i entI nf or mat i on” During a patient Session, there are effectively two recorded sets of data. One set of data is saved as the Slow Data file. This records periodically (default is every 5 seconds) all of the information relating to the running of Tafonius. For a more details explanation of the Slow Data files see the section entitled “ Dat aRec or di ngusi ngt heSl owDat aFi l e” . The other set of data is data saved as the Anaesthetic Record file. This file consists of data saved every 5 minutes as plotted or tabled data as well as header information such as name of Anaesthetist or Surgeon. Altering the Start Time of the Anaesthetic Record chart It is not uncommon to prepare Tafonius some time in advance of connection to the patient. During this time there will be continual recording of non-meaningful data. To avoid this, the Start time for the Anaesthetic Record data can be set using the Anaesthetic Record Start button. Pressing this button will reset the start time for the Anaesthetic Record data ONLY. Slow data information is not affected. The Anaesthetic Record Start button is found in the Data Logging tab of the Patient Data dialogs. The following dialog will appear: This procedure can be repeated as many times as required, noting that each time, data prior to selecting this option will no longer be available. After this creation of the Anaesthetic Record chart is automatic and the chart can be viewed from the Tafonius Shell via the View Data button. Viewing the Anaesthetic Record chart The Anaesthetic Record chart can only be viewed from the Tafonius Shell, whilst Tafonius is NOT running. Click or touch the View Data button in the Tafonius Shell. Use the Record Picker to select a patient and then click Select. Then highlight the AR file and click or touch Select. This will open a pdf version of the Anaesthetic Record in Adobe Viewer. Printed: 10/Mar/09 Page 52 of 61 DOCA4941B USING THE Tafonius SOFTWARE Data Recording using the Slow Data File The Slow Data file is an automatically generated file that records all information gathered during a Session. Data contained in this file includes all the monitoring information in terms of numerical and trend data. This periodic data (Default is every 5 seconds) also contains all events that occur during use. If an alarm condition occurs this is recorded in the Slow Data file. Similarly a change of anaesthetic agent type or the level of the MWPL setting is recorded in the Slow Data file. This raw file is noneditable so that the user can be sure that all events that occurred are recorded. For a full description of the data saved in the Slow Data file, see Appendix A, Slow Data Information. The Slow Data file can be exported to a Flash disk using the Export data function accessed from the Tafonius shell. Seet hes ec t i onent i t l ed“ Ex por tDat a”l at eri nt hi smanual . In addition to automatic events, user events can be added to the Slow Data file. These can be added by clicking or touching the Events button at the bottom right hand side of the Tafonius screen. These events will appear in the Slow Data file as well as being used for the events shown in the Anaesthetic Record chart. Formor ei nf or mat i ononent er i ngmanual Ev ent ss eet hes ect i onent i t l ed“ Addi ng Events Dur i ngaPr oc edur e”l at eri nt hi smanual . Changing the interval for Periodic Data in the Slow Data File The interval for periodic data can be changed in the Data Logging tab of the Patient Data dialog. Click or touch the Patient Data button and then select the Data Logging tab. In the Slow Data Logging edit box enter the value in seconds to be used as the logging interval. Note that this value will have an effect on the final file size. Logging every second will create a substantially larger file than every 5 seconds. Note also the effect of the logging interval as explained below. Effect of the Logging Interval on the Slow Data entries Whatever the interval period between logging of entries, automatic event entry will always be logged. For example, if the Ventilate button is pressed an automatic event will be generated and added to a temporary list of events. When the next logging episode occurs, all events stored since the previous logging event will be entered into the SD file. This is different from the physiological monitoring data which is simply grabbed at the instant of the periodic logging. Care should be used when interpreting periodic logged data because events that appear at the same logging could be separated by up the periodic logging interval. Printed: 10/Mar/09 Page 53 of 61 DOCA4941B USING THE Tafonius SOFTWARE Adding Events during a procedure Events can be added to the Slow Data (SD) record during a procedure. Events can be pre-existing in a dr opdownl i stormaybeaddedasanewt extent r y.Toaddanev ent ,cl i ckort ouc hont he“ Ev ent s” button at the bottom right hand side of the screen. This will open a new editor panel at the bottom of the screen. Cl i ckort ouc hont he“ Add”but t onandt hencl i ckort ouc hont hear r owoft heStandard Events drop down box. In the example below, Anaesthetic Induction has been chosen from the Drop Down List. Printed: 10/Mar/09 Page 54 of 61 DOCA4941B USING THE Tafonius SOFTWARE Standard Events can be added or removed from the Drop Down List by using the “ Add/Remove Standard Events”button. Clicking or touching this button opens a new editor which lists all the current Standard Events. These can be Edited or Deleted using the Edit/Delete buttons. To add new items to the Standard Event list, click or touch the Add button and then type your new Event title. Once a new Event has been entered it will appear last on the list. To change the position of this new item in the list, use the UP and Down buttons to move the item. Once the new Event and the order of Events has been set, click ort touch the Close button to leave the Standard Events editor. To add your own entry click or touch in the Event Details box and start typing Cl i ckort ouc h“ Acc ept ”t oaddi tt ot heSDf i l e. Us et he“ Cl ear ”but t ont or emov eanent r yf r om t heEv entDet ai l sedi tbox. Printed: 10/Mar/09 Page 55 of 61 DOCA4941B USING THE Tafonius SOFTWARE The Tafonius Shell The Tafonius Shell is the starting point for using the Tafonius Ventilator software and also the starting point for various related utilities. The buttons: Tafonius Launches the Tafonius ventilation and monitoring software View Data This opens a browser for selecting a patient. All data records are shown in date order with the most recent data at the top of the list. Choose the Patient Record you would like to View and click or touch the Select button. Each patient will have a Slow Data file (SD file) and an Anaesthetic Record file (AR file). Printed: 10/Mar/09 Page 56 of 61 DOCA4941B USING THE Tafonius SOFTWARE To view the Slow Data information, highlight the appropriate file and then touch or click the Select button. The Slow Data is viewed in a spreadsheet format and can be used to show monitoring trends. By touching any of the measured parameter columns (e.g. ECG heart rate, Pulse-Ox saturation) a trend view of the data over the course of the procedure is shown at the bottom of the screen. Touching the column again hides the trend view. For greater versatility, export the data to a USB stick and view the data in a commercial spreadsheet of your choice. All Slow Data files are saved as CSV or comma separated value files. To view the Anaesthetic Record chart, highlight the desired AR file and then touch or click Select. A new window opens to show the Anaesthetic Record pdf file. For printing and archiving of either the Slow Data or the Anaesthetic Record use the Export Data button from the Tafonius Shell to save the data to a USB flash drive and then open the files in your host computer. Printed: 10/Mar/09 Page 57 of 61 DOCA4941B USING THE Tafonius SOFTWARE Export Data This button opens a browser to allow you to choose the data to export. All data in the browser is listed in date order with the most recent files at the top of the browser. First select the patient that you wish to export data for and then click or touch the Next button. Then choose your destination drive (usually a USB flash drive named D:\) and touch or click the Export button. The Slow Data and the Anaesthetic Record data will be copied to your chosen destination. Printed: 10/Mar/09 Page 58 of 61 DOCA4941B USING THE Tafonius SOFTWARE Options This opens a small window with 3 facilities. Touch Screen Alignment Touching or clicking this button starts a utility to align the touch screen to your computers screen. Simply touch the red circles in the way you would normally use the touch screen and follow the prompts to reset the alignment. If you make a mistake simply wait and the utility will time out and be cancelled. You can then try again. Recover Anaesthetic Records Touching or clicking this button will create a new Anaesthetic Record chart if the original has been destroyed or corrupted for some reason. Company Name Enter your practice or company name here. This will appear on the Tafonius shell as well as at the top of the Anaesthetic Record chart. Shutdown This will shut down the PC and put the PC in an off condition. The PC can be started again by either turning on the Tafonius ventilator or by pressing the large ON/OFF button on the side of the PC. Printed: 10/Mar/09 Page 59 of 61 DOCA4941B USING THE Tafonius SOFTWARE Appendix A : SLOW DATA INFORMATION Monitoring data recorded in the Slow Data File includes the following: User control settings CPAP/PEEP TV TVcc RR IT IP Maximum PEEP or CPAP reading cm H2O Set Tidal Volume L Compliance compensated tidal volume L Respiratory Rate –breaths per minute Inspiratory Time in milliseconds Inspiratory Pause time in milliseconds Resultant parameters calculated from user settings MV Minute Volume L I Flow Inspiratory Flow L/min I:E Ratio Inspiratory:Expiratory ratio Exp Time Expiratory time in milliseconds Measured during Standby TV Insp Time Exp Time Spontaneous breath Tidal Volume in mls Inspiratory time in ms Expiratory time in ms Resultant parameters calculated from MEASURED values during Standby RR Respiratory rate in breaths per minute MV Minute Volume in litres Iflow Inspiratory flow rate in L/min I:E Ratio Inspiratory:Expiratory ratio Airway Pressure Measurements CPAP/PEEP PIP CPAP(Standby) or PEEP(Ventilate) values in cm H2O Peak Inspiratory Pressure in cm H2O Gas analysis Measurements Insp CO2 Exp CO2 Resp Rate Insp Agent Exp Agent Insp O2 Exp O2 Atmospheric Pressure Fractional %Volume measurement of inspired CO2 Fractional %Volume measurement of expired CO2 Breathing rate in breaths per minute Inspired Agent Fractional %Volume measurement Expired Agent Fractional %Volume measurement Inspired Oxygen %Volume measurement Expired Oxygen %Volume measurement Current Atmospheric pressure in mm Hg Nonin SpO2 Measurements SPO2 HR Saturation Heart rate from pulse-oximeter device Percentage oxygen saturation of arterial blood Printed: 10/Mar/09 Page 60 of 61 DOCA4941B USING THE Tafonius SOFTWARE IBP Measurements Mean Systolic Diastolic Heart Rate Temperatures T1 T2 Mean arterial blood pressure (mean 4 average) Systolic blood pressure (mean 4 average) Disatolic blood pressure (mean 4 average) Patient heart rate from blood pressure device o o Temperature from Thermometer 1 in either C or F o o Temperature from Thermometer 2 in either C or F ECG HR Heart rate from ECG monitoring device Battery Data Batt1 Current1 Batt2 Current2 Voltage level of battery 1 (lower 12v battery) Charging rate of battery 1 in amps Voltage level of battery 2 (upper 12v battery) Charging rate of battery 2 in amps Piston Position Units Shows the piston position in absolute units In addition to these headings in the file, there will be additional events recorded. The table below shows some typical events that have been recorded. [08:09:33.21 - Preset Loaded: Custom Preset] [08:09:33.191 - Leak 600.0, Compliance Low 27.4, Compliance High 63.3] [08:09:33.201 - MWPL: 35] [08:09:33.311 - Cylinder Open] [08:09:33.702 - FMSO ON: 65535ms] [08:09:33.722 - Init Requested] [08:09:35.695 - Auxiliary Controller - No Watchdog] [08:09:35.705 - Auxiliary Controller - No Position data] [08:09:35.895 - Auxiliary Controller - Watchdog data established] [08:09:37.237 - FMSO ON: 65535ms] [08:09:37.247 - Init Requested] [08:09:37.778 - Auxiliary Controller - Position data established] [Thursday, March 27, 2008 08:09:38] Records Started - Tafonius Version 0.1.1092.0. Every entry has a time associated with it and describes the event that occurred. Printed: 10/Mar/09 Page 61 of 61 DOCA4941B