1
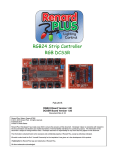
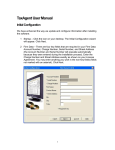
L/C Meter User Guide
Page 1 of 41
L/C Meter
User Guide
Important: Always use or print this document in colour as
there are references to the colours of
components. Errors may occur otherwise.
Issue 3. Copyright © Debug Innovations Ltd 2009.
L/C Meter User Guide
Page 2 of 41
Contents
Contents ................................................................................................................................... 2
Document History.................................................................................................................... 2
L/C Meter User Guide .............................................................................................................. 3
Overview ................................................................................................................................ 3
Power On/Off ......................................................................................................................... 4
Basic Operation...................................................................................................................... 4
Measuring Capacitance ......................................................................................................... 4
Measuring Inductance............................................................................................................ 5
The Zero Button ..................................................................................................................... 5
Measuring Low Value Components....................................................................................... 5
Test Mode .............................................................................................................................. 6
Error Messages...................................................................................................................... 6
Replacing The Battery ........................................................................................................... 6
LC Meter V1.2 Kit Assembly Instructions ............................................................................. 7
Step 1: Unpacking Your Kit.................................................................................................... 7
Step 2: Component Identification........................................................................................... 9
Step 3: Preparing For PCB Assembly ................................................................................. 18
Step 4: Component Connector Assembly............................................................................ 19
Step 5: Component Assembly ............................................................................................. 21
Step 6: LCD Display Assembly ............................................................................................ 23
Step 7: Testing & Calibration ............................................................................................... 24
Step 8: Box Assembly.......................................................................................................... 25
Step 9: The Box Top Label .................................................................................................. 27
L/C Meter V1.2 Circuit Operation (How It Works) ............................................................... 29
Power Supply Section.......................................................................................................... 29
Oscillator Section ................................................................................................................. 30
Microprocessor Section ....................................................................................................... 31
PIC Software ........................................................................................................................ 32
Appendix A – L/C Meter V1.2 Schematic............................................................................. 34
Appendix B1 – PCB V1.2 Parts List ..................................................................................... 35
Appendix B2 – Additional Parts List ................................................................................... 36
Parts List Key......................................................................................................................... 36
Appendix C1 – PCB V1.2, Unassembled ............................................................................. 37
Appendix C2 – PCB V1.2, Assembled ................................................................................. 38
Appendix D – PCB V1.2 Copper Pattern (not to scale) ...................................................... 39
Appendix E – Box Top Drill Drawing ................................................................................... 40
Appendix F – Side Panel Drill Drawing ............................................................................... 40
Appendix G – Resistor Colour Code Chart......................................................................... 41
Document History
Issue
1
2
3
Date
12th June 2009
13th July 2009
1st November 2009
Changes
First Issue
Assembly step 5.16 – changed “cable” to “cable tie”
Assembly step 5.13 – added alternate orientation marks for
K1
Issue 3. Copyright © Debug Innovations Ltd 2009.
L/C Meter User Guide
Page 3 of 41
L/C Meter User Guide
This section explains how to use your L/C Meter. If you have not yet built the meter, proceed
to the Kit Assembly Instructions section.
If you have any questions or are unsure about what is meant by anything, please email
[email protected] and we will be pleased to assist you.
Overview
An L/C meter is a very useful piece of test equipment. Most people have access to a multimeter which can measure resistance. Some multi-meters have a basic capacitance
measuring facility and low cost commercial capacitance meters are also available. However
inductance (L) measurement is a lot trickier. Most low cost commercial inductance meters
are designed for measuring power transformers and the like with inductances in the milliHenry and Henry range. For RF work we need a meter that works down to micro- and even
nano-Henrys. This meter is specifically designed for measuring small value capacitors (<1uF)
and inductors (<100mH). These are the types of components used in RF designs.
The meter works by measuring the resonant frequency of an LC circuit where either the L or
the C is the component to be measured. This method has the advantage that very small
values can be measured accurately – L’s down to a few nH and C’s to a few pF. It also
means that the L/C is measured at high frequencies – the sort of frequency you are going to
use them at.
Although similar to many designs on the internet, this meter has completely new software and
a unique connector for higher accuracy. Auto-calibration, auto-zeroing and auto-ranging
make this design simple and reliable.
The major parts of the L/C Meter are shown below:
LCD
Display
Component
Connector
Ground
Side
On/Off and
L/C Select
Issue 3. Copyright © Debug Innovations Ltd 2009.
Zero
Button
L/C Meter User Guide
Page 4 of 41
Power On/Off
To turn on the meter, press the L/C button once. The LCD display will show a sign-on
message with the software version followed by “Calibrating…”. During the calibration
procedure, do not touch or place any components on the component connector. The meter
starts up in capacitance measuring mode.
To turn off the meter, hold down the L/C button for 2 seconds. When the display goes blank
release the button. If the meter is not used for 2 minutes, it will turn off automatically to
preserve the battery.
Basic Operation
Basic operation is simplicity itself. The L/C button switches between inductance (L)
measuring mode and capacitance (C) measuring mode. The selected mode is indicated by
an L: or C: at the left hand end of the display. With no component connected, in C mode, 0pF
is indicated and in L mode ----- is indicated. The zero button zeros the display.
The component connector is designed to accommodate a wide range of different sized
components. Small surface mount devices can be pushed up to the point of the connector
using a non-conductive tool. Larger leaded devices should have their leads bent at right
angles to the connector bar – this will stop the component sliding along the connector as
pressure is applied.
Be careful not to touch the component leads or any conductive parts of the component as this
will change the reading. If you have to touch the leads e.g. when testing variable capacitors
where the shaft is connected to one side, make sure it is the ground side as indicated by the
ground symbol on the PCB (see photo).
Measuring Capacitance
To measure a capacitor, first switch to capacitance mode (press the L/C button until you see
C: on the left of the display). With no component connected, the display should read 0pF – if
it doesn’t, press the zero button.
Next connect your capacitor to the component connector taking care not to touch the leads.
The value will be shown on the display. The range is automatically chosen and the value is
displayed in the appropriate units. If the component is on the borderline between two ranges,
the meter may switch ranges as you move the component in the connector but built-in
hysteresis ensures the meter will not ‘hunt’ between ranges.
Electrolytic capacitors do not resonate well in an LC circuit and will not give a reliable reading
with this meter. Non-electrolytic capacitors can be measured from a few pF up to about 1uF.
Over Range is indicated at 1.5uF. Capacitors with significant ESR or inductive connections or
other impure capacitance will give erroneous readings. This may happen with old
components that have degraded or become leaky. Most modern commercial components
give reliable readings but you may be surprised how inaccurate they can be – some
capacitors have tolerances specifications like +80/-20% which means they can be almost
twice their nominal value.
With a purely capacitive component the accuracy of the reading is about +/- 1% except for
values at the extreme ends of the range e.g. <10pF.
WARNING
Ensure that capacitors are fully discharged before trying
to measure them !!
Issue 3. Copyright © Debug Innovations Ltd 2009.
L/C Meter User Guide
Page 5 of 41
Measuring Inductance
To measure an inductor (a coil), first switch to inductance mode (press the L/C button until
you see L: on the left of the display). With no component connected, the display should read
-----.
Next connect your inductor to the component connector taking care not to touch the leads.
The value will be shown on the display. The range is automatically chosen and the value is
displayed in the appropriate units. If the component is on the borderline between two ranges,
the meter may switch ranges as you move the component in the connector but built-in
hysteresis ensures the meter will not ‘hunt’ between ranges.
Inductors with a low Q do not resonate well in an LC circuit and will not give a reliable reading
with this meter. Coils in packages such as the TOKO tin-can type can also contain other
components notably capacitors in parallel with the inductors. Obviously these will not give
reliable readings.
Inductors from around 100nH to over 100mH can be measured accurately with this meter
though stray inductance can be challenging at less than 1uH. Try to measure close to the
component body rather than at the ends of the leads.
One situation in which this meter is particularly useful is when winding your own coils. A little
known fact is that cores such as the popular toroid types used in amateur radio designs have
quite a wide tolerance of +/-20%. This means that you may have to wind 20% more or less
turns to get the inductance you need – something that can be very important for oscillators or
filters. This meter takes the guess work out of winding you own coils.
With a purely inductive component the accuracy of the reading is about +/- 1% except for
values at the extreme ends of the range e.g. <100nH.
The Zero Button
The zero button has several uses. It can be used to zero out small inaccuracies when
measuring low value components (see next section) or it can be used for deliberate
adjustments.
For example, to select matching components from a batch of 1nF capacitors, first measure a
capacitor then, with the component still connected, press the zero button. When you remove
the capacitor the display will read -1nF. Connect the next capacitor and the display might
read say -10pF which means the second capacitor is 10pF lower in value than the first (990pF
if the first capacitor was exactly 1000pF). If the reading is 12pF, that means the capacitor is
12pF higher than the first part.
When switching from L mode to C mode or vice versa, any offset caused by pressing the zero
button is automatically reset (equivalent to switching the unit off and on again).
Measuring Low Value Components
Theoretically the unit should read 0pF on power on. In practice the oscillator frequency drifts
slightly and the reading changes in response. If you are trying to measure components with
very low values e.g. <10pF and <100nH, leave the unit on for a few minutes (you may have to
keep switching it on after auto-power off) to stabilise the oscillator, then recalibrate (switch off
and on), then take the reading.
Issue 3. Copyright © Debug Innovations Ltd 2009.
L/C Meter User Guide
Page 6 of 41
With low values, it is important to avoid stray inductance and capacitance. Stray capacitance
is calibrated out automatically by the meter at power-on. Stray inductance is compensated for
by the software based on measurements of the PCB characteristics. However this is not
enough for measurements of inductors below about 100nH. The best way is to warm up the
unit as described above then zero the inductance range using a zero ohm resistor or piece of
wire in the gap between the component connector bars. Then the inductor under test can be
measured. When measuring both small capacitors and inductors, it is very important to keep
your hands well away from the connector to avoid stray capacitance affecting the reading.
Test Mode
To enter test mode, start with the unit turned off. Hold down the zero button and turn on the
unit. After a few seconds the display will show -- Test Mode -- and then display the oscillator
frequency.
Pressing the zero button will toggle between Fosc and Fcal:
Fosc is the oscillator frequency with the calibration capacitor disconnected from the circuit.
Fcal is the oscillator frequency with the calibration capacitor connected to the circuit.
Pressing the L/C button will exit test mode and go into normal operation mode.
WARNING: Auto-power off does not function in test mode – the unit will stay on until
the battery goes flat.
Error Messages
If the unit fails you may get one of the following error messages:
Oscillator Fail is displayed when the oscillator doesn’t start at power-on. This may happen if
you leave a component connected or a short develops on the component connector.
Calibration Fail is displayed if the calibration capacitor doesn’t have the expected effect on
the oscillator frequency during the calibration process. Again it can be caused by
components on the component connector. If this happens and you are sure there is no
interference from external components, put the unit in test mode and check the frequency
with the calibration capacitor in and out of circuit – Fcal should be between 55 and 70% of
Fosc.
Error messages are displayed for 20 seconds or until you press the L/C button, upon which
the unit turns off.
Replacing The Battery
The unit is powered from a 9V PP3 battery. It is accessed through a slide out panel on the
back of the box. Simply open the panel, pull the battery out and unclip the battery clip, then
replace with a new battery.
Battery life is very good as power consumption is low and the unit powers off automatically
after 2 minutes of inactivity.
Issue 3. Copyright © Debug Innovations Ltd 2009.
L/C Meter User Guide
Page 7 of 41
LC Meter V1.2 Kit Assembly Instructions
This section gives step by step instructions on assembling and testing the kit. It is not a
difficult kit to build except for soldering the component connector which is a little tricky, but
can be done even by a novice if the instructions are followed carefully. Most people should
be able to build the kit in under 5 hours. Seasoned builders will only require 2 to 3 hours.
There are no surface mount components (unless you count the component connector).
If you have any questions or are unsure about what is meant by anything, please email
[email protected] and we will be pleased to assist you.
Step 1: Unpacking Your Kit
Your kit should come in a sealed package as shown below. These instructions are for PCB
V1.2. Please check that your kit label says PCB V1.2.
Issue 3. Copyright © Debug Innovations Ltd 2009.
L/C Meter User Guide
Page 8 of 41
3
1
4
2
9
8
5
6
10
7
Once opened you should have the following items. Ensure you have all the items before
proceeding.
1.
2.
3.
4.
5.
6.
7.
8.
9.
10.
An envelope containing the top panel artwork
The pre-cut box (includes battery clip and box screws)
A peg used for soldering the component connector
The PCB V1.2
The LCD display
The 74LS75 chip
Relay K2
The PIC chip, its socket and relay K1
A bag containing the mechanical parts
A bag containing the rest of the electronic components
Issue 3. Copyright © Debug Innovations Ltd 2009.
L/C Meter User Guide
Page 9 of 41
Step 2: Component Identification
First check you have the correct PCB version (V1.2). The version number is shown on the
solder side of the PCB etched in the copper as shown below.
PCB
Version
Number
Open the bags and check you have all the components on both parts lists (see Appendices
B1 & B2).
Resistors
All the resistors are through-hole types. There are 4 different values. Appendix G shows the
resistor colour codes. If in doubt, measure them with a multi-meter.
Designator
R1-R5, R11
R6, R7
R8, R9
R10
Issue 3. Copyright © Debug Innovations Ltd 2009.
Value
10K
100K
47K
4K7
L/C Meter User Guide
Page 10 of 41
Variable Resistors
You should have one preset potentiometer.
Designator
VR1
Value
2K2
Capacitors
All the capacitors should be identifiable from their markings. They may not be identical to the
photos and may have different voltage ratings, as components from different manufacturers
can look slightly different.
Designator
C1
Value
10uF
Markings / Identification
10uF, black in colour,
short & stubby. Take care
not to mix up with C4.
Designator
C2
Value
100uF
Markings / Identification
100uF, black in colour,
short & stubby
Designator
C3
Value
2.2uF
Markings / Identification
2.2uF, black in colour
Designator
C4
Value
10uF,
low ESR
Markings / Identification
10uF, brown in colour.
Take care not to mix up
with C1.
Issue 3. Copyright © Debug Innovations Ltd 2009.
L/C Meter User Guide
Page 11 of 41
Designator
C5
Value
680pF
Markings / Identification
681J, red in colour
Designator
C6
Value
1nF 1%
Markings / Identification
1n0 on top edge, blue in
colour
Designator
C7-C9
Value
100nF
Markings / Identification
104, blue in colour
Designator
C10 & C11
Value
22pF
Markings / Identification
22J, orange in colour.
Take care not to mix up
with C12.
Designator
C12
Value
5pF
Markings / Identification
5C, orange in colour.
Take care not to mix up
with C10/C11.
Issue 3. Copyright © Debug Innovations Ltd 2009.
L/C Meter User Guide
Page 12 of 41
Inductor
There is only one inductor. It looks like a fat resistor and has the same coloured bands.
Designator
L1
Value
68uH
Diodes
You should have five diodes (two different types). The diodes are marked with the part
number around their body. The striped end is the cathode.
Designator
D1 – D3
Type
1N4007
D4 & D5
1N4148
Transistors
There are two transistors. They look very similar but they are clearly marked with the part
number. Be careful not to confuse them with U2, which also looks the same.
Issue 3. Copyright © Debug Innovations Ltd 2009.
Designator
Q1
Type
BC337
Q2
BC327
L/C Meter User Guide
Page 13 of 41
Integrated Circuits
You should have three ICs and an IC socket. The ICs are marked with their part numbers.
Designator
U1
Type
PIC16F648A
(Programmed)
ICSKT1
18 pin IC socket
for U1
U2
78L05
U3
74LS75
U1 is supplied pre-programmed and is fitted in the IC socket. U3 must be soldered directly to
the board to maintain clearance from the LCD display which is mounted above U3.
Issue 3. Copyright © Debug Innovations Ltd 2009.
L/C Meter User Guide
Page 14 of 41
Crystal
You should have one quartz crystal.
Designator
Y1
Value
4MHz
Designator
K1
Type
Reed Relay
Designator
K2
Type
Miniature
Relay
Relays
You should have two relays.
Issue 3. Copyright © Debug Innovations Ltd 2009.
L/C Meter User Guide
Page 15 of 41
Switches
You should have two push button switches.
Designator Type
SW1 & SW2 Push button
Connectors
There are 3 connectors.
Issue 3. Copyright © Debug Innovations Ltd 2009.
Designator
J1
Type
Component Connector
made from square
section brass tubing
J2
Display Connector
J3
Battery clip
(supplied with case)
L/C Meter User Guide
Page 16 of 41
LCD Display
You should have an LCD display.
Designator
DISP1
Type
16 x 1 line
Alphanumeric LCD
Pre-drilled Case
The case comes pre-cut in 3 parts and is held together with a pair of self-tapping screws.
Top
Base
Issue 3. Copyright © Debug Innovations Ltd 2009.
End
Panel
L/C Meter User Guide
Page 17 of 41
Mechanical Components
The mechanical components bag contains the following parts.
Mounting screws for PCB
(to screw PCB to box base)
Display spacers x 4
Button standoffs x 2
These are the same part
used in 2 different places
LCD Display screws and nuts
(to screw the LCD display to
the PCB)
Battery clip cable tie
Issue 3. Copyright © Debug Innovations Ltd 2009.
L/C Meter User Guide
Page 18 of 41
Step 3: Preparing For PCB Assembly
First read through the rest of the assembly instructions. The build is not difficult and should
be easily completed in a day.
Before starting PCB assembly, ensure you have the following:
1. A large, clear, well lit working area. Use daylight if possible.
2. A fine tipped soldering iron and some thin solder. There are no SMD components but
care must still be taken.
3. A multi-meter. If you spot a suspect solder joint or break a track, test it and repair it if
necessary, before moving on.
4. Use a PCB assembly jig, if you have one.
Follow these basic tips for a good result:
1. Make sure your PCB is clean. If you have had your kit for a while, the plated areas of
the PCB may have started to tarnish. This will make it harder to solder. A simple
way to remove the tarnish is to rub the board with a standard pencil eraser.
2. Use only as much solder as necessary, particularly with the smaller parts.
3. Assemble the smallest components first, working up to the larger parts (the assembly
instructions keep to this order).
4. When soldering large metal parts, turn up the iron temperature (if possible) and use a
large bit, then use molten solder to spread the heat more evenly. Oh, and remember
not to touch the hot component for quite a while!!
5. Observe anti-static precautions.
6. Most importantly, take your time.
Issue 3. Copyright © Debug Innovations Ltd 2009.
L/C Meter User Guide
Page 19 of 41
Step 4: Component Connector Assembly
Before putting the ‘regular’ components on the PCB, you must first make and solder on the
component connector. This is the hardest part of the build and shouldn’t be rushed.
1. Take the brass bar and saw
it in half with a hacksaw –
you will end up with 2
pieces, each of which is
approximately 25-30mm in
length.
2. Cut / file one end of each piece diagonally at 45° until they are 23.5mm long on the
long side as shown below.
23.5mm
3. Polish the brass bars to make them
easier to solder. The best thing to use is
a polishing block such as Maplin part
number HX04E shown to the right.
Issue 3. Copyright © Debug Innovations Ltd 2009.
L/C Meter User Guide
Page 20 of 41
Solder
This
Side
Solder
This
Side
Do Not Solder
This Side
4. It is very important to solder the brass bars in exactly the right position on the board.
In the photo above, the gap between the two bars (inside the red circle) should be as
small as possible without touching. As a guideline, it should be possible to get a
piece of paper in the gap but not a small wire. The bars should be positioned close to
the edges of the copper tracks marked by red arrows. This edge will not be soldered
– the bars are held down by solder on the other side.
5. To solder the bars, use the wooden peg supplied to hold the bar in place. First put
the peg in the middle of a bar, adjust the bar until it is in the correct position then
solder the ends of the bar being careful not to move the bar. You will need a hot
soldering iron and a little patience as the bar and copper pattern have a high heat
capacity. Once the ends are soldered, you can move the peg to one end and solder
fillet the whole length of the bar. Take your time soldering the component connector
– this is the hardest part of the build and the only part of the PCB that is visible when
finished.
Issue 3. Copyright © Debug Innovations Ltd 2009.
L/C Meter User Guide
Page 21 of 41
Step 5: Component Assembly
Turn the board so it looks like the diagram above and fit the parts in the following order:
The parts list is shown in Appendix B1. A fully assembled PCB is shown in Appendix C2.
1. Fit all the resistors (R1 to R11) being careful not to mix up the different values. If in
doubt, measure them with a multi-meter.
2. Fit inductor L1 (68uH). Refer to the component photographs to correctly identify L1.
3. Fit diodes D1 to D3 (1N4007) and D4 & D5 (1N4148). Ensure they are fitted the
correct way round.
4. Fit the socket for U1. Even though it is a socket, make sure the notch is at the correct
end.
5. Fit capacitors C7 to C9 (100nF), C10 & C11 (22pF) and C12 (5pF).
6. Fit quartz crystal Y1 (4MHz).
7. Fit Q1 (BC337), Q2 (BC327) and U2 (78L05). Be careful as these devices are very
similar.
8. Fit VR1 (2K2 Preset).
9. Fit capacitors C5 (680pF), C6 (1nF, 1%).
10. Fit capacitor C4 (10uF, low ESR). Do not mix this up with the other electrolytic
capacitors. It is brown in colour (the others are black). This is a polarised component
that needs to be fitted the correct way round. The long lead should be inserted
through the hole marked ‘+’ on the PCB legend.
Issue 3. Copyright © Debug Innovations Ltd 2009.
L/C Meter User Guide
Page 22 of 41
11. Fit capacitors C1 (10uF), C2 (100uF) and C3 (2.2uF). These are polarised
components that need to be fitted the correct way round. The long lead should be
inserted through the hole marked ‘+’ on the PCB legend.
12. Fit relay K2. It only fits one way round. Solder two corner pins first and check it is flat
to the PCB before soldering the rest of the pins.
13. Fit reed relay K1. Depending on the make, the package has a sloped end or a dot /
cutout similar to an IC identifying pin 1. Pin 1 goes at the shaded end of the legend.
14. Fit buttons SW1 & SW2. They snap into place with a little pressure. Be careful to get
them really flat to the PCB surface.
15. Fit U3 (74LS75). Ensure it is fitted the correct way round. The pins may need
teasing inward as they are supplied splayed outwards. DO NOT use an IC socket –
U3 must be soldered directly to the board or it could foul the underside of the LCD
display.
16. Fit J3 (Battery Clip). First shorten the lead to remove some of the excess length (the
lead only has to reach as far as the battery compartment). The correct length is
approx. 50mm. Solder the ends to the board using the 2 pads marked J3 (Batt). The
positive (red) lead should go to the square pad marked + and the negative (black)
lead to the round pad marked –. Make a strain relief for the battery cable with the
supplied cable tie as shown in the photo below.
17. Fit U1 (programmed PIC16F648A) in its socket. Ensure it is fitted the correct way
round. The pins may need teasing inward as they are supplied splayed outwards.
Assembled PCB before LCD is fitted
(J2 has already been fitted in this photo, which is the next step)
Issue 3. Copyright © Debug Innovations Ltd 2009.
L/C Meter User Guide
Page 23 of 41
Step 6: LCD Display Assembly
The LCD display is fitted above some other components on the PCB and is connected by J2
which is soldered at both ends. Once fitted, it is difficult to remove the LCD to get access to
any components below. Before fitting the LCD display, inspect the area beneath the LCD for
solder splashes and check that the correct value components are fitted and diodes are the
correct way round.
To fit the LCD display…
1. First fit J2 (the display connector) to the PCB. This is a 14 pin connector which is
soldered at both ends. At the LCD display end, there are 16 holes – the connector
goes in holes 1-14. Holes 15-16 are not used. It should be impossible to get the
connector in the wrong holes because, mechanically, it won’t fit any other way when
the display mounting screws are in place.
2. Put the 4 mounting screws through the holes at the corners of the LCD display and
turn the display upside down so the screws stay in place.
3. Slide a spacer on to each of the 4 mounting screws.
4. Turn the PCB over and carefully place it on the upturned display making sure the
connector goes through holes 1-14.
5. Put a nut on each of the mounting screws and tighten. The spacers are a loose fit on
the screws and you must ensure the spacers are pushed inboard (away from the
PCB edge) when the screws are tightened or they will foul the battery compartment
and end panel and the PCB will not fit in the box (see arrows below). The screws
don’t have to be very tight – you will squeeze down the nylon spacer with excessive
force.
6. Solder the display end of J2 to the LCD display.
7. Cut off the excess length of J2 with wire cutters at the display end (the bit poking up
from the display PCB).
8. The 2 display mounting screws at the right hand side of the photo above need to be
shortened to avoid fouling the edge of the box. Cut the excess length off with a
hacksaw or bolt cutters (or even an old pair of wire cutters). Be careful that the loose
piece doesn’t fly off and hurt someone – put your hand over the job and wear safety
goggles.
Issue 3. Copyright © Debug Innovations Ltd 2009.
L/C Meter User Guide
Page 24 of 41
Step 7: Testing & Calibration
After assembly the unit needs to be tested before use as follows:
1. With the PCB out of the box and on an insulating surface, attach a battery and press
SW1. The power should come on – you may also see something on the LCD.
2. Measure the voltage between U1 pin 14 and GND. It should be approximately 5V. If
it is not, there is a fault with the power supply on the board – first check the battery is
good, then check D1 is fitted the correct way round. If you see a very low voltage on
pin 14, check for a short between VCC and GND. If you get 5V only when SW1 is
pressed down, refer to the power supply description in the circuit operation section.
3. Peel off the protective film from the LCD display and adjust VR1 for the best contrast.
At one extreme, the background will be black. At the other extreme, the text will be
very faint. The optimum contrast is the point at which the background just
disappears, so you can read the text but the background is not visible.
4. Next do some basic checks to get confidence that the unit is basically ok *
•
Switch on the meter. You should see a sign-on message showing the software
version followed by “Calibrating…” on the LCD display. After a couple of seconds
the calibration procedure should be complete and the meter should be in ‘C’
mode.
•
The meter should read zero pF. The reading will be changing slightly with time.
Bridging the component connector with your finger should cause the reading to
go up. Measuring a known value capacitor should give the expected result.
•
Press SW1 again. The meter should switch to ‘L’ mode. You may hear relay K2
clicking in and out when switching between ‘C’ and ‘L’ modes. Measuring a
known value inductor should give the expected result.
•
Next test SW2. Measure a component, then press SW2. The reading should go
to zero. Take the component away and the reading should go negative by the
same amount. For example, if you measure a 100pF capacitor, the reading
should say 100pF. After pressing SW2 the reading should be 0pF. When the
capacitor is removed, the reading should be –100pF.
•
If you leave the meter for 2 minutes, it should switch off automatically.
Alternatively holding down SW1 will also turn off the meter.
* If your meter doesn’t work you may find it useful to read the circuit operation section to help
with fault finding.
Issue 3. Copyright © Debug Innovations Ltd 2009.
L/C Meter User Guide
Page 25 of 41
Step 8: Box Assembly
1.
Slide the end panel over the component connector and drop the PCB into the box. You
will find the PCB is a snug fit in the box and if you haven’t taken care with the placement
of the display spacers, the end panel will bow out – refit the display spacers if this
happens.
2.
Screw the PCB in place with the 4 self-tapping screws provided.
3.
Put the top on the case, being careful not to squash the battery lead in the box edges.
Fix the top and bottom halves of the box together with the two long screws supplied.
Issue 3. Copyright © Debug Innovations Ltd 2009.
L/C Meter User Guide
Page 26 of 41
4.
Next, the button spacers must be fitted. Carefully drop the spacers through the button
holes in the box top on to the button shafts. Using something flat, press the spacers
down until they are flush with the box top. When released, the spacers will poke through
the box top by a small amount (the button plunge length).
5.
Put a drop of cyanoacrylate adhesive (super-glue) in the middle of the spacer. It will run
round the button shaft by capillary action and form a strong bond. If you push the spacer
in too far and glue it in place, you will never get the spacer off again, so make sure the
spacer is in the correct place before gluing it.
Issue 3. Copyright © Debug Innovations Ltd 2009.
L/C Meter User Guide
Page 27 of 41
Step 9: The Box Top Label
The label for the box top is made as follows:
1. Find a clean, well lit, flat surface. Before starting, wash your hands – any tiny bits of
dirt will ruin the appearance of the front panel.
a
b
c
2. The panel is made from 3 layers (see photo above):
a) A transparent film printed with the buttons and other text. This is the top layer.
One side is smooth and shiny – this side will become the final box top (the side
the user touches). The other side is rougher and is printed with a reverse image.
Be careful not to touch the printing when making up the label.
b) A white plastic sheet printed with a template for the display bezel. One side is
printed and the other has a self adhesive backing.
c) A double-sided adhesive sheet.
These layers will be referred to as layers (a), (b) and (c) below. Make sure you know
which layer is which and are clear about which side is which before starting.
3. Peel off the backing on one side of layer (c) and stick it to the printed side of layer (b)
i.e. cover up the printing. The printing will still be visible through layer (c). Trim the
excess sticky edge with scissors to make it easier to handle. You now have a
sandwich with a (b) and a (c) side.
4. With a scalpel or very sharp knife, cut a square hole for the LCD display. From the
(c) side you will be able to see the bezel template – stay slightly outside the bezel’s
inner edge so the hole is larger than required – layer (a) will cover up the cut edge
when finally assembled.
Issue 3. Copyright © Debug Innovations Ltd 2009.
L/C Meter User Guide
Page 28 of 41
5. Place layer (a) shiny side down on a flat surface i.e. the text will be mirror image. It is
important not to get any marks on the panel and not to transfer any surface lumps
when it is pressed, so put it on a pad of paper or something similar.
6. Peel the backing off layer (b) and carefully stick it down on the printed (rough) side of
layer (a), lining up the display window as closely as possible. The hole in layer (b)
and (c) will be larger than the black bezel printing on layer (a) so it is straightforward
to line up the pieces. When turned over, the cut edge of the hole on layers (b) and (c)
should be covered by the printing on layer (a).
7. Using something made from smooth hard plastic e.g. a screwdriver handle, carefully
rub over the whole of the shiny side of the label – as you work the surface, all the tiny
glue bubbles will disappear. Be careful the label stays flat and doesn’t ‘buckle’ while
rubbing.
8. With scissors, cut the whole label to a rough rectangle slightly bigger than the recess
in the top of the box. Don’t attempt to cut the curved sides at this point (just cut them
straight across but larger than the widest point).
9. Accurately cut the two straight edges to the correct size for the recess in the top of
the box. The right hand edge of the display is lined up exactly with the edge of the
recess so first cut the right hand side exactly along the edge of the display bezel’s
black printing. Then place the label in the box recess to judge where to cut the left
hand edge.
10. Peel off the other side of layer (c) and carefully press the label into place on the box.
Start by pushing the edge of the label against the right-hand edge of the recess, then
lay the label down – at this point the bezel of the display should be completely
covered by the label and the buttons should line up with their legends on the label.
11. Using a small screwdriver or the back of a knife, press the overlapping label edges
into the edges of the box’s label recess. Then run a scalpel along the edge to cut the
label to fit the curved edges.
12. Clean any fingerprints etc. from the finished label. You may also need to unscrew the
lid of the box and clean the back of the display window and/or the LCD display itself.
Finally, you will probably need to clean the scissors / knife blade with label remover
fluid or similar to get rid of the glue residue.
Finally, check the unit still operates as expected.
Your L/C Meter is complete. We hope you enjoyed building this project.
Issue 3. Copyright © Debug Innovations Ltd 2009.
L/C Meter User Guide
Page 29 of 41
L/C Meter V1.2 Circuit Operation (How It Works)
This section describes the circuit operation to help with troubleshooting and for general
interest. Appendix A shows the full schematic (circuit diagram) of the L/C meter.
Power Supply Section
The unit is powered from a 9V battery which is connected to J3. D1 protects the circuit from
an accidentally reversed battery. Power is switched on and off by pressing SW1 (the L/C
button). This works as follows:
Initially R3 ensures Q2 is turned off and no power flows to U2. As a result there is no power
on the microprocessor parts of the circuit ensuring that the signal POWER_HOLD is low and
Q1 is consequently in the off state. D5 prevents current flowing to the microprocessor via
R3/R4/D4. This ensures a negligible current drain when the meter is off (less than 1uA) to
prevent battery drain. D5 also prevents any part of the microprocessor internals drawing
enough current to turn on Q2 while the microprocessor is powered down.
When the user presses SW1, Q2 is turned on via D4 and R4. Power flows to the 5V regulator
U2 and 5V appears on the VCC line. The microprocessor starts up and the software sets the
POWER_HOLD line high. This turns on Q1 ensuring that Q2 is held in the on state after the
user releases SW1.
The state of SW1 is sensed by the microprocessor through D5 (there is a pullup resistor
inside the PIC on the signal LC_BUTT). When pressed LC_BUTT goes low, when released
the pullup pulls LC_BUTT high.
The software turns the power off by pulling POWER_HOLD low. This occurs after 2 minutes
of non-activity or when the user holds SW1 down for 2 seconds.
C1 decouples the input of U2. C2 provides bulk storage decoupling for the rest of the circuit.
Capacitors C7-C9 provide local decoupling for U1, U3 and the LCD display.
Issue 3. Copyright © Debug Innovations Ltd 2009.
L/C Meter User Guide
Page 30 of 41
Oscillator Section
The oscillator is the heart of the L/C meter. It is not easy to understand from the real circuit
diagram above because the active part of the circuit is inside the PIC. The equivalent circuit
is shown below using the same component designators as the real circuit. The PIC pin
numbers are also shown, pin 1 being connected to both comparators inside the PIC.
The oscillator is formed by COMP1. COMP2 is just used as a buffer so that loading on FOSC
has no effect on the oscillator frequency. R6 and R7 bias the non-inverting comparator inputs
to half the supply. Feedback keeps the other comparator inputs within the operating range.
C4 prevents L1 shorting out the bias and isolates the bias from the component under test.
L1 and C5 form an LC parallel resonant circuit with a resonant frequency of around 700KHz.
In C mode, the component under test adds capacitance in parallel with L1/C5 reducing the
frequency. With large capacitors the frequency can get quite low so C4 needs to be a high
value requiring an electrolytic capacitor. However we also need good high frequency
performance so we have to use a high quality, low ESR capacitor.
COMP1 switches on every cycle of the sine wave from the LC circuit. As the output switches
the fast edge sends a spike of energy through C12 to keep the LC circuit oscillating. Positive
feedback from R8 keeps the oscillator running and the network formed by R9 and C3 ensures
the inverting input of COMP1 lags behind the non-inverting input. At switch on, C3 takes time
to charge up ensuring COMP1 has a known starting state and the oscillator starts reliably.
Issue 3. Copyright © Debug Innovations Ltd 2009.
L/C Meter User Guide
Page 31 of 41
In L mode, relay K2 reconfigures the circuit so that L1 is in series with the component being
tested as shown below.
We need to change the configuration because putting low value inductors in parallel with L1
would result in unacceptably high resonant frequencies (over 100MHz) which are outside the
comparator’s capabilities. With this configuration, adding inductance reduces the frequency
as did adding capacitance in C mode.
The function of C6 (shown on the full circuit) is to calibrate the oscillator. It is the only
precision component in the circuit and sets the basic accuracy for the meter. Relay K1
switches the capacitor in and out of circuit as if it were a component under test in C mode.
The calibration procedure is described in detail in the PIC Software section below.
Diodes D2 and D3 conduct away the high voltage inductive switching spikes which occur
when the relays are switched off and could otherwise damage U3.
Microprocessor Section
Issue 3. Copyright © Debug Innovations Ltd 2009.
L/C Meter User Guide
Page 32 of 41
U1 is a PIC microprocessor which runs the meter software. U3 is a latch which is used to
increase the number of I/O pins on the PIC. Pins RB0-3 are treated like a data bus and are
labelled D0-3 on the circuit. The bus goes to the LCD display and U3. LCD_EN goes high
when the software wants to send data to the LCD and LATCH_EN goes high when the
software wants to send data to U3. In this way D0-3 are used for two purposes, effectively
adding 4 pins to the micro (less LATCH_EN gives a net gain of 3 pins). This only works
because we never read from the LCD (pin 5 (R/W) is tied to GND).
VR1 controls the contrast of the LCD display. R11 reduces the range of VR1 so that the
display text is still visible at any setting of VR1.
Y1 and C10/C11 are connected to the PIC’s internal oscillator circuitry to produce a 4MHz
CPU clock. This PIC also has an internal clock but it is not stable enough for this application
as we are measuring the oscillator frequency using the CPU clock frequency as a reference.
SW2 (zero button) and R1 are connected to one of the PIC’s digital inputs.
PIC Software
With this project the real magic happens in the software. A full description is beyond the
scope of this section but the basic principles are described.
To measure the oscillator frequency, one of the PIC’s internal counters (we will call it OSC) is
connected to the output of COMP2 (see oscillator section) and another is connected to the
4MHz CPU clock (we will call it TIME). The CPU clock is used to wait a fixed length of time
(about half a second) after which the OSC counter is stopped. The frequency is then
calculated as OSC / TIME.
Ordinarily we can calculate an L or C value from the frequency if we know one of the L/C
values. However the accuracy of the meter would depend on how accurately we know the
value of the L/C. This isn’t too difficult with capacitors but precision inductors are expensive
and inductors wound on metal cores are temperature sensitive.
To avoid this problem we use a calibration capacitor. We can derive a formula which
effectively compares the frequency with and without the known calibration capacitor against
the frequency with the unknown component. The clever thing about this formula is that, since
we are only making relative measurements and the value of L doesn’t change between
measurements, L cancels out and we don’t need to know the actual value of L. This means
we can use a cheap component for L1 and avoid the problem of knowing the value of L.
The software measures three oscillator frequencies:
F0 is the frequency with no component connected and no calibration capacitor
Fcal is the frequency when the calibration capacitor is switched in circuit
Fx is the frequency with the unknown component connected
In C mode we use this formula for finding the component value:
⎡⎛ F ⎞ 2 ⎤
⎢⎜⎜ 0 ⎟⎟ − 1⎥
⎥⎦
⎢⎣⎝ Fx ⎠
Cx =
× Ccal
⎡⎛ F ⎞ 2 ⎤
⎢⎜⎜ 0 ⎟⎟ − 1⎥
⎥⎦
⎢⎣⎝ Fcal ⎠
Issue 3. Copyright © Debug Innovations Ltd 2009.
L/C Meter User Guide
Page 33 of 41
In L mode we use this formula for finding the component value:
⎡⎛ F ⎞ 2 ⎤ ⎡⎛ F
Lx = ⎢⎜⎜ 0 ⎟⎟ − 1⎥ × ⎢⎜⎜ 0
⎥⎦ ⎢⎣⎝ Fcal
⎢⎣⎝ Fx ⎠
2
⎤ 1 ⎛ 1 ⎞2
⎞
⎟⎟
⎟⎟ − 1⎥ ×
× ⎜⎜
2
π
C
F
⎥⎦
0 ⎠
cal
⎝
⎠
Notice how the value of L1 isn’t in either formula. Notice also how the value of C5 isn’t in
either formula. The only capacitor that features is the calibration capacitor C6 which is why
we use a 1% tolerance type.
Now we have to consider the effect of stray capacitance and inductance on our results
especially on small value components.
In C mode the method we use automatically removes the effect of stray capacitance because
the absolute value of C is unimportant. When we measure F0 the stray capacitance affects
the value of C5, but C5 doesn’t feature in our equations. During calibration C6 is added to the
circuit but C5 and Cstray are still in circuit so the change is just the value of C6.
In L mode, when we change the configuration of the circuit the stray capacitance changes. In
C mode, L1 is connected to GND. The stray capacitance of the component connector and
tracks are in parallel with the LC circuit i.e. they simply add to the C. However when we are in
L mode, L1 is connected to the component connector which is shorted with the inductor under
test. This effectively isolates the stray capacitance of the component connector and its
tracks. The frequencies we measure during calibration are not the same as the values we get
in this configuration (the frequency with a zero nH short is higher than in C mode). The ratio
of the two frequencies is given by:
Fratio =
C
C + C stray
where C = Deliberate Capacitance and Cstray = Stray Capacitance
When measuring F0, C = 680pF
When measuring Fcal, C = 1680pF i.e. 680pF + the 1nF calibration capacitor
Cstray is constant for our PCB layout.
We use this formula to obtain equivalent calibration frequencies for L mode based on the
numbers we get in C mode.
Test modes and error messages are described in the User Guide section.
The rest of the software is straightforward – Mode switching and zeroing using the buttons,
measurement auto-ranging and driving the LCD display. The only other thing worthy of merit
is just how difficult it is to squeeze all the software into the chip. It is all written in C and the
maths takes up too much space so in reality the maths becomes even more complex because
we cannot afford the luxury of square roots for example.
Issue 3. Copyright © Debug Innovations Ltd 2009.
L/C Meter User Guide
Appendix A – L/C Meter V1.2 Schematic
Issue 3. Copyright © Debug Innovations Ltd 2009.
Page 34 of 41
L/C Meter User Guide
Page 35 of 41
Appendix B1 – PCB V1.2 Parts List
Designator
R1-R5, R11
R6, R7
R8, R9
R10
Part Type
10K
100K
47K
4K7
Footprint
AXIAL-0.4
AXIAL-0.4
AXIAL-0.4
AXIAL-0.4
Qty
6
2
2
1
Part Number
RAP 62-0897, RS 148-736
RAP 62-0964, RS 148-972
RAP 62-0942, RS 148-893
RAP 62-0862, RS 148-663
VR1
2K2
PRESET
1
RAP 67-0220
C1
C2
C3
C4
C5
C6
C7-C9
C10, C11
C12
10uF
100uF
2.2uF
10uF, low ESR
680pF
1nF, 1%
100nF
22pF
5pF
CAP_RAD_2P_5D
CAP_RAD_2.5P_6.5D
CAP_RAD_2P_5D
CAP_RAD_2P_5D
RAD-0.1
RAD-0.1
RAD-0.1
1
1
1
1
1
1
3
2
1
RS 475-9043, FN 945-2281
RS 475-8826
FN 945-1366, RS 228-6852
MS 647-UPM1H100MDD, FN 881-2594
FN 119-8308
RS 117-814, FN 141-3948
FN 146-9310, RAP 08-0275
FN 941-1674
FN 941-1640
L1
68uH
IND_AXIAL-0.5
1
RAP 88-2830, FN 608-531
D1-D3
D4, D5
1N4007
1N4148
DIODE-0.4
DIODE-0.3
3
2
RAP 47-3142, FN 956-5051
RAP 47-3308, FN 956-5124
Q1
Q2
BC337
BC327
TO-92
TO-92
1
1
FN 122-8215
FN 109-7285
U1 *
U2
U3
PIC16F648A *
78L05
74LS75
DIP-18
VREG_78LXX
DIP-16
1
1
1
RAP 73-2654, FN 976-0490, RS 623-0320
MS 512-LM78L05ACZX, FN 146-7367
RS 305-119, FN 110-6076
J1
J2
J3
ICSKT1
Component Conn
Display Conn
Battery
IC Socket
2 x 23.5mm length
14 pin 0.1" pitch SIL
SIP-2
18 pin IC socket for PIC
1
1
1
1
2.33mm wide square section brass tube
RS 251-8351
Comes with box
RAP 22-0134, FN 110-1348
Y1
K1
K2
SW1
SW2
DISP1
4MHz
Calibration Relay
L/C Select Relay
L/C Button
Zero Button
Display
HC49/S
Reed Relay
DPCO Ultra Low Power
6x6mm with long actuator
6x6mm with long actuator
16 x 1 Line Alphanumeric LCD
1
1
1
1
1
1
RAP 90-1074, RAP 90-0310, FN 146-9647
DK 306-1062-ND, FN 108-1682, RAP 60-0670
RS 515-537, FN 162-9004
RS 479-1457
RS 479-1457
Bolymin BC1601A, FN 122-0423
TOTAL COMPONENTS
45
* U1 needs to be programmed before assembly. The blank part number is given above.
Parts supplied in the kit are already programmed.
Issue 3. Copyright © Debug Innovations Ltd 2009.
L/C Meter User Guide
Page 36 of 41
Appendix B2 – Additional Parts List
Designator
PCB
Box
Description
Custom, approx. 100mm x 70mm
ABS with PP3 battery compartment
Label Top
Label Backing
Label Adhesive
PCB Screws
Display Spacers *
Display Screws
Display Nuts
Button Standoffs *
Cable Tie
HP Premium Transparency Film
(Inkjet)
Mega Quick-Laser Labels
Double-sided A4 adhesive sheets
Mounting screws for PCB
M3 x 8mm nylon
M2.5 x 16mm
M2.5
Standoffs for buttons, M3x8 nylon
Cable tie for battery cable
Qty
1
1
1
1
1
4
4
4
4
2
1
Part Number
MS 546-1553BGYBAT, RAP 30-3096,
FN 100-9442, RS 513-5296
EurOffice HP C3835A
RAP 37-1782
HandyHippo.co.uk
FN 593-394
RAP 33-3660, FN 666-889
RS 483-0063, FN 141-9768
RAP 33-1705, FN 141-9446
RAP 33-3660, FN 666-889
FN 129-6959
* Note that the display spacers and button standoffs are identical i.e. you will find 6 of the
same part supplied.
Parts List Key
Designator
Part Type
Footprint
Qty
Part Number
A unique identifier for this part on the board e.g. R1, C1, Q1 etc. This can be
given as a range or list e.g. C1-C3 means C1, C2 and C3.
The type or value of the component e.g. 10K, 100nF, 74LS04
The shape of the area on the PCB for the component. Often this translates to
the package style e.g. the same value of resistor comes in several different
sizes, transistors come in standard cases e.g. TO-92 and you can often get the
same IC in a DIP or a surface mount package.
Quantity required on the PCB. A blank indicates that the component is
accounted for somewhere else. A quantity of zero indicates that there is a
space on the PCB but the component is not fitted in the standard build.
Part numbers are for guidance only and all part numbers shown are suitable,
however part numbers are listed in order of preference (usually because of
price).
Part numbers are prefixed by supplier as follows:
Prefix
FN
RS
MAP
RAP
DK
MS
Supplier
Farnell Electronics
RS Components
Maplin Electronics
Rapid Electronics
Digi-Key UK
Mouser Electronics
Website
http://uk.farnell.com/
http://rswww.com/
http://www.maplin.co.uk/
http://www.rapidonline.com/
http://dkc1.digikey.com/uk/digihome.html
http://uk.mouser.com/
Issue 3. Copyright © Debug Innovations Ltd 2009.
L/C Meter User Guide
Appendix C1 – PCB V1.2, Unassembled
Component Side
Solder Side
Issue 3. Copyright © Debug Innovations Ltd 2009.
Page 37 of 41
L/C Meter User Guide
Appendix C2 – PCB V1.2, Assembled
Without LCD Display
With LCD Display
Issue 3. Copyright © Debug Innovations Ltd 2009.
Page 38 of 41
L/C Meter User Guide
Page 39 of 41
Appendix D – PCB V1.2 Copper Pattern (not to scale)
Component
Side
Solder Side
Issue 3. Copyright © Debug Innovations Ltd 2009.
L/C Meter User Guide
Page 40 of 41
Appendix E – Box Top Drill Drawing
100
28
49.3
23.1
13.5
44.3
2 x Φ8.5
83.8
Not to scale, for guidance only. All dimensions in mm. Outer rectangle is label recess,
representing widest dimension on curved edges.
Appendix F – Side Panel Drill Drawing
54
51
14
11
8.7
6.6
4.5
Not to scale, for guidance only. All dimensions in mm.
Issue 3. Copyright © Debug Innovations Ltd 2009.
L/C Meter User Guide
Appendix G – Resistor Colour Code Chart
Issue 3. Copyright © Debug Innovations Ltd 2009.
Page 41 of 41