1
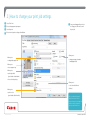
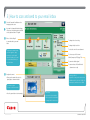
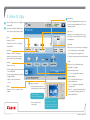
CANON USER GUIDE
1.
2.
3.
4.
How to register and print with your LSE ID Card
Changing print settings
Scan to email
How to copy
©COPYRIGHT OF CANON UK LTD
1 | How to register and print with your LSE ID Card
l1
Getting Started:
• When first using the Canon multi-functional
device (MFD), you will be required to
register your LSE ID Card.
l2
To Register:
• Select ‘Yes’ when presented with:
‘Unknown card. Do you wish to associate
this card with your user account?’
• At the print device, hold your LSE ID Card
on top of the card reader.
• Enter your LSE username and password
then press OK.
• This is usually on the right hand side of the
device or identified with ‘TAP HERE’.
• Your ID Card is now successfully registered
and can be used to log you onto any
Canon multi-functional device (MFD).
• A beep will confirm your pass has been
read.
l3
To Print:
• From your computer, send your document
to print.
• At any Canon MFD tap your card on
the card reader or log in with your LSE
username and Password.
• Your print jobs will appear on the screen.
• Select a document by pressing print or print
all.
• The MFD will then say your print job has
been queued for printing.
MST 01/2011
• Press OK and your document(s) will print.
©COPYRIGHT OF CANON UK LTD
2 | How to change your print job settings
1
l
l2
l3
l4
Select File & Print.
Choose the appropriate print queue.
Select Properties.
l5
Once you are happy with your choice
of settings, press OK twice to send
the print job.
Choose from the printer settings outlined below.
Allows you to:
• enlarge/reduce paper size
Allows you to:
• change your page orientation
(landscape/portrait)
Allows you to:
• choose a paper tray
Allows you to:
• print single-sided
(your default is double-sided)
• choose booklet printing
Allows you to:
Allows you to:
• select from the different
collation/
• print in colour
(your default is black & white)
NB. If you have a hole punch
unit you can access the hole
punch facility on the Finishing tab
and choose which hole punch
option you would like to use.
©COPYRIGHT OF CANON UK LTD
3 | How to scan and send to your email inbox
l1
l2
3
l
Select the Scan and Send button on the
homepage touch screen.
If you wish to change the default settings,
choose from the scanning options outlined
on the right hand side of this guide.
Choose ’Send to Myself’
to scan and send to your email
inbox.
To change the colour setting
To change the dpi resolution
To select the size of the scan document
NB. Because the device knows
you have logged on, simply
pressing the ‘send to myself’
option will enable you to email
the scanned image directly to
your email inbox.
To choose a specific file format
(Word, Powerpoint, PDF, Jpeg, Tiff)
To scan a two sided original
To scan a mixture of A3 and A4 sized documents as one job
4
l
Send your document.
Scanning to Word
• Place your document either onto the
platen glass or document feeder
If you wish to scan your document as an
editable word file, select the ‘OOXML’ file
format option, and then choose ‘Word’
Face down on glass
Face up on document feeder
• Press the green button to start scanning
Main Menu
If you wish to choose another
function, press the home button
to navigate back to main menu
©COPYRIGHT OF CANON UK LTD
4 | How to copy
l
l2
1
l3
Select ‘Use Copier’ option once logged on to
a Canon MFD.
If you wish to change the default settings,
choose from the copying options outlined.
Enter quantity.
Specify the copy quantity with the numeric keys.
If you enter a wrong number press the ‘C’ key to
clear and start again.
Paper Source
Allows you to choose the paper source to copy
from. If Auto is selected, the device will select the
most appropriate.
Colour
Allows you to choose:
• Auto Colour Select for colour copying
Original Type
• Black & White
Allows you to choose from a mixture of image types:
Copy Ratio
• Photo if making copies from photographs
Allows you to reduce or enlarge your
document. You may choose from preset
options or dial in your own percentage.
• Text if making copies from typed sheets
• Text/photo if making copies from mixed documents
2-Sided
Finishing
Allows you to choose double-sided copy
(single-sided is the default).
Allows you to choose:
• Collate to have your documents produced
in sets (ABC) (ABC)
Double-sided options include:
• Group to have your documents produced
by pages (AA) (BB)
• 1 to 2 – to copy single-sided originals to
double-sided copies
• Staple to collate your documents
into sets
• 2 to 2 – to make an identical copy of a
double-sided document
Density
Allows you set to Auto or adjust to lighter
or darker.
4
l
Copy your document.
• Place your document either onto
the platen glass or document feeder
Face down on glass
Face up on document feeder
• 2 to 1 – to copy a double-sided original
to separate sheets
• Book to 2 – to copy the left and right sides of
a ‘book’ placed on the platen glass onto a
double-sided document
Main Menu
• Press the green button to
start copying
If you wish to choose another
function, press the home button
to navigate back to main menu
©COPYRIGHT OF CANON UK LTD