1
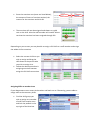
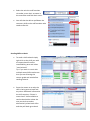
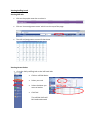
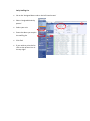
Daily Changes User Guide Unavailability Should a staff member contact the ward and inform them of an unavailability, whether it is sickness, careers leave or any other reason as to why the staff member cannot make their shift, this should be entered onto E-Roster at the earliest possible moment. In order to do this you should follow the below procedure: On the rota, right click on the persons shift that they were supposed to work and select “Add Unavailability” Enter the “group” information of what type of leave it is to be taken and the reason why. Enter the start date and end date of the leave - all leave requires an end date even if the staff member does not know when they will return. If the staff member does not know when they will return they must contact the ward the next day with an update on their sickness. Amending Unavailability If a staff member contacts the ward with an update of their absence. Right click on their unavailability and select “edit unavailability” From here you will be able to amend the dates of the unavailability and the reason. Approving Leave From the main screen select the three little dots next to annual leave or study leave (whichever needs approving). You can also see how many requests need approving next to the leave requests. The green shaded area above shows you all the leave requests that have been submitted by staff - this will include both annual leave and study leave. If you select a staff member in the list on the left hand side, it will show who their leave overlaps with which you can see in the orange shaded area. If your rota is separated into teams you can filter the staff by using the team drop down above the green area and clicking find. By doing this it will also filter the staff on the right hand side. Once you have checked the leave overlaps you can approve or decline the request by selecting the appropriate button at the bottom of the screen. If you decline the request you will be prompted to give a reason for the request being declined. Leave Symbols Leave has been requested Leave has been requested and the staff member has left a note for the authorisor, to view this select the request and on the right hand side select the notes tab Annual leave has been granted Parenting leave has been granted (usually maternity leave) Study Request has been granted Shifts Amending shift times and assigning overtime If a staff member has altered their working hours and worked overtime. Right click on the shift that they have worked and select “adjust times” Amend the hours as necessary, you can also enter a reason as to why the timings of the shifts had been assigned and enter any additional comments. To assign overtime to the additional hours created, right click on the shift that you have amended the hours and select “Assign Overtime” Enter the overtime rate (rates are listed below), the amount of hours of overtime worked, the reasons for the overtime and click OK. The overtime will now be assigned and shown as a gold coin on the shift. Also the staff member will now be able to see that the overtime has been assigned through EOL. Depending on your access you may be able to assign a full shift to a staff member and assign the whole shift as overtime. Select the correct shift that you wish to assign and drag the shift down to the person who you wish to assign it to. Follow the above procedure in assigning overtime however assign the full shift to overtime Assigning Shifts to another Area If your department cross covers with another and both are on E-Rostering, you are able to assign staff to the necessary shifts. Find the shift group you wish to assign to a member of staff from another area and lock the padlock in the top right of the blue box. Select the unit the staff member sits under, enter their surname in the search bar and find their roster. You will then be able to pull down the necessary shift to the staff member who needs to work it. Sending Shifts to Bank To send a shift to bank simply right click on the shift you wish to request bank from the unavailability pane and select “send to bank” Tip: if you work in a unit with multiple areas/shifts make sure that you are selecting the correct grade and area before sending to bank. Enter the reason as to why the shift is being sent to bank and any other additional information the shift requires. If there is more than 1 shift available to send to bank either select the one you wish to send or alternatively select both shifts and they will both go to bank. If you wish to request a specific bank staff select the “Assign Preferred Person”. Enter the staff’s surname and click find, highlight the staff member you wish to request and click select. The preferred person will now be listed then click OK. To cancel the bank request right click on the shift and select “Reset to Unit Fulfilment” Swapping Shifts Go to the roster for which the swap takes place Click on the first shift you wish to swap so the shift become highlighted, in the example we have selected Claire Fraser’s late on the 7th November Hold the Ctrl button on your keyboard and select the shift you wish to swap, so that both shifts are now highlighted We have selected the Early for Karen Bailey on the 9thth November Right click on the shift that you have just selected, and select swap duties The duties will now have swapped Tip: make sure that when swapping shifts, staff are not on a DO, if so remove the DO first. Viewing Staffing Levels Viewing Skill Mix Click on the purple roster bar to select it Click on ‘show assignment count’ which is at the top of the page The skill mix/assignment count will then show Viewing Vacant Duties Go to the ‘daily staffing’ tab on the left hand side Click on unfilled duties Select your unit Select the dates you want to look at Click find The unfilled shifts will Be listed underneath Daily Staffing List Go to the ‘Assigned Hours tab on the left hand screen’ Select ‘Assigned duties by person’ Select your unit Enter the dates you require the staffing list Click find If you wish to print the list click on the printer icon in the top right.