1
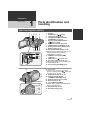
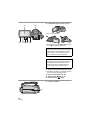
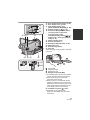
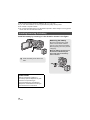
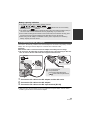
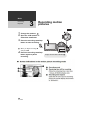
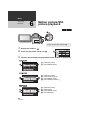
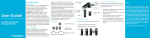
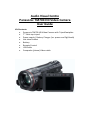
Audio Visual Centre Panasonic TM700 HD Video Camera User Guide Kit Contents: Panasonic TM700 HD Video Camera with Tripod footplate 7” Table top tripod Power supply / Battery Charger (inc. power and Fig8 leads) Hot-shoe bracket Battery Remote Control USB Cable Composite (phono) Video cable Preparation Before using 1 Parts identification and handling [HDC-SD700]/[HDC-TM700] 1 23 4 5 1 2 3 4 Speaker Power button [ ] (l 22) Inlet (cooling fan) (l 26) Intelligent auto/Manual button [iA/MANUAL] (l 32, 75) 5 Optical image stabilizer button [ /O.I.S.] (l 50) 6 Eyepiece corrector dial (l 24) 7 1080/50p button [1080/50p] (l 52) 8 Battery release lever [BATT] (l 16) 9 Battery holder (l 16) 10 DC input terminal [DC IN] (l 19) ≥ Always use the supplied AC adaptor or a genuine Panasonic AC adaptor (VW-AD21E-K; optional). 11 HDMI mini connector [HDMI] (l 95, 99) 12 USB terminal [ ] (l 104, 119) 13 AV multi connector (l 95, 110) ≥ Use the AV multi cable (only the supplied cable). 14 Card slot (l 21) 15 Access lamp [ACCESS] (l 21) 6 7 8 9 10 11 12 13 15 14 16 17 18 19 20 21 22 16 Lens cover ≥ The lens cover opens in motion picture recording mode or still picture recording mode. (l 23) 17 Multi manual ring (l 75, 78) 18 Camera function button [CAMERA FUNCTION] (l 75) 19 Remote control sensor (l 48) 20 Built-in flash (l 55) 21 Lens (LEICA DICOMAR) ≥ Please refer to page 26 for details about attaching the lens hood. 22 AF assist lamp (l 74) 23 Recording lamp (l 42) 23 9 VQT2N56 24 LCD monitor (Touch screen) (l 24) 24 25 ≥ It can open up to 90o. 26 27 28 29 30 ≥ It can rotate up to 180o A towards the lens or 90o B towards the viewfinder. Due to limitations in LCD production technology, there may be some tiny bright or dark spots on the LCD monitor screen. However, this is not a malfunction and does not affect the recorded picture. 25 Viewfinder (l 24) Due to limitations in LCD production technology, there may be some tiny bright or dark spots on the viewfinder screen. However, this is not a malfunction and does not affect the recorded picture. 26 Quick menu button [Q.MENU] (l 38) 27 Sub recording start/stop button (l 26) ≥ This button functions in the same manner as the recording start/stop button. 28 Adjust zoom buttons (l 49) 29 Menu button [MENU] (l 37) 30 Delete button [ ] (l 88) 31 Tripod receptacle 31 10 VQT2N56 32 33 34 35 36 37 39 40 41 38 32 Shoe adaptor mounting part (l 150) 33 Shoe adaptor cover (l 150) 34 Shoe adaptor release lever [SHOE ADAPTOR RELEASE] (l 150) 35 Photoshot button [ ] (l 30) 36 Zoom lever [W/T] (In motion picture recording mode or still picture recording mode) (l 49) Thumbnail display switch [ / ]/ Volume lever [sVOLr] (In playback mode) (l 36) 37 Status indicator (l 22) 38 Internal microphones 39 Recording start/stop button (l 28) 40 Mode dial (l 23) 41 Shoulder strap fixture 42 Grip belt Adjust the length of the grip belt so that it fits your hand. 42 MIC 43 44 1 Flip the belt. 2 Adjust the length. 3 Replace the belt. 43 Microphone terminal [MIC] ≥ A compatible plug-in powered microphone can be used as an external microphone. ≥ Audio will be stereo (2 ch) with the external microphone input. ≥ When the unit is connected with the AC adaptor, sometimes noise may be heard depending on the microphone type. In this case, please switch to the battery for the power supply and the noise will stop. 44 Headphone terminal [ ] (l 57) ≥ Excessive sound pressure from earphones and headphones can cause hearing loss. 11 VQT2N56 ≥ We recommend using Panasonic batteries. (l 8, 17, 18, 149) ≥ If you use other batteries, we cannot guarantee the quality of this product. ≥ Do not heat or expose to flame. ≥ Do not leave the battery(ies) in an automobile exposed to direct sunlight for a long period of time with doors and windows closed. Inserting/removing the battery Install the battery by inserting it in the direction shown in the figure. Removing the battery Be sure to hold down the power button until the status indicator goes off. Then remove the battery while supporting the unit to prevent it dropping. Move the battery release lever in the direction indicated by the arrow and remove the battery when unlocked. A Insert the battery until it clicks and locks. BATT CAUTION Danger of explosion if battery is incorrectly replaced. Replace only with the same or equivalent type recommended by the manufacturer. Dispose of used batteries according to the manufacturer’s instructions. 16 VQT2N56 Battery capacity indication ≥ The display changes as the battery capacity reduces. # # # # If there is less than 3 minutes remaining, then will become red. If the battery discharges, then will flash. ≥ The remaining battery capacity is displayed when using the Panasonic battery that you can use for this unit. The actual time can vary depending on your actual use. ≥ If the actual remaining time exceeds 9 hours 59 minutes, the indication will stay green and will not change until the remaining time falls below 9 hours 59 minutes. ≥ When using the AC adaptor or batteries made by other companies, the remaining battery capacity will not be shown. Connecting to the AC outlet The unit is in the standby condition when the AC adaptor is connected. The primary circuit is always “live” as long as the AC adaptor is connected to an electrical outlet. Important: While the DC cable is connected to the AC adaptor, the battery will not charge. ≥ Do not use the AC cable with any other equipment as it is designed only for this unit. Also, do not use the AC cable from other equipment with this unit. DC IN 1 2 3 A DC output terminal B DC input terminal Insert the DC cable matching the [ ] mark of the DC input terminal. Connect the AC cable to the AC adaptor and the AC outlet. Connect the DC cable to the AC adaptor. Connect the DC cable to the DC input terminal [DC IN]. ≥ When removing the AC adaptor, be sure to hold down the power button until the status indicator goes off. Then remove the AC adaptor. 19 VQT2N56 Preparation Setup 2 Recording to a card The unit can record still pictures or motion pictures to an SD card, built-in memory or HDD. To record to an SD card, read the following. This unit (an SDXC compatible device) is compatible with SD Memory Cards, SDHC Memory Cards and SDXC Memory Cards. When using an SDHC memory card/SDXC memory card with other equipment, check the equipment is compatible with these memory cards. Cards that you can use with this unit Use SD cards conforming to Class 4 or higher of the SD Speed Class Rating* for motion picture recording. Card type Capacity 8 MB/16 MB SD Memory Card 32 MB/64 MB/ 128 MB/256 MB Motion picture recording Cannot be used. Cannot be guaranteed in operation. The recording may suddenly stop during motion picture recording depending on the SD card you use. (l 130) 512 MB/1 GB/ 2 GB SDHC Memory Card 4 GB/6 GB/8 GB/ 12 GB/16 GB/ 24 GB/32 GB SDXC Memory Card 48 GB/64 GB Still picture recording Can be used. Can be used * The SD Speed Class Rating is the speed standard for successive writes. ≥ Please confirm the latest information about SD Memory Cards/SDHC Memory Cards/SDXC Memory Cards that can be used for motion picture recording on the following website. http://panasonic.jp/support/global/cs/e_cam (This website is in English only.) ≥ 4 GB or more Memory Cards that do not have the SDHC logo or 48 GB or more Memory Cards that do not have the SDXC logo are not based on SD Memory Card Specifications. 20 VQT2N56 ≥ When the write-protect switch A on SD card is locked, no recording, deletion or editing will be possible on the card. ≥ Keep the Memory Card out of reach of children to prevent swallowing. 32 Basic Recording/ Playback 2 Selecting a media to record [HDC-TM700/HDC-HS700] The card, built-in memory, and HDD media can be selected separately to record motion pictures or still pictures. 1 2 Change the mode to or . Select the menu. : [MEDIA SELECT] 3 Touch the media to record motion pictures or still pictures. A B C D [VIDEO/SD CARD] [VIDEO/Built-inMemory] [PICTURE/SD CARD] [PICTURE/Built-inMemory] E F G H [VIDEO/SD CARD] [VIDEO/HDD] [PICTURE/SD CARD] [PICTURE/HDD] ≥ The media is selected separately to motion pictures or still pictures is highlighted in yellow. 4 Touch [ENTER]. 27 VQT2N56 Basic Recording/ Playback 3 Recording motion pictures 1 2 Change the mode to 3 Press the recording start/stop button to start recording. . Open the LCD monitor or extend the viewfinder. B When you begin recording, ; changes to ¥. 4 Press the recording start/stop button again to pause recording. ≥ Align with the status indicator A. ≥ Still pictures can be recorded while recording the motion picture. (l 31) ≥ The images recorded between pressing the recording start/stop button to start recording and pressing it again to pause recording become one scene. ≥ Maximum number of recordable scenes: 3900 Maximum number of different dates: 200 (l 83) When either of them reaches to the maximum limit, more scenes cannot be recorded. (In the case of SD cards it is the maximum number of recordable scenes per card.) ≥ While recording is in progress, the recording will not stop even if the LCD monitor is closed and the viewfinder is retracted. ≥ Put the unit in pause mode when connecting or disconnecting an external microphone with the MIC terminal. 28 VQT2N56 Basic Recording/ Playback 6 Motion picture/Still picture playback ≥ Align with the status indicator A. 1 2 Change the mode to 3 Touch the desired media to be played back motion pictures or still pictures. . Touch the play mode select icon B. A [VIDEO/SD CARD] B [PICTURE/SD CARD] C D E F [VIDEO/SD CARD] [VIDEO/Built-inMemory] [PICTURE/SD CARD] [PICTURE/Built-inMemory] G H I J [VIDEO/SD CARD] [VIDEO/HDD] [PICTURE/SD CARD] [PICTURE/HDD] 34 VQT2N56 4 Touch the scene or the still picture to be played back. ≥ Next (previous) page can be displayed by touching / . 5 Select the playback operation by touching the operation icon. A Operation icon 0h00m00s ≥ Touch icon. F / to display/not-display the operation F F Motion picture playback 1/;: 6: 5: ∫: 1: Playback/Pause Rewind playback Fast forward playback Stops the playback and shows the thumbnails. Displays the direct playback bar. (l 80) Still picture playback Slide show (playback of the still pictures in numerical order) start/pause. Plays back the previous picture. Plays back the next picture. Stops the playback and shows the thumbnails. 1/;: 2;: ;1: ∫: ∫ Play back 1080/50p recorded scenes (l 52) ≥ Change the mode to and touch the play mode select icon. Touch [CHANGE VIDEO]. ≥ The motion picture media switches between normal and 1080/50p recorded scenes each time [CHANGE VIDEO] is touched. A 1080/50p appears. 35 VQT2N56