1
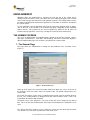
TOUCH 247
USER GUIDE
V2.1.7
Visionpoint™ Touch Screens Ltd
Rowley House, The Quay, Poole, Dorset, BH15 1HL, United Kingdom
Technical Support: +44 (0) 845 224 3714
Fax: +44(0) 1202 674 387
www.touch247.com
© 2008 VISIONPOINT™ TOUCH SCREENS LIMITED
Preliminary Pages
Page 2 of 25
Copyright and Trademarks
Copyright © 2008 Visionpoint™ Touch Screens Limited. All rights reserved.
Any technical documentation made available by Visionpoint Touch Screens Ltd (hereinafter called
‘Visionpoint’) is the copyright work of Visionpoint and wholly owned by Visionpoint.
Other brands and product names mentioned in this manual may be trademarks or registered
trademarks of their respective companies and are hereby acknowledged.
Disclaimer
Visionpoint accepts no liability for any loss of data or the ability of Touch247 to work with equipment,
nor can Visionpoint accept any liability or responsibility for software which is non-compliant.
However, Visionpoint in continuance of product improvement and customer satisfaction will without
prejudice, and where possible, support the integration of Touch247 onto non-compliant hardware or
software.
Should you have any queries or comment please contact the Visionpoint Support helpdesk:
United Kingdom
International
0845 224 3174
+44 (0) 845 224 3714
(calls charged at local rate)
(international rates apply)
The information contained in this document and the software to which it relates is subject to change
without notice. If you find any problems with the document or software please report them to
Visionpoint. Visionpoint does not warrant that this documentation or software is error free.
© 2008 VISIONPOINT™ TOUCH SCREENS LIMITED
Preliminary Pages
Page 3 of 25
Contents
Copyright and Trademarks .......................................................................................................................2
Disclaimer .................................................................................................................................................2
INTRODUCTION ......................................................................................................................................5
The Touch247 Software ...........................................................................................................................5
Touch247 and Show247...........................................................................................................................5
Installation.................................................................................................................................................5
USING ADMIN247 ...................................................................................................................................6
THE ADMIN247 SCREEN........................................................................................................................6
1. The General Page ............................................................................................................................6
2. The Import Page...............................................................................................................................8
3. The Messages Page ......................................................................................................................10
4. The Featured Items Page...............................................................................................................11
5. The View Statistics Page................................................................................................................11
6. The Branding Page ........................................................................................................................12
USING DATABASE247 .........................................................................................................................15
The Database247 Screen.......................................................................................................................15
1. The List Page .................................................................................................................................15
2. The Add Page ................................................................................................................................15
3. The Edit Page.................................................................................................................................16
Database Administration Options ...........................................................................................................18
Backup Database ...................................................................................................................................18
Restore Database...................................................................................................................................18
Unlock Database ....................................................................................................................................19
Select Database .....................................................................................................................................19
USING TOUCH247 ................................................................................................................................21
The Touch247 Screen ............................................................................................................................21
Figures
Figure 1 The General Screen............................................................................................................................ 6
Figure 2 The Search Question Dialog.............................................................................................................. 7
Figure 3 The Search Question Edit Dialog...................................................................................................... 7
Figure 4 The Categories Dialog ........................................................................................................................ 8
Figure 5 The Database Location Dialog .......................................................................................................... 8
Figure 6 The Import Options Screen ................................................................................................................ 9
Figure 7 The Import Options Screen Displaying the Progress Bar............................................................10
Figure 8 The Messages Screen ......................................................................................................................10
Figure 9 The Messages Screen ......................................................................................................................11
Figure 10 The Featured Items Screen ...........................................................................................................11
Figure 11 The View Statistics Page................................................................................................................12
Figure 12 The Branding Screen ......................................................................................................................12
Figure 13 The Background Colour Screen .....................................................................................................13
Figure 14 The Advertisement Screen..............................................................................................................13
Figure 15 The Property List Screen................................................................................................................15
Figure 16 The Add Property Screen................................................................................................................16
Figure 17 The Edit Property Screen...............................................................................................................17
Figure 18 Delete Image....................................................................................................................................17
Figure 19 The DB Backup Warning.................................................................................................................18
Figure 20 The Select Backup Window...........................................................................................................18
Figure 21 The Unlock Property Window ........................................................................................................19
© 2008 VISIONPOINT™ TOUCH SCREENS LIMITED
Preliminary Pages
Page 4 of 25
Figure 22 The Browse for Database Location Dialog ..................................................................................20
Figure 23 The Touch247 Sales Screen ..........................................................................................................21
Figure 24 The Touch247 Lettings Screen .....................................................................................................22
Figure 25 The Search Screen (Price) ............................................................................................................22
Figure 26 The Search Screen (Property) ......................................................................................................23
Figure 27 The Search Results Screen...........................................................................................................23
Figure 28 The Property Details Screen..........................................................................................................24
Figure 29 The Contact Us Screen ..................................................................................................................24
Figure 30 Entering Contact Details.................................................................................................................25
Figure 31 The Confirmation Popup Dialog ....................................................................................................25
© 2008 VISIONPOINT™ TOUCH SCREENS LIMITED
Touch247
Page 5 of 25
INTRODUCTION
This user guide is for administrators of the Touch247 software.
The Touch247 Software
The Touch247 software is comprised of three elements. The first, Touch247, resides on a
dedicated PC that drives the projector and thus the display screen. The second and third
elements, Admin247 and Database247, can reside anywhere on a local network.
(a)
Touch247 - The Touch247 application presents property details in an interactive format
that enables passers-by to access information using innovative through-the-glass
technology, and to leave messages expressing interest.
(b)
Admin247 - The Admin247 application is used to perform administration functions, which
includes the import of industry standard data in the Rightmove™ format. This element
also contains basic setup functions and facilities to brand the Touch247 display.
(c)
Database247 - The Database247 application allows all users on a local network to add,
view and edit data.
Touch247 and Show247
The database used to hold the property information is common across both Touch247 and
Show247 (the non-interactive version). This is deliberate and allows a single site to run both
applications simultaneously (on different equipment), perhaps with one in the window and one
inside the shop, both accessing the same database.
The Admin247 and Database247 applications are therefore common to both the Touch247 and
Show247 products. Throughout this guide the various screen shots will occasionally show
options that are specific to Show247 and thus not applicable to Touch247. Where these occur it
will be pointed out in the text but the functionality will not be described. These options are
described fully in the Show247 User Guide.
Installation
The Touch247 software is supplied on a CD. To install the software:
(a)
Make sure all open applications are closed prior to beginning the installation.
(b)
Insert the CD into the CD-ROM drive of your computer.
(c)
The installation wizard will start and display the install menu.
(d)
Click on ‘Install Software’ to begin installation of the Touch247 software.
(e)
Follow the on screen instructions until the setup has completed.
(f)
Once complete the Touch247, Database247 and Admin247 applications can be started
from icons located in the Start menu or on the Desktop screen.
(g)
If the installation wizard does not start automatically, go to ‘Start’ followed by ‘Run’ and
type in d:\setup.exe (where d: is your CD-ROM drive).
The Installation Guide supplied with Touch247 CD describes the installation process in detail.
© 2008 VISIONPOINT™ TOUCH SCREENS LIMITED
Touch247
Page 6 of 25
USING ADMIN247
Admin247 allows the administrator to customise the look and feel of the content that is
displayed on the Touch247 screen. It also allows the user to import property files from a known
source, view messages that have been left by potential customers, view activity statistics for the
preceding six month period and brand the appearance of Touch247, each which is described in
the sections below.
To start Admin247 select the Admin247 entry from the ‘Start’ menu program group or doubleclick on the icon on the Desktop or in the Quick Start group (depending on the installation
options chosen). This program can be closed at anytime by clicking on the ‘X’ (exit) icon
located on the top right of the screen or by selecting File on the top menu and then Exit.
THE ADMIN247 SCREEN
The screen is displayed with six navigable buttons situated on the left side (‘General’, ‘Import’,
‘Messages’, Featured Items’, ‘View Stats’ and ‘Branding’). Selection of each button displays a
different administration page, each of which is described in the sections below.
1. The General Page
This page allows the administrator to manage the presentational of the Touch247 screen
(Figure 1).
Figure 1 The General Screen
At the top of the page is the ‘Screen Resolution’ field, which allows the user to set the size of
the Touch247 screen (4:3 (1024 x 768) or 16:9 (1280 x 768). The default setting for this is 4:3
(1024 x 768).
The ‘Ticker Text’ field is used to create a scrolling marquee and to select the required colour for
the text. The scrolling marquee is displayed at the top of the Touch247 screen. If this is not
required then the field should be left blank.
The default screen saver delay time is set to 40 seconds but can be changed to any desired
time. This is the time that Touch247 waits after a period of inactivity before showing the screen
saver.
The ‘Search Questions’ facility is used to change the search text and criteria that Touch247
uses when the user selects the Search button on the main screen.
© 2008 VISIONPOINT™ TOUCH SCREENS LIMITED
Touch247
Page 7 of 25
Each Category (e.g. Sales, Lettings) has a number of questions that appear in sequence when
the user searches in that category. Each question has a title, description and a number of
options, from which the user can choose. These are the visible parts of the question (shown in
Figure 2).
Figure 2 The Search Question Dialog
In addition to the visible elements of each question (the text on the screen and the buttons),
each option that the user can select has a corresponding database query that is used by
Touch247 to filter the list of properties for display. The combination of all the questions for a
Category and the options selected by the user will give the final list of properties that match the
criteria.
To change the search criteria first click on the required ‘Search Options’ text box and enter the
words/values for the option. This text will be displayed on the appropriate button on Touch247
search screen. Then change the command values to match your text (Figure 3).
Figure 3 The Search Question Edit Dialog
Up to 8 search options can be specified for each question. If fewer options are required then
individual entries can be removed by selecting Clear Entry button.
The ‘Button Categories’ option is used to define the property categories; for example ‘Sales’ and
‘Lettings’. The name of the categories is used for the text on the buttons on the left hand side of
© 2008 VISIONPOINT™ TOUCH SCREENS LIMITED
Touch247
Page 8 of 25
the Touch247 screen, as shown in the screen (Figure 4). Each button has a maximum of 11
characters. To change the text of a button simply select it and enter the required value. If you
require only one category for example ‘For Sale’ then the other field should be left blank. The
text for the Search button cannot be changed.
Figure 4 The Categories Dialog
The ‘Database File’ field is used to specify the location of the database. By default this will be
set up to be in the installation directory. Selecting the ‘Change’ button displays a dialog through
which a new database file can be specified (see Figure 5).
Database files have a file type of ‘.mdb’. Associated with each database file is a directory of all
the associated pictures. This is named ‘media’ and should be located in the same parent
directory as the database file. For example, Figure 5 shows the database file residing in the
directory C:\Touch247. The media directory must therefore be C:\Touch247\media for the
pictures to be located by Touch247.
Figure 5 The Database Location Dialog
The remaining field, ‘Show247’ is used purely in conjunction with the Show247 software and is
not covered in this manual.
Once editing has been completed the ‘Save Changes’ button should be selected. This will
display a dialog that confirms the changes have been saved.
2. The Import Page
The Import page is used to populate the Touch247 database from an external data file, such as
a Rightmove ‘blm’ file (see Figure 6).
© 2008 VISIONPOINT™ TOUCH SCREENS LIMITED
Touch247
Page 9 of 25
Figure 6 The Import Options Screen
There are a number of import options, as follows:
•
Import File – This field is used to import the textual content of the properties. The file
format used (.blm files) is the same format that is used with websites such as
www.rightmove.co.uk. Access to the files is achieved by clicking on the ‘Browse’ button
and navigating to the applicable file.
•
Import Media Directory – This field is used to import the image files associated with the
text file described above. This field automatically populates when the text files are
imported, however this can be configured manually if required.
•
Output Media Directory – This field is pre-populated on installation and unless it needs
to change should remain as set (please discuss with your supplier about editing this
field).
•
Select Required Agent from List - This field has a drop down menu that enables the
administrator to select data from all branches or just from a sole branch. Note that most
installations will normally only use data from the branch where Touch247 is installed.
•
Include Properties with no Image – This checkbox should be selected if properties that
do not have an image attached are required to be imported.
•
Replace Properties in Database – This radio button should be selected if all the existing
entries in the database are to be deleted as part of the import.
•
Append Properties to Database – This radio button should be selected if the imported
data is to be appended to the existing contents of the database.
Changes will not be made until the ‘Process Import’ button is selected. The time required to
load the data will depend on the number of properties involved and the number of images. A
progress bar is presented to gauge the time (Figure 7).
© 2008 VISIONPOINT™ TOUCH SCREENS LIMITED
Touch247
Page 10 of 25
Figure 7 The Import Options Screen Displaying the Progress Bar
3. The Messages Page
This page is used to display all messages that have been left by potential customers on the
Touch247 ‘Contact Us’ screen (Figure 8).
Selection of the ‘Refresh List’ button will update the screen with all the latest messages.
Figure 8 The Messages Screen
Double-click on any of the message lines will display a dialog screen to enable printing or
deleting the details. (Figure 9)
© 2008 VISIONPOINT™ TOUCH SCREENS LIMITED
Touch247
Page 11 of 25
Figure 9 The Messages Screen
4. The Featured Items Page
This page shows all the properties that are in the database and a ‘Featured List’ which shows
those properties that are displayed on the Home page of the Touch247 screen for the selected
Category.
Figure 10 The Featured Items Screen
The Featured List can be updated at any time by first selecting the category and then selecting
the required properties from the full list of properties on the left of the screen and clicking on the
‘Add’ (>>) button. Similarly properties can be removed from the Featured List by using the
‘Remove’ (<<) button. Note that the Featured List can only contain a maximum of 6 properties
for each category.
5. The View Statistics Page
This page displays the viewing statistics for the system, which are colour coded as follows:
•
Red – represents the number of detailed views during a given month.
•
Green – represents the number of messages left during a given month.
•
Yellow – represents the number of in depth searches completed during a given month.
Moving the mouse pointer over the column will show the statistics in more detail.
© 2008 VISIONPOINT™ TOUCH SCREENS LIMITED
Touch247
Page 12 of 25
Figure 9 The View Statistics Page
6. The Branding Page
Figure 12 The Branding Screen
The branding of Touch247 consists of three parts: the background colour, the top image and the
bottom image. The background colour can be changed by clicking on ‘Background colour’
button. This will display the background dialog (Figure 13)
© 2008 VISIONPOINT™ TOUCH SCREENS LIMITED
Touch247
Page 13 of 25
Figure 13 The Background Colour Screen
The background can be a single colour or a graduation between two colours. Clicking on the
Colour1 or the Colour2 buttons will show the colour picker from which the desired colour can be
selected.
To change the top or bottom image simply drag the desired image from anywhere in the file
system and drop it over the Touch247 image area.
The Screensaver consists of three parts: featured properties, moving hand with Touch me &
strap line and a selection of advertisements. The sequence is as follows - the first of the top six
featured properties is displayed full screen followed by the moving hand & touch me screen.
Then the next featured property is displayed, again followed by the moving hand & touch me
screen. After all the featured properties have been displayed this way, this process is then
repeated, but displaying the advertisements in place of the featured properties. The
Advertisements screen is described in the sections below.
The strapline text field is used to display what ever you choose under the pulsing dot and touch
me text. To change the text, simply select the text and type. Selecting the Text colour button will
show the colour picker from which the desired colour can be selected. Text Font button will
show the font dialog from which the desired font, size etc., can be selected. Change Colour
button on the bottom colour band will show the colour picker from which the desired colour can
be selected.
The Advertisement button will show the Advertisement screen, a total of six advertisements can
be defined. The advertisements are jpeg images (see Figure 14).
Figure 14 The Advertisement Screen
© 2008 VISIONPOINT™ TOUCH SCREENS LIMITED
Touch247
Page 14 of 25
To change an advertisement simply the grab the desired image from anywhere in the file
system and drop it over the image area. The duration for the featured property and
advertisement to be displayed is determined by the value in the Seconds box.
The Enable option either selects the advertisement to be displayed or not. To remove the
advertisement completely simply click on the image and press the delete (Del) key.
The Show247 element only applies to the Show247 software and thus is not covered by this
user guide.
Once editing has been completed the ‘Save and Brand’ button should be selected. This will
display a dialog that confirms the changes have been saved.
If a different page of Admin247 is selected before any changes have been saved then a dialog
will appear offering the option to save, to discard changes, or to cancel the change of page.
For more advanced branding and screensaver information see the file Touch247_Branding.pdf
located in the installation folder under interface\branding\documentation, there you will also find
Adobe Flash templates (.fla) files.
© 2008 VISIONPOINT™ TOUCH SCREENS LIMITED
Touch247
Page 15 of 25
USING DATABASE247
Database247 allows users on an local network to add, view and edit individual details for
display on the Touch247 screen
To start Database247 select the Database247 entry from the ‘Start’ menu program group or
double-click on the icon on the Desktop or in the Quick Start group (depending on the
installation options chosen). This program can be closed at anytime by clicking on the ‘X’ (exit)
icon located on the top right of the screen.
The Database247 Screen
The screen is displayed with three navigable buttons situated on the left side (‘List’, ‘Add’ and
‘Edit’). Selection of each button displays a different database administration page, each of which
is described in the sections below.
1. The List Page
This page shows all the properties that are loaded in the database.
Most fields are self-explanatory, however the ‘Display’ column indicates if the property has been
selected for display in Show247.
Double clicking on any property in the list will display its details in the ‘Edit Property’ page
(Figure 15).
Figure 15 The Property List Screen
At the top of the page is a search facility that can be used to find properties by their reference or
name. Simply select the Reference or Name option and then enter the search word or partial
word into the search field and click the ‘Go’ button. This filters the list and displays just those
properties which match the search term. To return to the full list clear the search field and click
the ‘Go’ button again.
2. The Add Page
This page allows a new property to be manually added into the database. (Figure 16) The page
is also accessible from the ‘New’ option found in the ‘File’ menu.
© 2008 VISIONPOINT™ TOUCH SCREENS LIMITED
Touch247
Page 16 of 25
Figure 16 The Add Property Screen
The screen is made up of several fields which allow details to be entered or values to be
selected from relevant dropdown lists.
The ‘Display in Show247’ checkbox is only applicable to the Show247 software and is not
covered in this guide.
Note that at this stage photo images cannot be added as indicated by the icon displayed in the
image placeholders. Images are added using the ‘Edit Property’ page.
Once the basic details have been added clicking the ‘Save’ button will save the property to the
database. Note all the fields with yellow background are mandatory.
3. The Edit Page
This page is displayed by selecting the ‘Edit’ button (Figure 16) or when an individual property is
selected in the Property List page, and allows the user to edit the details of properties held in
the database. The page is also accessible from the ‘Edit’ option found in the ‘File’ menu.
This page is similar to the ‘Add Property’ page but with the additional functionality that allows
the user to select images for display on the Touch247 screen. This is achieved by dragging a
desired image from anywhere on the computer disk and dropping it onto the required
placeholder. The title of the picture is the text that appears on the button on the property details
screen of Touch247 that is associated with picture.
If the property is in the list of featured properties (i.e. it appears on the main screen for a
particular category) then the first two pictures will be the ones that are displayed (displayed
alternately) on the main screen.
Once editing is complete clicking the ‘Save’ button will save the changes to the database.
© 2008 VISIONPOINT™ TOUCH SCREENS LIMITED
Touch247
Page 17 of 25
Figure 17 The Edit Property Screen
As with the ‘Add Property’ page the ‘Display in Show247’ checkbox is only applicable to the
Show247 software and is not covered in this guide.
To remove an image simply select the image then press and hold the Control (Ctrl) key and
click the right mouse button. A dialog will be displayed confirming your actions. See Figure 18
Figure 18 Delete Image
The movie placeholder is applicable only to Show247 and is not covered in this guide.
© 2008 VISIONPOINT™ TOUCH SCREENS LIMITED
Touch247
Page 18 of 25
Database Administration Options
There are various database administration options available, which are accessible from the DB
Tools menu. These are:
•
Backup Database
•
Restore Database
•
Unlock Database
•
Select Database
Backup Database
A backup of the database can be performed at any time by selecting the ‘Backup Database’
option from the ‘DB Tools’ menu. Each file that is backed up is time stamped with the date and
time.
When a backup is completed a dialog is displayed with the message “Backup Successful”.
In the event that the database is in use at the time a backup is attempted a warning dialog will
be displayed (Figure 19).
Figure 19 The DB Backup Warning
Restore Database
The restoration of a backed up database can be performed at any time by selecting the ‘Restore
Database’ option from the ‘DB Tools’ menu.
Selection of this option will open a browse window that allows the user to navigate to the folder
from where the restore is to be made (Figure 20). Selecting the backup file and clicking the
‘Open’ button will then restore the database.
Figure 20 The Select Backup Window
© 2008 VISIONPOINT™ TOUCH SCREENS LIMITED
Touch247
Page 19 of 25
Unlock Database
As the database can be used by more than one user at a time, when a property is being edited
it gets marked as locked to prevent any other user from inadvertently changing the data at the
same time.
If a user doesn’t exit the program in a proper manor then the record can be left in a locked state.
If this is the case the property in the database can be unlocked by selecting the ‘Unlock
Database’ option from the ‘DB Tools’ menu.
This action displays the ‘Unlock Property’ screen (Figure 21). Selecting the locked property on
this screen and clicking on the ‘Unlock’ button will place the property in an unlocked state, which
then allows it to be edited as normal.
Figure 21 The Unlock Property Window
Select Database
The Admin247 and Database247 are often run on a PC that is separate to the PC used to run
Touch247. In addition, there may be more than one Touch247 application, or indeed copies of
Show247 running in an agency, each of which can have a separate database.
The ‘Select Database’ option allows the user to choose which database to administer. Selecting
this option displays a dialog that allows the user to either enter a file path to the database or to
browse for the database via a browse window (see Figure 22).
© 2008 VISIONPOINT™ TOUCH SCREENS LIMITED
Touch247
Page 20 of 25
Figure 22 The Browse for Database Location Dialog
Selection of either the ‘OK’ button in the ‘Database Location’ dialog or the ‘Open’ button in the
browse window (assuming a correct file path or database has been selected) will open the
database for editing as required.
© 2008 VISIONPOINT™ TOUCH SCREENS LIMITED
Touch247
Page 21 of 25
USING TOUCH247
To start Touch247 select the Touch247 entry from the ‘Start’ menu program group or doubleclick on the icon on the Desktop or in the Quick Start group (depending on the installation
options chosen). The program can be exited at anytime by pressing the ‘Escape’ button on the
keyboard.
Please note that at start up there is no cursor present on the screen. This can be toggled on by
pressing the ‘Caps Lock’ button on the keypad. If a touch screen is connected then the cursor
should be off as the normal selection of on-screen functionality is achieved by the user touching
the screen.
In the text and figures that follow the configuration of the display and the branding is the default
presentation that is part of the installation. If the display of Touch247 has been configured
differently (text, logo, categories) and specific customer branding applied then the screen may
look very different from the figures below.
The Touch247 Screen
The main screen displays up to three buttons (‘Sales’, ‘Lettings’ and ‘Search’) and six individual
property views, each showing an image and summary of a property (see Figure 23).
Touching the ‘Sales’ button takes the user from any screen they may be using back to this main
screen of the 6 featured properties for Sales, shown in Figure 23.
Touching the ‘Lettings’ button takes the user from any screen they may be using back to this
main screen of the 6 featured properties for Lettings, shown in Figure 24.
Touching either the picture of a particular property or its summary text will display the full details
of the property (Figure 28)
Figure 23 The Touch247 Sales Screen
© 2008 VISIONPOINT™ TOUCH SCREENS LIMITED
Touch247
Page 22 of 25
Figure 24 The Touch247 Lettings Screen
Touching the ‘Search’ button displays the first in a short sequence of screens that enable the
user to search for properties based on the criteria selected. The type of properties displayed by
the search will depend on the type of properties featured when the search was started. If the
Lettings properties were featured, as in Figure 24 above, then the search operation will search
properties to let. If Sales properties were featured then the search will look for properties for
sale that match the chosen criteria.
The first search screen displayed enables selection of a preferred price range (Figure 25).
Once selected, a further screen is displayed that enables selection of the type of property
required (Figure 26). At any stage the user can navigate back to amend choices by touching
the ‘Back’ button, or cancel the search by touching the ‘Sales’ or ‘Lettings’ button.
Figure 25 The Search Screen (Price)
© 2008 VISIONPOINT™ TOUCH SCREENS LIMITED
Touch247
Page 23 of 25
Figure 26 The Search Screen (Property)
The set of screens below show the results of a search, which are displayed six properties at a time,
with the option to move forward (‘Next’) or move back (‘Previous’).
Figure 27 The Search Results Screen
To gain more information on a property the user can touch the property’s picture or the details.
This will display a screen that gives in depth features of the property and the option to view
further images (Figure 28).
© 2008 VISIONPOINT™ TOUCH SCREENS LIMITED
Touch247
Page 24 of 25
Figure 28 The Property Details Screen
The description column on this screen can be scrolled up or down by touching the relevant
arrow. If more than one picture is available for the properties then the buttons below the picture
area become active. Selecting one of these will show the appropriate picture and any
associated text.
At any stage the user can navigate back to the results of the search by touching the ‘Back to
search results’ button.
Selection of the ‘Contact us’ button displays a screen that allows the user to leave their contact
details regarding the property that they have selected (Figure 29).
Figure 29 The Contact Us Screen
Information is entered by touching the keys of the interactive keypad to complete the ‘Name’,
‘Phone’ and ‘Email’ fields. Note all fields except ‘Email’ is mandatory (Figure 30).
© 2008 VISIONPOINT™ TOUCH SCREENS LIMITED
Touch247
Page 25 of 25
Figure 30 Entering Contact Details
When the user has finished entering their contact details, touching the ‘Submit’ button will
complete the process. This is indicated by a popup dialog (see figure 31). Touching ‘Continue’
will take the user back to the property details screen.
Figure 31 The Confirmation Popup Dialog
© 2008 VISIONPOINT™ TOUCH SCREENS LIMITED