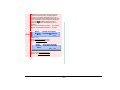
1
NWA-039786-001
ISSUE 4.0
DT750
USER’S GUIDE
NEC Corporation
2010 August
LIABILITY DISCLAIMER
NEC Corporation reserves the right to change the specifications, functions,
or features, at any time, without notice.
NEC Corporation has prepared this document for use by its employees and
customers. The information contained herein is the property of NEC Corporation and shall not be reproduced without prior written approval from
NEC Corporation. All brand names and product names on this document
are trademarks or registered trademarks of their respective companies.
Copyright 2008-2010
NEC Corporation
TABLE OF CONTENTS
1.INTRODUCTION
FACE LAYOUT.....................................................................................
TECHNICAL SPECIFICATIONS ..........................................................
KEYS AND PARTS...............................................................................
PHONE START UP AND MENU SCREEN
(Firmware version 4.0.0.0 and later).....................................................
PHONE START UP AND MENU SCREEN
(Firmware version before 4.0.0.0).........................................................
SHORTCUT MENU ..............................................................................
DESI-LESS SCREEN ...........................................................................
SOFT KEYS..........................................................................................
MULTI-WINDOW (Firmware version 4.0.0.0 and later) ........................
POP-UP WINDOWS (Firmware version 4.0.0.0 and later)...................
POP-UP WINDOWS (Firmware version 3.0.0.0)..................................
1
2
3
6
10
15
16
20
24
29
32
2.TERMINAL SETUP
SETUP WITH UP/DOWN KEY .............................................................
SETUP WITH FEATURE KEY..............................................................
SETUP WITH MENU KEY....................................................................
33
34
35
3.BASIC OPERATION
TO LOGIN.............................................................................................
TO LOGOUT.........................................................................................
TO MAKE AN EXTERNAL CALL..........................................................
TO MAKE AN INTERNAL CALL...........................................................
TO ANSWER AN EXTERNAL CALL ....................................................
TO ANSWER AN INTERNAL CALL .....................................................
MULTILINE APPEARANCE .................................................................
i
100
100
101
102
104
105
106
TO HOLD A CALL ................................................................................
TO PLACE A CALL ON EXCLUSIVE HOLD ........................................
TO TRANSFER A CALL .......................................................................
TO ORIGINATE A CALL USING SELECTIVE DIALING
(DYNAMIC DIAL PAD, PRESET DIAL) ................................................
ONE-TOUCH SPEED CALLING KEYS................................................
SPEED CALLING - STATION/GROUP ................................................
SPEED CALLING - SYSTEM ...............................................................
LAST NUMBER REDIAL ......................................................................
VOICE CALL.........................................................................................
THREE-PARTY CONFERENCE ..........................................................
VOICE MAIL SYSTEM .........................................................................
DO NOT DISTURB ...............................................................................
HOW TO INPUT CHARACTERS .........................................................
SECURITY MODE................................................................................
EMERGENCY CALL.............................................................................
PHONEBOOK.......................................................................................
CALL HISTORY....................................................................................
107
108
109
110
111
117
118
118
119
119
120
120
121
135
137
138
149
4.DIRECTORY OPERATION
TO ADD NEW DATA ............................................................................
TO CHANGE GROUP NAME...............................................................
TO FIND A REGISTERED DATA .........................................................
TO MAKE A CALL FROM DIRECTORY ..............................................
TO ADD PREFIX TO NUMBER............................................................
TO EDIT DIRECTORY DATA...............................................................
TO DELETE ALL DATA........................................................................
TO DELETE SPECIFIC DATA..............................................................
5.CALL HISTORY OPERATION
ii
153
161
162
179
181
185
186
187
TO VIEW CALL HISTORY....................................................................
TO MAKE A CALL FROM CALL HISTORY..........................................
TO ADD CALL HISTORY DATA TO DIRECTORY ..............................
TO EDIT DIRECTORY DATA FROM CALL HISTORY ........................
TO DELETE ALL DATA........................................................................
TO DELETE SPECIFIC DATA..............................................................
190
191
193
196
200
201
6.MENU LIST
MENU LIST FOR DT750 ...................................................................... 204
7.WEB PROGRAMMING
TO LOGIN............................................................................................. 212
TO LOGOUT......................................................................................... 214
HOW TO OPERATE............................................................................. 216
iii
This page is for your notes.
1.
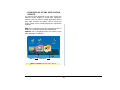
1.INTRODUCTION
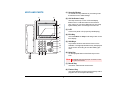
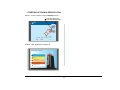
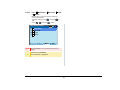
FACE LAYOUT
DT750
Exit
1
Help
2
3
ABC
DEF
4
5
6
GHI
JKL
MNO
7
8
9
PQRS
TUV
WXYZ
0
#
Transfer
Speaker
1
Feature
Mic
Menu
Redial
HOLD
Recall
Answer
250 [mm]
227 [mm]
1.
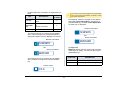
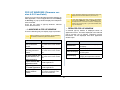
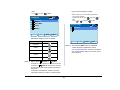
TECHNICAL SPECIFICATIONS
ITEM
Display (LCD)
DT750
5.7 inch Color TFT, QVGA, Touch Panel, with Backlight
Programmable Key
32 (8 X 4) Keys (displayed on LCD)
Fixed Feature Key
9 keys (with Menu button and Cursor key)
Backlight
Display and Digit Key (lit for 10 seconds when operating)
Soft Key
4 Keys
Directory
500 records
Call History
Outgoing Call: 50 record, Incoming Call: 50 records
Available
XML Browser
Hands-free
Standard equipment (Full-duplex), Wide-band
Available
Headset
LAN Interface
2-port, 10BASE-T/100BASE-TX, Full-duplex/Half-duplex,
Auto Negotiation /Fixed
Voice CODEC
G.711(µ-law, A-law), G.729a, G.722
IP Address Setting
Sets via DHCP server/Sets Directly
QoS
ToS (IP Precedence, Diffserv)
Tag VLAN (IEEE802.1Q/p)
VLAN
Security
Power Supply
Power Consumption
Download
Adapter (Optional)
IEEE802.1x authentication (EAP-MD5, EAPOL Forwarding),
SIP&RTP Encryption
Central Power Supply = IEEE802.3af,
Local Power Supply = AC adapter (AC-2R UNIT: optional)
Approximately 5.3 W (without optional connection)
Program/Configuration data/Ringing Tone/Music on Hold
/Directory data/Wallpaper
Recording Unit/Wall-mounting kit/Digit-key Set Unit/Side panel
Black
Color
Dimension (WDH)
227(W) 250(D) 112(H) [mm]
1.6 kg
Weight
2
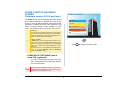
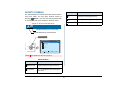
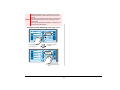
1.
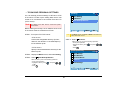
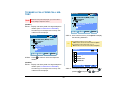
(1) Security Button
KEYS AND PARTS
To activate security features for preventing unauthorized access or data leakage.
(1)
(2)
(2) Call Indicator Lamp
The lamp at the top corner of DT750 Display
flashes when a call terminates to the terminal.
Also, when you use Voice Mail service, the Lamp
lights steadily when a message has been left.
(3)
(4)
(3) LCD
Color touch panel LCD (Liquid Crystal Display).
(5)
(4) Exit Key
Exit
To exit the Menu or Help mode and go back to the
time display.
Help
(6)
(7)
1
2
3
ABC
DEF
(8)
Recall
4
5
6
GHI
JKL
MNO
7
8
9
PQRS
TUV
WXYZ
0
#
(5) Soft Keys
Feature
Any feature shown at the bottom of the LCD is
available. The appropriate feature key is displayed
on the screen according to the call handling process.
(9)
Answer
Mic
Menu
(10)
(11)
Redial
HOLD
Transfer
Speaker
(12)
(6) Help Key
To call up explanations of the Soft Keys on the
LCD.
(15) (14) (13)
Note
Not all Help contents are displayed. For details, contact
the system administrator.
(7) Recall Key
To finish a call and hear the dial tone.
(8) Feature Key
To activate features such as terminal setup, and to
program One-Touch Speed Dial Keys.
3
1.
Redial and scroll back through numbers that have
been dialed. When the desired number is displayed, press
or # to activate dialing.
(9) Answer Key
When LED on this key is lit, press this key to
answer a waiting call.
(10) Mic Lamp
To respond hands-free. LED lights during speakerphone operation.
Note
A-law Countries [Europe, Australia, Russia, Latin America, Middle near East, other Asian nations]: #
µ-law Countries [North America, Japan, Hong Kong,
Taiwan]:
(11) Menu Button
To access the local menu of DT750.
(c) Directory
Pressing this key opens Directory menu. For
details on Directory service, see DIRECTORY
OPERATION.
(12) Cursor Key
By using this key, you can access various features
with simple operation.
(d) Enter
DT750 has shortcut menu for frequently-used features. Use this key to display the shortcut menu
(see MULTI-WINDOW (Firmware version 4.0.0.0
and later)) and determine the selected item in the
menu.
Also, this key is used as cursor-movement key on
the local menu of the telephone.
Details on Cursor Key
(a) Volume (UP) key
(Four-way Scroll UP key)
(b) Redial key
(Four-way Scroll LEFT key)
(d) Enter Key
(c) Directory key
(Four-way Scroll RIGHT key)
(a) Volume (DOWN) key
(Four-way Scroll DOWN key)
Up
(a) Up/Down
( DOWN UP)
Used to adjust speaker/receiver volume, and
ringer volume.
• Speaker/Receiver Volume:
Press ( ) or ( ) key during conversation.
• Ringer Volume:
Press ( ) or ( ) key during ringing.
Down
Left
(b) Redial
(Last Number Call, Speed Calling-Station/Group)
Press this key to activate redial feature. Press
4
Move the highlighted area one line up
the screen.
Move the highlighted area one line
down the screen.
Go back to the previous screen.
Right
Go to the screen which corresponds to
the highlighted menu item.
Enter
Go to the screen which corresponds to
the highlighted menu item.
1.
(13) Speaker Key
To control the built-in speaker which can be used
for:
Hands-Free dialing/monitoring.
LED on key lights when the key is active.
* All standard IP versions include support for full
duplex hands-free mode. All TDM and IP enabled
versions are half duplex hands-free mode.
(14) Transfer Key
Allows the station user to transfer established calls
to another station, without attendant assistance.
(15) Hold Key
To place an internal or external call on hold.
5
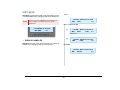
1.
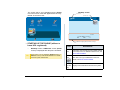
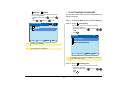
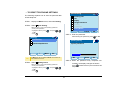
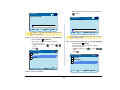
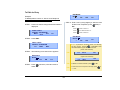
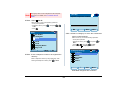
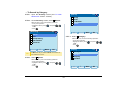
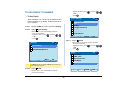
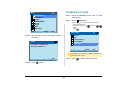
PHONE START UP AND MENU
SCREEN
(Firmware version 4.0.0.0 and later)
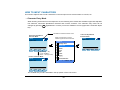
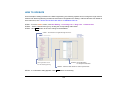
Ubiquitous Tourist
The Portal screen that is displayed right after starting
up the phone depends on whether you start up the
phone by using an XML application with its home URL
registered or without its home URL registered. This
section provides sample screen displays for both
cases, and explains how to start up the menu screen.
Hotel
Map
Restaurant
Transportation
HOME URL:
A home URL is the address information of the application that is to be accessed first after the phone is started.
Home URL registration is performed at installation. For
details, contact the system administrator.
TIP
Miscellaneous
PORTAL SCREEN:
A Portal screen is the home (entrance) screen of the
phone. When you use multiple XML applications, the
URL that is registered as the home URL is the Portal
screen: this is where other XML applications can be
accessed.
When a home URL is not registered, the default home
screen of the phone (Desktop screen or DESI-less
screen) is the Portal screen.
•
• STARTING UP THE PHONE (with a
home URL registered)
•
Note
The phone automatically accesses the home
URL, and displays the received XML application as Portal screen.
The following XML application screen is a sample. The
actual screen that is displayed on your phone may vary
depending on the application you use.
6
Click
Menu
to display the menu screen.
1.
The screen that is to be displayed as the Portal
icon is the screen of the XML application that is registered as the home URL.
Desktop screen
Status icon
Service icon
8/
History
Directory
RTP
Setting
Ubiquitous Tourist
Hotel
Map
Restaurant
Transportation
Miscellaneous
31313
7:25 AM MON 12 JUL 2010
MIC DND >>>
Portal
LCD 4-line display (Bottom line: Soft key)
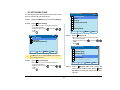
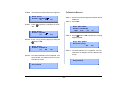
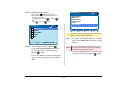
• STARTING UP THE PHONE (without a
home URL registered)
•
TIP
SERVICE
ICON
Desktop screen or DESI-less screen (Portal
screen) is displayed after the phone is started.
Status
Icon
Which screen is to be displayed (Desktop screen or
DESI-less screen) is selected at installation. For details,
contact the system administrator.
Service
Icon
DESCRIPTION
The LCD of DT750 displays icons which provide
notification when events (such as missed call and
voice mail) occur. For details of status icons, see
DESI-LESS SCREEN.
Click this icon to go to DESI-less screen.For
details, see DESI-LESS SCREEN.
LCD 4line dis- Displays LCD information sent from the system.
play
7
1.
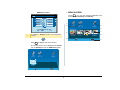
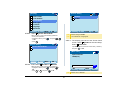
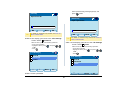
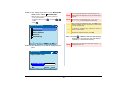
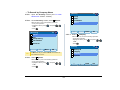
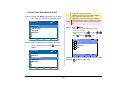
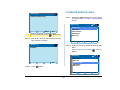
• MENU SCREEN
DESI-less screen
From Menu , you can use various application features such as Directory and History.
VM
LINE 06
LINE 03
3
LINE 07
LINE 04
4
LINE 08
(1)
(2)
7:25 AM MON 12 JUL 2010
MIC
DND
>>>
Ubiquitous Tourist
Hotel
City Map
(Bookings/Reservation)
2010
Ubiquitous City
Area:
First Night: 2010/07/12
Hotel
6
Nights
3
1
2
3
8
9
10 11 12
4
5
within $100/night
Infants:
For details on DESI-less screen, see DESI-LESS
SCREEN.
Click
Menu
Within 5 minutes
to display the menu screen.
Directory
Setting
90
5:17
MIC
within 5 minutes
within $100
East Park
Nearest Station:
Tokyo St.
French Restaurant
x Small Children
Search
Cancel
Detail
Selection on Map
Related Sites:
City Music Hall
National Theater
National Library
Map
Photo.
(7)
Italian Restaurant
More Info.
x Reservation
Sea of XXX
Resv.
Miyabi
Price:
National Library
New!
Within $100
Ubiquitous St.
Seek
Japanese Restaurant
Distance:
Italian Restaurant: Genova, 5 minutes from Tokyo Station.
PM 5:00 - PM 11:00,
Search
2-3-1 Ubiquitous City
1-1-1 Ubiquitous City
3-3-2 Ubiquitous City
AM 10:00 - PM 5:00
AM 10:00 - PM 5:00
Today is closed.
Other Candidates:
(6)
The screen that is to be displayed as Portal
icon is Desktop screen or DESI-less screen.
History
West Park
x Small Children
Other Information:
Hotel Search
Portal
(8)
•
Categories:
Italian Restaurant
City Hall
Japanese Restaurant
Admission Fee:
Lake
TIP
rary
Lib
Main St.
Distance:
Miscellaneous
Chinese Restaurant
Transportation:
by walking
Italian Restaurant
Piano Recital
National Theater
Art & Music
Selection on Calendar
Restaurant
Transportation
(4)
North Park
City Music Hall
by walking
0
Breakfast
(5)
Restaurants & Reservation
Ubiquitous City
Ubiquitous City
Transportation:
27 28 29 30
2
Categories:
Price:
(3)
Area:
Area:
20 21 22 23 24 25 26
Children:
3
River North
June
7
13 14 15 16 17 18 19
Nationality:
Adults:
Map
Setting
Directory
History
East Park
2
Novel
LINE 02
History I
LINE 05
History II
1
The Book
LINE 01
31313
PM MON 12 JUL 2010
DND >>>
Portal
8
Hotel
Map
Restaurant
(9)
1.
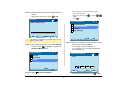
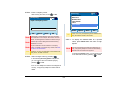
(2) Directory
(3) Setting
To view Call History; the history
data stored in the server (system)
memory (see CALL HISTORY) and
those stored in the memory of the
telephone, such as the histories of
missed calls, dialed numbers, and
received calls (see CALL HISTORY
OPERATION).
XML Services
One-Touch Keys
(1) History
MENU/ICON
DESCRIPTION
To use Directory features; there
are three types of directory features.
• Personal Directory: Controlled
by telephone set. For details, see
DIRECTORY OPERATION.
• Phonebook: Controlled by the
system. For details, see .PHONEBOOK.
• Corporate Directory: Controlled by the external XML server.
For details, contact the system
administrator.
(4) Portal
(5) XML
application 1
(6) XML
application 2
(7) XML
application 3
DESCRIPTION
A portal screen is the “home”
(entrance) screen of the phone.
When you use multiple XML
applications, the URL that is
registered as the home URL is the
Portal screen; this is where other
XML applications can be accessed.
When a home URL is not
registered, the default home screen
of the phone (Desktop screen or
DESI-less screen) is the Portal
screen.
You can launch up to four XML
applications including the Portal
window at a time. The icons of the
running applications are displayed
on the Menu screen from the left.
For details, see MULTI-WINDOW
(Firmware version 4.0.0.0 and
later).
When you click Phone icon, a pop-
(8) Phone icon up screen is displayed on an XML
Soft Keys
MENU/ICON
To make the user settings of DT750
such as incoming call and display,
and download various files such as
ringtones, Music on Hold, and
directories. For details, see
TERMINAL SETUP.
9
application screen. (For details, see
POP-UP WINDOWS (Firmware
version 4.0.0.0 and later).
Note: If pop-up window display is
disabled at installation, this icon is
not displayed.
(9) Back icon
When you click Back icon, you can
go back to the previous screen.
1.
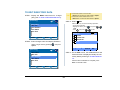
PHONE START UP AND MENU
SCREEN
(Firmware version before 4.0.0.0)
SERVICE
ICON
Service
Icon
• STARTING UP THE PHONE
•
TIP
The default home screen (Desktop screen or
DESI-less screen) is displayed after the
phone is started.
Click this icon to go to DESI-less screen. For
details, see DESI-LESS SCREEN.
Service
Icon
Click this icon to start an XML application.
Which screen is to be displayed (Desktop screen or
DESI-less screen) is selected at installation. For details,
contact the system administrator.
(This icon is displayed only when Home URL is set
at installation.)
Desktop screen
LCD 4line dis- Displays LCD information sent from the system.
play
Status icon
Service icons
8/
The LCD of DT750 displays icons which provide
notification when events (such as missed call and
voice mail) occur. For details of status icons, see
DESI-LESS SCREEN.
Status
Icon
This section provides sample screen displays, and
explains how to start up the menu screen.
DESCRIPTION
DESI-less screen
RTP
VM
LINE 01
1
LINE 05
LINE 02
2
LINE 06
LINE 03
3
LINE 07
LINE 04
4
LINE 08
7:25 AM MON 12 JUL 2010
MIC
DND
>>>
31313
7:25 AM MON 12 JUL 2010
MIC
DND >>>
TIP
LCD 4-line display (Bottom line: Soft key)
10
For details on DESI-less screen, see DESI-LESS
SCREEN.
1.
Displays the currently effective direction of the cursor.
•
Click
Menu
to display the menu screen.
[Menu]
[Menu]
History
Setting
Directory
Presence
Tool
Call Func.
Favorite
Config
Back
OK
TIP
History
Directory
Tool
Call Func.
Setting
Presence
Favorite
Config
Back
OK
Press Back to go back to the previous page.
Press Exit to go back to the home screen.
• MENU SCREEN
MENU ITEM
Press Menu to display the menu screen. Use this
screen to switch applications.
To select a menu item, select one of the following
operations.
History
• Touch panel operation.
• Highlight an item by using
, and press
.
• Select an item by using the arrow keys (soft key), and
press OK.
• Press the appropriate dial key.
11
DESCRIPTION
To view Call History. There are two
types of Call History features. The history
data stored in the server (system)
memory (see CALL HISTORY), and the
one stored in the memory of the
telephone (see CALL HISTORY
OPERATION).
1.
MENU ITEM
Directory
Tool
The following explains how to start the XML application
from DT750. For more information, refer to manuals
relating to XML applications.
DESCRIPTION
To use Directory features.There are the
following three types of directory
features.
• Personal Directory: Controlled by
telephone set. For details, see DIRECTORY OPERATION.
• Phonebook: Controlled by the system. For details, see .PHONEBOOK.
• Corporate Directory: Controlled by
the external XML server.
For details, contact the system
administrator.
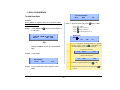
To Start Up From Menu Button
STEP 1: Select Tool on the menu screen.
Select an item by one of the following operations.
• Touch panel operation.
• Highlight an item by using
, and press
or
OK.
• Press 3 .
• Uses when accessing external XML
application.
• Uses when sending/receiving Instant
Message (Not used).
Call Func.
Currently Not Used (grayed out).
Setting
To make the setting of DT750 (such as
ringing volume control, LCD display
setting and download of Music on Hold).
For details, see TERMINAL SETUP.
Presence
Currently Not Used (grayed out).
Favorite
Currently Not Used (grayed out).
Config
This item is used for configuration setting
of DT750.
For details, contact the system
administrator.
[Menu]
History
Directory
Tool
Call Func.
Setting
Presence
Favorite
Config
Back
OK
STEP 2: Select 1 Service.
Select an item by one of the following operations.
• Touch panel operation.
• Highlight an item by using
, and press
,
or OK.
• Press 1 .
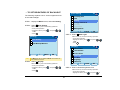
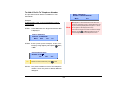
• STARTING UP XML APPLICATION
DT750 has an XML browser function. You can display
the information of XML application installed in an
external server onto the LCD of DT750 and use various
services in collaboration with the XML application.
12
,
1.
[Tool]
1/1
1 Service
2 IM
Back
OK
STEP 3: XML application will start up.
Ubiquitous Tourist
Hotel
Map
Restaurant
Transportation
Miscellaneous
13
1.
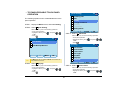
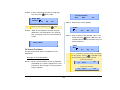
• STARTING UP FROM A SERVICE ICON
STEP 1: Press a service icon on Desktop screen.
Press this service icon
to start up XML application
90
7:25 AM MON 12 JUL
MIC
DND 31313
2010
>>>
STEP 2: XML application will start up.
Ubiquitous Tourist
Hotel
Map
Restaurant
Transportation
Miscellaneous
14
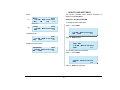
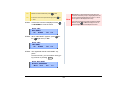
1.
SHORTCUT MENU
FEATURE
The LCD displays icons when there are missed calls or
new voice mails. You can open shortcut menu by
pressing
(Enter). You can also check missed calls
or access the new voice mails from shortcut menu.
Top line of LCD (icon information area)
8/
Indicates that there are new voice mails.
Indicates that there are new missed calls.
Press Enter Key
GHI
[Shortcut Menu]
Answer
9
XYZ
1/1
Mic
Menu
#
Redial
1
2
3
4
5
Missed Calls: 2
Voice Mail
Receive IM
Presence
Bluetooth
eaker
Back
Note
OK
Unavailable Menu items are grayed out.
Shortcut Menu
FEATURE
DESCRIPTION
1 Missed Calls
Access history of Missed Calls. The icon
disappears after checking the history.
2 Voice Mail
Access history of incoming Voice Mail.
The icon disappears after checking the
voice mails.
15
DESCRIPTION
3 IM
Currently Not Used (grayed out).
4 Presence
Currently Not Used (grayed out).
5 Bluetooth
Currently Not Used (grayed out).
1.
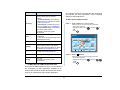
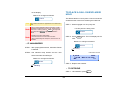
DESI-LESS SCREEN
FEATURE
DESI-less screen consists of the status icons,
programmable key information, and LCD 4-line display.
This icon appears when there is a
missed call. Once you check the
missed call, this icon will disappear.
Voice Mail
This icon provides notification of
incoming Voice Mail. Once you
check the mail, this icon will
disappear.
Cursor
This icon indicates the currently
available direction of the cursor.
This icon is displayed in the menu
screen.
Encryption
This icon appears when the
conversation is encrypted.
*Supported by the telephones with
the firmware version 2.2.0.0 and
later.
Status icon
LINE 01
1
LINE 05
LINE 02
2
LINE 06
LINE 03
3
LINE 07
LINE 04
4
LINE 08
DESCRIPTION
Missed Call
DESI-less screen
VM
8/
ICON
31313
7:25 AM MON 12 JUL
2010
MIC DND >>>
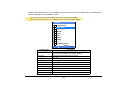
• PROGRAMMABLE KEYS
The programmable keys are used for registering my
line, other station lines, or various features.
LCD 4-line display
Switch to Desktop screen
Programmable key information
You can also set One-Touch Speed Dial on the
programmable keys to assign a telephone number or
station number to a key so that you can make a call to
that number with one-touch operation.
• STATUS ICONS
The LCD displays icons in the icon information area
(both on Desktop screen and DESI-less screen) when
there are missed calls or new voice mails. You can
check the status at a glance, and access the services
quickly.
The following icons are displayed:
16
1.
(a) Status Icon
USER STATUS
(b) Programmable Key Information
VM
1
LINE 05
LINE 02
2
LINE 06
LINE 03
3
LINE 07
LINE 04
4
LINE 08
• Call Hold
(Other Party Hold/Other Party Hold on
Call Park Group)
• Recall (Individual Hold/Exclusive
Call Hold/Call Transfer/Individual
Hold on Call Park Group)
• During Conversation (Individual
Use)
• Call Transfer
• Conference
(a) Status Icon
Status information on line keys such as call termination or Call Hold can be indicated as follows:
• Idle
Blink
• Receiving an Incoming Call
7:25 AM MON 12 JUL 2010
MIC
DND
>>>
USER STATUS
FLASHING
PATTERN
• Call Hold
(Individual Hold/Individual Hold on
Call Park Group)
(c) Page
LINE 01
ICON
ICON
FLASHING
PATTERN
No Icon
-
• During Conversation (Other Party
Use)
• Active Feature (Under a setting of
feature key such as “Call Forwarding”)
Steady Lit
(b) Programmable Key Information
You can register line keys (telephone numbers),
One-Touch Speed Dial keys, and various feature
keys (services) on programmable keys.
TIP
17
Registering features to programmable keys and setting
what to display are performed at installation. For details,
contact the system administrator.
1.
Programmable Key Information is displayed as follows:
KEY
DESCRIPTION
TIP
NUMBER
OF DIGITS
Line Key
- Name and Number information
8
One-Touch
Speed Dial
Key
- Speed Dial Name Information
- Number Information
8
Feature Key
- Feature Name
6
The names of the features registered to programmable
keys can be changed at installation. For details, contact
the system administrator.
The following shows an example of LCD display
when One -Touch Speed Dial is assigned to a
programmable key. For One -Touch Speed Dial,
no status icon is displayed.
Number information
12345678
The following shows an example of LCD display
when a line is assigned to a programmable key.
Appropriate status icons are displayed on the left.
OR
Name information
Number information
KENTARO
12345678
OR
(c) Page Icon
DESI-less display has four pages (eight programmable keys per page). You can use up to 32 programmable keys.
Name information
KENTARO
STATUS OF
PAGE ICON
The following shows an example of LCD display
when a feature is assigned to a programmable
key.
Feature name
CF-A
18
DESCRIPTION
Steady Lit
Indicates currently displayed page.
Blink
Indicates page with event happening.
1.
Note
Register line keys on page 1, otherwise, you have to
change pages with a scroll button to answer an incoming call.
Call indicator lamp flashes even when an incoming call
terminates to the line key that is not displayed on the
current page.
Line keys are registered at installation. For details, contact the system administrator.
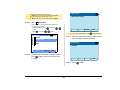
Example of Page Switching From Page 1 to 3
1
LINE 05
LINE 02
2
FLASHING
LINE 06
LINE 03
3
LINE 07
LINE 04
4
LINE 08
LINE 01
Switch from Page 1
to Page 3
Touch flashing button
to go to Page 3.
LINE 17
1
LINE 18
2
LINE 21
INCOMING
CALL
LINE 22
LINE 19
3
LINE 23
LINE 20
4
LINE 24
Touch this Line Key
to asnswer Incoming
Call.
19
1.
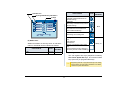
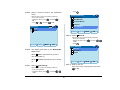
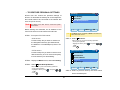
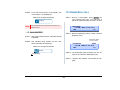
SOFT KEYS
Soft Keys on DT750 provide a set of functions on the
LCD that adapts to the changing state of the telephone.
Note
IDLE
7:25 AM MON 12 JUL 2010
MIC
DND
>>>
Patterns and names of Soft Keys to be displayed are
set at installation. For details, contact the system
administrator.
DIAL TONE/DIALING
7:25 AM MON 12 JUL 2010
MIC DND
>>>
Exit
(1)
7:25 AM MON 12 JUL 2010
FDA
MIC
PICK
>>>
Push >>>
(2)
7:25 AM MON 12 JUL 2010
FDN
FDB
>>>
Help
• DISPLAY SAMPLES
Soft Keys provide a set of functions on the LCD that
adapts to the changing state of the telephone.
RINGING
7:25 AM MON 12 JUL 2010
MIC
VOICE
>>>
20
1.
• HOW TO USE SOFT KEYS
This section provides some sample operations of
features using Soft Keys.
BUSY
(1)
(2)
BUSY
2000
7:25 AM MON 12 JUL 2010
CW
>>>
CB
MIC
Push >>>
BUSY
7:25 AM
S&R
Example 1: DO NOT DISTURB
● Setting DO NOT DISTURB
STEP 1: Press DND.
2000
MON 12 JUL 2010
>>>
7:25 AM MON 12 JUL 2010
MIC
DND
>>>
CONNECTION
2000
7:25 AM MON 12 JUL 2010
MIC
DND
>>>
STEP 2: DND flashes.
CONSULTATION HOLD
DND SET
7:25 AM MON 12 JUL 2010
DND
>>>
TRANSFER
2000
7:25 AM MON 12 JUL 2010
MIC
CONF
>>>
● Cancelling DO NOT DISTURB
STEP 1: Press DND.
7:25 AM
DND
MON 12 JUL 2010
>>>
STEP 2: DND stops flashing.
21
1.
STEP 4: Dial the station number to be transferred to,
DND CANCEL
7:25 AM MON 12 JUL 2010
MIC
DND
>>>
and you will hear a service set tone (SST).
TRANSFER
7:25 AM MON 12 JUL 2010
MIC
>>>
Example 2: CALL FORWARDING (BUSY LINE)
● Setting CALL FORWARDING (BUSY LINE)
STEP 1: Press SPEAKER, and the speaker lamp
turns on red.
You will hear a dial tone.
STEP 5: Press SPEAKER, and the speaker lamp
turns off.
TRANSFER SET
7:25 AM MON 12 JUL 2010
MIC
>>>
7:25 AM MON 12 JUL 2010
MIC
DND
>>>
STEP 6: FDB starts flashing.
STEP 2: Press >>>, and the following four soft keys
appear.
7:25 AM
FDB
7:25 AM MON 12 JUL 2010
MIC PICK
>>>
FDA
MON 12 JUL 2010
● Canceling CALL FORWARDING (BUSY LINE)
STEP 1: Press SPEAKER, and the speaker lamp
turns on red.
FDB starts flashing.
You will hear a dial tone.
STEP 3: Press FDB, and you will hear a special dial
tone.
7:25 AM MON 12 JUL 2010
>>>
FDN
FDB
22
1.
7:25 AM
FDB
MON 12 JUL 2010
STEP 2: Press FDB, and you will hear a service set
tone (SST).
7:25 AM
FDB
MON 12 JUL 2010
>>>
STEP 3: Press SPEAKER, and the speaker lamp
turns off.
TRANSFER CANCEL
7:25 AM MON 12 JUL 2010
MIC
>>>
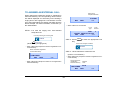
23
1.
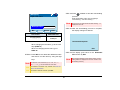
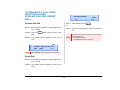
MULTI-WINDOW (Firmware version
4.0.0.0 and later)
TIP
DT750 can display multiple windows at a time.
As it is possible to launch multiple applications
simultaneously, you can switch the displays quickly. If
you receive an incoming call while displaying an
application screen, you can operate line keys without
exiting other applications first.
You can go back to the previous application screen
after operating the line keys.
You can exit an XML application by pressing Exit while
the LCD displays the XML application window. When
you exit an XML application, the icons of other applications that are currently running are rearranged from left.
● Normally, only the Portal icon is displayed on the
Desktop screen right after the phone is set up.
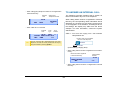
• SWITCHING XML APPLICATIONS
History
The windows of the XML applications that are currently
running are displayed as icons on the menu screen.
You can use this screen to switch windows to display.
Select a service icon of the application that are
currently running from the menu screen to display the
XML application window.
Directory
Setting
Ubiquitous Tourist
Hotel
Map
Restaurant
Transportation
Miscellaneous
Portal
When a home URL is registered:
Hotel
City Map
(Bookings/Reservation)
2010
Ubiquitous City
Area:
Hotel
First Night: 2010/07/12
Map
Adults:
6
Nights
3
1
2
3
8
9
10 11 12
4
5
Infants:
Breakfast
within $100/night
Italian Restaurant
Piano Recital
National Theater
Art & Music
Selection on Calendar
Categories:
Main St.
Italian Restaurant
City Hall
West Park
Japanese Restaurant
Within 5 minutes
Admission Fee:
within 5 minutes
Novel
History I
History II
East Park
within $100
East Park
Nearest Station:
Tokyo St.
French Restaurant
x Small Children
Search
Cancel
Detail
Selection on Map
Portal ル
Related Sites:
City Music Hall
National Theater
National Library
Hotel
Map
Photo.
Italian Restaurant
More Info.
x Reservation
Sea of XXX
Resv.
Miyabi
Price:
National Library
New!
Within $100
x Small Children
Ubiquitous St.
Seek
Hotel Search
Japanese Restaurant
Distance:
Distance:
Lake
Other Information:
Miscellaneous
Chinese Restaurant
Transportation:
by walking
ary
Libr
Categories:
Price:
North Park
City Music Hall
by walking
0
Restaurant
Transportation
Ubiquitous City
Ubiquitous City
Transportation:
27 28 29 30
2
● When you launch an XML application, the icon of the
application appears to the right of the Portal icon on
the Desktop screen.
Restaurants & Reservation
Area:
Area:
20 21 22 23 24 25 26
Children:
3
River North
June
7
13 14 15 16 17 18 19
Nationality:
The Book
Ubiquitous Tourist
Setting
Directory
History
Italian Restaurant: Genova, 5 minutes from Tokyo Station.
PM 5:00 - PM 11:00,
Search
2-3-1 Ubiquitous City
1-1-1 Ubiquitous City
3-3-2 Ubiquitous City
AM 10:00 - PM 5:00
AM 10:00 - PM 5:00
Today is closed.
Map
Other Candidates:
Restaurant
Select a service icon of the XML
application to display.
24
1.
If you launch the same XML application more than once,
only one icon of the application is displayed on the menu
screen.
TIP
Ubiquitous Tourist
Hotel
• SWITCHING LOCAL APPLICATIONS
Local applications such as History, Directory, and
Setting are displayed in one window.
(Bookings/Reservation)
2010
Ubiquitous City
Area:
First Night: 2010/07/12
Hotel
Setting
Directory
History
6
Nights
3
June
7
1
2
8
9
3
4
5
10 11 12
13 14 15 16 17 18 19
Nationality:
Adults:
Map
Price:
20 21 22 23 24 25 26
Children:
3
27 28 29 30
Infants:
2
0
Breakfast
within $100/night
Selection on Calendar
Restaurant
Lake
Transportation
Other Information:
Ubiquitous St.
Miscellaneous
Sea of XXX
Seek
Resv.
Cancel
Detail
Selection on Map
Hotel Search
Portal
Hotel
Displays the icon of the newly running
XML application
Directory
History
90
[History]
1
2
3
4
● You can launch up to four XML applications including
the Portal window. The service icons of the running
applications are displayed in order from the left.
5:17
MIC
31313
PM MON 12 JUL 2010
DND >>>
Portal
Setting
1/1
Missed
Outgoing
Incoming
Delete All
Menu
OK
History
Local application icon
Ubiquitous Tourist
Setting
Directory
History
Hotel
City Map
(Bookings/Reservation)
2010
Ubiquitous City
Area:
Hotel
First Night: 2010/07/12
Map
Adults:
6
Nights
3
1
2
3
8
9
10 11 12
4
5
Infants:
North Park
City Music Hall
rary
Lib
National Theater
Art & Music
Selection on Calendar
Categories:
Main St.
Italian Restaurant
City Hall
West Park
Japanese Restaurant
Within 5 minutes
Admission Fee:
Novel
History I
History II
East Park
Transportation
x Small Children
Other Information:
within 5 minutes
within $100
East Park
Nearest Station:
Tokyo St.
French Restaurant
Ubiquitous St.
x Small Children
Search
Miscellaneous
Resv.
Cancel
Detail
Related Sites:
City Music Hall
National Theater
National Library
Hotel Search
Portal
Selection on Map
Hotel
Map
Photo.
Italian Restaurant
More Info.
x Reservation
Sea of XXX
Seek
Miyabi
Price:
National Library
New!
Within $100
The Book
Lake
Japanese Restaurant
Distance:
Distance:
Restaurant
Chinese Restaurant
Transportation:
by walking
Italian Restaurant
Piano Recital
by walking
0
Breakfast
within $100/night
Restaurants & Reservation
Ubiquitous City
Ubiquitous City
Transportation:
27 28 29 30
2
Categories:
Price:
Area:
Area:
20 21 22 23 24 25 26
Children:
3
River North
June
7
13 14 15 16 17 18 19
Nationality:
● Normally, only the Portal icon is displayed on the
Desktop screen right after the phone is set up.
Italian Restaurant: Genova, 5 minutes from Tokyo Station.
PM 5:00 - PM 11:00,
Search
2-3-1 Ubiquitous City
1-1-1 Ubiquitous City
3-3-2 Ubiquitous City
AM 10:00 - PM 5:00
AM 10:00 - PM 5:00
Today is closed.
Map
Other Candidates:
Restaurant
Displays up to four XML application icons.
25
1.
History
Directory
● If you stop operating the local application without exiting the application and press Menu, History icon is
added to the right of the Portal icon. The display of
this icon is the last screen you displayed at the History screen. You can continue the operation of the
application where you ended by selecting this icon.
Setting
90
5:17
MIC
31313
PM MON 12 JUL 2010
DND >>>
Portal
History
Directory
[History]
90
Setting
1/1
1 Missed
2 Outgoing
3 Incoming
4 Delete All
When a home URL is not registered:
5:17
MIC
31313
PM MON 12 JUL 2010
DND >>>
Portal
Menu
OK
History
● Select a desired local application from One-Touch
icons to launch the application.
TIP
History
Directory
Setting
If you select a local application by using a One-Touch
key while launching other local application, new local
application is not running. The initial screen of the currently running application is displayed.
90
• LAUNCHING THE FIFTH APPLICATION
31313
5:17 PM MON 12 JUL 2010
MIC
DND >>>
You can launch up to four XML applications including
Portal at a time. If you try to launch the fifth application,
an error message to ask you to exit one of the currently
running applications is displayed. While this error
message is displayed, you cannot execute any
operations on XML applications.
Portal
26
1.
● If you try to launch the fifth application, an error message to ask you to exit one of the currently running
applications is displayed.
You need to close 1 APP...
Can you choose it among 3 APPs?
Press Next.
Air Ticket Reservation
Hotel
City Map
(Bookings/Reservation)
2010
Ubiquitous City
Area:
Ubiquitous Air
First Night: 2010/07/12
6
Nights
3
1
2
3
8
9
10 11 12
4
5
within $100/night
Area:
Area:
Ubiquitous City
Ubiquitous City
North Park
City Music Hall
Infants:
Italian Restaurant
Piano Recital
Transportation:
27 28 29 30
2
rary
Lib
by walking
0
Breakfast
National Theater
Art & Music
Selection on Calendar
Categories:
Main St.
Italian Restaurant
City Hall
West Park
Japanese Restaurant
Within 5 minutes
Ubiquitous Air
London
Date:
2010/7/20
Air Port:
Ubiquitous International Air Port
UB-001
Novel
East Park
Tokyo St.
x Small Children
Search
Cancel
Detail
Related Sites:
Selection on Map
London
Rome
Alexandria
Los Angeles
Tokyo
Beijing
Map
Photo.
Italian Restaurant
More Info.
x Reservation
Sea of XXX
Resv.
Miyabi
within $100
Nearest Station:
East Park
French Restaurant
Italian Restaurant: Genova, 5 minutes from Tokyo Station.
PM 5:00 - PM 11:00,
Search
City Music Hall
National Theater
National Library
Hotel Search
Flight No.
History II
x Small Children
World Weather
Seek
Destination:
History I
The Book
New!
Within $100
Air Line:
within 5 minutes
Price:
National Library
Admission Fee:
Ubiquitous St.
Japanese Restaurant
Distance:
Distance:
Lake
Other Information:
Chinese Restaurant
Transportation:
by walking
20 21 22 23 24 25 26
Children:
3
Categories:
Price:
Restaurants & Reservation
River North
June
7
13 14 15 16 17 18 19
Nationality:
Adults:
2-3-1 Ubiquitous City
1-1-1 Ubiquitous City
3-3-2 Ubiquitous City
AM 10:00 - PM 5:00
AM 10:00 - PM 5:00
Today is closed.
Other Candidates:
Restaurant
Map
Currently running XML application icons
excluding the Portal.
You have already set 4 APPs.
24:00
18:00
12:00
6:00
0:00
Search On Map
TIP
● The exited application icon disappears from the
menu screen. The newly running application icon is
added to the rightmost.
Next
If you do not operate anything for 10 seconds after an
error message is displayed, the trial of launching the
new application is automatically canceled.
Ubiquitous Tourist
Hotel
2010
Ubiquitous City
Hotel
First Night: 2010/07/12
Map
Adults:
6
Nights
3
June
7
1
2
3
8
9
10 11 12
4
5
Price:
20 21 22 23 24 25 26
Children:
3
within $100/night
27 28 29 30
2
Infants:
0
Breakfast
Ubiquitous Air
Area:
Ubiquitous Air
Air Line:
Ubiquitous City
13 14 15 16 17 18 19
Nationality:
Air Ticket Reservation
Restaurants & Reservation
(Bookings/Reservation)
Area:
Currently running XML application icons excluding the
Portal are displayed. Select an application to exit. Now
you can launch a new application.
Setting
Directory
History
● Application exit screen is displayed.
Chinese Restaurant
Destination:
Transportation:
by walking
Italian Restaurant
Japanese Restaurant
World Weather
London
Date:
Categories:
Selection on Calendar
London
Rome
Alexandria
Los Angeles
Tokyo
Beijing
2010/7/20
Air Port:
Ubiquitous International Air Port
Flight No.
UB-001
Distance:
Restaurant
within 5 minutes
Miyabi
Price:
Lake
Transportation
within $100
Nearest Station:
Other Information:
Tokyo St.
Ubiquitous St.
x Small Children
Miscellaneous
Sea of XXX
Seek
Resv.
Cancel
Detail
Portal
Selection on Map
Map
Photo.
Italian Restaurant
More Info.
x Reservation
Search
Italian Restaurant: Genova, 5 minutes from Tokyo Station.
PM 5:00 - PM 11:00,
Other Candidates:
Hotel Search
Hotel
Restaurant
Newly running application icon
27
24:00
18:00
12:00
6:00
0:00
Search On Map
Transportation
1.
• ICON DISPLAY AT XML APPLICATION
UPDATE
The service icons displayed on the menu screen are
reduced screen images of actual XML application
screens. The icon and the actual application display
may differ because the system cannot iconize the
screen image until it actually displays the application
windows.
NEW icon is displayed when the application orders to
display an icon that was formerly not displayed.
UPDATE icon is displayed when the window of the
XML application is updated.
NEW
Hotel
City Map
(Bookings/Reservation)
2010
Ubiquitous City
Area:
First Night: 2010/07/12
6
Nights
3
Adults:
1
2
3
8
9
10 11 12
4
5
Ubiquitous City
Main St.
City Hall
West Park
Distance:
Japanese Restaurant
Within 5 minutes
Admission Fee:
National Library
East Park
Novel
New!
Within $100
History I
Lake
x Small Children
Other Information:
East Park
French Restaurant
Ubiquitous St.
Search
Miscellaneous
Sea of XXX
Seek
Resv.
Cancel
Detail
Selection on Map
Related Sites:
City Music Hall
National Theater
National Library
Hotel Search
NEW icon
rary
Lib
National Theater
Art & Music
Selection on Calendar
Restaurant
Portal
Italian Restaurant
Piano Recital
by walking
0
Breakfast
within $100/night
North Park
City Music Hall
Transportation:
27 28 29 30
Infants:
2
Categories:
Price:
Transportation
TIP
Area:
20 21 22 23 24 25 26
Children:
3
River North
June
7
13 14 15 16 17 18 19
Nationality:
Map
History II
Hotel
UP!
The Book
Ubiquitous Tourist
Setting
Directory
History
Hotel
2-3-1 Ubiquitous City
1-1-1 Ubiquitous City
3-3-2 Ubiquitous City
AM 10:00 - PM 5:00
AM 10:00 - PM 5:00
Today is closed.
Map
UPDATE icon
NEW and UPDATE icons flash every 1 second.
28
1.
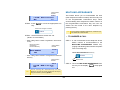
POP-UP WINDOWS (Firmware version 4.0.0.0 and later)
If there is an incoming call while the phone displays an
XML application, or a local application such as History
or Directory, a pop-up window displays the telephone
service window.
There are two sizes of pop-up windows: reduced
screen and full screen.
How to display a pop-up window is set at installation.
For details, contact the system administrator.
REMARKS
By pressing Phone
icon on the menu
screen.
Pop-up window is displayed in
the same size as it was closed
last.
When there is an
incoming call to the
phone.
Pop-up window is displayed in
the same size as it was closed
last.
ITEM
Pop-up window is displayed in
By going off-hook. (liftthe same size as it was closed
ing the handset, etc.)
last.
When receiving a
request from the XML
application server.
Conforms to the specifications
of XML applications.
By pressing POP-UP
Conforms to the specifications
on an XML application. of XML applications.
When the system
directs resource
release.
TIP
If one page before the menu screen is the default
home screen (DESI-less screen or Desktop screen),
the telephone icon of the menu screen is not displayed.
If there is an incoming call, or you lift the handset, line
keys are displayed.
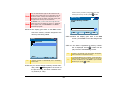
A reduced pop-up window is displayed below an
application screen. The items displayed in the reduced
pop-up window are as follows. Telephone service
information can be displayed with other application
window open.
There are following ways to display a pop-up window.
HOW TO DISPLAY
Pop-up window is displayed in reduced size when it is
displayed for the first time after the phone sets up.
• REDUCED POP-UP WINDOW
• LAUNCHING A POP-UP WINDOW
TIP
TIP
Pop-up window is displayed in
the full size regardless of the
size it was closed last.
29
DESCRIPTION
Expand button
Switches to the full-sized pop-up window display.
Close button
Closes the pop-up window.
LCD 4-line display
Displays the LCD information sent
from the system.
Volume display
Displays the volume levels when
changing the ring/receiver volumes.
1.
Volume display
Displays the volume levels when
changing the ring/receiver volumes.
Status icon
Displays status icons. For details,
see STATUS ICONS.
Application tab
Displays the title and the icon of the
XML/local application that is behind
the pop-up window. By touching this
tab, you can display the application
window.
City Map
River North
Area:
Ubiquitous City
North Park
City Music Hall
ry
Italian Restaurant
Piano Recital
Transportation:
ra
Lib
by walking
Categories:
National Theater
Art & Music
Main St.
City Hall
West Park
Distance:
Japanese Restaurant
Within 5 minutes
Admission Fee:
National Library
East Park
Novel
History II
History I
Within $100
The Book
New!
x Small Children
East Park
French Restaurant
Search
Related Sites:
31313
2-3-1 Ubiquitous
AM 10:00
- PM 5:00
4:26
PM CityMON
12
JUL 2010
1-1-1 Ubiquitous City AM 10:00 - PM 5:00
City TodayFDA is closed.
MIC3-3-2
Ubiquitous
PICK >>>
Application tab
City Music Hall
National Theater
National Library
Status icon
Expand button
90
+LVWRU\
Close button
TIP
Enable/disable of Expand/Close are set at installation.
For details, contact the system administrator.
/.
/.
/.
/.
/.
/.
/.
/.
• FULL-SIZED POP-UP WINDOW
The items displayed in the full-sized pop-up window
are as follows.
ITEM
31313
4:26 PM MON 12 JUL 2010
MIC PICK FDA >>>
Close button
DESCRIPTION
Reduce button
Switches to the reduced pop-up
window display.
Close button
Closes the pop-up window, and displays the previous XML or local
application screen.
LCD 4-line display
Displays the LCD information sent
from the system.
Reduce button
TIP
30
Enable/disable of Reduce/Close are set at installation.
For details, contact the system administrator.
When Close is disabled, touching the application tab
does not close the pop-up window.
1.
• EXITING A POP-UP WINDOW
A pop-up window closes when;
•
Menu
is pressed to display the menu screen.
• the phone goes on-hook.
• the ringing is abandoned.
• XML application server directs to.
• Pop-Up Close on the XML application is
pressed.
• Close or the application tab on the pop-up
window is pressed.
31
1.
POP-UP WINDOWS (Firmware version 3.0.0.0)
Volume display
If there is an incoming call while the phone displays an
XML application, a pop-up window displays the
telephone service window.
Displays the volume levels when
changing the ring/receiver volumes.
• LAUNCHING A POP-UP WINDOW
There are following ways to display a pop-up window.
• when there is an incoming call to the phone.
City Map
• the phone gpes off-hook. (lifting the handset,
River North
etc.)
Area:
Ubiquitous City
North Park
City Music Hall
Italian Restaurant
Piano Recital
Transportation:
ry
ra
Lib
by walking
Categories:
National Theater
Art & Music
Main St.
City Hall
• EXITING A POP-UP WINDOW
West Park
Distance:
Japanese Restaurant
Within 5 minutes
Admission Fee:
A pop-up window closes when;
National Library
East Park
Novel
History II
History I
The Book
New!
Within $100
x Small Children
East Park
• the phone goes on-hook.
French Restaurant
Search
Related Sites:
City Music Hall
National Theater
National Library
• the ringing is abandoned.
31313
AM 10:0012
- PM 5:00
4:26 PM MON
JUL 2010
AM 10:00 - PM 5:00
is closed.
MIC PICK Today FDA >>>
2-3-1 Ubiquitous City
1-1-1 Ubiquitous City
3-3-2 Ubiquitous City
• Close on the pop-up window is pressed.
Close button
LCD 4-line display
TIP
Close button can be hidden from view by setting at
installation. For details, contact the system administrator.
ITEM
DESCRIPTION
Close button
Closes the pop-up window.
LCD 4-line display
Displays the LCD information sent
from the system.
32
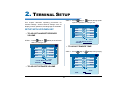
2. TERMINAL SETUP
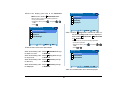
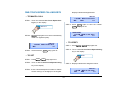
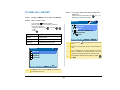
STEP 1: Press
(Up) or
(Down) during speakerphone operation or during a call.
This chapter describes operating procedures for
terminal settings. Various terminal settings such as
display, sounds, password, and language are available.
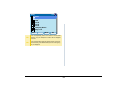
SETUP WITH UP/DOWN KEY
• TO ADJUST HANDSET RECEIVER
VOLUME
1
31314
31311
2
31315
31312
3
31316
31313
4
31317
1
31314
31311
2
31315
31312
3
31316
31313
4
31317
31310
5:17 PM MON 12 JUL 2010
SPEAKER
STEP 1: Press
(Up) or
(Down) in the off-hook
status or during a call.
31310
31310
• TO ADJUST RINGER TONE
STEP 1: Press
31310
5:17 PM MON 12 JUL 2010
HANDSET
(Up) or
(Down) during ringing.
31310
1
31314
31311
2
31315
31312
3
31316
31313
4
31317
• TO ADJUST SPEAKER VOLUME
41415
RING
33
Pad or Preset Dial to originate a call.
SETUP WITH FEATURE KEY
When only Dynamic Dial Pad is activated:
• MICROPHONE ON/OFF
To Set/Reset Dynamic Dial Pad
STEP 1: LED on Mic shows the status of the builtin microphone.
STEP 1: Press
Feature
and 1 .
Direct Dial Pad
OFF
7:26 AM MON 12 JUL 2010
MIC
DND
>>>
• CALL INDICATOR LAMP ON/OFF
You can choose to turn the call indicator lamp either on
or off during ringing.
STEP 1: Press
Feature
and 8 . The LCD displays:
Direct Dial Pad
ON
7:26 AM MON 12 JUL 2010
MIC
DND
>>>
STEP 2: Press soft key associated with the MIC Display or press
Feature
and 7 . The LCD displays:
TIP
INDICATOR
ON
7:26 AM MON 12 JUL 2010
MIC
DND
>>>
When this feature is ON, you may initiate a call by
immediately dialing the number and the station will go
hands-free off-hook automatically. For details, see TO
ORIGINATE A CALL USING SELECTIVE DIALING
(DYNAMIC DIAL PAD, PRESET DIAL).
When only Preset Dial is activated:
To Set/Reset Preset Dial
INDICATOR
OFF
7:26 AM MON 12 JUL 2010
MIC
DND
>>>
Note
STEP 1: Press
The call indicator lamp lights when used as Message
Waiting Lamp, even when it is turned off by the above
operation
• SELECT DIAL MODE
You can select one pattern from Normal, Dynamic Dial
34
Feature
and 8 . The LCD displays:
Dial Mode: Direct
7:26 AM MON 12 JUL 2010
MIC
DND
>>>
Preset Dial
ON
7:26 AM MON 12 JUL 2010
MIC
DND
>>>
Preset Dial
OFF
7:26 AM MON 12 JUL 2010
MIC
DND
>>>
TIP
Dial Mode: Preset
7:26 AM MON 12 JUL 2010
MIC
DND
>>>
When this feature is ON, you may initiate a call by
pressing Speaker or going off-hook after dialing the
number. For details, see TO ORIGINATE A CALL
USING SELECTIVE DIALING (DYNAMIC DIAL PAD,
PRESET DIAL).
Dial Mode: Normal
7:26 AM MON 12 JUL 2010
MIC
DND
>>>
When both Dynamic Dial Pad and Preset Dial are
activated:
To Set Dial Mode
Note
STEP 1: Every time Feature and 8 are pressed, Dial
Mode switches. The LCD displays:
The display example above displays the Dial Mode
setting..
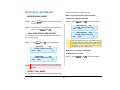
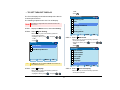
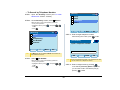
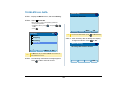
SETUP WITH MENU KEY
• TO ENABLE/DISABLE OFF-HOOK
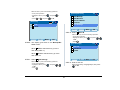
RINGING
The procedure below shows how to enable/disable Offhook ringing.
STEP 1: Display the Menu screen, and select Setting.
STEP 2: Select 1 User Setting.
Select an item by one of the following operations.
• Touch panel operation.
35
• Highlight an item by using
or OK.
• Press 1 .
[Setting]
, and press
,
[User Setting]
1 Incoming Call
2 Talk
1/1
3 Display
4 Change Password
1 User Setting
2 Download
3 Data Backup/Restore
5 Security
6 Peripherals
0 Setting Reset
TIP
Menu
1/1
Back
OK
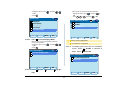
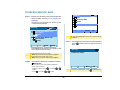
STEP 4: Select 2 Offhook Ring.
OK
Select an item by one of the following operations.
• Touch panel operation.
• Highlight an item by using
, and press
,
or OK.
• Press 2 .
The Menu soft key is labeled as Back for firmware versions earlier than 4.0.0.0. .
STEP 3: Select 1 Incoming Call.
[Incoming Call]
Select an item by one of the following operations.
• Touch panel operation.
• Highlight an item by using
, and press
,
or OK.
• Press 1 .
1/1
1 Ring Volume
2 Offhook Ring
3 Headset Ring
4 Ring Tone
5 Illumination
6 Headset Ring Volume
Back
OK
STEP 5: To disable/enable the off-hook ringing, select
36
1 Disable or 2 Enable.
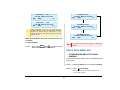
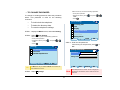
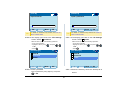
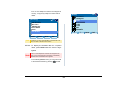
• TO SET RINGING OF HEADSET
Select an item by one of the following operations.
• Touch panel operation.
• Highlight an item by using
, and press
or
OK.
• Press 1 or 2 , and press
or OK.
The procedure below shows how to enable/disable the
ringing of headset.
STEP 1: Display the Menu screen, and select Setting.
STEP 2: Select 1 User Setting.
1/1
[Offhook Ring]
Select an item by one of the following operations.
• Touch panel operation.
• Highlight an item by using
, and press
,
or OK.
• Press 1 .
1 Disable
2 Enable
1/1
[Setting]
1 User Setting
Back
TIP
Default setting is Enable.
TIP
The enabled item is highlighted.
OK
2 Download
3 Data Backup/Restore
TIP
Menu
OK
The Menu soft key is labeled as Back for firmware versions earlier than 4.0.0.0. .
STEP 3: Select 1 Incoming Call.
Select an item by one of the following operations.
• Touch panel operation.
• Highlight an item by using
, and press
,
or OK.
• Press 1 .
37
[User Setting]
• Touch panel operation.
• Highlight an item by using
OK.
• Press 1 or 2 , and press
1/1
1 Incoming Call
2 Talk
, and press
[Headset Ring]
3 Display
4 Change Password
or OK.
1/1
1 Disable
2 Enable
5 Security
6 Peripherals
0 Setting Reset
Back
OK
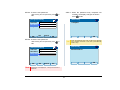
STEP 4: Select 3 Headset Ring.
Select an item by one of the following operations.
• Touch panel operation.
• Highlight an item by using
, and press
,
or OK.
• Press 3 .
[Incoming Call]
TIP
1/1
1 Ring Volume
2 Offhook Ring
3 Headset Ring
4 Ring Tone
5 Illumination
6 Headset Ring Volume
Back
OK
STEP 5: To disable/enable the ringing of headset, select 1 Disable or 2 Enable.
Select an item by one of the following operations.
38
Default setting is Disable.
Back
OK
or
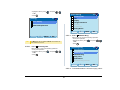
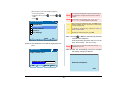
• TO SET RINGER TONE
[User Setting]
The procedure below shows how to change the ringer
tone for internal call and external call.
1 Incoming Call
2 Talk
STEP 1: Display the Menu screen, and select Setting.
3 Display
4 Change Password
STEP 2: Select 1 User Setting.
5 Security
6 Peripherals
Select an item by one of the following operations.
• Touch panel operation.
• Highlight an item by using
, and press
,
or OK.
• Press 1 .
[Setting]
1/1
0 Setting Reset
Back
STEP 4: Select 4 Ring Tone.
1/1
Select an item by one of the following operations.
• Touch panel operation.
• Highlight an item by using
, and press
,
or OK.
• Press 4 .
1 User Setting
2 Download
3 Data Backup/Restore
[Incoming Call]
TIP
Menu
OK
1/1
1 Ring Volume
2 Offhook Ring
3 Headset Ring
4 Ring Tone
OK
The Menu soft key is labeled as Back for firmware versions earlier than 4.0.0.0. .
5 Illumination
6 Headset Ring Volume
STEP 3: Select 1 Incoming Call.
Select an item by one of the following operations.
• Touch panel operation
• Highlight an item by using
, and press
,
or OK.
• Press 1 .
Back
OK
STEP 5: Select 1 External Call when setting the
ringer tone for external calls. Select 2 Internal Call when setting the ringer tone for internal calls.
39
Select an item by one of the following operations.
• Touch panel operation
• Highlight an item by using
, and press
,
or OK.
• Press 1 or 2 .
[Ring Tone]
[External Call]
1/3
0 Automatic
1 Tone Type 1
2 Tone Type 2
3 Tone Type 3
4 Tone Type 4
5 Tone Type 5
6 Tone Type 6
7 Tone Type 7
1/1
1 External Call
2 Internal Call
3 IM
Back
Back
OK
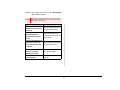
Frequency (Hz)
OK
No.
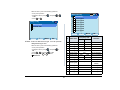
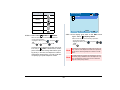
STEP 6: Select a desired tone type. You can preview
Menu Item
Remarks
1st
2nd
0
Automatic
520
660
16Hz modulation
designated ringer tone.
1
Tone Type1
520
660
16Hz modulation
Select an item by one of the following operations.
• Touch panel operation.
• Highlight an item by using
, and press
or
OK.
• Press 0 - 9 , and press
or OK.
For example, press 1 + 5 to select
15 Download1.
2
Tone Type2
520
660
8Hz modulation
3
Tone Type3
1400
1100
Door Phone
4
Tone Type4
1100
No modulation
5
Tone Type5
540
No modulation
6
Tone Type6
1100
1400
16Hz modulation
7
Tone Type7
660
760
16Hz modulation
8
Tone Type8
1100
Envelope
9
Tone Type9
-
Door Phone
Melody
10 Tone Type10
-
Melody 1
11
40
Tone Type11
-
Melody 2
12 Tone Type12
-
Melody 3
13 Tone Type13
-
Melody 4
Frequency (Hz)
No.
Menu Item
Remarks
1st
2nd
14
Tone Type14
-
15
Download1
-
16
Download2
-
17
Download3
-
Melody 5
Note
When selecting Automatic or not performing this ringer
tone setting, Tone Type 1 is automatically applied.
Note
When selecting Automatic, the preview function will
not operate. Also, when selecting Download 1/2/3, the
ringer tone file must be downloaded in advance. If there
is no downloaded file, you hear no tone.
Note
Tone Type 1 to Tone Type 8:
In the preview function, each ringer tone sounds continuously. Actual ringer pattern of each tone is determined
by the initial system settings.
Note
Terminal settings may not become effective, according
to the system settings. For details, contact the System
Administrator.
TIP
The enabled item is highlighted.
TIP
You can set ringer tone for the telephone set here.
Ringer Tone type can be set for "Name", "Group" and
"Telephone set". The ringer Tone type set for "Name"
has higher priority than the types set for "Group" and
"Terminal set".
41
• Press
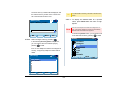
• TO SET ILLUMINATION PATTERN FOR
CALL INDICATION LAMP
[User Setting]
3 Display
4 Change Password
STEP 1: Display the Menu screen, and select Setting.
5 Security
6 Peripherals
STEP 2: Select 1 User Setting.
0 Setting Reset
Select an item by one of the following operations.
• Touch panel operation.
• Highlight an item by using
, and press
,
or OK.
• Press 1 .
OK
Select an item by one of the following operations.
• Touch panel operation.
• Highlight an item by using
, and press
,
or OK.
• Press 5 .
1 User Setting
2 Download
3 Data Backup/Restore
Menu
Back
STEP 4: Select 5 Illumination.
1/1
1/1
1 Incoming Call
2 Talk
The procedure below shows how to set the illumination
pattern (color of Call Indicator Lamp).
[Setting]
1 .
1/1
[Incoming Call]
1 Ring Volume
2 Offhook Ring
3 Headset Ring
4 Ring Tone
5 Illumination
OK
6 Headset Ring Volume
The Menu soft key is labeled as Back for firmware versions earlier than 4.0.0.0. .
TIP
STEP 3: Select 1 Incoming Call.
Back
OK
STEP 5: Select 1 External Call when setting the illu-
Select an item by one of the following operations.
• Touch panel operation.
• Highlight an item by using
, and press
,
or OK.
mination pattern for external calls. Select
2 Internal Call when setting the illumination
pattern for internal call.
42
Select an item by one of the following operations.
• Touch panel operation.
• Highlight an item by using
, and press
,
or OK.
• Press 1 or 2 .
[External Call]
0 Automatic
1 Disable
2 Red
3 Green
1/1
[Illumination]
4 Blue
5 Yellow
1 External Call
2 Internal Call
3 IM
6 Purple
7 Light Blue
1/2
Back
When selecting Automatic, the preview function will
not operate.
Note
When selecting Automatic or not performing this illumination setting, Red is automatically applied.
TIP
You can set illumination pattern for the telephone set
here. Illumination pattern can be set for "Name",
"Group" and "Telephone set". The illumination pattern
set for "Name" has higher priority than the patterns set
for "Group" and "Terminal set".
preview the designated illumination pattern.
Select an item by one of the following operations.
• Touch panel operation.
• Highlight an item by using
, and press
or
OK.
• Press 0 - 9 , and press
or OK.
43
OK
Note
OK
STEP 6: Select a desired illumination pattern. You can
Back
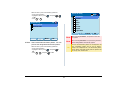
• TO ENABLE/DISABLE RTP ALARM
[User Setting]
1/1
The procedure below shows how to enable/disable
RTP alarm.
1 Incoming Call
2 Talk
STEP 1: Display the Menu screen, and select Setting.
3 Display
4 Change Password
5 Security
STEP 2: Select 1 User Setting.
6 Peripherals
0 Setting Reset
Select an item by one of the following operations.
• Touch panel operation.
• Highlight an item by using
, and press
,
or OK.
• Press 1 .
[Setting]
Back
STEP 4: Select 1 RTP Alarm.
1/1
Select an item by one of the following operations.
• Touch panel operation
• Highlight an item by using
, and press
,
or OK.
• Press 1 .
1 User Setting
2 Download
3 Data Backup/Restore
[Talk]
TIP
Menu
OK
1/1
1 RTP Alarm
2 DTMF Tone
3 Key Touch Tone
OK
4 Hold Music
The Menu soft key is labeled as Back for firmware versions earlier than 4.0.0.0..
5 Prefix
STEP 3: Select 2 Talk.
Select an item by one of the following operations.
• Touch panel operation.
• Highlight an item by using
, and press
,
or OK.
• Press 2 .
44
Back
OK
STEP 5: Select 0 Automatic, 1 Disable or 2 Enable (see the following table).
Select an item by one of the following operations.
• Touch panel operation
• Highlight an item by using
, and press
or
OK.
• Press 0 - 2 , and press
or OK.
[RTP Alarm]
1/1
0 Automatic
1 Disable
2 Enable
Menu Items
Back
OK
Descriptions
Follow the setting on the System. If no
0 Automatic setting is made in the System, the
default setting (Alarm=ON) is applied.
1 Disable
Follow the setting on the terminal (OFF).
2 Enable
Follow the setting on the terminal (ON).
TIP
For the setting on the System, contact the System
Administrator.
TIP
Default setting is Automatic.
TIP
The enabled item is highlighted.
45
• TO ENABLE/DISABLE DTMF TONE
[User Setting]
The procedure below shows how to enable/disable
DTMF Tone.
1 Incoming Call
2 Talk
3 Display
4 Change Password
5 Security
STEP 1: Display the Menu screen, and select Setting.
STEP 2: Select 1 User Setting.
6 Peripherals
Select an item by one of the following operations.
• Touch panel operation
• Highlight an item by using
, and press
,
or OK.
• Press 1 .
0 Setting Reset
[Setting]
1/1
Back
STEP 4: Select 2 DTMF Tone.
1/1
Select an item by one of the following operations.
• Touch panel operation
• Highlight an item by using
, and press
,
or OK.
• Press 2 .
1 User Setting
2 Download
3 Data Backup/Restore
[Talk]
TIP
Menu
OK
1/1
1 RTP Alarm
2 DTMF Tone
3 Key Touch Tone
OK
4 Hold Music
The Menu soft key is labeled as Back for firmware versions earlier than 4.0.0.0..
5 Prefix
STEP 3: Select 2 Talk.
Select an item by one of the following operations.
• Touch panel operation
• Highlight an item by using
, and press
,
or OK.
• Press 2 .
46
Back
OK
STEP 5: Select 0 Automatic, 1 Disable or 2 EnMenu Items
able (see the following table).
Select an item by one of the following operations.
• Touch panel operation
• Highlight an item by using
, and press
or
OK.
• Press 0 - 2 , and press
or OK.
[DTMF Tone]
Descriptions
0 Automatic
Follow the setting on the System. If no
setting is made in the System, the
default setting (DTMF=ON) is applied.
1 Disable
Follow the setting on the terminal (OFF).
2 Enable
Follow the setting on the terminal (ON).
1/1
0 Automatic
1 Disable
2 Enable
Back
OK
47
TIP
For the setting on the System, contact the System
Administrator.
TIP
Default setting is Automatic.
TIP
The enabled item is highlighted.
• TO SET KEY TOUCH TONE
[User Setting]
The procedure below shows how to set Key Touch
Tone. Key Touch Tone is a tone generated when the
digit keys are pressed while DT750 is off-hook.
3 Display
4 Change Password
STEP 1: Display the Menu screen, and select Setting.
5 Security
6 Peripherals
STEP 2: Select 1 User Setting.
0 Setting Reset
Select an item by one of the following operations.
• Touch panel operation
• Highlight an item by using
, and press
,
or OK.
• Press 1 .
[Setting]
1/1
1 Incoming Call
2 Talk
Back
OK
STEP 4: Select 3 Key Touch Tone.
Select an item by one of the following operations.
• Touch panel operation
• Highlight an item by using
, and press
,
or OK.
• Press 3 .
1/1
1 User Setting
2 Download
3 Data Backup/Restore
[Talk]
1/1
1 RTP Alarm
2 DTMF Tone
3 Key Touch Tone
TIP
Menu
OK
4 Hold Music
5 Prefix
The Menu soft key is labeled as Back for firmware versions earlier than 4.0.0.0..
STEP 3: Select 2 Talk.
Select an item by one of the following operations.
• Touch panel operation
• Highlight an item by using
, and press
,
or OK.
• Press 2 .
48
Back
OK
STEP 5: Select 0 Automatic, 1 No Tone, 2 Tone
or 3 Voice.
Select an item by one of the following operations.
• Touch panel operation
• Highlight an item by using
, and press
or
OK.
• Press 0 - 3 , and press
or OK.
[Key Touch Tone]
1/1
0 Automatic
1 No Tone
2 Tone
3 Voice
Note
Back
OK
When Automatic is set, the default setting (Tone) is
applied.
TIP
Default setting is Automatic.
TIP
The enabled item is highlighted.
49
• TO SET MUSIC ON HOLD
[User Setting]
The procedure below shows how to set Music on Hold
to be heard by DT750 user.
1/1
1 Incoming Call
2 Talk
STEP 1: Display the Menu screen, and select Setting.
3 Display
4 Change Password
STEP 2: Select 1 User Setting.
5 Security
6 Peripherals
Select an item by one of the following operations.
• Touch panel operation
• Highlight an item by using
, and press
,
or OK.
• Press 1 .
[Setting]
0 Setting Reset
Back
STEP 4: Select 4 Hold Music.
Select an item by one of the following operations.
• Touch panel operation
• Highlight an item by using
, and press
,
or OK.
• Press 4 .
1/1
1 User Setting
2 Download
3 Data Backup/Restore
[Talk]
TIP
Menu
OK
1/1
1 RTP Alarm
2 DTMF Tone
3 Key Touch Tone
OK
4 Hold Music
The Menu soft key is labeled as Back for firmware versions earlier than 4.0.0.0..
5 Prefix
STEP 3: Select 2 Talk.
Select an item by one of the following operations.
• Touch panel operation
• Highlight an item by using
, and press
,
or OK.
• Press 2 .
Back
OK
STEP 5: Select a desired Music on Hold. You can preview the designated Music on Hold.
Select 1 Default when the default data (Minuet)
50
is used as Music on Hold. Select 2 Download
when a downloaded data is used as Music on
Hold.
Select an item by one of the following operations.
• Touch panel operation
• Highlight an item by using
, and press
or
OK.
• Press 1 or 2 , and press
or OK.
[Hold Music]
1/1
1 Default
2 Download
Note
Back
OK
You can preview the designated music on hold. When
selecting Download, the music on hold file must be
downloaded in advance. If there is no downloaded file,
you hear no tone in the preview function (in actual operating conditions, “Minuet” is automatically applied.).
TIP
Default setting is Default (Minuet).
TIP
The enabled item is highlighted.
51
or OK.
• Press
• TO SET CLOCK FORMAT
Determines whether time is displayed with a 12-hour or
24-hour clock format.
Note
[User Setting]
1/1
1 Incoming Call
2 Talk
3 Display
4 Change Password
5 Security
This setting is available for Time Display only. Call Log
feature displays the time in 24-hour format regardless
of this setting.
STEP 1: Display the Menu screen, and select Setting.
6 Peripherals
0 Setting Reset
STEP 2: Select 1 User Setting.
Select an item by one of the following operations.
• Touch panel operation
• Highlight an item by using
, and press
,
or OK.
• Press 1 .
[Setting]
3 .
Back
OK
STEP 4: Select 1 Time Format.
Select an item by one of the following operations.
• Touch panel operation
• Highlight an item by using
, and press
,
or OK.
• Press 1 .
1/1
1 User Setting
2 Download
3 Data Backup/Restore
[Display]
1/1
1 Time Format
2 Local Volume
3 Screen Saver
TIP
Menu
4 Back Light
5 Font Size
OK
The Menu soft key is labeled as Back for firmware versions earlier than 4.0.0.0..
6 Language
7 Advanced
STEP 3: Select 3 Display.
Select an item by one of the following operations.
• Touch panel operation
• Highlight an item by using
, and press
,
Back
OK
STEP 5: Make a selection from the following list.
Select an item by one of the following operations.
52
• Touch panel operation
• Highlight an item by using
OK.
• Press 0 - 2 , and press
, and press
or
or OK.
[Time Format]
1/1
0 Automatic
1 12 hour Indication
2 24 hour Indication
Back
Menu Item
OK
Meaning
0 Automatic
Follow the setting on the system.
1 12 hour Indication 12-hour clock
2 24 hour Indication 24-hour clock
Note
When selecting Automatic or not performing this time
format setting, 12-hour clock is automatically applied.
TIP
For the setting on the System, contact the System
Administrator.
TIP
Default setting is Automatic.
TIP
The enabled item is highlighted.
53
• Highlight an item by using
or OK.
• Press 3 .
• TO ENABLE/DISABLE VOLUME LEVEL
DISPLAY
Determines whether or not to display the following
volume levels: handset receiver volume, speaker
volume, ringer tone volume and LCD contrast.
[User Setting]
, and press
,
1/1
1 Incoming Call
2 Talk
3 Display
4 Change Password
5 Security
STEP 1: Display the Menu screen, and select Setting.
STEP 2: Select 1 User Setting.
Select an item by one of the following operations.
• Touch panel operation
• Highlight an item by using
, and press
,
or OK.
• Press 1 .
6 Peripherals
0 Setting Reset
Back
OK
STEP 4: Select 2 Local Volume.
[Setting]
Select an item by one of the following operations.
• Touch panel operation
• Highlight an item by using
, and press
,
or OK.
• Press 2 .
1/1
1 User Setting
2 Download
3 Data Backup/Restore
[Display]
1/1
1 Time Format
2 Local Volume
3 Screen Saver
4 Back Light
5 Font Size
OK
6 Language
7 Advanced
The Menu soft key is labeled as Back for firmware versions earlier than 4.0.0.0..
TIP
Menu
STEP 3: Select 3 Display.
Select an item by one of the following operations.
• Touch panel operation
54
Back
OK
STEP 5: Make a selection from the following list.
Select an item by one of the following operations.
• Touch panel operation
• Highlight an item by using
, and press
or
OK.
• Press 0 - 2 , and press
or OK.
[Local Volume]
1/1
0 Automatic
1 Disable
2 Enable
Menu Item
0 Automatic
1 Disable
2 Enable
Note
Back
OK
Meaning
Each volume level is displayed on LCD.
Each volume level is not displayed on
LCD.
Each volume level is displayed on LCD.
When 0 Automatic is set, the default setting (Enable)
is applied.
TIP
Default setting is Automatic.
TIP
The enabled item is highlighted.
55
STEP 3: Select 3 Display.
• TO SET SCREEN SAVER
Select an item by one of the following operations.
• Touch panel operation
• Highlight an item by using
, and press
,
or OK.
• Press 3 .
Screen Saver works after the telephone is idle for a
certain period of time. The Screen Saver will be
displayed from XML server when the XML server is
available. If the Screen Saver cannot be downloaded
from the XML server, default Screen Saver will be
displayed.
Note
[User Setting]
1 Incoming Call
2 Talk
3 Display
4 Change Password
5 Security
For details on the XML service, contact the System
Administrator.
STEP 1: Display the Menu screen, and select Setting.
6 Peripherals
0 Setting Reset
STEP 2: Select 1 User Setting.
Select an item by one of the following operations.
• Touch panel operation
• Highlight an item by using
, and press
,
or OK.
• Press 1 .
[Setting]
2 Download
3 Data Backup/Restore
TIP
Back
OK
Select an item by one of the following operations.
• Touch panel operation
• Highlight an item by using
, and press
,
or OK.
• Press 3 .
1 User Setting
Menu
STEP 4: Select 3 Screen Saver.
1/1
1/1
OK
The Menu soft key is labeled as Back for firmware versions earlier than 4.0.0.0..
56
[Display]
[Screen Saver]
1/1
1 Time Format
2 Local Volume
3 Screen Saver
1/1
1 Disable
2 Enable
4 Back Light
5 Font Size
6 Language
7 Advanced
Back
OK
STEP 5: Select 1 Screen Saver Mode.
Select an item by one of the following operations.
• Touch panel operation
• Highlight an item by using
, and press
,
or OK.
• Press 1 .
[Screen Saver]
Back
TIP
Default setting is Disable.
TIP
The enabled item is highlighted.
OK
STEP 7: The display goes back to the Screen Saver
screen. When 2 Enable is selected Step7,
Select 2 Wait Time.
1/1
Input Wait Time to launch the screen saver (1-999min)
and press
or OK.
1 Screen Saver Mode
2 Wait Time
[Wait Time]
1
Input wait time.
1-999(min)
Back
OK
STEP 6: Select either 1 Disable or 2 Enable.
120
Select an item by one of the following operations.
• Highlight an item by using
, and press
or
OK.
• Press 1 or 2 , and press
or OK.
BK
TIP
57
Default value is 120 min.
Back
OK
• TO SET BRIGHTNESS OF BACKLIGHT
[User Setting]
The following explains how to set the brightness level
of the LCD backlight.
1 Incoming Call
2 Talk
3 Display
4 Change Password
5 Security
STEP 1: Display the Menu screen, and select Setting.
STEP 2: Select 1 User Setting.
6 Peripherals
0 Setting Reset
Select an item by one of the following operations.
• Touch panel operation
• Highlight an item by using
, and press
,
or OK.
• Press 1 .
[Setting]
1/1
Back
STEP 4: Select 4 Back Light.
Select an item by one of the following operations.
• Touch panel operation
• Highlight an item by using
, and press
,
or OK.
• Press 4 .
1/1
1 User Setting
2 Download
3 Data Backup/Restore
[Display]
TIP
Menu
OK
1/1
1 Time Format
2 Local Volume
3 Screen Saver
OK
4 Back Light
5 Font Size
The Menu soft key is labeled as Back for firmware versions earlier than 4.0.0.0..
6 Language
7 Advanced
STEP 3: Select 3 Display.
Select an item by one of the following operations.
• Touch panel operation
• Highlight an item by using
, and press
,
or OK.
• Press 3 .
Back
OK
STEP 5: Select a desired brightness level.
Select an item by one of the following operations.
• Touch panel operation
• Highlight an item by using
, and press
or
58
OK.
• Press
1 - 4 , and press
[Back Light]
or OK.
1/1
1 Level 1 (Bright)
2 Level 2
3 Level 3
4 Level 4 (Dark)
Back
TIP
Default setting is Level 3.
TIP
The enabled item is highlighted.
OK
59
• TO CHANGE CHARACTER SIZE
[User Setting]
The following explains how to change the displayed
character size on the LCD.
STEP 1: Display the Menu screen, and select Setting.
STEP 2: Select 1 User Setting.
6 Peripherals
0 Setting Reset
Select an item by one of the following operations.
• Touch panel operation
• Highlight an item by using
, and press
,
or OK.
• Press 1 .
[Setting]
1/1
1 Incoming Call
2 Talk
3 Display
4 Change Password
5 Security
Back
OK
STEP 4: Select 5 Font Size.
Select an item by one of the following operations.
• Touch panel operation
• Highlight an item by using
, and press
,
or OK.
• Press 5 .
1/1
1 User Setting
2 Download
3 Data Backup/Restore
[Display]
1/1
1 Time Format
2 Local Volume
3 Screen Saver
OK
4 Back Light
5 Font Size
The Menu soft key is labeled as Back for firmware versions earlier than 4.0.0.0..
6 Language
7 Advanced
TIP
Menu
STEP 3: Select 3 Display.
Select an item by one of the following operations.
• Touch panel operation
• Highlight an item by using
, and press
,
or OK.
• Press 3 .
Back
OK
STEP 5: Select either “Standard (16dot)“or “Small
(12dot)“.
Select an item by one of the following operations.
60
• Touch panel operation
• Highlight an item by using
OK.
• Press 1 or 2 , and press
, and press
[Font Size]
or
or OK.
1/1
1 Standard (16dot)
2 Small (12dot)
Back
TIP
Default setting is Standard (16dot).
TIP
The enabled item is highlighted.
OK
61
• TO SET A LANGUAGE
[User Setting]
The following explains how to set a language to be
displayed on LCD.
1 Incoming Call
2 Talk
3 Display
4 Change Password
5 Security
STEP 1: Display the Menu screen, and select Setting.
STEP 2: Select 1 User Setting.
6 Peripherals
0 Setting Reset
Select an item by one of the following operations.
• Touch panel operation
• Highlight an item by using
, and press
,
or OK.
• Press 1 .
[Setting]
1/1
Back
STEP 4: Select 6 Language.
Select an item by one of the following operations.
• Touch panel operation
• Highlight an item by using
, and press
,
or OK.
• Press 6 .
1/1
1 User Setting
2 Download
3 Data Backup/Restore
1/1
[Display]
TIP
Menu
OK
1 Time Format
2 Local Volume
3 Screen Saver
OK
4 Back Light
5 Font Size
The Menu soft key is labeled as Back for firmware versions earlier than 4.0.0.0..
6 Language
7 Advanced
STEP 3: Select 3 Display.
Select an item by one of the following operations.
• Touch panel operation
• Highlight an item by using
, and press
,
or OK.
• Press 3 .
Back
OK
STEP 5: Select a desired language.
Select an item by one of the following operations.
• Touch panel operation
• Highlight an item by using
, and press
or
OK.
62
• Press 0 - 9 , and press
or OK.
For example, press 1 + 5 to select 15 Spanish.
[Language]
1/3
0 Automatic
1 Japanese
2 NEC English
3 NEC Portuguese
4 NEC Spanish
5 NEC French
6 German
7 Italian
Back
OK
TIP
Default setting is Automatic.
TIP
When selecting Automatic, follow the setting on the
System. For the setting on the System, contact to the
System Administrator.
TIP
The enabled item is highlighted.
63
• TO ENABLE/DISABLE TOUCH PANEL
OPERATION
[User Setting]
1 Incoming Call
2 Talk
3 Display
4 Change Password
5 Security
The following explains how to enable/disable the touch
panel operation.
STEP 1: Display the Menu screen, and select Setting.
6 Peripherals
0 Setting Reset
STEP 2: Select 1 User Setting.
Select an item by one of the following operations.
• Touch panel operation.
• Highlight an item by using
, and press
,
or OK.
• Press 1 .
[Setting]
1/1
Back
OK
STEP 4: Select 7 Advanced.
Select an item by one of the following operations.
• Touch panel operation.
• Highlight an item by using
, and press
,
or OK.
• Press 7 .
1/1
1 User Setting
2 Download
3 Data Backup/Restore
[Display]
1/1
1 Time Format
2 Local Volume
3 Screen Saver
OK
6 Language
7 Advanced
The Menu soft key is labeled as Back for firmware versions earlier than 4.0.0.0..
TIP
Menu
4 Back Light
5 Font Size
STEP 3: Select 3 Display.
Back
OK
STEP 5: Select 2 Touch Panel.
Select an item by one of the following operations.
• Touch panel operation.
• Highlight an item by using
, and press
,
or OK.
• Press 3 .
Select an item by one of the following operations.
• Touch panel operation.
• Highlight an item by using
, and press
,
or OK.
64
• Press
2 .
[Advanced]
1/1
1 Wallpaper
2 Touch Panel
3 Shortcut Icon
4 Font Color
5 Turn Off Display
Back
OK
STEP 6: Select either 1 Disable or 2 Enable.
Select an item by one of the following operations.
• Touch panel operation.
• Highlight an item by using
, and press
or
OK.
• Press 1 or 2 , and press
or OK.
[Touch Panel]
1/1
1 Disable
2 Enable
Back
TIP
Default setting is Enable.
TIP
The enabled item is highlighted.
OK
65
or OK.
• Press
• TO SET WALLPAPER
The following explains how to set wallpaper
3 .
[User Setting]
1/1
STEP 1: Display the Menu screen, and select Setting.
1 Incoming Call
2 Talk
3 Display
4 Change Password
5 Security
STEP 2: Select 1 User Setting.
6 Peripherals
0 Setting Reset
Note
This feature is supported from Terminal Firmware Version 3.0.0.0. For details, contact the System Administrator.
Select an item by one of the following operations.
• Touch panel operation.
• Highlight an item by using
, and press
,
or OK.
• Press 1 .
[Setting]
[Display]
1/1
1 Time Format
2 Local Volume
3 Screen Saver
4 Back Light
5 Font Size
OK
6 Language
7 Advanced
The Menu soft key is labeled as Back for firmware versions earlier than 4.0.0.0..
TIP
OK
Select an item by one of the following operations.
• Touch panel operation.
• Highlight an item by using
, and press
,
or OK.
• Press 7 .
1 User Setting
2 Download
3 Data Backup/Restore
Menu
Back
STEP 4: Select 7 Advanced.
1/1
STEP 3: Select 3 Display.
Back
OK
STEP 5: Select 1 Wallpaper.
Select an item by one of the following operations.
• Touch panel operation.
• Highlight an item by using
, and press
,
Select an item by one of the following operations.
• Touch panel operation.
66
• Highlight an item by using
or OK.
• Press 1 .
, and press
,
TIP
Note
[Advanced]
1/1
1 Wallpaper
2 Touch Panel
3 Shortcut Icon
4 Font Color
5 Turn Off Display
Back
OK
STEP 6: Select either 1 Default or 2 Download.
Select an item by one of the following operations.
• Touch panel operation.
• Highlight an item by using
, and press
or
OK.
• Press 1 or 2 , and press
or OK.
[Wallpaper]
1/1
1 Default
2 Download
TIP
Back
OK
Default setting is Default.
67
The enabled item is highlighted.
When selecting Download, the wallpaper file must be
downloaded in advance. If there is no downloaded file,
the wallpaper is default.
Select an item by one of the following operations.
• Touch panel operation.
• Highlight an item by using
, and press
,
or OK.
• Press 3 .
• TO SET CHARACTER COLOR
The following explains how to set the displayed
character color on the LCD
.
Note
Note
[User Setting]
This feature is supported from Terminal Firmware Version 3.0.0.0. For details, contact the System Administrator.
Color characters are used at LCD 4-line display area.
The call pop-up window will display blue characters
only when the XML URL is defined (in use).
STEP 1: Display the Menu screen, and select Setting.
6 Peripherals
0 Setting Reset
STEP 2: Select 1 User Setting.
Select an item by one of the following operations.
• Touch panel operation.
• Highlight an item by using
, and press
,
or OK.
• Press 1 .
[Setting]
[Display]
OK
1/1
1 Time Format
2 Local Volume
3 Screen Saver
4 Back Light
5 Font Size
OK
6 Language
7 Advanced
The Menu soft key is labeled as Back for firmware versions earlier than 4.0.0.0..
TIP
Back
Select an item by one of the following operations.
• Touch panel operation.
• Highlight an item by using
, and press
,
or OK.
• Press 7 .
1 User Setting
2 Download
3 Data Backup/Restore
Menu
STEP 4: Select 7 Advanced.
1/1
1/1
1 Incoming Call
2 Talk
3 Display
4 Change Password
5 Security
STEP 3: Select 3 Display.
68
Back
OK
STEP 5: Select 4 Font Color.
Select an item by one of the following operations.
• Touch panel operation.
• Highlight an item by using
, and press
,
or OK.
• Press 4 .
[Advanced]
1/2
[Font Color]
1 Color 1
2 Color 2
3 Color 3
4 Color 4
5 Color 5
1/1
1 Wallpaper
2 Touch Panel
3 Shortcut Icon
4 Font Color
6 Color 6
7 Color 7
8 Color 8
5 Turn Off Display
Back
2/2
[Font Color]
Back
OK
9 Color 9
10 Color 10
11 Color 11
OK
STEP 6: Select a desired color.
Select an item by one of the following operations.
• Touch panel operation.
• Highlight an item by using
, and press
or
OK.
• Press 0 - 9 , and press
or OK.
For example, press 1 + 5 to select 15 Color 15.
12 Color 12
13 Color 13
14 Color 14
15 Color 15
16 Color 16
69
Back
OK
TIP
The color of the character corresponds to an actual display color on the screen of the color selection.
TIP
Default setting is Color 2.
TIP
The enabled item is highlighted.
Table of Font Color
NO.
Color
Name
Example
RGB code
1
Color 1
123
0x000000
2
Color 2
123
0x000080
3
Color 3
123
0x0000FF
4
Color 4
123
0x008000
5
Color 5
123
0x008080
6
Color 6
123
0x00FF00
7
Color 7
123
0x00FFFF
8
Color 8
123
0x800000
9
Color 9
123
0x800080
10
Color 10
123
0x808000
11
Color 11
123
0xA0A0A0
12
Color 12
123
0xC0C0C0
13
Color 13
123
0xFF0000
14
Color 14
123
0xFF00FF
70
NO.
Color
Name
Example
RGB code
15
Color 15
123
0xFFFF00
16
Color 16
123
0xFFFFFF
or OK.
• Press
• TO SET TURN OFF DISPLAY
The Turn off Display works after the telephone is idle for
a certain period of time.
The following explains how to set Turn off Display.
3 .
[User Setting]
1/1
STEP 1: Display the Menu screen, and select Setting.
1 Incoming Call
2 Talk
3 Display
4 Change Password
5 Security
STEP 2: Select 1 User Setting.
6 Peripherals
0 Setting Reset
This feature is supported from Terminal Firmware Version 3.0.0.0.
Note
Select an item by one of the following operations.
• Touch panel operation.
• Highlight an item by using
, and press
,
or OK.
• Press 1 .
[Setting]
[Display]
1/1
1 Time Format
2 Local Volume
3 Screen Saver
4 Back Light
5 Font Size
OK
6 Language
7 Advanced
The Menu soft key is labeled as Back for firmware versions earlier than 4.0.0.0..
TIP
OK
Select an item by one of the following operations.
• Touch panel operation.
• Highlight an item by using
, and press
,
or OK.
• Press 7 .
1 User Setting
2 Download
3 Data Backup/Restore
Menu
Back
STEP 4: Select 7 Advanced.
1/1
STEP 3: Select 3 Display.
Back
OK
STEP 5: Select 5 Turn Off Display.
Select an item by one of the following operations.
• Touch panel operation.
• Highlight an item by using
, and press
,
Select an item by one of the following operations.
• Touch panel operation.
71
• Highlight an item by using
or OK.
• Press 5 .
[Advanced]
, and press
,
Select an item by one of the following operations.
• Highlight an item by using
, and press
or
OK.
• Press 1 , 2 or 3 , and press
or OK.
1/1
[Turn Off Display Mode]
1 Wallpaper
2 Touch Panel
3 Shortcut Icon
4 Font Color
1/1
1 Disable
2 Enable
3 App priority
5 Turn Off Display
OK
Back
STEP 6: Select 1 Turn Off Display Mode.
Select an item by one of the following operations.
• Touch panel operation.
• Highlight an item by using
, and press
,
or OK.
• Press 1 .
[Turn Off Display]
Back
TIP
Default setting is App priority.
TIP
The enabled item is highlighted.
OK
STEP 8: The display goes back to the Turn Off Display
screen. When 2 Enable is selected at
1/1
Step7, Select 2 Wait Time.
1 Turn Off Display Mode
2 Wait Time
[Turn Off Display]
1/1
1 Turn Off Display Mode
2 Wait
WaitTime
Time
Back
OK
STEP 7: Select 1 Disable, 2 Enable or 3 App pri-
ority.
72
Back
OK
STEP 9: Input Wait Time to launch the screen saver
(1-999min) and press
[Wait Time]
or OK.
1
Input wait time.
1-999(min)
180
BK
TIP
Back
OK
Default value is 180 min.
73
Select an item by one of the following operations.
• Touch panel operation.
• Highlight an item by using
, and press
,
or OK.
• Press 4 .
• TO CHANGE PASSWORD
To change an existing password, follow the procedure
below. This password is used for the following
occasions.
•
•
•
[User Setting]
To lock/unlock the telephone.
To delete the directory data.
To reset the telephone settings.
1 Incoming Call
2 Talk
3 Display
4 Change Password
5 Security
STEP 1: Display the Menu screen, and select Setting.
6 Peripherals
0 Setting Reset
STEP 2: Select 1 User Setting.
Select an item by one of the following operations.
• Touch panel operation.
• Highlight an item by using
, and press
,
or OK.
• Press 1 .
[Setting]
Back
[Change Password]
2 Download
3 Data Backup/Restore
Menu
OK
After entering the old password, press
Set.
1 User Setting
TIP
STEP 4: Enter the old password.
1/1
1/1
or
1
Old Pass
New Pass
Retry Pass
OK
BK
The Menu soft key is labeled as Back for firmware versions earlier than 4.0.0.0..
Note
STEP 3: Select 4 Change.
74
Set
Cancel
OK
The initial password is "0000". When changing the
password for the first time, enter "0000" as the old
password.
STEP 5: Enter the new password.
STEP 7: When the password entry completes suc-
After entering the new password, press
Set.
[Change Password]
Old Pass
New Pass
Retry Pass
BK
cessfully, the display changes as follows.
or
Press
1
[Password]
****
Set
Complete
Cancel
OK
OK
STEP 6: Enter the new password.
After entering the new password, press
OK.
[Change Password]
Old Pass
New Pass
Retry Pass
BK
Note
TIP
or
When the password entry ends in failure, the following
error message is issued. In that case, press OK and
make a retry.
[Password]
1
Password Error
****
****
Set
or OK.
Cancel
OK
OK
A maximum of 32 digits (0-9, * and #) can be set as a
password.
75
• TO RESET TELEPHONE SETTINGS
[User Setting]
The following explains how to clear the personal data
off the telephone.
STEP 1: Display the Menu screen, and select Setting.
STEP 2: Select 1 User Setting.
6 Peripherals
0 Setting Reset
Select an item by one of the following operations.
• Touch panel operation.
• Highlight an item by using
, and press
,
or OK.
• Press 1 .
OK
After entering the password, press
1 User Setting
[Setting Reset]
2 Download
3 Data Backup/Restore
Input a password.
Menu
Back
STEP 4: Enter the password.
1/1
TIP
[Setting]
1/1
1 Incoming Call
2 Talk
3 Display
4 Change Password
5 Security
OK
or OK.
1
*********
The Menu soft key is labeled as Back for firmware versions earlier than 4.0.0.0..
BK
Back
OK
STEP 5: When the password entry completes suc-
STEP 3: Select 0 Setting Reset.
cessfully, the display changes as follows.
Select an item by one of the following operations.
• Touch panel operation.
• Highlight an item by using
, and press
,
or OK.
• Press 0 .
Press
or OK to clear the personal data off the
telephone.
76
[Setting Reset]
Are you sure?
Back
TIP
OK
When the password entry ends in failure, the following
error message is issued. In that case, press OK and
make a retry.
[Setting Reset]
Password Error
OK
77
or OK.
• Press
• TO DOWNLOAD A FILE
You can download files for Music on Hold, Ringer Tone,
Directory and Wallpaper.
When downloading these files, the DT750 needs to be
connected to the network that has FTP (TFTP server).
Wallpaper was supported from Terminal Firmware version 3.0.0.0.and later
Note
For details on the FTP/TFTP service, contact the System Administrator.
[Setting]
1/1
1 User Setting
2 Download
3 Data Backup/Restore
Note
2 .
Before starting the download, the IP Address of the
FTP/TFTP Server must be entered from DT750.
TIP
Menu
OK
The Menu soft key is labeled as Back for firmware versions earlier than 4.0.0.0..
STEP 1: Set up the FTP/TFTP server.
STEP 4: Select 3 Protocol.
<FTP server>
Select an item by one of the following operations.
• Touch panel operation.
• Highlight an item by using
, and press
,
or OK.
• Press 3 .
Put the downloading file into the designated
directory (for Windows IIS, the default is
“C:\InetPub\ftproot”) of the FTP server.
<TFTP server>
[Download Menu]
Put the downloading file into a desired direc-
1/1
1 Download Files
tory of TFTP server and specify it as the
2 Download Address
3 Protocol
directory for downloading.
4 FTP Settings
STEP 2: Display the Menu screen, and select Setting.
STEP 3: Select 2 Download.
Select an item by one of the following operations.
• Touch panel operation.
• Highlight an item by using
, and press
,
78
Back
OK
STEP 5: Select a protocol used by the server which
[Download Menu]
stores the download file.
Select an item by one of the following operations.
• Touch panel operation.
• Highlight an item by using
, and press
or
OK.
• Press 1 or 2 , and press
or OK.
[Protocol]
1/1
1 Download Files
2 Download Address
3 Protocol
4 FTP Settings
1/1
FTP
2 TFTP
1
Back
OK
STEP 8: Select 1 User ID.
Back
Select an item by one of the following operations.
• Touch panel operation.
• Highlight an item by using
, and press
,
or OK.
• Press 1 .
OK
[FTP Settings]
STEP 6: The display goes back to the Download
Menu screen.
1 User ID
When 1 FTP is selected here, go to the
2 Password
3 Folder
1/1
next Step (STEP 7).
When 2 TFTP is selected here, go to STEP
15.
STEP 7: Select 4 FTP Settings.
Back
OK
STEP 9: Enter a User ID.
Select an item by one of the following operations.
• Touch panel operation.
• Highlight an item by using
, and press
,
or OK.
• Press 4 .
Enter a User ID by pressing digit keys, and press
or OK.
79
[User ID]
Enter a password by pressing digit keys, and
press
or OK.
A
Input a user ID.
[Password]
A
Input a password.
BK
TIP
Back
OK
For details on character entry method, see HOW TO
INPUT CHARACTERS.
BK
STEP 10:The display goes back to the FTP Settings
screen. Select 2 Password.
TIP
OK
For details on character entry method, see HOW TO
INPUT CHARACTERS.
STEP 12:The display goes back to the FTP Settings
screen. Select 3 Folder.
Select an item by one of the following operations.
• Touch panel operation.
• Highlight an item by using
, and press
,
or OK.
• Press 2 .
[FTP Settings]
Back
Select an item by one of the following operations.
• Touch panel operation.
• Highlight an item by using
, and press
,
or OK.
• Press 3 .
1/1
1 User ID
[FTP Settings]
2 Password
3 Folder
1 User ID
2 Password
3 Folder
Back
OK
1/1
STEP 11:Enter a password.
80
Back
OK
STEP 13:Enter the directory where the download file is
Select an item by one of the following operations.
• Touch panel operation.
• Highlight an item by using
, and press
,
or OK.
• Press 2 .
stored.
After entering the directory, press
[Folder]
or OK.
A
[Download Menu]
Input a folder name.
1/1
1 Download Files
2 Download Address
3 Protocol
4 FTP Settings
TIP
Back
OK
BK
For details on character entry method, see HOW TO
INPUT CHARACTERS.
which stores the download file.
or Back to display the
For example, to set the IP address of
10.41.208.205, enter 10*41*208*205 [separate
with an asterisk (*)].
Download Menu screen.
[FTP Settings]
OK
Back
STEP 16:Enter an IP address of the FTP/TFTP server
STEP 14:The display goes back to the FTP Settings
screen. Press
1/1
[Download Address]
1 User ID
1
‘*‘For‘.‘
2 Password
3 Folder
0 .
Back
0 .
0 .
0
OK
BK
STEP 15:Select 2 Download Address.
Back
OK
After entering an IP address, press
81
or OK.
STEP 17:The display goes back to the Download
Menu screen. Select 1 Download Files.
[Download Files]
1 Hold Music
Select an item by one of the following operations.
• Touch panel operation.
• Highlight an item by using
, and press
,
or OK.
• Press 1 .
[Download Menu]
1/1
2 Ring Tone
3 Directory
4 Wallpaper
1/1
1 Download Files
Back
OK
STEP 19:When 2 Ring Tone is selected at STEP 18,
2 Download Address
3 Protocol
the following Ring Tone screen is displayed.
Select either 1 Download1, 2 Download2
4 FTP Settings
or 3 Download3.
Back
Select an item by one of the following operations.
• Touch panel operation.
• Highlight an item by using
, and press
,
or OK.
• Press 1 - 3 .
OK
STEP 18:Select a file to be downloaded.
[Ring Tone]
When downloading a file : Select 1 Hold Music and go
for Music on Hold
to STEP 20.
1/1
1 Download 1
2 Download 2
3 Download 3
When downloading a file : Select 2 Ring Tone and go
for ringer tone
to STEP 19.
When downloading a file : Select 3 Directory and go
for directory
to STEP 20.
When downloading a file : Select 4 Directory and go
for Wallpaper
to STEP 20.
Back
OK
STEP 20:The default file name will be displayed.
82
- When downloading a file for Music on Hold, the
default file name is “MOH.wav”.
[Hold Music]
File Format
Maximum Size
PCM µ-law 8kHz/s wav.
under 32 seconds
A
- When downloading a file for Directory, the default
file name is “Directory.csv”.
Input a file name.
[Directory]
A
Input a file name.
MOH.wav
BK
Cancel
Exec
File Format
Maximum Size
PCM µ-law 8kHz/s wav.
under 32 seconds
Directory.csv
BK
- When downloading a file for ringer tone, the default
file name is “Melody1/2/3/.wav”.
[Download 1]
A
Input a file name.
Exec
File Name
Directory.csv (Fixed)
Code
Unicode (UTF-8)
- When downloading a file for Wallpaper, the default
file name is “WallPaper.bmp”.
Meloady1.wav
BK
Cancel
Cancel
Exec
83
[Wallpaper]
STEP 22:Press
A
or Exec to start the downloading
process.
Input a file name.
While downloading a file, the LCD displays
“Downloading...” first and “Saving...”.
Note
Be sure not to turn OFF the DT750 while "Saving..." is
displayed on the LCD.
WallPaper.bmp
STEP 23:After the downloading process is complete,
BK
Cancel
the display changes as follows:
Exec
File Format
Maximum Size
bmp/jpg/gif/png
320 X 240 Pixels
230Kbyte
Download Complete!
When changing the file name, go to the next
step (STEP 21).
Exit
When not changing the file name, go to
STEP 22.
STEP 24:The display goes back to the Download
Files screen by Exit.
STEP 21:Press BK once to delete the default file name
and enter a new file name by using the digit
keys.
Note
Note
A maximum of 20 characters ("0-9", "A-Z", "a-z", "*",
"#", ".", "-" or "_") can be entered as a file name.
TIP
For details on character entry method, see HOW TO
INPUT CHARACTERS.
TIP
To delete an entered character, press BK.
84
When the downloading process ends in failure, "Downloading Failed!" is displayed on the LCD. Check to see
the following and retry.
Check Points
Download file is not
placed in the specified
directory.
A different file name is
specified between DT750
and FTP/TFTP server.
Incorrect IP address of
FTP/TFTP server has
been entered from the
telephone.
The power to FTP/TFTP
server or network
equipment is OFF.
LAN cable is
disconnected.
Actions
Place the download file in
the specified directory.
Set the same file name
from both DT750 and FTP/
TFTP server.
Set the proper IP address
of FTP/TFTP server.
Turn on the power.
Reconnect the cable
securely.
85
• TO BACKUP PERSONAL SETTINGS
[Setting]
You can backup personal settings of DT750 to FTP/
TFTP server. To back up the setting data, the DT 750
needs to be connected to the network that has FTP
(TFTP server).
Note
1/1
1 User Setting
2 Download
3 Data Backup/Restore
For details on the XML service, contact the System
Administrator.
Before starting the backup, the IP Address of the FTP/
TFTP Server must be entered from DT750.
STEP 1: Set up the FTP/TFTP server.
TIP
<FTP server>
Menu
OK
The Menu soft key is labeled as Back for firmware versions earlier than 4.0.0.0..
STEP 4: Select 4 Protocol.
Confirm the designated directory (for Win-
Select an item by one of the following operations.
• Touch panel operation.
• Highlight an item by using
, and press
,
or OK.
• Press 4 .
dows IIS, the default is “C:\InetPub\ftproot”)
for the backed up file.
<TFTP server>
Specify a desired destination directory for the
[Backup/Restore]
backed up file.
1/1
1 Data Backup
2 Data Restore
3 Server Address
4 Protocol
STEP 2: Display the Menu screen, and select Setting.
STEP 3: Select 3 Data Backup/Restore.
Select an item by one of the following operations.
• Touch panel operation.
• Highlight an item by using
, and press
,
or OK.
• Press 3 .
5 FTP Settings
86
Back
OK
STEP 5: Select a protocol used by the destination
• Press
server.
[Backup/Restore]
Select an item by one of the following operations.
• Touch panel operation.
• Highlight an item by using
, and press
or
OK.
• Press 1 or 2 , and press
or OK.
[Protocol]
5 .
1/1
1 Data Backup
2 Data Restore
3 Server Address
4 Protocol
1/1
5 FTP Settings
1 FTP
2 TFTP
Back
OK
STEP 8: Select 1 User ID.
Back
Select an item by one of the following operations.
• Touch panel operation.
• Highlight an item by using
, and press
,
or OK.
• Press 1 .
OK
[FTP Settings]
1/1
1 User ID
2 Password
STEP 6: The display goes back to the Backup/Restore screen.
3 Folder
When 1 FTP is selected here, go to the
next Step (STEP 7).
When 2 TFTP is selected here, go to STEP
15.
Back
OK
STEP 9: Enter a User ID.
STEP 7: Select 5 FTP Settings.
Enter a User ID by using digit keys, then press
or OK.
Select an item by one of the following operations.
• Touch panel operation.
• Highlight an item by using
, and press
,
or OK.
87
[User ID]
Enter a password by using digit keys, and press
or OK.
A
Input a user ID.
[Password]
A
Input a password.
Back
BK
TIP
OK
For details on character entry method, see HOW TO
INPUT CHARACTERS.
BK
TIP
STEP 10:The display goes back to the FTP Settings
screen. Select 2 Password.
OK
For details on character entry method, see HOW TO
INPUT CHARACTERS.
STEP 12:The display goes back to the FTP Settings
screen. Select 3 Folder.
Select an item by one of the following operations.
• Touch panel operation.
• Highlight an item by using
, and press
,
or OK.
• Press 2 .
[FTP Settings]
Back
Select an item by one of the following operations.
• Touch panel operation.
• Highlight an item by using
, and press
,
or OK.
• Press 3 .
1/1
1 User ID
2 Password
[FTP Settings]
1/1
1 User ID
2 Password
3 Folder
3 Folder
Back
OK
STEP 11:Enter a password.
88
Back
OK
STEP 13:Enter the destination directory of the FTP/
• Touch panel operation.
• Highlight an item by using
or OK.
• Press 3 .
TFTP server.
After entering the directory, press
[Folder]
or OK.
A
, and press
[Backup/Restore]
Input a folder name.
,
1/1
1 Data Backup
2 Data Restore
3 Server Address
4 Protocol
5 FTP Settings
TIP
OK
Back
BK
For details on character entry method, see HOW TO
INPUT CHARACTERS.
TFTP server.
For example, to set the IP address of
10.41.208.205, enter 10*41*208*205 [separate
with an asterisk (*)].
or Back to display the
Backup/Restore screen.
[FTP Settings]
1/1
[Server Address]
1 User ID
1
‘*‘For‘.‘
2 Password
3 Folder
0 .
OK
Back
STEP 16:Enter an IP address of the destination FTP/
STEP 14:The display goes back to the FTP Settings
screen. Press
Back
0 .
0 .
0
OK
BK
STEP 15:Select 3 Server Address.
Back
OK
After entering an IP address, press
OK.
Select an item by one of the following operations.
89
(Enter) or
STEP 17:The display goes back to the Backup/Restore screen. Select 1 Data Backup.
Select an item by one of the following operations.
• Touch panel operation.
• Highlight an item by using
, and press
,
or OK.
• Press 1 .
[Backup/Restore]
4 Protocol
Note
A maximum of 20 characters ("0-9", "A-Z", "a-z", "*",
"#", ".", "-" or "_") can be entered as a file name.
TIP
When changing the default file name, press BK once to
delete the default file name and enter a new file name
by using the digits keys.
TIP
For details on character entry method, see HOW TO
INPUT CHARACTERS.
TIP
To delete an entered character, press BK.
STEP 19:Press
5 FTP Settings
or Exec to start the data backup.
While making a backup copy, the LCD displays
“Uploading...” first and then “Saving...”.
OK
Back
Note
STEP 18:The default file name will be displayed as follows:
[Data Backup]
A
Input a folder name.
PersonalData.tgz
BK
Do not change the extension of the backup file. The
setting data of the telephone can only be backed up as
a.tgz file.
1/1
1 Data Backup
2 Data Restore
3 Server Address
Note
Cancel
Exec
90
Be sure not to turn OFF the DT750 while "Saving..." is
displayed on the LCD.
STEP 20:After the data backup is complete, the display
changes as follows:
Upload Complete!
Exit
STEP 21:The display goes back to the Backup/Restore screen by Exit.
Note
When the data backup ends in failure, "Upload Failed!"
is displayed on the LCD. Check to see the following and
make a retry.
Check Points
Actions
Incorrect IP address of
FTP/TFTP server has
been entered from the
telephone.
Set the proper IP address
of FTP/TFTP server.
The power to FTP/TFTP
server or network
equipment is OFF.
Turn on the power.
LAN cable is
disconnected.
Reconnect the cable
securely.
91
• TO RESTORE PERSONAL SETTINGS
[Setting]
DT750 user can restore the personal settings of
DT750. To download the backup file to the telephone,
the DT750 needs to be connected to the network that
has FTP (TFTP server).
1 User Setting
2 Download
3 Data Backup/Restore
For details on the XML service, contact the System
Administrator.
Note
1/1
Before starting the download, the IP Address of the
FTP/TFTP Server must be entered from DT750.
TIP
STEP 1: Set up the FTP/TFTP server.
Menu
OK
The Menu soft key is labeled as Back for firmware versions earlier than 4.0.0.0..
STEP 4: Select 4 Protocol.
<FTP server>
Select an item by one of the following operations.
• Touch panel operation.
• Highlight an item by using
, and press
,
or OK.
• Press 4 .
Put the backup file you want to restore into
the designated directory (for Windows IIS,
the default is “C:\InetPub\ftproot) of the FTP
server.
<TFTP server>
[Backup/Restore]
Put the backup file you want to restore into a
1/1
1 Data Backup
2 Data Restore
3 Server Address
4 Protocol
desired directory of TFTP server and specify
it as the directory for downloading.
STEP 2: Display the Menu screen, and select Setting.
5 FTP Settings
STEP 3: Select 3 Data Backup/Restore.
Select an item by one of the following operations.
• Touch panel operation.
• Highlight an item by using
, and press
,
or OK.
• Press 3 .
Back
OK
STEP 5: Select a protocol used by the server which
stores the backup file.
92
Select an item by one of the following operations.
• Touch panel operation.
• Highlight an item by using
, and press
or
OK.
• Press 1 or 2 , and press
or OK.
[Backup/Restore]
1 Data Backup
2 Data Restore
3 Server Address
4 Protocol
1/1
[Protocol]
1/1
5 FTP Settings
1 FTP
2 TFTP
Back
OK
STEP 8: Select 1 User ID.
Back
Select an item by one of the following operations.
• Touch panel operation.
• Highlight an item by using
, and press
,
or OK.
• Press 1 .
OK
STEP 6: The display goes back to the Backup/Re-
[FTP Settings]
store screen.
1/1
1 User ID
When 1 FTP is selected here, go to the
2 Password
3 Folder
next Step (STEP 7).
When 2 TFTP is selected here, go to the
next STEP 15.
STEP 7: Select 5 FTP Settings.
Select an item by one of the following operations.
• Touch panel operation.
• Highlight an item by using
, and press
,
or OK.
• Press 5 .
Back
OK
STEP 9: Enter a User ID.
Enter a User ID by using digit keys, then press
or OK.
93
[User ID]
[Password]
A
Input a user ID.
TIP
Input a password.
Back
BK
BK
OK
For details on character entry method, see HOW TO
INPUT CHARACTERS.
TIP
OK
For details on character entry method, see HOW TO
INPUT CHARACTERS.
Select an item by one of the following operations.
• Touch panel operation.
• Highlight an item by using
, and press
,
or OK.
• Press 3 .
Select an item by one of the following operations.
• Touch panel operation.
• Highlight an item by using
, and press
,
or OK.
• Press 2 .
[FTP Settings]
Back
STEP 12:The display goes back to the FTP Settings
screen. Select 3 Folder.
STEP 10:The display goes back to the FTP Settings
screen. Select 2 Password.
[FTP Settings]
1/1
1/1
1 User ID
2 Password
3 Folder
1 User ID
2 Password
3 Folder
Back
A
OK
STEP 11:Enter a password.
Back
OK
STEP 13:Enter the directory where the backup file is
Enter a password by using digit keys, and press
or OK.
stored.
94
Enter the directory and press
[Folder]
or OK.
• Press
3 .
[Backup/Restore]
A
1/1
1 Data Backup
2 Data Restore
3 Server Address
4 Protocol
Input a folder name.
5 FTP Settings
TIP
OK
Back
BK
For details on character entry method, see HOW TO
INPUT CHARACTERS.
OK
which stores the backup file.
For example, to set the IP address of
10.41.208.205, enter 10*41*208*205 [separate
with an asterisk (*)].
or Back to display the
Backup/Restore screen.
[FTP Settings]
Back
STEP 16:Enter an IP address of the FTP/TFTP server
STEP 14:The display goes back to the FTP Settings
screen. Press
1/1
[Server Address]
1 User ID
1
‘*‘For‘.‘
2 Password
3 Folder
0 .
Back
OK
BK
STEP 15:Select 3 Server Address.
0 .
0 .
Back
0
OK
After entering an IP address, press
Select an item by one of the following operations.
• Touch panel operation.
• Highlight an item by using
, and press
,
or OK.
or OK.
STEP 17:The display goes back to the Backup/Restore screen. Select 2 Data Restore.
95
Select an item by one of the following operations.
• Touch panel operation.
• Highlight an item by using
, and press
,
or OK.
• Press 2 .
[Backup/Restore]
Note
Do not change the extension (.tgz) of the backup file. If
the extension is changed, the file cannot be restored
properly.
Note
A maximum of 20 characters ("0-9", "A-Z", "a-z", "*",
"#", ".", "-" or "_") can be entered as a file name.
1/1
1 Data Backup
2 Data Restore
3 Server Address
4 Protocol
TIP
When changing the default file name, press BK once to
delete the default file name and enter a new file name
by using the digits keys.
TIP
For details on character entry method, see HOW TO
INPUT CHARACTERS.
5 FTP Settings
TIP
To delete an entered character, press BK.
STEP 19:Press
Back
OK
While downloading the backup data, the LCD displays “Downloading...” first and “Saving...”.
STEP 18:The default file name will be displayed as follows:
Note
[Data Restore]
A
the display changes as follows:
PersonalData.tgz
Cancel
Be sure not to turn OFF the DT750 while "Saving..." is
displayed on the LCD.
STEP 20:After the downloading process is complete,
Input a folder name.
BK
or Exec to start restoring the back-
up data to the telephone.
Download Complete!
Exec
Exit
96
STEP 21:The display goes back to the Backup/Restore screen by Exit.
Note
When the downloading process ends in failure, "Download Failed!" is displayed on the LCD. Check to see the
following and make a retry.
Check Points
Actions
Download file is not
placed in the specified
directory.
Place the download file in
the specified directory.
A different file name is
specified between
DT750 and FTP/TFTP
server.
Set the same file name
from both DT750 and FTP/
TFTP server.
Incorrect IP address of
Set the proper IP address
FTP/TFTP server has
been entered from the of FTP/TFTP server.
telephone.
The power to FTP/TFTP
server or network
Turn on the power.
equipment is OFF.
LAN cable is
disconnected.
Reconnect the cable
securely.
97
This page is for your notes.
98
3. BASIC OPERATION
This chapter describes the following basic operation of
DT750.
•
•
•
•
•
•
•
•
•
•
•
•
•
•
•
•
•
•
•
•
•
•
•
TO LOGIN
TO LOGOUT
TO MAKE AN EXTERNAL CALL
TO MAKE AN INTERNAL CALL
TO ANSWER AN EXTERNAL CALL
TO ANSWER AN INTERNAL CALL
MULTILINE APPEARANCE
TO HOLD A CALL
TO PLACE A CALL ON EXCLUSIVE HOLD
TO TRANSFER A CALL
TO ORIGINATE A CALL USING SELECTIVE
DIALING (DYNAMIC DIAL PAD, PRESET
DIAL)
SPEED CALLING - STATION/GROUP
SPEED CALLING - SYSTEM
LAST NUMBER REDIAL
VOICE CALL
THREE-PARTY CONFERENCE
VOICE MAIL SYSTEM
DO NOT DISTURB
HOW TO INPUT CHARACTERS
SECURITY MODE
EMERGENCY CALL
.PHONEBOOK
CALL HISTORY
99
TO LOGIN
STEP 1: When login mode is activated, the telephone
prompts for Login ID and Password.
1:25 PM MON 12 JUL 2010
MIC
DND
>>>
Time/Feature Activity
Information Area of LCD
Login ID :
Password :
Cancel
Back
TO LOGOUT
Set
STEP 1: Press the preassigned Logout on the terminal.
OK
STEP 2: Enter Login ID and press Set.
(Station number is usually used as the Login code.)
Login ID :
Password :
Cancel
Back
TIP
The soft key location is an example.
TIP
For the assignment of Logout, contact the PBX maintenance personnel.
2000
Set
1:25 PM MON 12 JUL 2010
MIC
DND
>>>
OK
STEP 3: Enter a password and press OK.
STEP 2: “LOGOUT?” is displayed on the LCD of the
Login ID :
Password :
Cancel
Back
terminal.
2000
Set
*****
OK
LOGOUT?
1:25 PM
L-OUT
STEP 4: If the Login ID and password is accepted, display changes to normal idle status.
MON 12 JUL 2010
>>>
STEP 3: Press the Logout on the terminal again.
100
STEP 3: Dial desired telephone number.
TO MAKE AN EXTERNAL CALL
When dialed telephone number is registered in Personal Directory, the corresponding name information
will be displayed on LCD while you are hearing a ringback tone or are engaged in a conversation. According
to the initial settings, the display may differ from the following examples. For more information, contact the
system administrator.
Note
(while hearing a ringback tone)
Dialed Code + Number
1:25 PM
MIC
STEP 4: Use handset or MIC to start a conversation.
This section describes the Normal Dial Mode. Regarding the other mode, see TO ORIGINATE A CALL
Display indicates:
USING SELECTIVE DIALING (DYNAMIC DIAL
PAD, PRESET DIAL).
STEP 1: Lift the handset or press
receive a dial tone.
Speaker
9XXXXXXXXX
MON 12 JUL 2010
>>>
(while in a conversation)
• When dialed number is registered in Personal Directory
, and you will
Name Information
registered in
Personal Directory
Line Key which accommodates
My Line of the telephone
Elapsed Time
00:05
TOM JONES
MIC
DND
31313
Dialed Code
+ Number
9XXXXXX*
>>>
Station Number
of My Line
31313
1:25 PM MON 12 JUL 2010
MIC
DND
>>>
Note
In the above case, a maximum of eight digits of the
number (including “*”) can be displayed. If the dialed
number exceeds eight digits, “the first seven digits of
the number + *” or “the last seven digits of the number +
*” are displayed. For more information, contact the system administrator.
STEP 2: Dial the Central Office access code, e.g. 9.
• When dialed number is not registered in Personal Directory
Dialed Code
9
1:25 PM MON 12 JUL 2010
MIC
DND
>>>
101
Elapsed Time
TO MAKE AN INTERNAL CALL
Dialed Code
+ Number
When dialed station number is registered in Personal
Directory, the corresponding name information will be
displayed on LCD while you are hearing a ringback
tone or are engaged in a conversation. According to
the initial settings, the display may differ from the following examples. For more information, contact the
system administrator.
00:05
MIC
TIP
DND
9XXXXXXXXX
>>>
My Line is an actual line that is directly associated with
station number of the telephone. The user can make/
answer a call via this line. Usually, My line is seized
automatically only by lifting the handset or pressing
Speaker.
Note
This section describes the Normal Dial Mode. Regarding the other mode, see TO ORIGINATE A CALL
USING SELECTIVE DIALING (DYNAMIC DIAL
PAD, PRESET DIAL).
STEP 1: Lift handset or press
ceive a dial tone.
Speaker
, and you will re-
Line Key which accommodates
My Line of the telephone
31313
Blink
Station Number
of My Line
31313
1:25 PM MON 12 JUL 2010
MIC
DND
>>>
STEP 2: Dial a desired station number. Display indicates the dialed number.
(while hearing a ringback tone)
• When dialed station number is registered in Personal Directory
102
Name Information registered
in Personal Directory
Dialed Station Number
Dialed Station Number
31314
1:25 PM MON 12 JUL 2010
MIC
DND
>>>
31314
MARY HARRIS
MIC
>>>
• When dialed station number is not registered in Personal
Directory
TIP
Dialed Station Number
1:25 PM
MIC
31314
MON 12 JUL 2010
>>>
STEP 3: Use the handset or MIC to start a conversation.
(while in a conversation)
• When dialed station number is registered in Personal Directory
Name Information
registered in
Personal Directory
Dialed Station Number
31314
MARY HARRIS
MIC
DND
>>>
• When dialed station number is not registered in Personal
Directory
103
My Line is an actual line that is directly associated with
station number of the telephone. The user can make/
answer a call via this line. Usually, My line is seized
automatically only by lifting the handset or pressing
Speaker.
TO ANSWER AN EXTERNAL CALL
Calling Party
Telephone Number
When calling party telephone number is registered in
Personal Directory, the corresponding name information will be displayed on LCD while you are hearing a
ringing tone or are engaged in a conversation. According to the initial settings, the display may differ from the
above example. For more information, contact the system administrator.
MIC
DND
01234567
>>>
• When caller ID is not received
Trunk
Type
STEP 1: You hear the ringing tone. Call Indicator
Lamp flash red.
3
DDD
1:25 PM MON 12 JUL 2010
MIC
DND
>>>
Line Key receiving an Incoming Call
31315
STEP 2: Press
Answer
or touch the appropriate Line
Key.
Starts to flash
(while hearing a ringing tone)
Status icon changes as follows:
• When calling party telephone number is registered in Personal Directory:
31315
Name Information registered
in Personal Directory
TOM JONES
MIC
DND
Trunk
Number
STEP 3: Lift the handset to answer the call.
(while in a conversation)
• When calling party telephone number is registered in Personal Directory:
>>>
Name Information
registered in
Personal Directory
• When calling party telephone number is not registered in
Personal Directory:
Elapsed
Time
00:05
TOM JONES
MIC
DND
104
>>>
• When calling party telephone number is not registered in
Personal Directory:
Elapsed
Time
TO ANSWER AN INTERNAL CALL
The following procedure explains how to answer an
internal call routed to My Line of the telephone.
Calling Party
Telephone Number
When calling station number is registered in Personal
Directory, the corresponding name information will be
displayed on LCD while you are hearing a ringing tone
or are engaged in a conversation. According to the initial settings, the display may differ from the above
example. For more information, contact the system
administrator.
00:05
MIC
DND
01234567
>>>
• When caller ID is not received
Elapsed
Time
Trunk
Type
Trunk
Number
STEP 1: You hear the ringing tone. Call Indicator
Lamp flashes red.
3
00:05
DDD
1:25 PM MON 12 JUL 2010
MIC
DND
>>>
TIP
Line Key which accommodates
My Line of the telephone
When an incoming call is terminated to My Line of the
telephone, the user can usually answer the call only by
lifting the handset or pressing Speaker.
31313
Starts to flash
(while hearing a ringing tone)
• When calling station number is registered in Personal Directory:
Name Information registered
in Personal Directory
Calling Station
Number
31314
MARY HARRIS
MIC
>>>
• When calling station number is not registered in Personal
Directory:
105
MULTILINE APPEARANCE
Calling Station
Number
STEP 2: Press
This feature allows you to accommodate the lines
(other telephone’s station number) other than My Line
on the Programmable Line/Feature Keys. When
accommodating other telephone’s station number on
the Programmable Line/Feature Key, the user can
answer the call routed to the other telephone by
pressing the key.
31314
MON 12 JUL 2010
>>>
1:25 PM
MIC
Answer
or touch the appropriate Line
Key.
Status icon changes as follows:
31313
TIP
STEP 3: Lift the handset to answer the call.
• TO ANSWER A CALL
(while in a conversation)
• When calling station number is registered in Personal Directory:
Name Information
registered in
Personal Directory
MARY HARRIS
MIC
For the setting of Multiline Appearance, contact the System Maintenance Administrator.
STEP 1: A call is terminated to the telephone whose
station number is accommodated to the
MULTILINE APPEARANCE Feature key.
(ringing and flashing Call Indicator lamp alert
user to incoming call).
Calling Station
Number
31314
>>>
MULTILINE APPEARANCE Feature key
31315
• When calling station number is not registered in Personal
Directory:
Starts to false
Calling Station
Number
1:25 PM
MIC
TIP
STEP 2: Touch the MULTILINE APPEARANCE Fea-
31314
MON 12 JUL 2010
>>>
ture key on the display.
red.
When an incoming call is terminated to My Line of the
telephone, the user can usually answer the call only by
lifting the handset or pressing Speaker.
106
Speaker
lamp lights
TO HOLD A CALL
Status icon changes as follows:
31315
STEP 3: Lift handset to start a conversation.
STEP 1: While engaged in a Two-party call:
Line Key which is being used
Speaker
lamp goes off.
31313
STEP 2: Press
HOLD
to hold the call in progress.
Status icon changes as follows:
31313
31313
Flashing
Held Station Number
HOLD
1:25 PM
XXXX
MON 12 JUL 2010
MIC
>>>
STEP 3: The person on the other end hears the music
on hold.
STEP 4: Replace the handset.
• TO RETRIEVE
STEP 1: Lift handset or press
Speaker
.
STEP 2: Lift the handset and touch the held Line Key
107
on the display.
TO PLACE A CALL ON EXCLUSIVE
HOLD
Status icon changes as follows:
This feature allows a user to place a call on hold and to
exclude all other users from retrieving the Held Call.
31313
TIP
Any station with this line appearance can retrieve the
call.
Note
Line key will be disabled while the information of XML
application is displayed on to the LCD. DT750 placing
other line on hold by pressing HOLD can bring back
the call pressing HOLD again, in Hold Fixation
Mode.
Note
STEP 1: While engaged in a Two-party call:
Line Key which is being used
31313
Conditions for Hold Fixation Mode;
- Exclusive Hold cannot use at the same time.
- When collaborating with Softphone, this service is not
available.
STEP 2: Press
HOLD
twice. The LCD displays as fol-
lows:
Status icon changes as follows:
• IF UNANSWERED
31313
31313
STEP 1: After preprogrammed time, Automatic Recall
is initiated.
Flashing
STEP 2: Call Indicator lamp flashes and the user
Held Station Number
hears Automatic Recall Ringer.
E_HOLD
1:25 PM
MIC
Status icon changes as follows:
XXXX
MON 12 JUL 2010
>>>
31313
STEP 3: Replace the handset.
Flashing
• TO RETRIEVE
STEP 1: Lift handset or press
108
Speaker
.
STEP 2: Touch the held Line Key on the display. The
TO TRANSFER A CALL
conversation is re-established.
STEP 1: During a conversation, press Transfer . Receive Special Dial Tone. The first party is
placed on hold and hears the music on hold.
Status icon changes as follows:
31313
Note
Only the telephone that set Exclusive Hold option can
retrieve the call.
TRANSFER
1:25 PM MON 12 JUL 2010
MIC
>>>
• IF UNANSWERED
STEP 2: Dial the destination party’s number. Receive
Ringback Tone.
STEP 1: After preprogrammed time, Automatic Recall
is initiated.
Destination station
or trunk number
STEP 2: Call Indicator lamp flashes and the user
hears Automatic Recall Ringer.
TRANSFER
XXXX
1:25 PM MON 12 JUL 2010
MIC
>>>
Status icon changes as follows:
31313
STEP 3: The destination party answers the call. An-
Flashing
nounce the call to the destination party.
STEP 4: Replace the handset. The transfer is complete.
109
TO ORIGINATE A CALL USING
SELECTIVE DIALING
(DYNAMIC DIAL PAD, PRESET
DIAL)
Input Dial Number
Clr
Speaker
2000
Cnl
Dynamic Dial Pad
STEP 3: Lift handset or press
STEP 1: Enter desired telephone number (Digit Keys
0-9, *, and #).
STEP 3: Press the originating Line Key and lift hand-
STEP 2: LED on
Speaker
or
set.
lights and hear key touch
tone.
STEP 3: The dialed number appears on the top of
Note
LCD.
2000
1:25 PM MON 12 JUL 2010
MIC
DND
>>>
Note
.
Pressing Speaker or going off-hook is not necessary.
Preset Dial
STEP 1: Enter desired telephone number (Digit Keys
0-9, *, and #).
STEP 2: The dialed number appears on the top of
LCD.
110
Originating call operation is cancelled by the following
Soft Key operation;
- Press Exit or Cancel.
- Press Clear and cancel by one digit.
Display indicates the digits dialed.
ONE-TOUCH SPEED CALLING KEYS
• TO MAKE A CALL
0821111
1:25 PM MON 12 JUL 2010
MIC
DND
>>>
STEP 1: Touch the desired One-Touch Speed Calling key on the display.
STEP 4: Press
Feature
0821111
STEP 2:
Speaker
again to save the number.
Feature
lamp goes off.
SPEED SET
1:25 PM MON 12 JUL 2010
MIC
DND
>>>
lamp lights red. A call is automatically
made to a registered party.
• TO VERIFY
0821111
MON 12 JUL 2010
>>>
1:25 PM
MIC
STEP 3: Lift the handset.
Speaker
STEP 1: Press
.
Feature
lamp lights red.
STEP 2: Touch a desired One-Touch Speed Calling
lamp goes off.
key on the display.
SPD
• TO SET
STEP 1: Press
Feature
Feature
.
Feature
lamp lights red.
STEP 2: Touch a desired One-Touch Speed Calling
STEP 3: Display indicates the assigned number.
key on the display.
0821111
1:25 PM MON 12 JUL 2010
MIC
DND
>>>
STEP 3: Enter a desired telephone number or feature
access code (up to 32 digits) on the keypad.
111
STEP 4: Press
TIP
TIP
TIP
TIP
Feature
again.
Feature
lamp goes off.
SPD
To program a hook switch for transfer or feature activation, press
Recall
as first digit. (! displays on LCD.)
To program a pause, press
Recall
as any digit other
than the first digit. (– displays on LCD.)
^
To program a Voice Call, press Transfer after dialing
BK
>>>
station number. (V displays on LCD.)
One-Touch Speed Calling key for feature access:
One-Touch Speed Calling key may be used as a feature key by storing the feature access code. The features may be programmed on a system basis by the
Telephony Server Administrator.
Access codes may be stored in conjunction with telephone numbers. For example, one button can be programmed by the user to transfer to a certain extension.
TIP
For the key to which no name information is registered,
the character "SPD" will be displayed.
STEP 3: Enter desired name on the keypad. Display
indicates the name entered.
NEC BNET
^
• TO REGISTER NAME ONTO ONETOUCH SPEED CALLING KEY
STEP 1: Press NAME.
BK
>>>
STEP 4: Press >>> twice to display the following soft
keys.
Push Speed Calling Key
1:25 PM MON 12 JUL 2010
NAME
>>>
NEC BNET
^
SET CLEAR CANCEL >>>
STEP 2: Press a desired One-Touch Speed Calling
STEP 5: Press SET to save the entered name.
key.
112
1:25 PM
NAME
MON 12 JUL 2010
>>>
Name information displayed on the One-Touch
Speed Calling key changes as follows:
NEC BNET
TIP
To delete the entry, press DEL or BK and delete each
one character.
TIP
To delete the whole setting, press CLEAR and back to
idle status.
113
Character Code For Name Information of One-Touch Speed Calling Key
Uppercase Alphabetical Characters
DIGIT
KEY
CHARACTER
1
2
3
4
5
6
7
8
9
0
#
1
A
D
G
J
M
P
T
W
0
#
B
E
H
K
N
Q
U
X
@
&
C
F
I
L
O
R
V
Y
.
(
a
d
g
j
m
S
t
Z
,
)
b
e
h
k
n
p
u
w
’
[
c
f
i
l
o
q
v
x
:
]
2
3
4
5
6
r
8
y
;
!
s
z
-
?
7
9
/
114
Uppercase European Characters
DIGIT
KEY
CHARACTER
1
2
3
4
5
6
7
8
9
0
#
.
A
D
G
J
M
P
T
W
0
#
,
B
E
H
K
N
Q
U
X
:
C
F
I
L
O
R
V
Y
!
À
È
Ì
5
Ñ
S
Ù
Z
?
Á
É
Í
Ò
Ú
9
-
Â
Ê
Î
Ó
7
Û
+
Ã
Ë
Ï
Ô
Ü
%
Ä
3
4
Õ
8
&
Å
Ö
/
Æ
Œ
(
Ç
Ø
)
2
6
=
¿
¡
1
* The shaded area indicates the characters which cannot be entered.
115
Lowercase European Characters
DIGIT
KEY
CHARACTER
1
2
3
4
5
6
7
8
9
0
#
.
a
d
g
j
m
p
t
w
0
#
,
b
e
h
k
n
q
u
x
:
c
f
i
l
o
r
v
y
!
à
è
ì
5
ñ
s
ù
z
?
á
é
í
ò
ú
9
-
â
ê
î
ó
7
û
+
ã
ë
ï
ô
ü
%
ä
3
4
õ
8
&
å
ö
/
æ
œ
(
ç
ø
)
2
6
=
¿
¡
1
* The shaded area indicates the characters which cannot be entered.
116
STEP 5: Press
SPEED CALLING - STATION/GROUP
• TO SET
STEP 1: Press Speaker . Receive Dial Tone.
lamp lights red.
.
Speaker
lamp goes off.
SPEED SET
1:25 PM MON 12 JUL 2010
MIC
>>>
Speaker
• TO MAKE A CALL
STEP 2: Dial the Speed Calling – Station/Group Access Code.
SPEED
1:25 PM
MIC
Speaker
STEP 1: Press
(Redial). Receive Dial Tone.
lamp lights red.
XX
MON 12 JUL 2010
>>>
Speaker
Line Key which accommodates
My Line of the telephone
31313
TIP
For the assignment of Speed Calling - Station/Group
Access Code, contact the PBX maintenance personnel.
LNR[ ]/SPD[_ _]
STEP 3: Dial the desired abbreviated call code. In this
MIC
example, “01” is dialed as the desired abbre-
PICK
–1
XXXXXX
FDA
>>>
viated call code.
STEP 2: Press the desired speed calling number.
SPEED
1:25 PM
MIC
XX01
MON 12 JUL 2010
>>>
MIC
01
XXXXXX
>>>
DND
STEP 4: Dial the destination telephone number.
STEP 3: Lift the handset.
1:25 PM
MIC
0471821111
MON 12 JUL 2010
>>>
117
Speaker
lamp goes off.
ing – System” key, dial the Speed Calling –
SPEED CALLING - SYSTEM
System Access Code, then the abbreviated
• TO SET SPEED CALLING -SYSTEM
KEY (ONE-TOUCH SPEED CALLING KEY)
STEP 1: Press
Feature
.
Feature
call code.
LAST NUMBER REDIAL
lamp lights red.
To Recall Last Number Dialed
STEP 2: Press a desired One-Touch Speed Calling
STEP 1: Press
(Redial). The user hears Dial tone
and the last number dialed is displayed.
Speaker lamp lights red.
key. The LCD displays previously stored digits.
Line Key which accommodates
My Line of the telephone
STEP 3: Dial the Speed Calling – System Access
Code and the abbreviated call code.
STEP 4: Press
Feature
again.
Feature
31313
lamp goes off.
–1
XXXXXX
FDA
>>>
LNR[# or *]/SPD[_ _]
SPEED SET
1:25 PM MON 12 JUL 2010
MIC
PICK
Number to
be Redialed
STEP 2: Press
• TO OPERATE FROM SPEED CALLINGSYSTEM KEY
(Redial)
until a desired number is
displayed. Up to 5 previously dialed numbers
are available.
STEP 1: Press the Speed Calling – System key.
STEP 3: Press # or
1:25 PM
. The number on the display is
automatically redialed.
XXXX
MON 12 JUL 2010
STEP 4: When party has answered, lift handset or
speak hands-free.
STEP 2: If the DT750 does not have the “Speed Call118
Note
THREE-PARTY CONFERENCE
A-law Countries [Europe, Australia, Russia, Latin America, Middle near East, other Asian nations]: #
µ-law Countries [North America, Japan, Hong Kong,
Taiwan]:
STEP 1: While Station A and Station B are engaged in
a Two-party connection, Station A presses
Transfer .
Station A hears Special Dial Tone.
Station B hears the music on hold.
VOICE CALL
Using Feature Key
STEP 1: Lift handset.
TRANSFER
1:25 PM MON 12 JUL 2010
MIC
>>>
STEP 2: Dial desired station number.
STEP 3: Press Voice.
STEP 2: Station A dials a desired Station Number
VOICE
1:25 PM
MIC
(Station C).
2000
MON 12 JUL 2010
>>>
Station Number
of Station C
STEP 4: Speak to called party.
TRANSFER
XXXX
1:25 PM MON 12 JUL 2010
MIC
CONF
>>>
Using Soft Key
STEP 1: Lift handset.
STEP 3: After Station C answers the transferred call,
STEP 2: Dial desired station number; VOICE appears
Station A presses CONF.
while station is ringing.
STEP 4: Three-Party call is now established.
2000
1:25 PM MON 12 JUL 2010
MIC
VOICE
>>>
CONF
1:25 PM
MIC
STEP 3: Press VOICE. Speak to called party.
119
MON 12 JUL 2010
>>>
VOICE MAIL SYSTEM
DO NOT DISTURB
To Set
To Set
STEP 1: Press
STEP 2: Press
Feature
.
STEP 1: Press DND when the telephone is in idle state
(on hook).
(Enter).
STEP 3: Dial desired “Voice Mail System” access
DND SET
1:25 PM
DND
code.
STEP 4: Press
Feature
again.
TIP
SPEED SET
1:25 PM MON 12 JUL 2010
MIC
DND
>>>
With Soft Key operation, "DND" flashes when set.
To Cancel
To Originate
STEP 1: Press flashing DND.
STEP 1: Press
(Enter). The Shortcut menu screen
is displayed on LCD.
STEP 2: Select 2 Voice Mail and press
(Right-cursor)
MON 12 JUL 2010
DND CANCEL
1:25 PM MON 12 JUL 2010
MIC
DND
>>>
(Enter),
or OK to access a preset
Voice Mail System.
STEP 3: Hear ringback tone.
120
HOW TO INPUT CHARACTERS
This section explains how to enter characters on the text input screen such as Name or User ID, etc.
• Character Entry Mode
When entering characters from the telephone set, the following three modes are available: uppercase alphabetical character, lowercase alphabetical character and numeric character. The character entry mode can be
changed by pressing
(alphabetical / numeric) or from the SubMenu screen (uppercase / lowercase alphabet).
*
Indicates the enabled character mode.
Uppercase Alphabetical
Character Mode
[Name]
A M
Select “2 Word-case” to switch
between uppercase and lowercase.
Lowercase Alphabetical
Character Mode
[Name]
a M
Input a name.
Input a name.
SubMenu
1 Change-word
2 Word-case
3 Word-width
4 Delete
BK
Option
Back
OK
By pressing “*” key
or from SubMenu
(select “1 Change-word”)
Numeric Character Mode
[Name]
1 M
BK
Option
7
8
9
10
Input a name.
Back
BK
5 Copy
6 Cut
Paste
Space
Return
Overwrite/Insert
Cancel OK
OK
The enabled entry mode is indicated in the top portion of the LCD screen.
121
Option
Back
OK
To display the SubMenu screen, press Option while the text input screen is displayed. Also, the following operations are available from the SubMenu screen.
-For firmware version 4.0.0.0 or later : HELP button can also be used instead of Option .
-For firmware version earlier than 4.0.0.0 : Menu button can also be used instead of Option .
SubMenu
1 Change-word
2 Word-case
3 Word-width
4 Delete
5 Copy
6 Cut
7
8
9
10
Paste
Space
Return
Overwrite/Insert
TIP
Cancel OK
Submenu Items
Descriptions
Change-word
Change character entry mode between uppercase alphabetical, lowercase alphabetical and numeric character.
Word-case
Switch between uppercase and lowercase.
Word-width
Not used.
Delete
Delete a single character.
Copy
Copy the specified characters.
Cut
Cut the specified characters.
Paste
Paste the specified characters.
Space
Enter a space.
Return
Start a new line.
Overwrite/Insert
Write over existing characters.
122
• Character Code List
<Character Code For English (1/2)>
DIGIT
KEY
1
2
3
4
5
6
7
8
9
0
CASE
SHIFT
1st
2nd
3rd
4th
5th
6th
A
.
,
\
1
?
!
a
A
a
A
A
a
D
B
b
E
C
c
F
2
2
3
d
e
f
3
A
G
H
I
4
a
g
h
i
4
A
J
K
L
5
a
j
k
l
5
A
M
N
O
6
a
m
n
o
6
A
P
Q
R
S
7
a
p
q
r
s
7
A
T
t
U
u
V
v
8
8
W
w
X
x
Y
y
Z
z
[SP]
0
A
a
A
a
Note:
8th
9th
10th
“
@
:
;
Note
a
a
7th
9
9
Not available from Firmware version 3.0.0.0 and later
123
11th
12th
13th
<Character Code For English (2/2)>
A
a
A
#
2nd
3rd
4th
5th
6th
7th
8th
9th
10th
*
#
.
/
:
~
!
@
$
%
11th
12th
13th
14th
15th
16th
17th
18th
19th
20th
^
&
(
)
'
?
"
_
+
-
Note2
a
Note1
A
a
*
1st
21th
22th
23th
24th
25th
26th
27th
28th
29th
30th
=
[
]
{
}
<
>
,
;
\
Used as a case shift key. Shifts the characters between alphabetical and numeric.
Note1
Note1:
Note2:
# and
*
is the same for Russian, Turkish and other Languages.
Not available from Firmware version 3.0.0.0 and later.
124
<Character Code For Russian>
DIGIT
KEY
1
2
3
4
5
6
7
8
9
0
Note:
CASE
SHIFT
1st
2nd
3rd
4th
5th
6th
7th
8th
9th
10th
11th
12th
13th
14th
15th
.
,
:
!
?
+
-
%
&
/
(
)
=
¿
¡
A
A
а
Д
Б
б
Е
В
в
Ё
Г
г
Ж
З
a
д
е
ё
ж
з
A
И
Й
К
Л
a
и
й
к
л
A
М
Н
О
П
a
м
н
о
п
A
Р
С
Т
У
a
р
с
т
у
A
Ф
Х
Ц
Ч
a
ф
х
ц
ч
A
Ш
ш
Э
э
Щ
щ
Ю
ю
Ъ
ъ
Я
я
Ы
ы
A
a
A
a
a
A
a
A
a
Ь
ь
[SP]
# and
2)>.
*
is the same for English. Refer to the <Character Code For English (2/
125
<Character Code For Turkish>
DIGIT
KEY
1
2
3
CASE
SHIFT
1st
2nd
3rd
4th
5th
6th
7th
8th
9th
10th
11th
12th
13th
14th
15th
.
,
:
!
?
+
-
%
&
/
(
)
=
¿
¡
B
b
E
e
C
c
F
f
Ç
ç
a
A
a
D
d
A
G
Ğ
H
I
İ
a
g
ğ
h
I
i
A
J
j
M
m
P
p
T
t
Y
y
K
k
N
n
R
r
U
u
Z
z
L
l
O
o
S
s
Ü
ü
A
a
A
a
A
4
5
6
7
8
9
0
Note:
a
A
a
A
a
A
a
A
a
A
a
Ö
ö
Ş
Ş
V
v
[SP]
# and
2)>.
*
is the same for English. Refer to the <Character Code For English (2/
126
<Character Code For Other Languages>
DIGIT
KEY
1
2
3
4
5
6
7
8
9
0
Note:
CASE
SHIFT
1st
2nd
3rd
4th
5th
6th
7th
8th
9th
10th
11th
12th
13th
14th
15th
.
,
:
!
?
+
-
%
&
/
(
)
=
¿
¡
B
b
E
e
H
h
K
k
N
n
Q
q
U
C
c
F
f
I
i
L
l
O
o
R
r
V
À
à
È
è
Ì
ì
Á
á
É
é
Í
í
Â
â
Ê
ê
Î
î
Ã
ã
Ë
ë
Ï
ï
Ä
ä
Å
å
Æ
æ
Ç
ç
Õ
õ
Ö
ö
Œ
œ
Ø
ø
t
u
v
Ò
ò
ß
ß
Ú
ú
Ô
ô
a
Û
û
Ü
ü
A
W
w
X
x
Y
y
Ñ
ñ
S
s
Ù
ù
Z
z
Ó
ó
A
A
a
D
d
G
g
J
j
M
m
P
p
T
A
a
A
a
A
a
A
a
A
a
A
a
A
a
a
A
a
[SP]
# and
2)>.
*
is the same for English. Refer to the <Character Code For English (2/
127
<Number Code>
DIGIT
KEY
CASE
SHIFT
1st
1
1
1
2
1
2
3
1
3
4
1
4
5
1
5
6
1
6
7
1
7
8
1
8
9
1
9
0
1
0
#
1
*
*
1
Note:
2nd
3rd
4th
5th
6th
7th
8th
9th
10th
11th
12th
13th
14th
15th
#
.
@
/
(
)
,
-
_
:
‘
~
&
\
Used as a case shift key. Shifts the characters between alphabetical and numeric.
* When entering password, “0-9”, “*” and “#” are available.
“#” is entered by pressing # .
“*” is entered by pressing * .
128
• Character Entry Method
SubMenu
1 Change-word
As an example of character entry method, the following shows how to enter “Ken Kobus”.
2 Word-case
3 Word-width
STEP 1: Press 5 twice to enter “K”.
[Name]
1/2
4 Delete
A M
5 Copy
6 Cut
Input a name.
7 Paste
8 Space
K
STEP 3: Press
BK
Option
Back
OK
Cancel
(Enter) or OK
on the SubMenu to go
back to text input screen.
OK
[Name]
STEP 2: Press Option to display SubMenu screen,
and select 2 Word-case to switch the text
a M
Input a name.
input mode from uppercase to lowercase.
TIP
-For firmware version 4.0.0.0 or later
: HELP button can also be used instead of Option .
-For firmware version earlier than 4.0.0.0
: Menu button can also be used instead of Option
K
BK
Option
Back
STEP 4: Enter “en” by using digit keys.
Press 3 twice to enter “e”.
Press 6 twice to enter “n“.
129
OK
a M
[Name]
SubMenu
1 Change-word
Input a name.
1/2
2 Word-case
3 Word-width
4 Delete
5 Copy
6 Cut
Ken
BK
Option
Back
7 Paste
8 Space
OK
Cancel
OK
STEP 5: Press 0 once to enter a space.
STEP 7: Press
[Name]
(Enter) or OK
on the SubMenu to go
back to text input screen.
a M
Input a name.
[Name]
A M
Input a name.
Ken
BK
Option
Back
OK
Ken
STEP 6: Press Option to display SubMenu screen,
and select 2 Word-case to switch the text
BK
input mode from lowercase to uppercase.
TIP
Option
Back
STEP 8: Press 5 twice to enter “K”.
-For firmware version 4.0.0.0 or later
: HELP button can also be used instead of Option .
-For firmware version earlier than 4.0.0.0
: Menu button can also be used instead of Option
130
OK
back to text input screen.
[Name]
A M
[Name]
Input a name.
a M
Input a name.
Ken K
Ken K
BK
Option
Back
OK
BK
STEP 9: Press Option to display SubMenu screen,
and select 2 Word-case to switch the text
Back
OK
STEP 11:Enter “obus” by using digit keys.
input mode from lowercase to uppercase.
SubMenu
1 Change-word
Option
Press
three times to enter “o”.
Press
twice to enter “b“.
6
2
Press 8
Press 7
1/2
2 Word-case
3 Word-width
twice to enter “u”.
four times to enter “s“.
[Name]
4 Delete
a M
Input a name.
5 Copy
6 Cut
7 Paste
8 Space
TIP
Cancel
Ken Kobus
OK
BK
-For firmware version 4.0.0.0 or later
: HELP button can also be used instead of Option .
-For firmware version earlier than 4.0.0.0
: Menu button can also be used instead of Option
STEP 10:Press
STEP 12:Press
(Enter) or OK on the SubMenu to go
131
Option
(Enter)
Back
or OK.
OK
• To Overwrite Characters
SubMenu
9 Return
STEP 1: Place the cursor at the left of the characters
to be overwritten.
[Name]
2/2
10 Overwrite/Insert
A M
Input a name.
ABCDE
BK
Cancel
OK
STEP 4: Enter new words over existing characters. In
Option
Back
this example, “F” is entered.
OK
[Name]
STEP 2: Press Option.
A M
Input a name.
TIP
-For firmware version 4.0.0.0 or later
: HELP button can also be used instead of Option .
-For firmware version earlier than 4.0.0.0
: Menu button can also be used instead of Option .
ABFDE
STEP 3: On the following SubMenu screen, select
10 Overwrite/Insert and press
(Enter),
(Right-cursor)
BK
or OK.
132
Option
Back
OK
• To Copy and Paste Characters
SubMenu
1 Change-word
STEP 1: While characters which you want to copy are
displayed, press Option.
1/2
2 Word-case
3 Word-width
4 Delete
[Name]
A M
5 Copy
6 Cut
Input a name.
7 Paste
8 Space
Cancel
OK
ABCDE
STEP 3: Place the cursor at the starting point of the
BK
TIP
Option
Back
OK
target characters by using
(Left-cursor)
and press Start.
-For firmware version 4.0.0.0 or later
: HELP button can also be used instead of Option .
-For firmware version earlier than 4.0.0.0
: Menu button can also be used instead of Option
[Copy]
A
Input a name.
STEP 2: On the SubMenu screen, press
(Enter) or
OK while 5 Copy is highlighted, or press
5 .
ABCDE
Start
Back
STEP 4: Place the cursor at the end point of the target
characters
133
(Right-cursor) and
press End.
(or press 7 .)
[Copy]
A
SubMenu
1 Change-word
Input a name.
1/2
2 Word-case
3 Word-width
4 Delete
5 Copy
6 Cut
ABCDE
End
Back
7 Paste
8 Space
STEP 5: Place the cursor at position where you want
to paste the copied characters and press
Option.
Cancel
OK
STEP 7: The copied characters “CD” are inserted as
[Name]
follows:
A M
Input a name.
[Name]
A M
Input a name.
ABCDE
BK
TIP
Option
Back
CDABCDE
OK
BK
-For firmware version 4.0.0.0 or later
: HELP button can also be used instead of Option .
-For firmware version earlier than 4.0.0.0
: Menu button can also be used instead of Option.
STEP 6: On the SubMenu screen, select 7 Paste
and press
(Enter),
(Right-cursor)
or OK.
134
Option
Back
OK
SECURITY MODE
• TO LOCK THE TELEPHONE
DT750 has Security which prevents information
leakage from terminal. While the telephone is locked,
Security Lamp lights up.
STEP 1: Press Security on the telephone. The following message is displayed on LCD.
Security Lamp lights up.
Press Security Key.
Security Lock?
Cancel
STEP 2: Press
Security lock will be released.
Please input a password.
BK
Cancel
(Enter)
OK
or OK to place DT750 in Se-
curity mode.
OK
STEP 3: When the telephone is placed in Security
mode, Security Lamp lights red and the
Note
The default password to release a security lock is 0000.
Be sure to change the default password before placing
the telephone in security mode. For details on the password setting, see TO CHANGE PASSWORD in Terminal Setup.
Note
While the telephone is locked, Menu becomes disabled. Also, any features provided by the telephony
server, such as call origination or call answering, cannot be performed.
Note
Even when the telephone is reset for any reason (such
as power-off, etc.) while the telephone is placed in
security mode, the lock is not released.
Note
When the system administrator invalidates the security
mode, this function cannot be used. For details of the
security mode, contact the system administrator.
screen saver will be activated.
Security Lock
• TO UNLOCK THE TELEPHONE
STEP 1: Display the Password Entry screen by either
135
of the following operations.
•
•
Press any key while the screen saver is
activated.
Press Security while the screen saver is
activated.
Incorrect security code
password entered.
OK
Security lock will be released.
input a password.
BK
Cancel
OK
STEP 2: Enter the password and press
(Enter)
or
OK. Security Lamp is extinguished and Security Mode is canceled.
Note
When the password entry ends in failure, the following
error message is issued. In that case, press
or OK
and retry.
Password Error.
Retry?
Cancel
Note
OK
After a third attempt (if incorrect passwords are entered
three times consecutively), the following error message
is issued. Press
or OK. The telephone locks up,
and any key operation will be disabled for 10 minutes.
After 10 minutes, make a retry.
136
EMERGENCY CALL
The user can make a call to a predetermined
emergency telephone number while the telephone is
locked (in Security mode). This function is available on
the telephone with Security.
Note
The user can make a call to only the predetermined
number. When telephone numbers other than the predetermined emergency number are dialed, the following message appears (after a few seconds, the display
goes back to "Dial Emergency Number Only” screen).
Invalid Dial.
Note
The user can make an emergency call to only the predetermined number. For details on the setting of the
emergency number, contact the system administrator.
911
STEP 3: After a conversation, replace the handset.
STEP 1: Lift the handset while the telephone is locked
(the screen saver is activated).
The LCD turns to time display. (Security
mode is released.)
Dial Emergency Number Only
Unlock
Note
TIP
Emergency call cannot be made with Speaker.
When pressing Unlock, the telephone prompts for the
Security mode cancellation password.
STEP 2: Dial an emergency telephone number by
pressing digit keys(0-9, *, #).
Note
Emergency telephone number needs to be set in
advance. For the setting of the emergency telephone
numbers, contact the system administrator.
137
.
PHONEBOOK
If Local Phonebook is enabled by the setting
There are two types of Phonebook features: System
Phonebook and Local Phonebook.
on the system side, go to STEP2.
If Local Phonebook is disabled by the setting
on the system side, go to STEP 3.
System Phonebook
System Phonebook is used on a system basis. The
data entry is made by the Telephony Server
Administrator.
- OR Display the Menu screen, and select Directory.
Local Phonebook
Local Phonebook is used on a station basis. Up to 100
entries are available per station. The user can make
entries with key operation from the telephone. Up to 32
digits can be registered for each dial number. Up to 24
characters can be registered for each name.
If Local Phonebook is enabled by the setting
on the system side, go to STEP 2.
If Local Phone is disabled, the display
changes as follows. In that case, select 2
System and go to STEP 3.
Note
When the system administrator invalidates the Phonebook, this feature cannot be used. For details contact
the system administrator.
[Directory]
1/1
1 Personal
2 System
3 Corporate
• SYSTEM PHONEBOOK
To Search And Make A Call
Example: To Search For “NEC BNET”.
STEP 1: Press Pbook while Station is in Idle state.
TIP
4:26 PM
Pbook
138
OK
The Menu soft key is labeled as Back for firmware versions earlier than 4.0.0.0..
STEP 2: Press Sys.
MON 12 JUL 2010
MIC DND
Menu
or UP/DOWN to scroll the result.
Phonebook
Local
Sys
Name: NEC
NEC ABIKO
UP
DOWN
Cnl
STEP 3: Enter a name and press
perform a search.
(Enter) or
OK
Cnl
OK to
STEP 5: When “NEC BNET” appears, press
(Right-cursor) or OK.
ter),
Ex. To enter “NEC”:
6 twice to enter “N”.
3 twice to enter “E“.
Press 2 three times to enter “C“.
(En-
Press
Press
Name:
NEC
Clr
OK
Name: NEC
NEC BNET
UP
DOWN
or Eu-s/Eu-l shifts
characters between uppercase and lowercase.
(Lower-case character)
TIP
<<<
-Eu-s
Name: NEC BNET
Number: XXXXXXXX
More
Cnl
Cnl
(Upper-case character)
<<<
TIP
TIP
Cnl
STEP 6: The registered Phonebook data for “NEC
BNET” appears. From this screen, you can
make a call by going off-hook or pressing
Speaker .
>>>
If “>>>” is pressed on the above screen, the following
soft keys appear. Pressing
OK
-Eu-l
To delete an entered character, press
Cnl
or Clr.
To move the cursor one space to the right, press
or
“” once
STEP 4: A result of the search is displayed. Press
139
>>>
More appears in Phonebook data screen when the
number of characters (name) or digits (telephone
number) are exceeding displayable limit (Up to 17
characters or digits can be displayed at a time). If the
name or telephone number exceeds the displayable
limit, press
or More to display the last 17
characters/digits of the name/telephone number.
Example:
Name Suzuki Taro(JapanSumida) 24 characters
Number: 01234567890123456789 20 digits
Note
: Suzuki Taro(Japan
Name
Number : 01234567890123456
More
Cnl >>>
(Display area)
Name: Suzuki Taro(JapanSumida)
Number: 01234567890123456789
Name
:Taro(JapanSumida)
Number :34567890123456789
More
Cnl >>>
(Display area)
Name: Suzuki Taro(JapanSumida)
Number: 01234567890123456789
140
• LOCAL PHONEBOOK
Local Phonebook
To Add New Data
Srch
Example:
DT750 Station A registers “NEC” as new name and its
Telephone Number.
Add
Cnl
STEP 4: Enter a name and press
(Enter) or
OK.
Ex. To enter “NEC”:
STEP 1: Press Pbook or
in Idle state.
4:26 PM
Pbook
(Directory) while
Press
6 twice to enter “N”.
3 twice to enter “E“.
Press 2 three times to enter “C“.
Station is
Press
Add name:
NEC
Clr
MON 12 JUL 2010
MIC DND
- OR -
OK
>>>
If “>>>” is pressed on the above screen, the following
soft keys appear. Pressing
Display the Menu screen, and select Direc-
or Eu-s/Eu-l shifts
characters between uppercase and lowercase.
tory.
(Lower-case character)
TIP
<<<
-Eu-s
Cnl
STEP 2: Press Local.
(Upper-case character)
Phonebook
Local
Sys
<<<
Cnl
TIP
STEP 3: Local Phonebook screen appears. Press
Add.
TIP
141
-Eu-l
To delete an entered character, press
Cnl
or Clr.
To move the cursor one space to the right, press
“” once
or
STEP 5: Enter the telephone number by using digit
keys and press
(Enter) or OK.
Local Phonebook
Srch
Name: NEC
Number:
Clr
TIP
OK
To delete an entered character, press
Cnl
Add
Cnl
STEP 2: Name Entry screen appears.
or Clr.
Name:
STEP 6: “NEC” and its telephone number has been
added into Local Phonebook. Two seconds
later, the display returns to Local Phonebook
screen.
Clr
OK
>>>
STEP 3: Enter a name (in this example, “NEC” is entered) and press
(Enter) or OK. (If no appropriate data exists, the message “Entry not
found!” appears.)
Entry added!
Name:
NEC
To Search For Name
The procedure shown below is available in Local
Phonebook.
Clr
OK
>>>
If “>>>” is pressed on the above screen, the following
soft keys appear. Pressing
Example: To Find “NEC BNET”.
or Eu-s/Eu-l shifts
characters between uppercase and lowercase.
(Lower-case character)
STEP 1: While Local Phonebook screen is displayed,
press Srch. (If no data is registered in Local
Phonebook, the message “Local Phonebook
Empty” appears.)
TIP
<<<
-Eu-s
Cnl
(Upper-case character)
<<<
142
-Eu-l
Cnl
TIP
To delete an entered character, press
TIP
To move the cursor one space to the right, press
or Clr.
or
Note
“” once
If the name or telephone number exceeds the displayable limit, press
or More to display the last 17
characters/digits of the name/telephone number.
STEP 4: A result of the search is displayed. Press
or UP/DOWN to scroll the result.
Name: NEC
NEC ABIKO
UP
DOWN
OK
Cnl
STEP 5: When “NEC BNET” appears, press
(Right-cursor) or OK.
ter),
Name: NEC
NEC BNET
UP
DOWN
OK
(En-
Cnl
STEP 6: The registered data for “NEC BNET” appears.
From this screen, you can make a call by going off-hook or pressing Speaker .
Name: NEC BNET
Number: XXXXXXXX
More
Cnl
Pref
More appears in Phonebook data screen when the
number of characters (name) or digits (telephone number) are exceeding displayable limit (Up to 17 characters or digits can be displayed at a time).
>>>
143
To Edit An Entry
Edit Name:
Ho
Clr
Example:
To Modify Name “Home” to “House” and Telephone
Number “0123456789” to “0123456712”.
>>>
STEP 5: Enter “use” by using digit keys. After the modification has completed, press
(Enter) or
OK.
Press 8 twice to enter “u”.
Press 7 four times to enter “s“.
Press 3 twice to enter “e“.
STEP 1: Press >>> while the target Phonebook data is
displayed.
Name: Home
Number: 0123456789
More
Cnl
Pref
OK
>>>
Edit Name:
House
Clr
STEP 2: Press EDIT.
Name: Home
Number: 0123456789
<<<
EDIT
DEL
OK
>>>
If “>>>” is pressed on the above screen, the following
soft keys appear. Pressing
or Eu-s/Eu-l shifts
characters between uppercase and lowercase.
(Lower-case character)
STEP 3: The following name edit screen appears.
Edit Name:
Home
Clr
TIP
<<<
-Eu-s
Cnl
(Upper-case character)
OK
<<<
>>>
STEP 4: Press
(Left-cursor) or Clr two times to
erase “me”.
Cnl
TIP
To delete an entered character, press
TIP
To move the cursor one space to the right, press
“” once
144
-Eu-l
or Clr.
or
STEP 6: The following number edit screen appears.
Name: House
Number: 0123456789
Clr
OK
To Delete A Record
STEP 1: Press >>> while the target Phonebook data is
displayed.
Cnl
STEP 2: Press DEL.
STEP 7: Press
“89”.
(Left-cursor) or
Name: House
Number: 01234567
Clr
OK
Clr twice to erase
Name: NEC ABIKO
Number: 0123456789
More
Cnl
Pref
Cnl
STEP 3: Press
(Enter) or
>>>
OK to delete the currently
displaying data.
STEP 8: Enter “12” by pressing digit keys and press
(Enter) or OK.
Name: House
Number: 0123456712
Clr
OK
Name: NEC ABIKO
Delete this entry?
OK
Cnl
Cnl
STEP 4: The data deletion has completed. Two seconds later, the display returns to Name Entry
screen.
STEP 9: The data modification has completed. Two
seconds later, the display returns to Local
Phonebook screen.
Entry deleted!
Entry edited!
145
To Add A Prefix To Telephone Number
Name: Takahashi
Number: 01840123456789
The procedure shown below is available in Local
Phonebook.
More
Example:
To add a prefix “0184” in front of telephone number
“0123456789”
Note
STEP 1: Press Pref while the target Phonebook data
is displayed.
Name: Takahashi
Number: 0123456789
More
Cnl
Pref
STEP 2: Enter a prefix (In this example, “0184” is en(Enter)
or OK.
Prefix Number Input
Number: 0184
Clr
OK
TIP
To delete an entered character, press
More appears in Phonebook data screen when the
number of characters (name) or digits (telephone number) are exceeding displayable limit (Up to 17 characters or digits can be displayed at a time).
If the name or telephone number exceeds the displayable limit, press
or More to display the last 17
characters/digits of the name/telephone number.
>>>
tered) by using digit keys and press
Cnl
Cnl
or Clr.
STEP 3: The prefix is added in front of the telephone
number. Once the prefix is added, Pref will
disappear.
146
Available Characters In Local Phonebook
The following tables show available characters in Local Phonebook.
UPPERCASE CHARACTER
Digit
Code
Character
1
2
3
4
5
6
7
8
9
0
#
.
A
D
G
J
M
P
T
W
SP
#
,
B
E
H
K
N
Q
U
X
0
:
C
F
I
L
O
R
V
Y
!
À
È
Ì
5
Ñ
S
Ù
Z
?
Á
É
Í
Ò
Ú
9
-
Â
Ê
Î
Ó
7
Û
+
Ã
Ë
Ï
Ô
Ü
%
Ä
3
4
Õ
8
&
Å
Ö
/
Æ
Œ
(
Ç
Ø
)
2
6
=
¿
¡
1
SP: Blank Space
147
LOWERCASE CHARACTER
Digit
Code
Character
1
2
3
4
5
6
7
8
9
0
#
.
a
d
g
j
m
p
t
w
SP
#
,
b
e
h
k
n
q
u
x
0
:
c
f
i
l
o
r
v
y
!
à
è
ì
5
ñ
s
ù
z
?
á
é
í
ò
ú
9
:
â
ê
î
ó
7
û
\
ä
ë
ï
ô
ü
“
å
3
4
õ
8
@
æ
ö
1
ç
6
2
SP: Blank Space
148
STEP 2: The history data of the last received call is
CALL HISTORY
displayed.
There are two types of Call History features. One is the
history data that is stored in the system memory, and
the other is the history data that is stored in the memory
of the telephone (see 5.CALL HISTORY OPERATION).
1:03 PM
The following describes the operating procedures for
the Call History feature which controlled by the system.
This Call History feature can store up to 20 records. If
exceeding 20 records, a record will be deleted in order
of occurrence. Also, this Call History feature can store
up to 32 digits of dial number and 16 characters of
name information per record.
Note
TIP
MON 12 JUL 2010
31300
Pbook >>>
If no history data is saved, "NO LIST" will be displayed
on LCD.
STEP 3: Press
or to display a desired history
data.
12:55 PM
!!
If the system administrator invalidates the Call History,
this feature cannot be used. For details, contact the
system administrator.
TIP
To View Call History
STEP 1: Press iCall or Call History while the current
time is displayed on LCD.
MON 12 JUL 2010
51500
Pbook >>>
Call History will display "!!" for an unanswered incoming
call.
To Make A Call From Call History
STEP 1: Display the history data of the target party.
5:25 PM
iCall
MON 12 JUL 2010
MIC DND
12:55 PM
!!
MON 12 JUL 2010
51500
Pbook >>>
- OR STEP 2: Go off-hook or press
STEP 1: Display the Menu screen, and select History.
the displayed party.
149
Speaker
to make a call to
TIP
Note
While the history data is displayed, the user cannot
make a call by dialing a telephone number.
the name is displayed as follows:
STEP 1: Press >>> while the history data to which you
want to add a prefix is displayed.
Name :NEC ABIKO
Number :01234531300
More
Cnl
MON 12 JUL 2010
31300
Pbook >>>
Note
STEP 2: Press Pref.
More appears in Phonebook data screen when the
number of characters (name) or digits (telephone number) are exceeding displayable limit (Up to 17 characters or digits can be displayed at a time).
If the name or telephone number exceeds the displayable limit, press
or More to display the last 17
characters/digits of the name/telephone number.
1:03 PM
<<<
or Clr.
STEP 4: If the call history data has name information,
To Make A Call With Prefix
1:03 PM
To delete an entered character, press
MON 12 JUL 2010
31300
Pref
DEL END
STEP 5: Go off-hook or press
Speaker
to make a call to
the displayed telephone number.
STEP 3: Enter a prefix by using the digit keys. In this
example, “012345” is entered. After entering
the prefix, press
(Enter)
Prefix Number Input
Number:
Clr
OK
To Delete A Specific Data
or OK.
STEP 1: Press >>> while the history data which you
want to delete is displayed.
1:03 PM
Cnl
Note
A maximum of 10 digits (0-9, * and #) can be set as a
prefix.
Note
When prefix is added, up to 32 digits including the prefix can be sent as dial number.
STEP 2: Press DEL.
150
MON 12 JUL 2010
31300
Pbook >>>
STEP 2: Enter a desired name, and press OK.
(In this example, “NEC ABIKO” is entered.)
1:03 PM
<<<
TIP
MON 12 JUL 2010
31300
Pref
DEL END
Add name:
NEC ABIKO
Clr
If you want to exit Call History, press END.
To Add Call History Data To Local
Phonebook
TIP
OK
>>>
If name information is stored on the call history, the
name is displayed.
If “>>>” is pressed on the above screen, the following
TIP
soft keys appear. Pressing
The Call History data stored on the system can be
added to Phonebook (controlled by the system) only.
The data cannot be added to the Personal Directory
(described in 4.DIRECTORY OPERATION) controlled
by the telephone.
TIP
<<<
Cnl
-Eu-s
(Upper-case character)
STEP 1: Press Pbook or Phonebook while the history
data of the target party is displayed.
1:03 PM
or Eu-s/Eu-l shifts
characters between uppercase and lowercase.
(Lower-case character)
<<<
Cnl
-Eu-l
STEP 3: The telephone number stored on the call his-
MON 12 JUL 2010
31300
Pbook >>>
tory is displayed. The telephone number can
be changed if necessary. Press OK to add
the displayed data to Local Phonebook.
TIP
Local Phonebook feature allows the user to register up
to 100 records. If exceeding 100 records at this point,
the error message shown below appears. Press OK to
go back to the previous display.
Name :NEC ABIKO
Number :31300
OK
Clr
Entry NG (over)
OK
151
Cnl
This page is for your notes.
152
4. DIRECTORY OPERATION
This chapter explains Personal Directory of DT750. By
using Personal Directory, you can make a call with
simple operation.
[Directory]
1 Personal
2 System
3 Corporate
Personal Directory function can register up to 500
entries (four telephone numbers per entry). You can
add/view/edit/delete these entries.
TO ADD NEW DATA
STEP 1: Display the Menu screen, and select Directory.
(Directory).
The Directory screen
shown at STEP 3 can be directly displayed.
Menu
OK
Note
When using Phonebook feature is disabled by the setting on the system, this screen will not be displayed. In
that case, skip this step.
TIP
The Menu soft key is labeled as Back for firmware versions earlier than 4.0.0.0..
OR
Press
1/1
STEP 3: Select 2 Edit.
Select an item by one of the following operations.
• Touch panel operation.
• Highlight an item by using
, and press
,
or OK.
• Press 2 .
STEP 2: Select 1 Personal.
Select an item by one of the following operations.
• Touch panel operation
• Highlight an item by using
, and press
,
or OK.
• Press 1 .
153
[Directory]
1/1
1 Search
2 Edit
3 Group Setting
4 Own Number
0 Delete All
Menu
OK
STEP 4: Select 1 Name.
Select an item by one of the following operations.
• Touch panel operation.
• Highlight an item by using
, and press
,
or OK.
• Press 1 .
[Edit]
1
2
3
4
5
6
7
8
1/2
Name
Gr Group
Tel #1
Tel #2
Tel #3
Tel #4
Company Name
Ring Tone
Save
Back
OK
154
STEP 5: Enter a name to be registered in directory.
[Name]
1/2
[Edit]
Enter a name by using digits keys. After entering the
name, press
or OK.
1
2
3
4
5
6
7
8
A M
Input a name.
Gr
Ken Kobus
Group
Tel #1
Tel #2
Tel #3
Tel #4
Company Name
Ring Tone
Save
BK
Note
Option
Back
OK
Back
OK
STEP 7: Select a desired group.
Select an item by one of the following operations.
• Touch panel operation.
• Highlight an item by using
, and press
or
OK.
• Press 0 - 9 , and press
or OK.
In this example, 2 Colleagues is selected.
Up to 32 characters can be entered as a group name.
For details on character entry method, see HOW TO
INPUT CHARACTERS.
STEP 6: The display goes back to the Edit screen. Select 2 Group.
1/3
[Group Select]
Select an item by one of the following operations.
• Touch panel operation.
• Highlight an item by using
, and press
,
or OK.
• Press 2 .
1 Default
2 Colleagues
3 VIPs
4 Family
5 Friends
6 Group 6
7 Group 7
8 Group 8
155
Back
OK
Note
Each group name can be changed from the Group Setting screen. For details, see TO CHANGE GROUP
NAME.
[Tel1 #1]
1
Input a Telephone number.
STEP 8: Select 3 Tel #1.
Select an item by one of the following operations.
• Touch panel operation.
• Highlight an item by using
, and press
,
or OK.
• Press 3 .
STEP 10:Select a Category to which the entered tele-
Ken Kobus
Gr Colleagues
Tel #1
Tel #2
Tel #3
Tel #4
Company Name
Ring Tone
Save
Next
1/2
[Edit]
1
2
3
4
5
6
7
8
Back
BK
Back
phone number belongs.
Select an item by one of the following operations.
• Touch panel operation.
• Highlight an item by using
, and press
or
Next.
• Press 0 - 5 , and press
or Next.
In this example, 1 Company is selected.
OK
[Category Setting]
1/1
1 Company
2 Mobile
3 Voice Mail
4 Home
5 Others
STEP 9: Enter a telephone number to be registered in
directory.
Enter a telephone number by using digits keys. After
entering the telephone number, press
or Next.
Prev
Next
Selectable categories are as follows:
156
Category
ICON
[Priority Flag]
Company
1/1
1 Disable
2 Enable
Mobile
Voice Mail
Home
Others
Prev
OK
STEP 12:The display goes back to the Edit screen
again. Select 7 Company Name.
STEP 11:Select either 1 Disable or 2 Enable.
Select an item by one of the following operations.
• Touch panel operation.
• Highlight an item by using
, and press
or
OK.
• Press 1 or 2 , and press
or OK.
Select an item by one of the following operations.
• Touch panel operation.
• Highlight an item by using
, and press
,
or OK.
• Press 7 .
A maximum of four telephone numbers can be set
to an entry. If 2 Enable is selected here, the telephone number which is being edited will be given
top priority. In that case, the telephone number is
automatically selected when you make a call without specifying a specific telephone number.
157
Note
A maximum of four telephone numbers can be set to an
entry. If two or more telephone numbers are required to
be set, set the remaining telephone numbers to Tel #2 Tel #4.
Note
If multiple telephone numbers are registered to an entry
and Priority Flag is disabled to all of the telephone numbers, the telephone number set to Tel #1 is automatically set as first priority number.
[Edit]
1
2
3
4
5
6
7
8
Select an item by one of the following operations.
• Touch panel operation.
• Highlight an item by using
, and press
,
or OK.
• Press 8 .
1/2
Ken Kobus
Gr Colleagues
31300
Tel #2
Tel #3
Tel #4
Company Name
Ring Tone
Save
Back
[Edit]
1
2
3
4
5
6
7
8
OK
STEP 13:Enter a company name.
Enter a company name by using digits keys. After entering the company name, press
or OK.
[Company Name]
Note
Option
Back
OK
STEP 15:Select a desired Ringing Tone.
A M
Back
Ken Kobus
Gr Colleagues
31300
Tel #2
Tel #3
Tel #4
NEC
Ring Tone
Save
Select an item by one of the following operations.
• Touch panel operation.
• Highlight an item by using
, and press
or
OK.
• Press 0 - 9 , and press
or OK.
For example, press 1 + 7 to select
17 Download1.
Input a Company name.
BK
1/2
OK
Up to 32 characters can be entered as a company
name. For details on character entry method, see HOW
TO INPUT CHARACTERS.
STEP 14:The display goes back to the Edit screen. Select 8 Ring Tone.
158
[Edit]
[Ring Tone]
1/3
9
0
1 Automatic
2 Default
3 Tone Type 1
4 Tone Type 2
5 Tone Type 3
6 Tone Type 4
7 Tone Type 5
8 Tone Type 6
2/2
Illumination
No 0
Save
Back
OK
Note
You can set ringer tone for calls routed from the specific
name (calling party) here. Ringer Tone type can be set
for “Name”, “Group” and “Telephone set”. The ringer
Tone type set for “Name” has higher priority than the
types set for “Group” and “Terminal set”.
Note
Set Default when you don’t want to change the ringer
tone here. The setting for “Group” or “Telephone set” is
applied. Also, when Automatic is set, Tone Type 1 is
automatically applied.
TIP
For details on each ringer tone type, see TO SET
RINGER TONE.
Back
OK
STEP 17:Select a desired color of the Call Indication
lamp.
Select an item by one of the following operations.
• Touch panel operation.
• Highlight an item by using
, and press
or
OK.
• Press 0 - 9 , and press
or OK.
For example, press 1 + 0 to select 10 White.
[Illumination]
1/2
1 Automatic
2 Default
3 Disable
4 Red
5 Green
6 Yellow
7 Blue
8 Light Blue
STEP 16:The display goes back to the Edit screen. Select 9 Illumination.
Select an item by one of the following operations.
• Touch panel operation.
• Highlight an item by using
, and press
,
or OK.
• Press 9 .
159
Back
OK
Note
You can set illumination type for calls routed from the
specific name (calling party) here. Illumination type can
be set for "Name", "Group" and "Telephone set". The
illumination type set for "Name" has higher priority than
the types set for "Group" and "Terminal set".
Note
Set Default when you don’t want to change the illumination type here. The setting for “Group” or “Telephone
set” is applied. Also, when Automatic is set, Red is
automatically applied.
Enter a memory number by using digits keys. After
entering the memory number, press
or OK.
[Memory ID]
1
Input a Memory number.
0-499
0
STEP 18:The display goes back to the Edit screen.
Check the memory number assigned to the
BK
directory data being edited.
Back
OK
STEP 20:When the display goes back to the Edit
[Edit]
9
0
screen, press Save to save the assigned da-
2/2
ta.
Automatic
No 0
STEP 21:“The data is registered at memory number:
XX” is displayed. Press
or OK. The dis-
play returns to the Directory screen.
Save
TIP
Back
TIP
If Name is not entered, “No Input Name” will appear.
Name information is required for a entry.
TIP
If a duplicate Memory ID is entered, “It will overwrite a
data at memory number:XX” will appear. If you do not
overwrite the Memory ID, press Back. If you overwrite
the Memory ID, press
or OK.
OK
A memory number is automatically set in ascending
numeric order.
STEP 19:If you need to assign a memory number manually, select 0 Memory ID on the screen of
the previous step, and enter a desired memory number (0 - 499).
160
TO CHANGE GROUP NAME
[Group]
STEP 1: Open the Directory screen (see TO ADD
NEW DATA: STEP1 - STEP3.)
1 Default
2 Colleagues
3 VIPs
4 Family
5 Friends
6 Group 6
7 Group 7
8 Group 8
STEP 2: On the Directory screen, select 3 Group
Setting.
Select an item by one of the following operations.
• Touch panel operation.
• Highlight an item by using
, and press
,
or OK.
• Press 3 .
Back
OK
STEP 4: Select 1 Name.
1/1
[Directory]
1/3
Select an item by one of the following operations.
• Touch panel operation.
• Highlight an item by using
, and press
,
or OK.
• Press 1 .
1 Search
2 Edit
3 Group Setting
4 Own Number
0 Delete All
[Group Setting]
1/1
1 Name
TIP
Menu
2 Ring Tone
3 Illumination
OK
The Menu soft key is labeled as Back for firmware versions earlier than 4.0.0.0..
STEP 3: Select a group name to be changed.
In this example, 1 Default is selected.
Select an item by one of the following operations.
• Touch panel operation.
• Highlight an item by using
, and press
or
OK.
• Press 1 , and press
or OK.
161
Back
OK
STEP 5: Enter a new group name.
TO FIND A REGISTERED DATA
Enter a group name by using digits keys. After entering
the group name, press
or OK.
[Group Name Set]
• To Search by Group Name
STEP 1: Open the Directory screen (see TO ADD
NEW DATA: STEP1 - STEP3.)
A M
Input a group name.
STEP 2: On the Directory screen, select 1 Search.
Select an item by one of the following operations.
• Touch panel operation.
• Highlight an item by using
, and press
,
or OK.
• Press 1 .
Default
BK
Note
Option
Back
OK
[Directory]
Up to 32 characters can be entered as a group name.
For details on character entry method, see HOW TO
INPUT CHARACTERS.
1/1
1 Search
2 Edit
3 Group Setting
STEP 6: Display returns to the Group screen. Make
4 Own Number
sure that the new group name takes effect.
0 Delete All
You can set ringer tone ( select 2 Ring Tone) and illu-
mination types ( select 3 Illumination) for calls routed
from the specific group here.
Note
Ringer tone and illumination types can be set for
“Name”, “Group” and “Telephone set”. The ringer tone
and illumination types set for “Name” have higher priority than the types set for Group and Telephone set.
TIP
Menu
OK
The Menu soft key is labeled as Back for firmware versions earlier than 4.0.0.0..
STEP 3: Select 1 Group.
Also, the ringer tone and illumination types for Group
have higher priority than the types set for Terminal set.
Select an item by one of the following operations.
• Touch panel operation.
• Highlight an item by using
, and press
,
or OK.
• Press 1 .
162
STEP 5: Select a target name by pressing
[Search]
1/1
In the following Directory (Name List) screen,
you can make a call to the selected party by
pressing
or Call.
1 Group
2 Name
3 Tel Number
4 Others
If two or more telephone numbers are assigned to
an entry, a top priority telephone number will be
dialed.
[Directory]
.
Back
1/1
Abe Kentaro
Abe Taro
Aikawa Ken
John Smith
Julia
Ken Kobus
STEP 4: Select a target group.
In this example, 2 Colleagues is selected.
Select an item by one of the following operations.
• Touch panel operation.
• Highlight an item by using
, and press
or
OK.
• Press 2 , and press
or OK.
Detail
[Group]
M
OK
Option
Back
OK
1/3
TIP
1 Default
2 Colleagues
3 VIPs
4 Family
5 Friends
6 Group 6
7 Group 7
8 Group 8
If no entry is set to the selected group, "No data" is
issued on the screen.
STEP 6: To display the detailed data for a specific
name, press Detail while the name is highlighted.
Note
Back
OK
If two or more telephone numbers are assigned to an
entry, a top priority telephone number is automatically
selected when the Detail screen appears.
In the following Detail screen, you can make a call
to the selected number by pressing
or Call.
163
[Detail]
Ken Kobus
Gr Colleagues
31300
0800XXXXXX
Tel #3
Tel #4
NEC
Automatic
1
2
3
4
5
6
7
8
1/2
Back
Call
164
• To Search by Name
[Search]
STEP 1: Open the Directory screen (see TO ADD
NEW DATA: STEP1 - STEP3.)
1 Group
2 Name
3 Tel Number
4 Others
STEP 2: On the Directory screen, select 1 Search.
Select an item by one of the following operations.
• Touch panel operation.
• Highlight an item by using
, and press
,
or OK.
• Press 1 .
[Directory]
1/1
Back
OK
STEP 4: Enter a target name.
1 Search
After entering the name, press
2 Edit
3 Group Setting
4 Own Number
[Name]
0 Delete All
Input a name.
TIP
1/1
Menu
or OK.
A M
OK
The Menu soft key is labeled as Back for firmware versions earlier than 4.0.0.0..
BK
STEP 3: Select 2 Name.
Select an item by one of the following operations.
• Touch panel operation
• Highlight an item by using
, and press
,
or OK.
• Press 2 .
165
Option
Back
OK
Note
A distinction is made between upper case and lower
case characters, according as the system settings. For
example, "Ken Kobus" and "ken kobus" are distinguished as different character strings. For details, contact the System Administrator.
Note
A blank space is also distinguished while searching
database for a name.
Note
Up to 32 characters can be entered as a company
name. For details on character entry method, see HOW
TO INPUT CHARACTERS.
TIP
Even if the name is not entered to the end, you can
search for a name.
TIP
If there is no entry corresponding to the entered name,
"No data" is issued on the screen.
Note
If two or more telephone numbers are assigned to an
entry, a top priority telephone number is automatically
selected when the Detail screen appears.
In the following Detail screen, you can make a call
to the selected number by pressing
or Call.
[Detail]
STEP 5: Select a target name by pressing
.
1
2
3
4
5
6
7
8
In the following Directory (Name List) screen,
you can make a call to the selected party by
pressing
or Call. If two or more telephone
numbers are assigned to an entry, a top priority
telephone number will be dialed.
[Directory]
M
1/1
Detail
Option
Ken Kobus
Gr Colleagues
31300
0800XXXXXX
Tel #3
Tel #4
NEC
Automatic
Abe Ichiro
Abe Jiro
Abe Kentaro
Abe Sabro
Abe Taro
Back
OK
STEP 6: To display the detailed data for a specific
name, press Detail while the name is highlighted.
166
1/2
Back
Call
• To Search by Telephone Number
[Search]
STEP 1: Open the Directory screen (see TO ADD
NEW DATA: STEP1 - STEP3.)
1 Group
2 Name
3 Tel Number
4 Others
STEP 2: On the Directory screen, select 1 Search.
Select an item by one of the following operations.
• Touch panel operation.
• Highlight an item by using
, and press
,
or OK.
• Press 1 .
[Directory]
1/1
OK
Back
STEP 4: Enter a target telephone number.
1 Search
After entering the number, press
2 Edit
3 Group Setting
4 Own Number
[Tel Number]
0 Delete All
Input a Telephone number.
TIP
1/1
Menu
or OK.
1
OK
The Menu soft key is labeled as Back for firmware versions earlier than 4.0.0.0..
BK
STEP 3: Select 3 Tel Number.
TIP
Select an item by one of the following operations.
• Touch panel operation.
• Highlight an item by using
, and press
,
or OK.
• Press 3 .
Back
OK
Even if the telephone number is not entered to the end,
you can search for a telephone number.
STEP 5: Select a target name by pressing
.
In the following Directory (Name List) screen,
you can make a call to the selected party by
pressing
or Call.
167
If two or more telephone numbers are assigned to
an entry, a top priority telephone number will be
dialed.
[Directory]
M
[Detail]
1
2
3
4
5
6
7
8
1/1
Abe Kentaro
Abe Taro
Aikawa Ken
John Smith
Julia
Ken Kobus
TIP
Option
Back
OK
If there is no entry corresponding to the entered number, "No data" is issued on the screen.
STEP 6: To display the detailed data for a specific
name, press Detail while the name is highlighted.
Note
Ken Kobus
Gr Colleagues
31300
0800XXXXXX
Tel #3
Tel #4
NEC
Automatic
Detail
If two or more telephone numbers are assigned to an
entry, a top priority telephone number is automatically
selected when the Detail screen appears.
In the following Detail screen, you can make a call
to the selected number by pressing
or Call.
168
1/2
Back
Call
• To Search by Memory ID
[Search]
STEP 1: Open the Directory screen (see TO ADD
NEW DATA: STEP1 - STEP3.)
1 Group
2 Name
3 Tel Number
4 Others
STEP 2: On the Directory screen, select 1 Search.
Select an item by one of the following operations.
• Touch panel operation.
• Highlight an item by using
, and press
,
or OK.
• Press 1 .
[Directory]
1/1
1/1
1 Search
Back
STEP 4: Select 1 Memory ID.
2 Edit
3 Group Setting
Select an item by one of the following operations.
• Touch panel operation.
• Highlight an item by using
, and press
,
or OK.
• Press 1 .
4 Own Number
0 Delete All
[Others]
TIP
OK
Menu
OK
1/1
1 Memory ID
2 Category
3 Company
The Menu soft key is labeled as Back for firmware versions earlier than 4.0.0.0..
4 Alphabet
STEP 3: Select 4 Others.
Select an item by one of the following operations.
• Touch panel operation.
• Highlight an item by using
, and press
,
or OK.
• Press 4 .
Back
OK
STEP 5: Enter a memory number (0-499).
After entering the memory number, press
OK.
169
or
The list of memory numbers will be displayed, with
the entered memory number or the number closest to the entered number in front.
[Memory ID]
TIP
STEP 7: To display the detailed data for a specific
1
name, press Detail while the name is high-
Input a Memory number.
lighted.
Note
0
BK
Back
[Detail]
.
In the following Directory (Name List) screen,
you can make a call to the selected party by
pressing
or Call.
1
2
3
4
5
6
7
8
If two or more telephone numbers are assigned to
an entry, a top priority telephone number will be
dialed.
1/1
Ken Kobus
Abe Kentaro
Detail
Option
Back
OK
170
1/2
Ken Kobus
Colleagues
Gr
31300
0800XXXXXX
Tel #3
Tel #4
NEC
Automatic
M
If two or more telephone numbers are assigned to an
entry, a top priority telephone number is automatically
selected when the Detail screen appears.
In the following Detail screen, you can make a call
to the selected number by pressing
or Call.
OK
STEP 6: Select a target name by pressing
[Directory]
If no data exists in Directory, "No data" is issued on the
screen.
Back
Call
• To Search by Category
STEP 1: Open the Directory screen (see TO ADD
NEW DATA: STEP1 - STEP3.)
1 Group
2 Name
3 Tel Number
4 Others
STEP 2: On the Directory screen, select 1 Search.
Select an item by one of the following operations.
• Touch panel operation.
• Highlight an item by using
, and press
,
or OK.
• Press 1 .
[Directory]
1/1
[Search]
1/1
Back
OK
1 Search
STEP 4: Select 2 Category.
2 Edit
3 Group Setting
Select an item by one of the following operations.
• Touch panel operation.
• Highlight an item by using
, and press
,
or OK.
• Press 2 .
4 Own Number
0 Delete All
TIP
Menu
[Others]
OK
1/1
1 Memory ID
The Menu soft key is labeled as Back for firmware versions earlier than 4.0.0.0..
2 Category
3 Company
STEP 3: Select 4 Others.
4 Alphabet
Select an item by one of the following operations.
• Touch panel operation.
• Highlight an item by using
, and press
,
or OK.
• Press 4 .
171
Back
OK
STEP 5: Select a desired category.
[Directory]
In this example, 1 Company is selected.
Select an item by one of the following operations.
• Touch panel operation.
• Highlight an item by using
, and press
or
OK.
• Press 1 , and press
or OK.
[Category]
M
1/1
Abe Kentaro
Abe Taro
Aikawa Ken
John Smith
Julia
Ken Kobus
1/1
1 Company
2 Mobile
3 Voice Mail
4 Home
5 Etc
Detail
TIP
Option
Back
OK
If there is no entry corresponding to the selected category, "No data" is issued on the screen.
STEP 7: To display the detailed data for a specific
name, press Detail while the name is high-
Back
lighted.
OK
STEP 6: Select a target name by pressing
.
Note
In the following Directory (Name List) screen,
you can make a call to the selected party by
pressing
or Call.
If two or more telephone numbers are assigned to an
entry, a top priority telephone number is automatically
selected when the Detail screen appears.
In the following Detail screen, you can make a call
to the selected number by pressing
or Call.
If two or more telephone numbers are assigned to
an entry, a top priority telephone number will be
dialed.
172
[Detail]
Ken Kobus
Colleagues
Gr
31300
0800XXXXXX
Tel #3
Tel #4
NEC
Automatic
1
2
3
4
5
6
7
8
1/2
Back
Call
173
• To Search by Company Name
[Search]
STEP 1: Open the Directory screen (see TO ADD
NEW DATA: STEP1 - STEP3.)
1 Group
2 Name
3 Tel Number
4 Others
STEP 2: On the Directory screen, select 1 Search.
Select an item by one of the following operations.
• Touch panel operation.
• Highlight an item by using
, and press
,
or OK.
• Press 1 .
[Directory]
1/1
1/1
Back
STEP 4: Select 3 Company.
1 Search
Select an item by one of the following operations.
• Touch panel operation.
• Highlight an item by using
, and press
,
or OK.
• Press 3 .
2 Edit
3 Group Setting
4 Own Number
0 Delete All
[Others]
TIP
OK
Menu
1/1
1 Memory ID
2 Category
3 Company
OK
The Menu soft key is labeled as Back for firmware versions earlier than 4.0.0.0..
4 Alphabet
STEP 3: Select 4 Others.
Select an item by one of the following operations.
• Touch panel operation.
• Highlight an item by using
, and press
,
or OK.
• Press 4 .
174
Back
OK
STEP 5: Enter a company name.
After entering the name, Press
[Company]
[Directory]
or OK.
A M
Detail
Option
Back
OK
TIP
Note
A distinction is made between upper case and lower
case characters. For example, "Ken Kobus" and "ken
kobus" are distinguished as different character strings.
Note
A blank space is also distinguished while searching
database for a name.
Note
Up to 32 characters can be entered as a company
name. For details on character entry method, see HOW
TO INPUT CHARACTERS.
TIP
If there is no entry corresponding to the entered company name, "No data" is issued.
STEP 6: Select a target name by pressing
1/1
Abe Kentaro
Abe Taro
Aikawa Ken
John Smith
Julia
Ken Kobus
Input a Company name.
BK
M
Option
Back
OK
If there is no entry corresponding to the selected Company, "No data" is issued on the screen.
STEP 7: To display the detailed data for a specific
name, press Detail while the name is highlighted.
Note
If two or more telephone numbers are assigned to an
entry, a top priority telephone number is automatically
selected when the Detail screen appears.
In the following Detail screen, you can make a call
to the selected number by pressing
or Call.
.
In the following Directory (Name List) screen,
you can make a call to the selected party by
pressing
or Call.
If two or more telephone numbers are assigned to
an entry, a top priority telephone number will be
dialed.
175
[Detail]
Ken Kobus
Colleagues
Gr
31300
0800XXXXXX
Tel #3
Tel #4
NEC
Automatic
1
2
3
4
5
6
7
8
1/2
Back
Call
176
• To Search by Alphabet
STEP 1: Open the Directory screen (see TO ADD
NEW DATA: STEP1 - STEP3.)
[Search]
1 Group
2 Name
3 Tel Number
4 Others
STEP 2: On the Directory screen, select 1 Search.
Select an item by one of the following operations.
• Touch panel operation.
• Highlight an item by using
, and press
,
or OK.
• Press 1 .
[Directory]
1/1
1/1
Back
OK
1 Search
STEP 4: Select 4 Alphabet.
2 Edit
3 Group Setting
Select an item by one of the following operations.
• Touch panel operation.
• Highlight an item by using
, and press
,
or OK.
• Press 4 .
4 Own Number
0 Delete All
TIP
Menu
[Others]
OK
1/1
1 Memory ID
2 Category
3 Company
4 Alphabet
The Menu soft key is labeled as Back for firmware versions earlier than 4.0.0.0..
STEP 3: Select 4 Others.
Select an item by one of the following operations.
• Touch panel operation.
• Highlight an item by using
, and press
,
or OK.
• Press 4 .
177
Back
OK
STEP 5: Select a desired group of alphabets.
[Directory]
In this example, 0 ABC is selected.
Select an item by one of the following operations.
• Touch panel operation.
• Highlight an item by using
, and press
or
OK.
• Press 0 , and press
or OK.
[Alphabet]
M
1/1
Abe Ichiro
Abe Jiro
Abe Kentaro
Abe Sabro
Abe Taro
1/2
0 ABC
1 DEF
2 GHI
3 JKL
4
5
Detail
TIP
MND
PQRS
Back
OK
If there is no entry corresponding to the group of alphabets, "No data" is issued on the screen.
STEP 7: To display the detailed data for a specific
6 TUV
7 WXYZ
name, press Detail while the name is high-
TIP
Option
Back
lighted.
OK
Note
Select Others to find names which begin with a character other than alphabet such as numerics or symbols.
STEP 6: Select a target name by pressing
If two or more telephone numbers are assigned to an
entry, a top priority telephone number is automatically
selected when the Detail screen appears.
In the following Detail screen, you can make a call
to the selected number by pressing
or Call.
.
In the following Directory (Name List) screen,
you can make a call to the selected party by
pressing
or Call.
If two or more telephone numbers are assigned to
an entry, a top priority telephone number will be
dialed.
178
TO MAKE A CALL FROM DIRECTORY
[Detail]
Abe Kentaro
Note
Gr Colleagues
While Directory screen is being displayed, you cannot
make a call by dialing a telephone number.
31300
• To Make a Call from Name List Screen
0800XXXXXX
Tel #3
Tel #4
NEC
STEP 1: Display the Directory (Name List) screen for
a target party (see TO FIND A REGISTERED
DATA).
Automatic
1
2
3
4
5
6
7
8
1/2
Back
Call
[Directory]
M
1/1
Abe Ichiro
Abe Jiro
Abe Kentaro
Abe Sabro
Abe Taro
Detail
Option
Back
Call
STEP 2: Select a target name, and make a call.
Select a target name by pressing
, and press
or Call to make a call to the selected party.
Note
179
If multiple telephone numbers are registered to a target
party, a call is made to the first priority telephone number.
[Directory]
M
a call.
1/1
Select a target telephone number by pressing
, and press
or Call to make a call to the
selected number.
Abe Ichiro
Abe Jiro
Abe Kentaro
Abe Sabro
Abe Taro
Detail
Option
[Detail]
Back
1
2
3
4
5
6
7
8
OK
• To Make a Call from Detail Screen
STEP 1: Display the Detail screen for a target party
(see TO FIND A REGISTERED DATA).
If two or more telephone numbers are assigned to an
entry, a top priority telephone number is automatically
selected when the Detail screen appears.
[Detail]
1
2
3
4
5
6
7
8
1/2
Abe Kentaro
Gr Colleagues
31300
0800XXXXXX
Tel #3
Tel #4
NEC
Automatic
Back
Abe Kentaro
Colleagues
Gr
31300
0800XXXXXX
Tel #3
Tel #4
NEC
Automatic
Note
Call
STEP 2: Select a target telephone number, and make
180
1/2
Back
Call
• Highlight an item by using
or OK.
• Press 2 .
TO ADD PREFIX TO NUMBER
• To Set Prefix
[User Setting]
When making a call, a prefix can be added to telephone numbers to be dialed. Prefixes need to be
set in advance.
, and press
,
1/1
1 Incoming Call
2 Talk
3 Display
4 Change Password
STEP 1: Display the Menu screen, and select Setting.
5 Security
6 Peripherals
STEP 2: Select 1 User Setting.
Select an item by one of the following operations.
• Touch panel operation.
• Highlight an item by using
, and press
,
or OK.
• Press 1 .
0 Setting Reset
Back
OK
STEP 4: Select 5 Prefix.
[Setting]
Select an item by one of the following operations.
• Touch panel operation.
• Highlight an item by using
, and press
,
or OK.
• Press 5 .
1/1
1 User Setting
2 Download
3 Data Backup/Restore
[Talk]
Menu
1/1
1 RTP Alarm
2 DTMF Tone
3 Key Touch Tone
OK
4 Hold Music
5 Prefix
TIP
The Menu soft key is labeled as Back for firmware versions earlier than 4.0.0.0..
STEP 3: Select 2 Talk.
Select an item by one of the following operations.
• Touch panel operation.
181
Back
OK
STEP 5: Select 1 Prefix 1.
Select an item by one of the following operations.
• Touch panel operation.
• Highlight an item by using
, and press
,
or OK.
• Press 1 .
Note
A maximum of 10 digits (0-9, * and #) can be set as a
prefix.
Note
When prefix is added, up to 32 digits including the prefix can be sent as dial number.
STEP 7: The display goes back the Prefix screen at
[Prefix]
1/1
STEP 6. If multiple prefixes need to be set, repeat STEP 5 and STEP 6. In that case, select
2 Prefix 2 and 3 Prefix 3.
1 Prefix 1
2 Prefix 2
3 Prefix 3
Back
OK
STEP 6: Enter a prefix.
Enter a prefix number by pressing the digit keys.
After entering the prefix, press
or OK.
[Prefix 1]
1
Input a prefix number.
BK
Back
OK
182
• To Add Prefix When Making A Call
TIP
STEP 1: Display the Name List screen for a target
party (see TO FIND A REGISTERED DATA).
[Directory]
M
Note
1/1
Abe Ichiro
Abe Jiro
Abe Kentaro
Abe Sabro
Abe Taro
Detail
Option
Select an item by one of the following operations.
• Touch panel operation.
• Highlight an item by using
, and press
,
or OK.
• Press 1 , and press
,
or OK.
Back
Call
Select a target name by pressing
Option.
[Directory]
SubMenu
11 Prefix 11:00
Ken Kobus
2 Tel:
Delete
One
7205
3 Delete All
2
10:00
4 Abe
EditShintaro
Tel: 7207
M
, and press
1/1
Abe Ichiro
Abe Jiro
Abe Kentaro
Abe Sabro
Abe Taro
Option
If multiple telephone numbers are registered to a target
party, a call is made to the first priority telephone number.
STEP 3: Select 1 Prefix.
STEP 2: Select a target name and display SubMenu.
Detail
-For firmware version 4.0.0.0 or later
: HELP button can also be used instead of Option .
-For firmware version earlier than 4.0.0.0
: Menu button can also be used instead of Option
Cancel
1/1
OK
Predetermined prefixes are displayed. Select a prefix
and press
or Call to make a call.
Back
OK
183
1/1
[Prefix]
1 184
2 186
3 187
Back
Call
184
TO EDIT DIRECTORY DATA
STEP 1: Display the Name List screen for a target
party (see TO FIND A REGISTERED DATA).
[Directory]
M
TIP
1/1
STEP 3: Select 4 Edit.
Select an item by one of the following operations.
• Touch panel operation.
• Highlight an item by using
, and press
,
or OK.
• Press 4 , and press
,
or OK.
Abe Ichiro
Abe Jiro
Abe Kentaro
Abe Sabro
Abe Taro
Detail
Option
SubMenu
11 Prefix 11:00
Ken Kobus
2 Tel:
Delete
One
7205
3 Delete All
2
10:00
4 Abe
EditShintaro
Tel: 7207
Call
Back
STEP 2: Select a target name and display SubMenu.
[Directory]
M
, and press
Select a target name by pressing
Option.
1/1
Option
Cancel
1/1
OK
STEP 4: On the Edit screen, the detailed data for the
Abe Ichiro
Abe Jiro
Abe Kentaro
Abe Sabro
Abe Taro
Detail
-For firmware version 4.0.0.0 or later
: HELP button can also be used instead of Option .
-For firmware version earlier than 4.0.0.0
: Menu button can also be used instead of Option
selected name is displayed. Modify the necessary data by referring to TO ADD NEW DATA.
After the data modification is complete, press
Save on the Edit screen.
Back
OK
185
[Edit]
1
2
3
4
5
6
7
8
Gr
TO DELETE ALL DATA
1/2
STEP 1: Open the Directory screen (see TO ADD
NEW DATA).
Abe Kentaro
Colleagues
31300
STEP 2: Select 0 Delete All.
0800XXXXXX
Select an item by one of the following operations.
• Touch panel operation.
• Highlight an item by using
, and press
,
or OK.
• Press 0 .
Tel #3
Tel #4
NEC
Automatic
Save
Back
OK
[Directory]
STEP 5: After the data is saved, the display changes
1/1
as follows.
1 Search
2 Edit
[Edit]
3 Group Setting
4 Own Number
0 Delete All
The data is registered at
memory number: xx
TIP
STEP 6: Press
or OK.
186
OK
The Menu soft key is labeled as Back for firmware versions earlier than 4.0.0.0..
STEP 3: Press
OK
Menu
or OK to delete all the data.
TO DELETE SPECIFIC DATA
[Directory]
Delete All Directory?
STEP 1: Display the Name List screen for a name to
be deleted (see TO FIND A REGISTERED
DATA).
[Directory]
Back
TIP
To cancel the data deletion, press
M
1/1
Abe Ichiro
Abe Jiro
Abe Kentaro
Abe Sabro
Abe Taro
OK
or Back soft key.
STEP 4: After all the directory data is deleted, the display changes as follows:
Detail
[Directory]
Option
Back
Call
STEP 2: Select a name to be deleted and display SubMenu.
Deleted.
Select a target name by pressing
Option.
[Directory]
M
1/1
Abe Ichiro
Abe Jiro
Abe Kentaro
Abe Sabro
Abe Taro
OK
STEP 5: Press
, and press
or OK.
Detail
187
Option
Back
OK
TIP
[Directory]
-For firmware version 4.0.0.0 or later
: HELP button can also be used instead of Option .
-For firmware version earlier than 4.0.0.0
: Menu button can also be used instead of Option
Delete this entry?
STEP 3: Select 2 Delete One.
Select an item by one of the following operations.
• Touch panel operation.
• Highlight an item by using
, and press
,
or OK.
• Press 2 , and press
,
or OK
Back
TIP
SubMenu
11 Prefix 11:00
Ken Kobus
2 Tel:
Delete
One
7205
3 Delete All
2
10:00
4 Abe
EditShintaro
Tel: 7207
Cancel
1/1
To cancel the data deletion, press
OK
or Back soft key.
STEP 5: After the appropriate directory data is deleted, the display changes as follows:
[Directory]
Deleted.
OK
STEP 4: The following confirmation message appears.
Press
or OK to delete the appropriate directory data.
OK
STEP 6: Press
188
or OK.
5. CALL HISTORY OPERATION
This chapter explains Call History of DT750. By using
Call History, you can make a call with simple operation.
Call History allows the telephone to register up to 50
records into its memory. If the number of registered
records exceeds 50, a record will be deleted in order of
occurrence.
Register call history data to Personal Directory as necessary. Call History data will be cleared when powering
off the telephone.
Note
Note
However, Call History data can be backed up to your
PC. About Backup/Restore, see •TO BACKUP PERSONAL SETTINGS” or “•TO RESTORE PERSONAL
SETTINGS” in “3. TERMINAL SETUP”.
The call history data that is stored in the memory of
each telephone cannot be added to Phonebook (both
System Phonebook and Local Phonebook) controlled
by the system.
189
STEP 3: The history data of the last received call is
displayed.
TO VIEW CALL HISTORY
STEP 2: Select a kind of calls.
[Missed]
In this example, 1 Missed is selected.
Select an item by one of the following operations.
• Touch panel operation.
• Highlight an item by using
, and press
,
or OK.
• Press 1 .
Item
Missed
Outgoing
Incoming
1 Missed
2 Outgoing
3 Incoming
4 Delete All
TIP
OK
The Menu soft key is labeled as Back for firmware versions earlier than 4.0.0.0..
190
Back
Option
TIP
For missed calls,
name.
TIP
If there is no history data, "No data" will be displayed on
LCD.
TIP
If you make/answer a call to/from the telephone number
which is registered to Personal Directory, the corresponding name will be displayed as call history data.
TIP
To go back to former menu (STEP 2), press
or Back.
1/1
Menu
1/1
2 12/JUL/2010 (MON) 9:55
Abe Kentaro
7207
Display the history of unanswered
incoming calls.
Display the history of outgoing calls.
Display the history of answered and
unanswered incoming calls.
M
1 12/JUL/2010 (MON) 11:00
Ken Kobus
7205
Description
[History]
or to
If two or more records exist, use
display the next/former records.
STEP 1: Display the Menu screen, and select History.
will be displayed on the left of the
TO MAKE A CALL FROM CALL HISTORY
Note
[Missed]
2 12/JUL/2010 (MON) 9:55
Abe Kentaro
7207
(CASE 1)
STEP 1: Display call history data of a target telephone
number (see TO VIEW CALL HISTORY).
The following is an example when a history data
of Missed Calls is displayed.
M
TIP
2 12/JUL/2010 (MON) 9:55
Abe Kentaro
7207
STEP 2: Press
number.
Back
Back
Option
STEP 2: On the above screen, press Option to display
the following SubMenu.
1/3
1 12/JUL/2010 (MON) 11:00
Ken Kobus
7205
1/3
1 12/JUL/2010 (MON) 11:00
Ken Kobus
7205
While the history data is displayed, you cannot make a
call by dialing a telephone number.
[Missed]
M
-For firmware version 4.0.0.0 or later
: HELP button can also be used instead of Option .
-For firmware version earlier than 4.0.0.0
: Menu button can also be used instead of Option.
SubMenu
1/1
(MON)
11:00
11 12/JUL/2010
Call
Ken Kobus
2 Tel:
Directory
7205 Add
3 Prefix
2
10:00
4 Abe
Delete
One
Shintaro
Delete
All
5 Tel:
7207
Option
to make a call to the telephone
(CASE 2)
STEP 1: Display call history data of a target telephone
number (see TO VIEW CALL HISTORY).
The following is an example when a history data
of Missed Calls is displayed.
Cancel
OK
STEP 3: To make a call, select 1 Call (by using
pressing 1 ) and press
191
,
or OK.
or
Note
When making a call from Call History, a prefix can be
added to the dial number. In that case, select 3 Prefix
on the SubMenu (indicated at STEP 2 of CASE 2) to
display the Prefix screen.
On the Prefix screen, choose a prefix to be added to
the dial number. Also, prefixes need to be set in
advance. For details on setting of prefix, see TO ADD
PREFIX TO NUMBER.
192
TO ADD CALL HISTORY DATA TO
DIRECTORY
SubMenu
11 Call
11:00
Ken Kobus
2 Tel:
Directory
7205 Add
3 Prefix
2
10:00
4 Abe
Delete
One
Shintaro
Delete
All
5 Tel:
7207
STEP 1: Display call history data of a target telephone
number (see TO VIEW CALL HISTORY).
The following is an example when history data of
a Missed Calls is displayed.
M
1/1
[Missed]
1 12/JUL/2010 (MON) 11:00
7205
7205
Back
Cancel
OK
Select an item by one of the following operations.
• Touch panel operation.
• Highlight an item by using
, and press
,
or OK.
• Press 1 .
Option
[Directory Edit]
Press Option while displaying the call history data
for the target telephone number.
TIP
STEP 3: Select 1 New.
2 12/JUL/2010 (MON) 9:55
Abe Kentaro
7207
1/1
1/1
1 New
2 Addition
-For firmware version 4.0.0.0 or later
: HELP button can also be used instead of Option .
-For firmware version earlier than 4.0.0.0
: Menu button can also be used instead of Option.
STEP 2: The following SubMenu is displayed. Select
2 Directory Add.
Select an item by one of the following operations.
• Touch panel operation.
• Highlight an item by using
, and press
,
or OK.
• Press 2 , and press
,
or OK.
Back
OK
STEP 4: Select a category.
In this example, 1 Company is selected.
Select an item by one of the following operations.
• Touch panel operation.
• Highlight an item by using
, and press
or
193
Next.
• Press
ifying a specific telephone number.
1 , and press
or Next.
[Category]
Select an item by one of the following operations.
• Touch panel operation.
• Highlight an item by using
, and press
or
OK.
• Press 1 or 2 , and press
or OK.
1/1
1 Company
2 Mobile
3 Voice Mail
4 Home
[Priority Flag]
1/1
1 Disable
2 Enable
5 Others
Back
Next
Selectable categories are as follows:
Category
ICON
Company
Prev
OK
STEP 6: The following Edit screen is displayed.
“7205” has been registered to Tel #1.
Mobile
See “TO ADD NEW DATA” in Directory Operation,
and register detailed data (such as name, group,
etc) to directory.
Voice Mail
Home
Others
STEP 5: Select either 1 Disable or 2 Enable.
A maximum of four telephone numbers can be set
to an entry. If 2 Enable is selected here, the telephone number which is being edited will be given
top priority.
In that case, the telephone number is automatically selected when you make a call without spec-
194
[Edit]
1
2
3
4
5
6
7
8
1/2
Name
Gr Group
7205
Tel #2
Tel #3
Tel #4
Company Name
Ring Tone
Save
Back
OK
TIP
If the corresponding data is not stored in the Personal
Directory, only the telephone number will be displayed
as Tel #1.
TIP
If the corresponding data has already stored in the Personal Directory, the detailed data (such as name group,
etc.) is displayed.
195
TO EDIT DIRECTORY DATA FROM
CALL HISTORY
SubMenu
11:00
11 Call
Ken Kobus
2 Tel:
Directory
7205 Add
3 Prefix
2
10:00
4 Abe
Delete
One
Shintaro
Delete
All
5 Tel:
7207
STEP 1: Display call history data of a target telephone
number (see TO VIEW CALL HISTORY).
The following is an example when history data of
a Missed Calls is displayed.
M
1/1
[Missed]
1 12/JUL/2010 (MON) 11:00
7205
7205
Back
OK
Select an item by one of the following operations.
• Touch panel operation.
• Highlight an item by using
, and press
,
or OK.
• Press 2 .
[Directory Edit]
Option
1/1
1 New
2 Addition
Press Option while displaying the call history data
for the target telephone number.
-For firmware version 4.0.0.0 or later
: HELP button can also be used instead of Option .
-For firmware version earlier than 4.0.0.0
: Menu button can also be used instead of Option.
TIP
Cancel
STEP 3: Select 2 Addition.
2 12/JUL/2010 (MON) 9:55
Abe Kentaro
7207
1/1
STEP 2: The following SubMenu is displayed. Select
2 Directory Add.
Back
OK
STEP 4: Select a search method.
Select an item by one of the following operations.
• Touch panel operation.
• Highlight an item by using
, and press
,
or OK.
• Press 2 , and press
,
or OK.
See TO FIND A REGISTERED DATA for the procedure of the searching method.
In this example, 1 Group is selected.
Select an item by one of the following operations.
• Touch panel operation.
196
• Highlight an item by using
or OK.
• Press 1 .
[Directory Search]
, and press
STEP 6: The names belonging to Colleagues are displayed as the following example. Select a
name and press
or OK.
,
1/1
[Directory]
1 Group
John Smith
Julia
Ken Kobus
2 Name
3 Tel Number
4 Others
Back
OK
STEP 5: Select a group.
In this example, 2 Colleagues is selected.
Select an item by one of the following operations.
• Touch panel operation.
• Highlight an item by using
, and press
or
OK.
• Press 2 , and press
or OK soft.
[Group]
TIP
OK
If there is no corresponding data, "No data" will be displayed on LCD.
Select an item by one of the following operations.
• Touch panel operation.
• Highlight an item by using
, and press
or
OK.
• Press 1 - 4 , and press
or OK.
1 Default
2 Colleagues
3 VIPs
4 Family
5 Friends
6 Group 6
7 Group 7
8 Group 8
Note
Back
Back
STEP 7: Select a registration destination. In this example, “7205” will be added to Tel #2.
1/3
1/1
OK
197
In this example, a mobile telephone number
“0800XXXXXXX” has already been registered to Tel #1.
If you select Tel #1 here, “0800XXXXXXX” will be overwritten with “7205”.
[Directory]
A maximum of four telephone numbers can be set
to an entry. If 2 Enable is selected here, the telephone number which is being edited will be given
top priority. In that case, the telephone number is
automatically selected when you make a call without specifying a specific telephone number.
1/1
1 Tel #1: 0800XXXXXXX
2 Tel #2:
3 Tel #3:
4 Tel #4:
Back
Select an item by one of the following operations.
• Touch panel operation.
• Highlight an item by using
, and press
or
OK.
• Press 1 or 2 , and press
or OK.
[Priority Flag]
OK
1/1
1 Disable
2 Enable
STEP 8: Select a Category to which the telephone
number belongs.
In this example, 1 Company is selected.
Select an item by one of the following operations.
• Touch panel operation.
• Highlight an item by using
, and press
or
OK.
• Press 1 , and press
or OK.
[Category Set]
OK
1/1
STEP 10:The display moves to the Edit screen of Directory. “7205” has been registered to Tel #2.
1 Company
2 Mobile
3 Voice Mail
4 Home
5 Others
Prev
See TO EDIT DIRECTORY DATA in Directory
Operation, and edit the data as necessary.
Back
Next
STEP 9: Select either 1 Disable or 2 Enable.
198
[Edit]
1
2
3
4
5
6
7
8
1/2
Ken Kobus
Gr Colleagues
0800XXXXXX
7205
Tel #3
Tel #4
NEC
Automatic
Save
Back
OK
199
TO DELETE ALL DATA
[Delete All]
STEP 1: Display the Menu screen, and select History.
Delete All Histories?
STEP 2: Select 4 Delete All.
Select an item by one of the following operations.
• Touch panel operation.
• Highlight an item by using
, and press
,
or OK.
• Press 4 .
Back
[History]
1/1
TIP
1 Missed
2 Outgoing
3 Incoming
To cancel the data deletion, press
OK
or Back soft key.
STEP 4: After all history data is deleted, the display
changes as follows. Press
or OK.
4 Delete All
[Delete History]
All History data has been deleted.
TIP
Menu
OK
The Menu soft key is labeled as Back for firmware versions earlier than 4.0.0.0..
STEP 3: The following confirmation message appears.
Press
OK
or OK to delete all the data.
200
TO DELETE SPECIFIC DATA
SubMenu
11 Call
11:00
Ken Kobus
2 Tel:
Directory
7205 Add
3 Prefix
2
10:00
4 Abe
Delete
One
Shintaro
Delete
All
5 Tel:
7207
STEP 1: Display the call history data of the target telephone number referring to TO VIEW CALL
HISTORY.
The following is an example when the history data
of missed call is displayed.
M
1/1
[Missed]
1 12/JUL/2010 (MON) 11:00
Ken Kobus
7205
TIP
2 12/JUL/2010 (MON) 9:55
Abe Kentaro
7207
Back
Cancel
OK
By selecting 5 Delete All, all records of missed call can
be deleted.
STEP 3: The following confirmation message appears.
Press
data.
Option
Press Option while displaying the call history data
for the target telephone number.
TIP
1/1
or OK to delete the appropriate history
[Missed]
Delete this entry?
-For firmware version 4.0.0.0 or later
: HELP button can also be used instead of Option .
-For firmware version earlier than 4.0.0.0
: Menu button can also be used instead of Option.
STEP 2: The following SubMenu is displayed. Select
4 Delete One.
Select an item by one of the following operations.
• Touch panel operation.
• Highlight an item by using
, and press
,
or OK.
• Press 4 , and press
,
or OK.
Back
TIP
201
To cancel the data deletion, press
OK
or Back soft key.
STEP 4: After the appropriate call history data is deleted, the display changes as follows. Press
or OK.
[Missed]
Deleted.
OK
202
6. MENU LIST
203
MENU LIST FOR DT750
Menu Item
Description
For firmware version 4.0.0.0 and later
Menu
Press
Menu
to display the Menu screen.
History
To view Call History data. Also, you can add the history data to the directory.
Directory
To access directory feature. There are the following three types of directory
features: Personal Directory, Phonebook and Corporate Directory. This
chapter explains the menu list for Personal Directory feature.
Setting
To make the user setting of DT750.
For firmware version before 4.0.0.0
Menu
Press
Menu
to display the Menu screen.
History
To view Call History data. Also, you can add the history data to the directory.
Directory
To access directory feature. There are the following three types of directory
features: Personal Directory, Phonebook and Corporate Directory. This
chapter explains the menu list for Personal Directory feature.
Tool
Uses when accessing external XML server. For details, contact the system
administrator.
Call Func.
Not used.
Setting
To make the user setting of DT750.
Presence
Not used.
Favorite
Not used.
Config
To make the configuration setting of DT750. For details, contact the system
administrator.
204
Menu List For History
Menu Item
Description
Default Value
1 Missed
Displays the history of missed calls. You can also make
a call from this menu.
-
2 Outgoing
Displays the history of outgoing calls. You can also
make a call from this menu.
-
3 Incoming
Displays the history of incoming calls. You can also
make a call from this menu.
-
4 Delete All
Deletes all the history data.
-
History
SubMenu (Press Option soft key or
Menu Item
Menu
key while the history data is displayed) Note 1
Description
Default Value
SubMenu
1 Call
Make a call to the currently displayed party.
2 Directory Add
1 New
Category Set
Priority Flag
Edit
2 Addition
Directory Search
Directory
3 Prefix
4 Delete One
5 Delete All
Add the currently displayed history data to the personal directory.
Add call history data to the personal directory.
Select Company, Mobile, Voice Mail, Home or Others.
Select either Enable or Disable.
Edit the directory data.
Edit the personal directory data from call history.
Search the personal directory.
Register the telephone number to the searched directory data.
Add Prefix to the telephone number and make a call.
Delete a specific data.
Delete all history data of a specific call type (“missed”, “outgoing”
or “incoming”)
Company
Disable
-
Note 1: For the firmware version 4.0.0.0 and later, you can display the SubMenu screen by pressing Option soft key
or HELP key .
205
Menu List For Directory
Menu Item
Directory
1 Search
1 Group
2 Name
3 Tel Number
4 Other
1 Memory ID
2 Category
3 Company
4 Alphabet
2 Edit
1 Name
2 Group
3-6 Tel #1-Tel #4
Category Set
Priority Flag
7 Company Name
Description
From Menu screen, select 2 Directory 1 Personal.
Search the personal directory.
Select a group as a search condition.
Enter the target name and perform a search.
Enter the target telephone number and perform a search.
Perform a search by one of the following conditions.
Enter a memory number.
Select a category.
Enter a company name.
Select a group of alphabets.
Add a new data to the personal directory.
Enter a name of the target party to be added to the directory.
Select a group to which the target party belongs.
Enter the telephone number.
Select Company, Mobile, Voice Mail, Home or Others.
Select either Enable or Disable.
Enter the company name of the target party.
8 Ring Tone
Select a ringer tone type per caller.
9 Illumination
Select a illumination pattern (color) of the call indication lamp.
0 Memory ID
Enter a memory number to be assigned to the target party.
206
Default Value
Default
Company
Disable
Default (follows
group settings)
Note 2
Default (follows
group settings)
Note 2
-
Menu Item
3 Group Setting
Group Setting
1 Name
2 Ring Tone
3 Illumination
4 Own Number
0 Delete All
Description
Change a group name.
Select a desired group name to be changed.
Enter a new group name.
Select a ringer tone type per group.
Select a illumination pattern (color) of the call indication lamp.
Displays the number of the telephone itself.
Delete all the registered directory data.
Default Value
Default (follows
terminal settings)
Note 2
Default (follows
terminal settings)
Note 2
-
Note 2: For firmware versions earlier than 4.0.0.0, the deafult is "Automatic."
Menu List For Tool
Menu Item
Description
Default Value
Tool
Note:
1 Service
Activate XML browser.
-
2 IM
Not used.
-
Tools are not supported at the firmware version 4.0.0.0 and later.
207
Menu List For Setting
Menu Item
Description
Default Value
Setting
1 User Setting
1 Incoming Call
1 Ring Volume
Make the user setting of DT750.
Settings for incoming call.
Not used.
-
2 Offhook Ring
Enable/Disable Off-hook ringing.
Enable
3 Headset Ring
Enable/Disable the ringing of headset.
Disable
4 Ring Tone
Select a ringer tone for External Call and Internal Call.
(Automatic / Tone Type 1~14 / Download 1~3)
5 Illumination
Set the illumination pattern for External Call and Internal Call.
(Automatic / Disable / Red / Green / Blue / Yellow / Purple
Light Blue / White / Rotation)
6 Headset Ring Volume
Not used.
2 Talk
Automatic
(Tone Type1)
Automatic
(Red)
-
Settings for telephone conversation.
1 RTP Alarm
Enable/disable RTP alarm.
Automatic
2 DTMF Tone
Enable/disable DTMF tone.
Automatic
3 Key Touch Tone
Set key touch tone generated when the digit keys are
pressed while the telephone is off-hook.
Automatic
(Tone)
4 Hold Music
Select a Music on Hold to be heard by DT750 user.
5 Prefix
Register Prefix number.
3 Display
Settings for LCD display.
Default
-
1 Time Format
Determines whether time is displayed with a 12-hour or 24hour clock format.
Automatic (12hour format)
2 Local Volume
Determines whether or not to display the following volume
levels: handset receiver volume, speaker volume, ringer tone
volume and LCD contrast.
Automatic
(Enable)
208
Menu Item
Description
3 Screen Saver
Default Value
-
1 Screen Saver
Mode
Enable/Disable Screen Saver.
2 Wait Time
Set the Wait Time to launch Screen Saver
120min
4 Back Light
Set the brightness of the backlight.
1. Level 1 (Bright) ~ 4. Level 4 (Dark)
Level 3
5 Font Size
Change the displayed character size on the LCD.
6 Language
Select a language to be displayed on LCD.
7 Advanced
Setting for the following additional data.
Disable
Standard(16dot)
Automatic
-
Sets the Home screen background.
(default/download)
default
2 Touch Panel
Enable/Disable the touch panel operation.
Enable
3 Shortcut Icon
Not used.
4 Font Color
Sets the font color for Time Display/Feature Information
Display area.
* You can check the color while selecting.
(Color 1 ~ Color 16)
1 Wallpaper
Note
Note
5 Turn Off Display
Note
-
Sets the data when turning off the display
automatically.
1 Turn Off
Display Mode
Sets whether Turn Off Display Mode is in service.
(Disable/Enable/App Priority)
2 Wait Time
Sets the time until turning off the display.
(1-999 min.)
4 Change Password
Change the password to lock/unlock the telephone.
5 Security
Not used.
Color 2
App Priority
180min
0000
-
6 Peripherals
Not used
-
0 Setting Reset
Reset the telephone settings.
-
209
Menu Item
2 Download
1 Download Files
Description
Set the data required for the file downloading.
-
Download the files for Music on Hold, ringer tone, Directory
and Wallpaper
-
1 Hold Music
Download a file for Music on Hold.
2 Ring Tone
Download files for ringer tones (Download 1 to 3).
MOH.wav
-
1 Download 1
Download a file for ringer tone (Download 1).
Melody1.wav
2 Download 2
Download a file for ringer tone (Download 2).
Melody2.wav
3 Download 3
Download a file for ringer tone (Download 3).
Melody3.wav
3 Directory
Download the directory files.
Directory.csv
4. Wallpaper
Download a file for Wallpaper
Note
WallPaper.bmp
2 Download Address
Enter an IP address of the FTP/TFTP server.
3 Protocol
Select a protocol of the server (either FTP or TFTP).
4 FTP Settings
Set necessary data when using FTP service.
-
1 User ID
Enter a user ID for downloading via FTP server.
-
2 Password
Enter a password for downloading via FTP server.
-
3 Folder
Specify the directory where the download file is stored.
-
Set the data required for the file backup/restore.
-
3 Data Backup/Restore
Note:
Default Value
0.0.0.0
FTP
1 Data Backup
Specify the file name to be backed up.
PersonalData.tgz
2 Data Restore
Specify the file name to be restored.
PersonalData.tgz
3 Server Address
Enter an IP address of the FTP/TFTP server.
4 Protocol
Select a protocol of the server (either FTP or TFTP).
5 FTP Settings
Set necessary data when using FTP service.
0.0.0.0
FTP
-
1 User ID
Enter a user ID for the data backup via FTP server.
-
2 Password
Enter a password for data backup via FTP server.
-
3 Folder
Specify the destination directory of FTP server.
-
Supported from Firmware version 3.0.0.0 and later.
210
7. WEB PROGRAMMING
Web Programming allows you to configure the terminal settings of DT750 from the PC. An Internet browser (Internet
Explorer, etc.) is used to access Web Programming. It is not necessary to install any special application software onto
the PC.
Note
DT750 and Web Programming PC needs to be connected to the same network. When downloading the files
for Music on Hold, Ringer Tone and Directory to the DT750, FTP (TFTP server) is required on the network. For
details on the FTP service, contact to the System Administrator.
Note
Terminal settings through the Web Programming is available while the DT750 logs into the system.
PC Requirements For Web Programming
Items
Operating Conditions
Operating System
Microsoft Windows XP/Vista
CPU
Memory
Comply with conditions for use of Microsoft Windows or Microsoft Internet Explorer.
Browser
Microsoft Internet Explorer 6.0 or later
Monitor
Others
SVGA (minimum: 800 600 pixel, recommended: 1024 768
pixel,)
Mouse, LAN connection port (RJ-45)
211
TO LOGIN
Follow the steps below to open the Web Programming.
STEP 1: Start up Internet browser on the PC.
STEP 2: Enter IP address of the target DT750 on the address toolbar and press Enter key.
STEP 3: The Web Programming Login screen appears. Enter a user name (type “USER”) and a password (Note 1),
then click OK button.
Note 1
Enter the same password used when logging into the DT750. “0000” is used as password by the default setting.
212
Note
For IP address of DT750, contact to the System Administrator.
Note
When the login screen does not appear, check the LAN connection status and entered IP address. If the
problem persists, contact the system administrator.
STEP 4: The following Web Programming Home screen appears.
213
TO LOGOUT
Follow the steps below to exit the Web Programming.
STEP 1: Click Logout button at the lower left of the screen.
STEP 2: The confirmation message appears. Click OK button to log out of Web Programming.
STEP 3: The display changes as follows. Click Back button.
214
STEP 4: After the Web Programming Login screen is displayed, close the Internet browser.
Note
Make sure to perform the logout operation after the data setting of the telephone.
Note
When 15 minutes have passed leaving the PC without operation after log in to Web Programming, the user
is forcibly logged out from the Web Programming.
215
HOW TO OPERATE
As an example of setting method on the Web Programming, the following explains how to change the ringer tone for
external call. Web Programming includes the same menu configuration as "Setting" of DT750 terminal. For details on
each menu item, see 2 SETUP WITH FEATURE KEY in 2 TERMINAL SETUP.
STEP 1: From the Home screen, click User Setting Incoming Call Ring Tone External Call.
STEP 2: Select a desired tone type by clicking the corresponding radio button.
STEP 3: Click OK button to save the change to the database.
STEP 1: Click items to navigate through the menu.
STEP 3: Click OK button
to accept the selection.
Click Logout button to exit
from the Web Programming.
STEP 2: Click the radio button to select a parameter.
STEP 4: A confirmation dialog appears. Click OK button on the dialog.
216
Printed in Japan
1008-040