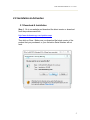
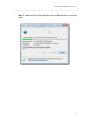
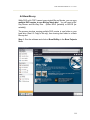
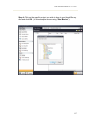
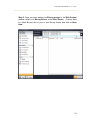
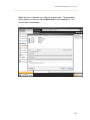
1
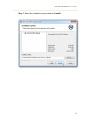
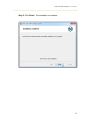
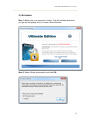
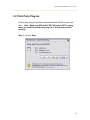
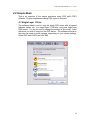
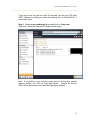
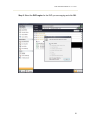
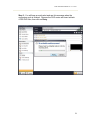
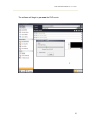
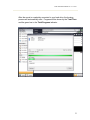
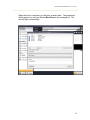
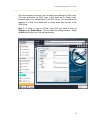
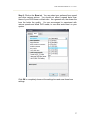
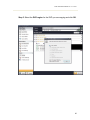
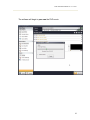
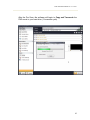
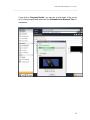
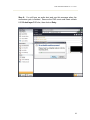
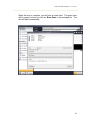
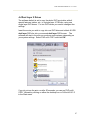
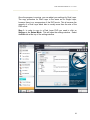
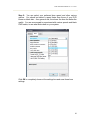
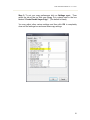
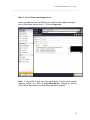
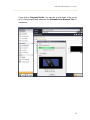
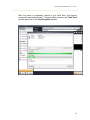
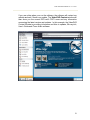
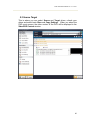
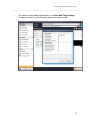
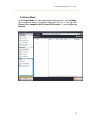
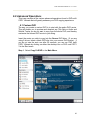
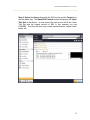
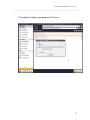
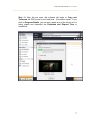
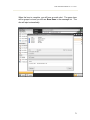
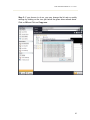
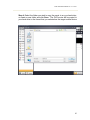
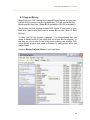
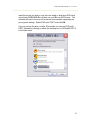
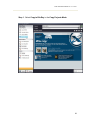
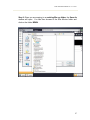
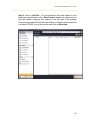
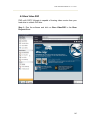
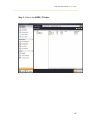
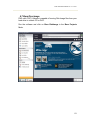
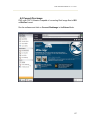
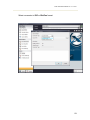
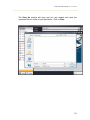
DVD neXt COPY Ultimate
User’s Guide
DVD neXt COPY Ultimate V3 User’s Guide
Table of Contents
1.0 Introduction................................................................................................................... 3
1.1 Helpful Tips .............................................................................................................. 4
1.2 Limitations ................................................................................................................ 4
1.3 Support ...................................................................................................................... 4
2.0 Installation & Activation............................................................................................... 5
2.1 Download & Installation ........................................................................................... 5
2.2 Activation ................................................................................................................ 13
3.0 Third Party Plugins ..................................................................................................... 15
4.0 Simple Mode................................................................................................................ 18
4.1 Single Layer 1 Drive ............................................................................................... 18
4.2 Single Layer 2 Drives ............................................................................................. 27
4.3 Dual Layer 1 Drive ................................................................................................. 35
4.4 Dual Layer 2 Drives ................................................................................................ 47
5.0 Graphical User Interface ............................................................................................ 58
5.1 Main Control Panel ................................................................................................. 58
5.2 Source Target .......................................................................................................... 60
5.3 Copy Projects Mode ................................................................................................ 63
5.4 Burn Projects Mode ................................................................................................ 64
5.5 Extras Mode ............................................................................................................ 65
6.0 Advanced Operations .................................................................................................. 66
6.1 Custom DVD .......................................................................................................... 66
6.2 Copy to Mobile ....................................................................................................... 80
6.3 Copy to Blu-ray....................................................................................................... 86
6.4 Burn Data CD/DVD .............................................................................................. 100
6.5 Burn Video DVD .................................................................................................. 105
6.6 Burn Blu-ray ......................................................................................................... 114
6.7 Burn Disc Image ................................................................................................... 121
6.8 Convert Disc Image .............................................................................................. 127
6.9 XP Blu-ray Browser .............................................................................................. 132
7.0 Terms......................................................................................................................... 133
2
DVD neXt COPY Ultimate V3 User’s Guide
1.0 Introduction
DVD neXt COPY Ultimate provides you the ability to backup your DVD
movies onto blank DVDs using a standard DVD +R or –R burner or a DVD
–R(W) or DVD +/-RW Dual Layer discs. You can also burn multiple DVD
movies to blank Blu-ray discs.
NEW DVD neXt COPY ULTIMATE FEATURES:
- Copy DVD movies to DVD, iPod, PSP, Zune, your computer and more.
- Contains neXt Tech™, for copying your latest DVD movies
- Copy special features (movie trailers, commentary, etc.)
- Copy full multi-channel audio (Dolby Digital 5.1, DTS)
- Automatically REMOVE DTS audio stream for MOBILE devices
- Copies DVD movies to one blank disc (no need to split)
- Copy up to 10 DVD MOVIES to 1 BLU-RAY DISC
- Copy episodic DVD Movies
- Make copies of copies
- PRE SCAN, delivering HIGHEST QUALITY available
- Browse and view DVD movies on your network
- Erase and reuse rewritable discs
- Copy with one drive and burn with the other
- Preview tracks before and during copying
- Remove region limitations
- Burn all Disk Image Types
- Convert Disk Image to ISO format
- Integrated Blu-Ray Browser
- Supports all Dual Layer/Single Layer/Blu-ray discs and burners
- Supports all SCSI, IDE, USB DVD burners/recorders on the market
- Supports both NTSC and PAL DVD movies
- Supports both home and PC DVD players
- Supports 1x - 20x speed blank media
- Technical Support
DVD neXt COPY Ultimate Minimum System Requirements
- Win 2000, XP
- Pentium III® 500 MHz or equivalent
- 256 MB RAM
- 10 GB of free hard drive space.
- A DVD Writer and media.
DVD neXt COPY Ultimate Recommended System Requirements
- Win XP, X64, VISTA
- Pentium 4® 1.4GHz or equivalent
- 512 MB RAM
- 15 GB of free hard drive space.
- A DVD Dual Layer/Blu-ray writer and media
3
DVD neXt COPY Ultimate V3 User’s Guide
1.1 Helpful Tips
Turn off all active programs including anti-virus before you begin.
DVD neXt COPY Ultimate can write to any media numerous times
during a given session.
If you have two DVD drives you can convert from one drive and
burn with the other.
1.2 Limitations
Some programs may affect the burning cycle.
When using an external DVD burner, you should limit the number of
additional external devices connected during the burning process.
1.3 Support
Regardless of where you purchased your software, DVD neXt
COPY Ultimate offers FREE 24/7 technical support via one of the
following:
DVD neXt COPY Ultimate Help and Support
If you are having problems using DVD neXt COPY Ultimate, you will
most likely be able to find the answers to your problems right on our
website. Please use our online 24/7 ticket support system. Click
here
If you are unable to find your answer in on our support page, please
submit a support ticket to our tech support team. All tickets
submitted will be answered within 24 hours of the posting time.
4
DVD neXt COPY Ultimate V3 User’s Guide
2.0 Installation & Activation
2.1 Download & Installation
Step 1: Go to our website and download the latest version or download
from the purchase email link:
http://www.dvdnextcopy.com/updates.aspx
Then click on Save. Make sure you download the latest version of the
product that you purchased, or your Activation Serial Number will not
work.
5
DVD neXt COPY Ultimate V3 User’s Guide
Step 2: Save the file to your hard drive.
6
DVD neXt COPY Ultimate V3 User’s Guide
Step 3: Make sure the “Close this dialog box” is UN checked so it will stay
open.
7
DVD neXt COPY Ultimate V3 User’s Guide
Step 4: After saving the file you will see this window. Click on Run.
8
DVD neXt COPY Ultimate V3 User’s Guide
Step 5: The setup Wizard will open. Click Next.
9
DVD neXt COPY Ultimate V3 User’s Guide
Step 6: Read the License Agreement and Click on I Agree. Please note
installation is limited to two of your own computers for each DVD neXt
COPY Ultimate license purchased.
10
DVD neXt COPY Ultimate V3 User’s Guide
Step 7: Select the installation options and click Install.
11
DVD neXt COPY Ultimate V3 User’s Guide
Step 8: Click Finish. The installation is complete.
12
DVD neXt COPY Ultimate V3 User’s Guide
2.2 Activation
Step 1: Make sure your computer is online. Run the software and when
you get the trial popup, click on I have a Serial Number.
.
Step 2: Select Online (automated), and click OK.
13
DVD neXt COPY Ultimate V3 User’s Guide
Step 3: Input your Activation Serial Number. If you TYPE in your Activation
Serial Number, use only the number zero (0) and not the letter O, and click OK.
You will get an Activation Success! popup. Click OK.
Note: If you have lost or misplaced your serial number, please go to our
online support system and submit a support ticket with your purchase
information. Click here
14
DVD neXt COPY Ultimate V3 User’s Guide
3.0 Third Party Plug-ins
All third party plug-ins should be downloaded and SAVED to your hard
drive. Note: Make sure DVD neXt COPY Ultimate is NOT running
when you install any third party plug-ins or they may not install
properly.
Step 1: Click on Save.
15
DVD neXt COPY Ultimate V3 User’s Guide
Step 2: Save to your hard drive
16
DVD neXt COPY Ultimate V3 User’s Guide
Step 3: You can then click on Run to install the third party plug-ins.
Step 4: Click on Run again and install the plug-in.
17
DVD neXt COPY Ultimate V3 User’s Guide
4.0 Simple Mode
This is an overview of the simple operations using DVD neXt COPY
Ultimate. No prior experience making DVD copies is required.
4.1 Single Layer 1 Drive
The software default is set to copy the whole DVD movie with all special
features, trailers, etc., to a single layer 4.7GB disc, using one single layer
DVD burner. You do not need to change the settings in this mode. Insert
the movie you wish to copy into the DVD burner. The software will start in
the auto run mode on most systems, depending on your system settings.
Select DVD neXt COPY and click OK.
18
DVD neXt COPY Ultimate V3 User’s Guide
If you do not see the auto run after 30 seconds, you can run DVD neXt
COPY Ultimate by clicking on either the desktop icon or DVDneXtCOPY 3
in the Start menu.
Step 1: Select source and target drives and click on Copy now.
(With only 1 drive the Source and Target are the same).
Note: If you prefer to only copy the movie and not all the other special
features, trailers, etc., click on Copy Main Movie. (Details for custom
DVDs will be discussed in our Advance Operations chapter).
19
DVD neXt COPY Ultimate V3 User’s Guide
Step 2: Select the DVD region for the DVD you are copying and click OK.
20
DVD neXt COPY Ultimate V3 User’s Guide
The software will begin to pre scan the DVD movie.
21
DVD neXt COPY Ultimate V3 User’s Guide
After the Pre Scan, the software will begin to Copy and Transcode the
DVD movie to your hard drive. (Conversion cycle)
22
DVD neXt COPY Ultimate V3 User’s Guide
If you click on Progress Details, you can see a quick scan of the movie
as it is being copied and determine the Estimated and Elapsed Time to
completion.
23
DVD neXt COPY Ultimate V3 User’s Guide
Step 3: You will hear an audio alert and see this message when the
conversion cycle is finished. Remove the DVD movie and insert a blank
4.7GB DVD disc, then click on Retry.
24
DVD neXt COPY Ultimate V3 User’s Guide
The burning process will start. Progress will be shown by the Total Time
and the green bar in the Total Progress indicator.
25
DVD neXt COPY Ultimate V3 User’s Guide
When the burn is complete, you will hear an audio alert. The green bars
will be grayed out and you will see Burn Done in the message list. The
disc will eject automatically.
26
DVD neXt COPY Ultimate V3 User’s Guide
4.2 Single Layer 2 Drives
The software default is set to copy the whole DVD movie disc with all
special features, trailers, etc., to a single layer 4.7GB disc, using one
single layer DVD burner. For two DVD drives you need to change a few
settings.
Insert the movie you wish to copy into one DVD drive and a blank 4.7 GB
disc into your DVD burner. The software will start in the auto run mode
on most systems, depending on your system settings. Select DVD neXt
COPY and click OK.
27
DVD neXt COPY Ultimate V3 User’s Guide
If you do not see the auto run after 30 seconds, you can run DVD neXt
COPY Ultimate by clicking on either the desktop icon or DVDneXtCOPY 3
in the Start menu.
Step 1: Select Source and Target drives, put a blank single layer disc in
the target drive, and click on Copy now.
Note: If you prefer to only copy the movie and not all the other special
features, trailers, etc., click on Copy Main Movie. (Details for custom
DVDs will be discussed in our Advance Operations chapter).
28
DVD neXt COPY Ultimate V3 User’s Guide
Step 2: Select the DVD region for the DVD you are copying and click OK.
29
DVD neXt COPY Ultimate V3 User’s Guide
The software will begin to pre scan the DVD movie.
30
DVD neXt COPY Ultimate V3 User’s Guide
After the pre scan, the software will begin to Copy and Transcode the
DVD movie to your hard drive. (Conversion cycle)
31
DVD neXt COPY Ultimate V3 User’s Guide
If you click on Progress Details, you can see a quick scan of the movie
as it is being copied and determine the Estimated and Elapsed Time to
completion.
32
DVD neXt COPY Ultimate V3 User’s Guide
After the movie is completely converted to your hard drive, the burning
process will automatically start. Progress will be shown by the Total Time
and the green bar in the Total Progress indicator.
33
DVD neXt COPY Ultimate V3 User’s Guide
When the burn is complete, you will hear an audio alert. The green bars
will be grayed out and you will see Burn Done in the message list. The
disc will eject automatically.
34
DVD neXt COPY Ultimate V3 User’s Guide
4.3 Dual Layer 1 Drive
The software default is set to copy the whole DVD movie disc with all
special features, trailers, etc., to a single layer 4.7GB disc, using one
single layer DVD burner. For dual layer and one DVD drive you need to
change a few settings.
Insert the movie you wish to copy into the dual layer DVD burner. The
software will start in the auto run mode on most systems, depending on
your system settings. Select DVD neXt COPY and click OK.
If you do not see the auto run after 30 seconds, you can run DVD neXt
COPY Ultimate by clicking on either the desktop icon or DVDneXtCOPY 3
in the Start menu.
35
DVD neXt COPY Ultimate V3 User’s Guide
Once the program is running, you can adjust your settings for Dual Layer.
The copy procedure for Dual Layer is the same as for Single Layer,
however there is no compression of the DVD movie. This is because the
capacity of a Dual Layer blank disc is usually more than the size of the
DVD movie.
Step 1: In order to copy to a Dual Layer DVD you need to click on
Settings in the Extras Mode. This will open the settings window. Select
the Burn tab at the top of the settings window.
36
DVD neXt COPY Ultimate V3 User’s Guide
Step 2: Click on the Burn tab. You can select your preferred burn speed
and other various options. You should not select a speed faster than
those of your DVD burner or blank disc. As a general rule, the slower the
burn the better the quality. You are encouraged to experiment with
various speeds and blank DVD media, to see what works best on your
system.
Click OK to completely close out the settings box and save those burn
settings.
37
DVD neXt COPY Ultimate V3 User’s Guide
Step 3: To set your copy preferences click on Settings again. Then
select the tab at the top that says Copy. Put a check mark in the box
labeled “Create Double Layer Copy”. (The default is blank).
You may adjust other various settings and then click OK to completely
close out the settings box and save those copy settings.
38
DVD neXt COPY Ultimate V3 User’s Guide
Step 4: Select Source and Target drives. In this example we have one
Dual Layer DVD drive E. Click on Copy now.
Note: If you prefer to only copy the movie and not all the other special
features, trailers, etc., click on Copy Main Movie. (Details for custom
DVDs will be discussed in our Advance Operations chapter).
39
DVD neXt COPY Ultimate V3 User’s Guide
Step 5: Select the DVD region for the DVD you are copying and click OK.
40
DVD neXt COPY Ultimate V3 User’s Guide
The software will begin to pres can the DVD movie.
41
DVD neXt COPY Ultimate V3 User’s Guide
After the Pre Scan, the software will begin to Copy and Transcode the
DVD movie to your hard drive. (Conversion cycle)
42
DVD neXt COPY Ultimate V3 User’s Guide
If you click on Progress Details, you can see a quick scan of the movie
as it is being copied and determine the Estimated and Elapsed Time to
completion.
43
DVD neXt COPY Ultimate V3 User’s Guide
Step 6: You will hear an audio alert and see this message when the
conversion cycle is finished. Remove the DVD movie and insert a blank
8.5 GB dual layer DVD disc, then click on Retry.
44
DVD neXt COPY Ultimate V3 User’s Guide
The burning process will start. Progress will be shown by the Total Time
and the green bar in the Total Progress indicator.
45
DVD neXt COPY Ultimate V3 User’s Guide
When the burn is complete, you will hear an audio alert. The green bars
will be grayed out and you will see Burn Done in the message list. The
disc will eject automatically.
46
DVD neXt COPY Ultimate V3 User’s Guide
4.4 Dual Layer 2 Drives
The software default is set to copy the whole DVD movie disc with all
special features, trailers, etc., to a single layer 4.7GB disc, using one
single layer DVD burner. For two DVD drives you need to change a few
settings.
Insert the movie you wish to copy into one DVD drive and a blank 8.5 GB
dual layer DVD disc into your second dual layer DVD burner. The
software will start in the auto run mode on most systems, depending on
your system settings. Select DVD neXt COPY and click OK.
If you do not see the auto run after 30 seconds, you can run DVD neXt
COPY Ultimate by clicking on either the desktop icon or DVDneXtCOPY 3
in the Start menu.
47
DVD neXt COPY Ultimate V3 User’s Guide
Once the program is running, you can adjust your settings for Dual Layer.
The copy procedure for Dual Layer is the same as for Single Layer,
however there is no compression of the DVD movie. This is because the
capacity of a Dual Layer blank disc is usually more than the size of the
DVD movie.
Step 1: In order to copy to a Dual Layer DVD you need to click on
Settings in the Extras Mode. This will open the settings window. Select
the Burn tab at the top of the settings window.
48
DVD neXt COPY Ultimate V3 User’s Guide
Step 2: You can select your preferred burn speed and other various
options. You should not select a speed faster than those of your DVD
burner or blank disc. As a general rule, the slower the burn the better the
quality. You are encouraged to experiment with various speeds and blank
DVD media, to see what works best on your system.
Click OK to completely close out the settings box and save those burn
settings.
49
DVD neXt COPY Ultimate V3 User’s Guide
Step 3: To set your copy preferences click on Settings again. Then
select the tab at the top that says Copy. Put a check mark in the box
labeled “Create Double Layer Copy”. (The default is blank).
You may adjust other various settings and then click OK to completely
close out the settings box and save those copy settings.
50
DVD neXt COPY Ultimate V3 User’s Guide
Step 1: Select Source and target drives.
In this example we have the DVD movie in drive E and a blank dual layer
disc in Dual Layer burner drive D. Click on Copy now.
Note: If you prefer to only copy the movie and not all the other special
features, trailers, etc., click on Copy Main Movie. (Details for custom
DVDs will be discussed in our Advance Operations chapter).
51
DVD neXt COPY Ultimate V3 User’s Guide
Step 2: Select the DVD region for the DVD you are copying and click OK.
52
DVD neXt COPY Ultimate V3 User’s Guide
The software will begin to Pre Scan the DVD movie.
53
DVD neXt COPY Ultimate V3 User’s Guide
After the Pre Scan, the software will begin to Copy and Transcode the
DVD movie to your hard drive. (Conversion cycle).
54
DVD neXt COPY Ultimate V3 User’s Guide
If you click on Progress Details, you can see a quick scan of the movie
as it is being copied and determine the Estimated and Elapsed Time to
completion.
55
DVD neXt COPY Ultimate V3 User’s Guide
After the movie is completely copied to your hard drive, the burning
process will automatically start. Progress will be shown by the Total Time
and the green bar in the Total Progress indicator.
56
DVD neXt COPY Ultimate V3 User’s Guide
When the burn is complete, you will hear an audio alert. The green bars
will be grayed out and you will see Burn Done in the message list. The
disc will eject automatically.
57
DVD neXt COPY Ultimate V3 User’s Guide
5.0 Graphical User Interface
This is a brief overview of the various windows, tabs and each of the
features you will find in DVD neXt COPY Ultimate. A more detailed
description of how to use the advanced features of the software will follow
in our Advanced Operations Chapter.
5.1 Main Control Panel
The software opens in the Main Control Panel, which gives you access to
the Main Menu and all the various Copy and Burn Projects features and
options as well as Extras. Since the software will default to copying the
entire DVD movie disc, you also have the option to Copy Main Movie only
or create a custom DVD by deselecting certain tracks and title sets.
58
DVD neXt COPY Ultimate V3 User’s Guide
If you are online when your run the software, the software will contact our
website and ask if there is an update. The VideoDVD Content window will
then show you the current DVD neXt COPY news and any information
concerning the latest version and updates. In this example, the VideoDVD
Content Window is providing information and links to updates, Blu-ray info,
User’s Guide and iTurns Audio software.
59
DVD neXt COPY Ultimate V3 User’s Guide
5.2 Source Target
This is where you can select Source and Target drives, refresh your
drives and select basic Burn and Copy Settings. When you select the
DVD movie source, the video content of the DVD will be displayed in the
VideoDVD Content window.
60
DVD neXt COPY Ultimate V3 User’s Guide
You can also make basis adjustments to your Burn and Copy Settings
by clicking on the icon just below the green drive refresh arrow.
61
DVD neXt COPY Ultimate V3 User’s Guide
When selecting Copy FullDVD in the Copy Projects Mode you can also
Expand or Collapse the DVD movie video content in the VideoDVD
Content window. (When selecting Copy Main Movie the first two icons
allow you to Sort DVD movie video content).
While in the Burn Projects Mode these icons change to Add or Delete
files, folders and tracks.
62
DVD neXt COPY Ultimate V3 User’s Guide
5.3 Copy Projects Mode
In the Copy Projects Mode you can Copy the Full DVD or Main Movie
to your hard drive. You can also choose to copy movies to your Mobile
device folder on your hard drive or copy multiple DVD movies to a single
Blu-ray project folder on your hard drive.
63
DVD neXt COPY Ultimate V3 User’s Guide
5.4 Burn Projects Mode
In the Burn Projects Mode you can Burn a Data CD/DVD or Video DVD
to a blank disc. You can also Burn multiple DVD movies to a Blu-ray
blank disc or burn a Disc Image to a blank disc.
64
DVD neXt COPY Ultimate V3 User’s Guide
5.5 Extras Mode
In the Extras Mode you can make detailed adjustments to your Settings.
Each individual setting is explained when you click on it. You can also
Convert Disc Images to Bin/Cue and ISO formats. Or use the Blu-ray
Browser.
65
DVD neXt COPY Ultimate V3 User’s Guide
6.0 Advanced Operations
This is an overview of the various advanced operations found in DVD neXt
COPY Ultimate that will greatly enhance your DVD copying experience.
6.1 Custom DVD
The way you create a custom DVD is to start with the entire DVD movie.
This will enable you to preview and deselect any Title Sets or Audio and
Subtitle Tracks you do not want to copy from the whole DVD, and thereby
customize the burned DVD movie to your liking.
Insert the movie you wish to copy into the Source DVD drive. (If you are
using 2 drives, insert a blank DVD disc into your second DVD burner). If
you do not see the auto run after 30 seconds, you can run DVD neXt
COPY Ultimate by clicking on either the desktop icon or DVD next COPY
3 in the Start menu.
Step 1: Select Copy FullDVD in the Main Menu.
66
DVD neXt COPY Ultimate V3 User’s Guide
Step 2: Select the Source drive with the DVD movie and the Target drive
with the blank disc. The VideoDVD Content window will display the Video
Title Sets in the Movie. In most cases, the main movie will be the Video
Title Set with the largest amount of MB. In this example you see
(7462MB). The other title sets may contain special features, trailers, blank
tracks, etc.
67
DVD neXt COPY Ultimate V3 User’s Guide
Step 3: Click on Expand all items in the upper right hand corner, just
above the VideoDVD Content window. This will expand all the Video
Title Sets in the VideoDVD Content window and provide each one with a
preview screen.
68
DVD neXt COPY Ultimate V3 User’s Guide
Step 4: Click on and preview selected Video Title Sets in the Preview
Window. You may pause and play the Video Title Set or use the slider to
move to any point in the Video Title Set while previewing. Some Video
Title Sets my not have any video. You may deselect any Video Title Sets
or Audio and Subtitle Tracks you do not want to copy.
69
DVD neXt COPY Ultimate V3 User’s Guide
Step 5: Click on and preview the Main Movie Video Title Set in the
Preview Window.
70
DVD neXt COPY Ultimate V3 User’s Guide
Step 6: Click on Audio in the Main Movie Video Title Set and deselect any
audio tracks you do not want to copy. (Be sure to use the scroll bar to see
all the audio tracks).
71
DVD neXt COPY Ultimate V3 User’s Guide
Step 7: Click on Subtitles in the Main Movie Video Title Set and deselect
any subtitle tracks you do not want to copy. (Be sure to use the scroll bar
to see all the subtitle tracks).
72
DVD neXt COPY Ultimate V3 User’s Guide
Step 8: After you have made your custom selections, click on Collapse all
items.
73
DVD neXt COPY Ultimate V3 User’s Guide
Step 9: Click on Copy now.
74
DVD neXt COPY Ultimate V3 User’s Guide
Step 10: Select the DVD region for the DVD you are copying and click
OK.
75
DVD neXt COPY Ultimate V3 User’s Guide
The software will begin to pre scan the DVD movie.
76
DVD neXt COPY Ultimate V3 User’s Guide
Step 11: After the pre scan, the software will begin to Copy and
Transcode the DVD movie to your hard drive. (Conversion cycle). If you
click on Progress Details, you can see a quick scan of the movie as it is
being copied and determine the Estimated and Elapsed Time to
completion.
77
DVD neXt COPY Ultimate V3 User’s Guide
After the movie is completely converted to your hard drive, the burning
process will automatically start. Progress will be shown by the Total Time
and the green bar in the Total Progress indicator.
78
DVD neXt COPY Ultimate V3 User’s Guide
When the burn is complete, you will hear an audio alert. The green bars
will be grayed out and you will see Burn Done in the message list. The
disc will eject automatically.
79
DVD neXt COPY Ultimate V3 User’s Guide
6.2 Copy to Mobile
Insert the DVD movie into your DVD drive. If you do not see the auto run
after 30 seconds, you can run DVD neXt COPY Ultimate by clicking on
either the desktop icon or DVD next COPY 3 in the Start menu.
The process involves copying your DVD movie in mobile format to one
folder on your hard drive, then transferring you DVD movie to your mobile
device.
Step 1: Select Copy to Mobile in the Copy Projects Mode.
80
DVD neXt COPY Ultimate V3 User’s Guide
Step 2: Select the Source drive containing your DVD movie and select
your portable device as the Target.
81
DVD neXt COPY Ultimate V3 User’s Guide
Step 3: If you choose to do so, you may change the bit rate or quality
settings by clicking on the icon just below the green drive refresh arrow.
Click on OK and Click on Copy now.
82
DVD neXt COPY Ultimate V3 User’s Guide
Step 4: Select the folder you wish to copy the movie to on your hard drive,
or create a new folder and click Save. The DVD movie will be copied to
your hard drive in the format that you selected as the target mobile device
.
83
DVD neXt COPY Ultimate V3 User’s Guide
Step 5: Transfer the movie to your mobile device.
Transfer to iPOD
You need to have iTunes installed on your computer to transfer DVD
movies to your iPod. All you have to do is open iTunes, then drag and
drop the DVD movie you just converted to your hard drive in iPod format
to your iPod movies folder in iTunes. You can then transfer the DVD
movie to your iPod.
Transfer to PSP
There are two ways to transfer the PSP formatted DVD movie from your
hard drive to your PSP.
#1 You need a media card reader. Most computers have a media card
reader. It is normally located on your CPU tower or on the side of your
laptop. It is a small slot where you insert memory and media cards from
your digital camera and other devices. Inside of your PSP you should
have a memory card where you can store your data games and movies.
You can take that out or use a new one, and insert it into your media card
reader on your computer. This will allow you to transfer your DVD movie to
the card and then to your PSP.
#2 The second way requires the purchase of software called “Sony Media
Manager” and can be found on the internet. Sony Media Manager gives
you complete control of everything on your PSP from within, and is an
easy to use software interface.
84
DVD neXt COPY Ultimate V3 User’s Guide
Transfer to Zune
You will need to have Zune Player software installed on your computer to
transfer DVD movies to your Zune Player. All you have to do is open your
Zune player software and follow the instructions for transferring the DVD
movie you just converted to your hard drive in Zune format to your Zune.
85
DVD neXt COPY Ultimate V3 User’s Guide
6.3 Copy to Blu-ray
While DVD neXt COPY cannot copy original Blu-ray Movies, you can copy
multiple DVD movies to one Blu-ray blank disc. You will need a Blu-Ray
Burner and Blu-Ray Disc. (Either BD-R [writable] or BD-RE [re-writable]).
The process involves copying multiple DVD movies to one folder on your
hard drive, then burning that folder to a blank Blu-ray disc. (See 6.6 Burn
Blu-ray).
To keep your Blu-ray projects organized, it is recommended that you
create a master folder on your hard drive for all your Blu-ray projects. In
this way you can browse to that folder when creating new multiple DVD
movie Blu-ray projects and create subfolders for each project within that
master folder.
Create a Blu-ray Projects Folder on your hard drive.
86
DVD neXt COPY Ultimate V3 User’s Guide
Insert the movie you wish to copy into one single or dual layer DVD drive
and a blank 25GB/50GB Blu-ray disc into your Blu-ray DVD burner. The
software will start in the auto run mode on most systems, depending on
your system settings. Select DVD neXt COPY and click OK.
If you do not see the auto run after 30 seconds, you can run DVD neXt
COPY Ultimate by clicking on either the desktop icon or DVDneXtCOPY 3
in the Start menu.
87
DVD neXt COPY Ultimate V3 User’s Guide
Step 1: Select Copy to Blu-Ray in the Copy Projects Mode.
88
DVD neXt COPY Ultimate V3 User’s Guide
Step 2: Select Source drive with the DVD movie. If this is your FIRST
DVD movie for this multiple DVD movie project, select the target as Copy
to new BluRay and click on Copy now.
89
DVD neXt COPY Ultimate V3 User’s Guide
Step 3: Select the DVD region for the DVD you are copying and click OK.
90
DVD neXt COPY Ultimate V3 User’s Guide
Step 4: The Browse For Folder window will open. Browse to your Bluray projects folder. Click on it and click on Make New Folder.
91
DVD neXt COPY Ultimate V3 User’s Guide
Step 5: Name the new subfolder the name of your new project and click
OK. In this example we are using “Star Movies”. Of course each time
you start a new project you will create and name a new subfolder in your
Blu-ray Projects master folder.
92
DVD neXt COPY Ultimate V3 User’s Guide
The software will begin to Pre Scan the DVD movie. After the pre scan,
the software will begin to Copy and Transcode the DVD movie to the
project folder (“Star Movies”)
93
DVD neXt COPY Ultimate V3 User’s Guide
Step 6: When the copy process is finished, remove the DVD movie you
just copied to the project folder (“Star Movies”). Insert another DVD movie
and click OK.
94
DVD neXt COPY Ultimate V3 User’s Guide
Step 7: Click on the green refresh arrow in the upper right hand corner to
refresh your DVD drive with the new movie you just inserted. Select the
Source drive. Since you are going to put this additional DVD movie into
the same project folder (“Star Movies”), you need to select Copy to
existing BluRay as the Target. Click on Copy now.
95
DVD neXt COPY Ultimate V3 User’s Guide
Step 8: Select the DVD region for the DVD you are copying and click OK.
96
DVD neXt COPY Ultimate V3 User’s Guide
Step 9: Since you are copying to an existing Blu-ray folder, the Save As
window will open. You can then browse to the Star Movies folder and
click on the folder BDMV.
97
DVD neXt COPY Ultimate V3 User’s Guide
Step 10: Select index.bdmw. This will save this second movie to the
index of the Star Movies project folder. Click on Save.
98
DVD neXt COPY Ultimate V3 User’s Guide
The software will begin to Pre Scan the DVD movie. After the Pre Scan,
the software will begin to Copy and Transcode the DVD movie to the
Star Movies project folder
You may repeat this Copy to existing BluRay process until you have
copied the desired number of DVD movies to your Star Movies project
folder. (See 6.6 Burn Blu-ray for instructions on how to burn your
projects to a blank Blu-ray disc.)
99
DVD neXt COPY Ultimate V3 User’s Guide
6.4 Burn Data CD/DVD
DVD neXt COPY Ultimate is capable of burning all types of data from your
hard drive to a blank CD or DVD.
Step 1: Run the software and click on Burn DataCD/DVD in the Burn
Projects Mode.
100
DVD neXt COPY Ultimate V3 User’s Guide
Step 2: You may see this warning. This is just a reminder that you will
loose any information you have added to the Disk Content window, when
you are selecting different options in the Burn Projects Mode. You can
click the “Do not show this message anymore”, if you prefer.
Clicking on Yes will open the Burn DataCD/DVD option and clear the Disk
Content window.
101
DVD neXt COPY Ultimate V3 User’s Guide
Step 2: Click on Add File. You can browse for files and folders on your
hard drive and add them to the Disk Content window, as well as remove
files and folders, using the four options to the top right of the window.
Once you have added all the files and folders you desire, make sure there
is a blank CD/DVD in your burn device and click on Burn Now.
102
DVD neXt COPY Ultimate V3 User’s Guide
Progress will be shown by the Total Time and the green bar in the Total
Progress indicator.
103
DVD neXt COPY Ultimate V3 User’s Guide
When the burn is complete, you will hear an audio alert. The green bars
will be grayed out and you will see Burn Done in the message list. The
disc will eject automatically.
104
DVD neXt COPY Ultimate V3 User’s Guide
6.5 Burn Video DVD
DVD neXt COPY Ultimate is capable of burning video movies from your
hard drive to a blank DVD disc.
Step 1: Run the software and click on Burn VidoeDVD in the Burn
Projects Mode.
105
DVD neXt COPY Ultimate V3 User’s Guide
Step 2: You may see this warning. This is just a reminder that you will
loose any information you have added to the Disk Content window, when
you are selecting different options in the Burn Projects Mode. You can
click the “Do not show this message anymore”, if you prefer.
Clicking on yes will open the Burn VidoeDVD option.
106
DVD neXt COPY Ultimate V3 User’s Guide
Step 3: Click on the VIDEO_TS folder.
107
DVD neXt COPY Ultimate V3 User’s Guide
Step 4: Click on Add File.
108
DVD neXt COPY Ultimate V3 User’s Guide
Step 5: You can browse to your preferred VIDEO_TS folder on your hard
drive. Double click on the folder you want to copy.
109
DVD neXt COPY Ultimate V3 User’s Guide
Step 6: Highlight all the files in the folder and click on Open.
110
DVD neXt COPY Ultimate V3 User’s Guide
Step 7: The files are now ready to burn to disc. Make sure there is a
blank DVD disc in your select burner and click Burn now.
111
DVD neXt COPY Ultimate V3 User’s Guide
Progress will be shown by the Total Time and the green bar in the Total
Progress indicator.
112
DVD neXt COPY Ultimate V3 User’s Guide
When the burn is complete, you will hear an audio alert. The green bars
will be grayed out and you will see Burn Done in the message list. The
disc will eject automatically.
113
DVD neXt COPY Ultimate V3 User’s Guide
6.6 Burn Blu-ray
While DVD neXt COPY cannot copy original Blu-ray Movies, you can copy
multiple DVD movies to one Blu-ray blank disc. You will need a BluRay Burner and Blu-Ray Disc. (Either BD-R [writable] or BD-RE [rewritable]).
The process involves copying multiple DVD movies to one folder on your
hard drive (See 6.3 Copy to Blu-ray), then burning that folder to a blank
Blu-ray disc.
Step 1: Run the software and click on Burn BluRay in the Burn Projects
Mode.
114
DVD neXt COPY Ultimate V3 User’s Guide
Step 2: You may see this warning. This is just a reminder that you will
loose any information you have added to the Disk Content window, when
you are selecting different options in the Burn Projects Mode. You can
click the “Do not show this message anymore”, if you prefer.
Clicking on Yes will open the Burn BluRay option and clear the Disk
Content window.
115
DVD neXt COPY Ultimate V3 User’s Guide
Step 3: Click on Add Folder in the upper right had corner and browse to
your Blu-ray projects folder on your hard drive. (If you have not copied any
DVD movies to your Blu-ray Projects Folder, see 6.3 Copy to Blu-ray).
116
DVD neXt COPY Ultimate V3 User’s Guide
Step 4: Click on the specific project you wish to burn to your blank Blu-ray
disc and click OK. (In this example we are using “Star Movies”).
117
DVD neXt COPY Ultimate V3 User’s Guide
Step 5: Once you have added your Blu-ray project to the Disk Content
window, select your Blu-ray Burner as the Burn Device. Confirm there
is a blank Blu-ray disc in your in your Blu-ray burner and click on Burn
Now.
118
DVD neXt COPY Ultimate V3 User’s Guide
Progress will be shown by the Total Time and the green bar in the Total
Progress indicator. NOTE: The total time to burn a Blu-ray project will
vary, depending on your quality settings and the size of the project.
119
DVD neXt COPY Ultimate V3 User’s Guide
When the burn is complete, you will hear an audio alert. The green bars
will be grayed out and you will see Burn Done in the message list. The
disc will eject automatically.
120
DVD neXt COPY Ultimate V3 User’s Guide
6.7 Burn Disc Image
DVD neXt COPY Ultimate is capable of burning Disk Image files from your
hard drive to a blank CD or DVD.
Run the software and click on Burn DiskImage in the Burn Projects
Mode.
121
DVD neXt COPY Ultimate V3 User’s Guide
You may see this warning. This is just a reminder that you will loose any
information you have added to the Disk Content window, when you are
selecting different options in the Burn Projects Mode. You can click the
“Do not show this message anymore”, if you prefer.
122
DVD neXt COPY Ultimate V3 User’s Guide
You can browse for image files on your hard drive and double click them
to add them to the Tracks window, as well as remove tracks, using the
three options to the top right of the window.
123
DVD neXt COPY Ultimate V3 User’s Guide
Once you have added all the image files you desire to the Tracks window,
make sure there is a blank CD/DVD in your burn device and click on Burn
Now.
124
DVD neXt COPY Ultimate V3 User’s Guide
Progress will be shown by the Total Time and the green bar in the Total
Progress indicator.
125
DVD neXt COPY Ultimate V3 User’s Guide
When the burn is complete, you will hear an audio alert. The green bars
will be grayed out and you will see Burn Done in the message list. The
disc will eject automatically.
126
DVD neXt COPY Ultimate V3 User’s Guide
6.8 Convert Disc Image
DVD neXt COPY Ultimate is capable of converting Disk Image files to ISO
or Bin/Cue format.
Run the software and click on Convert DiskImage in the Extras Mode.
127
DVD neXt COPY Ultimate V3 User’s Guide
Select conversion to ISO or Bin/Cue format.
128
DVD neXt COPY Ultimate V3 User’s Guide
You can browse to the Source of the image file on your hard drive that
you want to convert and double click the file. Click OK.
129
DVD neXt COPY Ultimate V3 User’s Guide
The Save As window will open and you can rename and save the
converted file to a folder on your hard drive. Click on Save.
130
DVD neXt COPY Ultimate V3 User’s Guide
You will receive an Image Conversion Successful message.
131
DVD neXt COPY Ultimate V3 User’s Guide
6.9 XP Blu-ray Browser
The XP Blu-ray Browser is not restricted to WinXP. This utility can be used
on all windows Operating Systems. However, Windows 2000 and
Windows XP (SP2) do not support Blu-ray Disks and they will not
recognize them. With the XP Blu-ray Browser you can browse through
and check the multiple DVD movie Blu-ray discs you have created.
132
DVD neXt COPY Ultimate V3 User’s Guide
7.0 Terms
A
a-characters
An ISO-9660 character set. A B C D E F G
HIJKLMNOPQRSTUVWXYZ01
2 3 4 5 6 7 8 9 _SP ! “ % & ‘ ( ) * + , - . : ; < =
>?
administrator rights
An administrator is who manages the
computer system.
Anti-piracy
Being against unauthorized use of patented
or copyrighted work.
Application Name
The name of the application necessary for
accessing data from the CD.
ASCII
American Standard for Information
Interchange – a binary code for text
communication and printer controls. It is the
built in character code in all computers.
ASPI
Advanced SCSI Programmer’s Interface.
An expanded standard low-level interface
used for accessing SCSI devices
Audio
There are three types of audio formats:
Dolby AC3, PCM, MPEG-1 Layer II and
MPEG-2
B
Bit
A contraction of a binary digit. The binary
system number is based on powers of two.
A binary digit, or a bit, is either a one or a
zero. Since DVDs are digital storage media
format, all information is recorded as digital
data, or as bits (ones or zeros).
Block
Also known as a sector or a logical block
and is identified by a logical block number
(LBN). A block is the smallest unit of
information on a CD-ROM that can be
addressed.
Blu-ray disc
(also known as Blu-ray or BD) is an optical
133
DVD neXt COPY Ultimate V3 User’s Guide
disc storage media format. Its main uses are
high-definition video and data storage. The
disc has the same physical dimensions as a
standard DVD or CD.
The name Blu-ray Disc is derived from the
blue laser (violet colored) used to read and
write this type of disc. Because of its shorter
wavelength (405 nm), substantially more
data can be stored on a Blu-ray Disc than
on the DVD format, which uses a red (650
nm) laser. A dual layer Blu-ray Disc can
store 50 GB, almost six times the capacity
of a double-dual layer DVD (or more than 10
times if single-layer).
Buffer
A memory holding area used to temporarily
store data.
The process of writing information to a
writable CD or DVD.
Burn
Bytes
Eight bits of digital data.
C
Cache
A memory buffering method used to obtain
data faster than from a CD or other media.
Caddy
The tray or carrier where the CD is placed
for reading or writing.
Caliber
CD
Compact Disc
CD-DA
Compact Disc – Digital Audio, developed by
both Philips and Sony corporations. These
are playable on any audio CD player or
computer CD-ROM drive.
CD-R
Compact Disc – Recordable, These are
read-only on a standard CD-ROM drive.
Images, text data or sound can be recorded.
CD-ROM
Compact Disc – Read Only Memory, Media
which can contain data, audio or voice.
CD-ROM Drive
A hardware device which allows the CD
134
DVD neXt COPY Ultimate V3 User’s Guide
media to be read, played or recorded.
CD-RW
Compact Disc- Read/Write, A rewriteable
CD. These can be erased and re-recorded.
CD-Text
Text information stored on an audio CD in
either the lead-in or in audio tracks.
Compression
A method to reduce the storage size
requirements of digital information by
removing redundant data. Video
compression allows the hundreds of
gigabytes of data contained in a full length
movie to be reduced so that it will fit on a
DVD.
Content
The video, audio and graphics that are to be
added to a DVD.
Copyright Filename
The name of a file located in the root
directory containing a copyright notice.
C2
The minimum security level defined by the
National Computer Security Center (NCSC).
D
DAT
Digital Audio Tape
Data Preparer’s Name
The name of the author of the Cd’s
contents.
Details Pane
The details pane displays files associated
with currently selected session and directory
within that session.
Device
Any electronic machine or component from
a transistor to a disc drive. Ther term
“device” always refers to hardware.
Disc
An alternate spelling for disc. Disc is
135
DVD neXt COPY Ultimate V3 User’s Guide
usually used with read-only media, such as
CDs and CD-ROMs.
Disc at Once
A single process method of recording data
on a CD. The Lead-in is converted first,
then the data sector, followed by the Leadout.
Disc Image
A file that contains the image of a DVD. If
you elect to create a Disc Image, you can
then make copies of that DVD simply by
writing that Disc Image to a writeable CD or
DVD.
Directory
The term directory refers to the address of a
file of group of files on your hard drive or
removable media.
Direct X
A set of multi-media programming interfaces
from Microsoft fro Windows.
Disc
A direct access storage device such as
floppy disc, hard disc, magnetic disc, optical
disc, CD-ROM and DVD.
Dolby AC3
Dolby Audio Coding 3 – the audio coding
technology used in Dolby digital.
Dolby Digital
A digital audio encoding system from Dolby
used in movie & home theatres.
DV
Digital Video – video captured to a computer
from a digital camcorder.
DVD
The term DVD officially doesn’t stand for
anything, although it is often said to stand
for Digital Versatile Disc or Digital Video
Disc. DVDs are a 3 or 6 inch discs capable
of storing 2.2, 4.7, 8.5 9.4 or 17 gigabytes of
data.
DVD-RAM
Alternative competing format of record-once
type discs with 2.4 GB storage capacity per
side.
136
DVD neXt COPY Ultimate V3 User’s Guide
DVD-ROM
DVD-Rom does not contain Video_TS and
Audio_TS directories and therefore cannot
read by a consumer DVD player. DVDROMs typically are used to store data much
in a way a CD_ROM is used today.
DVD-R/DVD+RW
Alternative competing format of record-once
type (DVD+R) or re-recordable type
(DVD+RW) discs with 4.7 GB storage
capacity per side.
E
Episodic Discs
EULA
These are TV Series discs that have
multiple shows that have been produced as
a single DVD.
End User License Agreement
F
File System
A data structure that converts the physical
image of a disc into a logical structure of
files and directories.
Folder
The term directory refers to the address of a
file of group of files on your hard drive or
removable media.
Folder Pane
The folder pane shows the tracks, sessions
and folders on the CD or DVD.
G
gigabytes
One million bytes
GIF
Graphics Interchange Format – a popular
bitmapped graphics file format developed by
CompuServe.
H
Hard drive
The primary computer storage device, which
spins, reads and writes one or more fixed
disc platters. (hard drive & hard disc are
used synonymously)
Hard errors
Errors that can not be automatically
recovered from device in a single read
attempt.
HDTV
High Definition Television – A high-
137
DVD neXt COPY Ultimate V3 User’s Guide
resolution digital television combined with
Dolby Digital surround sound (AC-3).
Hexadecimal
16. The base 16 numbering system is used
as shorthand for representing binary
numbers. Each half byte (4bits) is assigned
a hex digit.
HFS
Hierarchal File System. The file system
used by the Macintosh operating system to
arrange data on hard discs and floppy discs.
This system can also be used for CDROMs.
HFS+
Allows longer file names (256) characters
and supports Unicode.
I
Image
A single file containing all edited data on a
CD.
IFO
Publishing information about the content of
this file would be contrary to the license
agreement and non-disclosure agreement
with the DVD forum.
.INI
A file containing configuration information
for Windows. Some applications have their
own .ini files which hold program
information.
.ISO
A CD image format similar to a BIN/CUE
image file set, but the one single .ISO file
contains both the data and the CD layout
information.
ISRC
International Standard Recording Code
ISO-9960
An international logical file format for CDROMs originally developed by the High
Sierra Group. All data on a CD is
addressed using logical block numbers
J
Joliet
A logical file format created by Microsoft
138
DVD neXt COPY Ultimate V3 User’s Guide
Corporation which conforms to ISO-9960
format. This format allows long file names
(up to 64 characters) and uses the Unicode
international character set.
Joint Photographic Experts Group – a
standard for compressing still images.
JPEG
K
Kilobytes
1 thousand bytes or 1,024 bytes in technical
specs.
L
LBN
Logical Block Number. See Block
Lead-in
The first part of a CD-R recording session.
The Table of Contents is converted into the
lead-in when the session is closed.
Lead-out
The ending area for each session where the
index to the next session is stored. Writing
the lead-out closes the session.
License Number
A number provided to a specific copy of the
software used to identify the end user who
purchased the product.
M
MCN
Media Catalog number
Media
Video and audio used in the creation of a
DVD
Mobile Device
Reference to iPod, PSP or Zune mobile
device used to view DVD movies while on
the move.
Mode 1
The original “ordering” of control information
in the sector header. Most basic form read
by all CD devices.
Mode 2
(XA) “extended architecture” that allows
definitions of sub-types within the data by
139
DVD neXt COPY Ultimate V3 User’s Guide
using an additional 8 bytes in the sector
header. This was moved from the back end
of the sector to the front to allow for this.
MPEG
A video compression system developed by
the Motion Picture Experts Group. There
are currently two types in use: MPEG-1 and
MPEG-2.
MPEG-1
Achieves approximately ¼ the resolution of
broadcast TV and is slow fro processing
high quality moving images.
MPEG-2
The super high quality video technique used
for DBS (satellite TV), DHTV and DVD.
MPEG-4
A transport-agnostic multi-media
representation technology developed as an
expansion on the MPEG-2 standard.
MSF
Minute Second Frame addressing, used
with both data and audio tracks. This is an
alternate addressing form for CD.
N
O
Optical Media
P
Packet Writing
PCM
Preferences
A direct access media converted and read
by light.
A technique of writing to a CD-R or CD-RW
disc which allows small increments of data
to be added to the disc. This is used by
nearly all “drag-and-drop” type CD burning
software. See UDF.
Pulse Code Modulation- an uncompressed,
digitally codes representation of an analog
signal.
Options in a program that can be changed
by the user. They usually control the user
interface letting the user customize the way
they view data.
140
DVD neXt COPY Ultimate V3 User’s Guide
Publisher’s Name
Q
Quick Erased disc
R
Region coding
Identifies the name of the CD’s publisher
CD/RW discs can be erased “quickly” taking
less than 5 minutes. However, the original
information is present on the disc but it
cannot be read by consumer drives. The
information on the disc can only be
recovered using special hardware.
A standard based upon country that the
technology is available in.
S
SCSI
Small Computer System Interface, An
interface allowing you to connect media
devices to your computer.
Sector
The smallest unit of information on a CD
that can be addressed. Also referred to as
a block. A sector may contain a header,
synchronization bits and user data.
Different types of CDs contain different
sector sizes. A data CD-ROM contains a
sector size of 2048 bytes of data.
Settings
User defined choices that can be “set” as
their default.
Soft errors
Errors that the software can normally
recover from.
Sub-q Data
A hex hump containing current position data
for the track, UPC code for the track, current
minutes and seconds time into the track and
ISRC.
SVCD
Super Video Compact Disc – a movie on an
SVCD is the same quality as a VHS tape.
141
DVD neXt COPY Ultimate V3 User’s Guide
System Name
The name of the operating system running
the application.
T
TDF
Title Definition Format
Text Editor
Software used to create and edit files that
contain only text.
Third Party Plugins
Any 3rd party plugin applications, such as a
Graphical User Interface (GUI), that are not
part of the DVD neXt COPY Ultimate
program.
Thumbnail
A small, scaled-down version of any given
image or video. Although typically much
smaller than the original image, thumbnails
give you a quick, overall preview of an entire
image.
Titleset
A titleset is the highest position in the
hierarchy on a video DVD. Every DVD has
at least one, and most will contain multiple
chapters and/or titles. All files associated
with a given titleset have the prefix VTS_
and then the number of the titleset itself.
TOC
Table of Contents, shows the contents of
every recorded session. The contents
consist of the number of tracks, the starting
location for each track, and the total size of
the data area. The lead-in contains TOC.
Tool Bar
A small window which contains buttons or
icons that are shortcuts to menu commands.
Toolbars list available commands.
Track
On a data CD-ROM, one track may contain
data, files and folders. On an audio CD, a
single track contains one piece of music.
Each track is separated by a gap.
U
142
DVD neXt COPY Ultimate V3 User’s Guide
UDF
Universal Disc Format, nearly all drag-anddrop CD burning software uses this format.
UPC
Unique Product Code, A unique bar code
format for a CD.
V
VCD
Video Compact Disc – a CD that contains
moving pictures and sound.
VHS
Video Home System – a half inch analog
videocassette recorder (VCR)
VOB
Video Object File – the next step in video
files past analog source
Volume Descriptor
This resides at the beginning of the CD
where the structure of the file system is
located. A volume descriptor may contain:
system name, volume name, volume set
name. publisher’s name, data preparer’s
name, application name, copyright filename.
Volume Name
The name of the CD displayed when it is
mounted.
Volume Set Name
The name of the set of volumes.
W
Stores samples “in the raw” where no preprocessing is required other than formatting
of data.
.WAV
X
See Mode 2
XA
Y
Z
143