1
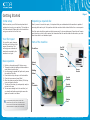
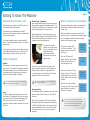
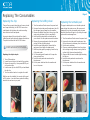
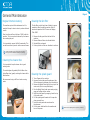
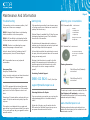
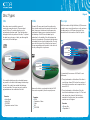
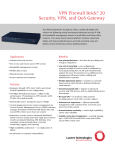
What’s In This User Guide?
Getting started - repair a disc right now
Getting to know your machine and how it works
The general usage of your machine
Maintenance
and other useful information
M
©Total Disc Repair
|
www.totaldiscrepair.co.uk
|
Technical Support: 0800 412 5424 - [email protected]
|
Sales: 01202 489 500 - [email protected]
User Guide Contents
Page 1
Page 3
Page 5
Getting Started
Replacing The Consumables
Maintenance & Information
Initial setup
Replacing the chip
Troubleshooting
How you should go about first setting up the machine
How you replace the chip that comes in every pack
What the error messages mean and how to respond
Your first repair
Replacing the buffing wheel
Getting help
How to prepare for your first disc repair
This is always replaced at the same time as the chip
Help with all other problems and getting advice
Basic operation
Replacing the turntable pad
Ordering consumables
How to run your first disc repair
This needs to be done every two packs used
What you will need to order and how to do it
Page 4
Page 6
General Maintenance
Disc Types
Inspecting a repaired disc
Why it is important to look at discs after repair
Parts of the machine
Front and back, just the parts you need to know
Page 2
Regular internal cleaning
CDs, DVDs & Blu-rays
Cleaning the machine is very important
How their construction affects the repair process
Cleaning the cleaner disc
Getting To Know The Machine
This disc helps with the regular cleaning
Page 7
Understanding the repair cycle
Cleaning the fan filter
Good Machine Use & Safety
What the repair cycles are and how long they run for
Very simple and takes a few seconds
Covering different usage topics
Modes of operation
Cleaning the splash guard
Selecting different cycles and elements of operation
Stops contaminants falling in during the repairs
We
•
•
•
•
When to replace consumables
How you know when this needs doing and why
©Total Disc Repair
|
www.totaldiscrepair.co.uk
|
Technical Support: 0800 412 5424 - [email protected]
|
believe it is important that you know:
How to use our technical support team
How to get the most out of your machine
How to use the machine safely at all times
How to prevent voiding your warranty
Sales: 01202 489 500 - [email protected]
Getting Started
Page 1
Initial setup
Inspecting a repaired disc
With the machine you will find a setup sheet which
explains how to set up your machine. This includes a
list of box contents. Please refer to this sheet before
using your machine for the first time.
Even if you aren’t new to disc repair, it is important that you understand what the machine is capable of
removing within each cycle. So inspection should be carried out after at least the first ten or more repairs.
Your first repair should have made a visible improvement, if not a complete repair. Some discs will require
more than one cycle to be fully repaired, but remember that this machine heats the disc and so you must
allow those discs to cool between repairs.
Your first repair
Parts of the machine
For your first repair, choose a
disc that you think has a light
amount of scratches. This
will help give an indication of
what can be repaired by the
machine in one cycle.
Chip
Socket
Basic operation
1.
2.
3.
4.
5.
6.
7.
8.
On/Off
Switch
Front Door
Switch on the machine and lift the top cover.
Thoroughly shake the buffing solution and dab a
small amount onto the disc.
Use the sponge to spread the liquid evenly across
the surface of the disc.
Place the disc shiny side up on to the turntable.
Close the top cover and press ‘Start’.
After the repair process has finished, lift the top
cover and remove the disc.
The disc will be clean, dry and repaired, ready to
go back in its case.
You can move straight on to the next disc, but
you should wait before repairing the same disc
again as it needs to cool down.
Splash
Guard
Power
Socket
Buffing
Wheel
Control
Display
Disc
Turntable
Control
Switches
Rubber
Feet
Avoid spreading buffing solution on the clear
plastic centre ring of the disc. The buffer wheel
does not touch this area and solution will still be
visible there after the repair cycle has finished.
©Total Disc Repair
|
www.totaldiscrepair.co.uk
Fan
|
Technical Support: 0800 412 5424 - [email protected]
|
Sales: 01202 489 500 - [email protected]
Getting To Know The Machine
Understanding the repair cycle
Now that you have repaired your first disc, here is a
more in-depth look at the process.
The machine uses a combination of heat and
abrasive to soften and then polish the polycarbonate
to get out the scratches.
It is a single-stage disc repair machine and offers
either a 1 minute light/medium repair or a 2 minute
deeper repair.
Modes of operation
Regular:
The machine is preset to regular repair mode. The
cycle runs for 1 minute and is suitable for most light
and medium damage. The scroll and Start buttons
turn green to signify a regular repair is being run
and the LCD screen displays ‘Cycle Reg’.
Approximately every 20 minutes of repair cycles,
the machine will display ‘Cycle CLNR’ and the Start
button will flash red. This is the indication to run a
cleaning cycle for the buffing wheel.
Each pack contains everything you need for 500
minutes of repair. The amount of consumable usage
time is displayed on the LCD screen and counts
down to zero throughout usage.
The consumables pack consists of one replacement
buffer wheel, 2 bottles of buffing solution and a
counter chip.
Once the chip reaches 10%,
or 50 mins, an asterisk ‘*’ will
appear next to the count time
to alert you.
Also, the LCD screen will
display ‘Low Chip’ and the Start
button will flash from blue to
green during the cycle.
Note – It is not necessary to use the buffing solution
with the cleaning procedure.
Emergency Stop:
To immediately stop the machine at any point, either
press any of the control buttons, or simply lift the
top cover.
Deep:
To switch to a deep repair, press either one of the
scroll buttons. The buttons will turn blue to confirm
your choice and the LCD screen will display ‘Cycle
Deep’. The cycle will run for 2 minutes and is
suitable for medium to heavy scratches, Blu-ray and
PS3 discs.
www.totaldiscrepair.co.uk
When to replace the consumables
If you wish to use the cleaner disc at any other
point, press either one of the scroll buttons until
Cleaner mode is reached. It is good practice to
run the cleaning cycle as the last cycle of the day,
regardless of when it was last used.
Note: In Regular repair mode, Blu-ray and PS3 discs
can only be cleaned, not repaired.
|
Cleaner Cycle - Important:
Over time the buffing wheel will become covered in
dried polishing compound and plastic particles. This
will reduce its effectiveness to repair and so it needs
to be cleaned regularly to remove the dirt.
Just insert the supplied
cleaning, so the coarse side
faces up, close the top cover
and press the Start
button. When finished,
the machine will revert to
Regular mode.
In the beginning, inspecting the disc after the repair
is important because it gives you an idea of which
repair setting you need to use for the next disc.
©Total Disc Repair
Page 2
Technical Support: 0800 412 5424 - [email protected]
T : 0:57
LOW CHIP
Once the chip reaches 0% the
display will show ‘000’ minutes
and the machine will not permit
further repairs until a new chip is
installed.
STAT EMPTY
COUNT 000
CYCLE REG
Once the new chip is installed,
the screen will read ‘500’ minutes
again. Read how to install the
chip on the next page.
STAT READY
COUNT 500
CYCLE REG
Note: To see how many total cycles have been
run, lift the top cover and press the repair button.
The LCD screen will display the totals, broken
down by regular, deep and clean cycles.
The cycle will end and the LCD screen will display
‘Emergency Stop Wait’, accompanied by a flashing
red LED on the Start button. Once the machine has
realigned itself and the top cover has been closed
the machine will revert to the previous mode of
operation.
|
STAT READY
COUNT 050*
CYCLE REG
|
Sales: 01202 489 500 - [email protected]
Page 3
Replacing The Consumables
Replacing the chip
Replacing the buffing wheel
Replacing the turntable pad
There will come a point when the pad is worn out and
won’t repair effectively, the VMI 2550 uses a time
credit-based chip that stops the machine working
when the time credit has elapsed.
1.
2.
Any repairs beyond this point would be virtually
ineffective and could eventually damage the machine.
The polish should last for the full 500 minutes.
4.
The grey turntable pad is a semi-durable part and
wears during the repair process. We recommend
changing it every two consumable packs, because
otherwise the discs will begin to slip during the repair
cycles which can damage them:
3.
5.
6.
If you find you run out, or have polish left over, then
you want to adjust how much you use on each repair.
7.
Replacing the chip is simple:
8.
1.
2.
3.
9.
4.
5.
Turn off the machine.
Locate the used chip on the back of the machine.
Remove the used chip - the exposed RS232 port
will now be visible.
Install a new chip into the RS232 port and discard
the old chip.
Turn the machine back on to register the credit.
10.
Turn the machine off and remove the power lead.
Unscrew the two side panel thumbscrews, then lift
the side panel up and away from the machine.
Remove the Splash Guard which sits on top of the
main motor and clean it (this is snap-fitted).
Hold the buffing wheel with one hand and use
your other to turn the spade screw anti-clockwise.
Remove the screw and washer from the spindle
and pull off the old buffing wheel.
Install the new buffing wheel, followed by the
washer and then tighten the spade screw.
Refit the splash guard by snapping it onto the top
of the main motor.
Pull the splash guard forward until it snaps into
place a second time.
Install the side panel and screw down the
thumbscrews.
Put the power lead back into the machine and
turn on the power.
1.
2.
Turn the machine off and remove the power lead.
Unscrew the two side panel thumbscrews, then
lift the side panel up and away from the machine
3. Peel the worn pad away.
4. Clean any remaining adhesive from the surface
with a strong enough cleaner, ensuring that the
surface is flat, clean and eventually, dry.
5. Align and affix the new turntable pad, discarding
the old one.
6. Install the side panel and screw down the
thumbscrews.
7. Put the power lead back into the machine and
turn on the power.
With the new chip installed, the counter will be reset
to 500 minutes - you should now replace the buffing
wheel for the new one in your pack.
©Total Disc Repair
|
www.totaldiscrepair.co.uk
|
Technical Support: 0800 412 5424 - [email protected]
|
Sales: 01202 489 500 - [email protected]
General Maintenance
Page 4
Regular internal cleaning
Cleaning the fan filter
The machine requires little maintenance but it is
essential to keep it clean in order to produce the best
results.
The fan filter must be kept clear of debris to ensure
constant air flow through the machine. After 60
minutes of operation the LCD screen will display
‘Filter CLNR’.
Over time there will be a build up of ‘fluff’ inside the
machine. This is normal and is caused by the cleaner
disc combing the pad.
1.
It is important to remove this fluff occasionally. This
can be done either by hand or with a vacuum cleaner.
2.
3.
4.
Remove the fan guard from the back of the
machine.
Remove filter and blow out collected debris.
Reinstall filter and guard.
Push any button on the user interface to continue.
Please remember to turn off the power and remove
the plug from the wall before starting any cleaning.
Cleaning the cleaner disc
It is important to keep the cleaner disc in good
working order.
The metal ridges will gradually fill with fibres from
the buffing wheel, greatly reducing the cleaner disc’s
effectiveness.
Cleaning the splash guard
1.
2.
We recommend using a stiff brush under running
water.
3.
4.
5.
6.
7.
8.
©Total Disc Repair
|
www.totaldiscrepair.co.uk
|
Turn off power to the machine.
Unscrew the two side panel thumbscrews, then
lift the side panel up and away from the machine.
Remove the Splash Guard which sits on top of the
main motor (this is a snap-fitted piece).
Run the Splash Guard under warm water, wiping
away any buffing solution residue.
Refit the splash guard by snapping it onto the top
of the main motor.
Pull the splash guard forward until it snaps into
place a second time.
Install the side panel and screw down the
thumbscrews.
Put the power lead back into the machine and
turn on the power.
Technical Support: 0800 412 5424 - [email protected]
Make sure the splash guard is dry when you refit it.
|
Sales: 01202 489 500 - [email protected]
Maintenance And Information
Page 5
Troubleshooting
Getting help
Ordering your consumables
If the machine runs into a common problem, it will
display one of these error messages:
If the machine stops working for an unknown reason,
or if acting upon the error code does not resolve the
problem, then do not worry.
2550 Consumable Pack
ES003 - Magnetic Switch Sensor is not detecting
that the turntable is in the home position.
Action for above: Switch off, reboot and wait. If
problem persists, then call Technical Support.
In the unlikely event that the machine has to come in
for repair, the cost of parts and labour will be covered
during your warranty period.
RC - Consumables have run out, replace all
consumables.
Shipping in both directions is covered for the first
quarter of the warranty period, but thereafter, you
would be required to post the machine to us and
either pay for its return or arrange a collection
yourself.
Emergency Stop
Emergency Shutdown Mode.
0800 412 5424
0187293000167
We recommend replacing
this for every 2 consumables
packs used.
Cleaning Accessories
Cloth & Spray Pack (Standard)
5055378101656
Cloth & Spray Pack (XL)
Mon-Fri, 9am-5pm
5055378101663
[email protected]
The 2550 is equipped with an internal thermostat
that protects it from getting too hot. If the machine
gets too hot it will turn off power in order to cool
down.
The best way to order is to use our website. We offer
Free Shipping to UK mainland on orders over
£50 and items arrive within 24-48 hours (excluding
weekends and public holidays).
Returning Machines For Repair:
If you are returning your machine, you must use the
original packaging as this is the safest method of
transit.
Please leave 15 minutes before continuing with your
repairs. To help the machine cool quicker, open the
top cover.
www.totaldiscrepair.co.uk
On the side of the box, you will need to write the
RMA number that Technical Support give you so we
can process the machine when it arrives.
This machine is not designed to be run again and
again all day long, we recommend that if you require
100 or more repairs per day, you upgrade to a more
powerful machine.
www.totaldiscrepair.co.uk
2550 Turntable Pad
Contacting Technical Support:
Action: Leave the machine to cool down then reboot.
Call Technical Support if it happens again.
|
Enough for 500 minutes
of repair time.
Our technicians will always attempt to resolve any
problems over the phone and can send out parts and
assist with fitting should this be required.
EMC006 - Machine is not detecting the proper
amount of amperage on the main motor.
©Total Disc Repair
Contains:
1 x Buffing wheel
2 x Polish bottles
1 x Repair chip
Technical Support is available Mon-Fri, 9am-5pm over
the telephone and also by email. This is offered for
the entire life of the machine.
EC004 - Lift Cam Switch is not detecting that the
Lift Cam has been reset back to the home position.
5055378118647
|
Technical Support: 0800 412 5424 - [email protected]
Telephone and email orders can be taken but we
cannot offer free shipping for this method due to the
administration involved.
|
Sales: 01202 489 500 - [email protected]
Disc Types
Page 6
CDs
DVDs
Blu-rays
When discs were invented the process of
construction was quite simple. These are what
we call CD discs. To produce the disc, a solid
polycarbonate disc was made. Then the data layer
was applied to the top surface of the disc. To protect
this data layer, a lacquer, or label, was then applied
over the top of the data layer.
The early CDs were mainly used for audio and so
often a small scratch was not enough to disrupt the
data. However as the data on discs became more
complicated it became more important to protect
the data layer. On DVD discs the data layer is
sandwiched in the middle of the disc between two
pieces of polycarbonate. This protects the data layer
and makes the disc virtually indestructible. The only
issue with this type of disc is that the two layers of
disc can separate around the whole in the centre of
the disc, although this is quite rare.
With the invention of High Definition (HD) there was
a need to carry more information on a disc and soon
the data space on a DVD was not enough. Sony
solved this with the invention of the Blu-ray disc.
Hard coat
Polycarbonate
Data
Polycarbonate
Label
Polycarbonate
Data
Label
Polycarbonate
Data
Polycarbonate
Label
It is essentially the same as a DVD with 2 main
differences:
This made the data layer quite vulnerable because
any scratch to the label could damage the data layer
beneath. If a scratch has reached the data layer
it is not repairable. Disc repair can only repair the
polycarbonate on the underside of the disc.
Because the data is so protected virtually all DVD
discs can be repaired by the disc repair process.
Formats:
Audio Books
Audio CDs
CD-ROMS
Playstation version 1 discs
©Total Disc Repair
|
www.totaldiscrepair.co.uk
1. The polycarbonate on the bottom of the discs is
much thinner than a DVD and so the number of
times that the same disc can be repaired falls to
around 10-15.
2. The polycarbonate on the bottom of the disc
has a hard coated lacquer on top of it. This hard
coat reduces the chance of the disc being
scratched in the first place, but nonetheless
scratches can still happen.
Formats:
DVDs
Playstation 2 discs
Xbox
Wii
DVD ROM
|
Technical Support: 0800 412 5424 - [email protected]
Formats:
Blu-ray film
Playstation 3
|
Sales: 01202 489 500 - [email protected]
Page 7
©Total Disc Repair
|
www.totaldiscrepair.co.uk
|
Technical Support: 0800 412 5424 - [email protected]
|
Sales: 01202 489 500 - [email protected]