1
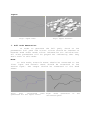
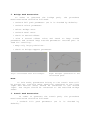
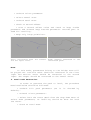
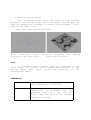
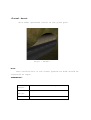
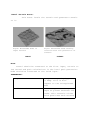
USER GUIDE FOR ROAD TOOLS OTLS
NETWORK CONNECTIONS OF THE ROAD TOOLS OTLS FOR THE
COMPLETE SETUP.
NOTE :
All the assets are saved under RoadTools.otl
file. In order to install this digital asset, click
on File -> Install Digital Asset Library in a new
Houdini scene. Give the path of the otl file and
follow the above depicted connections.
Key points about input path( curve).
If the user wants his own path for the generation of
bridges and tunnels,then the following steps have to be
followed.
*In the networks view. Click on tab and type curve. Draw the
curve and change its interpolation to Nurbs.
Important points for a good input curve for better results:
Please draw the curve on to the grid(XY plane). Give
more number of control vertices. After the curve is drawn,
modify each point individually. Make a gradual increase of y
position of every point and then gradual decrease (say about
for 6 points) , leave the next point unmodified and then make
a gradual decrease of y position of every point and then
gradual increase (say about for 6 more points) and then leave
the next point unmodified. Repeat this process until the end
of the curve in order to avoid abrupt highs or lows in the
road path. The above path ensures that the road follows good
curvature. Several input curves have been provided as
examples in the scene file for the generation of bridges and
tunnels. At present the system has only one problem,
i.e.,when the curve has curvature with around 90 degrees
angle ( may occur because of division of bridge path),it is
unable to level the area properly due to overlap of the level
profile. If any of the curves given by the user has that
problem, then please modify the curve. It happens only in rare
cases. Please see curves provided in the file for reference.
* Terrain Asset:
This asset generates terrain.
PARAMETERS:
3D Frequency
Noise frequency
3D Offset
Noise Offset
Amplitude
Displacement amount of the height
Roughness
Fractal Roughness
Terrain Size
Size of the terrain
Terrain
Center
Center of the terrain
Detail(X)
Number of rows
Detail(Y)
Number of tunnels
* Controls Asset:
Important parameters of Path Calculations asset which
should be maintained same in all the modes of road element
generation are controlled by using this asset. This asset
helps in scaling the input curve to the size of terrain.
PARAMETERS:
For Input Curve:
Scale(Y)
Scales the Y size of the input curve.
Scale
Percent(X Z)
Percentage of scale of X, Z sizes of
the input curve.
For Path Calculations:
First Offset
Offsets the terrain
Size Range
Range
for
the
perimeter
of
the
primitives. Primitives whose perimeter
lesser than this will be considered as
small Primitives and vice versa.
Divide Once
Range
Range for the arc length of the
primitives (only bridge
area).Primitives whose arc length
greater than this will be partitioned
once.
Extra Range
Extra Range for
primitives
area).Primitives
greater than sum
Divide once range
twice.
Del.Supp.Low
er
Number of primitives to be deleted
from Del. Supp. Higher for bridge
supports.
HeightThres(
Tunnel)
Threshold
for
the
minimum
height
between
normal
path
and
mountain
path(points
of
the
normal
path
transformed
on to terrain)using Ray
SOP for tunnel.
HeightThres(
Bridge):
Threshold
for
the
minimum
height
between
normal
path
and
mountain
path(points
of
the
normal
path
transformed on to terrain)using Ray
SOP for bridge.
arc length of the
(only
bridge
whose
arc
length
of Extra range and
will be partitioned
Note:
Input Curve should be connected to the first input and
Terrain asset should be connected to the second input.
*Path Calculations Asset:
By using this asset, the user can calculate different
sets of paths for different road elements (bridges, tunnels,
levelled area for normal road).This is a multipurpose asset.
This asset has to be used 4 times in 4 different modes in
order to create the complete set up.
WARNING:
This SOP needs the Controls asset to be connected to the
first input. Controls asset plays a key role in controlling
the important parameters of this asset.
USAGE:
This asset has to be used 4 times in 4 different modes in
order to create the complete set up.
Note:
Important parameters which should be maintained same in
all the 4 modes are controlled using Controls asset. They
include,
* First Offset.
* Size Range.
* Divide Once Range.
* Divide Twice Range.
* Del. Supp. Lower.
* Del. Supp. Higher.
* Height Threshold (Bridge).
* Height Threshold (Tunnel).
Inputs:
Fig1: Input Path
Fig2: Input Terrain.
1. Full Path Generation:
In order to generate the full path, check on the
parameters full path and colour. Colour should be checked on
because Road asset needs colour information for calculations.
All other parameters will be greyed out indicating that they
won’t work in this mode.
Note:
In this mode, Controls asset should be connected to the
first input and Terrain asset should be connected to the
second input. The output should be connected to the Road
asset.
Fig3:
Full
calculated
path Fig4:
Road
generated
generated for the input curve.
calculated path.
on
the
2. Bridge Path Generation:
In order to generate the bridge
mentioned below should be followed.
path,
the
procedure
* Uncheck full path parameter (as it is checked by default).
* Uncheck colour parameter.
* Select Bridge area.
* Uncheck Level Area.
* Check on Second Offset.
* Give a second offset value and check on keep inside
parameter and uncheck keep outside parameter. Outside part is
used for levelling.
* Keep only large primitives.
* Check on bridge support parameter.
Fig5: Calculated area for bridges.
Fig6: Bridges generated on the
calculated path.
Note:
In this mode, parameters belong to the tunnel area will
be greyed out. Controls asset should be connected to the first
input and Terrain asset should be connected to the second
input. The output should be connected to the Detailed Bridge
asset.
3. Tunnel Path Generation:
In order to generate the tunnel path, the procedure
mentioned below should be followed.
* Uncheck
default).
full
path
parameter
(as
it
is
checked
by
* Uncheck colour parameter.
* Select Tunnel area.
* Uncheck Level Area.
* Check on Second Offset.
* Give a second offset value and check on keep inside
parameter and uncheck keep outside parameter. Outside part is
used for levelling.
* Keep only large primitives.
Fig7: Calculated area for tunnels Fig8: Tunnels generated on the
for the input curve.
calculated path.
Note:
In this mode, parameters belong to the bridge area will
be greyed out. Controls asset should be connected to the first
input and Terrain asset should be connected to the second
input. The output should be connected to the Tunnel asset.
4. Level Path Generation:
In order to generate the path to level, the procedure
mentioned below should be followed.
* Uncheck
default).
full
path
parameter
(as
it
is
checked
by
* Uncheck colour parameter.
* Select both the areas (Both from the drop down menu of
Select Area parameter) as levelling should be done for both
the areas.
* Check on Level Area.
* Check on Second Offset.
* Give a second offset value and check on keep outside
parameter and uncheck keep inside parameter. Inside part is
used for generation of bridge or tunnel. Value between 3 and 4
would be an ideal value.
* Keep small and large primitives.
Fig9:
Calculated
area
levelling of the input curve.
for Fig10:
Wireframe
mode
level area on terrain.
showing
Note:
In this mode, Controls asset should be connected to the
first input and Terrain asset should be connected to the
second input. The output should be connected to the
LevelTerrain asset.
PARAMETERS:
Select Area
Select the area for bridge, tunnel or
both (helpful for levelling).
Level area
Mandatory area to be levelled. This
should
not
be
mistaken
for
the
complete level area. The user can
select some more area to be levelled
based on his needs.
Offsets:
First Offset
Offsets the terrain. This parameter is
controlled by Controls asset.
Second
Offset(Toggle
)
Enables the second offset when checked
on.
Second Offset
Offsets
individual
primitives
of
selected area from both sides. Doesn’t
work on primitives whose perimeter
lesser than size range and level area.
Keep Inside
Keeps inside part of the second offset
area.
Keep Outside
Keeps outside
offset area.
Size Range
Primitives whose perimeter lesser than
this
are
considered
as
small
primitives
and
vice
versa.
This
parameter is controlled by Controls
asset.
Small
Primitives
Enables only
checked on.
small
primitives
when
Large
Primitives
Enables only
checked on.
large
primitives
when
part
of
the
second
For Bridge:
Note:
This section is disabled when the tunnel mode or
path mode is selected.
full
Bridge
Support
Enables
on.
bridge
support
when
checked
Divide
Range
Once Range for the arc length of the
primitives
(only
bridge
area).Primitives
whose
arc
length
greater than this will be partitioned
once. This parameter is controlled by
Controls asset.
Divide
Range
Twice Range for the arc length of the
primitives (only bridge area).This is
the sum of Divide Once Range and Extra
Range
(parameter
of
Controls).Primitives whose arc length
greater than this will be partitioned
twice. This parameter is controlled by
Controls asset.
Del.
Lower
Supp. Number of primitives to be deleted
from Del. Supp. Higher for bridge
supports. It is controlled by Controls
asset.
Del.
Higher
Supp. Upper Range for bridge supports. For
every (Del. Supp. Higher) primitives
(Del.
Supp.
Lower)
number
of
primitives will be deleted. It is the
sum of (Del. Supp. Lower) and 1.
Height
Threshold for minimum height between
Threshold(Brid normal path and mountain path (points
ge)
of the normal path transformed on to
terrain)using Ray SOP for bridge. It
is controlled by Controls asset.
For Tunnel:
Note:
This section is disabled when the bridge mode or
path mode is selected.
Height
Threshold(Tunn
el)
full
Threshold for minimum height between
normal path and mountain path (points
of the normal path trasformed on to
terrain)using Ray SOP for tunnel. It
is controlled by Controls asset.
For Road:
Full Path
Enables the full path when checked on.
All other parameters except colour
will be greyed out. It is useful for
laying the full road.
Color
Enables color values of every point
when checked on.
*Road Asset:
This asset generates road on the given path.
Note:
Path Calculations in the full path generation mode should
be connected as input.
PARAMETERS:
Road Thickness
Thickness of the road.
Road Offset
Offsets the road along Y-axis.
Detail
Resamples the road to increase the
detail on it.
Keep Texture
Keeps the texture when checked on.
*Detailed Bridge Asset:
This asset creates a small or a large bridge based on the
perimeter of input path.
Fig11 : Large Bridge
Fig12: Small Bridge
Note:
Path Calculations in the bridge generation mode should be
connected as input.
PARAMETERS:
Size Limit
Limit for the perimeter of the
primitive. Primitives with perimeter
lesser than this will have smaller
bridges and vice versa.
Towers
Choice to have towers at centre or at
beginning and end of bridge also. This
works only on large bridges. For small
bridges there will be no towers.
Bottom:
Bottom Height
Height (or)depth of the bottom part of
the bridge(both small and large).
Cable
Curvature
Value to control the curvature of the
bottom part of the bridge (both small
and large).
Vertical
Cables
Number of vertical cables along the
bottom part (both small and large).
Bridge Supp.
Radius:
Radius of the bridge support (both
small and large).
Top:
Top Height
Height of the top part of the large
bridge.
Cable
Curvature
Value to control the curvature of the
top part of the bridge (large).
Vert.
Cables(Large)
Number of vertical cables per side
along the top part (large bridge).
Vert.
Cables(Small)
Number of vertical cables along the
top part (small bridge).
Small Bridge
Height
Height of the top part of small
bridge.
Number of
Braces:
Number of braces (large bridge).
Tower Radius:
Radius of the tower.
*Tunnel Asset:
This asset generates tunnel on the given path.
Fig13 : Tunnel
Note:
Path Calculations in the tunnel generation mode should be
connected as input.
PARAMETERS:
Tunnel
Offset
Offsets the tunnel along Y-axis
Tunnel
Height
Height of the tunnel
Size
Uniform size of the tunnel
*Level Terrain Asset:
This asset levels the terrain and generates tunnels
on it.
Fig14: Wireframe mode of
Input Terrain
INPUT
Fig15: Wireframe mode showing
levelled area and generation of
tunnels.
OUTPUT
Note:
Tunnel should be connected to the first input, terrain to
the second and path calculations in the level path generation
mode should be connected to the third input.
PARAMETERS:
Keep
The percentage of polygons
to keep. This is with
respect to the triangulated
mesh
Stiffen Border
Without any constraints, the
edges of planar surfaces can
erode. This controls a bias
which penalizes such erosion
Attrib Weight
This bias uses the point
attribute weight ン to control
the polygon reduction.
Points with a larger weight
value will be more resistant
to collapse and better
preserve the original
surface geometry.
Detail
Level of detail on the
terrain
Level Span width
Width of the level span
Detail Level span
Detail on the profile used
for levelling
Keep Texture
Keeps the texture when
checked on
*Procedural Texture asset:
This asset sweeps, skins the given profile on to the
given path and textures it.
Example:
Fig16:Input Path
Fig17:Input Profile
Fig18: Output
Note:
Profile curve should be connected to the first input and
path curve should be connected to the second input.
PARAMETERS:
Texture Element
Choice for the element to be
texture. They include road,
tunnel, cables, towers,
braces, bridgesupport. The
name has to be entered
precisely for respective
textures. Help provided on
the parameters menu for
precise names
Ends
Choice to have ends
Keep Texture
Keeps the texture when
checked on