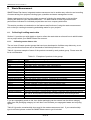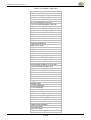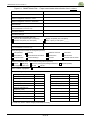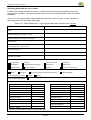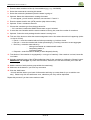
1
SMARTWaste Plan
The Site Waste Management Plan
and Waste Measurement Tool
from BRE
User Guide
www.smartwaste.co.uk/swmp
Version 3
Date: 2 April 2009
SMARTWaste Plan User Guide V3
Contents page
1.
Introduction ....................................................................................................................... 4
2.
Managing your online SMARTWaste Plan account ....................................................... 5
2.1. Logging in ............................................................................................................. 5
2.2. SMARTWaste Plan toolbar................................................................................... 6
2.3. Company Homepage............................................................................................ 6
2.4. Adding projects ..................................................................................................... 7
2.4.1.
2.4.2.
2.4.3.
2.5.
2.6.
2.7.
2.8.
Project cost and floor area ................................................................................. 8
Data Format....................................................................................................... 8
SWMP format: Online format or downloadable template .................................... 8
Adding users ........................................................................................................ 8
Adding waste management contractors ............................................................. 11
Adding Subcontractors ....................................................................................... 15
Editing company details...................................................................................... 16
3.
Company Homepage ...................................................................................................... 17
3.1. Company Homepage ‘Summary Chart’ .............................................................. 19
3.2. Company Homepage ‘Detailed Information’ ....................................................... 20
3.3. Company Homepage ‘Cost Information’ ............................................................. 22
3.4. Company Homepage ‘Summary by Date’ .......................................................... 23
3.5. Company Homepage ‘Contact Details’ ............................................................... 25
4.
Projects............................................................................................................................ 26
4.1. Project Homepage ‘Summary Information’ ......................................................... 26
4.2. Project ‘Granting users access to projects’......................................................... 29
4.3. Project ‘Assigning waste management contractors to projects’ .......................... 30
4.4. Project ‘Assigning subcontractors to projects’ .................................................... 31
4.5. Project ‘Adding waste cost data’ ......................................................................... 33
4.6. Project ‘Viewing waste cost log’.......................................................................... 34
5.
Site Waste Management Plan Tool................................................................................ 35
5.1. Accessing your SWMP ....................................................................................... 35
5.2. Downloadable word template ............................................................................. 35
5.3. Interactive online SWMP .................................................................................... 36
5.3.1.
Preparing your SWMP ..................................................................................... 37
Step 1: Responsibilities ............................................................................................37
Step 2: Waste minimisation .....................................................................................38
Step 3: Forecast of waste ........................................................................................39
Step 4: Waste management options .......................................................................42
5.3.2.
Implementing your SWMP ............................................................................... 44
Step 5: Duty of Care ..................................................................................................44
Step 6: Training and communication .......................................................................45
Step 7: Comparison of actual waste with forecast waste ......................................46
Step 8: Ongoing review of implementation.............................................................47
5.3.3.
Reviewing your SWMP .................................................................................... 48
Step 9: Completion review.......................................................................................48
2 of 76
SMARTWaste Plan User Guide V3
6.
Waste Measurement ....................................................................................................... 50
6.1. Collecting & adding waste data .......................................................................... 50
6.1.1.
Collecting waste data on site ........................................................................... 50
Collecting waste data on site in volume ..................................................................52
Collecting waste data on site in tonnes ...................................................................54
6.1.2.
Adding waste data onto your project ................................................................ 55
Add waste data in volume ........................................................................................55
Add waste data in tonnes .........................................................................................58
6.2.
Viewing and amending waste data entered ........................................................ 60
6.2.1.
6.2.2.
6.3.
6.4.
6.5.
6.6.
6.7.
Viewing Waste Data Log .................................................................................. 60
Amending incorrect waste data on ‘Waste Data Log’ page .............................. 61
Project ‘Summary information’............................................................................ 63
Project ‘Summary charts’.................................................................................... 65
Project ‘Detailed information’ .............................................................................. 67
Project ‘Cost Information’ ................................................................................... 69
Project ‘Summary by date’.................................................................................. 70
7.
Log out............................................................................................................................. 72
8.
Contact us ....................................................................................................................... 72
Appendix 1 – Definition of project cost and floor area ....................................................... 73
Appendix 2 - SMARTWaste Plan Additional Services ........................................................ 74
Generic SMARTWaste Plan account structure ............................................................. 74
Additional Levels – Group and Client levels .................................................................. 75
Bespoke versions of SMARTWaste Plan ...................................................................... 76
Training on how to use SMARTWaste Plan .................................................................. 76
3 of 76
SMARTWaste Plan User Guide V3
1.
Introduction
SMARTWaste Plan is a free software tool for preparing, implementing and reviewing Site Waste
Management Plans (SWMPs). It is user friendly with either a downloadable template or an interactive
web session to guide you through the steps to completing a SWMP.
SMARTWaste Plan includes an optional integrated online waste measurement tool to help you easily
measure and monitor the types and amounts of waste leaving sites and benchmark your performance
with waste on individual sites and on a company-wide basis. This waste measurement tool is an
improved and updated version of our old SMARTStart tool. Now, with SMARTWaste Plan you will only
need one account to create SWMPs for your projects and also measure waste generated by them.
This user guide will provide you with an introduction to the features and functions of SMARTWaste
Plan. We hope it can give the necessary information you need to begin using this tool on your sites. If
you have any questions regarding SMARTWaste Plan which are not answered by this user guide,
please do not hesitate to contact the SMARTWaste Team at BRE on 01923 664851 or 01923 664633
or [email protected].
Please note: This is the 3rd version of this user guide, which includes details of new features, functions
and refinements made to SMARTWaste Plan since June 2008 including:
•
•
•
•
waste management contractors function updated to enable recording of both generic overall and
product specific recycling rates for the waste sites/facilities
company admin users can now amend incorrect waste data via the waste data log page
a cost log has been added to enable review of all cost data entered (similar to the waste data log),
company admin users can also amend cost data via the cost log
step 4 of the SWMP (waste management options) has been updated to speed up data entry, now
both onsite and offsite options for each waste type can be entered at the same time.
Additional features coming to the tool soon:
•
•
•
•
•
improved print out version of the SWMP
revised layout of company and project homepages
online step-by-step visual tutorials
graphs on step 7 of the SWMP to show how much waste has been generated against your forecast
amounts
company's own benchmarking calculator (based on previous data if available).
Additional SMARTWaste Plan services now available to purchase (see Appendix 2 for further details):
•
•
•
•
If you have a number of business units, regional offices or divisions and would like to be able to
show data at a business unit level or regional level (i.e. adding an extra reporting tier), you can
purchase a Group Level SMARTWaste Plan for a one-off fee (£1500 + VAT).
If you have a number of contractors who are using SMARTWaste Plan and you would like to
view all your project data from one location, you can purchase a Client Level SMARTWaste
Plan for a one-off fee (£3000 + VAT).
If you would like other changes to suit your company’s specific needs, we can create a bespoke
version of the tool for you at a small cost.
Training on SWMPs and SMARTWaste Plan.
We update our SMARTWaste website regularly; you can visit www.smartwaste.co.uk to find out the
latest news, briefings and waste benchmarks as well as details of SWMP training and additional
SMARTWaste services.
If you have any queries or feedback, please do not hesitate to contact us at [email protected].
4 of 76
SMARTWaste Plan User Guide V3
2.
Managing your online SMARTWaste Plan account
2.1.
Logging in
SMARTWaste Plan is accessed through www.smartwaste.co.uk/swmp. You log in to your
SMARTWaste Plan account using unique usernames and passwords (figure 2.1). Logging in will take
you to your company homepage (see section 2.3).
On the login page (figure 2.1), you can download our quick reference guide to getting started with
SMARTWaste Plan, which explains a simple 4 step process to begin writing SWMPs and record waste
arising data for your projects.
The tool is set up so that you can view overall summary information for your company as a whole, and
then drill down to view individual project/site data and SWMPs.
Figure 2.1: SMARTWaste Plan login page
When you register your company as a new user you allocate yourself a username and password.
These are your company admin log on details which allow you to fully set up and manage your account
including editing your company details, adding projects, users, SWMPs, waste management
contractors, subcontractors and waste data. It is recommended that you assign the responsibility of
using the company admin login to one person so that the creation of projects and users is managed to
ensure their set up is completed properly.
You can set up other users within your SMARTWaste Plan account who you can grant a particular
access level with specific permission enabling them to perform certain functions (see section 2.5 for
details on how to do this).
5 of 76
SMARTWaste Plan User Guide V3
2.2.
SMARTWaste Plan toolbar
The toolbar appears at the top of every page in SMARTWaste Plan (figure 2.2) and can be used to
navigate around your account.
Figure 2.2: SMARTWaste Plan toolbar
2.3.
Company Homepage
The company homepage provides you with an overview of information for your whole company through
a number of tabs. Whenever you login to SMARTWaste Plan, you are automatically taken to the
‘Summary Information’ tab (figure 2.3).
From here, you add new projects so that you can create a SWMP for the project and start collecting
waste data (see sections 2.4, 5 and 6 for details).
This tab summarises the total waste data for your whole company in actual volume, bulk volume and
tonnage, and cost Key Performance Indicators (KPIs). It lists all the projects you have set up, whether
they are collecting waste data in volume or tonnes, completed or live and the type of SWMP they have.
The type of SWMP a project has is shown by the colour of the tick. A grey SWMP tick is given for
projects using the downloadable word template SWMP. A black SWMP tick shows projects using the
online SWMP.
Figure 2.3: Sample of the Company Homepage ‘Summary Information’ tab
6 of 76
SMARTWaste Plan User Guide V3
2.4.
Adding projects
To add projects to your SMARTWaste Plan account, press the ‘Add new project’ button under the
‘Projects’ section of the company homepage ‘Summary Information’ tab page (figure 2.4). This takes
you to the ‘Add/Edit project details’ page (figure 2.5).
Figure 2.4: Company Homepage - ‘Add new project’
Figure 2.5: The Add/Edit project details page
7 of 76
SMARTWaste Plan User Guide V3
Fill in the form (figure 2.5); further details are given below about the important sections of this form.
When the form is complete, click the ‘Save’ button to create your project; this will take you into that new
project’s homepage (see section 4).
2.4.1. Project cost and floor area
Please make sure you add the correct figures for project cost (£) and floor area1. Please use numbers
only; do not use £ signs, commas or letters. If you are entering the floor area as square feet, the tool
will automatically convert this into square metres if you tick the box labelled ‘entered in sq ft’.
It is very important to fully complete the project cost and floor area fields as this information is essential
for the system to calculate your performance indicators either in:
•
•
Volume: m3 of waste/100m2 of floor area, m3 of waste/£100,000 project cost, or
Weight: tonnes of waste/100m2 of floor area, tonnes of waste/£100,000 project cost.
2.4.2. Data Format
You will need to choose whether you will be collecting and recording all waste data as volume or
tonnes. Important note: once you have selected the data format for a project (either in volume or in
tonnes), and you have started to add waste data, the data format cannot be changed, you must keep
using the same format to collect waste data.
If you choose to collect waste data in tonnes, some waste mangement contractors may be able to give
you the tonnes for each waste material if there is more than one material in a container which is being
segregated offsite. But this information is likely to be less detailed than the volume based information.
For the Code for Sustainable Homes you have to report by waste types (e.g. timber, packaging,
insulation) so if you measure in tonnes you will need to ensure that you can obtain this information from
your waste management contractors.
2.4.3. SWMP format: Online format or downloadable template
There are two options for the format of your SWMP; either an interactive online SWMP or a
downloadable word template. We recommend using the interactive online version as this has additional
features such as reporting, waste benchmark calculator tool and the integrated waste measurement
tool.
2.5.
Adding users
When registering for SMARTWaste Plan you will have set up your own company admin username and
password. These company admin login details enable you to add projects and users to the system as
well as to amend incorrect waste data and cost data.
You can add as many other users to the system as you like, giving them their own usernames and
passwords. To add users, select ‘add/edit users’ from company menu (figure 2.6). This takes you to
the ‘Add/Edit user details’ page (figure 2.7). On this page the new users details can be added or
current users details can be edited.
Remember that for each new user you add, you will need to select a user access permission level
based on the functions you want them to be able to complete. Please see table 2.1 for the list of user
levels and an explanation of their associated permissions. This table can also be downloaded from the
‘Add/Edit user details’ page (figure 2.7).
After adding new users, you must grant them access to the projects they will be using (see section 4.2
for details on how to do this).
1
As a simple check, we would expect the project cost to be around between £300/m2 and £3500/m2
8 of 76
SMARTWaste Plan User Guide V3
Figure 2.6: Company Homepage - Add users
Figure 2.7: Add/Edit user details page
9 of 76
SMARTWaste Plan User Guide V3
Table 2.1: SMARTWaste Plan user access/permission levels
(Summary of functions available at each user permission level)
Add & update
Add
subcontractors
Brief description waste/
and waste
cost data management
contractors
User Type
Company Admin
(Top level)
Update
users
Edit
project
details
√
√
√
(of same
level or
lower)
√
(of same
level or
lower)
√
(all
projects)
√
(of same
level or
lower)
√
(of same
level or
lower)
√
(specified
projects
only)
Add
users
√
(of same
level or
lower)
access to all info for
business units and
projects
√
√
√
√
Company Admin
access to all data
for the company
and all projects
√
√
Project Admin
view company data
and access to
specified projects
Project User
view company data
and access to
specified projects
√
√
x
x
√
√
x
can read company
data and specified
projects data but
can’t add data
x
x
can read specified
projects data but
can't add data
x
x
[for Group Level
SMARTWaste
Plans only]
Project User (No
can't view company
access to company data but can access
info)
specified projects
Read only
Read only
(No access to
company info)
√
√
√
√
x
x
x
x
x
x
x
x
x
x
x
x
x
x
x
x
x
x
x
x
x
x
x
x
x
x
no access to
anything, can’t log
on
Disabled - No
access
Key:
Amend
Add
waste
projects data and
cost data
e.g. to disable
access for
someone who has
left the company
√
User has permission to perform this function (may be restrictions though, see notes in brackets)
x
User does not have permission to perform this function
10 of 76
SMARTWaste Plan User Guide V3
2.6.
Adding waste management contractors
Waste management contractors and their waste sites must be added at the company level before they
can be assigned to a project.
•
Select waste management contractors from the ‘company menu’ (see figure 2.8)
•
This takes you to the add/edit waste management contractors page (figure 2.9)
•
Click ‘Add’ and fill in the form (figure 2.10) with the waste contractor’s contact details, make sure
you tick which activity they do (you can select more than one)
o carrier – only moving/transporting your waste (i.e. haulage)
o broker – arranging waste management with other waste contractors on your behalf
o facility – waste site/facility e.g. waste transfer station
o reprocessor – direct recycler of specific waste stream e.g. metal merchant
•
When finished, click the ‘save’ button to set up the waste contractor. Tables then appear based
on the activity options you ticked. Click on the ‘add’ buttons under ‘waste carrier licences’ and
‘waste sites’ to complete the tables (figure 2.11). Please note: you have a responsibility under
the Waste Duty of Care Regulations, to be checking out the waste carrier and waste site/facility
details and licence numbers (see section 5.3.2 ‘Step 5 - Duty of Care’ to find out more details).
•
Once the waste site/facility details are set up, you can enter an overall recycling rate and if
required or known, recycling rates by waste product type (figure 2.12, 2.13 and 2.14). If using
the recycling rates by waste product type and only a few are entered, for those waste products
with no individual recycling specified, the system will assume the ‘overall recycling rate’ applies
for those waste products.
Note:
•
The recycling rates entered here are linked to the ‘Add waste data’ page (see section 6.1.2) so that
for any containers marked as being sent for recovery offsite using the waste site/facility, a
proportion of that waste is classed as being recycled (using the recycling rate percentage) and is
therefore added to your total recycled figure for that project.
•
Ensure that recycling rates do not overlap the same period e.g. overall recycling rate 80% to cover
1/1/2009 - 31/1/2009 and another overall recycling rate 85% to cover 15/1/2009 - 31/1/2009. If
recycling rates overlap the same period, the tool will add up the recycling rates for the period
leading to an incorrect ‘Total recovered from licensed facility’ figure on the project homepage (e.g.
80% + 85% = 165%).
•
Ensure that at least overall recycling rates are added to cover any periods for which you have
entered unsegregated/mixed waste data as being sent for recovery offsite. If there are no recycling
rates for the dates in question, the tool will assume that all of the waste went to landfill (disposal)
even though the recovery option was selected.
Figure 2.8: Accessing Waste Management Contractors function
11 of 76
SMARTWaste Plan User Guide V3
Figure 2.9: Add/edit waste management contractors
Note:
•
•
A link is provided to the Environment Agency’s website so that you can check whether the licence
numbers you have entered are valid and in date – this is an important part of your Duty of Care as
a waste producer.
There is also a link to the BREMAP website where you can search for local waste management
facilities for free.
Figure 2.10: Add waste management contractor details
12 of 76
SMARTWaste Plan User Guide V3
Figure 2.11: Add waste carrier and waste site/facility details
Figure 2.12: Add waste site/facility recycling rate
13 of 76
SMARTWaste Plan User Guide V3
Figure 2.13: Add/edit your waste site/facility recycling rates (overall and by waste product)
Figure 2.14: Add waste site/facility recycling rates (overall and by waste product)
Once you have completed inputting recycling rates for the site (figure 2.14) click the ‘Save’ button.
Then click ‘Back’ to return to the overview page for recycling rates (figure 2.13) where you can review
the waste site/facility overall recycling rates (figure 2.14). To view the recycling rates by waste product
again, click the ‘Edit’ button shown in figure 2.13. To add more recycling rates for different periods,
click on the ‘Add’ button again shown in figure 2.13.
The waste management contractors are now ready to be assigned to the relevant project (see section
4.3).
14 of 76
SMARTWaste Plan User Guide V3
2.7.
Adding Subcontractors
Subcontractors must be added at the company level before they can be assigned to a project:
•
•
•
Select 'subcontractors' from the company menu (figure 2.15)
This takes you to a page where you can add new subcontractors (figure 2.16)
Click on ‘add’ and fill in the form, then click ‘save’ when complete (figure 2.17).
The subcontractors are now ready to be assigned to projects (see section 4.4 for details).
Subcontractors can also be linked with waste arisings on the 'add waste data' page of a project (see
section 6.1) and with some sections of the SWMP (see section 5.3.1).
Figure 2.15: Accessing subcontractors function
Figure 2.16: Add/edit subcontractors page
Figure 2.17: Add subcontractors details
15 of 76
SMARTWaste Plan User Guide V3
2.8.
Editing company details
If your company details change, please amend them so that we can get in touch with you if needed:
•
•
•
Select ‘Edit company details’ from the ‘company menu’ (figure 2.18).
This takes you to the ‘Edit company details’ page (figure 2.19) where you can change and
update information.
Click ‘save’ when you have finished.
Figure 2.18: Edit company details page
Figure 2.19: Edit company details page
16 of 76
SMARTWaste Plan User Guide V3
3.
Company Homepage
The company homepage provides you with an overview of information for your whole company through
a number of tabs.
Whenever you login to SMARTWaste Plan, you are automatically taken to the company homepage
‘Summary Information’ tab (see section 2.3) which lists the projects you have registered on the tool.
The company homepage provides a summary at a company level of any waste data entered via
projects. If you wish to see SWMP details you will need to click on the relevant project name to see
this, as SWMPs are project specific.
Click on the green tabs to navigate around your company information (details below on each tab). The
title of the tab you are using appears in bold font.
You can obtain a useful report of your company-wide information by clicking on the ‘printer friendly’
button under the list of projects on the ‘Summary Information’ page. This amalgamates all the
information from all the tabs into one page (figures 3.1a and 3.1b). This can then be printed in the
usual way, by going to ‘File’ on the toolbar and selecting ‘Print’. It can also be saved as an html file
[save as type: Webpage, complete (*.htm, *.html)], opened in Microsoft Word and be edited so that
you can tailor your report with text as necessary.
Figure 3.1a: Summary Report for the Company
17 of 76
SMARTWaste Plan User Guide V3
Figure 3.1b: Summary Report for the Company (continued)
18 of 76
SMARTWaste Plan User Guide V3
3.1.
Company Homepage ‘Summary Chart’
The ‘Waste to date by product group’ graphs found on the ‘Summary Chart’ tab (figure 3.2) show the
total waste generated to date on all projects by waste product group. There is one graph for volume
based projects and one for tonnage based projects. These graphs automatically update as new
information is submitted into the system.
Figure 3.2: Company Homepage ‘Summary Chart’ tab
19 of 76
SMARTWaste Plan User Guide V3
3.2.
Company Homepage ‘Detailed Information’
The ‘Detailed information’ tab shows the overall performance for all your projects split into those
collecting waste data as volume and those collecting it as tonnes (figure 3.3). Table 3.1 summarises
the waste data displayed.
Table 3.1: Information displayed on company’s Detailed information’ tab
Waste data displayed
Volume based projects
Tonnage based projects
√
Volume of waste in m3
√
Weight of waste in tonnes
Estimated tonnage
(based on a conversion factor
which translates the volume
into approximate tonnes2)
√
x
The percentage of all waste
that is mixed waste
√
√
The percentage of all waste
that is segregated waste
√
√
√
m3 waste / 100m2 of floor area
and
m3 of waste / £100,000 project cost
√
tonnes of waste / 100m2 of floor area
and
tonnes of waste / £100,000 project cost
Total actual waste
Performance indicators for
each of the 22 product groups
2
The conversion factors used on SMARTWaste Plan have been taken from the Environment Agency Wales
report on the key findings of their Construction and Demolition waste survey which can be downloaded from
http://www.environment-agency.gov.uk/research/library/publications/33979.aspx. The conversion factors can be
seen in Appendix 5 of the full report.
20 of 76
SMARTWaste Plan User Guide V3
Figure 3.3: Company Homepage ‘Detailed Information’ tab
21 of 76
SMARTWaste Plan User Guide V3
3.3.
Company Homepage ‘Cost Information’
The ‘Cost information’ tab (figure 3.4) shows a summary of the waste cost data for all your projects.
This includes the total cost of waste removal, waste cost by project value, floor area, waste weight,
waste volume and by waste product type.
Figure 3.4: Company Homepage ‘Cost Information’ tab
22 of 76
SMARTWaste Plan User Guide V3
3.4.
Company Homepage ‘Summary by Date’
The ‘Summary by Date’ tab (figure 3.5a and 3.5b) shows filtered information by date. Just enter a Start
Date and End Date for the period you are looking for (e.g. this could be a month, quarter or year), then
click ‘Update’. The tool will then create a summary report of the waste data for the criteria you
specified.
Figure 3.5a: Company Homepage ‘Summary by Date/Project Type’ tab
23 of 76
SMARTWaste Plan User Guide V3
Figure 3.5b: Company Homepage ‘Summary by Date/Project Type’ tab (continued)
24 of 76
SMARTWaste Plan User Guide V3
3.5.
Company Homepage ‘Contact Details’
The ‘Contact Details’ tab (figure 3.6) shows your company contact details (click ‘Edit’ to update) and
lists the users set up on the company account.
When a user’s name is underlined, this means that you have user access rights to view and edit any of
the details for that user by clicking on their name (see section 2.5). Where the user name is not
underlined, this means that you are unable to have access to the user’s details.
If you have the appropriate admin access rights then you will also be able to add new users by using
the ’Add’ button (see section 2.5).
Figure 3.6: Company Homepage ‘Contact Details’ tab
25 of 76
SMARTWaste Plan User Guide V3
4.
Projects
The company homepage lists all the projects your company has registered on SMARTWaste Plan.
When a project name is underlined, you as a user can access the project by clicking on the name (see
figure 4.1). If you cannot access a project which you need to get into, please contact your company
admin or project admin user to be granted access.
Figure 4.1: Access to project name
4.1.
Project Homepage ‘Summary Information’
Clicking on a project listed on the company homepage takes you to that project’s homepage. The
name of the project you are viewing information for is shown above the tabs at all times.
The information shown is slightly different depending on whether you are collecting waste data in
volume (figure 4.2a) or collecting waste data in tonnes (figure 4.2b). This data format was chosen
when the project was set up, once waste data has been added you cannot change the data format i.e.
cannot change from tonnes to volume or vice versa.
The project ‘Summary Information’ page summarises the project details, SWMP progress, cost KPIs
and waste data. On this project page, you can add or update the following (providing you have the
correct access rights):
•
•
•
•
•
projects details
project users (see section 4.2 for further details)
waste management contractors (see section 4.3)
subcontractors (see section 4.4)
cost data (see section 4.5)
You can access your SWMP for this project by clicking on the tab ‘SWMP’ (figure 4.3), which will take
you to the SWMP home page (see section 5 for further details).
You can also view waste measurement data you have entered and add further data (see section 6 for
further details).
In addition, you can link your project to a specific client if that client has their own special Client
Level SMARTWaste Plan account. To do this, click the ‘update’ button in the client link section (figure
4.2a) and enter the password which your client has given to you. This will give that client read only
access to that project in their Client Level account, so they will not need to log in to your account to
26 of 76
SMARTWaste Plan User Guide V3
view the project’s information. The client will not be able to change or add information to these linked
projects. Also, any data or projects you have stored on your SMARTWaste plan account for other
clients will remain confidential; the client will not be able to view projects which you do not link to their
account. For further details about the Client Level SMARTWaste Plan, see appendix 2 and 3.
Figure 4.2a: Project ‘Summary Information’ tab (collecting waste data in volume)
27 of 76
SMARTWaste Plan User Guide V3
Figure 4.2b: Project ‘Summary Information’ tab (collecting waste data in tonnes)
Figure 4.3: Access to SWMP
28 of 76
SMARTWaste Plan User Guide V3
4.2.
Project ‘Granting users access to projects’
For a user to be able to access a project, the company or project admin user must grant them access
to the relevant project:
•
•
•
•
•
Go to the relevant project homepage
Click the ‘Update’ button (figure 4.4) in the users section of the project ‘Summary Information’
tab
This takes you to the ‘Project Users’ update page which lists all the users for your company
(figure 4.5)
Tick the box next to the user name to give them access to the project
Click the ‘Update’ button
Figure 4.4: Project - ‘Users’ update button
Figure 4.5: Project Users update page
29 of 76
SMARTWaste Plan User Guide V3
Project ‘Assigning waste management contractors to projects’
4.3.
A waste management contractor must be added at the company level before it can be assigned to a
project (see section 2.6 for how to add them at the company level).
The company admin user, project admin user or project user can add or change the waste
management contractors associated with a project:
•
•
•
•
•
Go to the relevant project’s homepage
Click the ‘Update’ button in the Waste management contractors section (figure 4.6) of the
project ‘Summary Information’ tab
This takes you to the ‘Waste management contractor’ page (figure 4.7) which lists all the waste
management contractors you have added for your company, the waste carrier is listed first and
then underneath the waste site/facilities for this carrier are listed (shown as a bullet point)
Tick the box next to the carrier name and its relevant waste site/facility name to assign them to
the project – it is important to select both the carrier and the associated waste site/facility
Click the ‘Save’ button
Figure 4.6: Project - ‘Waste management contractors’ update button
30 of 76
SMARTWaste Plan User Guide V3
Figure 4.7: Waste management contractors update page
Waste contractor/carrier
Waste site/facility
Project ‘Assigning subcontractors to projects’
4.4.
This process is similar to assigning waste management contractors. Subcontractors must be added at
the company level first (see section 2.7 for how to add them at the company level).
The company admin user, project admin user or project user can add or change the subcontractors
associated with a project:
•
•
•
•
•
Go to the relevant project’s homepage
Click the ‘Update’ button in the Subcontractors section (figure 4.8) of the project ‘Summary
Information’ tab
This takes you to the ‘Subcontractor’ page (figure 4.9) which lists all the subcontractors you
have added for your company
Tick the box next to the subcontractor name to assign them to the project
Click the ‘Save’ button
31 of 76
SMARTWaste Plan User Guide V3
Figure 4.8: Project - ‘Subcontractors’ update button
Figure 4.9: Subcontractor page
32 of 76
SMARTWaste Plan User Guide V3
4.5.
Project ‘Adding waste cost data’
To keep a record of how much is being spent on removing waste from site, use the ‘Add cost data’
function from the project homepage (figure 4.10):
•
•
Click ‘add cost data’ button on the bottom right hand side of the project homepage
This will take you to a form (figure 4.11) where you can record container costs either per
skip/container, or overall for the project.
Cost data is stored cumulative, so if you add more than one set of data, the tool will automatically sum
this up for you.
Figure 4.10 Project ‘Add cost data’ button
Figure 4.11: Cost information page
33 of 76
SMARTWaste Plan User Guide V3
4.6.
Project ‘Viewing waste cost log’
To view all waste cost data that has been entered for the project:
•
•
•
•
•
From the project homepage, click on the ‘Cost information’ tab
Click the ‘View cost log’ link at the bottom right hand side of the cost information page (figure
4.12).
This will open the project’s ‘cost log’ which displays each entry of cost data that has previously
been added for this project.
This gives you the opportunity to review the cost data and also amend it if necessary. However,
please note that to amend an entry, you must be logged in as a company admin user.
To amend a cost data entry, click on the hyperlinked ‘entry type’ to open the original form and
make the necessary amendments (figure 4.13). When finished, click the ‘submit’ button.
Figure 4.12: Cost information – ‘view cost log’ button
Figure 4.13: Project ‘Waste cost log’ page
34 of 76
SMARTWaste Plan User Guide V3
5.
Site Waste Management Plan Tool
5.1.
Accessing your SWMP
SWMPs are unique to each project so you access it by:
•
•
•
At the company homepage, click on the relevant project name
At the project homepage click on the SWMP tab (figure 5.1)
This will take you to the ‘SWMP Home’ page where you can begin your SWMP (figure 5.2 for
downloadable template, figure 5.3 for online SWMP)
Figure 5.1: SWMP tab
There are two formats of SWMP on SMARTWaste Plan. You choose the format when setting up your
project:
•
•
Downloadable Microsoft Word based template – download and fill in offline
Interactive online SWMP – work through the 9 stages online (recommended)
The online version provides additional functions such as:
•
•
a benchmark calculator to assist with forecasting of waste and comparisons of forecasts with
actual waste
interaction with the built in measurement tool for actual waste arising.
Further details on the two formats are given in sections 5.2 and 5.3.
5.2.
Downloadable word template
If you chose the word template format for your project3 SWMP you will need to download the template
from the ‘SWMP Home’ page to begin (figure 5.2):
•
•
•
Click the blue link ‘Click here to download’
This will open a Microsoft Word document called ‘Site Waste Management Plan – Paper copy’
Save this template and fill it in to complete your SWMP.
Section 5.3 of this user guide relates to the online version of the SWMP but it may give you some
guidance on the type of detail to include in your SWMP.
3
For details of how to choose the format for your SWMP, see section 2.4, figure 2.5
35 of 76
SMARTWaste Plan User Guide V3
Figure 5.2: To down the SWMP word template
5.3.
Interactive online SWMP
If you have chosen the online SWMP format, the tool will take you through the steps to preparing,
implementing and reviewing your project SWMP via numbered tabs which you access through the
‘SWMP Home’ page (figure 5.3).
Each tab contains simple tables and text boxes that you should fill in to create your plan. By filling in all
parts of each tab, you will be complying with the SWMP Regulations for your project(s).
You can update any part of your SWMP at any point by clicking on the relevant tab and editing the
information entered, remember to click on the submit button at the bottom of the page to save the
updated information you have entered.
A checklist is provided on the ‘SWMP Home’ page summarising the steps of the plan and which ones
have been completed so far (shown by a tick). In order to get the tick to appear in your checklist, you
will need to fill in all the relevant details on that tab, then tick the box labelled “All required information
on this page has been entered” before clicking submit.
Your SWMP can be printed by clicking on the ‘print your SWMP’ button on the SWMP Home page.
Figure 5.3: Online SWMP Home page
36 of 76
SMARTWaste Plan User Guide V3
5.3.1.
Preparing your SWMP
Steps 1 to 4 make up the preparation stages for your SWMP; these must be completed BEFORE
construction work commences onsite.
Step 1: Responsibilities
A SWMP must have a record of who is responsible for different aspects of the SWMP (figure 5.4).
Complete the table to record who has the necessary roles and responsibilities.
The SWMP regulations require the Client and Principal Contractor to declare to take reasonable steps
to ensure waste duty of care is complied with, materials are handled efficiently and waste is managed
appropriately. Tick the box to confirm that you agree to do this.
Figure 5.4: Online SWMP – step 1: Responsibilities
37 of 76
SMARTWaste Plan User Guide V3
Step 2: Waste minimisation
Waste minimisation is about trying to reduce the amount of waste that will be produced (i.e. prevent
waste arising).
It is an important part of SWMPs and the regulations require that you keep a record of any waste
minimisation decisions taken with regards to the nature of the project, design, construction methods
and materials.
A table is provided on this tab to record these details. Click the ‘Add’ button (Figure 5.5) to go to the
‘Edit waste minimisation’ page (figure 5.6) where you enter the details of waste minimisation decisions
taken. When finished, click the ‘Submit’ button.
Figure 5.5: Online SWMP – step 2: Waste Minimisation
Figure 5.6: Online SWMP – step 2: Edit Waste Minimisation
38 of 76
SMARTWaste Plan User Guide V3
Step 3: Forecast of waste
The SWMP regulations require you to estimate the type and quantity of waste you expect to be
generated on a project.
Use the table to record the types and amounts of waste you forecast will be generated. Click the ‘Add’
button to make an entry.
This information can be linked up to the work packages, likely causes, and any relevant subcontractors
for the waste type (figure 5.7a if collecting waste data in volume and figure 5.7b if collecting waste data
in tonnes). If you have not yet entered any subcontractor’s details, you will first need to do this at the
company level then assign them to your project (see sections 2.7 and 4.4).
If you need to change any details once they have been added, click on the ‘Edit’ button next to the
entry on the SWMP - Forecast page, it will take you to the ‘Edit forecast’ page (figure 5.8).
A benchmarking calculator is provided on the forecast tab to help you estimate the waste generated on
site if you don’t have previous data to use. Click on the link to access the benchmark calculator. This
will open a new window (figure 5.9) with typical construction waste arisings for new build projects
calculated based on your project’s floor area and project type. These can be used as a guide, but may
need adjusting for the specifics of your project.
The BRE waste benchmarking data used in the benchmark calculator are updated and refined
bimonthly. For more information about this, please visit www.smartwaste.co.uk/page.jsp?id=37
Figure 5.7a: Online SWMP – step 3: Forecast of Waste (if collecting waste data in volume)
39 of 76
SMARTWaste Plan User Guide V3
Figure 5.7b: Online SWMP – step 3: Forecast of Waste (if collecting waste data in tonnes)
Figure 5.8: Online SWMP – step 3: Edit Forecast of Waste
40 of 76
SMARTWaste Plan User Guide V3
Figure 5.9: Online SWMP – step 3: Waste Benchmark Calculator
(currently for new build projects only)
41 of 76
SMARTWaste Plan User Guide V3
Step 4: Waste management options
Once you have estimated the amounts of waste you think will be generated, you then need to consider
how you will manage these waste streams.
For each waste stream you expect to arise, you should estimate the percentage of each that you plan
to reduce, reuse, recycle, recover or dispose and whether this will take place onsite or offsite, along
with a brief description of how you will achieve this. Use the table provided to record the information,
using the ‘add’ button to enter a new row of information (figure 5.10 and figure 5.11).
There is also a facility on this page to upload a drawing of your site layout showing locations of waste
and materials storage areas to show that you are complying with the declaration made in step 1.
Figure 5.10: Online SWMP – step 4: Waste management options
42 of 76
SMARTWaste Plan User Guide V3
Figure 5.11: Online SWMP – step 4: Add/Edit Waste management options
43 of 76
SMARTWaste Plan User Guide V3
5.3.2.
Implementing your SWMP
Steps 5 to 8 make up the implementation phase of your SWMP and relate to when construction work
has commenced onsite.
Step 5: Duty of Care
It is important to keep a record of what waste management contractors you are using and confirm that
they have the necessary licenses such as waste carriers licences and waste management facility
licenses. You should ensure that these licenses are in date which can be done by visiting the
Environment Agency website (a link is provided on the ‘add waste management contractors’ page of
SMARTWaste Plan). You should keep copies of Waste Transfer Notes (WTNs) that accompany every
waste movement, for a minimum of 2 years.
The ‘Duty of Care’ tab (figure 5.12) summarises the duty of care information for your project based on
waste contractors entered at a company level that have been assigned to the project (see section 2.6
and 4.3).
In addition you need to make a note of whether you are registered as a hazardous waste producer and
your registration details if you are.
If further assistance is needed to find local waste management contractor, you can use our free online
tool called BREMAP (www.bremap.co.uk).
Figure 5.12: Online SWMP – step 5: Duty of Care
44 of 76
SMARTWaste Plan User Guide V3
Step 6: Training and communication
Ensuring that the workforce is informed about the SWMP is part of the additional duties within the
SWMP regulations.
This tab enables you to log details of the types of training and communication you are using on the
project, and to keep a training log (either by uploading a document or filling in the table provided)
(figure 5.13 and figure 5.14).
Figure 5.13: Online SWMP – step 6: Training and communication
45 of 76
SMARTWaste Plan User Guide V3
Figure 5.14: Online SWMP – step 6: Edit training log
Step 7: Comparison of actual waste with forecast waste
The SWMP regulations require that whenever waste is removed from site you must record certain
details such as the identity of the person removing the waste, the type of waste that is removed, and
the waste site/facility that it is going to.
You can use the integrated waste measurement tool (see section 6) to record this information by
clicking on the ‘click here to add waste data link’ at the top of the page.
If you use the waste measurement tool, the ‘Actual versus forecast waste’ tab (figure 5.15) will
automatically summarise the actual types and amounts of waste against those you forecast would be
generated in step 3.
Figure 5.15: Online SWMP – step 7: Actual versus forecast waste
46 of 76
SMARTWaste Plan User Guide V3
Step 8: Ongoing review of implementation
Your SWMP should be reviewed regularly to see if the plan accurately reflects the progress of the
project. Information should be updated as necessary. A plan should be reviewed at least every six
months.
This tab provides a simple form to record when the SWMP was reviewed and what the outcome was
(e.g. was any information updated/changed) (figure 5.16 and figure 5.17).
Filling in information on this step will mean that you will be able to comply with a declaration in step 9.
Figure 5.16: Online SWMP – step 8: Ongoing review of implementation
Figure 5.17: Online SWMP – step 8: Edit implementation review
47 of 76
SMARTWaste Plan User Guide V3
5.3.3.
Reviewing your SWMP
The SWMP regulations require that your SWMP must be reviewed within 3 months of construction work
being completed on your project.
Step 9: Completion review
The principal contractor must confirm that the plan has been monitored on a regular basis to ensure
that work was progressing to the plan and that the plan was updated. Tick the box to confirm this.
The information you entered in steps 7 and 8 will back up this declaration.
The review requirements are slightly different depending on the value of the project.
For projects with a value of between £300k and £500k, the following boxes are provided to help you
record the necessary details:
•
•
•
how successful you believe implementation of the SWMP was
explanation of any deviations from the original plan
any actions planned for future projects (figure 5.18).
Figure 5.18: Online SWMP – step 9: Completion review (for project values between £300k to £500K)
For projects with a value of over £500k, there are 2 additional boxes to be completed (figure 5.19):
•
•
a comparison of the estimated quantities of each waste type against the actual quantities – if
you have used the integrated waste measurement tool, step 7 will help you complete this
an estimate of the cost savings achieved.
48 of 76
SMARTWaste Plan User Guide V3
Figure 5.19: Online SWMP – step 9: Completion review (for project value of over £500K)
49 of 76
SMARTWaste Plan User Guide V3
6.
Waste Measurement
SMARTWaste Plan has an integrated waste measurement tool to enable easy collection and recording
of wastes arising from projects including types, quantities and waste management routes.
Waste measurement involves a two stage process of collecting the waste data on site and then
entering the data onto your web-based account. The data entered is used to generate waste
performance indicators for individual projects/sites and on a company-wide basis.
This section provides an introduction to the features and functions of using the waste measurement
tool so that you can begin measuring and adding waste for your projects.
6.1.
Collecting & adding waste data
Section 6.1 provides you with details on how to collect the waste data on site and how to add this data
onto a project within your SMARTWaste Plan account.
6.1.1.
Collecting waste data on site
The tool uses 22 waste product groups that have been developed to facilitate easy data entry, as on
many construction sites there can be thousands of individual products in use.
Table 6.1 gives an example of some of the products covered by each product group. Please note this
list is not exhaustive.
Table 6.1: Examples of products in the groups
Waste product group
Bricks
Tiles and ceramics
Electrical equipment
Inert
Metals
Packaging
Floor coverings (soft)
Plastic
Concrete
Furniture
Insulation
Canteen/office/ad-hoc
Gypsum
Binder
Timber
Oil (Liquids and Oils)
Liquids
Soils
Asphalt and tar
Hazardous Materials
Other
Mixed*
Examples of products in the group
Bricks
Ceramic tiles, clay roof tiles, ceramic toilets and sinks
TVs, fridges, air conditioning units, lamps
Aggregates, stones, gravel slates, glass, rubble/hardcore
Copper, aluminium, lead, zinc, iron/steel, tin, mixed metal
Cardboard, bubble wrap, wrapping bands, polystyrene, paper, cable drums, pallets
Carpets, vinyl
Gutters, downpipes, DPC, PVC-U windows and doors, socket boxes
Concrete pipes, kerb stones, paving slabs, concrete, solid blocks
Tables, chairs, desks, sofas, blinds, carpets
Glass fibre, mineral wool, purlboard, breather paper
Office and canteen waste, vegetation, sweepings, ad-hoc materials
Plasterboard, ceiling tiles, plaster
Cement, render, mortar
Plywood, chipboard, noggins, battens, doors and windows, MDF
Hydraulic oil, engine oil, lubricating oil, transmission oil, mould oil, interceptor waste
liquid fuel, cleaning agents
Sand, clay, subsoil, topsoil, dredgings, railway ballast
Bitumen, asphalt, tar
Paint pots, line markers, creosoted timber, asbestos, radioactive waste, bituminous mixtures
with coal tar, tarred products, PCB or Mercury coated products, fluorescent light tubes
Any waste not covered by the other categories
Mixed construction and demolition waste
If you are segregating wood on site, then timber packaging can be entered into the timber category
rather than the packaging category as it will then count towards your segregated waste and recycling
figures.
Table 6.2 gives the container/skip sizes used in the waste measurement tool. If your container/skip
type is not listed, please contact the SMARTWaste team to get it included.
50 of 76
SMARTWaste Plan User Guide V3
Table 6.2: Container / skip sizes
1cu metre bag
1100 litre wheelie bin
3cu metre skip (4cu yd)
4.6cu metre skip (6cu yd)
6.12cu metre skip (8cu yd)
9.17cu metre skip (12cu yd)
10.7cu metre compactor (14cu yd)
11.5cu metre skip (15cu yd)
15.3cu metre skip (20cu yd)
22.94cu metre skip (30cu yd)
30.58cu metre skip (40cu yd)
240 litre wheelie bin
760 litre wheelie bin
10cu metre truck
3000 litre tanker (3cu metre)
660 litre wheelie bin
20cu metre truck
500 litre tanker
1000 litre tanker
360 litre wheelie bin
1.5cu metre skip (2cu yd)
12.23cu metre skip (16cu yd)
7.65cu metre REL (10cu yd)
26.8cu metre skip (35 cu yd)
7.6cu metre truck (10 cu yd)
0.8cu metre container (1.05 cu yd)
15.3cu metre truck (20cu yd)
19.11cu metre skip (25 cu yd)
10.7cu metre skip (14 cu yd)
7.5 tonne truck
Stockpile
Bulkers
Roll on Roll off
Bagged waste
Builder skips
0.25cu metre bag
1.5cu metre bag
4cu metre bag
1.15cu metre bag (1.5cu yd)
0.76cu metre bag (1cu yd)
3cu metre bag (4cu yd)
19.115cu metre skip (25cu yd)
18160 litre tanker (18.16cu metre)
7.6cu metre skip (10cu yd)
995cu metre stockpile
6cu metre truck
4cu metre truck
709cu metre stockpile
51 of 76
SMARTWaste Plan User Guide V3
Collecting waste data on site in volume
To collect data in volume, the person responsible for the container leaving site makes a note of its
contents by visually estimating the percentage of the 22 product groups within the container.
To help with data collection, a paper based form can be downloaded from the ‘Add waste data’ page,
an example is also show in figure 6.1.
The completed paper forms can be collated ready for inputting the data entered onto the relevant
SMARTWaste Plan project (see section 6.1.2).
52 of 76
SMARTWaste Plan User Guide V3
Figure 6.1: SMARTWaste Plan – Paper based waste data collection form in volume
Project name
Date
Waste management contractor - carrier
Waste management contractor - destination
Subcontractor
Waste Transfer Note (WTN) number
(can be added later if not known now)
Container reference
Container size/ type
Has waste been compacted? (tick one)
Normal / Uncompacted (40% void space)
Machine compactor (5% void space)
Slightly compacted (25% void space)
Other – specify % void space: _______
Number of containers
Overall weight of containers in tonnes*
(can be added later if not known now)
Work package that the waste is coming from (tick one):
Not specified
Soft strip
Asbestos removal
Demolition
Remediation
Groundworks & excavation
Construction
Substructure
Superstructure
Fixtures & fittings
Services
External and site works
Waste management route - is the container being sent for (tick one):
Reuse
Recycling
Is this happening (tick one):
Recovery (sorting/composting/incineration)
On site
Disposal (landfill)
Off site
Is the container segregated?
Enter percentage composition of wastes below (in 5% increments):
Bricks (170102)
%
Tiles and Ceramics (170103)
%
Concrete (170101)
%
Inert (1701)
%
Insulation(170604)
%
Metals
%
Packaging (1501)
%
Gypsum (170802)
%
Binder (10)
%
Plastics (170203)
%
Timber (170201)
%
Floor coverings (soft)
%
Electrical and electronic
equipment (1602)
Canteen/office/adhoc (200301)
%
Furniture (200307)
%
%
Liquids
%
Oils (1301)
%
Soils (1705)
%
Asphalt and tar (1703)
%
Hazardous Materials
%
Other
%
Mixed (170904) **
%
* 1 tonne = 1000 kg
** Please only use the “Mixed” category if absolutely necessary.
53 of 76
SMARTWaste Plan User Guide V3
Collecting waste data on site in tonnes
If waste data is being collected in tonnes, it is likely that this data is being provided by the waste
management contractor. Ask them to provide data in as much detail as possible for the 22 product
categories.
Figure 6.2 is an example paper based waste data collection form for tonnes. A copy can also be
downloaded from the ‘Add waste data’ page.
Figure 6.2: SMARTWaste Plan – Paper based waste data collection form in tonnes
Project name
Date
Waste management contractor - carrier
Waste management contractor - destination
Subcontractor
Waste Transfer Note (WTN) number
(can be added later if not known now)
Container reference
Container size/ type
Number of containers
Work package that the waste is coming from (tick one):
Not specified
Soft strip
Asbestos removal
Demolition
Remediation
Groundworks & excavation
Construction
Substructure
Superstructure
Fixtures & fittings
Services
External and site works
Waste management route - is the container being sent for (tick one):
Reuse
Recycling
Is this happening (tick one):
Recovery (sorting/composting/incineration)
On site
Disposal (landfill)
Off site
Is the container segregated?
Enter the weight of waste in tonnes* below:
Bricks (170102)
tonnes
Tiles and Ceramics (170103)
tonnes
Concrete (170101)
tonnes
Inert (1701)
tonnes
Insulation(170604)
tonnes
Metals
tonnes
Packaging (1501)
tonnes
Gypsum (170802)
tonnes
Binder (10)
tonnes
Plastics (170203)
tonnes
Timber (170201)
Electrical and electronic
equipment (1602)
Canteen/office/adhoc (200301)
tonnes
Floor coverings (soft)
tonnes
tonnes
Furniture (200307)
tonnes
tonnes
Liquids
tonnes
Oils (1301)
tonnes
Soils (1705)
tonnes
Asphalt and tar (1703)
tonnes
Hazardous Materials
tonnes
Mixed (170904) **
tonnes
Other
tonnes
* 1 tonne = 1000 kg
** Please only use the “Mixed” category if absolutely necessary.
54 of 76
SMARTWaste Plan User Guide V3
6.1.2.
Adding waste data onto your project
Data is entered within each project that you have set up on SMARTWaste Plan. To add waste data:
•
Access the relevant project by clicking on the project name on the company homepage
•
Click on ‘project home’ in the grey toolbar at the top of the page and select ‘Add waste data’
(figure 6.3)
•
This will take you to the ‘Update’ page
•
Add the relevant information for each waste container by entering the details and selecting
items from the drop down lists (figure 6.4a for volume data, figure 6.4b for tonnes data)
•
Click the ‘Add’ button at the bottom of the page to save the information
Please note: only click the ‘Add’ button once otherwise you may duplicate the saving of
your entry. All of the waste information within your project and company pages is
automatically updated with the new data entered.
•
Once the data has been saved a blank ‘Update’ page will appear so that you can continue
adding other paper logs into the system.
Figure 6.3: Project ‘Add waste data’ button
If the container type you want to use is not listed please contact the SMARTWaste Team to arrange for
the new container size to be added to the drop down list.
You can make sure you have entered the information correctly by checking the log of containers
leaving site for the particular project (see Section 6.2.1).
If you realise that waste information has been entered incorrectly, please ask your company admin
user to amend the data for you (see section 6.2.2).
Add waste data in volume
If you are entering data as volumes, you will need to enter the percentages for the product groups. The
bar at the bottom of the page will total up how much has been entered for that container. The total
cannot exceed 100%, however, it may be less than 100% as sometimes partially full containers are
removed from site.
See figure 6.4a and the numbered key for an explanation of what should be recorded.
55 of 76
SMARTWaste Plan User Guide V3
Figure 6.4a: Add waste data in volume
1
2
3
4
5
6
7
8
9
10
11
12
13
14
15
16
17
1. Enter the date container left site (in format dd/mm/yyyy, e.g. 19/03/2008).
2. Select the waste carrier removing this waste*
3. Select the waste site (destination) that the waste is going to*
4. Optional: Select the subcontractor creating the waste*
*if none appear, you will need to add them; see sections 2.7 and 4.3.
5. Enter the waste transfer note (WTN) number (skip ticket number).
6. Optional: Enter a container reference.
56 of 76
SMARTWaste Plan User Guide V3
7. Choose the container type from the drop down list
– if it is not listed, contact the SMARTWaste team to get it included.
8. Select level of compaction of the container contents
– this will nearly always be normal, unless you are using a compactor onsite. Table 6.3 shows the void
space associated with compaction levels.
Table 6.3: Void percentage for the different types of compaction
Compaction
Normal
Slightly compacted
Machine
compactor
Other
Description
Uncompacted waste
Crushed with a forklift or heavy object
Waste compacted with a dedicated
compactor
If necessary enter your own void space
figure
Assumed Void Percent
40
25
5
specify
9. If more than one container with the same contents is leaving site, enter the number of containers.
10. Optional: Enter the overall tonnage of the container
– you can get this information from the waste transfer note.
11. Optional: Select the work package that the waste is coming from.
12. Tick one of the boxes to select the waste management route. Also select where this is happening (either
on site or off site).
• Reuse = reuse the material without further processing e.g. brick as a brick
• Recycle = reuse the material with further processing e.g. crushing concrete to create aggregate
• Recovery = treat the waste either by:
− sorting mixed waste at a waste transfer station,
− composting waste, or
− incinerating waste
• Disposal = send the waste to landfill (or other disposal) directly
13. Tick box if the container is segregated (i.e. one type of material). If the container is mixed, leave this box
blank.
14. Upload a scanned image of the WTN/weighbridge ticket for the container by clicking the ‘Browse’ button.
IMPORTANT: Do not type any other text in this box; otherwise, the tool will not allow you to save the
waste entry.
15. Select the percentages of each product group within the container. Some categories also have optional
sub-categories (use the + next to product name).
– the red bar along the bottom will add up the contents, telling you when you have reached 100%.
16. Add notes at the bottom if you have any comments.
17. Click the ‘Add’ button
– this will add the data to your bank of information and bring up a new sheet for you to add the next
entry. Please only click the add button once, otherwise your entry will be duplicated.
Repeat this process if you have more entries to add.
57 of 76
SMARTWaste Plan User Guide V3
Add waste data in tonnes
If you are entering data as tonnage, you will need to enter the relevant weight next to the product
groups.
Please note that some waste management contractors may be able to give you the tonnes for each
waste material leaving your site, but this is likely to be less detailed than the volume based data. For
the Code for Sustainable Homes you have to report by waste types (e.g. timber, packaging, insulation)
so if you measure in tonnes you will need to ensure that you can obtain this information from your
waste management contractors.
See figure 6.4b and the numbered key for an explanation of what should be recorded.
Figure 6.4b: Add waste data in tonnes
1
2
3
4
5
6
7
8
9
10
11
12
13
14
15
58 of 76
SMARTWaste Plan User Guide V3
1. Enter the date container left site (in format dd/mm/yyyy, e.g. 19/03/2008).
2. Select the waste carrier removing this waste*
3. Select the waste site (destination) that the waste is going to*
4. Optional: Select the subcontractor creating the waste*
*if none appear, you will need to add them; see sections 2.7 and 4.3.
5. Enter the waste transfer note (WTN) number (skip ticket number).
6. Optional: Enter a container reference.
7. Choose the container type from the drop down list
– if it is not listed, contact the SMARTWaste team to get it included.
8. If more than one container with the same contents is leaving site, enter the number of containers.
9. Optional: Select the work package that the waste is coming from.
10. Tick one of the boxes to select the waste management route. Also select where this is happening (either
on site or off site).
• Reuse = reuse the material without further processing e.g. brick as a brick
• Recycle = reuse the material with further processing e.g. crushing concrete to create aggregate
• Recovery = treat the waste either by:
− sorting mixed waste at a waste transfer station,
− composting waste, or
− incinerating waste
• Disposal = send the waste to landfill (or other disposal) directly
11. Tick this box if the container is segregated (i.e. one type of material). If the container is mixed, leave this
box blank.
12. Upload a scanned image of the WTN/weighbridge ticket for the container by clicking the ‘Browse’ button.
IMPORTANT: Do not type any other text in this box; otherwise, the tool will not allow you to save the
waste entry.
13. Add the tonnes of each product group within the container(s).
14. Add notes at the bottom if you have any comments.
15. Click the ‘Add’ button
– this will add the data to your bank of information and bring up a new sheet for you to add the next
entry. Please only click the add button once, otherwise your entry will be duplicated.
Repeat this process if you have more entries to add.
59 of 76
SMARTWaste Plan User Guide V3
Viewing and amending waste data entered
6.2.
The waste data you enter can be viewed in a number of different ways including through the:
•
•
•
waste data log
project summary information, summary chart, detailed information, cost data and summary by
date tabs
company summary information, summary chart, detailed information, cost data and summary
by date tabs
In addition, any incorrect waste data can be amended by the company admin users only via the waste
data log. Users at access permission levels lower than company admin users (such as project admin
users and project users) have no access rights to amend waste data, they have to ask their company
admin users to do this for them (see section 6.2.2).
6.2.1.
Viewing Waste Data Log
To view a log record of all the containers that have left the project site to date:
•
•
•
•
•
Click on the ‘project menu’ on the toolbar at the top of a Project’s Homepage
Select ‘Waste data log’ (figure 6.5)
This will take you to the log record of all the containers that have left this site to date(figure 6.6)
To filter the information in the log, make your selection of what you want to filter by:
o a date range
o a waste carrier
o a waste destination
o a subcontractor (if entered)
o a work package
o a particular container size
o a segregated container or not
o a management route
o an individual product group
then click on the ‘update’ button (see figure 6.6).
Figure 6.5: Project ‘Waste data log’
60 of 76
SMARTWaste Plan User Guide V3
Figure 6.6: Filtering on the container log page
If the material was segregated for reuse, recycling or recovery this is shown by a green tick 4or a red
cross 6 if it was not segregated.
QA check stands for Quality Assurance check – you can tick this box if you have checked that the
information is correct.
6.2.2.
Amending incorrect waste data on ‘Waste Data Log’ page
If you realise that waste information has been entered incorrectly, please ask your company admin
user to amend the data for you. Users with access permission levels lower than company admin users
(such as project admin users and project users) have no access rights to amend waste data.
To amend waste data:
o
o
o
o
o
o
o
Please note: you must be logged in with a username and password that is set up at the
company admin permission level otherwise you will not be able to amend data.
For each waste entry, the date of the entry is shown as a hyperlink.
To amend waste data, click on the appropriate date hyperlink (see figure 6.6).
A new form called ‘Update: followed by the project name’ will open which looks the same as the
‘add waste data’ page you originally filled in (figure 6.7).
Here you can amend the waste data by changing the details as required.
When you have finished amending data, click the ‘Add’ button at the bottom of the page.
This will save your data and return you back to the waste data log page, so that you can review
the changes and continue.
61 of 76
SMARTWaste Plan User Guide V3
Figure 6.7: Project ‘Amending waste data’
62 of 76
SMARTWaste Plan User Guide V3
6.3.
Project ‘Summary information’
The Project ‘Summary Information’ tab highlights waste information for the project by summarising:
•
For volume based waste data
o actual volume of waste
o bulk volume of waste
o amounts of waste reused, recycled, recovered or disposed
o tonnage of waste (if entered)
o cost KPIs
•
For tonnes based waste data
o actual tonnage of waste
o amounts of waste reused, recycled, recovered or disposed
o cost KPIs
Click on the ‘Printer friendly’ button at the bottom of the page to get a report which amalgamates all the
information from the Project ‘Summary Information’, ‘Summary Charts’, ‘Detailed information’, ‘Cost
information’ and ‘Summary by date’ tabs into one page (figure 6.8).
This can then be printed in the usual way, by going to ‘File’ on the toolbar and selecting ‘Print.’ It can
also be saved as an html file [Webpage, complete (*.htm, *.html)] which can then be opened in
Microsoft Word and be edited so that you can tailor your report with text as necessary.
63 of 76
SMARTWaste Plan User Guide V3
Figure 6.8: ‘Printer friendly’ summary report for a project
64 of 76
SMARTWaste Plan User Guide V3
6.4.
Project ‘Summary charts’
This tab shows two waste data charts for the project, either in volume (figure 6.9a) or tonnes (figure
6.9b) depending on how you set up your project:
•
‘Waste to date by product group’ chart
o Cumulative waste entered to date for each of the 22 product groups
•
‘Waste over time’ chart
o Track of cumulative waste data over the timeline of the project
o Week 0 is the first week data was entered for
The graphs automatically update as new waste data is entered into the system.
Please note: If you are entering volume based waste data, the quantities shown are actual material
volume i.e. with void space removed from the container based on the compaction levels you have
selected. This allows you to see a clear picture of the project’s waste.
Figure 6.9a: Project: ‘Summary Chart’ tab (example in volume)
65 of 76
SMARTWaste Plan User Guide V3
Figure 6.9b: Project: ‘Summary Chart’ tab (example in tonnes)
66 of 76
SMARTWaste Plan User Guide V3
6.5.
Project ‘Detailed information’
The ‘Detailed information’ tab shows the overall performance for the project in detail for each of the 22
product groups. Table 6.4 summarises the information displayed depending on whether you are
collecting waste data as volume or tonnes. Also see figure 6.10a (volume) or figure 6.10b (tonnes).
Table 6.4: Information displayed on project ‘Detailed information’ tab
Waste data displayed
Volume based projects
Tonnage based projects
√
Volume of waste in m3
√
Weight of waste in tonnes
Estimated tonnage
(estimate based on a conversion
factor which translates the volume
into approximate tonnes4)
√
x
the percentage of all waste that is
mixed waste
√
√
the percentage of all waste that is
segregated waste
√
√
the percentage of waste that has
been sent for reuse/recycling/
recovery/disposal
√
√
√
m3 waste / 100m2 of floor area
and
m3 of waste / £100,000 project
cost
√
tonnes of waste / 100m2 of
floor area and
tonnes of waste / £100,000
project cost
Total actual waste
performance indicators for each of
the 22 product groups
Figure 6.10a: Project ‘Detailed Information’ tab (entering data as volume)
4
The conversion factors used on SMARTWaste Plan have been taken from the Environment Agency Wales report on the key
findings of their Construction and Demolition waste survey http://www.environment-agency.gov.uk/regions/wales/816243/1985904/
67 of 76
SMARTWaste Plan User Guide V3
Figure 6.10b: Project ‘Detailed Information’ tab (entering data as tonnes)
68 of 76
SMARTWaste Plan User Guide V3
Project ‘Cost Information’
6.6.
The ‘Cost information’ tab shows a summary of the waste cost data in either volume (figure 6.11a) or
tonnes (figure 6.11b), including:
•
the total cost of waste removal
•
waste cost per:
o
o
o
o
o
£100,000 of project value
100m2 of floor area
as % of project cost
per tonne or m3 of waste
by waste type
Figure 6.11a: Project ‘Cost Information’ tab (in volume)
69 of 76
SMARTWaste Plan User Guide V3
Figure 6.11b: Project ‘Cost Information’ tab (in tonnes)
6.7.
Project ‘Summary by date’
The ‘Summary by Date’ tab (figure 6.12) shows a report of information filtered by date, subcontractors,
and work package.
Just enter a Start Date and End Date for the period you are looking for (e.g. this could be a month,
quarter or year), select the details you want to focus on, then click on the ‘Update’ button.
The tool will then create a summary report of the waste data for the criteria you specified.
70 of 76
SMARTWaste Plan User Guide V3
Figure 6.12: Project ‘Summary by Date’ tab
71 of 76
SMARTWaste Plan User Guide V3
7.
Log out
When you have finished your visit to SMARTWaste Plan, please remember to log off your company
account, by clicking on ‘log out…’ on the toolbar at the top of the page you are on (figure 7.1).
Figure 7.1: Log out of SMARTWaste Plan using the toolbar
8.
Contact us
If you have any queries regarding SMARTWaste Plan, please do not hesitate to contact the
SMARTWaste Team on 01923 664851 or 01923 664633 or [email protected].
Please do not e-mail specific contacts at BRE with enquiries or questions about SMARTWaste Plan; it
is best to e-mail the dedicated SMARTWaste e-mail address shown above to enable a quick response
to your query. The dedicated SMARTWaste e-mail address is checked regularly by the members of
the SMARTWaste team who are in the office, whereas if you e-mail to a direct contact they may be out
of the office for a few days so will not be able to get back to you as promptly. Thank you for your cooperation with this.
72 of 76
SMARTWaste Plan User Guide V3
Appendix 1 – Definition of project cost and floor area
•
Project cost - This is the price agreed by the contractor and the client in the tender. If there is
no tender, the cost must include labour, plants, materials, overheads and profit but VAT is
excluded as are land costs.
•
Floor area - This is the gross internal floor area (including walls).
73 of 76
SMARTWaste Plan User Guide V3
Appendix 2 - SMARTWaste Plan Additional Services
Generic SMARTWaste Plan account structure
SMARTWaste Plan is BRE’s free Site Waste Management Plan (SWMP) and waste measurement
tool. Each company using SMARTWaste Plan registers to set up a company account. Within the
company account, projects are created for which a Site Waste Management Plan can then be
written and waste arisings data be recorded.
Diagram showing generic account structure
74 of 76
SMARTWaste Plan User Guide V3
Additional Levels – Group and Client levels
There are a couple of additional levels which you can purchase to make managing accounts and
projects easier:
Level
Who is it suitable for
Description
Group
Level
For companies who
have a number of
business units,
regional offices or
divisions
A group level account is created under which an account
is set up for each business unit.
One-off
fee
£1500
+VAT
Each business unit account has its own username and
password access. This is separate from the group and
enables viewing of that business unit’s details only.
The username and password access of the group level
enables viewing of data for the group as a whole, by
business unit and by individual project, all from one
location.
Client
Level
For clients who have a
number of contractors
who are using
SMARTWaste Plan
Each contractor has their own account on SMARTWaste
Plan where they store all projects they are working on (for
all of their clients). The contractor then links their project
to a client using a password provided by the client.
The client has their own account where they can view all
their projects linked by their contractors. The client sets
up a password that is given to contractors to set up the
link. The client can then view all their project data from
one location, sorted by contractor then project.
Diagram showing group level account structure
75 of 76
£3000
+VAT
SMARTWaste Plan User Guide V3
Diagram showing client level account structure
Bespoke versions of SMARTWaste Plan
BRE are able to create a bespoke SMARTWaste Plan for you with additional functions or features
that you require. Bespoke versions have their own website which can include branding with your
logo.
Bespoke versions of the tool have currently been created for Bovis Lend Lease, Kier, Marks and
Spencer, National Federation of Demolition Contractors and Sainsbury’s.
For further details and to discuss options and costs please contact us.
Training on how to use SMARTWaste Plan
We run regular training sessions at BRE in Watford which provide an overview of the Site Waste
Management Plan Regulations and detailed interactive workshops on how to use SMARTWaste
Plan. For further details on the programme, dates of forthcoming training sessions and to book your
place online, please visit www.smartwaste.co.uk/page.jsp?id=47
BRE can also provide tailored training for larger groups from one company, either at your premises
or at BRE. Both half day and full day training sessions can be provided. Please get in touch to
discuss this option and associated costs further on 01923 664851 or 01923 664155 or
[email protected].
76 of 76