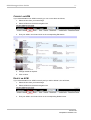
1
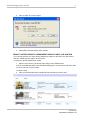
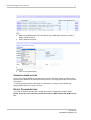
AMS
Step-by-step user guide
ACM Manager
Version 2.00
ACM Manager User Guide
2
Introduction ........................................................................................................................... 5
What’s new in Version 2?................................................................................................... 5
Getting started ................................................................................................................... 5
Developing an Asbestos Management Plan.................................................................... 5
System Requirements........................................................................................................ 6
Support.............................................................................................................................. 6
Starting ACM Manager .......................................................................................................... 7
Starting ACM Manager....................................................................................................... 7
Logging on to the system ................................................................................................... 7
Navigation ......................................................................................................................... 8
Viewing and adding site information....................................................................................... 9
View details of a site .......................................................................................................... 9
Applying a filter............................................................................................................... 9
Update a site’s detail........................................................................................................ 10
Create a new site............................................................................................................. 12
Delete a site..................................................................................................................... 13
Adding ACMs to registers .................................................................................................... 14
Add an ACM .................................................................................................................... 14
Correct an ACM............................................................................................................... 15
Delete an ACM ................................................................................................................ 15
Adding drawings to registers................................................................................................ 17
Add a drawing.................................................................................................................. 17
Change a drawing............................................................................................................ 18
Delete a drawing.............................................................................................................. 19
Adding “no access” details to registers................................................................................. 20
Add “No access” to a register........................................................................................... 20
Change “No Access” in a register..................................................................................... 21
Delete a “No Access” ....................................................................................................... 21
Viewing and updating registers............................................................................................ 23
View a register................................................................................................................. 23
Enter details of completed works...................................................................................... 24
Edit or delete remedial actions that have been carried out ................................................ 26
Enter details of a review or re-inspection that has been carried out................................... 27
How to edit or delete a previously entered site action ....................................................... 28
Version 1.02
Last Updated: 17/01/2007 11:32
ACM Manager User Guide
3
User administration ............................................................................................................. 29
Adding a user to the system............................................................................................. 29
Edit a user’s details.......................................................................................................... 31
Delete a user’s details...................................................................................................... 31
Priority assessment ............................................................................................................. 32
Produce a priority assessment survey report .................................................................... 33
How to enter priority assessment results onto the system................................................. 34
Action plans ........................................................................................................................ 36
Enter planned works ........................................................................................................ 36
Change planned actions .................................................................................................. 37
Delete Planned Actions.................................................................................................... 37
View an action plan.......................................................................................................... 38
Quotes ................................................................................................................................ 40
Enter a quote ................................................................................................................... 42
Change a Quote .............................................................................................................. 43
View/Send a Quote.......................................................................................................... 43
View a list of ACMs in order of material risk...................................................................... 45
View a list of ACMs by priority.......................................................................................... 46
View my site reinspection and review schedule ................................................................ 46
Reviewing ACMs .......................................................................................................... 47
Reinspecting ACMs...................................................................................................... 47
Frequency of reinspections and reviews ....................................................................... 47
How does your report know when reviews and reinspections are due? ......................... 47
View a Compliance report ................................................................................................ 47
Labelled ....................................................................................................................... 48
Priority Assess.............................................................................................................. 48
Action Plan................................................................................................................... 48
Reviewed ..................................................................................................................... 48
Reinspected ................................................................................................................. 48
System settings................................................................................................................... 49
Edit company details........................................................................................................ 49
Edit your personal details................................................................................................. 51
Change Print Settings ...................................................................................................... 52
Change System Defaults ................................................................................................. 53
Useful functions................................................................................................................... 55
Advanced Search ............................................................................................................ 55
Version 1.02
Last Updated: 17/01/2007 11:32
ACM Manager User Guide
4
View your activity log ....................................................................................................... 56
Managers ............................................................................................................................ 57
Login as a manager ......................................................................................................... 57
Add a new customer ........................................................................................................ 58
To change your manager details ...................................................................................... 59
Tenants............................................................................................................................... 61
Login as a tenant ............................................................................................................. 61
View a register................................................................................................................. 61
Add or change a tenant login ........................................................................................... 62
Appendix 1 – ACM fields ..................................................................................................... 63
Room............................................................................................................................... 63
Description....................................................................................................................... 63
Quantity........................................................................................................................... 63
Sample ID........................................................................................................................ 63
Labelled........................................................................................................................... 63
Condition ......................................................................................................................... 63
Surface treatment ............................................................................................................ 64
Material type .................................................................................................................... 64
Asbestos type .................................................................................................................. 66
Accessibility..................................................................................................................... 66
Index................................................................................................................................... 67
Version 1.02
Last Updated: 17/01/2007 11:32
ACM Manager User Guide
5
Introduction
ACM Manager is a software product that provides the user with a number of specialist tools to
make the job of managing asbestos containing materials (ACMs) simpler and quicker. It has
been developed within the AMS group of companies, an organisation with over 10 years
experience of providing asbestos management services. It is aimed at dutyholders who wish
to comply with the Control of Asbestos at Regulations but do not have the time or resource to
commit to the complicated processes involved.
ACM Manager provides tools to simplify all of the following;
Making asbestos condition, location and risk registers easily and securely available to
both internal and external operatives through the Internet.
Viewing details of high-risk materials.
Updating the status of ACMs to ensure that registers are always up-to-date.
Producing concise quote requests that can be sent to contractors for pricing of
remedial works.
For the more committed user the system also provides some more sophisticated tools to do
the following
Plan future actions and produce action plans
Carry out priority assessment surveys
Plan and record site re-inspections and reviews
View compliance reports
The system has been developed using Microsoft .NET technology to provide a user-friendly
interface through your Internet browser.
WHAT’S NEW IN VERSION 2?
The system has a new look and feel and is more menu-driven than before making it simpler to
navigate. It has been changed to look more user-tailored displaying the user’s logo at the top
of each page. The major functionality change is the addition of two more levels of access
known as tenants and managers.
Manager access is aimed at asbestos management companies and property managers
looking to have overall control of their portfolio of companies. It allows you to introduce new
companies and their sites all of which are controlled from a central console screen. The
manager has single password administrator access to all of their client’s data.
Tenant access gives the customer the ability to provide login details that give read-only
access to a single site. This is particularly useful when you want to give a tenant access to
their register but don’t want them to be able to see anybody else’s.
GETTING STARTED
Before you or any of your operatives can use ACM Manager you need to contact our support
department to get a user name and password to enable you to login. Further details on how to
login can be found later in this guide.
Developing an Asbestos Management Plan
Before you start to use ACM Manager we strongly suggest that you develop an Asbestos
Management Plan (AMP). This is a strategy document that will outline exactly how you intend
to manage your asbestos hazard. You might include;
Version 1.02
Last Updated: 17/01/2007 11:32
ACM Manager User Guide
6
How you will make information available to operatives and staff;
How and when you will review and/or re-inspect your ACMs;
How you will determine the priority of remedial works;
Responsibilities;
Procedures to follow when working with asbestos materials;
Training;
We managed to find several good examples of AMPs by searching for “Asbestos
Management Plan” on the internet.
SYSTEM REQUIREMENTS
PC with a 1 Mhz processor or above. 128Mb of RAM, Internet Explorer 5, Internet connection
(1Mb recommended).
To view the reports you will need to have Adobe Acrobat Reader installed. This can be
downloaded from http://www.adobe.com/acrobat.
SUPPORT
If you have any questions or problems while using this user guide please visit the Support
section of ACM Manager at www.acmmanager.co.uk/Support.aspx.
Version 1.02
Last Updated: 17/01/2007 11:32
ACM Manager User Guide
7
Chapter
1
Starting ACM Manager
In this chapter you will learn how to:
Start ACM Manager
Log-in to the system
STARTING ACM MANAGER
To start ACM Manager open your web-browser as you would normally. Type in the Internet
address (URL) www.acmmanager.co.uk and press enter.
LOGGING ON TO THE SYSTEM
1. Click on the customer login button on the top right of the home page.
2. Click on the User name field and type your user name.
3. Tab to the password field and type your password. If you do not have a password or your
password doesn’t work contact our support department immediately.
4. Select the type of login you are attempting.
5. Click on the Login button.
You should now be presented with the Site details screen.
Version 1.02
Last Updated: 17/01/2007 11:32
ACM Manager User Guide
8
NAVIGATION
Navigation has been made simpler by the addition of two new menus. The top (black) menu is
for administration and gives you quick access to the administration, log and support pages
and also a log out button. It also provides a dropdown menu which gives you fast access
(don’t forget to click on the Go button!) to management reports and your asbestos register.
The second menu provides a quick way for administrators and users with update privileges to
switch between different information screens. Read-only users will see these buttons but they
will be disabled as above.
The My Home button (not available to tenants users) will take you back to your home page
which is essentially your main console giving you access to all of your sites
Version 1.02
Last Updated: 17/01/2007 11:32
ACM Manager User Guide
9
Chapter
2
Viewing and adding site information
In this chapter you will learn how to:
View details of a site
Change details of a site
Add a new site
Delete a site
If you have previously entered details of sites or your data has been automatically uploaded
you will be presented with a list of sites. You can view, change or delete any of these sites by
following the instructions in this chapter.
If you are starting afresh or you’ve just had a new survey carried out you can add new sites
by following the instructions in the “Add a new site” section.
VIEW DETAILS OF A SITE
1. You will see that as your cursor hovers over each site it is highlighted in pink. To select a
site simply click on it while highlighted.
Applying a filter
Some users will have several sites under their control and may wish to narrow the site
selection down by applying a filter e.g only view sites that include word meadow.
To apply a filter;
1. Type words that you want included in the site name in the filter box.
2. Click on the go button
Version 1.02
Last Updated: 17/01/2007 11:32
ACM Manager User Guide
10
To remove the filter
1. Delete the text from the filter box
2. Click on the go button.
UPDATE A SITE’S DETAIL
Occasionally some of your site details will change (or will have been entered erroneously) so
you will need to change them.
NOTE: You must have update rights to use this facility.
To update site details
1. Click on the corresponding Edit button.
2. Enter the new details as required
Version 1.02
Last Updated: 17/01/2007 11:32
ACM Manager User Guide
11
3. Click on the Next button.
The site parameters screen will be displayed.
4. Enter site details as required. An explanation on the use of these parameters will be
provided later in this guide.
5. Click on the Next button.
You will be returned to the Site selection screen
Version 1.02
Last Updated: 17/01/2007 11:32
ACM Manager User Guide
12
CREATE A NEW SITE
If you have had a new survey carried out you will need to create a new site (AMS clients will
have automatic data uploads).
To enter a new site go to your home page, and;
1.
Click on the new button.
2.
Enter details as required
3.
Click on the Next button
The site parameters will screen will be displayed. The fields will automatically be filled with
any defaults set for your organisation.
Version 1.02
Last Updated: 17/01/2007 11:32
ACM Manager User Guide
13
4. Fill in the fields as required. If you are not sure about any of the parameters leave
them set as their defaults.
5. Click on Next
NOTE: You will be presented with another Enter Site page. If you do not wish to enter further
details click on the Exit button.
DELETE A SITE
Occasionally you may need to remove sites from your portfolio.
To delete a site;
1. Click on the corresponding Delete button on your Home page.
A confirmation screen will be displayed.
2.
Click on the yes button
You will be returned to the your Home page.
Version 1.02
Last Updated: 17/01/2007 11:32
ACM Manager User Guide
14
Chapter
3
Adding ACMs to registers
In this chapter you will learn how to:
Add an ACM
Correct an ACM
Delete an incorrect ACM
If you are manually entering your asbestos data you will need to add details of each ACM. In
this chapter you can see how to enter, correct and delete ACMs.
NOTE: You should not use the methods described in this chapter to update or delete ACMs
that have changed as a result of remedial works. These methods should only be used to
change ACMs that have been entered erroneously.
ADD AN ACM
To add an ACM to your register
1. Select the relevant site from your Home Page.
2. Click on the ACMs button on the black navigation bar.
3. Click on the New button at the bottom the screen.
4. Enter details as required. Field details can be found in Appendix 1
5. Click on Next.
NOTE: You will be presented with another Enter ACM page. If you do not wish to enter
further details click on Exit.
Version 1.02
Last Updated: 17/01/2007 11:32
ACM Manager User Guide
15
CORRECT AN ACM
If you entered details of an ACM incorrectly you can correct them as follows;
1. Select the site from your Home Page.
2. Select ACMs from the black navigation bar.
3. Find your ACM in the list and click on the corresponding Edit button.
4. Change details as required.
5. Click on Next.
DELETE AN ACM
If you entered details of an ACM incorrectly and you wish to delete it, do as follows;
1. Select the site from your Home Page.
2. Select ACMs from the black navigation bar.
3. Find your ACM in the list and click on the corresponding Delete button.
Version 1.02
Last Updated: 17/01/2007 11:32
ACM Manager User Guide
16
4. Click on the Yes button.
Version 1.02
Last Updated: 17/01/2007 11:32
ACM Manager User Guide
17
Chapter
4
Adding drawings to registers
In this chapter you will learn how to:
Add a drawing
Change a drawing
Delete a drawing
Many surveys will include drawings that indicate where samples were taken. These can be
particularly helpful when trying to identify the location of a hazardous material within a
building. ACM Manager can print several graphics format (JPEG, GIF, TIFF, BMP, PNG,
EXIF, WMF or EMF) images and add them into both the register and the quote request
reports.
ADD A DRAWING
To add a drawing.
1. Select a site from your Home page and go to the drawings screen.
2. Click on New.
3. Click on the Browse button.
4. Navigate to the file you wish to add and click on Open.
Version 1.02
Last Updated: 17/01/2007 11:32
ACM Manager User Guide
18
5. Enter a title
6. Click on Next.
7. If you have more drawings to enter then repeat steps 4-7 otherwise click on the Exit
button.
CHANGE A DRAWING
If you wish to change the title of a drawing or change the picture itself follow the steps below.
To change a drawing;
1. Carry out steps 1 and 2 as above.
2. Click on the corresponding Edit button.
Version 1.02
Last Updated: 17/01/2007 11:32
ACM Manager User Guide
19
3. Enter the new details as required.
4. Click on the exit button.
DELETE A DRAWING
If you wish to delete a drawing you can do so as below.
To delete a drawing;
1. Repeat steps 1 and 2 of Add a Drawing.
2. Click on the corresponding Delete button (on the right-hand side of your screen).
3. Click the Exit button.
Version 1.02
Last Updated: 17/01/2007 11:32
ACM Manager User Guide
20
Chapter
5
Adding “no access” details to registers
In this chapter you will learn how to:
Add no access to a register
Change a no access
Delete a no access
It is common when surveying to find areas that are inaccessible for a variety of reasons.
Maybe a door is locked and the key is not available or maybe an areas, such as a roof,
cannot be safely accessed because of its height. Whatever the reason is you need to record
these areas in your registers so that people are aware that there may be unidentified
hazardous materials present.
ADD “NO ACCESS” TO A REGISTER
To add a “No access” to a register;
1. Select a site on your Home page and go to the No Access screen.
2. Click on the New button
3. Enter details as required.
4. Click on Next.
Version 1.02
Last Updated: 17/01/2007 11:32
ACM Manager User Guide
21
5. If you wish to continue entering No Access details repeat steps 4 and 5. Otherwise
click on the Exit button.
CHANGE “NO ACCESS” IN A REGISTER
If you want to change the “No Access” details in your register follow these steps.
1. .Repeat steps 1 and 2 as above.
2. Click on the Edit button
3. Amend the details as required.
4. Click on Next.
DELETE A “NO ACCESS”
To delete a “No Access”
1. Go into the No Access screen as above.
Click on the corresponding Delete button (on the right-hand side)
Version 1.02
Last Updated: 17/01/2007 11:32
ACM Manager User Guide
22
Version 1.02
Last Updated: 17/01/2007 11:32
ACM Manager User Guide
23
Chapter
6
Viewing and updating registers
In this chapter you will learn how to:
View a register
Enter remedial actions that have been carried out
Edit or delete remedial actions that have been carried out
Enter site actions that have been carried out
Edit or delete site actions that have been carried out.
A major part of complying with CAWR is making your asbestos information available to staff
and operatives that may come into contact with your ACMs. By making these people aware of
the risk you are protecting them and yourself. ACM manager provides registers online in
Adobe Acrobat format (PDF) format and these can be viewed by anyone that you set-up on
the system as a user (see user administration).
It is essential that all of your actions are documented and that asbestos information is
correctly maintained. ACM Manager provides screens that allow you to enter details of any
works that have been carried out at the site as well as any actions such as re-inspections or
reviews.
This chapter assumes that you have reached the Site details screen as documented in the
previous section.
VIEW A REGISTER
Registers contain details of all of the ACMs on your site detailing the condition, location and
risk. The reports are produced in Adobe Acrobat format and must have the free reader
installed before proceeding (most users have it installed).
To view an asbestos register, either;
1.
Go to your summary page and click on the Asbestos Register button, or
2.
Select Asbestos Register from the report dropdown and click on the go button.
The file download dialogue will be displayed.
3.
Click on Open to view the register.
Version 1.02
Last Updated: 17/01/2007 11:32
ACM Manager User Guide
4.
24
Close Adobe |Acrobat reader when finished.
ENTER DETAILS OF COMPLETED WORKS
Under CAWR you are required as a minimum to label all of your ACMs but you may also want
to carry out remedial works to reduce the risk posed by some of the materials. Such works will
often change the condition or surface treatment of the material and thus the risk score.
Therefore it is essential that these actions be recorded so that the site register is up-to-date.
ACM Manager automatically updates the condition and surface treatment of a material once
you have entered an action. It also record the ful history of each ACM in the site register.
To enter a remedial action;
1. Go to the Completed Works screen and click on the new button.
2. Click on the new button.
Version 1.02
Last Updated: 17/01/2007 11:32
ACM Manager User Guide
25
3. Select an ACM from the dropdown list
NOTE 1: If an ACM has previously been ‘removed’ it will still appear in the list in case
you wish to delete the action where it was entered erroneously.
NOTE 2: If a planned action has been entered for this ACM the relevant fields will
automatically be set to this action.
4. Select the action that was carried out from the dropdown list.
Version 1.02
Last Updated: 17/01/2007 11:32
ACM Manager User Guide
26
5. Enter the date that the action was carried out (dd/mm/yy format).
6. Enter the name or the individual or organisation that carried out the action
7. Enter any comments
8. Click on Next.
EDIT OR DELETE REMEDIAL ACTIONS THAT HAVE BEEN CARRIED OUT
Occasionally you may enter details of remedial actions incorrectly or erroneously and you will
need to change them.
To edit a remedial action;
1. Select Completed Works.
2. Click on “A remedial action on an ACM that has already been carried out”
3. Click on the Edit button that corresponds to the action you wish to edit.
Version 1.02
Last Updated: 17/01/2007 11:32
ACM Manager User Guide
27
4. Amend the details as required.
5. Click on the Next button.
To delete an action;
1. Select Actions.
2. Click on “A remedial action on an ACM that has already been carried out”
3. Click on the Delete button that corresponds to the action you wish to edit.
ENTER DETAILS OF A REVIEW OR RE-INSPECTION THAT HAS BEEN
CARRIED OUT
CAWR obligates duty-holders to periodically review the status of their ACMs to ensure that
their condition has not deteriorated in any way. This can be done through an internal review
or by using an external operative to re-inspect. All such actions should be documented and
ACM Manager provides screen to do this.
1. Go to the reviews & re-inspections page and Click on New.
2. Select an action from the dropdown
3. Enter the date the action was carried out (dd/mm/yyyy)
4. Enter the name of the individual or organisation that carried out the action.
5. Enter any comments.
6. Click on the submit button.
Version 1.02
Last Updated: 17/01/2007 11:32
ACM Manager User Guide
28
HOW TO EDIT OR DELETE A PREVIOUSLY ENTERED SITE ACTION
Occasionally you will incorrectly or erroneously enter a re-inspection or review that will need
to be either edited or removed.
To edit a site action;
1. Go to the re-inspections & review screen and click on the Edit button that
corresponds to the action that you wish to change.
2. Enter the changes as required
3. Click on the submit button.
To delete a review or re-inspection;
1. select Re-inspections/reviews and click on the Delete button that corresponds to the
action that you wish to delete.
Version 1.02
Last Updated: 17/01/2007 11:32
ACM Manager User Guide
29
Chapter
7
User administration
In this chapter you will learn how to:
Add new users
Edit user details
Remove users
User administration is a very important task because it controls who accesses the system and
what level of access they have. ACM Manager has three levels of user for a customer login;
Administrator
Update
Read-only
Administrators
Administrators have a full set of privileges and are able to do anything on the system. There is
only one administrator and only this user can add, edit or remove other users.
Update
Update users have considerably less privileges than the administrator but they are able to
perform any action that will update registers. You should take care who you give these
privileges as the integrity of your data is essential to complying with CAWR.
Read-only
These users are limited to read-only access to the system. This allows them to vew reports
such as registers but they can’t update anything.
ADDING A USER TO THE SYSTEM
As new people or operatives who are likely to manage or come into contact with ACMs join
your organisation you will need to give them some sort of access to ACM Manager. Some
organisations will provide a single guest account that everybody has the password for. Some
will assign user names to everybody. But whichever way you choose please bear in mind the
following;
1. When a register is accessed the user name is logged. Some organisations may wish
to use this information as mitigation following exposure to asbestos and it would
therefore be essential that you were able to prove who viewed it.
2. Should the login information fall into the wrong hands you will not be able to trace the
security leak (asbestos information can be sensitive).
You should also consider at this point whether you would like to give update privileges to the
user. Please be aware that this will allow the user to apply potentially damaging changes and
should therefore be given sparingly.
To add a new user;
1. Click on the administration button
2. Click on the edit button in the user section
Version 1.02
Last Updated: 17/01/2007 11:32
ACM Manager User Guide
30
2. Click on the New button
3. Enter details of the users as required.
4. Click on Next.
Version 1.02
Last Updated: 17/01/2007 11:32
ACM Manager User Guide
31
5. You will now be presented with this screen again. At this stage you can either enter
further user details as above or click on the Exit button.
EDIT A USER’S DETAILS
As user’s change their details you will want to update them on the system.
To edit a user’s details;
1. Click on the administration button.
2. Click on the Edit button in the user section;
3. Click on the edit command that corresponds to the user that you wish to edit.
4. Enter the changes as required.
5. Click on the next button.
DELETE A USER’S DETAILS
There is a variety or reasons why you may wish to remove a user’s details from the system.
For example, the user may have left the company or have been moved to a different
department.
To delete a user;
1. Click on the administration button.
2. Click on the edit button in the Users section.
3. Click on the delete button that corresponds to the user that you wish to delete.
Version 1.02
Last Updated: 17/01/2007 11:32
ACM Manager User Guide
32
Chapter
8
Priority assessment
In this chapter you will learn how to:
Produce a priority assessment survey report
Enter the results onto the system
Many users, especially smaller organisations, of this system will never get this far in their use
of ACM Manager. They will simply use the system to view, update and distribute their
asbestos registers. For those that wish to be fully compliant there are further steps that you
will need to take starting with priority assessment.
Priority assessment is essentially a way of determining the order in which ACMs need to be
dealt with. It is particularly useful for large organisations that do not have the resources to
carry out all of the necessary actions in one go.
ACM Manager provides three options for priority assessment;
None;
Develop your own , and;
HSE.
None (default)
Some duty-holders will decide that the priority of their remedial works is determined simply by
the material risk. This will particularly suit smaller organisations that do not have any
significant works to be carried out and therefore have little need for priority assessment.
Own
Those organisations that have a significant number of works to be carried out may want to
develop a system of prioritisation. This will, of course, consist of varying factors not least of
which will probably be cost. It is, of course, essential that you consider the risk that the
material poses when developing your system and continue to take all actions necessary to
safeguard your staff and operatives until remedial works are carried out. This in itself could be
costly and will often determine the priority (e.g if an area was permanently cordoned-off).
ACM Manager simply gives you the ability to assign each ACM a score of 1-12 so your
system will need to take this into account. When ACM Manager uses priority assessment in
its calculations it will simply add the material assessment score to the priority assessment
score to get a total score.
HSE
The HSE have developed a priority assessment algorithm which they have published in their
book HSG227 “A comprehensive guide to managing asbestos in premises”. This is a useful
tool if a little complicated to understand. Essentially they have decided upon a number of
factors to which they assign scores and these are averaged by section and combined to form
a final priority assessment score (of 0-12). Some organisations will find this useful, which is
why we’ve included it in ACM Manager. We would urge you to read the above publication first
though to get a better understanding of exactly what is involved.
For those using this method we have provided a survey report that will print a tick sheet per
ACM for you to complete.
Version 1.02
Last Updated: 17/01/2007 11:32
ACM Manager User Guide
33
PRODUCE A PRIORITY ASSESSMENT SURVEY REPORT
If you are using the HSE priority assessment algorithm we have added a report that should
assist you to record your results. There is one tick-sheet per ACM that should be filled in
accordingly.
To run the priority assessment survey report;
1. Go to the site summary screen and click on Priority Assessment Survey.
NB: If the button is greyed out you will need to get your administrator to change the site
priority assessment parameter from “none”.
Version 1.02
Last Updated: 17/01/2007 11:32
ACM Manager User Guide
34
2. Click on Open to view the report.
3. Close Adobe Acrobat reader when finished.
HOW TO ENTER PRIORITY ASSESSMENT RESULTS ONTO THE SYSTEM
If you are using either your Own priority assessment system or the HSE’s you will need to
enter the results onto the system at some point.
To enter your priority assessment results;
1. Select a site from the your Home page and go to the ACMs screen.
A list of the ACMs identified at this site will be displayed. You will need to edit each ACM
for which you wish to enter results.
To edit an ACM;
2. Click on the edit button that corresponds with the ACM you wish to edit.
Version 1.02
Last Updated: 17/01/2007 11:32
ACM Manager User Guide
35
Scroll down to the priority assessment section. The layout of the dropdowns will be dependant
on the site setting for priority assessment. I.e if you have set Priority Assessment to None,
none of the dropdowns will be available and if you’ve set it to Own only the Priority
Assessment dropdown will be available.
3. Select values from the dropdowns as required.
4. Click on Next
Repeat steps 3-5 until all details have been entered.
5. Click on Exit.
Version 1.02
Last Updated: 17/01/2007 11:32
ACM Manager User Guide
36
Chapter
9
Action plans
In this chapter you will learn how to:
Enter planned actions
Change planned actions
View an action plan
Now that you have registers in place and have assessed the priority of the works that need to
be done you need to plan the works. By recording planned actions you will be satisfying one
of the major obligations under CAWR, which is to produce action plans. Few organisations
have the resources to carry out all necessary works immediately so it is essential that you
produce a plan.
ACM Manager allows you to assign planned actions, actionees and planned dates to all
ACMs. As a minimum all ACMs must be labelled but some will require further remedial works
to make them safe to be around. It is not always easy to work out what action is required.
The majority of your ACMs will most likely be in a good condition and therefore labelling is
likely to be adequate. But how do you label a fuse sitting on a windowsill? The answer of
course is that you don’t, you take an alternative action that is likely, in this example, to be safe
disposal. ACM Manager does provide recommended actions for each ACM that will give you
good guidance on what to do and in the majority of cases it will be easy to calculate the
correct action. Occasionally though you will have to make decisions based on other factors
such as;
Cost;
Risk;
Disruption;
The most important thing here is that you carry out whatever work is feasible and manage the
risk from the ACMs where it isn’t. So, for example, if you’ve got a 500m2 badly damaged
cement roof that is going to cost you £30,000 to replace you might decide that you can’t afford
to replace it but you’ll just make sure that nobody accesses it unless wearing protective
equipment. Or you might decide to replace only the damaged panels. If you are unsure then
you should seek advice (your surveying company will probably be pleased to help).
ENTER PLANNED WORKS
Once you’ve decided upon the actions that you are going to take you will need to enter them
onto the system.
To enter a planned action;
1. Select a site from your Home page and go to the panned works screen.
Version 1.02
Last Updated: 17/01/2007 11:32
ACM Manager User Guide
37
2. Select the Add/Edit button that corresponds to the ACM against which you want to
assign a planned action.
3.
Enter details as required.
4. Click on the submit button.
CHANGE PLANNED ACTIONS
Once you’ve entered details of planned actions you will most likely need to go back at some
point and enter details of the actionee and action date or you might just need to correct some
of the detail.
To change a planned action follow steps 1 to 6 as above. In step 5 you will update the
existing details rather than enter new ones.
DELETE PLANNED ACTIONS
If you wish to delete a planned action simply click on the corresponding “Delete” button.
NOTE: This action will only blank out the action field. It WON’T delete the ACM from the
list.
Version 1.02
Last Updated: 17/01/2007 11:32
ACM Manager User Guide
38
VIEW AN ACTION PLAN
Once you have entered details for all of the actions that you are proposing to carry out you
may want to view your action plan. There are two types of action plan report available; one for
the whole organisation and one for each individual site.
To view an action plan for your whole organisation;
1. Select “Action Plan” from the reports dropdown and clik on the Go button.
2. Click on Open
3. Close Adobe Acrobat reader when finished.
To view a site organisation plan;
1. Go to the Summary page and click on the action plan button.
2. Click on Open
Version 1.02
Last Updated: 17/01/2007 11:32
ACM Manager User Guide
39
3. Close Adobe Acrobat reader when finished.
Version 1.02
Last Updated: 17/01/2007 11:32
ACM Manager User Guide
40
Chapter
10
Quotes
In this chapter you will learn how to:
Enter a quote
Change a quote
View and send a quote
Many organisations will need to go and get quotes for remedial works. ACM Manager
allows the user to create a customized quote request report in Adobe format that can be
sent to a prospective contractor.
Quote report page extracts
Version 1.02
Last Updated: 17/01/2007 11:32
ACM Manager User Guide
41
Version 1.02
Last Updated: 17/01/2007 11:32
ACM Manager User Guide
42
ENTER A QUOTE
When you are at the stage to send out quote requests you must first consider exactly what
works you are going to have carried out and whom you want to quote for them. There are
strict guidelines on who can carry out work on asbestos materials and you should familiarise
yourself with these (further information and a list of licensed contractors is available at
http://www.hse.gov.uk/asbestos).
To enter a quote request;
1. Select a site from your Home page and go to the Quotes screen.
2. Click on the New button.
3. Enter a quote title and details of the person managing the job.
Version 1.02
Last Updated: 17/01/2007 11:32
ACM Manager User Guide
43
4. If you wish to remove an ACM from the quote click on the corresponding “-“ button
(you can also click on the Remove All button to remove all of the ACMs)
5. You will not be permitted to send a quote request until an Action has been assigned
to each ACM within the request. To edit an ACM and assign an action click on the
Edit button.
6.
To save the quote click on the Submit button.
CHANGE A QUOTE
If you wish to update a quote you can do.
To change a quote;
1. Repeat steps 1 and 2 as above.
2. Click on the corresponding View/Edit button
3. Amend details as required.
4. Click on the submit button.
VIEW/SEND A QUOTE
The quote report is in Adobe PDF format and will be opened by Acrobat Reader. This
software has several file options available including Emailing or printing and enables you to
send the quote request to your chosen contractors either as an electronic or hard-copy.
Version 1.02
Last Updated: 17/01/2007 11:32
ACM Manager User Guide
44
To view a quote.
1. Select a site.
2. Click on Quotes.
3. Click on the corresponding view/edit button.
4. Click on the view button.
5. Click on Open.
6. Print or Email the document as required.
7. Close Adobe Acrobat Reader
Version 1.02
Last Updated: 17/01/2007 11:32
ACM Manager User Guide
45
Chapter
10
Reports
In this chapter you will learn how to:
View a list of ACMs in order of material risk
View a list of ACMs in order of priority
View your organisation’s reinspection and review schedule
View your CAWR compliance status
In some organisations there will be many sites and ACMs that need to be managed. In these
cases it is often handy to have reports that give an overview of what needs to done, when and
by whom. ACM Manager provides four such reports (as well as the organisational Action Plan
that we saw in chapter 6) as detailed above.
VIEW A LIST OF ACMS IN ORDER OF MATERIAL RISK
This report will be particularly useful to large organisations that have to manage many
buildings because it shows exactly which ACMs are an immediate danger to those working in
close proximity. This will help such organisations to deal with high-risk ACMs as a priority.
To view this report simply “High risk ACMs” from the reports dropdown and click on Go.
Version 1.02
Last Updated: 17/01/2007 11:32
ACM Manager User Guide
46
VIEW A LIST OF ACMS BY PRIORITY
In Chapter 5 we talked about the importance of priority assessment in some organisations. If
yours is such an organisation you will probably want to see your ACMs organised by priority
assessment and this report does just that.
To view this report simply select “ACMs by Priority” from the reports dropdown and click on
the Go button.
In this example some ACMs that would normally be classed as low risk have become high
priority because the priority assessment algorithm in use by this client classifies them as
needing urgent attention.
VIEW MY SITE REINSPECTION AND REVIEW SCHEDULE
As a minimum all dutyholders are required to check the condition of their ACMs regularly to
ensure that it has not altered significantly. This ensures that materials have not become a risk
since the last inspection. There are two ways to achieve this; review and reinspection. ACM
Manager provides a Review and Reinspection schedule report so that you can clearly see
what is outstanding.
To view this report simply select Site Schedule from the reports dropdown and click on the Go
button.
Version 1.02
Last Updated: 17/01/2007 11:32
ACM Manager User Guide
47
Reviewing ACMs
Reviewing of ACMs is something that can be carried out by the dutyholder or those appointed
by them. Essentially it is a walk around to visually assess whether or not the condition of an
ACM or its accessibility has changed. For example, you might have a situation where an ACM
was considered low risk because it was located in a room that wasn’t in use. However, since
the last inspection the cleaners have started to use the room for storage. In this instance your
priority assessment may have increased and thus when you enter the new details into the
system the risk increases and falls within your parameters of materials that need attention. A
review is simply a quick check to make sure that nothing significant has changed with your
ACM. You should not though that a review is a visual assessment only, you should not touch
the ACMs or enter areas where it would not be safe to do so.
Reinspecting ACMs
Reinspection is very similar to review but should be carried out by a qualified person (typically
the same person or organisation that performed the survey). Essentially it is a full visual
assessment of your material as would be performed in a non-intrusive survey (such as a Type
1). The condition and accessibility of ACMs is expertly reassessed ensuring that you have an
accurate picture of your asbestos hazard.
Frequency of reinspections and reviews
There is no definitive frequency for either and it needs to be decided on an individual basis.
You may have one site that has 10 very low risk ACMs present that you decide you will
reinspect every two years but another which has 3 medium risk ACMs you will reinspect every
year. The same principle applies to reviews.
As a guide we suggest reviewing at least twice a year and reinspection every 18 months for
sites that contain a high number of ACMs.
How does your report know when reviews and reinspections are
due?
In Chapter 2 you will have seen how to change details for a site. The reinspection and review
frequency parameters are set here. If you didn’t set this or change it, it will have defaulted to
whatever is set in your Site Parameters. You will see how to change these parameters in
subsequent chapters.
VIEW A COMPLIANCE REPORT
For those organisations using ACM Manager to fully comply with CAWR it is not always
obvious where you are not compliant. This report clearly shows which areas of CAWR you
are satisfying and which you are not.
To view a compliance report simply select “Compliance Report” from the reports dropdown
and click on Go.
Version 1.02
Last Updated: 17/01/2007 11:32
ACM Manager User Guide
48
Labelled
The labelled column indicates whether your ACMs have been labelled as containing asbestos
fibres. Under CAWR dutyholders must ensure that all materials that have been identified as
containing asbestos are labelled as so. If you have done so then you need to enter the
information into ACM Manager by adding a “remedial action that has been carried out” to
each ACM (see chapter 3).
A typical asbestos hazard warning label
Priority Assess
This column indicates whether a priority assessment has been carried out at the site. If the
site default for Priority Assessment is None then a tick will always appear in this column
otherwise you will need to carry out an assessment and enter the results (see chapter 5).
Action Plan
This column indicates whether an action plan has been prepared for the site. To prepare an
action plan you need to enter planned actions against your ACMs (see chapter 7). The report
checks if ACMs with a Medium Risk or higher (material assessment > 6) have planned
actions.
Reviewed
This column indicates whether a review has been carried out at the site. The report calculates
when a review is due by adding the review frequency to the date of the last review (or
survey). If a review is outstanding this column will show a red cross (fail).
Reinspected
As above, but for reinspection.
Version 1.02
Last Updated: 17/01/2007 11:32
ACM Manager User Guide
49
Chapter
11
System settings
In this chapter you will learn how to:
Edit company details (including logo)
Edit personal details
Edit print settings
Edit the system defaults
There are a number of system settings that are held in the ACM Manager database many of
which can be changed by the administrator. All of the above settings are changed within the
administration section.
To enter the administration section click on the administration button on the administration
(black) menu.
EDIT COMPANY DETAILS
The company details parameters include the address and corporate logo.
To change these details.
1. Enter the administration area as above.
2. Click on the Edit button in the Company Details section.
3. Enter the new details as required.
Version 1.02
Last Updated: 17/01/2007 11:32
ACM Manager User Guide
50
4. To enter a new logo clcik on the browse button and navigate to the file you want and
select Open.
Version 1.02
Last Updated: 17/01/2007 11:32
ACM Manager User Guide
51
5. Click on the Submit button.
EDIT YOUR PERSONAL DETAILS
If you wish to change your password or any other personal details you can do so.
To change your personal details;
1. Enter the administration area.
2. Click on the Edit button in the Personal Details section.
3. Enter your new details as required.
Note: If you want to enter a new password you must ensure that you enter a matching
password in the repeat password field.
Version 1.02
Last Updated: 17/01/2007 11:32
ACM Manager User Guide
52
4. Click on the Next button.
CHANGE PRINT SETTINGS
The “Important Notes” section in the register is intended to provide a way of adding your own
set of organisation specific notes, warning and caveats. At present this is the only print setting
held within the ACM Manager database.
To change the important notes;
1. Enter the administration area.
2. Click on the Edit button in the Print Setting section.
3. Enter your new settings as required.
Version 1.02
Last Updated: 17/01/2007 11:32
ACM Manager User Guide
53
4. Click on the Submit button
CHANGE SYSTEM DEFAULTS
Your system defaults are stored by ACM Manager and used as default values when creating
new sites.
To change your system defaults;
1. Enter the administration area.
2. Click on the Edit button in the System Defaults section.
3. Enter your details as required.
Version 1.02
Last Updated: 17/01/2007 11:32
ACM Manager User Guide
54
4. Click on the Submit button.
Version 1.02
Last Updated: 17/01/2007 11:32
ACM Manager User Guide
55
Chapter
12
Useful functions
In this chapter you will learn how to:
Advanced search
View the activity log
This section describes some of the functions in ACM Manager that you may find useful.
ADVANCED SEARCH
In some of the larger organisations using ACM Manager just finding a site can be a painful
experience which is why we’ve included an advanced search that gives you a but more
flexibility. With this function you search by;
Client ref
Address
Post code, or;
County
The “client ref” field allows the user to assign a generic description to a register so that it can
be used for all buildings that fall into that category i.e 1953 Flat roof 3 bed semi. This is often
used by housing authorities to minimise the number of surveys that are carried out.
To carry out an advanced search;
1. Click on the advanced search button on the Site Selection Screen.
2. Enter your search fields as required.
3. Click on the search button.
Version 1.02
Last Updated: 17/01/2007 11:32
ACM Manager User Guide
56
4. If the search is successful you can select one of the site options as required.
VIEW YOUR ACTIVITY LOG
The activity log is particularly useful and can be used to;
Monitor register access
Find when something was changed
Check for unauthorised access attempts
To view the log;
1. Click on the log button on the administration (black) menu.
2. Page through the log using the scroll button on the right.
3. Click on the Exit button when you have finished.
Version 1.02
Last Updated: 17/01/2007 11:32
ACM Manager User Guide
57
Chapter
13
Managers
In this chapter you will learn how to:
Login as a manager
Select a customer
Add a new customer
Change your details
Version 2 of ACM Manager introduces the idea of a Manager login. The objective of a
manager login is to give asbestos management companies and property managers a platform
to provide their customers with online registers that can be controlled from a single manager
screen.
In version 1 a survey company will have had to buy a license for every one of their customers
and would have had to store details of a username and password for each. This was both
expensive and time-consuming and the manager login overcomes these obstacles.
A manager login can be supplied by contacting Support.
LOGIN AS A MANAGER
To login as a manager click on the customer login button at the top of the screen.
1. Enter your username and password as supplied by our Support department.
2. Select Manager from the dropdown and
3. Click on the login button.
You will be presented with a list of the customers under your control known as the
Management Summary view. You will notice that a Manager View button is available on your
administration (black) menu and this will return you to this screen whenever pressed.
SELECT A CUSTOMER
1. To select a customer simply hover over the site you wish to select and then click.
Version 1.02
Last Updated: 17/01/2007 11:32
ACM Manager User Guide
58
By selecting a customer you will be logged into their account as an administrator and have
the power to do anything you wish to such as change their details or add ACMs.
ADD A NEW CUSTOMER
As a manager you will need to add new customers as you add them to your portfolio.
To add a new customer.
1. Click on the New Customer button.
2. Enter details as required.
3. Click on Next
Version 1.02
Last Updated: 17/01/2007 11:32
ACM Manager User Guide
59
4. Click on Next.
You will be returned to the Manager Summary screen. To add ACMs simply click on the
site and follow the instructions in this guide.
TO CHANGE YOUR MANAGER DETAILS
1. Go to your Manager Summary screen and click on the Edit my Details button.
2. Insert changes as required.
Version 1.02
Last Updated: 17/01/2007 11:32
ACM Manager User Guide
60
3. Click on the submit button.
You will be returned to the manager summary.
Version 1.02
Last Updated: 17/01/2007 11:32
ACM Manager User Guide
61
Chapter
14
Tenants
In this chapter you will learn how to:
Login as a tenant
View your register
Add or change a tenant
Version 2 introduces the tenant login that is aimed at providing staff and dutyholders at sites
within large portfolios with quick and easy access to their asbestos register. This allows the
property portfolio manager to maintain discretion where necessary such as in a Local
Authority where you don’t want Mrs Jones seeing Mr Smith’s asbestos register.
LOGIN AS A TENANT
To Login as a tenan.
1. Go to the login screen by clicking on the customer login button at the top right of your
screen.
2. Enter your username and password in the correct fields.
3. Select “Tenant” from the type dropdown.
2. Click on the submit button.
You will now be take to the Summary screen for your property.
VIEW A REGISTER
To view a register.
1. Click on the Asbestos Register button, or;
2. Select Site Register from the reports dropdown on the administration (black) menu
and clik on Go.
Version 1.02
Last Updated: 17/01/2007 11:32
ACM Manager User Guide
62
To exit click on the logout button.
ADD OR CHANGE A TENANT LOGIN
Administrators can add or change a tenant login. To do so enter or change site details as
detailed previously in this guide and enter a tenant username and tenant password.
Version 1.02
Last Updated: 17/01/2007 11:32
ACM Manager User Guide
63
Appendix 1 – ACM fields
FLOOR
st
The name of the floor where the material was identified i.e 1 floor.
ROOM
The name of the room where the material was identified i.e Kitchen
DESCRIPTION
A basic description of the material i.e Textured coating on ceiling, pad under sink, lining to
cupboard, etc.
QUANTITY
This consists of two fields, the first is a measurement and the second indicates the type that
can be one of SQM (square metres), LM (linear metres), No. or space.
SQM should be used for materials that cover a wide area such as boarding, textured coating
or tiles. Example 5 SQM
LM should be used for materials that are long and narrow and indicates the length in metres.
Typical materials that this applies to would be pipe lagging and rope seals.
No. should be used for objects such as sink pads, gaskets and blankets and indicates the
number of these objects that were discovered in this area. So for example if you found 12
gaskets lying in a pile you would use 12 No.
Finally you can free type something in the first field such as Throughout and select the space
for the second field. An example of this might be where debris has been found throughout a
boiler room.
SAMPLE ID
The identifier that survey companies use to uniquely identify each sample they take i.e
FG/010906/08.
LABELLED
Indicates whether the ACM has been labelled to identify the presence of asbestos.
CONDITION
Condition
Description
Good
No visible damage
Low damage
A few scratches or surface marks; broken edges on boards, tiles etc.
Medium
Significant breakage of materials or several small areas where material has
been damaged revealing loose asbestos fibres.
High
High damage or delamination of materials, sprays and thermal insulation.
Visible asbestos debris.
Unknown
Used when the surveyor has presumed the presence of ACMs but cannot
actually see the material. I.e where a surveyor has found a electrical
fusebox and can only presume that it contains asbestos fuseguards
Version 1.02
Last Updated: 17/01/2007 11:32
ACM Manager User Guide
64
because the fusebox is live.
SURFACE TREATMENT
Surface
Description
Encapsulated/sealed
The material is boxed, painted, papered or protected in some way.
Composite
The material is a composite such as a plastic, resin or vinyl product.
Unsealed
The material has at least one surface where fibres are exposed.
Unknown
Used when the surveyor has presumed the presence of ACMs but
cannot actually see the material. I.e where a surveyor has found a
electrical fusebox and can only presume that it contains asbestos
fuseguards because the fusebox is live.
Not applicable
The surveyor is presuming that the material is not asbestos (you have
the option to enter non-asbestos materials)
MATERIAL TYPE
Material
adhesive
Tile adhesives
textured coating and board
Textured coating (Artex) painted onto board
bitumastic adhesive
A bitumen mastic used as an adhesive (often for ceramic
floor tiles)
bitumastic adhesive & paper
Asbestos paper painted with bitumastic adhesive
bitumastic product
Any other bitumen mastic product
bitumen
Bitumen products suck as acoustic sink pads.
bitumen adhesive
See bitumastic adhesive.
bitumen product
See bitumen.
bitumen with board
Bitumen over board.
board
Asbestos cement board.
board with textured coating
Asbestos cement board painted with textured coating.
cement board
Cement board
cement & bitumen
Cement board painted with bitumen.
cement & paper
Cement board covered with asbestos paper.
cement debris
Debris from damaged cement product
cement product
Cement product such as rainwater goods or profiled roof
sheet.
cement product & textile
Cement product covered with asbestos textile.
cement residue
Residue created by drilling or sanding cement product.
cement with spray coating
Cement product covered with an asbestos spray coating
composite
Composite asbestos material.
Version 1.02
Last Updated: 17/01/2007 11:32
ACM Manager User Guide
65
debris
Debris from unknown or mixed asbestos material(s).
dust
Dust from unknown or mixed asbestos material(s).
felt
Roofing felt
fibrous dust
See dust
fibrous wool
Fibrous wool such as packing
floor covering
Roll floor covering (see also linoleum).
floor tile
Tiled floor covering
flooring
Flooring product that does not come in rolls or tiles.
friction product
Product that is used to protect a material against friction
such as a brake pad.
galbestos
Galvanised metal backed with asbestos cement
gasket
Gasket
heavy duty paper tile
Heavy duty paper tile
insulation
Insulation product such as lagging.
insulation board
Asbestos insulation board (AIB)
insulation board debris
Debris from damaged asbestos insulation board
insulation residue
Residue from drilled or sanded asbestos insulation board
lagging debris
Debris from damaged insulation.
linoleum
Linoleum
mastic
Mastic
mastic product
Mastic product
mastic seal
Mastic seal
packing
Packing used for insulation, often found under floors and in
roof voids.
paint
Paint
paper
Paper
paper backing
Paper backing used as fireproofing
paper lining
Paper lining used as fireproofing
paper packing
Paper packing
plaster
Plaster
plastic & bitumen
Bitumen backed or painted plastic product (such as tile)
plastic & bitumen adhesive
Bitumen adhered plastic product.
plastic & paper
Paper backed plastic product
plastic & plastic
Combination of plastic products
plastic product
Plastic product such as toilet cistern.
putty
Putty
Version 1.02
Last Updated: 17/01/2007 11:32
ACM Manager User Guide
66
residue
Residue from unknown or mixed materials
residue on paper
Residue from unknown or mixed materials stuck to paper
residue on felt
Residue from unknown or mixed materials stuckto felt
roofing
Roofing material such as tile
rope
Rope such as rope seal around an oven door.
rubber product
Rubber
slate
Roofing slate
spray coating
Sprayed asbestos coating
textile
Textile such as a blanket, oven glove, pan mat.
textile gasket
Gasket created from asbestos textile.
textured coating
Textured coating (also known as Artex).
textured coating with AIB
Textured coating painted onto asbestos insulation board.
timber
Timber
unknown
Survey has not been able to identify the material
ASBESTOS TYPE
Asbestos type
Chrysotile, crocidolite, amosite,
etc
Asbestos type as identified by a UKAS laboratory.
Presumed as asbestos
Surveyor has not been able to access the material and has
therefore presumed that it contains asbestos.
No asbestos detected
The material does not contain asbestos.
Where the report has identified the presence of other
amphibole asbestos such as anthophyllite, tremolite and
actinolite use amosite.
ACCESSIBILITY
High
The ACM is highly accessible when in the room. I.e textured coating,
boarding.
Medium
The ACM is fairly hard to get to. I.e it’s a gasket.
Low
The ACM is not easily accessible in the room i.e its in a locked cupboard
Unlikey
It is very unlikely that the ACM will be accessed i.e it’s in the middle of a
motor.
Version 1.02
Last Updated: 17/01/2007 11:32
ACM Manager User Guide
67
Index
A
ACMs · 14
Add an ACM · 14
Correct an ACM · 15
Delete an ACM · 15
Actions
Action plan report · 38
Change planned actions · 37
Edit or delete remedial actions · 26
Edit or delete site actions · 28
Enter a remedial action · 24
Enter a site action · 27
Enter planned actions · 36
Plans · 36
Advanced Search · 56
Asbestos Management Plan · 6
Asbestos warning label · 48
D
M
Manager
Login as a manager · 58
Managers · 58
N
No Access · 20
Adding · 20
Changing · 21
Deleting · 21
P
Priority assessment · 32
Entering onto the system · 34
Survey report · 33
Types · 32
Drawings · 14, 17
Adding · 17
Changing · 18, 19
Q
F
Quotes · 40
Change · 43
Entering · 42
Report page extracts · 40
Sending · 43
filter · 9
Frequency of reinspections and reviews · 47
G
Getting started · 5
I
Important notes · 53
Introduction · 5
L
Log · 57
Logging on · 7
Logo · 50
R
Registers · 23
Add site actions · 27
Enter a remedial action · 24
Enter or delete remedial actions · 26
Important notes · 53
View · 23
Reports · 45
ACMs by Priority · 46
ACMs by risk · 45
Compliance · 48
Site schedule · 46
S
Site · 9
Create · 12
Version 1.02
Last Updated: 17/01/2007 11:32
ACM Manager User Guide
Delete · 13
Edit or Delete site actions · 28
Reinspections · 47
Reviews · 47
Update · 10
View details of · 9
Starting ACM Manager · 7
Support · 6
System Requirements · 6
System settings · 50
Change company details · 50
Change personal details · 52
Change print settings · 53
System defaults · 54
68
T
Tenants · 62
Login as a tenant · 62
View a register · 62
U
Useful functions · 56
Users · 29
Adding · 29
Changing · 31
Deeting · 31
Types · 29
Version 1.02
Last Updated: 17/01/2007 11:32