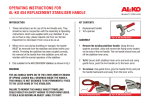
1
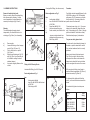
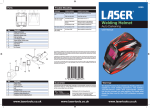
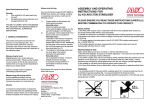
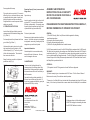
Secure gaiter with tie wrap.
Removing Security Cover (reverse order to
fitting cover):
Put security device on and lock. If the cover is
difficult to put on or lock/unlock then you need
to reposition the locking plates. Loosen front
bolt and the plates can now move laterally.
Re-tighten bolts to correct torque and check if
safety cover now fits.
Open dust cap.
Insert key and turn to the right, as far as it will
go (about 600). As a result the lock cylinder
will slide up automatically. If necessary, press
the safety cover forward and pull out the lock
cylinder with the key (turned about 600).
2. OPERATING INSTRUCTIONS:
Insert left and right lugs of safety cover into
cutaway portion of the attached locking plates
(Fig. 7/Item 2).
Pull security device back.
Remove security device and stow in vehicle or
caravan. So that the dust cap is not damaged
during transit, remove key (inserting lock) and
swing dust cap over the lock cylinder.
Push security device firmly forward until it can
go no further (Fig. 8/Item 1).
Hold security device in place, turn key to the
right and press the lock cylinder in, until it
clicks into place (Fig. 9). Turn the key to the
left into the locked position. The strain bolt
then moves out and locks.
Important Information:
Never attempt to fix or remove the security
device with the aid of a hammer - this may
result in damage to the cover.
Swing the dust cap over the lock cylinder to
protect from dirt (Fig. 9).
3. MAINTENANCE
.Clean strain bolt, locking bolts and the
cutaway portion in the locking plates if they
become dirty. A little grease may be applied
but remove excess with a cloth so that only a
thin film remains.
Fig. 7
Operate the locking cylinder periodically, if
the cover has not been used for a while. If
the lock only operates with difficulty, spray the
cylinder with WD 40 (or similar).
Fig. 8
ASSEMBLY AND OPERATING
INSTRUCTIONS FOR AL-KO SECURITY
DEVICE FOR AK160/300 COUPLINGS &
AKS 1300 STABILISER.
PLEASE ENSURE YOU READ THESE INSTRUCTIONS CAREFULLY,
BEFORE COMMENCING TO OPERATE THIS PRODUCT.
GENERAL:
1) The AL-KO Security (Hitch Lock) Device is effective against the following
unauthorized operations:
a) Uncoupling from the towing vehicle
b) Coupling onto another towing vehicle
c) Theft of the Coupling/Stabiliser from the trailer/caravan.
2) AL-KO recommends the use of the AL-KO Safety Ball to complement the AL-KO Security.
The Safety ball is inserted into the coupling area of the Stabiliser, before the AL-KO Safety is
locked into position (Fig. 1). This prevents your caravan from being coupled to any other tow
hook or smaller towball and being towed away. The AL-KO Safety Ball is available from most
Caravan Shops or if this Safety Device was purchased via AL-KO’S direct Mail Order Service*,
the Safety Ball is provided with the kit.
APPROVAL:
1) This product holds full TUV approval and is also Sold Secure Approved.
WARRANTY:
1) Product warranty is given in accordance with S10, Clause 1-7 of the General Terms of
Business and is usually 12 months from date of purchase.
* Please note - the Safety Ball is only included with kits purchased direct from AL-KO‘s main
factory - if this item is purchased from a caravan dealer then the Safety Ball is an additional
item.
Fig. 1
Fig. 9
4
AL-KO Kober Ltd
South Warwickshire Business Park
Kineton Road
Southam
Warwickshire, CV47 0AL
01926 818500 01926 818562
www.al-ko.co.uk
Part No. 1385108
Please Note:
All diagrams shown in this booklet represent
AK160/300 couplings but assembly procedure
for AKS 1300 Stabiliser is identical.
Iss. 02/2011
1
1. ASSEMBLY INSTRUCTIONS
Procedure:
Cross-type Bolt Fitting: (for other overruns)
Fig. 3
Removal of existing fixing bolts:
Before you start to remove the existing fixing
bolts, please note the following: On most
overrun assemblies, the shock absorber is
secured by the fixing bolt (Fig. 2/Item 2).
Parts configuration as Fig. 5
Item
1
2
3
4
5
kit)
6
Warning:
The shock absorber (damper) extends
independently. Enclosed with this box is a
retaining pin (Fig. 3/Item 1) to aid assembly.
a)
Remove gaiter
b)
Loosen self-locking nut from hexagon
cap bolt (Figs. 2/3, Items 1/2)
c)
Push or knock out hex. cap bolt
(Fig. 2/Item 1)
d)
Knock through retaining pin (Fig. 3/2)
with (Fig. 3/Item 1) and leave the pin
in the shaft for centring the shock
absorber (damper).
e)
Any spacers originally fitted must be
re-used.
Push Gaiter onto the drawshaft followed by the
AK160/300 coupling or AKS 1300 stabiliser
with spacers (Fig. 6) if necessary, so that the
Locking plates left/right
fixing holes line up. If present, position the
Inner Hex. Bolt M12 8.8 with flat head spacer sleeve in the draw shaft.
to DIN 7984
Dome Head Bolt M12 8.8
Fit parts as shown on figs. 4 or 5. If a spacer
Half moon shaped fixing lugs
sleeve is in the draw shaft, thread this on as
Section washer (not included in this
well. Push retaining pin (Fig. 3/Item 1) through
(with the bolt behind - horizontal or vertical).
- please use original washer from
Shock absorber (damper), is threaded on.
coupling head you are removing
Self locking nut M12
For your own safety, please check:
To make sure the shock absorber (damper) is
threaded on, push the draw shaft in and out.
If you can feel resistance, then it is correctly
positioned.
Fig. 5
Fig. 4
Always insert horizontal bolts as shown in
Figs. 4/5 ie from right to left (when facing
caravan) as this allows correct clearances.
Always insert vertical bolt from top to bottom
and re-use original shim used on the overrun
Fitting of AL-KO Security Device
Horizontal Bolt Fitting: (for AL-KO Overruns)
With cross-type bolt fixing, do not forget to
insert half moon shaped plates (Fig. 5/Item 4)
and section washer (Fig. 5/Item 5).
Parts configuration as Fig. 4
Item
1
2
3
Fig. 2
Locking plates left/right
Inner Hex. Bolt M12 8.8 with flat head
to DIN 7984
Self locking nut M12
For horizontal bolts, tighten with Allen Key
(size 8), as the nuts are fixed and cannot be
moved.
Fig. 6
For vertical bolt: tighten nut and torque as
follows:
Overrun Torque
TypeSetting
2
AL-KO 30S
AL-KO 60S-60S/2
AL-KO 90S-90S/3
Other overruns with M12 (8.8) Bolts
3
60 Nm
60 Nm
70 Nm
86 Nm