1
V 11.4
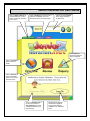
Junior Librarian.net User Guide
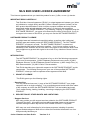
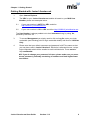
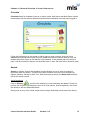
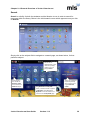
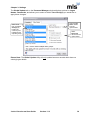
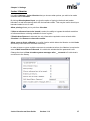
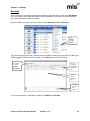
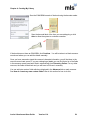
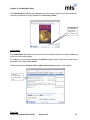
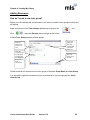
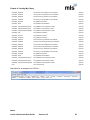
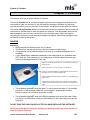
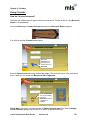
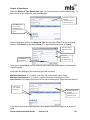
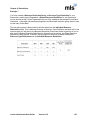
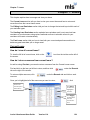
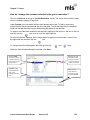
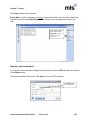
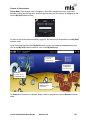
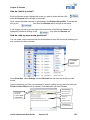
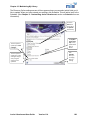
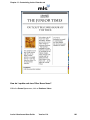
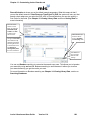
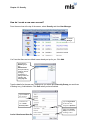
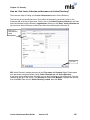
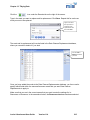
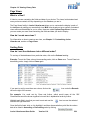
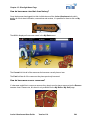
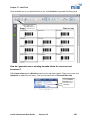
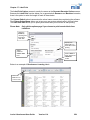
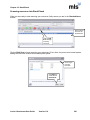
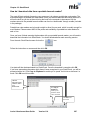
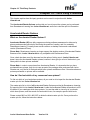
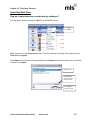
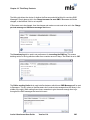
Click on Other Libraries to
visit MLSLibraries.net and
library catalogues outside of
your school.
Click on Settings to choose from a
selection of different icons and
backgrounds (log in required first).
Click in the quick Search
box to begin searching
for resources.
Click Enquiry to
browse through the
library catalogue.
Click on Circulate to
issue and return
books.
Click on Reviews to
write a descriptive
review of a book you
have borrowed.
Click on Librarian only to
go into the Librarian‟s
management area of the
system (authorised log in
required first).
Students and Librarians
should click Log On to
access other features
available on an individual
basis.
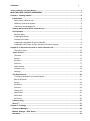
Contents
i
Junior Librarian.net User Guide ............................................................................................... 1
MLS END USER LICENCE AGREEMENT ................................................................................. 1
Chapter 1: Getting Started ........................................................................................................ 4
Introduction ........................................................................................................................... 4
About Junior Librarian.net .................................................................................................... 4
Obtaining Technical Support................................................................................................ 4
Comments and Suggestions ................................................................................................ 5
Getting Started with Junior Librarian.net ............................................................................ 6
Prerequisites.......................................................................................................................... 7
Machine Spec ...................................................................................................................... 7
Installing Silverlight .............................................................................................................. 7
Unlocking Circulate .............................................................................................................. 8
Installing the Hardware Plugin for IdentiKit .......................................................................... 9
Installing the AD Plugin for use with Active Directory Linking ............................................. 11
Chapter 2: A General Overview of Junior Librarian.net ........................................................ 12
The Home Page ................................................................................................................ 12
Junior Classic ...................................................................................................................... 12
Circulate ............................................................................................................................ 13
Search ............................................................................................................................... 13
My Stuff ............................................................................................................................. 17
Reviews ............................................................................................................................. 17
Reservations ..................................................................................................................... 18
Librarian Only .................................................................................................................... 18
Settings ............................................................................................................................. 19
The Beach Scene ................................................................................................................. 20
Turning off Animation to Increase Speed ........................................................................... 21
Borrow & Return ................................................................................................................ 21
Search ............................................................................................................................... 22
My Books........................................................................................................................... 23
Reviews ............................................................................................................................. 24
Grown Ups ........................................................................................................................ 25
Multi Return ....................................................................................................................... 25
Multi Issue ......................................................................................................................... 26
Self Issue........................................................................................................................... 26
Librarian Only ...................................................................................................................... 27
Read IT ................................................................................................................................. 27
Chapter 3: Settings ................................................................................................................. 28
Password Manager .............................................................................................................. 29
Module Settings / SIP2 Server ............................................................................................ 31
Barcodes .............................................................................................................................. 32
Contents
ii
Junior Librarian ................................................................................................................... 37
Data Tidy .............................................................................................................................. 38
Fields .................................................................................................................................... 39
Language ............................................................................................................................. 41
Page Views........................................................................................................................... 43
Restrictions.......................................................................................................................... 45
Reservations: ....................................................................................................................... 46
Reviews ................................................................................................................................ 47
Printing................................................................................................................................. 48
Reminders ............................................................................................................................ 49
General ................................................................................................................................. 50
Interface switching ............................................................................................................. 51
Chapter 4: Creating My Library .............................................................................................. 52
Cataloguing Resources....................................................................................................... 52
Where do I put the barcode labels? ................................................................................... 52
Where should I start cataloguing?...................................................................................... 53
How do I enter a new resource onto the system? .............................................................. 53
How do I catalogue a Book? .............................................................................................. 55
What should I do with school library service books? .......................................................... 56
How do I catalogue a film?................................................................................................. 56
How do I catalogue hardware? .......................................................................................... 57
How do I catalogue live media? ......................................................................................... 58
How do I catalogue music? ................................................................................................ 59
How do I catalogue a musical instrument?......................................................................... 59
How do I catalogue sheet music? ...................................................................................... 60
How do I catalogue a Document? ...................................................................................... 60
How do I catalogue a picture? ........................................................................................... 61
How do I catalogue a website? .......................................................................................... 61
How do I catalogue a text book? ........................................................................................ 62
How do I catalogue an item which doesn‟t belong to a specific resource type?.................. 62
How do I catalogue an eBook? .......................................................................................... 63
What if I make a mistake when cataloguing? ..................................................................... 64
How do I copy a resource? ................................................................................................ 64
How do I link and un-link resource items?.......................................................................... 65
What other information is stored on a resource record? ..................................................... 66
Floor Plan ............................................................................................................................. 72
How do I create a floor plan image? .................................................................................. 72
How do add a floor plan record? ........................................................................................ 72
How do I add an individual resource to the floor plan? ....................................................... 74
How do I globally add a selection of resources to the floor plan? ....................................... 75
Contents
iii
How do I edit a floor plan record? ...................................................................................... 77
How do I delete a floor plan record? .................................................................................. 79
How do I export a floor plan image? .................................................................................. 80
Adding Borrowers ............................................................................................................... 82
How do I create a new tutor group? ................................................................................... 82
How do I add my borrowers manually? .............................................................................. 83
How do I add a photograph of a borrower? ........................................................................ 84
How do I import my borrowers using the school‟s administration system? ......................... 84
How do I import my student file into Junior Librarian.net? .................................................. 92
How do I manually move my borrowers to their new groups? ............................................ 95
What if I have mixed year groups?..................................................................................... 96
What other information is stored on a borrower‟s record? .................................................. 96
Custom Fields ...................................................................................................................... 98
How do I create my own custom fields? ............................................................................. 98
Chapter 5: Circulate .............................................................................................................. 100
Identikit .............................................................................................................................. 100
Looking after the Identikit ................................................................................................. 101
Identikit minimum system requirements ........................................................................... 101
How do I install the IDK software? ................................................................................... 103
How do I import my Junior3 fingerprints? ......................................................................... 104
How do I register a fingerprint? ........................................................................................ 105
IdentiKit and Data Protection ........................................................................................... 106
Using Circulate .................................................................................................................. 107
How do I issue a resource? ............................................................................................. 107
How do I return a resource? ............................................................................................ 110
How do I renew a resource? ............................................................................................ 111
Multi Return ..................................................................................................................... 112
How does a borrower reserve a resource? ...................................................................... 114
Warning messages .......................................................................................................... 116
Chapter 6: Restrictions ......................................................................................................... 117
Setting up Restrictions ..................................................................................................... 117
How do restrictions work? ................................................................................................ 117
How do I create my own borrower restriction groups? ..................................................... 117
How do I add resource type restrictions to my borrower restriction groups? .................... 120
How do I change the default borrower restriction group? ................................................. 122
How do I change a tutor group‟s borrower restriction group? ........................................... 122
How do I change an individual borrower‟s restriction group? ........................................... 123
How do I globally set resource restrictions? ..................................................................... 124
How do I set restrictions for individual resources? ........................................................ 126
Restrictions example tables ............................................................................................. 127
Contents
iv
Calendar ............................................................................................................................. 131
How do I mark weekends and closed days? .................................................................... 131
How do I force a return date for resources? ..................................................................... 132
How do I add notes? ........................................................................................................ 132
How do I exclude closed days from fines and overdue‟s? ................................................ 133
Chapter 7: Loans ................................................................................................................... 134
Current Loans .................................................................................................................... 134
How do I view all current loans? ...................................................................................... 134
How do I return resources from current loans? ................................................................ 134
How do I renew resources from current loans? ................................................................ 135
What does each resource colour code mean? ................................................................. 135
Editing Loan Reminders ................................................................................................... 136
How do I edit the text in my reminders? ........................................................................... 136
How do I specify what format the reminder is sent in? ..................................................... 139
What happens if I have specified the reminder to be printed? .......................................... 140
What happens if I have specified a reminder to be printed and emailed?......................... 140
What if the borrower‟s email address is wrong or missing? .............................................. 140
Sending Loan Reminders ................................................................................................. 141
How do individual reminders work? ................................................................................. 141
How do I apply the settings for scheduled reminders? ..................................................... 141
How do group reminders work? ....................................................................................... 143
How do I apply the settings for group reminders? ............................................................ 143
What happens after I‟ve applied my reminder settings? ................................................... 144
How do I print reminders? ................................................................................................ 145
What is a memo used for? ............................................................................................... 146
How do I send reminders to individual borrowers? ........................................................... 147
Past Loans ......................................................................................................................... 148
How do I view past loans? ............................................................................................... 148
How do I delete a past loan? ........................................................................................... 148
Chapter 8: Reservations ....................................................................................................... 149
Making Reservations ......................................................................................................... 149
How do reservations work?.............................................................................................. 149
How does a borrower reserve a resource? ...................................................................... 150
The second way to reserve a resource is by logging into the My Books screen. .............. 152
How do I reserve a resource for a borrower? ................................................................... 153
Managing Reservations .................................................................................................... 153
How do I view reservations? ............................................................................................ 153
How long are reservations listed in the reservations database? ....................................... 153
How do I delete a reservation? ........................................................................................ 153
How do I automatically delete reservations? .................................................................... 154
Contents
v
Chapter 9: Reviews ............................................................................................................... 155
Making Reviews ................................................................................................................. 155
How do borrowers review resources? .............................................................................. 155
Managing Reviews ............................................................................................................ 157
How do I view reviews? ................................................................................................... 157
How do I approve a review? ............................................................................................ 157
How do I delete a review? ............................................................................................... 158
How do I add my own review questions? ......................................................................... 158
Chapter 10: Maintaining My Library ..................................................................................... 159
Making Changes To Resources ........................................................................................ 159
How do I edit an existing resource? ................................................................................. 159
How do I delete a resource? ............................................................................................ 159
How do I change the accession number of a resource? ................................................... 160
How do I make global changes to selected resource records? ........................................ 160
Using Quick Search in Quick Replace ............................................................................. 162
How do I mark a resource as missing? ............................................................................ 163
Making Changes To Borrowers and Tutor Groups ......................................................... 166
How do I edit a borrower? ................................................................................................ 166
How do I change a borrower‟s PIN? ................................................................................ 166
How do I delete a borrower? ............................................................................................ 166
How do I edit a tutor group?............................................................................................. 167
How do I delete a tutor group?......................................................................................... 167
Discovery Online ............................................................................................................... 168
What is Discovery Online? ............................................................................................... 168
How do I choose which fields to update? ......................................................................... 168
How and when does my catalogue get updated?............................................................. 170
How do I update my whole catalogue? ............................................................................ 170
What happens if the Discovery Online update fails? ........................................................ 170
Housekeeping .................................................................................................................... 171
What does housekeeping do? ......................................................................................... 171
Chapter 11: Customising Junior Librarian.net .................................................................... 172
News ................................................................................................................................... 172
Where are my news items displayed? ............................................................................. 172
How do I modify settings for my news items? .................................................................. 173
How do I update and view my New Resources news item? ............................................. 175
How do I update and view my Book of the Week? ........................................................... 176
How do I update and view Other News Items? ................................................................ 180
How do I update and view my Top Ten Resources? ........................................................ 181
Schedule ............................................................................................................................ 182
How does schedule work? ............................................................................................... 182
Contents
vi
What is a task? ................................................................................................................ 183
How do I edit a scheduled task? ...................................................................................... 183
How do I delete a scheduled task? .................................................................................. 184
Page Views......................................................................................................................... 186
What is a view? ............................................................................................................... 186
How do I create a new view? ........................................................................................... 186
How do I set default views for my borrowers? .................................................................. 191
How do I change the information shown on a resource record? ....................................... 192
How do I change the information shown on a borrower record? ...................................... 193
How do I change the column names in my page views? .................................................. 195
Language ........................................................................................................................... 196
How do I change the field names? ................................................................................... 196
Chapter 12: Security ............................................................................................................. 198
Security .............................................................................................................................. 198
What is user manager? ................................................................................................... 198
How do I create a new user account? .............................................................................. 199
What is group manager? ................................................................................................ 201
How do I create a new security group? ............................................................................ 201
How do I change a security group‟s permissions? ........................................................... 203
How do I change the security group for an individual borrower? ...................................... 204
How do I change my password? ...................................................................................... 204
Active Directory ................................................................................................................. 205
What is Active Directory? ................................................................................................. 205
How does Active Directory work within Junior Librarian.net? ........................................... 205
How do I Configure Active Directory Linking for Junior Librarian.net? .............................. 206
How do I link Junior Librarian.net borrowers to Active Directory?..................................... 207
How do I check that the scheduled task has run successfully? ........................................ 209
How do I know which borrowers are not linked to Active Directory? ................................. 210
How do I import Active Directory details into Junior Librarian.net? ................................... 211
Chapter 13: Tidying Data ...................................................................................................... 214
Data Cleanse Replacements ............................................................................................. 214
What is data cleanse replacements? ............................................................................... 214
How do I apply the settings for data cleanse replacements?............................................ 214
Data Cleanse Remove ....................................................................................................... 217
What is data cleanse remove? ......................................................................................... 217
How do I apply the settings for data cleanse remove? ..................................................... 217
Data Tidy ............................................................................................................................ 220
What is data tidy? ............................................................................................................ 220
How do I apply the settings for data tidy? ........................................................................ 220
How do I schedule a date for data tidy to take place? ...................................................... 221
Contents
vii
Chapter 14: Viewing Library Data......................................................................................... 222
Searching Databases ........................................................................................................ 222
How do I use quick search? ............................................................................................. 222
How do I use advanced search? ...................................................................................... 226
Flagging: ............................................................................................................................ 231
What is flagging? ............................................................................................................. 231
When would I use flagging? ............................................................................................. 232
Flagging using the Barcode Reader................................................................................. 233
Page Views......................................................................................................................... 234
What is a View? ............................................................................................................... 234
How do I create new views? ............................................................................................ 234
Sorting Data ....................................................................................................................... 234
How do I sort the databases into a different order? .......................................................... 234
Exporting Data ................................................................................................................... 236
How do I export data into a different format? ................................................................... 236
Printing Data ...................................................................................................................... 237
How do I print data?......................................................................................................... 237
Chapter 15: Silverlight Home Page ...................................................................................... 238
Launching Silverlight Home Page .................................................................................... 238
What is Silverlight Home Page? ...................................................................................... 238
How do I open Silverlight Home Page? ........................................................................... 238
Using Silverlight Home Page ............................................................................................ 239
How do borrowers view resources? ................................................................................. 239
What other information is shown on a resource record in Silverlight Home Page? ........... 241
How do borrowers use quick search? .............................................................................. 242
How do borrowers use advanced search? ....................................................................... 243
How do borrowers view their loan history? ....................................................................... 244
How do borrowers reserve resources? ............................................................................ 244
How do borrowers review resources? .............................................................................. 245
How do borrowers read reviews?..................................................................................... 245
Chapter 16: Reports .............................................................................................................. 246
Accessing Reports ............................................................................................................ 246
How do I view reports? .................................................................................................... 246
Chapter 17: Label Print ......................................................................................................... 248
Technical Information ....................................................................................................... 248
What will Label Print do? ................................................................................................. 248
Which printers will it work on? .......................................................................................... 248
Which labels should I buy? .............................................................................................. 248
Printing Labels................................................................................................................... 249
How do I print library cards for borrowers? ...................................................................... 249
Contents
viii
How do I generate new or existing barcode labels for resources and borrowers? ............ 250
How do I print book labels?.............................................................................................. 253
Chapter 18: StockCheck ....................................................................................................... 256
About StockCheck ........................................................................................................... 256
Creating a New StockCheck ............................................................................................ 257
Scanning resources into StockCheck .............................................................................. 261
How can I search for resources in StockCheck? .............................................................. 265
How do I download data from a portable barcode reader? ............................................... 267
How do I edit a previously started StockCheck? .............................................................. 268
How do I complete a StockCheck? .................................................................................. 269
What happens to completed StockChecks? ..................................................................... 270
Chapter 19: Third Party Products......................................................................................... 271
Accelerated Reader Quizzes ............................................................................................. 271
What are Accelerated Reader Quizzes? .......................................................................... 271
How do I find out which of my resources have quizzes? .................................................. 271
How do I print out Accelerated Reader labels? ................................................................ 274
How do I find Resources with AR Quizzes in the Home Page? ........................................ 275
Importing Book Data ......................................................................................................... 277
How do I import resource records into my catalogue? ..................................................... 277
How do I import resource records into my custom catalogue? ......................................... 278
LinksPlus ........................................................................................................................... 280
What is LinksPlus? .......................................................................................................... 280
How do I import a LinksPlus (WebLinks) file? .................................................................. 280
ITV Signed Stories ............................................................................................................. 281
What are ITV Signed Stories? ......................................................................................... 281
How do I get ITV Signed Stories? .................................................................................... 281
How Can the Children View Signed Stories in the Silverlight Home Page?...................... 283
Text Message Alerts .......................................................................................................... 284
What are Text Message Alerts? ....................................................................................... 284
How do I Setup Text Message Alerts? ............................................................................. 284
How do I Schedule Text Message Alerts? ....................................................................... 287
How do I check if the messages have been sent successfully? ....................................... 290
ClickView............................................................................................................................ 291
What is ClickView? .......................................................................................................... 291
How do I Import ClickView into Junior Librarian.net? ....................................................... 292
How do Borrowers view ClickView Videos in Junior Librarian.net? .................................. 294
How do Borrowers search ClickView Videos in Junior Librarian.net?............................... 295
MLS END USER LICENCE AGREEMENT
This Licence Agreements lets you install the product for one (1) Site, on one (1) domain.
IMPORTANT-READ CAREFULLY:
This End-User Licence Agreement ("EULA") is a legal agreement between you (either
an individual or a single entity) and MLS ("Micro Librarian Systems Limited") for the
MLS product identified above, which includes computer software and may include
associated media, printed materials, and "online" or electronic documentation
(collectively, "SOFTWARE PRODUCT"). By installing, copying, or otherwise using the
SOFTWARE PRODUCT, you agree to be bound by the terms of this EULA. If you do
not agree to the terms of this EULA, you may not use the SOFTWARE PRODUCT.
SOFTWARE PRODUCT LICENSE
Copyright laws and international copyright treaties, as well as other intellectual
property laws and treaties protect the SOFTWARE PRODUCT. The SOFTWARE
PRODUCT is licenced, not sold. The SOFTWARE PRODUCT is owned and
copyrighted by MLS and its third party suppliers. Your Licence confers no title or
ownership in the Software and is not a sale of any rights in the Software. MLS's third
party suppliers may protect their rights in the event of any violation of these Licence
Terms.
INTRODUCTION
The SOFTWARE PRODUCT is comprised of any or all of the following components:
(i) the core file components, (ii) MLS Database Scripts and source code, (iii) MLS
Database Schema, (iv) MLS Database Stored Procedures, (v) MLS Image Files, (vi)
MLS Documentation, (vii) MLS “Online” Documentation.
This EULA describes your rights with respect to the SOFTWARE PRODUCT and its
components. The following terms govern your use of the specified SOFTWARE
PRODUCT unless you have a separate written agreement with MLS.
1. GRANT OF LICENSE
This EULA grants you the following rights:
* Standard Use
You may install and use one (1) copy of the SOFTWARE PRODUCT on a single
computer and on a single company. You must disclose and reveal to MLS the name
of the company on which the SOFTWARE PRODUCT will be installed and used.
"Use" means storing, loading, installing, executing or displaying the SOFTWARE
PRODUCT.
2. DESCRIPTION OF OTHER RIGHTS AND LIMITATIONS
* Support Services
MLS may provide you with support services related to the SOFTWARE PRODUCT
("Support Services"). All support services will be provided via an annual support
contract starting the same day that the SOFTWARE PRODUCT is supplied.
MLS may use such information for its business purposes, including for product
support and development. MLS will not utilize such technical information in a form
that personally identifies you
Junior Librarian.net User Guide
Version 11.4
1
* License Term Verification
MLS reserves the right to check all Licensees to verify compliance with this EULA. In
order to verify this compliance, you understand and acknowledge that the
SOFTWARE PRODUCT may collect and send back information to MLS about the
location where the SOFTWARE PRODUCT has been installed. This information is
entirely restricted to the IP address where the SOFTWARE PRODUCT is installed; no
other information will be collected or sent back to MLS.
* Confidential Information
The term "Confidential Information" means any information or material, which is
proprietary to MLS, whether or not owned or developed by MLS, which is not
generally known other than by MLS, and which you have obtained through MLS.
Confidential Information includes without limitation: trade secrets, technical
information, product design information, database scripts, database schema, source
code and/or object code, copyrights and other intellectual property associated with
the SOFTWARE PRODUCT.
*Protection of Confidential Information
You understand and acknowledge that the Confidential Information associated with
the SOFTWARE PRODUCT has been developed or obtained by MLS by the
investment of significant time, effort and expense, and that the Confidential
Information is a valuable, special and unique asset of MLS, which provides MLS with
a significant competitive advantage, and needs to be protected from improper
disclosure. You agree to hold in confidence and to not disclose the Confidential
Information to any person or entity, except those who are required to have access to
the Confidential Information in order to perform their job duties in connection with the
limited purposes of this agreement.
*Limitations on Reverse Engineering, De-Compilation, and Disassembly
You may not reverse engineer, decompile, or disassemble the SOFTWARE
PRODUCT, except and only to the extent that such activity is expressly permitted by
applicable law notwithstanding this limitation.
* Rental
You may not rent, lease or lend the SOFTWARE PRODUCT.
* Software Transfer
You may permanently transfer all of your rights under this EULA, provided you retain
no copies, you transfer all of the SOFTWARE PRODUCT (including all component
parts, the media and printed materials, any upgrades, this EULA, and, if applicable,
the Certificate of Authenticity), and the recipient agrees to the terms of this EULA
3. ALL RIGHTS NOT EXPRESSLY GRANTED HEREIN ARE RESERVED BY MLS.
4. TERMINATION
Without prejudice to any other rights, MLS may terminate this EULA if you fail to
comply with the terms and conditions of this EULA. In such event, you must destroy
all copies of the SOFTWARE PRODUCT and all of its component parts.
5. COPYRIGHT
All title and copyrights in and to the SOFTWARE PRODUCT (including but not limited
to any images, photographs, animations, video, audio, music, text, and "applets"
incorporated into the SOFTWARE PRODUCT), the accompanying printed materials,
the accompanying “online” materials, and any copies of the SOFTWARE PRODUCT
are owned by MLS or its suppliers. Copyright laws and international treaty provisions
protect the SOFTWARE PRODUCT. Therefore, you must treat the SOFTWARE
PRODUCT like any other copyrighted material. You may not copy the printed or
“online” materials accompanying the SOFTWARE PRODUCT.
Junior Librarian.net User Guide
Version 11.4
2
6. LIMITED WARRANTY
MLS guarantees that: (a) during a time period of forty five (45) days starting at the
same date of the SOFTWARE PRODUCT acquisition, the SOFTWARE PRODUCT
will work and operate conforming to the terms and conditions of the provided
documentation, and that (b) any technical support supplied by MLS will be provided
according to this EULA. MLS will be either in position to (a) repair the SOFTWARE
PRODUCT or (b) replace the SOFTWARE PRODUCT. The SOFTWARE PRODUCT
replacement will be guaranteed during the rest of the original warranty time period or
during thirty (30) days, choosing from both periods the larger one. The present
warranty will be terminated if the SOFTWARE PRODUCT fails as result of an
accident, abuse or misuse.
7. NO OTHER WARRANTIES
To the maximum extent permitted by applicable law, MLS and its suppliers disclaim
all warranties and conditions, either express or implied, including, but not limited to,
implied warranties of merchantability, fitness for a particular purpose, title and noninfringement, with regard to the software product, and the provision of or failure to
provide support services.
8. LIMITATION OF LIABILITY
To the maximum extent permitted by applicable law, in no event shall MLS or its
suppliers be liable for any special, incidental, indirect, or consequential damages
whatsoever (including, without limitation, damages for loss of business profits,
business interruption, loss of business information, or any other pecuniary loss)
arising out of the use of or inability to use the software product or the provision of or
failure to provide support services.
Junior Librarian.net User Guide
Version 11.4
3
Chapter 1: Getting Started
Chapter 1: Getting Started
This chapter introduces you to Junior Librarian.net.
The Introduction section gives a brief overview of how Junior Librarian.net runs, how to
get help should you need it and also how to feed back any comments and suggestions for
ways to improve Junior Librarian.net.
The Prerequisites section tells you what you need in order to run Junior Librarian.net
successfully on your computer. Included in this section is information on installing the
hardware plugin, which enables you to use hardware other than the standard barcode
reader with your Junior Librarian.net software. You do not need to install any additional
software to enable hardware such as the IdentiKit to work with Junior Librarian.net once
you have installed the hardware plugin.
Introduction
About Junior Librarian.net
Junior Librarian.net is a web-based library system which is accessed via a web browser.
The web browser accesses a web server which hosts your Junior Librarian.net website. The
library database is held on a separate SQL server, which gives you a robust and
manageable database storage solution. The aforementioned server(s) are administered by
Micro Librarian Systems, leaving you the easy task of simply accessing and administering
your own Junior Librarian.net library system via the Internet.
Obtaining Technical Support
Our friendly dedicated team are always on hand to offer clear, step by step expert advice
and assistance by phone, fax or email whenever you need it.
Tel: (+44) 0161 449 9357 Option 1
Fax: (+44) 0161 449 0055
E-mail: [email protected]
Junior Librarian.net User Guide
Version 11.4
4
Chapter 1: Getting Started
On the Web:
The quickest and easiest way to contact us is
through the online MLS Service Area.
www.microlib.co.uk/MyMLS
Here you can:
Search our comprehensive knowledgebase
Search the MLS forums for any related
discussions
Open and download software User Guides
Raise support tickets and track progress of any
live incidents online
Obtain further contact information
Comments and Suggestions
If you have any comments or suggestions for ways to enhance any of our products, you can
contact us using the above details.
Note: All suggestions will be considered for future development. In the past several years
the suggestions that our customers have made have played an integral part in our
development. This feedback enables us to develop the system to meet your needs.
Junior Librarian.net User Guide
Version 11.4
5
Chapter 1: Getting Started
Getting Started with Junior Librarian.net
1.
Open Internet Explorer
2.
The URL for your Junior Librarian.net website is based on your MLS User
Number, please see examples below.
2.1
If your user number is 98757 the URL would be
http://U098757.juniorlibrarian.net
2.2
If your user number is 12 the URL would be http://U000012.juniorlibrarian.net
The User Number is always padded out to be 6 characters long, by using „0‟s,
prefixed by the letter „U‟.
3.
To access Management you simply need to click on Log On, enter your login
credentials (see following point for login credential details) and click on Librarian
Only.
4.
Please note that your default username and password is NOT the same as that
you may have used in Junior Librarian 3. Each site is allocated its own, unique
login credentials which will be emailed to each individual site. These must be
kept confidential.
N.B. If you do change your password in future, please make sure you use a
secure password, preferably consisting of numbers and both higher/lower
case letters.
Junior Librarian.net User Guide
Version 11.4
6
Chapter 1: Getting Started
Prerequisites
Machine Spec
Please note, it is advisable to be logged into the PC as an Administrator in order to install
any prerequisites and configure Internet Explorer.
Please make sure you are running Internet Explorer 7.0+ on every machine you wish to run
Junior Librarian.net from. Below are the machine specifications required for running Junior
Librarian.net:
Library PC:
1.5 GHz Dual Core CPU or
better with 1GB RAM.
Free USB ports for hardware
400MB of free disk space (for
scratch disk and IE plugin)
Other client PC‟s:
1GHz Single Core CPU or
better with 512 RAM.
Internet connectivity
Minimum 512K ADSL (or equivalent) broadband connection (1MB or above
recommended)
Please note: this is what is required for our application alone. If you are sharing this
connection with lots of other people or applications, you may find you require a faster
internet connection.
Installing Silverlight
It is a requirement of the software for you to have Silverlight installed on the machine which
you wish to run Junior Librarian.net from. A link to install Silverlight becomes available as
soon as you try to access Junior Librarian.net; alternatively, if you wish to download this
manually beforehand, please click on http://silverlight.net/getstarted and click on the link to
Install Silverlight
Junior Librarian.net User Guide
Version 11.4
7
Chapter 1: Getting Started
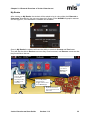
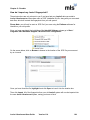
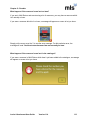
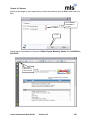
Unlocking Circulate
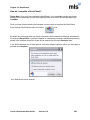
Please follow the below instructions in order to use Circulate without installing the plugin (if
you are only using a barcode reader on your PC, rather than an IdentiKit fingerprint scanner).
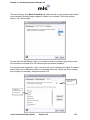
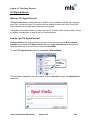
Launch Internet Explorer, and enter the URL for your Junior Librarian.net website.
Click on the Log On button from the home page.
Log in using either the administrator or librarian login credentials.
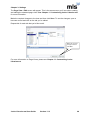
Click on Circulate from the book; the alert will pop up as shown below.
Click Yes.
Close Circulate and Log Off to disable Librarian Only functions.
This PC is now set up to allow resources to be issued and returned without having to log into
Librarian Only. This is handy if you want to allow student librarians to issue and return
books from that computer as it poses no security threat to your student / resource data.
If you only use a Barcode Reader, and do not use Active Directory linking, you
are now ready to use your Junior Librarian.net Hosted library system.
If you do use Active Directory linking or use IdentiKit, RFID or Security Gates
at school, please continue reading.
Junior Librarian.net User Guide
Version 11.4
8
Chapter 1: Getting Started
Installing the Hardware Plugin for IdentiKit
IMPORTANT
ONLY IDENTIKIT HARDWARE THAT IS COMPATIBLE WITH DIGITAL PERSONA
PLATINUM EDITION DRIVERS WILL WORK WITH JUNIOR LIBRARIAN.NET. IF YOUR
IDENTIKIT USES DIGITAL PERSONA GOLD EDITION DRIVERS, YOU NEED TO
PURCHASE AN UPDATED IDENTIKIT.
Installing the Hardware Plugin is a prerequisite if you wish to issue or return books from a
particular computer, using the IdentiKit device.
Please Note:
We suggest that installation is carried out by an ICT technician.
Installation should only be performed at the PC where you issue books.
Ensure you are logged on as Administrator with full permissions.
If you are using an Identikit device, plug it in before you begin the installation.
You will be prompted to install the plugin when you log into the Grown Ups area on the
signpost on the Home page
When you accept the prompt, a PDF document will display on your screen, detailing where
to download the plugin from and how to install it.
Enter the below web address into your Internet Explorer Address bar:
http://supportfiles.microlib.co.uk/ieplugin.exe
A Security Warning box will pop up asking if you want to run or save this file. Click on Run.
Once the file has successfully downloaded, another Security Warning box will pop up; this
time giving you the options to Run or Don‟t Run. Click on Run.
Junior Librarian.net User Guide
Version 11.4
9
Chapter 1: Getting Started
The InstallAware Wizard for MLS Hardware Support Setup will load. Click Next on the
first and second screens of the Wizard.
Once the installation has completed, click Finish. You may be prompted to restart your
computer.
Please Note: This installer automatically adds *.microlibrarian.net to your Internet
Explorer Trusted sites. Please ensure that there are no Group Policy Settings on the
Domain Controller which could override the changes you have just made.
Please also ensure that your Proxy Server is not blocking the Junior Librarian.net Hosted
URL.
If you are unsure of any of the above, please ask your IT Technician.
Junior Librarian.net User Guide
Version 11.4
10
Chapter 1: Getting Started
Installing the AD Plugin for use with Active Directory Linking
If your Junior Librarian.net Hosted software is linked with Active Directory (i.e. borrowers
are automatically logged into Junior Librarian.net Hosted when you log into the computer),
you will be prompted to install an AD Plugin when you enter the site.
To install the AD Plugin ensure you are logged into the computer as an administrator
before clicking on the relevant link (below) and following the on screen instructions.
If you do not wish to install the AD Plugin, and you do not wish to be reminded about it
again, click on the relevant link (above).
Login details for My Account will be requested if –
a) The user you are currently logged into the PC on is not Active Directory linked to
your borrower account in Junior Librarian.net.
b) You are accessing the Junior Librarian.net Hosted system from outside the school
network
Please Note, the login details for My Account are not the same as the Active Directory
login details.
For further information on Active Directory Linking please see Chapter 12: Security.
Junior Librarian.net User Guide
Version 11.4
11
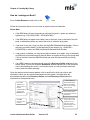
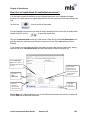
Chapter 2: A General Overview of Junior Librarian.net
Chapter 2: A General Overview of Junior
Librarian.net
This chapter will give an explanation of the home page, as well as the different areas of the
system you‟ll be able to view once Junior Librarian.net has been opened.
A brief explanation will be given for each section on the home page. The different areas of
each section will all be covered in depth later on in the guide.
The Home Page
The home page is the first screen you will see once Junior Librarian.net has been opened.
There are two different „looks‟ or interfaces to the home page that can set in Librarian Only
or Grown Ups; Junior Classic or the Beach Scene.
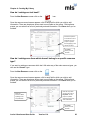
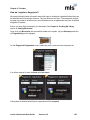
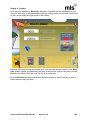
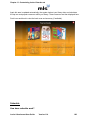
Junior Classic
The home page of Junior Librarian.net Classic features the book interface. The book
interface hosts a number of interactive links that you can click on.
Access a feature of the system by choosing an icon or button from the book interface.
Click on Other Libraries to
visit MLSLibraries.net and
library catalogues outside of
your school.
Click on Settings to choose from a
selection of different icons and
backgrounds (log in required first).
Click in the quick Search
box to begin searching
for resources.
Click on Circulate to issue
and return books.
Click on Reviews to
write a descriptive
review of a book you
have borrowed.
Click Enquiry to browse
through the library
catalogue.
Click here to go to a list
of new books in the
library.
Toggle
sound on
or off.
Click on My Stuff
to see what you‟ve
borrowed,
reserved and
reviewed (log in
required first).
Click on
Librarian only
to go into the
Librarian‟s
management
area of the
system.
Junior Librarian.net User Guide
Students and
Librarians
should click Log
On to access
other features
available on an
individual basis.
Version 11.4
Click
here to
visit the
News
section of
the
library.
Click here to
go to a list
of the most
popular
borrowed
books.
12
Chapter 2: A General Overview of Junior Librarian.net
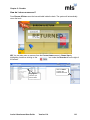
Circulate
Circulate allows for students to borrow or return books. Multi Issue and Multi Return can be
accessed by both the teacher librarian and the student librarians once they have logged in.
Follow the instructions on the screen to either issue or return a book. Once you have
scanned the barcode label inside the book, scan the student‟s barcode label or have the
student place their finger on the IdentiKit (if purchased). If they already have this book on
loan, it will be returned. If they do not have this book on loan, the book will be issued to them.
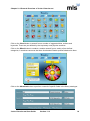
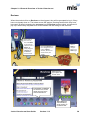
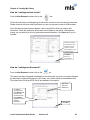
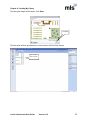
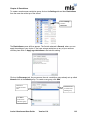
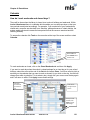
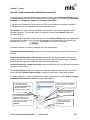
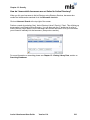
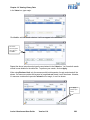
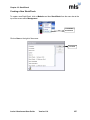
Search
Search is a facility for both the students and the librarian to use in order to search for
resources within the library. There are two ways to search from the Junior Librarian.net
Classic interface: Visually or with Text. After performing a search, the book shelf interface
will list the search results.
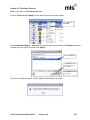
Visual searching
Click on Enquiry
and the main window for visual searching will appear. Choose to
perform the search using categories such as A-Z (of authors, titles and genres), the Cloud,
the Wheel or with an Advanced search.
Simply click on any of the visual search icons to begin searching in that area of the library.
Junior Librarian.net User Guide
Version 11.4
13
Chapter 2: A General Overview of Junior Librarian.net
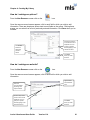
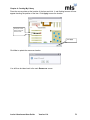
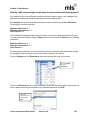
Click on the Cloud button to search from a number of suggested titles, authors and
keywords. These are pre-defined by the top twenty most popular searches.
Click on the Wheel button to conduct a random search from a variety of pre-defined
categories; it searches resources that have Accelerated Reader quizzes attached to them.
Click on the Advanced button to perform a search of specific fields in the library catalogue.
Junior Librarian.net User Guide
Version 11.4
14
Chapter 2: A General Overview of Junior Librarian.net
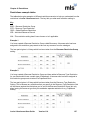
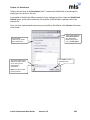
Text searching
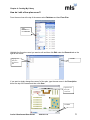
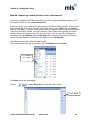
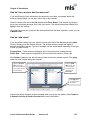
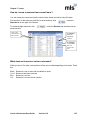
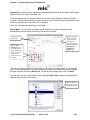
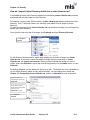
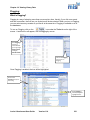
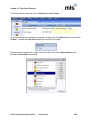
From the home page, find the quick search area in the top-right corner of the screen which is
ready for search criteria to be entered by keyboard.
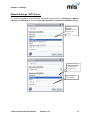
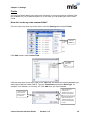
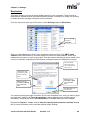
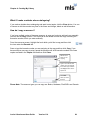
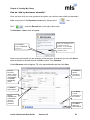
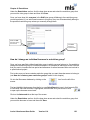
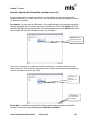
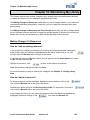
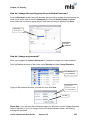
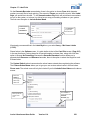
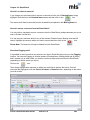
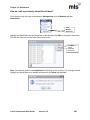
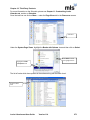
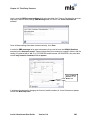
Type in your search
criteria.
Click here to start
your search.
Click here to reset
your search.
Press ENTER on your keyboard or click on the white/blue arrow button to start the search.
Clicking on the green button will reset the search box.
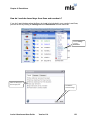
After typing the third character of the word or phrase into the search box a white box will
appear to help fine tune the query if required.
Click and choose a
specific resource
field to be queried.
Close this box by
clicking the white/red
cross icon if not
required.
Choosing „All fields‟
will effectively run
the query without
applying any filtering.
Choose how the
search phrase will be
processed against
any specific resource
fields if chosen
above.
Choose a specific
type of book to be
queried with the
search phrase.
Junior Librarian.net User Guide
Version 11.4
15
Chapter 2: A General Overview of Junior Librarian.net
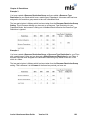
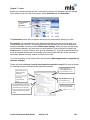
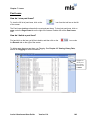
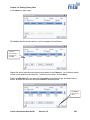
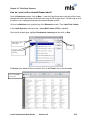
Search results on the Book Shelf
After conducting a search either visually or by text, the search results are displayed on a
book shelf interface. Depending on the number of results you can scroll right or left to view
all of the shelves with the resources that met your search criteria.
Clicking on a given resource icon displays further information about it including the title or
name, author, class and its availability in the library.
You may also filter, sort, print and export the results directly from the book shelf interface.
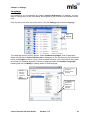
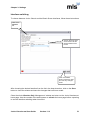
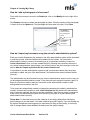
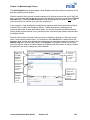
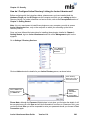
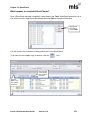
Click on a
resource icon to
view more
information
about it.
Click on a
resource type to
filter it off the
shelves of
search results.
Click on a
badge to enter
your account or
view items
you‟ve reserved
(requires login).
Click here to
sort the search
results in a
specific order.
Junior Librarian.net User Guide
Click here to
export the
search results
as a CSV file.
Version 11.4
Click here to
generate a
printable list of the
search results.
Use the arrow
buttons left/right
to scroll through
the shelves of
the search
results.
16
Chapter 2: A General Overview of Junior Librarian.net
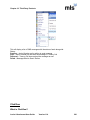
My Stuff
The My Stuff icon is disabled until the user logs on. Click on the Log On button to be taken
to the logon screen where the user must enter the user name and password before they are
given access to their personal area of the system. Alternatively, the user may place their
finger on the IdentiKit fingerprint scanner and be logged in, if the hardware is installed and
available.
These credentials must first be set by the Librarian in Management manually or alternatively
the user will be automatically logged in if they have been successfully linked with Active
Directory. More information on setting up borrower user names and accounts can be found in
Chapter 3: Settings; Password Manager and Chapter 12: Security.
Once the user has successfully logged in, the My Stuff icon will be enabled.
The user may now see their Current and Past loans, write a Review for resources they
have borrowed and Reserve resources that they would like to borrow.
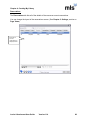
Reviews
From the home page, click on Review and enter the borrower PIN or place a pre-registered
finger on the touch pad if the IdentiKit system has been purchased. The PIN might also be
the borrower barcode number. When successfully authorised, the user‟s name will be
displayed.
A list will be displayed of books previously borrowed. Click on any one of these records
before clicking on the Review this book button to be taken to the area to write a new review.
Junior Librarian.net User Guide
Version 11.4
17
Chapter 2: A General Overview of Junior Librarian.net
The user should write about the resource and make use of various formatting options such
as different font styles, colours and smilies to help explain the review.
Click on the Save button to keep changes to the review without finalising it. Choosing this
option will allow the user to come back and finish the review at another time. Choose the
Publish button to save and finish the review; the user cannot return to make anymore
changes to the review after publishing it.
Both options will send the review to the Reviews table in Management for the Librarian to
acknowledge and approve it before it is actually published for all users of the library to see.
Details of acknowledging user reviews in Management can be found in Chapter 9:
Reviews.
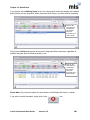
Reservations
Firstly, log into the system from the home page and conduct a search using any of the
searching methods as described above. Find a resource from the search results on the book
shelf and click on it to view the details of the item.
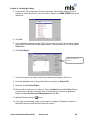
The In/Out notification icons at the bottom-left of the screen depict whether a copy of the
resource is available for loan at this time or not. If the latter, the user may place a reservation
on the item by clicking on the green Reserve icon near the top-right corner of the screen.
Total number of
reservations
placed for the
user currently
logged in.
By reserving a resource, the total number of reservations for the immediate borrower (shown
inside the icon) will increase by one.
A record of the reservation will be placed in the Reservations table in Management for the
Librarian to manage. Details of managing reservations in Management can be found in
Chapter 8: Reservations.
Librarian Only
To gain access to Management, an authorised user must first log on as normal. The
Librarian Only button will be activated if the user is authorised to use the administrative
areas of the system.
Details of setting up users to gain access to Librarian Only is covered in Chapter 12:
Security. Please note, Librarian Only shares the same function as „Grown Ups‟, when
using the Beach Scene interface rather than Junior Classic.
Junior Librarian.net User Guide
Version 11.4
18
Chapter 2: A General Overview of Junior Librarian.net
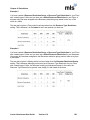
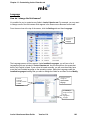
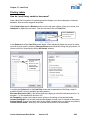
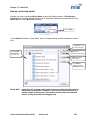
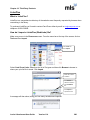
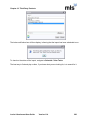
Settings
Use the Settings features to change fundamental aspects of the Junior Classic interface
display.
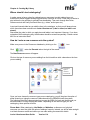
Choose from
five different
themes that
affect the icons
used throughout
the interface.
Choose from
eight different
backgrounds to
change the main
image displayed
behind the book
interface.
Click OK to save
any changes
made or click
Cancel to
discard the
changes and
return to the
book interface.
Change the
language used
throughout the
Junior Classic
interface
(currently
unavailable).
More features are available here if a user of Librarian Only has logged in before clicking on
Settings.
Enable or
disable the
Other Libraries
tab appearing
on the home
page. This
setting affects
any user of the
system.
Junior Librarian.net User Guide
Enable or
disable the
Circulate
module from
being unlocked
when the plugin
is not installed.
Version 11.4
19
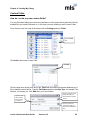
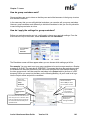
Chapter 2: A General Overview of Junior Librarian.net
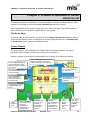
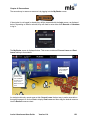
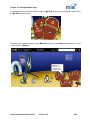
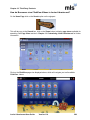
The Beach Scene
The student may
click on Login to
log into their
account.
Click on Borrow /
Return to issue and
return books to one
student at a time.
Click on Grown Ups
to get to Multi
Return, Grown Ups,
Multi Issue and
Read-IT.
Enter your Search
Criteria in here to quicksearch through your
resources.
Click on Search
to search
through the
library catalogue.
Click on My
Books to see the
books you have
borrowed,
reserved, and
reviewed.
Click on the
newspaper to
display News,
and the books
to display
Top Ten
Books.
Click on Reviews to
write a descriptive
review of a book you
have borrowed.
The returns trolley lists
resources that have
recently been returned to
the library.
Click on the help
icon to view ways in
getting support.
The search cloud
shows most recent
popular search
terms.
Click here to adjust interface
settings.
New reviews are
listed here.
Junior Librarian.net User Guide
Version 11.4
20
Chapter 2: A General Overview of Junior Librarian.net
Turning off Animation to Increase Speed
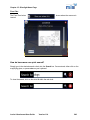
Turning off the animation on the home page may increase the speed of the system. Click on
the bottom right hand corner of the Home Page (as detailed in the image above) to move the
page across and display the Animations button.
Click the switch to change Animations from On to Off.
Please note, if you are experiencing any speed issues, please turn animations off before you
contact the helpdesk for assistance.
Borrow & Return
Borrow & Return allows for students to borrow or return books one at a time, one pupil at a
time. This may be accessed by both the teacher librarian and the student librarians.
Follow the instructions on the screen to either issue or return a book. Once you have
scanned the barcode label inside the book, scan the student‟s barcode label. If they already
have this book on loan, it will be returned. If they do not have this book on loan, the book will
be issued to them.
Junior Librarian.net User Guide
Version 11.4
21
Chapter 2: A General Overview of Junior Librarian.net
Search
Search is a facility for both the students and the librarian to use in order to search for
resources within the library. Below is the initial search screen which appears once you click
on Search.
Simply click on the subject field to navigate to a search page, as shown below, for that
particular subject
Resources are
displayed here; enter
resource by simply
clicking on it and
going to More
Listed above is
the number of
Resource Types
that relate to the
Animals subject
Junior Librarian.net User Guide
Drag Resources into My stuff
chest, in order for them to appear
in My Books, described below.
My Stuff can also be clicked on as
a shortcut to the My Books page.
Version 11.4
Above are suggested
keywords you may
wish to add to your
original Animals
search
22
Chapter 2: A General Overview of Junior Librarian.net
My Books
After clicking on My Books, the student will be asked to log in using either their Barcode or
Username. Alternatively, the user may place their finger on the IdentiKit fingerprint scanner
and be logged in, if the hardware is installed and available.
Once in My Books the student will have the ability to see their Current and Past loans.
They will also be able to Review resources they have borrowed, and Reserve resources that
they would like to borrow.
Place any items
you wish to
Reserve into
this chest.
Click on All to see
all books, Current
to see books
currently on loan,
and Past to see
past loans.
Click on My Stuff to
view resources
dragged into the chest
on the Search page.
My Books holds all of
your Current Loans and
Past Loans.
Junior Librarian.net User Guide
Version 11.4
23
Chapter 2: A General Overview of Junior Librarian.net
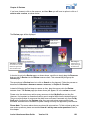
Reviews
When the student clicks on Reviews on the signpost, they will be prompted to log in if they
have not already done so. The below screen will appear, showing books which they have
borrowed. By simply dragging the resource into the Review treasure chest, a window will
pop up in which they may enter their review details and star rating for the resource.
Either click on
the resource,
then click More
to be given the
option to write a
Review. Or,
simply drag the
resource into
the Review
treasure chest.
Click on
Home to
navigate
back to the
Home page.
Once the resource has
been dragged into this
chest, a Review
window, like the one
shown below, will
appear.
Font size and
type options are
chosen here.
Text Colour and Smilies
are chosen here, review
details are typed in the
white window above.
Star ratings are
selected here by
simply clicking on
the desired star.
Junior Librarian.net User Guide
Version 11.4
24
Chapter 2: A General Overview of Junior Librarian.net
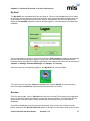
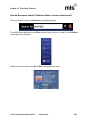
Grown Ups
Click on Grown Ups to log into the librarian‟s area of the software.
A Login box as shown below will appear, into which you will need to type your login
credentials.
Multi Return
Multi Return is only accessible once you have logged into the Grown Ups section.
Multi Return allows you to return a large amount of books, without the requirement of a
corresponding Student‟s barcode. This comes in handy when you have a large pile of
„return‟ books dumped on your desk!
Junior Librarian.net User Guide
Version 11.4
25
Chapter 2: A General Overview of Junior Librarian.net
Multi Issue
Multi Issue is a facility for issuing multiple books to one student. Once you have initially
scanned in the student‟s barcode, you are not required to scan it in again. Every book
barcode you scan after that is issued to that student.
There is an Undo facility, should you wish to reverse the issue of a book. All books issued
will show along the bottom toolbar of the screen.
Self Issue
Self Issue is a facility which allows students to use Borrow & Return on a computer,
without having to log into Grown Ups first.
To turn on Self Issue, load the Junior Librarian.net site and log into Grown Ups. Click on
the Welcome signpost following by the settings icon.
An option to Enable Self Service will become available at the foot of the list of options.
Simply place a tick in that box.
Once this box has been ticked, Borrow & Return will automatically load as soon as your
Junior Librarian.net site is loaded; giving students the ability to issue and return resources.
To turn off Self Issue, simply reverse this process.
Junior Librarian.net User Guide
Version 11.4
26
Chapter 2: A General Overview of Junior Librarian.net
Librarian Only
Librarian Only is the area in which you will manage your library system itself. This section,
as well as all other sections mentioned in this chapter, will be covered in more depth at a
later stage in this guide. Below is a brief description of various functions within the Librarian
Only area.
Click these
icons on the
menu bar to
access extra
settings
Click Help to access the
help topics and to access
version details
A single click
on any of
the icons on
the left gives
immediate
access to
that
database
Click these arrows to
move through the pages
of your records
Click here to search the
database you’re in. You can
click the Advanced Search
option to perform a more
detailed search. (See Chapter
15: Viewing Library Data for
more information)
The options in the Records
area enable you to perform
certain actions within each
database. These may
change according to the
database you’re in
You can access
the Tools
options from
all screens
Items in the catalogue shown in
Black indicate it’s available to issue.
Blue means it’s on loan. Green
means it’s been reserved.
Red mean it’s on loan and overdue
Click here to see the views you have set
up and to add new ones. The views will
vary depending on the screen you’re in.
(See Chapter 15: Viewing Library Data
for more information)
Read IT
The Read IT signpost is a direct link to the Digital Readit website.
Digital Readit is an information skills program which embeds literacy and ICT into the
curriculum. It is the ideal solution for the development of information skills across the
Foundation Stage / KS1 and KS2
Junior Librarian.net User Guide
Version 11.4
27
Chapter 3: Settings
Chapter 3: Settings
This chapter explains about the different ways in which you can customise Junior
Librarian.net. Some of the sections are covered in greater detail later in the guide.
The Password Manager menu allows you to choose the level of security you would like to
set for Borrower and User Manager passwords. User Manager is covered in greater detail
in Chapter 12.
The Module Settings / SIP2 Server menu enables the system to work with SIP2 Compatible
Terminals.
The Barcodes section tells you about the relevance of setting up barcode masks to enable
the system to read the different borrower and resource barcodes you will use.
The Junior Librarian Section explains how you enable / disable settings as you see fit for
your Circulate and Review screens. Junior Librarian is covered in greater detail in Chapter
5.
The Data Tidy section tells you how you can make changes to the data which is stored in
Junior Librarian.net. Data Tidy is covered in greater detail in Chapter 13.
The Fields section tells you how you can add your own custom fields into borrower, tutor
group and resource record cards. Custom Fields is covered in greater detail in Chapter 4.
The Language section explains how you can change the field names which appear in any of
the databases. Language is covered in greater detail in Chapter 11.
The Page Views section tells you how you can create your own views which show the
information that you require. Page Views is covered in greater detail in Chapter 11.
The Restrictions section explains how restrictions in Junior Librarian.net work. Restrictions
are covered in greater detail in Chapter 6.
The Reviews section explains how you can create your own review questions for when a
borrower reviews a resource that they have read. Reviews are covered in greater detail in
Chapter 9.
The Printing section tells you how you can set up Junior Librarian.net so that anyone who
wants to print information out in My Books has a limit on the number of records they can
print.
The Reminders section tells you how to set up your email reminder settings. Reminders are
covered in greater detail in Chapter 7.
The General section allows you to upload an image (i.e. your school logo) to appear on the
home page of Junior Librarian.net. This is also the place to switch interfaces for the home
page between Junior Classic and the Beach Scene.
Junior Librarian.net User Guide
Version 11.4
28
Chapter 3: Settings
Password Manager
Password Manager is the area in which the password strength for Borrower‟s user
accounts and User Management user accounts is set.
It is also the area in which you can apply a Global Update to all Borrower‟s usernames and
passwords in the system. This new feature takes a matter of minutes instead of having to
change usernames and passwords in each record manually!
To enter, click on Settings / Password Manager.
Click on Settings /
Password Manager
The Complexity tab on the Password Manager window displays three options each for both
the Borrower and User Manager accounts.
The requirements for each option are listed below:
Weak = Minimum of 5 characters in length
Strong = Minimum of 8 characters in length, containing at least 1 number
Complex = Minimum of 8 characters in length, containing at least 1 number and both upper /
lower case characters.
Junior Librarian.net User Guide
Version 11.4
29
Chapter 3: Settings
The Global Update tab on the Password Manager window displays options for Logon
Names; Passwords; and allows you to select to which Tutor Group(s) you would like to
apply these changes.
Select Logon
Name values
from the
options listed
Select more
than one Tutor
Group(s) by
holding the
CTRL key and
highlighting the
required groups
Select
Password
values from the
options listed
Please Note: The Global Update utility will only update borrower records which have no
existing logon details.
Junior Librarian.net User Guide
Version 11.4
30
Chapter 3: Settings
Module Settings / SIP2 Server
To enable the system to work with SIP2 compatible terminals click on Settings then Module
settings and SIP2 Server. Enter the Borrower Identifier and Resource Identifier settings.
Select the relevant
Borrower
Identifier method
from the drop
down list
Select the relevant
Resource Identifier
method from the
drop down list
Enter password
and click Save
Junior Librarian.net User Guide
Version 11.4
31
Chapter 3: Settings
Barcodes
All new resources and borrowers who are added to Junior Librarian.net will be allocated a
barcode. A barcode mask must be set up beforehand so that Junior Librarian.net can
recognise the borrower or resource when the barcode is scanned.
Please Note: various barcode masks are added to the system as default upon setup, to help
you get started on using your library as quickly as possible. However, barcode masks for
barcodes such as SLS barcodes will need to be set up by you manually.
Every barcode, whether it‟s for a resource or borrower, consists of characters. These can be
numbers (Numeric), letters (Alphabetic) or a mixture of both letters and numbers
(Alphanumeric).
By looking at the barcode, it‟s not always possible to see what characters it consists of, some
barcodes contain „hidden‟ characters. For this reason, we recommend that you use the
Notepad program on your computer to scan in the barcode which will show all of the
characters.
When creating a mask, symbols represent the characters of the barcode that you want to
scan. These symbols are hashes (#) which represent a numeric character, stars (*) which
represent alphabetic characters, question marks (?) which represent any character, and
percentage signs (%) which ignore a character. The mask you set up can be a combination
of all 4 symbols.
Please Note: There are some exceptions to using the * symbol. These will be covered later in
this section.
How do I set up a resource or borrower barcode mask consisting of
numbers only?
From the menu bar at the top of the screen, select Settings and then Barcodes. Click on the
Barcode Masks tab at the top of the screen. You will see that there are already some
barcode masks which have been set up for you. The top one is for a resource barcode which
has a barcode consisting of 6 numeric characters. The second one is for resource barcodes
which consist of 5 numeric characters and the last one is for borrower barcodes which consist
of 4 numeric characters.
To set up a new mask, click New.
Junior Librarian.net User Guide
Version 11.4
32
Chapter 3: Settings
Masks which
have already
been set up are
listed here
Junior Librarian.net User Guide
Click New to
create a
new mask
Version 11.4
33
Chapter 3: Settings
Type a description for the mask you are creating and then choose the barcode type from the
Type drop down menu. Look at the barcode you want to set up a mask for. An example of a
barcode could be „1234‟. As this consists of just numeric characters, type 4 hashes (# # # #)
in the Mask field. Click OK when you have finished.
Type a
description for
the mask here
Select the type
of barcode here
e.g. Resource
or Borrower
Type the symbols
which correspond
to the barcode here
If you have resource barcodes which consist of more numeric characters than the masks you
have created, repeat the above instructions. For example, as well as a barcode of „1234‟ you
could also have „12345‟. In this case, the mask would be „# # # # #‟.
How do I set up a resource or borrower barcode mask consisting of
numbers and letters?
You may have some resources which have a barcode that contains both numbers and letters
(alphanumeric).
It is important to scan a few of the same type of barcode in Notepad so that you can see what
characters are included.
For example: You could have a selection of resource barcodes which all start with the same
letter:
R0234
R2345
R4567
From the Settings, Barcodes screen click on New.
Click New to
create a
new mask.
Junior Librarian.net User Guide
Version 11.4
34
Chapter 3: Settings
Type a description for the mask you are creating and then choose the barcode type from the
Type drop down menu. As the barcodes in the example above consist of alphanumeric
characters with one letter at the beginning and then four numbers, type „R# # # #‟ in the Mask
field.
If the letter was at the end of the barcode (e.g.1234R), the mask would read „# # # #R‟.
MLS recommend that you use the letter in the mask as opposed to the * symbol. This is so
that the system can distinguish between the different types of barcodes which will be scanned
as your library becomes more established.
Click OK when you have finished.
Type a
description for
the mask here
Select the type of
barcode here e.g.
Resource or
Borrower
Type the symbols
which correspond
to the barcode here
What if my barcodes include a letter which is different on each barcode?
You may have a situation where you have some barcodes which consist of alphanumeric
characters, where a different letter has been included in each one. For example:
123A4
234B5
276V9
In this case, the mask would be „# # # * #‟ because it is better to use the * symbol as this
indicates that the letter could be any letter between A to Z. Not using the * symbol would
mean creating 26 different masks!
Please Note: If the letter appears in a different place on each barcode, a separate mask will
need to be set up accordingly. For example:
123A4
12B34
2345V
Junior Librarian.net User Guide
Version 11.4
35
Chapter 3: Settings
What does Returning the Value do?
On the screen when you are creating a new mask, there is an option you can tick called
Return the Value. By placing a tick in this box, you are simply instructing the system to look
at the scanned barcode and it will return the value of that barcode
For example: If you scan in the 6 digit barcode “000123”, it will simply return 123 as this is
the value of the barcode.
Please Note: If you have converted to Junior Librarian.net from Junior3, there will already
be a tick in the Return the Value box. If you are a new customer, the Return the Value box
will be empty.
If you are unsure about creating or editing barcode masks, please consult the MLS Help
desk.
What does the Modification Mask do?
The modification mask enables you to control how barcodes are stored and searched within
Junior Librarian.net.
Please consult the MLS Help desk for more information.
Junior Librarian.net User Guide
Version 11.4
36
Chapter 3: Settings
Junior Librarian
It is within Settings / Junior Librarian that you choose what options you wish to be made
available within Circulate.
By ticking Allow keyboard input you give the option of typing in the book and reader
barcodes, as well as scanning them with the barcode reader. This may be useful should your
barcode reader be out of order.
Allow printing allows you to print from Circulate.
If Allow a reference item to be issued is select, the ability to bypass the default restriction
of referenced items not being available for issue is given.
If Enable Auto Returns is selected, the only information required to return a book within
Circulate is the Resource‟s barcode number.
Allow a user to Undo a Mistake is a useful function which allows the librarian to click Undo
should they have issued or returned incorrectly.
In order to Issue or return multiple resources to a student at a time, the librarian is required to
enter a Multi Issue/Return Password. It is within this window that the password is set.
Change the time to Clear circulate system messages after __ seconds to fit with what is
convenient to the libaray.
Junior Librarian.net User Guide
Version 11.4
37
Chapter 3: Settings
Data Tidy
What is Data Tidy?
When entering resources or borrowers into Junior Librarian.net, especially if more than one
person has been in charge of this, you may have differences in the way that some words
have been entered into each field. To save you having to find and edit each individual record,
you can use Data Tidy to apply settings of your choice to both previously entered borrower
and resource records and any that are entered in the future.
How do I apply the settings for Data Tidy?
Make sure you are in the screen that you‟d like to apply the Data Tidy settings to e.g.
Resources or Borrowers. From the menu bar at the top of the screen click on Settings and
then Data Tidy.
Select Settings
and then Data
Tidy
If there is a tick in Do not tidy, uncheck this box so that you can select the settings for that
field. Click the drop down arrow at the end of the Field box and select the first field that you
would like to choose your data tidy settings for. Select the Data Tidy options you want.
Repeat this for each field you wish to apply Data Tidy settings to. Click Close when you have
finished.
When you have clicked Close, any future records which are added to the database will have
the Data Tidy settings applied to them when the Save option is clicked.
If there is a tick
in Do Not Tidy,
take this out
Use the drop down arrow to select
the field you would like to apply Data
Tidy settings to
Click here to activate Data
cleanse replacements and
Data cleanse remove
Select the Data
Tidy settings
you require for
the field
Click Close when
you have finished
For more information on Data Tidy, please see Chapter 13: Tidying Data.
Junior Librarian.net User Guide
Version 11.4
38
Chapter 3: Settings
Fields
You may find when adding your resources, borrowers or tutor groups that a particular field
isn‟t available for you to add information to. In this case you can create your own Custom
Fields.
How do I create my own custom fields?
From the menu bar at the top of the screen, click the Settings tab and then Fields.
Click the
Fields tab
Click Add to add a new Custom Field.
Click Add to
add a new
field
Click the drop down arrow at the right of the Table field and select the relevant database you
would like to add the custom field to. Type the Field Name and then the Data Type, for
example Text, Number, or Currency etc. Click Add when you have finished.
Click the arrow to
select which
database you want to
add the custom field
to
Type the name
of the custom
field you want
to add here
Click the arrow and
select the format you
want the custom field
to be in
Junior Librarian.net User Guide
Version 11.4
39
Chapter 3: Settings
The Custom Field you‟ve created will now be shown underneath the relevant table. You can
delete or rename it if you wish.
When you create a new Custom Field, it can be accessed by clicking on the Advanced tab
which is located on the individual resource or borrower record card.
Click the
Advanced
tab
The Custom
Field you’ve
created is
shown here
For more information on Custom Fields, please see Chapter 4: Creating My Library.
Junior Librarian.net User Guide
Version 11.4
40
Chapter 3: Settings
Language
It is possible for you to customise any fields in Junior Librarian.net. For example, you may
want to change some of the field names which appear in the Resources or Borrower record
card.
From the menu bar at the top of the screen, click the Settings tab and then Language.
Select
Language
The Language screen will then appear. Under Installed Languages, a list of languages
which are included in Junior Librarian.net is displayed. As you can see from the screenshot
below, only English is listed. If your school is based overseas, you will more than likely have
more than one installed language. Select the Language under the Installed Languages
heading and click on Modify to change field/s for that language.
Click the arrow to
change the
system default
language
Lists the
languages
currently
installed in
Junior
Librarian.ne
t
Junior Librarian.net User Guide
Click Modify to
change the
fields for the
highlighted
language
Version 11.4
41
Chapter 3: Settings
At the top left of the screen under the Section drop down list, select which section of
Junior Librarian.net you wish to change the fields for. To change Field Names, make sure
this has been selected.
Select the
section that you
would like to edit
the fields for
here e.g. Field
Names
A list of the fields you can change will then be shown. The original name is listed under the
Source heading, any modification name is listed under the Edited heading.
To change a field name, highlight the field in the list i.e. highlight „Recycled‟ to change to
„Deleted‟. Click the Edit option next to the field name that you want to change. The cursor will
flash next to the field name. Type the new name e.g.
Deleted, and then click Save at the bottom of the screen. Click Save again on the main
languages page.
Please note: The new field names will be shown only once the IIS server has been restarted.
The edited field
name is shown in
this column
The original field
name is shown in
this column
Type the
new field
name
Click Save
when you have
finished
For more information on Languages, please see Chapter 11: Customising Junior
Librarian.net, section on Language.
Junior Librarian.net User Guide
Version 11.4
42
Chapter 3: Settings
Page Views
It is possible for you to customise some of the tabs which are held on a resource and
borrower record and on the circulate screen.
From the menu bar at the top of the page select Settings and then Page Views.
Click on
Settings
and then
Page Views
The Settings - Page Views screen will then appear. Click on the relevant tab to change page
views e.g. Borrowers.
Click on tab you’d
like to change
Click on the relevant sub-tab e.g. Reservations.
Click on the sub-tab
you’d like to change
Junior Librarian.net User Guide
Version 11.4
43
Chapter 3: Settings
The Page View - Edit screen will appear. This is the same screen you‟ll see when creating
and editing the standard page views. See Chapter 11: Customising Junior Librarian.net
for more information.
Make the required changes to the view and then click Save. To see the changes, open a
borrower record and click on the tab you‟ve edited.
Repeat this for each tab that you‟d like to edit.
Make the required
changes and then
click Save
For more information on Page Views, please see Chapter 11: Customising Junior
Librarian.net.
Junior Librarian.net User Guide
Version 11.4
44
Chapter 3: Settings
Restrictions
How do restrictions work?
Restrictions in Junior Librarian.net work similarly to Active Directory permission settings.
This means that you create different borrower restriction groups, set up the permissions for
those groups and then add your borrowers to whichever group you want them to belong to.
One of the main benefits of this is that you can create as many restriction groups as you wish,
all with different allowances. For example, you may have a restriction group for your staff
borrowers and one for your standard borrowers, giving the staff restriction group more
allowances than the borrowers.
As well as being able to set up restriction groups for your borrowers, you can also set
restrictions for your resource types e.g. Book. And the different media types within the
resource type e.g. Paperback. If you have set various different restrictions for your resources,
media types and borrowers, the system will compare the loan period which has been set for
all 3 and will take the lowest of them all. This will be covered in greater detail later in this
section.
Please Note: There is a default restriction group set up when you first install Junior
Librarian.net. This restriction group is called Normal and allows your borrowers to take out
and reserve 3 resources for a maximum of 14 days. Any existing borrower and any new
borrowers who are added to Junior Librarian.net will belong to the default, Normal, security
group initially. You can then change the default restriction group (as long as you have created
others), to something more suitable to that particular Tutor Group or individual.
To create a new borrower restriction group, click on the Settings tab and then Restrictions
from the menu bar at the top of the screen.
Click on Settings
and then
Restrictions
For more information on Restrictions, please see Chapter 6: Restrictions.
Junior Librarian.net User Guide
Version 11.4
45
Chapter 3: Settings
Reservations:
Click on Settings, and then Restrictions. It is within this area that general settings for
Reservations are set.
Click on
Settings and
then
Reservations
Delete reservations older than __ Days deletes all reservations that have reached the
specified time limit.
Stop reservations for on shelf resources prohibits books, which are on the shelf and
available, from being reserved.
By ticking Reprint reservations for resources which already have a reservation slip
upon return? The librarian is given the option to reprint the last reservation slip printed for
that resource.
Reservation restrictions are discussed in Chapter 6: Restrictions.
Junior Librarian.net User Guide
Version 11.4
46
Chapter 3: Settings
Reviews
Your borrowers can make reviews of the resources they take out on loan using My Books.
You can create a more structured way for the borrowers to write their reviews by creating
your own questions for them to answer.
From the menu bar at the top of the screen, select Settings and then Reviews.
Click
Settings
and then
Reviews
Type the questions you‟d like your borrowers to answer, making sure you do so for both your
Fiction and Non-Fiction items (if needed). Click Save when you have finished.
Click here to
change the
screen to
Fiction or
Non-Fiction
You can
change the
layout using
the Tools
here
Type your
review
questions
here
Click Save
when you
have
finished
For more information on Reviews, please see Chapter 9: Reviews
Junior Librarian.net User Guide
Version 11.4
47
Chapter 3: Settings
Printing
It‟s possible to restrict the amount of pages which are printed from My Books.
From the menu bar at the top of the screen, select Settings and then Printing.
Click on
Settings and
then Printing
Specify the maximum number of pages that you‟d like anyone printing from My Books to be
able to print. Click Save.
Enter the
number of
pages here
Junior Librarian.net User Guide
Version 11.4
48
Chapter 3: Settings
Reminders
This page is where you can set some global settings for your reminders. These include a
default email address that will be used to send the emails, a checkbox to enable the sending
of emails and also the page orientation of the reminders.
From the menu bar at the top of the screen, select Settings and then Reminders.
Click on Settings
and then
Reminders
Enter an email address from which your reminders will be sent from. The SMTP email
address allows the librarian to send the emails from their own email address, which then
enables the borrowers to email a reply back. This also means that they will get an email in the
event of a reminder email being bounced back, perhaps because the address is incorrect.
Enter the email
address of which
your reminders will
be sent from
Change the page
orientation of the
email reminder
here
Select how you
would like to Sort
your reminders
here
Select how you
would like to Group
your reminders
here
Click Save when you
have finished
You can also change the page orientation of the email reminders here, how you wish to group
the reminders (grouping by Tutor Group Name is handy when printing / emailing group
reminders), and how you wish to Sort Reminders. Click Save when you have finished.
Please see Chapter 7: Loans, section How do I specify what format the reminder is sent
in? for more information on the reminder default output settings.
Junior Librarian.net User Guide
Version 11.4
49
Chapter 3: Settings
General
The General menu option allows you to change the image that appears on the home page for
Junior Librarian.net.
From the menu bar at the top of the screen, select Settings and then General.
Click on Settings
and then
General
Click on Browse to browse to the image before clicking Upload and finally, Save.
Click on
Browse to
browse to
the image.
Junior Librarian.net User Guide
Version 11.4
50
Chapter 3: Settings
Interface switching
To choose between Junior Classic and the Beach Scene interfaces, follow these instructions.
Click on the
Interface
tab.
Click on the drop-down
arrow and choose the
desired interface from
the list.
Click on the Save
button to leave this area
and save any changes
made.
After choosing the desired interface from the list in the drop-down box, click on the Save
button to close the window and save the changes that have been made.
Close the whole Librarian Only „Management‟ window and return to the Junior Librarian.net
home page. Use the controls of the web browser to refresh the home page before expecting
to see the interface switching taken into effect.
Junior Librarian.net User Guide
Version 11.4
51
Chapter 4: Creating My Library
Chapter 4: Creating My Library
This chapter will explain how to add your resources and borrowers to the system. We
recommend that you add your resources first because this can take up the most time.
The section Cataloguing Resources starts off by explaining where you should put your sticky
barcode labels (accession numbers) and the recommended order in which to add them to the
system. It then moves on to how you add a resource, what to do if you make any mistakes and
how to link resources together. It also explains how to copy a resource‟s details and finally tells
you what other information is held inside a resource record.
The Floor Plan section tells you how to create a floor plan and how to import it into Junior
Librarian.net. It also tells you how to add the location of your resources to the floor plan and
how to edit an existing plan.
The section Adding Borrowers explains how to add a new tutor group, and then how to add
your borrowers manually into those groups. This section also covers how you import your
borrower‟s details using your school‟s own administration system, and what to do if your school
has borrowers in mixed year groups.
The section Custom Fields explains how you can create your own fields within a resource or
borrower record.
Cataloguing Resources
The Resources database is where all of your catalogued items are stored. To access
Resources, click on the
icon from the left of the screen in Grown Ups.
Where do I put the barcode labels?
Every item should be given an Accession number starting from 00001. The bar-coded sticky
labels included with the package for new users represent these numbers and should be
attached onto each item. Extra labels can be ordered if necessary.
We recommend you insert the labels on a white or light coloured background if possible.
This will insure that there is less chance of the barcode reader not reading the label.
Since the bar code reader is a non-contact device, it is not necessary to laminate the
labels for protection.
We advise that the labels should be inserted as each item is catalogued. Items already
catalogued can then be recognised because they have a label.
Number your resources from 00001 upwards. It does not matter to the system what
order your resources are numbered in or whether there are any gaps.
Junior Librarian.net User Guide
Version 11.4
52
Chapter 4: Creating My Library
Where should I start cataloguing?
It makes sense to have a plan for cataloguing your resources to avoid missing items out;
therefore we would suggest cataloguing your library a section at a time. Fiction may be easier to
start with as the key wording is generally less demanding. Then work through Non-fiction,
Reference stock and finally non-book items (e.g. videos, audio tapes etc).
Insert each barcode label as you add the item to the catalogue, so that you will always know
which items have been entered onto Junior Librarian.net. (Label = stored, no label = not
stored).
Remember the order in which you apply barcode labels is not important. However, if you have
ordered an MLS cataloguing day, the barcodes should be entered sequentially. Please contact
MLS for an instruction sheet.
How do I enter a new resource onto the system?
Make sure you are in the Resources database by clicking on the
Click
icon.
under the Records tab on the right of the screen.
The New Resource screen will appear
Click on the type of resource you are adding from the list and then stick a barcode on the item
you are adding.
Choose the
type of
resource
from the list
Once you have chosen the resource type you are cataloguing, you will be given the option of
either scanning or typing the resource‟s barcode and/or the ISBN/EAN onto the system.
The following instructions demonstrate how to scan the ISBN of a book and the barcode you
have allocated to it using the barcode reader. Depending on the resource type you are
cataloguing, these options will differ.
Please Note: When cataloguing Live Media and Websites, as these are not „physical‟
resources you won‟t be given the option of adding a barcode. Instead, you will be taken straight
to a blank resource record card where you can start adding the resource‟s details.
Junior Librarian.net User Guide
Version 11.4
53
Chapter 4: Creating My Library
Scan the EAN/ISBN barcode of the book using the barcode reader
Scan the barcode label of the item you are cataloguing or click
Auto to allow the system to nominate a number.
If the book does not have an EAN/ISBN, click Continue. You will be taken to a blank resource
record card where you can add the details manually.
Once you have scanned or typed the resource‟s barcode information, you will be taken to the
resource record card screen. If you are cataloguing a book, you may find that a lot of the fields
in the resource record have been filled in automatically from Discovery Online. For any other
resource, the fields will be blank and you will have to fill them in manually.
You can add extra custom fields which are displayed in the Advanced tab on each resource.
See How do I create my own custom fields? later in this section for how to do this.
Junior Librarian.net User Guide
Version 11.4
54
Chapter 4: Creating My Library
How do I catalogue a Book?
From the New Resource screen click on the
icon.
Follow the instructions above on how to scan or type the resource‟s barcode.
Please Note:
If the ISBN does not have a barcode you will need to type it in. Ignore any spaces or
hyphens (e.g. 9 781-2345-67896 = 9781234567896)
If the ISBN does not appear on the back cover of the book, look on the back of the title
page, or alternatively at the very end of the book or inside the dust jacket.
If the book is very old, it may only have a 9-digit SBN (Standard Book Number). If this is
the case you need to add a 0 to the beginning of the number (e.g. 123456789 =
0123456789) to make it an ISBN (International Standard Book Number).
If the number is rejected, you may have made a mistake, so try again. Very occasionally
an ISBN may be printed incorrectly and will either not register or bring up the wrong data.
If this is the case, leave the ISBN field blank and enter the data manually by clicking
continue.
If an ISBN is entered, the computer will search the Discovery Online database for the
record, which, if found, will close the Resources window and take you to the resources
card to finish editing the record. If no record is found, you will go to blank resources
card to enter the details manually.
Once the resource record screen appears, click in each field in which you wish to add
information. When you are entering new books onto the system, the information will
automatically be taken from Discovery Online, provided Discovery Online holds the
information on that particular item.
The Date Added field
will automatically be
filled in with today’s
date. You can change
this if you wish
If you select
‘Reference’ or
‘Ref’ as a class, a
tick will
automatically be
placed in the
Reference box
Click on the arrow to
see previously entered
information
Click the drop down
arrow to see a list of
keywords. You can
jump to a specific
word by typing in the
start of the word
Click Save
when you have
finished
Junior Librarian.net User Guide
Version 11.4
55
Chapter 4: Creating My Library
There are drop down arrows next to most fields on the screen. Clicking these means you can
select from a list of previously entered information.
If you are cataloguing a book and it is either very old or very new, Discovery Online may not
hold the information at that time. If that‟s the case, you can either enter the details manually or
wait until Discovery Online holds the information.
Please be assured that Discovery Online does get updated.
If you wish to change any information which has already been entered, simply highlight it and
then type the new details. Click Save when you have finished.
What should I do with school library service books?
If you borrow books on long-term loan from your School Library Service, it is usual to add these
to your catalogue with an indication as to their owner. On the Owner field type School Library
Service. It is possible to use the existing SLS accession barcode in the book (if it already has
one).
How do I catalogue a film?
From the New Resource screen click on the
icon.
Follow the instructions at the beginning of this section on how to enter the resource‟s barcode.
Please note that with items other than Books you are not required to enter an ISBN number.
Once the resource record screen appears, click in each field in which you wish to add
information. There are drop down arrows next to most fields on the screen. Clicking these
means you can select from a list of previously entered information. Click Save when you‟ve
finished.
The Date Added field
will automatically be
filled in with today’s
date. You can change
this if you wish
Click the drop down
arrow to see a list of
keywords. You can
jump to a specific
word by typing in the
start of the word
Click Save
when you have
finished
Junior Librarian.net User Guide
Version 11.4
56
Chapter 4: Creating My Library
How do I catalogue hardware?
You may want to catalogue your hardware, e.g. mobile phones, projectors, cameras, laptops etc.
From the New Resource screen click on the
icon.
Follow the instructions at the beginning of this section on how to enter the resource‟s barcode.
Please note that with items other than Books you are not required to enter an ISBN number.
Once the resource record screen appears, click in each field in which you wish to add
information. There are drop down arrows next to most fields on the screen. Clicking these
means you can select from a list of previously entered information. Click Save when you‟ve
finished.
The Date Added field
will automatically be
filled in with today’s
date. You can change
this if you wish
Enter the
resource details
by filling in the
required fields
Click Save
when you have
finished
Junior Librarian.net User Guide
Version 11.4
Click the drop down
arrow to see a list of
keywords. You can
jump to a specific
word by typing in the
start of the word
57
Chapter 4: Creating My Library
How do I catalogue live media?
You may want to catalogue live media, e.g. video‟s, images etc.
From the New Resource screen click on the
icon.
Once the resource record screen appears, click in each field in which you wish to add
information. There are drop down arrows next to most fields on the screen. Clicking these
means you can select from a list of previously entered information. Click Save when you‟ve
finished.
You can also add extra custom fields which are displayed in the Advanced tab. See How do I
create my own custom fields? later in this section.
Please Note: When you save the live media record it will transfer the media file to your web
server and then re-encode the media file into a flash format where it will be compatible for all
users who have flash installed. If you get any problems saving your live media record, it will most
likely be because you don‟t have the required software on your web server to read the media
file. To test this, you will need to try and play the media file directly from your web server. If you
have any problems at all, please contact the helpdesk.
Enter the
resource details
by filling in the
required fields
Click Browse to
browse to
where the live
media is stored
Click the drop down
arrow to see a list of
keywords. You can
jump to a specific
word by typing in the
start of the word
Junior Librarian.net User Guide
Click Save
when you have
finished
Version 11.4
58
Chapter 4: Creating My Library
How do I catalogue music?
From the New Resource screen click on the
icon
Follow the instructions at the beginning of this section on how to enter the resource‟s barcode.
Please note that with items other than Books you are not required to enter an ISBN number.
Once the resource record screen appears, click in each field in which you wish to add
information. There are drop down arrows next to most fields on the screen. Clicking these
means you can select from a list of previously entered information. Click Save when you‟ve
finished.
Enter the
resource details
by filling in the
required fields
Click the drop down
arrow to see a list of
keywords. You can
jump to a specific
word by typing in the
start of the word
Click Save
when you have
finished
How do I catalogue a musical instrument?
From the New Resource screen click on the
icon
Follow the instructions at the beginning of this section on how to enter the resource‟s barcode.
Please note that with items other than Books you are not required to enter an ISBN number.
Once the resource record screen appears, click in each field in which you wish to add
information. There are drop down arrows next to most fields on the screen. Clicking these
means you can select from a list of previously entered information. Click Save when you‟ve
finished.
Click the drop down
arrow to see a list of
keywords. You can
jump to a specific
word by typing in the
start of the word
Click Save
when you have
finished
Junior Librarian.net User Guide
Version 11.4
59
Chapter 4: Creating My Library
How do I catalogue sheet music?
From the New Resource screen click on the
icon
Follow the instructions at the beginning of this section on how to enter the resource‟s barcode.
Please note that with items other than Books you are not required to enter an ISBN number.
Once the resource record screen appears, click in each field in which you wish to add
information. There are drop down arrows next to most fields on the screen. Clicking these
means you can select from a list of previously entered information. Click Save when you‟ve
finished.
Click the drop down
arrow to see a list of
keywords. You can
jump to a specific
word by typing in the
start of the word
Click Save
when you
have finished
How do I catalogue a Document?
From the New Resource screen click on the
icon.
The resource screen will appear immediately for this document, as you do not need to barcode
the document and physically store it in your library, as it will be stored on the database itself.
This allows Word, Excel and PDF files to be uploaded to the system.
Type in the
document
details here
To add the
document, first
click Browse and
browse to the
document. Then
click Update to
update the record
with that
document.
Junior Librarian.net User Guide
Click Save
Version 11.4
60
Chapter 4: Creating My Library
How do I catalogue a picture?
From the New Resource screen click on the
icon.
Once the resource record screen appears, click in each field in which you wish to add
information. There are drop down arrows next to most fields on the screen. Clicking these
means you can select from a list of previously entered information. Click Save when you‟ve
finished.
Click the drop down
arrow to see a list of
keywords. You can
jump to a specific
word by typing in the
start of the word
Click Browse to
browse to
where the
picture is
stored
Click Save
when you have
finished
How do I catalogue a website?
From the New Resource screen click on the
icon.
Once the resource record screen appears, click in each field in which you wish to add
information.
Type the URL
of the website
here
Enter the
resource details
by filling in the
required fields
Click the drop down
arrow to see a list of
keywords. You can
jump to a specific
word by typing in the
start of the word
Junior Librarian.net User Guide
Click Save
when you have
finished
Version 11.4
61
Chapter 4: Creating My Library
How do I catalogue a text book?
From the New Resource screen click on the
icon.
Once the resource record screen appears, click in each field in which you wish to add
information. There are drop down arrows next to most fields on the screen. Clicking these
means you can select from a list of previously entered information. Click Save when you‟ve
finished.
Click the drop down
arrow to see a list of
keywords. You can
jump to a specific
word by typing in the
start of the word
Click Save
when you have
finished
How do I catalogue an item which doesn‟t belong to a specific resource
type?
If you want to catalogue resources which don‟t fall under any of the main resource types, you
can use the „Generic‟ type.
From the New Resource screen click on the
icon.
Once the resource record screen appears, click in each field in which you wish to add
information. There are drop down arrows next to most fields on the screen. Clicking these
means you can select from a list of previously entered information. Click Save when you‟ve
finished.
Click the drop down
arrow to see a list of
keywords. You can
jump to a specific
word by typing in the
start of the word
Enter the
resource details
by filling in the
required fields
Click Save
when you have
finished
Junior Librarian.net User Guide
Version 11.4
62
Chapter 4: Creating My Library
How do I catalogue an eBook?
From the New Resource screen click on the
icon.
Once the resource record screen appears, click in each field in which you wish to add
information. There are drop down arrows next to most fields on the screen. Clicking these
means you can select from a list of previously entered information. Click Save when you‟ve
finished
Junior Librarian.net User Guide
Version 11.4
63
Chapter 4: Creating My Library
What if I make a mistake when cataloguing?
If you make a mistake when cataloguing and want to start again, click the Close button. You can
of course re-visit the record at any time in the future and change, delete or add information.
How do I copy a resource?
If you have multiple copies of the same resource, to save you having to add each one manually
you can use the Copy function. This copies all of the details from the first copy excluding the
accession number, which you enter manually.
From the resources screen, highlight the book which you‟d like to copy and then click
the icon under the Records tab.
Scan or type the barcode number you are assigning to the copy and then click Copy. If you
have more than one copy to enter, repeat the process until all of barcode numbers of the new
copies are listed in the Copies field and then click Close.
Details of the
book you are
copying
Type or scan the barcode
number you are assigning
to the new copy and then
click Copy to add it to the
Copies list
Click Close
when you have
finished
Please Note: The resource types you can copy are: Books, Hardware, Film/DVD‟s and Generic.
Junior Librarian.net User Guide
Version 11.4
64
Chapter 4: Creating My Library
How do I link and un-link resource items?
It‟s possible for you to link your catalogue resources together so that when your borrowers are
searching the catalogue, they will be able to see items which might also be of interest.
An example for wanting to do this could be that you have a book in your library on the RSPCA
as well as the RSPCA website. It would be very useful to you and your borrowers if the two
resources were linked together.
Using the example above, first find and go into the book on the RSPCA and then click on the
Linked Items tab. Click on Find Resource or if you know the barcode of the resource you want
to link, type it in the box and then click Find Resource.
Click on Find
Resource or type
the barcode of
the resource you
want to be linked
in the box
Select the resource you want to be linked from the list, using Quick Search if you need to. Once
it‟s highlighted, click on Select at the bottom right of the screen. You can select multiple
Resources, if you wish.
If you clicked on
Find Resource,
highlight the
resource from the
list that you want
to link and then
click on Select
Junior Librarian.net User Guide
Version 11.4
65
Chapter 4: Creating My Library
The resource/s will now be listed in the Linked Items tab.
Once the
resource you wish
to remove is
highlighted, click
on Remove Link
to remove the link
between the two
items.
To remove a resource link, simply highlight the linked resource and click Remove Link.
What other information is stored on a resource record?
On each resource record card there are a number of different tabs. The tabs you see depend on
the type of resource record you are in. You can click on each available tab to view the
information stored.
Advanced
The advanced tab holds extra information and settings which generally you will not need to
access on a regular basis.
Resource Type allows you to change the type of resource
The Unlink Resource button is very useful when cataloguing a series of encyclopaedias, for
example. When cataloguing resources with the same ISBN the resource records become linked
or joined together. This means that any change made to one record is then replicated to all of
the other records with the same ISBN number, and any reservations placed on one of those
resources, will replicate to all copies of that book.
While this is useful should you be cataloguing 20 of the exact same book, it can become a
nuisance if you are cataloguing 20 encyclopaedias which each have a different title. To remove
this link, simply click on the Unlink Resource button. Please note that this will mean any
Junior Librarian.net User Guide
Version 11.4
66
Chapter 4: Creating My Library
reservations made on that resource, will now only be on that particular resource not any of the
others in that series.
Restrictions allow you to edit the restrictions for the individual resource record. These are
covered in greater detail in Chapter 6.
Change the resource
type here
If you have added any
Custom Fields they will
show here. (See
Custom Fields section
later in this chapter
for information)
Change
restrictions for the
resource here.
(See Chapter 6:
Restrictions for
information)
Loans
The Loans tab shows all current and past loan information for the resource.
You can change the layout of the loans screen. (See Chapter 3: Settings, section on Page
Views)
Tells you when
the resource is
due back
Shows which borrower
the resource is
currently on loan to. If
the borrower field is
blank, the resource
isn’t on loan
A full list of
current and
past loans is
displayed here
Junior Librarian.net User Guide
Version 11.4
67
Chapter 4: Creating My Library
Reservations
The Reservations tab lists all of the details of the resources current reservations.
You can change the layout of the reservations screen. (See Chapter 3: Settings, section on
Page Views)
A full list of
current
reservations is
displayed here
Junior Librarian.net User Guide
Version 11.4
68
Chapter 4: Creating My Library
Summary
The Summary tab shows a book summary from Discovery Online, or any notes on the
resource that you want others to be able to view.
Add any notes
here that you
want to be
seen by people
using Enquiry
Add any notes you
want anyone
using the Grown
Ups section to see
here
Click Save when
you have finished
Public Notes allows you to write a note which is viewable by everybody who accesses the
resource either via the Grown Ups section or Search. For example, you may want to let
borrowers and staff know that the resource is currently unavailable.
Notes allows you to record information on the resource record purely for viewing by anyone who
accesses the Grown Ups section. For example, if a book is returned to the library damaged, you
may want to write a note to remind yourself to replace it after completing your next stockcheck.
Photograph
Junior Librarian.net User Guide
Version 11.4
69
Chapter 4: Creating My Library
The Photograph tab displays any photograph of the resource, either one you have attached
manually or one which is being obtained from Discovery Online.
Click Browse to
search for an
image to add
to the resource
Linked Items
The Linked Items tab shows any resources which are linked to this one, and also enables you
to link your resources together.
For example, you may have catalogued a website relating to Harry Potter and you want this to
be linked to your Harry Potter books.
Please see section on How do I link / unlink resource items? earlier in this chapter.
Lists the
resources which
are linked to this
one
Floor Plan
Junior Librarian.net User Guide
Version 11.4
70
Chapter 4: Creating My Library
The Floor Plan tab allows you to specify the location of the resource on a floor plan image.
For more information on floor plans please see the Floor Plan section below.
Junior Librarian.net User Guide
Version 11.4
71
Chapter 4: Creating My Library
Floor Plan
How do I create a floor plan image?
Using a paint package (e.g. Paint Shop Pro) draw a simple floor plan of your library. We
recommend the size of 630 x 400 pixels. A number of users have given this as a project to pupils
as very often they are already quite familiar with packages such as Paint Shop Pro.
MLS recommend that you save the floor plan in .png format or .jpg because the quality of the
image will be better, however you can save it in any format you wish. Once the floor plan has
been created, save it somewhere you can easily access it.
How do add a floor plan record?
You can have as many floor plan records as you wish in Junior Librarian.net.
From the menu bar at the top of the screen, select Database and then Floor Plan.
Select
Database and
then Floor Plan
under the Records tab on the right of the screen. Type a name for the floor
Click
plan in the Description box at the top of the screen.
Click Browse and select the location of the saved floor plan. Once the location is specified, click
Update.
Type a
description here
Click Browse to
select the
location of the
floor plan
Click Update to
import the
floor plan
Junior Librarian.net User Guide
Version 11.4
72
Chapter 4: Creating My Library
The floor plan image will be shown. Click Save.
Click Save
The floor plan will then be shown as a new record on the Floor Plan screen.
The new floor
plan is shown
Junior Librarian.net User Guide
Version 11.4
73
Chapter 4: Creating My Library
How do I add an individual resource to the floor plan?
From within the Resources screen, find and select the resource that you‟d like to add to the
floor plan.
Find and highlight
the resource
Once in the resource record click on the Floor Plan tab at the top of the screen. Place the
mouse pointer at the location of the item and click. A red flashing beacon will now appear
denoting the position of the item. Click Save to save the location. You will then be taken back to
the main Resources screen.
Click on the
Floor Plan tab
Click your
mouse at the
location of the
resource.
Click Save
Junior Librarian.net User Guide
Version 11.4
74
Chapter 4: Creating My Library
How do I globally add a selection of resources to the floor plan?
You may want to add specific resources to an area of the floor plan. Perhaps you have an area
of your library where you keep your fiction resources. Junior Librarian.net allows you to search
your catalogue for specific resources, for example by classification, media type, Title etc. and
add these resources to a floor plan (you can have as many floor plans as you wish!)
From the Resources screen, use the Advanced Search to search for your resources, for
example Fiction.
For more information on searching, please see Chapter 14: Viewing Library Data, section on
Searching Databases.
Once you have just your fiction resources on the screen, from the menu bar at the top of the
screen select Tools and then Floor Plan.
Click Tools and
then Floor Plan
From the Floor Plan drop down menu, select the floor plan that you want to add the resources
to, e.g. Fiction.
Select the floor
plan that you’d
like to add the
resources to
Junior Librarian.net User Guide
Version 11.4
75
Chapter 4: Creating My Library
Place the mouse pointer at the location of the item and click. A red flashing beacon will now
appear denoting the position of the item. Click Apply to save the location.
Click your mouse
at the location of
the resources
Click Apply
Click Yes to update the resources location.
You will then be taken back to the main Resources screen.
Junior Librarian.net User Guide
Version 11.4
76
Chapter 4: Creating My Library
How do I edit a floor plan record?
From the menu bar at the top of the screen select Database and then Floor Plan.
Select
Database and
then Floor Plan
Highlight the floor plan record you want to edit and then click Edit under the Records tab on the
right of the screen.
Click Edit
Highlight the
floor plan
you’d like to
edit
If you want to simply change the name of a floor plan, type the new name in the Description
box at the top of the screen and then click Save.
Type the new
floor plan
name here
Click Save
Junior Librarian.net User Guide
Version 11.4
77
Chapter 4: Creating My Library
If you have made changes to your floor plan image and want to update the one which is stored
in the floor plan record, highlight the floor plan record from the list in the Floor Plan screen and
click
Click Browse at the bottom of the screen and select the location of the updated floor plan
image. Once the location has been specified, click Update.
Click Browse to select
the location of the
updated floor plan
Click Update to
import the
floor plan
The new floor plan image will be shown in the floor plan record. Click Save.
Click Save
Junior Librarian.net User Guide
Version 11.4
78
Chapter 4: Creating My Library
How do I delete a floor plan record?
From the menu bar at the top of the screen select Database and then Floor Plan.
Select
Database and
then Floor Plan
Highlight the floor plan record that you want to delete and then click on
the Records tab on the right of the screen.
Highlight the
floor plan
you’d like to
delete
under
Click Remove
The floor plan record will then be removed to the Floor Plan Recycle Bin.
If you want to restore it, click on
screen.
under the Records tab on the right of the
Highlight the floor plan record from the list and then click on
Records tab on the right of the screen.
under the
Please Note: If you restore a floor plan from the Recycle Bin, the links between your resources
and that floor plan will also be restored. Once you‟ve deleted a floor plan record from the
Recycle Bin, all links between your resources and the floor plan will be gone.
Junior Librarian.net User Guide
Version 11.4
79
Chapter 4: Creating My Library
How do I export a floor plan image?
If you accidentally delete a floor plan image which you‟ve designed, you can export the image
from the floor plan record.
From the menu bar at the top of the screen select Database and then Floor Plan.
Select
Database and
then Floor Plan
Highlight the floor plan record that you want the image for and then
Records tab on the right of the screen.
Highlight the
floor plan
you’d like the
image for
Junior Librarian.net User Guide
click under the
Click
Edit
Version 11.4
80
Chapter 4: Creating My Library
Click Export at the bottom of the screen.
Click Export
Click Save and select a location for where you want to save the image to.
Junior Librarian.net User Guide
Version 11.4
81
Chapter 4: Creating My Library
Adding Borrowers
How do I create a new tutor group?
Before you can manually add your borrowers, you need to create the tutor groups to which they
will belong.
Make sure you are in the Tutor Groups database by clicking on the
icon
under the Records tab on the right of the screen.
Click
A Blank Tutor Groups screen will then appear.
If you have
added any
borrower
custom fields
they will be
listed here
Enter the
details of the
tutor group
here
Select the
restriction type
that the group
will have here
(See Chapter 6:
Restrictions for
more
information)
Click save
when you’ve
finished
Please note that you cannot have two tutor groups of the same Group Name and Year Group.
You will need to repeat this process until you‟ve entered all of your tutor groups into Junior
Librarian.net.
Junior Librarian.net User Guide
Version 11.4
82
Chapter 4: Creating My Library
How do I add my borrowers manually?
Once you have all of your tutor groups on the system, you can then start to add your borrowers.
Make sure you are in the Borrowers database by clicking on the
icon.
under the Records tab on the right of the screen.
Click
The Borrower – New screen will appear.
Either enter the PIN you wish
to allocate to the new
borrower, or click the Auto
button to allocate the first
available number
Click Continue to
move to the Borrower
record card
Scan or type the barcode you are assigning to the borrower. Alternatively you can click Auto to
allow the system to allocate the next available number. Click Continue.
A blank Borrower card will appear. Fill in the required details and then click Save.
Use Notes to
add any
notes about
the borrower
Fill in the
borrower‟s
details, making
sure you enter
their Surname
and Group /
Year Group
details
The Address
field is optional
Click Modify
to add a
photograph of
the borrower
Use the
Guardian tabs
to add details
about the
borrower‟s
guardian/s
Junior Librarian.net User Guide
Click Save
when you
have finished
Version 11.4
83
Chapter 4: Creating My Library
How do I add a photograph of a borrower?
From within the borrower‟s record in the Details tab, click on the Modify tab on the right of the
screen.
Click Browse to browse to where the photograph is stored. Once the location of the photograph
is listed, click on the Update tab. The photograph will then show in the box. Click Close.
Click Browse to
browse to where
the photograph is
stored
Click Update to
import the
photograph
How do I import my borrowers using the school‟s administration system?
Each year (usually September) the students in the office administration system will be 'promoted'
to new tutor groups, and new students will be added into the system. You can use the
administration system to create a file containing all of your borrower‟s details to import into
Junior Librarian.net. Once you have created the file by following the instructions relevant to
your school‟s administration system below, you will then need to see the instructions in the subsection How do I import my student file into Junior Librarian.net?
It is pointless to use the administration system to add your borrowers before they have been
promoted or added. Ask your office administrator if the students have been 'promoted' before
you start.
The intake details may be all entered into your school‟s administration system, but they may not
yet be assigned an administration number. If they have not been assigned a number, again it‟s
best not to use this method to add your borrowers, as the administration number is what
distinguishes one record from the next.
Tutor groups are automatically created or changed by comparing the student‟s administration
number, surname and forename on both Junior Librarian.net and the school‟s administration
data. If these are matched, but the tutor groups are different, then the tutor group is changed to
match that of the administration system, thus 'promoting' the pupil up a year (assuming the
administration data is correct!)
Please Note: It‟s important that you make a backup of your library data before making any
global changes to your borrowers. Your data is backed up by MLS nightly. If you are making any
big system changes we would suggest you make them first thing in the morning, to avoid any
loss of changes made to data between the backup and the system change.
Junior Librarian.net User Guide
Version 11.4
84
Chapter 4: Creating My Library
Sims.net
If you are using the Sims.net system, you need to download the Sims.net Borrower Import
disk from our website (www.microlib.co.uk) onto your computer‟s desktop. You can find this in
the User Area section under the Updates tab.
You then need to put either a floppy disk or a USB memory stick in your machine, download on
the file and click „Open‟. This will download the executable file, and run it immediately.
Once the wizard pops up it will ask where you would like the relevant files extracted to, this is
where your floppy disk or USB memory stick comes in. Simply select the relevant drive letter, and
the Report Definition file, along with instruction document, will be saved to the disk / memory stick
for you.
The instructions will tell you what you need to do to create the CSV file from SIMS.net.
RM Integris
Student data can be easily imported from Integris by designing a report in Integris with the
following fields (certain fields are optional):
SURNAME
FORENAME
DOB
(Date of Birth)
DOA
(Date of Admission)
GENDER
REG
(Tutor Group)
ADNO
(Grown Ups System ID)
YEAR
(Year Group)
STUDENT ADDRESS - LINE 1
(optional)
STUDENT ADDRESS - LINE 2
(optional)
STUDENT ADDRESS - LINE 3
(optional)
STUDENT ADDRESS - LINE 4
(optional)
STUDENT ADDRESS - TOWN
(optional)
STUDENT ADDRESS - POST CODE (optional)
STUDENT E-MAIL ADDRESS
(optional)
NAME: KNOWN NAME
(optional)
The report should be saved in 'Mail merge' format to a USB pen drive under the name
„students.csv‟ (comma-delimited format.) Also select the option to use headings.
If you wish to edit the data, make sure you open it in Notepad. (Please do not open it in
Microsoft Excel.)
Junior Librarian.net User Guide
Version 11.4
85
Chapter 4: Creating My Library
The following instructions illustrate how to design the export report within Integris
1. Go into the Reports section of Integris
2. Click on Ad-Hoc Reports
3. Select Ad-Hoc Manager (over to the right of the screen)
4. Select the first icon at the top left - Create New Report
5. Enter Report Name and Description
6. In the bottom right hand corner of the screen - select Export, as a report type
7. Go through each of the next four or five screens selecting the required fields
SURNAME
FORENAME
DOB
DOA
GENDER
REG
ADNO
YEAR
8. When you come to the last screen ensure that Mail merge format is selected
9. Click Create
10. Close down Report Designer Screen (click the cross in the top right hand corner)
11. Close the AD-Hoc Manager Screen
12. Select New Query and run the report for all Current Roll
13. Click Print. It will bring up a box saying 'Set Print File Name'. Name the file students.csv
14. Select and save the file to an external drive
Junior Librarian.net User Guide
Version 11.4
86
Chapter 4: Creating My Library
Phoenix
Student data can be easily imported from Phoenix by designing a report with the following fields:
(ALL THESE EXACT FIELDS MUST BE INCLUDED!):
SURNAME
KNOWN AS
DOB
M/F
AD DATE
CLASS
ADNO
For details on how to design the report within Phoenix, please refer to the Phoenix User Guide.
The report should be saved as a comma separated value (CSV) file to an external drive under
the name students.csv
Sample of a Phoenix student file:
"Surname”,” Known As","DOB","M/F","Ad date","Class","Roll N°"
"Anderton","Danielle","10 01 1991","F","05 09 1995","IMC","00664"
"Clarke","Sam","18 07 1992","M","06 01 1997","LO","00769"
"Jones","Charlotte","18 01 1995","F","07 09 1999","LT","00941"
In most schools the following routine has proved successful, though it may vary according to
your version of Phoenix.
1. In Phoenix Gold: Go to the Pupils Reports menu then select the option Easy
2. Right-Click on any report in the list and select the option New Easy Adhoc/Export.
Junior Librarian.net User Guide
Version 11.4
87
Chapter 4: Creating My Library
3. From the list, click on Surname, Preferred Forename, Date of Birth, Gender, Date of
Admission, Class and Roll No. You must click on these in the SAME ORDER as they are
listed here.
4. Click OK.
5. In the screen that appears change TAB to CSV and put in the title “Junior Export” so that
your screen looks like the one that appears below. Please make sure you tick the Omit
Titles option.
6. Click Save Report.
Select the Omit Titles
option
7. In the list of reports, the report we have just created should appear. Click on it.
8. From the destination box (in the middle of the screen) click on Export File.
9. Now click on All Current Pupils.
10. Phoenix will now ask you for a filename. Type in students.csv and click Save. Ensure
you take note of where it is saving the file. It will prompt you to launch an application.
Select the option Do Not Launch Application and click OK.
11. Minimise Phoenix using the
button.
12. If you wish to edit the data, make sure you edit it in Notepad. (Please do not edit it in
Microsoft Excel as you will lose the correct file format.)
Junior Librarian.net User Guide
Version 11.4
88
Chapter 4: Creating My Library
Other administration systems
Student information can be imported into Junior Librarian.net by placing a CSV file containing
student information onto a blank floppy disk. This information can then be imported using the
Intake facility built into Junior Librarian.net.
The first line of the CSV file must contain the name of the fields you are importing. The data
must be comma separated and be qualified by double quotes.
The field names that must be used are as follows (they can appear in any order within the text
file).
Field Name
Description
Required
MangementSystemID
Unique number which identifies the borrower in your administration system
Yes
Surname
Surname of the Borrower
Yes
Forename
Forename of the borrower
Yes
DateOfBirth
Borrower's date of birth
Yes
Gender
Gender of the borrower
Yes
TutorGroup
Tutor group the borrower belongs to
Yes
YearGroup
Year group the borrower belongs to
Yes
LogonName
The logon name you want the borrower to have when accessing Junior Librarian.net
Optional
Password
The password you want the borrower to have (non active directory linked borrowers)
Optional
Barcode
The barcode you want the borrower to have
Optional
Title
The borrowers salutation
Optional
Address1
The first line of the borrowers home address
Optional
Address2
The second line of the borrowers home address
Optional
Address3
The third line of the borrowers home address
Optional
Address4
The fourth line of the borrowers home address
Optional
Address5
The fifth line of the borrowers home address
Optional
Address6
The sixth line of the borrowers home address
Optional
PostCode
The borrowers postcode
Optional
Email
The borrowers email address
Optional
TelephoneNumber_Home
The borrowers home telephone number
Optional
TelephoneNumber_Work
The borrower work telephone number
Optional
TelephoneNumber_Mobile
The borrower mobile telephone number
Optional
LibrarySet
The borrowers library set
Optional
Ethnicity
The borrowers ethnicity
Optional
House
The borrowers house
Optional
DateExpires
The date the borrower is automatically recycled
Optional
DateAdded
The date the borrower was added to the administration system
Optional
Photograph_Filename
The path & name of the borrower photograph
Optional
RFID
The borrower RFID ID
Optional
Guardian1_Title
The guardian1's salutation
Optional
Guardian1_Surname
The guardian1's surname
Optional
Guardian1_Forename
The guardian1's forename
Optional
Guardian1_Address1
The first line of the guardian1's home address
Optional
Guardian1_Address2
The second line of the guardian1's home address
Junior Librarian.net User Guide
Version 11.4
Optional
89
Chapter 4: Creating My Library
Guardian1_Address3
The third line of the guardian1's home address
Optional
Guardian1_Address4
The fourth line of the guardian1's home address
Optional
Guardian1_Address5
The fifth line of the guardian1's home address
Optional
Guardian1_Address6
The sixth line of the guardian1's home address
Optional
Guardian1_Postcode
The guardian1's postcode
Optional
Guardian1_Email
The guardian1's email address
Optional
Guardian1_TelephoneNumber_Home
The guardian1's home telephone number
Optional
Guardian1_TelephoneNumber_Work
The guardian1' work telephone number
Optional
Guardian1_TelephoneNumber_Mobile
The guardian1' mobile telephone number
Optional
Guardian2_Title
The guardian2's salutation
Optional
Guardian2_Surname
The guardian2's surname
Optional
Guardian2_Forename
The guardian2's forename
Optional
Guardian2_Address1
The first line of the guardian2's home address
Optional
Guardian2_Address2
The second line of the guardian2's home address
Optional
Guardian2_Address3
The third line of the guardian2's home address
Optional
Guardian2_Address4
The fourth line of the guardian2's home address
Optional
Guardian2_Address5
The fifth line of the guardian2's home address
Optional
Guardian2_Address6
The sixth line of the guardian2's home address
Optional
Guardian2_Postcode
The guardian2's postcode
Optional
Guardian2_Email
The guardian2's email address
Optional
Guardian2_TelephoneNumber_Home
The guardian2's home telephone number
Optional
Guardian2_TelephoneNumber_Work
The guardian2' work telephone number
Optional
Guardian2_TelephoneNumber_Mobile
The guardian2' mobile telephone number
Optional
UPN
The borrowers UPN
Optional
See below for an example of a CSV file...
Notes
Junior Librarian.net User Guide
Version 11.4
90
Chapter 4: Creating My Library
If you add the „LogonName„ field to the CSV file, Junior Librarian.net will automatically
try and
link the borrower to Active Directory. If you also add the „Password „field, this will turn off
Active Directory linking.
If you add the „Logon Name„ field to the CSV file but the borrower‟s Logon Name isn‟t
their Active Directory Logon Name, you can either use the Password field in the CSV file
to import passwords from your administration system, or simply add one in the
Borrower's record in the Advanced tab.
If you add the „DateAdded„ field to your CSV file, this will be the date the borrower was
added to your administration system and will be shown on the borrower‟s record card in
Junior Librarian.net. If no date is entered, the date shown on the borrower‟s record is
the date
they were added to Junior Librarian.net.
If you add the „DateExpires„ field to your CSV file but don‟t enter a date, the borrower will
be placed into the Borrower Recycle Bin 100 years after they are added to Junior
Librarian.net.
There must be no double quotes within any of the information entered. E.g. Joe "Billy" is
not a valid entry for a forename.
The gender field must begin with M or F, so M, F, Male and Female are all valid entries.
The „Grown UpsSystem ID„ is a unique number from which you can identify a pupil on
your school administration system.
If you have entered borrowers on your system already, ensure that their names are spelt
correctly. The program tries to intelligently match to see if the people you are importing
exist on the system already.
Once you have created the CSV file, copy it to a floppy disk or pen drive/memory stick under the
name of students.csv
Junior Librarian.net User Guide
Version 11.4
91
Chapter 4: Creating My Library
How do I import my student file into Junior Librarian.net?
Once you‟ve created the CSV file which contains all of your new and existing borrowers, you‟ll
then need to import this into Junior Librarian.net.
Before you do this, you‟ll need to manually move your leavers to the Recycle Bin. There are two
ways of doing this. You can go into each Tutor Group record, click on Move To, tick Leavers
and then click Save. If you have a lot of groups which you need to mark as Leavers, this method
is too time consuming. Instead, if you do a search in Tutor Groups for the groups you want to
mark as Leavers, for example Year 11‟s. Once all of your Year 11‟s are listed, highlight one
record and then click Remove under the Records tab on the right of the screen. An option to
remove Selected Records or All Records will appear, click on All Records.
Now follow the instructions below to import the file.
From the menu bar at the top of the screen click on Database and then Intake.
Click on Database
and then Intake
The Intake screen will then appear.
Click on
from the Records tab on the right of the screen.
Click on Import
Junior Librarian.net User Guide
Version 11.4
92
Chapter 4: Creating My Library
Click Browse and select the location of the student file. Once the location of the file is showing
in the Filename box, make sure you have the correct file type selected before clicking Import.
NB: A very important detail to remember is, if your csv file from SIMS.NET has “quotation
marks” on either side of each data entry, you must select Sims.net (Quoted) or you may end
up with duplicated tutor groups.
If your csv file
from SIMS.NET
is quoted then
please make
sure you select
Sims.net
(Quoted)
Click Browse to
select the
location of the
student file
When the import is complete, existing Junior Librarian.net borrowers will automatically
be updated to their new groups. Any new borrowers will be listed in the Intake screen.
There are two ways to add your new borrowers to Junior Librarian.net. If you are want to add
them all at once, click under the Records tab on the right of the screen.
If you want to transfer them individually, either double click on the record or highlight it and click
Transfer. The new record will then show.
The Imported Details tab shows the details for the borrower which have been imported from the
student file. Under the Choose import method tab, select whether the borrower is New to
Junior Librarian.net or if they are an Existing Borrower. If they are an existing borrower, there
is a list of Junior Librarian.net borrowers at the bottom of the screen whose surnames all start
with the same first 2 letters of the borrower‟s surname that you are importing. This makes it
easier for you to match them. If the borrower you are importing isn‟t listed, type in their surname
or forename in the Quick Search box and click Go. This brings up a list of borrowers for you to
make your selection.
Select how you would like to allocate a barcode to the new borrower, we recommend the
Automatic option.
Junior Librarian.net User Guide
Version 11.4
93
Chapter 4: Creating My Library
When you are happy with the details, click Import. Repeat this for each new borrower listed in
the Intake screen.
Select how you’d
like to allocate a
barcode to the
borrower
Details of the
borrower from
the student file
Select New
Borrower if they
are new to Junior
Librarian.net
List of existing Junior
Librarian.net borrowers
whose surnames start
with the same first two
letters as the new
borrower
Select Existing
Borrower if they are
already listed in the
Junior Librarian.net
borrower database
Junior Librarian.net User Guide
Click Import
when you are
happy with the
details
Version 11.4
94
Chapter 4: Creating My Library
How do I manually move my borrowers to their new groups?
If you are unable to use your school‟s administration system to move your borrowers to their new
groups, it‟s possible to move them manually.
1. From the Tutor Group screen, double click or highlight
first group that you‟d like to move.
and click on the
2. In the Tutor Group record, click on the Move To tab. By default there will be a tick in the
Ignore box. To select a new group, tick the Move To box.
3. Type the Group Name that you want the group to move to. Type the Year Group and
then click Save. If the group is leaving school, select Leavers.
4. Repeat this for each group who are moving.
Select Move
To
If the group are
leaving, tick here
Type the Group
Name and Year
Group they are
moving to
Click Save
5. Once you‟ve selected a new group for each group who are moving, click on
under the Tools tab on the right of the screen.
Please Note: We strongly recommend that you make a backup of your data before making any
changes. Your data is backed up by MLS nightly. If you are making any big system changes we
would suggest you make them first thing in the morning, to avoid any loss of changes made to
data between the backup and the system change.
6. When you are ready to move your groups click Yes.
NB: Groups who you have marked as Leavers will be moved to the Borrower Recycle Bin. You
can delete them from here if you wish, however borrowers who have loans outstanding cannot
be deleted until the resource has been returned or has been marked as „missing‟.
Junior Librarian.net User Guide
Version 11.4
95
Chapter 4: Creating My Library
What if I have mixed year groups?
If you have groups with readers from different year groups, the system can accommodate this.
You need to make sure that you create a separate Tutor Group for each Year Group which
belongs to the tutor group. For Example, if Tutor Group SEG has years 7,8 and 9 in it, you need
to create three Tutor Groups called SEG, one with a Year Group of 7, another with a Year
Group of 8, and another with a Year Group of 9.
Select the correct
Year Group from
the drop down list.
This list will only
show what has
been added in the
Tutor Groups
page, so make
sure all of the
correct groups are
in there first.
Select the Group
Name that the
student belongs to
here.
What other information is stored on a borrower‟s record?
Advanced
The advanced tab holds settings which you generally will only need to change occasionally.
Security is where you would choose the type of login for your users.
Other is where you would store the borrower‟s Grown Ups System ID.
Restrictions is where you would ban a borrower and also where you would choose the
restriction group they belong to (See Chapter 6: Restrictions for more information).
Click here to
enable Active
Directory logon
If you have added any
custom fields, they will
show here. (See Custom
Fields section later in
this chapter)
Enter the
borrower’s
Grown Ups
system ID here
Select the Security
Group the borrower
belongs to
Set the Reader
Restriction
Group here
Junior Librarian.net User Guide
Version 11.4
96
Chapter 4: Creating My Library
Current Loans
The Current Loans tab shows all of the resources currently on loan to the borrower. You can
change the layout of the current loans tab (See Chapter 12: Customising Junior
Librarian.net, section on Page Views).
Lists the
resources
currently on loan
to the borrower
Reservations
The Reservations tab shows a list of resources that the borrower has reserved. You can change
the layout of the reservations tab (See Chapter 12: Customising Junior Librarian.net, section
on Page Views).
Lists the resources
the borrower has
reserved
Past Loans
The Past Loans tab shows a list of the resources the borrower has previously taken out on loan. You
can change the layout of the past loans tab (See Chapter 12: Customising Junior
Librarian.net, section on
Page Views).
Lists the
resources the
borrower has
taken out in the
past
Junior Librarian.net User Guide
Version 11.4
97
Chapter 4: Creating My Library
Custom Fields
How do I create my own custom fields?
You may find when adding your resources, borrowers or tutor groups that a particular field isn‟t
available for you to add information to. In this case, you can create your own Custom Fields.
From the menu bar at the top of the screen click on Settings and then Fields.
Click the Fields
tab
Click Add to add a new Custom Field.
Click Add
Click the drop down arrow at the end of the Table field and select the relevant database you‟d
like to add the custom field to. Type the Field Name and then the Data Type, for example Text,
Number, or Currency etc. Click Add when you have finished.
Click the arrow to select
which database you
want to add the custom
field to
Type the name
of the custom
field you want
to add here
Click the arrow and
select the format you
want the custom field to
be in
Junior Librarian.net User Guide
Version 11.4
98
Chapter 4: Creating My Library
The Custom Field you‟ve created will now be shown underneath the relevant table. You can
delete or rename it if you wish.
When you create a new Custom Field, it can be accessed by clicking on the Advanced tab
which is located on the individual resource or borrower record card.
Click the
Advanced tab
Junior Librarian.net User Guide
The Custom
Field you’ve
created is
shown here
Version 11.4
99
Chapter 5: Circulate
Chapter 5: Circulate
This chapter will cover all of the features of Circulate.
The section Identikit will tell you how to register your borrower‟s fingerprints so that they can
use Identikit to take out resources. It will also detail the warranty information, the minimum
requirements which your pc must have to use Identikit, and also how to look after the scanner.
The section Using Circulate details how to issue and return your resources, how to renew and
reserve them, and also how to check the status of a resource. It will also explain how you can
add messages to your borrower‟s accounts from the circulate screen. When issuing and
returning your resources, certain warning messages can appear. What these messages mean
will also be covered in this section.
Identikit
Warranty
MLS guarantee the Identikit device for 12 months.
This starts from the date you receive it and not the date you start using it.
This guarantee covers parts and labour for a repair or a complete replacement unit if
necessary.
If your Identikit has a rubberized membrane on the scanning area, the guarantee does
NOT cover this. This membrane is an integral part of the thumbprint scanner and
should not be tampered with in any way.
Please do not damage the membrane – the rubberised surface you
actually touch!
Please inspect it for any cuts, scratches, air bubbles etc.
Unless you contact MLS before using IdentiKit, we will assume the
Identikit scanner is in perfect working order.
Keep the membrane away from heat, moisture or sharp objects (e.g.
finger nails!)
The membrane cannot be repaired or replaced. If it is damaged a
completely new device will be necessary for which a charge will be
made
The guarantee does NOT cover the cable. Try not to stretch the cable. If it is too short,
please buy a USB extension cable from a local supplier - please make sure any
extension cable is no more than one meter in length.
The guarantee does NOT cover the USB plug attached to the end of the cable. When
you plug it in a USB socket, check you are inserting it in the correct way round and do
not force it.
DO NOT PLUG THE CABLE IN UNTIL AFTER YOU HAVE INSTALLED THE SOFTWARE!
MLS reserve the right to charge for repairing or replacing a unit even under warranty, if
there is evidence of misuse.
Junior Librarian.net User Guide
Version 11.4
100
Chapter 5: Circulate
Looking after the Identikit
The Identikit scanner was originally designed for office use assuming only a limited number of
scans per day. However it has recently been improved to withstand a heavier load. We have
many users who have used the scanner now for several years on a daily basis without a
problem.
It is vital that you look after your scanner. If you do not, then you will eventually experience
problems. A daily maintenance routine should be established:
At the end of each day, turn the scanner over so that the scanning area is facing
downwards on a desk. This will protect it from dust overnight and encourage any existing
particles of dust etc to fall off the surface.
To remove any surface grit, stretch a length of sticky tape over the scanning surface
(sticky side down) and then peel it off slowly. Any grit or dirt should adhere to the tape
and be removed from the scanning surface.
The manufacturers recommend that you clean the scanning surface regularly with a dry
cloth. Do NOT use liquids of any kind!
Above all, ensure all users are aware of the danger of damaging the rubberized
membrane with their fingernails and the fact that a new scanner will be required if this is
damaged.
Identikit minimum system requirements
Identikit will only work reliably if your PC matches the following specification:
Windows XP, or Windows Vista
Internet Explorer 7.0
Minimum 1.5 Ghz Dual Core CPU
Minimum 1 Gb RAM
400 Mb of free disk space
USB 1 and 2.0 Sockets
Junior Librarian.net User Guide
Version 11.4
101
Chapter 5: Circulate
How can I check the hardware specification of my PC?
1. Switch on your PC so it shows the normal Windows „Desktop‟ display.
2. Click the „My Computer‟ icon with the RIGHT mouse button.
3. Click „Properties‟ in the resultant menu with the LEFT button.
You should now be able to see details of your hardware.
Please check this corresponds to the above requirements.
Seek clarification from a technician if necessary.
If your PC does not match this specification, please
return Identikit unused in a padded envelope to MLS
straight away and we will not invoice you for it.
Once you install the software (see Chapter 1: Getting
Started, Identikit) we will assume your hardware has been
verified as compatible and a refund will not be possible.
Other hardware issues:
The following points relate to known problems with some PCs. If you do not understand them,
please seek the assistance of a technician:
On some older PCs, the USB sockets may be disabled in the BIOS. Please ensure they
are enabled.
Some machines will randomly cut off the power to the USB sockets. Please ensure
„Power Grown Ups‟ is disabled in the BIOS.
Viatech chipset - known problems. Please visit www.usbman.com for help.
Junior Librarian.net User Guide
Version 11.4
102
Chapter 5: Circulate
How do I install the IDK software?
Everything you need for Identikit is installed through the Hardware Plugin. This is covered on
Page 5 of this user guide in point 3 beneath the heading Prerequisites.
Once the machine has been restarted after installing the hardware plugin, click on the Tools
menu within your Internet Explorer window itself. Then select MLS Hardware Configuration
from the menu.
Make sure that Identikit is showing as registered within the Biometric Library tab, as shown
below.
If you click on Settings you have the option to change the location to either the Default Server
(local machine) or the Custom Server (different machine). The default is the Default Server, it
is recommended that it remains on this selection.
Junior Librarian.net User Guide
Version 11.4
103
Chapter 5: Circulate
How do I import my Junior3 fingerprints?
These instructions are only relevant to you if you have had your Junior3 data converted to
Junior Librarian.net and have been sent an .SDF (database file) file, along with your converted
data files, which will contain the fingerprints from your old system.
Please Note: you will only be sent an .SDF file if you were using the Platinum software for
Identikit on your old system.
Once you have completed the installation of the Identikit Software, please go to Start /
Programs / MLS Hardware Support / MLS Bio Server configuration
On the screen below, click on Browse to browse to the location of the .SDF file you were sent
by us via email.
Once you have found the file, highlight it and click Open to insert it into the location box.
Then click Import. All of the fingerprints from your old Junior3 system will now be imported into
the new Junior Librarian.net system, saving you hours of time!
Junior Librarian.net User Guide
Version 11.4
104
Chapter 5: Circulate
How do I register a fingerprint?
All potential Identikit users will need to have their finger or thumbprint registered before they can
be identified when borrowing a resource. They can do this at any time. The registration process
normally only needs to be done once, but individuals can be re-registered at any time or deleted
altogether if required.
Ensure you have firstly enrolled all your borrowers (See Chapter 4: Creating My Library,
section on Adding Borrowers)
Once all of your Borrowers are successfully added to the system, log into Grownups and click
on Fingerprinting on the signpost.
On the Fingerprint Registration screen, select the pupil‟s name from the drop down list.
You will be required to scan the same print four times
If the system is satisfied with all prints, registration will be accepted.
Junior Librarian.net User Guide
Version 11.4
105
Chapter 5: Circulate
IdentiKit and Data Protection
MLS fully endorse the principle set out in the new Government‟s Coalition Agreement (2010) that
permission from parents should be sought before enrolling students in a biometric system.
Our systems make use of a range of identification methods. When a school chooses biometrics
as its preferred method of identification we recommend that they:
Engage in a full consultation process with students, their parents or guardians, staff and
governors before implementing a biometric system
Offer an alternative identification mechanism such as cards or PIN for those wishing to
opt out of using biometrics
Junior Librarian.net User Guide
Version 11.4
106
Chapter 5: Circulate
Using Circulate
How do I issue a resource?
There are two different ways to issue resources to borrowers. The first of which, using Borrow &
Return, is covered below.
From the Home page of Junior Librarian.net click on the Borrow & Return signpost
You will then see the Circulate screen below.
Notice the
resource icon,
this means you
need to scan in a
Resource.
Scan the Resource barcode using the barcode reader. The cursor will move to the next empty
field, in order for you to scan the Borrowers PIN / Fingerprint.
Notice the Borrower
icon is now showing,
meaning a
Borrower‟s barcode
/ fingerprint is
required.
Please Note: As long as you have selected to Allow Keyboard Input from within „Settings /
Junior Librarian‟ typing in the barcode is an option as well as scanning it.
Junior Librarian.net User Guide
Version 11.4
107
Chapter 5: Circulate
If you have selected the wrong borrower or the wrong resource, simply click on
which
becomes available once the book has been issued. This will simply undo the last action taken
within Borrow & Return.
The second option when issuing a resource to a borrower is accessible only once logged into
Grown Ups. This is the Multi issue option, which allows you to issue multiple resources to a
borrower at once.
The first difference you will notice between Borrow & Return and Multi Issue is that the first
barcode it requests is a Borrower‟s barcode, rather than a Resource barcode.
The Borrower icon
requires a
Borrower‟s
Barcode / fingerprint
to be scanned.
Junior Librarian.net User Guide
Version 11.4
108
Chapter 5: Circulate
Once you have scanned the Borrower‟s barcode or fingerprint into the designated box, the
cursor will then move to the Resource barcode box, and any books the borrower currently has
on loan, will be shown along the bottom of the window.
Resource after resource may be scanned here, each one listed along the bottom of the MultiIssue window. Should you accidentally issue the incorrect book, again you are able to use the
Undo function button, which will undo the last action performed.
Once the Borrower‟s maximum allowance has been reached, a warning will pop up, and no
further resources may be issued.
Junior Librarian.net User Guide
Version 11.4
109
Chapter 5: Circulate
How do I return a resource?
From Borrow & Return scan the barcode label inside the book. The system will automatically
return the book.
NB: You can also return a resource from the Current Loans screen in Grown Ups by
icon under the Records tab on the right of
highlighting it and then clicking on the
the screen.
Click on Return
to return the
selected resource
Highlight the
resource you
with to return
Junior Librarian.net User Guide
Version 11.4
110
Chapter 5: Circulate
How do I renew a resource?
There is no Renew functionality outside of the Grown Ups section of Junior Librarian.net.
Resources are renewed from the Current Loans screen in Grown Ups by highlighting the
resource and then clicking on the Renew icon beneath the Records tab on the right of the
screen.
Once you have
highlighted the relevant
Resource item, click
on Renew to renew the
item.
Junior Librarian.net User Guide
Version 11.4
111
Chapter 5: Circulate
Multi Return
Multi Return provides an option which enables users to return multiple resources in a much
more efficient way.
Click on Multi Return from the signpost on the Home page.
Simply scan the barcodes of the resources you want to return.
Simply scan the
Resource‟s barcode into
this box, once scanned
the resource will show as
returned and will be
listed in the area below.
Junior Librarian.net User Guide
Version 11.4
112
Chapter 5: Circulate
What happens if the resource I scan isn‟t on loan?
If you are in Multi Return and are returning a lot of resources, you may have a resource which
isn‟t actually on loan.
If you scan a resource which isn‟t on loan, a message will appear on screen to let you know.
Simply put the cursor over the „!‟ to see the error message. For this particular error, the
message will read „Could not return because item not currently on loan‟
What happens if the resource I scan isn‟t in the catalogue?
If you scan a resource in Multi Return which hasn‟t yet been added to the catalogue, a message
will appear on screen to let you know.
Junior Librarian.net User Guide
Version 11.4
113
Chapter 5: Circulate
How does a borrower reserve a resource?
In order to reserve a resource, the student needs to follow these instructions. Click on Search
on the home page.
This will bring up a clear and colourful easy search selection, as shown in the screen below.
Each picture represents a search criterion; for example the dog represents animals, and will
bring up all resources in the library which relate to animals.
Below is the Search Results page for the Animals search. Each area is described in the
captions below.
Floating in the
sea are
suggested
keywords to add
to your search.
Simply click on a
keyword to add it
to your search.
By clicking on a
resource type
you stop that
particular
resource type
from being
shown on the
search page.
Drag resources into the My
Stuff treasure chest. Click on
the My Stuff treasure chest for
a link to the My Books page,
where you may Reserve
resources
Please Note: If the student is not yet logged in, they will be requested to scan or type their
barcode number into the login box, which will pop up upon your first attempt of dragging an item
into the My Stuff treasure chest.
Junior Librarian.net User Guide
Version 11.4
114
Chapter 5: Circulate
As soon as the student has successfully logged in, the resource will be placed into the My Stuff
treasure chest.
Once the student has filled their My Stuff treasure chest, with whatever resources they wish,
click on the My Stuff treasure chest for a link to the My Stuff page.
Print, Reserve,
or Remove
resources here.
Drag resource
into Reserve to
reserve the
item.
Resources
currently stored
in the My Stuff
area
Drag items into
Review to review
the resource
The student may add as many resources to your My Stuff area, as they like. However, it is
important to remember that this area is emptied each time the student logs out. The My Stuff
page is the only page in which the students may write Reviews. They may write reviews for
resources they both have and haven‟t borrowed. Reviews are not available for public viewing
until they are approved by the librarian. This is discussed in greater detail in Chapter 10:
Reviews.
Junior Librarian.net User Guide
Version 11.4
115
Chapter 5: Circulate
Warning messages
From time to time, when you try to carry out an action, the system will show warning messages.
Whatever you are being warned about can be overridden, except if a borrower has been
banned.
If a borrower tries to take out a Reference item, a message will appear giving the option to issue
the resource anyway.
Please note: This facility needs to be enabled by clicking on Settings and then Restrictions in
Grown Ups.
Junior Librarian.net User Guide
Version 11.4
116
Chapter 6: Restrictions
Chapter 6: Restrictions
This chapter will explain how to apply the settings which will control your borrower‟s loan
allowances.
The Setting up Restrictions section explains how restrictions work and how to set up and apply
loan restrictions to your borrowers and catalogue items.
The Calendar section tells you how to mark days in the calendar when the library is closed and
how to force a return date for your resources.
Setting up Restrictions
How do restrictions work?
Restrictions in Junior Librarian.net work similarly to Active Directory permission settings. This
means that you create different borrower restriction groups, set up the permissions for those
groups and then add your borrowers to whichever group you want them to belong to. One of the
main benefits of this is that you can create as many restriction groups as you wish, all with
different allowances. For example, you may have a restriction group for your staff borrowers and
one for your standard borrowers. You can give the staff restriction group more allowances than
the borrowers.
As well as being able to set up restriction groups for your borrowers, you can also set restrictions
for your resource types e.g. Book, and the different media types within the resource type e.g.
Paperback. If you have set various different restrictions for your resources, media types and
borrowers, the system will compare the loan period which has been set for all 3 and will take the
Lowest of them all. This will be covered in greater detail later in this section.
Please Note: There is a default restriction group set up when you first install Junior
Librarian.net. This is called Normal and allows your borrowers to take out and reserve 3
resources for a maximum of 14 days. Any existing borrower and any new borrowers who are
added to Junior Librarian.net will belong to the default security group initially. You can then
change the default restriction group (once you have created it) to your preferred group, which
will automatically change the restrictions for anyone who belongs to the default group.
How do I create my own borrower restriction groups?
The first thing you need to do is decide what restrictions you‟d like to have. The simplest
restriction is to create your borrower restriction groups, and then assign your borrowers to those
groups. This means that when a borrower comes to take out or reserve a resource, the system
will allow them the specific loan period and allowances which belong to the restriction group that
they have been assigned to. By setting your restrictions in this way, you aren‟t giving your
resources any restrictions so the system is relying purely on the borrower group restrictions.
The more complex restrictions will be covered later in this section.
Junior Librarian.net User Guide
Version 11.4
117
Chapter 6: Restrictions
To create a new borrower restriction group, click on the Settings tab and then Restrictions
from the menu bar at the top of the screen.
Click on Settings
and then
Restrictions
The Restrictions screen will then appear. The first tab selected is General, where you can
apply the settings of your choice. If you have set age restrictions on any of your resource
records, place a tick in Apply age restrictions to activate this setting.
Click on the Borrowers tab. As you can see, there is a restriction group already set up called
Normal which is the Default group. To create a new group, click Add.
Restrictions
groups are listed
here
Click the arrow
to select a new
default group
Click Add to
create a new
restriction group
Junior Librarian.net User Guide
Version 11.4
118
Chapter 6: Restrictions
Type a name in for the restriction group you are creating e.g. Borrowers and then click Add.
The next screen is where you can specify the allowances you want this restriction group to have.
Type these in and then click Save.
Adding Resource Type Restrictions will be covered later in this section.
Specify the
standard
allowances and
loan period here
Click Save when
you have finished
Once you‟ve clicked Save, the new restriction group will be listed. Repeat these instructions for
each new restriction group you wish to create.
Junior Librarian.net User Guide
Version 11.4
119
Chapter 6: Restrictions
How do I add resource type restrictions to my borrower restriction groups?
It‟s possible for you to have different restrictions for each resource type in your catalogue, and
add these to the borrower restriction groups that you‟ve already created.
For example: You may have already created a borrower restriction group called Borrowers.
For this group, you have specified:
Maximum Allowance of 3
Maximum Reservations of 3
Loan Period of 14
This means that regardless of what type of resource is issued, the above restrictions will apply.
You may now want to specify that any Films which are a media type of Video have the following
restrictions:
Maximum Allowance of 1
Maximum Reservations of 1
Loan Period of 7
By setting these restrictions, you can control the maximum allowance and reservations allowed
on the specific resource types, as well as allocating a separate loan period.
Click on Settings and then Restrictions from the menu bar at the top of the screen.
Click on Settings
and then
Restrictions
Click on the Borrower tab at the top of the screen. Select the borrower restriction group that you
want to add a resource type restriction to e.g. Borrowers and then click Edit.
Select the
restriction group
and then click
Edit
Junior Librarian.net User Guide
Version 11.4
120
Chapter 6: Restrictions
Under the Resource Type Restrictions table, you‟ll see that there is nothing listed initially. To
add a resource type restriction, click the Add option.
Shows the standard
borrower
restrictions for this
restriction group
Click Add to add a
resource type
restriction to this
borrower restriction
group
Click the drop down arrow in the Resource Type box and select Film. Click the drop down
arrow in the Criteria box and select Video. Fill in the allowances and then click Save.
Click the arrows to
select the resource
type
Fill in the
allowances for
this resource type
Click Save when you
have finished
Once you‟ve clicked Save, the new resource type restrictions will be shown on the borrower
restriction group.
A borrower who belongs to this restriction group will now have:
Maximum Allowance of 3, of which 1 can be a Film with a media type of Video.
Maximum Reservations of 3, of which 1 can be a Film with a media type of Video
Loan Period of 14, except if they borrow a Film with a media type of Video where this will be 7.
The resource
type restriction
shows here
Shows the standard
borrower
restrictions for this
restriction group
If you delete the resource type restriction, the standard restrictions will apply to all resource
types.
Junior Librarian.net User Guide
Version 11.4
121
Chapter 6: Restrictions
Please Note: When setting the Maximum Allowance and Reservations on the Resource Type
Restrictions, the numbers cannot add up to more than the standard borrower maximum
allowances. For example, if your standard maximum allowance is 3, any resource type
maximum allowance restrictions can only add up to 3.
When you have set restrictions in this way, the Loan Period for the resource type will always be
chosen against the standard restriction loan period.
How do I change the default borrower restriction group?
If you want to change the default restriction group, click the System Default drop down arrow,
select the required restriction group from the list and then click Save. Any borrowers who belong
to the default restriction group will be automatically changed as well as inheriting the allowances
which have been given to the new default group.
Click the arrow to
select a new
default group
The new
restriction
group is listed
here
Click Save
when you
have finished
How do I change a tutor group‟s borrower restriction group?
When you first start using Junior Librarian.net, all borrowers and tutor groups will belong to the
default restriction group.
Once you have specified a default restriction group to which everyone belongs to, it‟s possible to
change the restriction group for your individual Tutor Groups.
First, make sure you have created a restriction group that you want these borrowers to belong
to. (See How do I create my own restriction groups? earlier in this chapter)
An example for wanting to do this could be that you‟ve set up a restriction group for your
borrowers called Borrowers, which is the default, and one for your staff which is called Staff. You
have specified a higher resource and loan period allowance when creating the Staff restriction
group.
Go into the Tutor Groups database by clicking on the
the left of the screen.
icon from the menu bar on
Find and highlight the Staff tutor group from the list, and then either double click on it or
click to open the record card.
Junior Librarian.net User Guide
Version 11.4
122
Chapter 6: Restrictions
Under the Restrictions section, click the drop down arrow and select the restriction group that
you want the tutor group to have and then click Save.
Once you have done this, everyone in the Staff tutor group will belong to the restriction group
you have selected. If you add a new borrower to this group, they too will automatically belong to
the specified restriction group unless you manually change them.
Select the Staff
restriction group
from the list
Click Save
when you
have finished
How do I change an individual borrower‟s restriction group?
Once you have specified a default restriction group to which everyone belongs to, it‟s possible to
change the restriction group for individual borrowers. An example for wanting to do this could be
that you want to increase the loan period and allowance for some borrowers who are involved in
a special school project.
First, make sure you have created a restriction group that you want these borrowers to belong to
(see How do I create my own restriction groups? earlier in this chapter).
Go into the Borrowers database by clicking on the
screen.
icon from the left of the
Find and highlight the borrower from the list, or use Quick Search to type in their barcode PIN
or Surname. Once the borrower is highlighted, either double click your mouse or click
to open up the borrower record card.
Click on the Advanced tab at the top of the screen.
Under the Restrictions section, click the drop down arrow and select the restriction group that
you want the borrower to have and then click Save.
Junior Librarian.net User Guide
Version 11.4
123
Chapter 6: Restrictions
Repeat this for each borrower that you want to change the restriction group for.
Select the
restriction
group from the
list
Click Save
when you
have finished
How do I globally set resource restrictions?
It‟s possible for you to specify restrictions on your resources, as well as having your borrower
restriction groups set up. However, MLS recommend that you choose either to use borrower
group restrictions or resource restrictions. You can of course use both, but if the system is
presented with a situation where there is more than one loan period set up, it will always choose
the lowest of them all.
For example: You may have set up a borrower restriction group which has a standard loan
period of 14, but you‟ve also set a resource type restriction for the media type of Film (Video) to
7. If you globally set the Film resource type to 21, when a borrower who belongs to this
restriction group takes out a film, the loan period given will be 7 because that is the lowest of the
three. (Please see the Restriction example tables later in this section for more information)
From the menu bar at the top of the page click on Settings and then Restrictions.
Click on the Resource tab at the top of the screen. Select the resource type that you want to set
restrictions for, and then click Modify.
Select the
resource type
from the list
and then click
Modify
Enter the restriction settings that you want this resource type to have. On this screen you can
also choose to restrict any whole year groups or individual groups from borrowing this resource
type. By placing a tick in any of the Not allowed to options, you are setting the restriction on all
of your resource records for the resource type you have selected. If you enter a Minimum age,
Junior Librarian.net User Guide
Version 11.4
124
Chapter 6: Restrictions
for example 10, it means that any borrower who is 10 or under won‟t be able to borrow any
resources. You can enter a different loan period by clicking on the Advanced tab. To place
restrictions on individual resources, please see the section below on How do I set restrictions
for individual resources.
Once you have finished entering the restrictions click Save.
To change the loan
period, click on the
Advanced tab
Enter the restrictions
you’d like this
resource type to have
Place a tick in any of
these boxes to
restrict the year
group from
borrowing all of this
resource type
Use these options to
select all or clear all of
the selected groups
Click Save
when you have
finished
Junior Librarian.net User Guide
Version 11.4
125
Chapter 6: Restrictions
How do I set restrictions for individual resources?
You may want to place a restriction on an individual resource in your catalogue, perhaps
because it is a book which is in higher demand than the rest, so you want the loan period to be
less.
Click on the
icon on the left of the screen.
Find and highlight the resource you want to set the restrictions for from the list, and then either
double click on it or click
to open the record card.
Click on the advanced tab at the top of the screen. Place a tick in the Lock Restrictions box
and then enter the restrictions you‟d like the resource to have. Click save when you have
finished.
If you change your mind and would like the system to ignore the resource restrictions, simply
take the tick out of Lock Restrictions and any restrictions will become greyed out.
Enter the Minimum
age for a borrower to
be able to take out the
resource
If you want to
restrict any year
groups or groups
from borrowing this
resource select
these here
Put a tick in
Lock
Restrictions
Enter the
restrictions
you’d like this
resource to have
Click save
when you
have finished
Please Note: Any global restrictions you‟ve set will be ignored when the resource is issued if
you set and lock an individual restriction.
Junior Librarian.net User Guide
Version 11.4
126
Chapter 6: Restrictions
Restrictions example tables
The tables below give examples of different restriction scenarios to help you understand how the
restrictions in Junior Librarian.net work. The key tells you what each restriction setting is.
Key
BRG – Borrower Restriction Group
RTR – Resource Type Restriction
GRR – Global Resource Restriction
IRR – Individual Resource Record
N/A – This restriction setting hasn‟t been chosen or isn‟t applicable.
Example 1
You have created a Borrower Restriction Group called Borrowers. A borrower who has been
assigned to this restriction group wants to take out any resource from the catalogue.
The loan period given is 14 days which has been taken from the Borrower Restriction Group
setting.
Example 2
You have created a Borrower Restriction Group and have added a Resource Type Restriction
for your Books which have a media type of Paperback. A borrower who has been assigned to
this restriction group wants to take out a Paperback Book.
The loan period given is 21 days which has been taken from the Resource Type Restriction
Setting. This is because any restrictions that you specify in the Resource Type Restriction field
will be chosen against the restrictions you‟ve set for the Borrower Restriction Group (but only
when issuing the resource type that you‟ve added a separate restriction for e.g. Paperback
Books).
Junior Librarian.net User Guide
Version 11.4
127
Chapter 6: Restrictions
Example 3
You have created a Borrower Restriction Group and have added a Resource Type
Restriction for your Books which have a media type of Paperback. A borrower who has been
assigned to this restriction group wants to take out a Hardback Book
The loan period given is 14 days which has been taken from the Borrower Restriction Group
Setting. This is because although you have set up a Resource Type Restriction for your
Paperback Books, the borrower is taking out a Hardback Book instead so the Resource Type
Restriction is ignored.
Example 4
You have created a Borrower Restriction Group, a Resource Type Restriction for your Films
with a media type of Video and you have set a Global Resource Restriction for your Films. A
borrower who has been assigned to the Borrowers restriction group wants to take out a Film
which is a Video.
The loan period given is 14 days which has been taken from the Borrower Restriction Group
setting. This is because it is the lowest of the three loan periods you have set.
Junior Librarian.net User Guide
Version 11.4
128
Chapter 6: Restrictions
Example 5
You have created a Borrower Restriction Group, a Resource Type Restriction for your Films
with a media type of Video and you have set a Global Resource Restriction for your Films. A
borrower who has been assigned to the Borrowers restriction group wants to take out a Film
which is a Video.
The loan period given is 7 days which has been taken from the Resource Type Restriction
setting. This is because it is the lowest of the 3 loan periods you have set.
Example 6
You have created a Borrower Restriction Group, a Resource Type Restriction for your Films
with a media type of Video and you have set a Global Resource Restriction for your Hardware.
A borrower who has been assigned to the Borrowers restriction group wants to take out a piece
of Hardware.
The loan period given is 14 days which has been taken from the Borrower Restriction Group
setting. This is because although you have set up a Resource Type Restriction for your Films
with a media type of Video, the borrower is taking out Hardware instead. In this case, the
Resource Type Restriction is ignored, even though it is the lowest of the three.
Junior Librarian.net User Guide
Version 11.4
129
Chapter 6: Restrictions
Example 7
You have created a Borrower Restriction Group, a Resource Type Restriction for your
Books with a media type of Paperback, a Global Resource Restriction for your Books and
you‟ve selected a Harry Potter Paperback Book out of the catalogue and changed its individual
restrictions. A borrower who has been assigned to the Borrowers restriction group wants to take
out the Harry Potter Book.
The loan period given is 6 days which has been taken from the Individual Resource
Restriction setting. This is because whenever a Resource Type Restriction has been set for the
resource type you are issuing, the Borrower Restriction Group loan period is ignored. As you‟ve
also set an Individual Resource Restriction for the book you are issuing, the Global Resource
Restriction is also ignored. Therefore, the loan period is whichever is lowest between the
Resource Type Restriction and the Individual Resource Restriction
Junior Librarian.net User Guide
Version 11.4
130
Chapter 6: Restrictions
Calendar
How do I mark weekends and closed days?
There will be times when the library is closed, due to school holidays and weekends. Within
Junior Librarian.net there is a calendar which enables you to mark these days so that your
loan periods are adjusted accordingly. For example, if you marked all of your weekends as
closed and a resource was due back on a Saturday, perhaps because of a bank holiday, the
system would adjust and increase the loan period so that the resource was due back the
following Monday.
To access the calendar click Tools on the menu bar at the top of the screen and then select
Calendar.
Select Tools and
then Calendar from
the menu bar
To mark weekends as closed, click on the Close Weekends tab and then click Apply.
If you want to mark days when the school is closed perhaps for an inset day or for your school
holidays, select the arrow at the end of the Set tab and select Close. You‟ll then need to click on
each day on the calendar that you want to mark as closed. As you click on the day, the field will
change from white to pale blue. To de-select a day, simply click your mouse over the day again
and it will return to white. Click Apply to save these settings.
Click here
choose what
you’d like to
set
Click here to mark
weekends as closed
Click here to
change the year
shown
Once you have
finished, click
Apply to apply
the settings
Junior Librarian.net User Guide
Version 11.4
131
Chapter 6: Restrictions
How do I force a return date for resources?
If you would like all of your resources to be returned by a set date, for example before the
summer holidays begin, you can set a return date in the calendar.
Select the arrow at the end of the Set tab and select Force Return. Find the date you‟d like to
set as your return date and then click it with your mouse. The date will then show in Red. Click
Apply to save the settings.
All normal issues will not go beyond the date specified until that date is passed, unless you use
a Manual Loan.
How do I add notes?
If you would like to add a day note, select the arrow at the end of the Set tab and select Note.
Click on the day you‟d like to make the note. The window will then change and display a
personal and public note pad. Type your message into the various areas depending on the type
of note you wish to leave...
Personal Note – These notes are displayed only for the person who created the note.
Public Note – These notes are displayed for all users who have access to Grown Ups.
Click Update to add the note, this will take you back to the main calendar screen. Click apply
when you have finished editing the calendar.
Type your personal
note in here. This
will only be displayed
for you when you log
into the system.
Type your public
note in here. This
will be displayed
for all users who
have access to
Grown Ups.
Click Apply when
you have entered
the note(s).
These notes will be displayed on the homepage when you log into the system. (See Chapter 2:
A General Overview of Junior Librarian.net for more information)
Junior Librarian.net User Guide
Version 11.4
132
Chapter 6: Restrictions
How do I exclude closed days from fines and overdue‟s?
If you don‟t want the days when the library is closed to be included in your overdue‟s and fines,
you can set this by clicking on Settings and then Restrictions from the menu bar.
Click on Settings
and then
Restrictions
Select the settings you
want to apply here
Junior Librarian.net User Guide
Click Save to
save the settings
Version 11.4
133
Chapter 7: Loans
Chapter 7: Loans
This chapter explains how to manage and view your loans.
The Current Loans section tells you how to view your current loans and how to return and
renew them from the current loans screen.
The Editing Loan Reminders section tells you how to change the text and layout within each of
your reminder types.
The Sending Loan Reminders section explains how reminders work, how to send out loan
reminders to your borrowers using various methods and how to schedule a time for your
reminders to be sent out automatically.
The Past Loans section tells you how to view both your current and past loans and how to
delete any past loans data you no longer need.
Current Loans
How do I view all current loans?
To view the full list of current loans, click on the
the screen.
icon from the tool bar on the left of
How do I return resources from current loans?
As well as using Circulate, you can also return a resource from the Current Loans screen.
Find and click on the loan you‟d like to return, and then click
tab on the right of the screen.
To return multiple resources, click
resource.
under the Records
under the Records tab and click on each
Once you‟ve highlighted all of the resources you want to return,
Click on the
resource you’d
like to return
click
Click Return
to return the
highlighted
resource
Click Flagging
to select more
than one
resource at a
time
Junior Librarian.net User Guide
Version 11.4
134
Chapter 7: Loans
How do I renew resources from current loans?
You can renew your resources from the current loans screen as well as using Circulate.
Find and click on the resource you‟d like to renew and then click
Records tab on the right of the screen.
To renew multiple resources, click
each resource.
under the
under the Records tab and then click on
Click on the
resource you’d
like to renew
Click Renew to
renew the
highlighted
resource
Click Flagging
to select more
than one
resource at a
time
What does each resource colour code mean?
When you are in Circulate, each resource will be colour coded depending on its status. These
are:
Black
Green
Blue
Red
Resource is not on loan and is available to issue
Resource has been reserved
Resource is on loan
Resource is on loan and is overdue
Junior Librarian.net User Guide
Version 11.4
135
Chapter 7: Loans
Editing Loan Reminders
How do I edit the text in my reminders?
Before sending out your loan reminders, you‟ll need to make sure that the text inside each
reminder is displayed in the way you want, the order in which each reminder is sent is correct
and that the format of the reminder is how you want it to look.
When you install Junior Librarian.net, there will already be some default reminders set up for
you. You can edit or delete these as you wish.
From the menu bar at the top of the page select Tools, and then Edit Reminders.
Select Tools
and then Edit
Reminders
The Edit Reminders screen will then appear. The drop down arrow next to the Add tab enables
you to select a different type of reminder e.g. Individual, Group or Memo.
The reminders for each type are listed in the order they will be sent.
For example: In individual reminders you may have your Reminder 1 as the „gentlest‟ reminder
and reminder 4 as being the most severe. This means that once a borrower has received
Reminder 1, the next time the reminders are scheduled to be sent that borrower will receive
Reminder 2 and so on.
Choose the type of reminder you want to edit by clicking the drop down arrow. Select the
reminder from the list and then click Edit.
Click Add to
create your own
reminder
Select the reminder
type you want to edit
by clicking the arrow
Click Edit to open up the
Edit Reminder screen
The reminders are listed in
the order that they will be
sent to your borrowers
Click Delete to delete
the reminder
Click Save to save any
changes you’ve made
Junior Librarian.net User Guide
Use these arrows to change the
order that the reminders are sent
Version 11.4
136
Chapter 7: Loans
The Edit Reminder screen will then appear where you‟ll see three tabs:
Reminder is where you can change the text which appears in the reminder and add images,
such as the school logo, to the reminder.
Grid is where you can change the fields which appear on the reminder and their position.
Options is where you can specify the format that the reminder is sent in and who it is sent to.
To edit the reminder text, select the Reminder tab at the top of the Edit Reminders screen. The
text which has a box around it can be changed to any of the fields which are listed in the Insert
Field drop down list.
To change the field, simply click on the text inside the box you want to change. The box will
become highlighted. Click the drop down arrow next to the Insert Field tab and select the field
you‟d like to appear in the box. To add a field which hasn‟t already been used, place your cursor
where you‟d like it to appear on the page and then select the required field from the Insert Field
drop down list.
To delete a field, highlight it and then select Delete on your keyboard.
You can add your own text by placing your cursor anywhere on the page where you want the
text to begin and then typing the required text.
If you have finished editing the reminder text and are happy with the grid, click Save. If you
would like to change the grid, see the next section
Click the arrow here to
select a new field to
appear in the reminder
If you wish to insert the current date before
printing, position the cursor where you want the
date to appear and then click Insert Date. To
insert the time, click Insert Time
Use these options
to change the
format of the text
To insert an image,
such as a school
logo, click here and
browse to where
the image is stored
When you have
clicked on the text,
the box will become
highlighted
The wording or
format can be
changed as with
any word
processor until
you are happy
with the result
Click Save when
you have finished
.
Junior Librarian.net User Guide
Version 11.4
137
Chapter 7: Loans
How do I change the columns included in the grid in reminders?
Click on the Grid tab at the top of the Edit Reminders screen. The screen looks similar to when
you are creating or editing a Page View.
Under Preview you‟ll see which columns have already been used. To add or remove any
columns/fields, use the two boxes at the top of the page. The left hand box lists the available
fields and the right hand box lists the fields which will appear in the reminder.
To select a new field to be included in the reminder, highlight it from the list in the box on the left
and then use the
icon to move it into the right hand box.
To move a field back, because you no longer want it to appear on the reminder, select it from
the right hand box and then click the
icon.
To change where the field appears within the grid use the
and
icons.
When you have finished editing the reminder, click Save.
Select the fields
you’d like to appear
in the reminder and
then use the arrows
to select them
Highlight the field
you’d like to move
and then use these
arrows to change its
location on the grid
A preview of the
how the fields will
look on the
reminder is shown
here
When you are
happy with the
reminder text and
the grid click Save
Junior Librarian.net User Guide
Version 11.4
138
Chapter 7: Loans
How do I specify what format the reminder is sent in?
As well as being able to change the content of your Reminders, you can also specify what
format it will be sent in i.e. email, print or both. You can also choose who the reminder is sent to
i.e. borrower or guardian.
For example: You may want your Reminder 4 to be emailed directly to the borrower‟s guardian.
Select the reminder that you want to edit from the reminder list. Click on the Options tab at the
top of the Edit Reminders screen and then click the drop down arrow next to Send to and select
who you want this reminder to always be sent to e.g. Guardian 1.
Select who you
want this reminder
to always be sent to
Once you‟ve chosen who you want the reminder to be sent to, you need to choose how you
want it to be sent. Click on the drop down arrow next to Output to and select the format that you
want the reminder to be sent in e.g. Email.
Select how you
want the
reminder to be
sent
Click Save when
you have chosen
the settings
Please Note: It‟s possible to override these settings when sending reminders to individual
borrowers. Please see section How do I print individual reminders?
Junior Librarian.net User Guide
Version 11.4
139
Chapter 7: Loans
What happens if I have specified the reminder to be printed?
If you‟ve set the reminder to be printed, a reminder PDF document will appear on the screen for
you to then print out if you wish. If you don‟t want to print the reminders at that time, simply click
the cross at the top right of the screen to close it. Reminder PDF‟s which have been viewed
and/or printed are automatically moved to the Output Recycle Bin. To print a reminder PDF,
click on Database at the top left of the screen, and then Output. A list of reminder PDF‟s will be
available. Find the one you want to print and then either double click your mouse over it or
highlight it and click Edit under the Records tab on the left of the screen.
What happens if I have specified a reminder to be printed and emailed?
If you have set the reminder to be printed and emailed, a reminder PDF document will appear on
the screen for you to print and an email will be sent to the borrower‟s email address
automatically. Again, if you don‟t want to print your reminders at that time, click the cross to
close the document and then print from the Output Recycle Bin when you are ready.
What if the borrower‟s email address is wrong or missing?
If you have specified the reminder to be sent by email but the address is wrong or missing, the
system will automatically send the reminder to the email address entered in the reminder
settings screen.
For more information on the email reminder settings, please see Chapter 3: Settings section
Reminders
Junior Librarian.net User Guide
Version 11.4
140
Chapter 7: Loans
Sending Loan Reminders
Before you send out your loan reminders, you‟ll need to make sure that the text inside each
reminder is displayed in the way you want, the order in which each reminder is sent is correct
and that the format for how and who you want to send the reminder to is correct. See sections
above on How do I edit the text in my reminders and How do I specify what format the
reminder is sent in.
Individual and group reminders are sent automatically using the Schedule, however they can
also be sent manually to individual borrowers. (Please see section How do I print reminders to
individual borrowers for how to do this)
How do individual reminders work?
Individual reminders are sent to your borrowers in the order that you‟ve specified in the Edit
Reminders screen. See section on How do I edit the text in my reminders? for more
information.
Shows the order in
which the
reminders will be
sent
The reminders will be sent according to their default output settings.
For example: If you have specified that reminder 1 is to be sent to the borrower by email,
anyone who is due this reminder will receive it by email provided that a valid email address has
been entered onto their enrolment record. If no email address is present or if it is incorrect, the
reminder will automatically be sent to the email address which has been specified in the
Settings, Reminders screen.
If you have specified that reminder 2 is to be sent to guardian 1 and is to be printed, a PDF
reminder document will appear for you to then print and send to the guardian.
If you have printed a large amount of individual reminders, i.e. for every student showing as
overdue in Current Loans, then the reminders will show as a single PDF document within the
Output table. Print this as described in section What happens if I have specified the
Reminder to be printed? This document will be ordered in terms of Tutor Group first, then
Surname.
Please see section How do I specify what format the reminder is sent in? for how to choose
the default output settings.
How do I apply the settings for scheduled reminders?
Junior Librarian.net User Guide
Version 11.4
141
Chapter 7: Loans
Before any reminders can be sent out, you‟ll need to choose your Schedule reminder settings.
From the menu bar at the top of the screen, select Schedule and then Reminders.
Select Schedule
and then
Reminders
The Reminders screen will then appear where you can choose which settings you‟d like.
For example: You may want to set your individual reminders to be sent once per week on a
Sunday evening at 18:00:00. This means that when the reminders are due, the Schedule will
send the reminders according to their default output settings. When you come into the library
on the following Monday, any reminders you have specified to be printed will be listed in the
Output screen, so all you‟ll need to do is print the reminders off. If you have specified that they
are to be emailed, the borrowers will already have received their reminder emails, provided a
valid email address has been entered onto their record card.
For more information on the Output table, see the section What happens after I‟ve applied my
reminder settings?
Please see section How do I specify what format the reminder is sent in? for how to choose
the reminder format for both group and individual reminders.
Use the calendar to
select a date you’d like
your reminders to start
Place a tick here to
select Individual
Reminders
Choose the
interval period
here
Type the time you’d like
the reminders to run
If you would like the reminders
to be sent now, put a tick in this
box. After that, the next time
they are sent will be on the date
and time that you’ve specified
above
Junior Librarian.net User Guide
When you have chosen
your settings click Save
Version 11.4
142
Chapter 7: Loans
How do group reminders work?
Group reminders are sent to tutors so that they can remind the borrowers in their group to return
their overdue resources.
In the same way that you can edit individual reminders, you can also edit your group reminders.
However, group reminders work differently to individual reminders in that you can only schedule
to send one group reminder at a time.
How do I apply the settings for group reminders?
Before any reminders can be sent out, you‟ll need to choose your reminder settings. From the
menu bar at the top of the screen, select Schedule and then Reminders.
Select Schedule
and then
Reminders
The Reminders screen will then appear where you can choose which settings you‟d like.
For example: You may want to set your group reminders to be sent once per week on a Sunday
morning at 10:00:00. The start date is 28/06/2007. This means that when the reminders are due,
the Schedule will send the reminders to the form tutors who have an email address entered in
the tutor group record. It will also send the reminders to the Output table in the form of a PDF
document. When you come into the library on the following Monday, all you‟ll need to do is go
into the Output screen and print the reminders.
Place a tick
here to select
Group
Reminders
Use the calendar to
select a date you’d like
your reminders to start
Choose the
interval period
here
Type the time
you’d like the
reminders to run
If you would like the reminders to be
sent now, put a tick in this box. After
that, the next time they are sent will
be on the date and time that you’ve
specified above
Junior Librarian.net User Guide
When you have
chosen your
settings click Save
Version 11.4
143
Chapter 7: Loans
For more information on the Output table, see the section What happens after I‟ve applied my
reminder settings? below.
What happens after I‟ve applied my reminder settings?
Once you‟ve clicked Save, the reminder settings will be added to the Schedule as a task to be
run. To see the task, click Schedule and then View Tasks from the menu bar at the top of the
screen.
Whenever you create a new reminder task or edit the current one, the Schedule adds a Last
Run date. The last run date is the way the schedule knows when the reminders would have
been sent last so that it knows when they are next due to be sent.
You can edit the Schedule reminder settings if you wish. See Chapter 11: Customising Junior
Librarian.net, section on Schedule for more information.
When the time comes for the Schedule to send out the reminders, any reminders which have
been specified to be emailed will be sent out to those borrowers who have a valid email address
held on their record card. (Please see Chapter 3: Settings for how to apply the email settings).
For any reminders which have been specified to be printed, a PDF reminder document will be
available to be printed as and when required.
The PDF reminder documents are held in the Output table. To access the Output table, select
Database and then Output from the menu bar on the top of the screen.
Select Database
and then Output
Junior Librarian.net User Guide
Version 11.4
144
Chapter 7: Loans
The Output screen will then appear.
Please Note: Only the reminders you haven‟t viewed will be listed. Once you have viewed them,
they will be moved to the Output Recycle Bin, where you can view and/or print them if you
wish.
Any viewed reminders
will be moved to the
Recycle Bin. To view
and/or print them
click here
How do I print reminders?
To print your current reminders, highlight or double click the required PDF document from the list
in the Output screen.
The reminder details will be shown. Click Open to view the PDF document.
Click Open to view
the reminder PDF
Junior Librarian.net User Guide
Version 11.4
145
Chapter 7: Loans
Once the PDF document is open, it will list all of the reminders you have scheduled to send as
„print‟. To print them, click on the print icon at the top left of the screen.
When the reminders are printed, they will be grouped together by borrower and reminder
number.
For example: A borrower may have three resources on loan. For one of the resources, he is
due to have Reminder 1 sent. For the other two resources, he is due to have Reminder 2 sent.
When the reminders are printed, the borrower will have one sheet of paper with Reminder 1 on
which lists the first resource and another sheet of paper with Reminder 2 on which lists the other
2 resources. So he will receive two sheets of paper altogether.
If you don‟t want to print any reminders, simply click on the cross at the top right of the screen.
Viewed and/or printed reminders will be moved to the Output Recycle Bin, where you can view
them and print them as many times as you wish.
Use the arrows to
scroll up and down
the list of reminders
Click here to print
the reminders
What is a memo used for?
You might need to send a memo to Year 11 leavers, for example, who usually leave officially
before their exams start. A memo would remind them to bring all their resources back,
regardless of whether they are overdue or not.
If you want to change the text in a Memo, you can edit in by clicking on Tools and then Edit
Reminders.
Junior Librarian.net User Guide
Version 11.4
146
Chapter 7: Loans
How do I send reminders to individual borrowers?
If you only want to send reminders to an individual borrower, use the Advanced Search facility
in Current Loans to search for the individual first or use Flagging. (See sections on Searching
Databases and Flagging in Chapter 16: Viewing Library Data.)
If you want your reminders to be shown on the PDF document and then printed in a specific
order, any sorting or record selection will need to be done first.
For example: You may want your reminders to be printed in order by tutor group and then
borrower surname. This sort will need to be applied to current loans before clicking the
reminders button.
To print individual reminders, make sure you are in the Current Loans screen and then perform
any searching you need. Once you have the borrower/s on the screen that you want to print
under Tools on the right of the screen.
reminders for, click on
Choose the options you want by placing a tick in the relevant box:
Output selected reminder only means you can choose the specific reminder that you want to
be sent.
Reprint last reminder when limit reached means that if any of the borrowers that you are
sending reminders to have already had the last reminder, they will receive it again. This option
won‟t be needed if you have selected Output selected reminder only.
Create reminders for overdue items only means that reminders will only be sent to borrowers
who have overdue items.
The Output Options enable you to choose how the reminders are sent out. You can use the
actual reminder‟s default output settings or specify to print them or send them by email.
For more information on the reminders default output, please see the section How do I specify
what format the reminder is sent in? earlier in this chapter.
If you want to send a
specific reminder, click
Output Selected Reminder
Only and select the
reminder you wish to send
Click here to send reminders to
borrowers who have overdue
items only
Select how you wish the
reminders to be sent
If you want the last reminder to
be printed again for those
readers who have already
received it, make sure you click
this box before clicking
Generate
Junior Librarian.net User Guide
When you are happy
with the settings, click
Generate
Version 11.4
147
Chapter 7: Loans
Past Loans
How do I view past loans?
To view the full list of past loans, click on the
of the screen.
icon from the tool bar on the left
The Past Loans database shows both current and past loans. To view just past loans, click on
more under the Page Views tab on the right of the screen. Double click on the Past Loans
view.
How do I delete a past loan?
Find and click on the loan you‟d like to delete, and then click on the
the Records tab on the right of the screen.
icon under
To delete more than one past loan, use Flagging. See Chapter 16: Viewing Library Data,
section on Flagging for more information.
Highlight the
record you’d
like to delete
and then click
on Delete
Junior Librarian.net User Guide
Version 11.4
148
Chapter 8: Reservations
Chapter 8: Reservations
This chapter will explain how reservations work in Junior Librarian.net and how to manage and
view them.
The Making Reservations section tells you how reservations work and how your borrowers can
reserve resources.
The Managing Reservations section explains how to view your reservations and how to delete
them if the reservation is no longer needed.
Making Reservations
How do reservations work?
When a resource is on loan, it‟s possible for other borrowers to reserve it for when it is returned.
If there are multiple copies of a resource all copies will be reserved. The advantage of this is that
if all copies of the resource are out on loan, the first copy to be returned, regardless of its
accession number, can be issued to the first person who has reserved it rather than them having
to wait for a particular copy to be returned. Reservation information is stored in the
Reservations database. (See the section How do I view reservations below).
Please Note: The only exception to the above is if more than one person reserves the same
resource and there are several copies on loan. If this happens, the first resource to be returned
gets reserved for the first person who made a reservation. The second resource to be returned
is then reserved for the second person who made a reservation. This process continues for all
subsequent reservations and resources which are returned.
When a resource is reserved and then returned to the library using Circulate, an Adobe Reader
window opens where you can print the reservation slip. You can then insert one part of the slip
inside the register for the form tutor to give to the borrower who has reserved the resource and
the other part inside the resource ready for collection.
Click the print
icon to print the
reservation slip
Junior Librarian.net User Guide
Version 11.4
149
Chapter 8: Reservations
If you don‟t want to print a slip straight away, simply close the Adobe Reader screen by clicking
the red cross at the top right of the screen. You can print the slip at any time by going into the
Reservations database, highlighting the reservation and then clicking on the
icon
under the Records tab on the right of the screen.
If the borrower has a valid email address, an email will also be sent to the borrower informing
them that the resource is now available for collection.
How does a borrower reserve a resource?
There are two ways to reserve a resource. The first of which is completed by following these
instructions.
Click on Search on the home page.
This will bring up a clear and colourful easy search selection, as shown in the screen below.
Each picture represents a search criterion; for example the dog represents animals, and will
bring up all resources in the library which relate to animals.
Below is the Search Results page for the Animals search. Each area is described in the
captions below.
Floating in the sea
are suggested
keywords to add
to your search.
Simply click on a
keyword to add it
to your search.
By clicking on a
resource type
you stop that
particular
resource type
from being
shown on the
search page.
Junior Librarian.net User Guide
Drag resources into the My Stuff
treasure chest. Click on the My
Stuff treasure chest for a link to
the My Books page, where you
may Reserve resources
Version 11.4
150
Chapter 8: Reservations
Please Note: If the student is not yet logged in, they will be requested to scan or type their
barcode number into the login box, which will pop up upon your first attempt of dragging an item
into the My Stuff treasure chest.
As soon as the student has successfully logged in, the resource will be placed into the My Stuff
treasure chest.
Once the student has filled their My Stuff treasure chest, with whatever resources they wish,
click on the My Stuff treasure chest for a link to the My Stuff page.
Print, Reserve,
or Remove
resources here.
Drag resource
into Reserve to
reserve the item.
Resources
currently stored in
the My Stuff area
Drag items into
Review to review
the resource
To Reserve the resource, the student simply needs to drag the item into the Reserve treasure
chest.
Junior Librarian.net User Guide
Version 11.4
151
Chapter 8: Reservations
The second way to reserve a resource is by logging into the My Books screen.
If the student is not logged in already they will be presented with the login screen, as displayed
below. Depending on what is selected, they will need to enter either their Barcode or Username
to log in.
The My Books screen is displayed below. This screen contains all Current Loans and Past
Loans relating to that student.
Drag resources
into the Reserve
bin to reserve
them.
Click on All to
show all books;
click on Current
to show current
loans; click on
Past to show past
loans.
As students obviously cannot reserve their Current Loans the best way to make reservations
through this page is to click on Past to display Past Loans and then drag the desired resource
into the Reserve treasure chest.
Junior Librarian.net User Guide
Version 11.4
152
Chapter 8: Reservations
How do I reserve a resource for a borrower?
It is only possible for you to reserve a resource for a borrower, by logging in as the borrower
themselves and following the steps above.
Managing Reservations
How do I view reservations?
To access the reservations database click the
the screen.
icon from the tool bar on the left of
Available copies displays
how many copies of this
resource are out on loan.
Resources shown in
black show as having 0
Available copies, this
means 0 copies are out
on loan.
A resource showing
in Black means it’s
not on loan and is
available to issue
How long are reservations listed in the reservations database?
Once the reserved resource has been issued to the borrower who reserved it, it will be removed
from the Reservations database.
How do I delete a reservation?
From the reservations screen, find and click on the reservation you wish to delete and then click
icon under the Records tab on the right of the screen.
the
Please Note: You can‟t reserve items marked as Reference.
Junior Librarian.net User Guide
Version 11.4
153
Chapter 8: Reservations
How do I automatically delete reservations?
When a resource is reserved, the reservation will stay on the resource record until it‟s issued to
the person who reserved it.
You can set Junior Librarian.net so that reservations over a certain period of days are
automatically deleted.
From the menu bar at the top of the screen click on Settings and then Reservations.
Click
Settings,
Reservations
Enter the number of days. You can also stop reservations being made for resources which aren‟t
on loan. If you want to do this, place a tick in the box. Click Save.
Enter the
number of days
here
Tick here to stop
reservations to
resources which
aren’t on loan
Click
Save
By clicking on this the
librarian is given the
option to reprint the last
reservation slip printed for
that resource
The reservations are then deleted during nightly housekeeping. When a reservation is deleted
the system will check and see if that resource is reserved by another borrower. The system will
create a report which will be placed in to the output table which consists of a list of resources
which no longer have reservations and all the new reservations for resources which are now
reserved by a different borrower.
Junior Librarian.net User Guide
Version 11.4
154
Chapter 9: Reviews
Chapter 9: Reviews
This chapter explains how your borrowers review the resources they take out on loan and how
you can manage them.
The Making Reviews section tells you how borrowers can make reviews.
The Managing Reviews section explains how you can view the reviews your borrowers have
made and what you need to do before the reviews are available for everyone to see. It also tells
you how to delete reviews and how you can customise the review questions.
Making Reviews
How do borrowers review resources?
There are two ways for borrowers to review resource, both of which are described below.
First of all, click on Reviews
depending on whether or not the student
is logged in, they will be presented with the Login screen.
The Reviews screen, as shown below, will then appear. This will contain all Current Loans and
Past Loans for the student.
Displayed here are
all Current and
Past Loans. Click
on the resource,
then More then I
want to write a
review to write a
review for the item
Junior Librarian.net User Guide
Drag a
resource into
the Review
treasure
chest to
review
Version 11.4
155
Chapter 9: Reviews
If you have chosen to click on the resource, and then More you will have to option to click on I
want to write a review, as shown below
The Review page will be displayed
Font size and
type options are
chosen here
Star ratings are
selected here by
simply clicking on
the desired star
Text Colour and Smileys
are chosen here, review
details are typed in the
white window above
A shortcut to get to the Review page, as shown above, would be to simply drag the Resource
that you wish to Review into the Review treasure chest. This automatically brings up the
Review page.
The second way to Review items is to click on Search on the signpost. Follow the process as
described in How does a borrower reserve a resource, in Chapter 5: Circulate.
Instead of following the final steps to reserve an item, drag the resource into the Review
treasure chest. The Review page (as shown above) will appear, fill in the review as normal.
Please note, the student may add as many resources to their My Stuff area, as they like.
However, it is important to remember that this area is emptied each time the student logs out.
They may write reviews for resources they both have and haven‟t borrowed only from the My
Stuff page; if writing from the Reviews page, they may only review resources they have
borrowed. Reviews are not available for public viewing until they are approved by the librarian.
Please Note: The screen above shows a review with set questions. To find out how to add your
own review questions, please see section How do I add my own review questions? later in
this chapter.
Junior Librarian.net User Guide
Version 11.4
156
Chapter 9: Reviews
Managing Reviews
How do I view reviews?
Once a borrower has written a review, it will be listed in the Reviews screen within Grown Ups.
To access the reviews database, click the
screen.
icon from the tool bar on the left of the
Click Edit to
view the
review
details
Highlight
the review
you want to
approve
How do I approve a review?
Before the review can be seen by anyone else, the librarian has to check it for content and then
approve it.
Highlight the review you want to view and then either double click your mouse or click
under the Records tab on the right of the screen.
When you are happy with the review, tick Approved at the bottom left of the screen and then
Save.
Click Save to
allow everyone to
view the review in
Enquiry.
Tick Approved
when you are
happy with the
review
You can delete a review if for example a borrower writes one which is either unsatisfactory or is
for the wrong resource.
Junior Librarian.net User Guide
Version 11.4
157
Chapter 9: Reviews
How do I delete a review?
From the Reviews screen, highlight the review you want to delete and then click
under the Records tab on the right of the screen.
Once a review has been removed, it gets placed in the Reviews Recycle Bin. To access this,
icon under the Records tab on the right of the screen.
click on the
If you change your mind, you can restore the review back to the Reviews database by
icon under the Records tab.
highlighting it and then clicking on the
How do I add my own review questions?
You can create a more structured way for the borrowers to write their reviews by creating your
own questions for them to answer.
Click Settings
and then
Reviews
From Grown Ups, select Settings and then Reviews from the menu bar at the top of the
screen.
Type the questions you‟d like your borrowers to answer, making sure you do so for both your
Fiction and Non-Fiction items (if needed). Click Save when you have finished.
You can change
the layout using
the tools here
Click here to
change the
screen to Fiction
or Non-Fiction
Type your
review
questions here
Click Save when
you have finished
Junior Librarian.net User Guide
Version 11.4
158
Chapter 10: Maintaining My Library
Chapter 10: Maintaining My Library
This chapter explains how to make changes to your existing resources and borrowers and how
to update the resources in your catalogue using Discovery Online.
The Making Changes to Resources section tells you how to change details on your resource‟s
records both individually and globally. It also tells you how to deal with resources which have
gone missing.
The Making Changes to Borrowers and Tutor Groups section tells you how to change details
on your borrower‟s records and how to merge tutor groups together. It will also tell you what you
need to do to move your borrowers up to their new groups ready for the new term.
Making Changes To Resources
How do I edit an existing resource?
If you would like to change some details on a resource which has already been catalogued,
simply find the item in the Resources database and then either double click on it or click
the icon under the Records tab on the right of the screen.
If you have the resources barcode to hand, you can type this into the Quick Search box, select
the Go To option and click Go.
Highlight the resource, Click
to open up the resource record card.
Make the necessary changes and then click Save.
For more information on ways to search your catalogue, see Chapter 15: Viewing Library
Data.
How do I delete a resource?
To delete a resource from the catalogue, highlight the record and then click on the
icon under the Records tab on the right of the screen.
Deleted items will be moved to the Resource Recycle Bin. To access this, click on the
icon under the Records tab on the right of the screen.
If you change your mind, you can restore the resource back to the Resources database by
icon under the Records tab.
highlighting it and then clicking on the
Junior Librarian.net User Guide
Version 11.4
159
Chapter 10: Maintaining My Library
How do I change the accession number of a resource?
You may want to change the accession number of a resource, perhaps if the barcode you have
assigned to it has become damaged.
Open up the resource‟s record card by highlighting it and clicking on
Type the new barcode into the Barcode field at the top of the screen and then click Save.
Type the
new barcode
number here
Click Save
when you are
happy with the
changes you’ve
made
How do I make global changes to selected resource records?
It‟s possible for you to make global changes to any of the fields in the resource‟s record i.e.
Location, Publisher and Class etc. For example, you may want to change the Location of a
selection of books because they have been moved to a different part of the school. To save you
having to manually change this on each resource, you can use the Quick Replace function.
You must first search for the records you wish to change. (See Chapter 15: Viewing Library
Data, section on Searching databases). Once you have just the records you wish to change on
screen, from the menu bar at the top of the page, select Tools and then Quick Replace.
Select Tools
and then
Quick Replace
Junior Librarian.net User Guide
Version 11.4
160
Chapter 10: Maintaining My Library
The Quick Replace box will then appear. Quick Replace works by looking for one piece of text
and then replacing it with another.
Select the specific field you wish to make changes to by clicking the box at the end of the Field
line. If you have searched for specific records to be changed, make sure you select the Filtered
Records range. Choosing All Records means that the changes will be made to ALL of your
resource records, not just the ones you have searched for.
In the example, I have decided that I would like all resources which have the location of either
Careers Room or Hall to be changed to Library. I initially searched my catalogue for all
resources with either of these two location types. You can see from the screenshot below by
looking under Occurrence that 3 of my resources have a Careers Room location and two have
the location of Hall.
Select the first location from the list that you want to change by clicking on it with your mouse.
Here, I have chosen Careers Room. You‟ll see that in the Look For box, Careers Room has
appeared. Now type the new replacement location that you want these resources to have in the
Replace with box. I have chosen Library. Click Replace. The system will then find all of the
resources with the location of Careers Room and replace it with the location of Library. Repeat
the process if you want to change any other locations.
Select which
range you’d
like Quick
Replace to
apply the
changes to
Click here to
select the
field type
you wish to
change
Select the
field data
you want to
replace
Type the new
replacement
data here. Click
Replace when
you have
finished
Shows the
field data
you have
chosen to
replace
Junior Librarian.net User Guide
Version 11.4
161
Chapter 10: Maintaining My Library
Using Quick Search in Quick Replace
It‟s possible to search for specific field data using the Quick Search function.
You may want to find specific data and replace it with something different. To save you having to
scroll down the list of entries in quick replace to find the one you want, you can type the data you
are looking for in the Quick Search box.
For example: You want to change the media of „Video‟ to „Tape‟ for all of your resources.
From Quick Replace, choose „Media‟ from the Field drop down menu. In the Quick Search box,
type „Video‟ and then click Go.
Choose Media
from the list
Type
Video here
and click
Go
The media „Video‟ has now appeared on the screen. If you highlight it, „Video‟ will appear in the
Look For box. Type „Tape‟ in the Replace With box and then click Replace.
Highlight Video
Video appears
here
Click Replace
Type Tape here
Please Note: The search will only be done in the selected field i.e. Media.
Junior Librarian.net User Guide
Version 11.4
162
Chapter 10: Maintaining My Library
How do I mark a resource as missing?
If a borrower has lost a resource while on loan or a leaver has left with a resource still on loan to
them, you may want to mark the resource as missing and return the resource from that
borrower‟s record.
There are various places in which you can mark a resource as Missing, all of which are listed
below.
Resources and Current Loans Page:
Find and highlight the resource you would like to mark as missing. Click on Missing beneath the
Records section to the right hand side of the screen.
Click on
Missing
Click on
Missing
Resources Page
Current Loans Page
On the Missing screen, specify a Reason Missing by either selection an option from the drop
down list, or by typing in a reason manually (this field works like other fields in record cards
where, if you have typed in a value manually, that value will appear in the drop down list the next
time).
You may also wish to enter a Cost of Replacement and select whether you wish to Return the
resource. We do suggest you choose to Return resource; this will remove it from the
Borrower‟s record when placing the resource in the Recycle Bin, and will avoid future confusion
as to the whereabouts of the on loan, now „missing‟, resource.
Specify a
missing
reason
Tick the Return
resource option to return
the resource from the
borrower‟s record
Click Ok when
you have
finished
Junior Librarian.net User Guide
Version 11.4
163
Chapter 10: Maintaining My Library
Once you click Ok the resource will be moved to the Resource Recycle Bin. To access the
Recycle Bin, click on the
icon on the main resources screen under the Records
tab.
If the resource turns up at a later date, you can simply restore it back to the main catalogue by
highlighting it and then clicking on the
icon.
To remove it from the catalogue completely, click on the
Resources Recycle Bin.
icon from within the
Please Note: you will be unable to Delete the resource from the Recycle Bin if you have not
returned the resource from the Borrower‟s record.
Borrower‟s Record Card:
From the Borrowers screen within Management, highlight the Borrower‟s record you wish to
on beneath the Records tab on the right hand side of the screen.
edit, and click
Navigate to the Current Loans tab of the Borrower record, highlight the resource you would
like to mark as „missing‟ and click on the
Highlight the
resource you
wish to mark
as Missing
Click on the Mark
as Missing button
on the bottom of
the screen
Junior Librarian.net User Guide
Version 11.4
164
Chapter 10: Maintaining My Library
On the Missing screen, specify a Reason Missing by either selection an option from the drop
down list, or by typing in a reason manually (this field works like other fields in record cards
where, if you have typed in a value manually, that value will appear in the drop down list the next
time).
You may also wish to enter a Cost of Replacement and select whether you wish to Return the
resource. We do suggest you choose to Return resource; this will remove it from the
Borrower‟s record when placing the resource in the Recycle Bin, and will avoid future confusion
as to the whereabouts of the on loan, now „missing‟, resource.
Specify a
missing
reason
Tick the Return
resource option to return
the resource from the
borrower‟s record
Click Ok when
you have
finished
Once you click Ok the resource will be moved to the Resource Recycle Bin. To access the
Recycle Bin, click on the
icon on the main resources screen under the
Records tab.
If the resource turns up at a later date, you can simply restore it back to the main catalogue by
highlighting it and then clicking on the
icon.
To remove it from the catalogue completely, click on the
Resources Recycle Bin.
icon from within the
Please Note: you will be unable to Delete the resource from the Recycle Bin if you have not
returned the resource from the Borrower‟s record.
Junior Librarian.net User Guide
Version 11.4
165
Chapter 10: Maintaining My Library
Making Changes To Borrowers and Tutor Groups
How do I edit a borrower?
If you would like to change some details on a borrower‟s record, simply find the borrower in the
Borrowers database and then click
to open up the record card.
If you have the borrower‟s PIN to hand, you can type this into the Go to box.
If you have the borrower‟s barcode to hand, you can type this into the Quick Search box, select
the Go To option and click Go.
Highlight the borrower,
click to open up the borrower‟s record card.
Make the necessary changes and then click Save.
For more information on ways to search your catalogue, see Chapter 15: Viewing Library
Data.
How do I change a borrower‟s PIN?
If you change a borrower‟s PIN, you must ensure that the system is updated to reflect the
change.
Open up the borrower‟s record card by highlighting it and clicking on
Type the new barcode into the Barcode field at the top left of the screen and then click Save.
How do I delete a borrower?
To delete a borrower from the library, highlight the record and then click on the
icon under the Records tab on the right of the screen.
Deleted borrowers will be moved to the Borrower Recycle Bin.
icon under the Records tab on the right of the
To access this, click on the
screen.
If you change your mind, you can restore the
database by highlighting the record and then
Records tab.
Junior Librarian.net User Guide
Version 11.4
borrower back to the borrower
clicking on the icon under the
166
Chapter 10: Maintaining My Library
How do I edit a tutor group?
If you would like to change some details on a tutor group record, simply find the tutor group in
the Tutor Groups database and then click
to open up the record card.
Make the necessary changes and then click Save.
How do I delete a tutor group?
To delete a tutor group from the library, highlight the group and then click on the
icon under the Records tab on the right of the screen.
Deleted groups will be moved to the Tutor Group Recycle Bin.
To access this, click on the
screen.
icon under the Records tab on the right of the
If you change your mind, you can restore the group back to the tutor group database by
icon under the Records tab.
highlighting the record and then clicking on the
Junior Librarian.net User Guide
Version 11.4
167
Chapter 10: Maintaining My Library
Discovery Online
What is Discovery Online?
Discovery Online is an online database which holds over 2 million Bibliographic Records, over
200,000 Book Cover Images as well as over 700,000 Book Summaries!
Discovery Online will add thousands of colour book cover images and book summaries (similar
to back cover blurb) to your own resources database. When your catalogue is searched, a
picture of the front cover and/or summary will appear on screen.
Discovery Online will also automatically find the bibliographic details of new resources added to
the catalogue and will open up retrospective cataloguing to a much wider range of users beyond
educational establishments. It will fill in any gaps in field entries in your catalogue, for example if
you have many records without publishers, Discovery Online will fill in that field for you.
How do I choose which fields to update?
If you have already spent time adding your own bibliographic information, you probably don‟t
want Discovery Online to overwrite it. The system allows you to choose which fields you want to
update (if any).
To access the Discovery Online settings, select Schedule and then Discovery from the menu
bar at the top of the screen.
Click
Schedule
and then
Discovery
Junior Librarian.net User Guide
Version 11.4
168
Chapter 10: Maintaining My Library
The Discovery Online settings screen will then appear where you can select which fields you‟d
like to update. When you have entered your settings, click Schedule. This will add a „task‟ to the
Schedule. (See Chapter 11: Customising Junior Librarian.net, section on Schedule for more
information).
Click each
field which
you’d like to
be updated
by Discovery
Tick Update
empty fields
only to only
update fields
with no
details
Tick this option to
update your entire
catalogue
Click
Schedule
when you
are happy
with the
settings
Tick this option to
update your entire
catalogue straight
away using the
options you’ve
specified
Junior Librarian.net User Guide
Version 11.4
169
Chapter 10: Maintaining My Library
How and when does my catalogue get updated?
Your catalogue records are updated using the Schedule. Once you‟ve scheduled Discovery
Online to run, it will be added as a task to the Scheduler.
When the time comes for the Discovery online task to run, resources in batches of 200 will be
updated each night. The schedule makes its selection by sorting all of the records in your
database by the date they were last updated.
The scheduler will then update the records with the oldest 'Discovery Last Updated' date with the
most recent discovery images and summaries. This ensures that your records are updated in a
timely and orderly manner with the least disruption to your system.
To see the Discovery Last Updated date, you‟ll need to create a new view in the Resources
database and add the „Discovery Last Updated‟ field to it. (For details on how to create views
see Chapter 11: Customising Junior Librarian.net, section on Page Views)
For more information on how Schedule works see Chapter 11: Customising Junior
Librarian.net, section on Schedule.
Once you‟ve chosen which fields you‟d like to update from Discovery Online, you have two
options as to when your records next get updated. You can either schedule the update to be run
the next day, or schedule it to be run straight away.
Scheduling the Discovery Online update for the next day
Once you have entered the Discovery Online settings, click Schedule. The task will be added to
the Schedule. The system will then allocate a time between 6pm and 6am for the task to run.
The time is automatically allocated by MLS and shouldn‟t be changed unless instructed to do so.
Please contact the helpdesk on 0161 449 9357 if you are unsure.
Scheduling the Discovery Online update to be run straight away
When choosing which fields you‟d like Discovery Online to update, tick the Force schedule to
run on save option at the bottom of the Discovery Online settings screen and then click
Schedule. The Discovery Online task will then be added to the Schedule and will run within 60
seconds. Once the update is complete, the Discovery Online task will next run at the allocated
time set by MLS (see above)
How do I update my whole catalogue?
If you want Discovery Online to update all of your resources instead of just 200, tick the Force
complete update option on the Discovery Online settings screen. Depending on whether you‟ve
set the task to run straight away or at the allocated time, all of resources will be updated. Once
the update is complete, the system will revert back to updating 200 resources at a time.
What happens if the Discovery Online update fails?
Discovery Online updates 200 resources each night. If the update fails, perhaps because the
internet connection has timed out, the update will start again. It will continue to do this until all
200 records have been updated.
Junior Librarian.net User Guide
Version 11.4
170
Chapter 10: Maintaining My Library
Housekeeping
What does housekeeping do?
Housekeeping runs automatically overnight and makes sure your days overdue, days on loan
and fine information is up to date. You can view the progress of housekeeping by clicking on
Schedule and then View Tasks from the menu bar at the top of the screen in Grown Ups.
The housekeeping task
is shown here. Unless
the status says failed
the task has run
successfully. Next Run
and Last Run dates are a
good indication of if it us
running nightly
Please Note: If the loan and/or fine information on your resources isn‟t up to date, there may be
a problem with the housekeeping task. In this instance please ask your IT Technician to restart
the MLS Scheduler Service on the IIS server. If this fails, contact the helpdesk on 0161 449
9357 for support.
Junior Librarian.net User Guide
Version 11.4
171
Chapter 11: Customising Junior Librarian.net
Chapter 11: Customising Junior Librarian.net
This chapter tells you how you can customise Junior Librarian.net to so that it works in the way
that you need it to.
The News section tells you how to add / edit your own news items, and describes how your Top
Ten Resources and New Resources are displayed.
The Schedule section tells you how the scheduler works in relation to Housekeeping, Discovery
Online, and Reminders.
The Page Views section tells you how to add your own customised views so that when you view
your library data, only the information which you require is shown.
The Settings section explains what each option in the list does and how it impacts on other
settings in Junior Librarian.net.
News
Where are my news items displayed?
There are three main areas in which News items are displayed on the Junior Librarian.net
home screen.
New Resources are displayed when clicking upon the hot air balloon
found floating across the sky on the Home screen.
which can be
Book of the Week and other news items are displayed when clicking on the newspaper
which can be found on the beach towel on the Home screen.
Top Ten resources are displayed when clicking on the books
beach towel on the Home screen.
Junior Librarian.net User Guide
Version 11.4
which can be found on the
172
Chapter 11: Customising Junior Librarian.net
How do I modify settings for my news items?
Log into Junior Librarian.net Grown Ups, and click on News within the Tools menu bar.
Click on News to open
up settings for New
Resources
There are three different tabs within the News window. The first of the three, New Resources,
simply allows you to choose which resource types you would like your new resources to be
taken from. If you simply leave the resource type of Book selected, only new books will be
shown. However, if you tick Film as well, then new books and films will be shown.
As default, only the resource type of Book is selected. This is to avoid students missing out on
new books by clogging up the New Resources screen with new Websites (for example) which
they cannot take out of the library.
Another setting on this tab is the number of items you would like to show in the New Resources
news item. 10 is the default, and recommended, setting.
Enter the number of
items to be shown in
the New Resources
news item here
Select the resource types
you would like to display
new resources from on
this list
Junior Librarian.net User Guide
Version 11.4
173
Chapter 11: Customising Junior Librarian.net
The next tab along, is the Book of the Week tab. Within this tab you may simply choose where
you would prefer the book image to appear in relation to its summary. There are just three
options; Top, Left and Right.
The last tab is the Top Ten tab. Again, you are able to select the resource types that you wish
this information to be taken from. All resource types are selected as default.
You may also enter the period, in days, over which the top ten should be calculated. The default
amount here is set to 365 which means it is calculated per annum. Should you wish to change
this to monthly (for example), change this period to 30.
Enter period, in
days, here.
Select the
resource types
from this list
Junior Librarian.net User Guide
Version 11.4
174
Chapter 11: Customising Junior Librarian.net
How do I update and view my New Resources news item?
Recently added resources will appear on the below New Resources screen automatically, there
is no need, or way, for you to manually update this area.
Scroll over each book to view the book cover and summary (if available).
Junior Librarian.net User Guide
Version 11.4
175
Chapter 11: Customising Junior Librarian.net
How do I update and view my Book of the Week?
Click on
to view a list of all of your resources.
Find the resource you wish to mark as Book of the Week. You may do this by either typing the
Author‟s name (for example) into the Quick Search, or using the Advanced Search facility.
(Please see the Searching Databases section of Chapter 14: Viewing Library Data for further
details on using the search facility)
Once you have found the resource that you would like to mark as Book of the Week, highlight it
and click on
to open the resource record.
Check this
resource has a
Summary here
Select this resource
as being Book of
the Week here
Tick the Book of the Week tick box at the bottom of the resource record, and click Save to save
your changes.
Please Note: The book summary, from the Summary/Notes tab, will be displayed with your
Book of the Week on your Home screen. The summary is usually pulled from Discovery Online
however; on occasion Discovery Online doesn‟t have a summary available for the book. If this is
the case, you may wish to enter the summary yourself before clicking Save on this record; that
way your Book of the Week article will look more substantial.
The summary is always taken from the blurb on the back of a book, so can be easily copied from
here.
Junior Librarian.net User Guide
Version 11.4
176
Chapter 11: Customising Junior Librarian.net
Once the resource record has saved successfully, click on Book of the Week from the Tools
menu
Click on Book of
the Week from the
Tools menu
The Book of the Week window will open, showing the book that you have chosen to be book of
the week.
To make this the active book of the week, highlight the record by clicking on the title of the book.
Once it shows as blue, click the Activate button.
Click the Activate
button to activate the
selected book as book
of the week
Junior Librarian.net User Guide
Version 11.4
177
Chapter 11: Customising Junior Librarian.net
Click Yes when the below window pops up.
As this is the first book of the week you have selected, you will more than likely see the below
warning pop up. This simply means that no further books of the week are scheduled. Click Ok to
this warning.
You will see that your book of the week has now moved from the Future books of the week
window, to the Current window. This means that this book is now currently book of the week,
and there are no future books of the week scheduled.
Current Book of the
Week shown here
Use these arrows
to order future
books
Future Books of the
week shown here
The book you have set as Current Book of the Week will expire after one week. If there are no
Future books of the week specified, no Book of the Week will show. In order to schedule
Future books of the week follow the previous steps to add further books to the Future books
of the week window. Then, once the current book has expired after one week, the next book in
the list will become Current Book of the Week. Once that expires, that will be deleted and the
Junior Librarian.net User Guide
Version 11.4
178
Chapter 11: Customising Junior Librarian.net
next book will become the Current Book of the Week and so on. You may order how they are
chosen by highlighting the book and clicking on the
„s to the left of the window.
To view Book of the Week, your students simply have to click on the newspaper icon on the
beach towel, displayed on the Home page.
Please note: if you have only just created your Book of the Week, the home page needs to be
refreshed in order for the changes to take effect.
Click on the
Newspaper
The front page will display the Book of the Week in the below format. Take note of the
summary, and how it makes the article more substantial. Hence the earlier suggestion of
inputting your own summary if necessary.
Junior Librarian.net User Guide
Version 11.4
179
Chapter 11: Customising Junior Librarian.net
How do I update and view Other News Items?
Within the Grown Ups screen, click on Database / News
Junior Librarian.net User Guide
Version 11.4
180
Chapter 11: Customising Junior Librarian.net
Click on News
All current news items will be listed on the screen. To create a new news item, click
,
alternatively to edit a current news item, highlight the item you wish to edit and click
The below News window allows you to edit the format of your news article.
Specify start
and end date
of article
validity here
Change layout,
font, add
images and
more from this
toolbar
Enter article
text here
Click Save
This news article will now be available to view by clicking on the newspaper on the Home
screen. To turn the pages of the newspaper, place your mouse of the top corner, click and pull
the page over.
Again, please remember you have to refresh the home page for changes to the newspaper to
take effect.
How do I update and view my Top Ten Resources?
Junior Librarian.net User Guide
Version 11.4
181
Chapter 11: Customising Junior Librarian.net
Again this area is updated automatically; the system looks at your library data, and calculates
the top ten most popular resources within your library. These resources are then displayed here.
Scroll over each book to view the book cover and summary (if available).
Schedule
How does schedule work?
Junior Librarian.net User Guide
Version 11.4
182
Chapter 11: Customising Junior Librarian.net
The MLS Schedule is a new facility which has been added to Junior .net. It is a windows service
that runs constantly on the server. Every minute it will check the list of scheduled tasks to see if
any are either overdue or flagged to run now. If there are, the scheduler will run these tasks in
the background on your behalf without any intervention from you.
This enables you to update your Discovery Online data on a regular basis, generate reminders,
and run housekeeping tasks. All you have to do is create the tasks you want to automate and
the scheduler will do the rest!
What is a task?
A task is something which you have asked the schedule to run. It can be any of these:
Discovery Online Update
Reminders
Data Tidy
With these scheduled tasks, you can:
Schedule a task to run daily, weekly or monthly at a time convenient for you.
Edit the scheduled task.
Stop a scheduled task.
Some scheduled tasks can‟t be changed. These are:
Error Log
Audit Log
How do I edit a scheduled task?
From the menu bar at the top of the screen, select Schedule and then View Tasks.
Click Schedule
and then View
Tasks
The Schedule screen will appear which lists all of the tasks you have asked it to run.
Highlight the task you want to edit and click the
right of the screen.
Junior Librarian.net User Guide
Version 11.4
icon under the Records tab on the
183
Chapter 11: Customising Junior Librarian.net
Highlight
the task
you’d like to
edit
Click Edit to
open up the
task settings
The screen showing the settings for the task will appear. Make the changes you require and
then click Save.
Repeat this for each task you‟d like to edit.
Tells you
when the task
was last run
Select when
you’d like the
task to finish
Select when
you’d like the
task to start
Description of
the task
Select the
Interval Type
using the drop
down arrow
Tick Run
Now if you
would like the
task to run
upon Save
Click Save
when you have
finished
Select the
Interval Period
you’d like to
have
How do I delete a scheduled task?
From the menu bar at the top of the screen select Schedule and then View Tasks.
Junior Librarian.net User Guide
Version 11.4
184
Chapter 11: Customising Junior Librarian.net
Click Schedule
and then View
Tasks
The Schedule screen will appear which lists all of the tasks you have asked it to run.
Highlight the task you want to delete and click the
right of the screen.
icon under the Records tab on the
Click the task
you’d like to
delete and
then click
Delete
Junior Librarian.net User Guide
Version 11.4
185
Chapter 11: Customising Junior Librarian.net
Page Views
What is a view?
A View is a screen containing the fields and data of your choice. The views, both standard and
ones you have created, will vary depending on the database you are in.
The Page Views facility in Junior Librarian.net allows you to customise the display in each of
the databases by setting your own default view. MLS have already set up a number of standard
views within each database for you to utilise, these are called System Page Views. However,
you can create your own Views containing the fields and data you wish to display.
How do I create a new view?
Once you are confident about searching the different databases (see Chapter 14: Viewing
Library Data), you will be able to create your own Views.
To access Page Views, click on More under the Page Views tab on the right of the screen.
Make sure you are in the database you want to create the new view for i.e. Resources.
Click More
to access
Page Views
Junior Librarian.net User Guide
Version 11.4
186
Chapter 11: Customising Junior Librarian.net
The main Page Views screen will appear.
Please Note: The screenshot above shows the views which have already been created under
System Page Views. These are views which are have been created by MLS and cannot be
deleted or edited.
When you are creating a new view, we would recommend that you copy one of the views which
have already been set up i.e. All Resources. Doing this means that you don‟t have to start
completely from scratch, and you can then edit and customise the copy.
To copy a view, highlight it and then click the
icon on the right of the screen.
Type in a description for the view copy you are creating, relevant to what will be shown in that
view. In the screen below, the description is „DVD‟s‟ because I am creating a view which will
show all the DVD‟s in my catalogue. From the Category field, select which category you‟d like
the new view to be listed in. Enquiry means the view information will be seen in Enquiry and
General means the view is just a general view which can only be viewed in Grown Ups.
When you are happy with the category and description, click Copy.
Select a
category for
the view
Type a
description for
the new view
Click Copy
to save the
new view
Junior Librarian.net User Guide
Version 11.4
187
Chapter 11: Customising Junior Librarian.net
Once you‟ve clicked Copy, the copy will then show in the Page Views screen. The view has the
correct description; however the information it shows is All Resources because that‟s the view
that was initially copied. You now need to edit the view so that it shows the information you need
i.e. DVD‟s. Highlight it and then click Edit.
The new copy
of the view
shows here
Highlight the
copied view
and then
click Edit
When you have clicked edit, the Page View – Edit screen will appear. This is where you can
customise the view to show the information you require, in this case DVD‟s.
You‟ll notice that there are 3 tabs along the top of the screen:
Layout is where you can choose which fields you‟d like to appear in the view. For example, you
may just want to see the Title and Author of the resource. In the Layout tab you can also change
the settings for the columns. Simply highlight the field in the Visible Fields tab and then choose
the settings you want under Column Settings.
Type a new name
for the
column/field here
Select the fields
you’d like to see in
the view by
highlighting them
from the Available
Fields list and then
using the arrows to
move them across
to appear in the
Visible Fields
section
Change where the
columns appear on
the page here
Change the colour of
the column here
Change the format of
the column here e.g.
Text
A preview of
the view shows
here
Junior Librarian.net User Guide
Use these arrows to
change the location
of the fields
Version 11.4
188
Chapter 11: Customising Junior Librarian.net
Record Selection is where you set the default search parameters. What this means is that if
you set the default search to „New Resource Type Equal To DVD‟ the system will carry out that
search criteria whenever you select the DVD view. In Record Selection you can also specify a
Sort Order for the fields. (See Chapter 15: Viewing Library Data section on Sorting Data for
more information)
Enter the search
criteria in these
fields. For example:
New Media Equal
To DVD. Click Add
to add it to the
search criteria
Select whether you
want the data to
show in Ascending
or Descending order
Change the Sort Order
of the fields here by
highlighting the fields
and using the arrows
to move them across.
See Chapter 15:
Viewing Library Data
for more information
Click Save when
you are happy
with the view
settings
You can use Boolean searching to customise the search even more. This allows you to broaden
your search by using and and Or. Boolean searching is useful because it allows you to refine
your search ensuring you get the results you want.
For more information on Boolean searching see Chapter 14: Viewing Library Data, section on
Searching Databases.
Junior Librarian.net User Guide
Version 11.4
189
Chapter 11: Customising Junior Librarian.net
Appearance is where you can change the font settings and select a default search field to show
when you are in the view for example, Title.
In the appearance tab you can also add an icon relevant to the information which will show in
the view. I have chosen the DVD icon (which belongs to the General category) because the view
I have set up shows all of the DVD‟s in the catalogue.
Once you are happy with the settings, click Save.
Please Note: The icon which you prefer may be located in any of the categories so we
recommend you browse them all until you find the one you want.
Change the font
settings here
Select which search
field you’d like to
appear first when
you make an
advanced search of
the view. For more
information on
searching see
Chapter 14
Select an icon
category here. The
icons which belong
to that category will
appear in the box
where you can
choose which one
you’d like
The view you have created will now be listed on the main Page Views screen. If you want the
view to be the default view i.e. the one you always see when you access Resources, highlight
the view and then click on the Default tab. To see the view straight away, click on Select.
You can carry out any of the actions on the right of the Page Views screen by highlighting the
view and then clicking on the action.
Select any of these
actions once you’ve
highlighted the view
Junior Librarian.net User Guide
Version 11.4
190
Chapter 11: Customising Junior Librarian.net
How do I set default views for my borrowers?
You can set up a system default view for each screen i.e. Resources, Reviews, Enquiry etc so
that anyone who hasn‟t specified their own personal default views will see the ones that you‟ve
specified when they view each screen. Once they specify their own default views, they will only
see those.
From the menu bar at the top of the screen select Settings and then Page Views.
Select Settings and
then Page Views
The Settings - Page Views screen will then appear. There are 3 tabs at the top of the screen,
General is the one you need to select to set your default views.
For each screen, click the drop down arrow to select the view that you‟d like to be the default.
When you are happy with the settings click Save.
Click each drop down
arrow to select the
default view for each
screen
Click Save when
you have finished
Junior Librarian.net User Guide
Version 11.4
191
Chapter 11: Customising Junior Librarian.net
How do I change the information shown on a resource record?
It‟s possible for you to customise some of the tabs which are held on a resource record. The
tabs you can change are:
Loans
Reservation
Linked Resources
From the menu bar at the top of the page select Settings and then Page Views.
Select Settings and
then Page Views
The Settings - Page Views screen will then appear. Click on the Resources tab. Click on the
first sub-tab you‟d like to change e.g. Loans.
Click on the tab
you’d like to change
Junior Librarian.net User Guide
Version 11.4
192
Chapter 11: Customising Junior Librarian.net
The Page View - Edit screen will appear. This is the same screen you‟ll see when creating and
editing the standard page views, however only the Layout tab is available (See How do I create
a new view)
Make the required changes to the view and then click Save. To see the changes, go into a
resource record and click on the tab you‟ve edited.
Make the
required changes
and then click
Save
How do I change the information shown on a borrower record?
It‟s possible for you to customise some of the tabs which are held on a borrower record. The
tabs you can change are:
Current Loans
Reservations
Past Loans
From the menu bar at the top of the page select Settings and then Page Views.
Select Settings and
then Page Views
Junior Librarian.net User Guide
Version 11.4
193
Chapter 11: Customising Junior Librarian.net
The Settings - Page Views screen will then appear. Click on the Borrowers tab. Click on the
first sub-tab you‟d like to change e.g. Reservations.
Click on the tab
you’d like to change
The Page View - Edit screen will appear. This is the same screen you‟ll see when creating and
editing the standard page views. (See How do I create a new view)
Make the required changes to the view and then click Save. To see the changes, go into a
borrower record and click on the tab you‟ve edited.
Make the required
changes and then
click Save
Junior Librarian.net User Guide
Version 11.4
194
Chapter 11: Customising Junior Librarian.net
How do I change the column names in my page views?
It‟s possible for you to change how field names are displayed in your page views. For example,
you may want the field „Barcode‟ to be displayed as „Number‟.
From the Page View - Edit screen, highlight the field name in the Visible Fields list that you‟d
like to change e.g. Barcode.
Under the Column Settings, delete any text in the Caption box and type the new word you‟d
like the field to be displayed as e.g. Number. Repeat this for each field you‟d like to change and
then click Save.
Type the new
column name in
the Caption box
Junior Librarian.net User Guide
Version 11.4
195
Chapter 11: Customising Junior Librarian.net
Language
How do I change the field names?
It‟s possible for you to customise any fields in Junior Librarian.net. For example, you may want
to change some of the field names which appear in the Resources or Borrower record card.
From the menu bar at the top of the screen, click the Settings tab and then Language.
Click Settings
and then
Language
The Language screen will then appear. Under Installed Languages, you will see a list of
languages which are included in Junior Librarian.net. As you can see from the screenshot
below, only English is listed. If your school is based overseas, you will more than likely have
more than one installed language on the operating system. Select the Language under the
Installed Languages heading that you want to change the field/s for and then click on Modify.
Click the arrow to
change the
system default
language
Lists the
languages
currently installed
in Junior
Librarian.net
Click Modify to
change the fields
for the
highlighted
language
Junior Librarian.net User Guide
Version 11.4
196
Chapter 11: Customising Junior Librarian.net
At the top left of the screen under the Section drop down list, you can select which section of
Junior Librarian.net you wish to change the fields for. To change Field Names, make sure this
has been selected.
Select the
section that
you’d like to
edit the fields
for here e.g.
Field Names
A list of the fields you can change will then be shown. The original name is listed under the
Source heading and any modification name is listed under the Edited heading.
To change a field name, find the one you want to change from the list, for example you may
want to rename the Recycled field to „Deleted‟. Click the Edit option next to the field name that
you want to change. Your cursor will flash next to the field name. Type the new name e.g.
Deleted and then click Save at the bottom of the screen. You will then be taken back to the main
languages screen, click Save.
The new field names will be shown once the IIS server has been restarted.
The edited
field name is
shown here
The original field
name is shown
here
Click Edit next
to the field you
wish to change
Type the new
field name
Click Save
when you have
finished
Junior Librarian.net User Guide
Version 11.4
197
Chapter 12: Security
Chapter 12: Security
This chapter will explain how security in Junior Librarian.net works. It will also tell you how to
set up different security groups as well as how to make sure that anyone who accesses Junior
Librarian.net is given the right permissions so that they can only access the areas which you
want them to.
The Security section explains how User Manager and Group Manager work, how to change the
security restriction group for your borrowers and how to change your password.
Security
When you first launch Junior Librarian.net, you will need to Log on. This is so that the system
knows
who you are and what permissions to give you. If you don‟t log on, you will only have access to
Enquiry.
Junior Librarian.net security works similarly to Windows security in that each person who
accesses the
system belongs to a specific security group. Initially, so that you can access the Grown Ups
side of Junior Librarian.net, you will need to use one of the default user manager logon details
below:
Administrator - The username is „Administrator‟ and the password is „Microlib‟
Librarian - The username is „Librarian‟ and the password is „Password‟
NB: Username and password are case sensitive.
Both of these default users are given maximum permissions in Junior Librarian.net.
What is user manager?
User Manager is the area in which you can set up users which you either don‟t want as borrowers
in Junior Librarian.net; or you wish to have access to the Grown Ups area within Junior
Librarian.net.
This means that rather than someone having to add themselves as a borrower to gain access to
the system, they can just use the logon details for the user manager group they belong to.
For example: You may want your IT technician to be able to access Junior Librarian.net,
however you don‟t want them to be listed as a borrower. You could set up a new user in User
Manager called „IT Technician‟ and give them the permission settings you want them to have.
This means that when they click on Log in on the Junior Librarian.net home page, they would
enter the username and password for their user account. If you don‟t want to be listed as a
borrower, simply create
yourself as a new user, making sure that you belong to the Security Group „Administrators‟. (See
How do I create a new user account? below).
If a user forgets their password, you can go into their account in User Manager and change the
password.
Junior Librarian.net User Guide
Version 11.4
198
Chapter 12: Security
How do I create a new user account?
From the menu bar at the top of the screen, select Security and then User Manager.
Click User
Manager
You‟ll see that there are two default users already set up for you. Click Add.
These are the
Default groups.
The
Administrator
Group should only
really be used for
changing
permissions or
settings within the
software, not
every day use.
Type the details for the new user, making sure you select which Security Group you want them
to belong to e.g. Administrator. Click Save when you have finished.
Type the name of
the user here
Tick here if the
user is Active
Directory linked
Type the Logon Name
for the user here,
along with a password
Select which Security
Group you want them
to belong to here
Junior Librarian.net User Guide
Version 11.4
199
Chapter 12: Security
Junior Librarian.net User Guide
Version 11.4
200
Chapter 12: Security
What is group manager?
Group Manager is where you set up the permission settings for each of your Security Groups.
Every borrower needs to belong to a security group. By default, every borrower who is added to
Junior Librarian.net belongs to the Guest security group. This means that when someone
either Logs in or is authenticated using Active Directory, they will have the permission settings
which
belong to the Guest security group.
Please Note: The Guest security group has been given some default permissions. Please see
page 174 for how to change these.
How do I create a new security group?
There are three security groups which have been created for you. These are Administrator,
Librarian and Guest. The Administrator and Librarian groups have full permissions, whereas
Guest only has limited permissions.
If you have converted from Junior 2 or a different library Grown Ups system, all borrowers will
belong to the Guest security group. You may want to create a new group, perhaps for your staff
borrowers and give them more permissions.
From the menu bar at the top of the screen, select Security and then Group Manager.
Click Group
Manager
Click Add.
Click Add
to add a
new group
Junior Librarian.net User Guide
Version 11.4
201
Chapter 12: Security
In the Description box, type a description for the group you are creating e.g. Staff.
You‟ll see there are two tabs, Database and Commands. The Database tab lists each table in
the Grown Ups section. For each table listed on the left, select the permission you want it to
have.
No Access means the button is removed from the screen completely, so whoever belongs to
this security group won‟t see it.
Read Only means the edit button on the right hand side will change to a show button and they
can only view a record‟s information.
Read/Write means they can view and edit a record.
For example, if you don‟t want this security group to have access to Current Loans highlight
Current Loans from the list and then select No Access. If you want them to be able to see
Current Loans but not be able to make any changes, select Read Only.
Type a
description for
the new group
here
For each table
select what
permissions
you’d like
Expand the
table and
highlight the
search criteria
below
Choose
whether or not
you want this
option to be
made
available in
Advanced
Search for this
user
Junior Librarian.net User Guide
Version 11.4
202
Chapter 12: Security
When you are happy with the permission settings for Grown Ups, click on the Commands tab.
The Commands tab is where you can choose which areas of Junior Librarian.net you want
people in this security group to have access to. Once you have finished choosing the
permissions both on the Database and Commands tab, click Save.
For each area select
what functionality you
would like to give to
that group. Be careful
of how much access you
give to a group.
Remember it is best to
keep system
administration to the
Administrator Account
How do I change a security group‟s permissions?
It‟s possible to change the permissions for each security group. For example, for the „Guest‟
group, you may want to have less permissions than the „Staff‟ group.
From the menu bar at the top of the screen, select Security and then Group manager.
Highlight the group from the list that you‟d like to change the permissions for, then click Edit.
Highlight the
group from
the list, and
then click Edit
Choose the
permissions
Select the permission settings that you‟d like the security group to have. Click Save when you‟ve
finished.
Junior Librarian.net User Guide
Version 11.4
203
Chapter 12: Security
How do I change the security group for an individual borrower?
From the Borrowers screen, select the borrower that you‟d like to change the security group for.
Once in their record card click on the Advanced tab. From the Security Group drop down
menu, select the new security group that you want them to belong to and then click Save.
Choose the
security group
Click Save
How do I change my password?
Once you‟ve logged into Junior Librarian.net, it‟s possible to change your logon password.
From the Tool bar at the top of the screen, select Security and then Change Password.
Click Security then
Change Password
Type your old password and then your new one, then click Save.
Type your old
password and then
your new password
Click Save
Please Note: If you are using Active Directory logon, you will need to use the Change Password
facility in Windows. If you try to change it from the Change Password screen, the following
message will be shown.
Junior Librarian.net User Guide
Version 11.4
204
Chapter 12: Security
Active Directory
If your borrowers are Active Directory linked, they won‟t need to type in a username and
password. If there are problems with Active Directory, or if a borrower hasn‟t logged onto the
computer initially, they will need to type in a username and password so that the library software
knows who they are. Active Directory logon details are stored in the borrower‟s record card in
the Advanced tab.
What is Active Directory?
Active Directory is a database which stores permission information about users who belong to
a computer network. The main purpose of Active Directory is to provide central authentication
and authorisation services for Windows based computers.
For more information on Active Directory please speak to your IT technician.
How does Active Directory work within Junior Librarian.net?
All users on a network which uses Active Directory will have a unique „Security ID‟. When a user
logs onto a computer with their user account, this ID is used to identify them and determine the
permissions which they have been given. In Active Directory terms, this is known as
„authentication‟.
It is possible to „import‟ the Active Directory Security ID‟s of all users into Junior Librarian.net.
This means that once they‟ve logged onto the computer, if they launch Junior Librarian.net
they will automatically be „logged in‟. This saves you having to have one set of login details for
the network and a separate set for Junior Librarian.net.
Junior Librarian.net User Guide
Version 11.4
205
Chapter 12: Security
How do I Configure Active Directory Linking for Junior Librarian.net?
Before continuing with the instructions below, please ensure you have installed both the
Hardware Plugin and the AD Plugin onto the computer on which you are setting up Active
Directory linking. For further information on how to do this, refer to the Prerequisites section of
Chapter 1: Getting Started.
Note: It is not a requirement to install these plugins on every computer you wish to access
Junior Librarian.net from; only on the computer on which you are setting up the Active
Directory Linking.
Once you have followed the instructions for installing these plugins, detailed in Chapter 1:
Getting Started, log into Junior Librarian.net and click on the Management option on the
signpost.
Go to Settings / Directory Services.
Go to Settings
and Directory
Services
Click on Add and enter the details for your Active Directory server, as shown below
Enter details by
placing the cursor in
each relevant field.
Click on Add to add
details for linking to
your AD Server
Test the
connection
before
clicking Save
Please Note: although the Password field displays in text when you first enter the details; it will
be encrypted once you click Save and will show as asterix‟s from then on. Because of this, once
you have clicked Save you will be requested to enter your password should you choose to Test
Connection again.
Junior Librarian.net User Guide
Version 11.4
206
Chapter 12: Security
How do I link Junior Librarian.net borrowers to Active Directory?
There are two ways of linking your Junior Librarian.net users to Active Directory.
The first way is to manually link them. From within the borrower‟s record card, click on the
Advanced tab at the top of the screen. Place a tick in the Active Directory Linked box and then
enter the borrower‟s Active Directory Logon Name. When you click Save, Junior Librarian.net
will connect to Active Directory to search and then store the borrower‟s Security ID.
Place a tick in
Active Directory
Linked
Click Save
NB: Active Directory matches accounts by the First name and Surname fields. Please make
sure that these are correct before linking Junior Librarian.net with Active Directory.
If you have set up different User Accounts you can also link these to Active Directory. From the
Tool bar at the top of the screen, click Security and then User Manager. Highlight the account,
then click Edit. Place a tick in Active Directory Linked, then click Save.
Junior Librarian.net User Guide
Version 11.4
207
Chapter 12: Security
The second, and easier way of mass linking borrowers to Active Directory is by using Directory
Services.
From the menu bar at the top of the screen, select Schedule and then Directory Services.
If the school has a Management Information System in place (eg. SIMS.NET) with all of these
options already entered in it (Address, Telephone numbers etc) then leave all of the fields in the
Directory Services Options window un-ticked. As you will have imported those details from
your Management Information System already, there is no need to import them again.
The Directory Services Advanced window, allows you to import more advanced options, such
as the UPN.
If you would like to run this right away, then tick Run Now before clicking Schedule. Otherwise
leave it blank and simply click on Schedule. The Schedule will then add the Active Directory
update to the list of scheduled tasks to be run.
The default time for the task to be run is everyday at midnight. You can change this by clicking
on Schedule and then View Tasks from the menu bar at the top of the screen. (See Chapter
12: Customising Junior Librarian.net, section on Schedule for more information).
Tick Run
Now if you
wish the
schedule to
run on save
Enter more
advanced
options here.
Click Schedule to link the
records
Junior Librarian.net User Guide
Version 11.4
208
Chapter 12: Security
How do I check that the scheduled task has run successfully?
To ensure that the Directory Services scheduled task has run successfully within Junior
Librarian.net open Internet Explorer and go to Tools / MLS AD Integration.
This tool details the progress and completion of the Active Directory scheduled task.
Junior Librarian.net User Guide
Version 11.4
209
Chapter 12: Security
How do I know which borrowers are not linked to Active Directory?
When you link your borrowers to Active Directory using Directory Services, borrowers who
couldn‟t be linked can be searched for in the Borrowers database.
Click on Advanced Search at the top right of the screen.
Perform a search by selecting „New‟ „Active Directory Linked‟ „Equal to‟ „False‟. This will bring up
anyone who is not linked to Active Directory. You can then ask your IT technician for a list of
Active Directory Logon Name‟s for the borrowers who couldn‟t be linked. Once you have these,
you will need to manually link the borrowers. (See previous section).
For more information on searching please see Chapter 15: Viewing Library Data, section on
Searching Databases.
Junior Librarian.net User Guide
Version 11.4
210
Chapter 12: Security
How do I import Active Directory details into Junior Librarian.net?
It is possible to import Active Directory details for both existing Junior Librarian.net borrowers
and people who are only listed in Active Directory.
For example, you may have 300 borrowers in Junior Librarian.net who are all linked to Active
Directory. Your IT technician informs you that they have added 50 more people to Active
Directory.
To save you having to go into Junior Librarian.net and add them manually, you can import the
details from Active Directory.
From the menu bar at the top of the page, click Schedule and then Directory Services.
Click Directory
Services
On the Directory Services screen, select which details you would like to import into Junior
Librarian.net. If you want to import the details of people who are not already on Junior
Librarian.net, tick „Import new records‟. When you have selected the details you want to
import, either click Run Now to import the records straight away into the Intake screen, or click
Schedule.
By clicking Schedule, you are adding the import as a „task‟. The default time for the Schedule to
run the Active Directory update is every day at midnight. You can change this, please see
Chapter 12: Customising Junior Librarian.net, section on Schedule for more information.
Select the details you
would like to import into
Eclipse.net
If you want to import
details for new borrowers
who are not in
Eclipse.net tick here
Click Run Now or
Schedule
Junior Librarian.net User Guide
Version 11.4
211
Chapter 12: Security
Once the import has been completed, any new records will be added to the Intake screen. To
access Intake, select Database, then Intake from the menu bar at the top of the screen.
If you need to make any changes to anyone listed in the Intake screen before they are imported,
highlight them from the list and either click
or double click your mouse to go into the
record.
Once in the record you can select whether the borrower is new to Junior Librarian.net or if they
are an existing borrower. If they are an existing borrower, simply place a tick in Existing
Borrower. The bottom section of the screen lists all of the borrowers in Junior Librarian.net
which share the same first two letters of the surname of the borrower you are importing. Simply
highlight the correct person from the list and click Import.
Active Directory details
are given here
If the borrower is new,
tick here
Lists the borrowers in
Eclipse.net whose surname
begins with the same 2 letters
as the borrower you are
importing
If the borrower is already
in Eclipse.net, tick here
to match them from the
list
Click Import when you
are ready to import the
borrower
Junior Librarian.net User Guide
Version 11.4
212
Chapter 12: Security
If you are happy with the details in the Intake screen, you can click Transfer under the Records
tab on the right of the screen. This will import everyone who is listed in Intake into the
Junior Librarian.net borrower database, along with the details you specified in the Directory
Services screen.
Click Transfer to transfer
all records into the
borrower database
Once you have clicked Transfer, select how you would like barcodes to be allocated to your
new borrowers. Click Transfer to transfer the records.
Select how you would
like the barcodes to be
allocated to the new
borrowers
Click Transfer to transfer
all records into the
borrower database
Junior Librarian.net User Guide
Version 11.4
213
Chapter 13: Tidying Data
Chapter 13: Tidying Data
This chapter will explain how to make changes to the data you have entered into Junior
Librarian.net and how to stop certain words from being entered. If more than one person has
been responsible for cataloguing resources, data entry may be different in respect of case or
punctuation.
The Data Cleanse Replacements section tells you how to replace words which are entered into
the catalogue with a word of your choice.
The Data Cleanse Remove section tells you how to stop words being entered into the
catalogue.
The Data Tidy section tells you how to apply the settings for tidying your data and how to
schedule a time for the tidy to take place.
Data Cleanse Replacements
What is data cleanse replacements?
When entering resources or borrowers into Junior Librarian.net, especially if more than one
person has been in charge of this, you may have differences in the way that some words have
been entered. For example, the word „U.F.O.‟ may have been entered onto a resource record
but you want it to be written as „UFO‟. Data Cleanse Replacements is a database which you can
add words to, along with a replacement word. This means that when a resource or borrower
has been added to the catalogue and includes a word listed in Data Cleanse Replacements, the
word is automatically changed to the one you‟ve specified as the replacement.
How do I apply the settings for data cleanse replacements?
From the menu bar at the top of the screen click on Database, Lookup Maintenance and then
Data Cleanse Replacements.
Select Database,
Lookup
Maintenance and
then Data Cleanse
Replacements
The Data Cleanse Replacements screen will then appear. This will be empty if you haven‟t
already added any words.
Junior Librarian.net User Guide
Version 11.4
214
Chapter 13: Tidying Data
Click the
icon under the Records tab on the right of the screen.
Type in the word you want to replace and its replacement. Click Save. Repeat this for each new
word you want to be replaced.
Type in the word
that you want to
replace and its
replacement here
then click Save
The word and its replacement will now be listed in the Data Cleanse Replacement database,
where you can edit or delete it if you wish.
You can edit or
delete the word if
you wish
Once you have added the words to the Data Cleanse Replacements database, you then need to
specify which fields within the resource/borrower record that you want Data Cleanse
Replacements to apply to.
Make sure that you are in the correct screen that you want to enter the settings for i.e.
Resources or Borrowers. In the screenshot below, the Resources database has been selected.
Junior Librarian.net User Guide
Version 11.4
215
Chapter 13: Tidying Data
From the menu bar at the top of the screen click on Settings and then Data Tidy.
Select Settings
and then Data
Tidy
The Data Tidy screen will now appear.
Using the arrow at the end of the Field tab, select the first field that you‟d like Data Cleanse
Replacements to apply to. In the screenshot below, the field selected is Artist.
You then need to place a tick in the Apply data cleanse replacements box.
Repeat this process by selecting each field from the drop down list and then placing a tick in
Apply data cleanse replacements. When you have finished, click Close.
Please Note: The available fields in the Field drop down menu will differ according to the screen
you are in. The fields in the Resources screen will differ from those in the Borrowers screen.
Use the drop down
arrow to select the
field you’d like to
apply data cleanse
replacements to
Click Apply data
cleanse
replacements
Click Close when
you have finished
You have now set up the Data Cleanse Replacement words, along with the fields you‟d like
them to apply to. This means that if someone enters a word which is listed in Data Cleanse
Replacements whilst adding a resource/borrower, when the record is saved the word is
automatically replaced.
Junior Librarian.net User Guide
Version 11.4
216
Chapter 13: Tidying Data
Data Cleanse Remove
What is data cleanse remove?
Data Cleanse Remove is a database which you can add words to that you don‟t want to be used
in a Resource or Borrower record. This means that when a resource or borrower has been
added and includes a word listed in Data Cleanse Remove, the word is automatically deleted.
How do I apply the settings for data cleanse remove?
From the menu bar at the top of the screen click on Database, Lookup Maintenance and then
Data Cleanse Remove.
Select Database,
Lookup
Maintenance and
then Data Cleanse
Remove
The Data Cleanse Remove screen will then appear. This will be empty if you haven‟t already
added any words.
Click the
icon under the Records tab on the right of the screen.
Type in the word you want to be removed and then Click Save. Repeat this for each new word
you want to be removed.
Type in the word
that you want to
remove then click
Save
Please Note: When you add a word to Data Cleanse Remove e.g. Poo, the system will only
remove the exact word Poo. If the word „Pooh‟ is entered, or any deviations including
abbreviations and punctuation marks, the system won‟t remove this word.
Junior Librarian.net User Guide
Version 11.4
217
Chapter 13: Tidying Data
The word will now be listed in the Data Cleanse Remove database, where you can edit or delete
it if you wish.
Once you have added the words to the Data Cleanse Remove database, you then need to
specify which fields within the resource/borrower record that you want Data Cleanse Remove to
apply to.
Make sure that you are in the correct screen that you want to enter the settings for i.e.
Resources or Borrowers. In the screenshot below, the Resources database has been selected.
From the menu bar at the top of the screen click on Settings and then Data Tidy.
Select Settings
and then Data
Tidy
The Data Tidy screen will now appear.
Using the arrow at the end of the Field tab, select the first field that you‟d like Data Cleanse
Remove to apply to. In the screenshot below, the field selected is Artist.
You then need to place a tick in the Apply data cleanse removals box.
Junior Librarian.net User Guide
Version 11.4
218
Chapter 13: Tidying Data
Repeat this process by selecting each field from the drop down list and then placing a tick in
Apply data cleanse removals. When you have finished, click Close.
Please Note: The available fields in the Field drop down menu will differ according to the screen
you are in. The fields in the Resources screen will differ from those in the Borrowers screen.
Use the drop down
arrow to select the
field you’d like to
apply data cleanse
remove to
Click Apply data
cleanse removals
Click Close when
you have finished
Junior Librarian.net User Guide
Version 11.4
219
Chapter 13: Tidying Data
Data Tidy
What is data tidy?
When entering resources or borrowers into Junior Librarian.net, especially if more than one
person has been in charge of this, you may have differences in the way that some words have
been entered into each field. To save you having to find and edit each individual record, you can
use Data Tidy to apply settings of your choice to both previously entered borrower and resource
records and any that are entered in the future.
How do I apply the settings for data tidy?
Make sure you are in the screen you‟d like to apply the Data Tidy settings i.e. Resources or
Borrowers. From the menu bar at the top of the screen click on Settings and then Data Tidy.
Select Settings and
then Data Tidy
The Data Tidy settings screen will then appear.
If there is a tick in Do Not Tidy, take this out so that you can select the settings for that field.
Click the drop down arrow at the end of the Field box and select the first field that you‟d like to
choose your data tidy settings for. Select the Data Tidy options you want. Repeat this for each
field you want to apply Data Tidy settings to. Click Close when you have finished.
When you have clicked Close, any future records which are added to the database will have the
Data Tidy settings applied to them when the Save option is clicked.
Use the drop down
arrow to select the field
you’d like to apply Data
Tidy settings to
If there is a tick in
Do Not Tidy,
remove it
Select the Data Tidy
settings you require
for the field
Junior Librarian.net User Guide
Click here to
activate Data
cleanse
replacements and
Data cleanse
remove
Version 11.4
220
Chapter 13: Tidying Data
How do I schedule a date for data tidy to take place?
If you would like to apply the Data Tidy settings to your existing resource/borrower records,
either because it‟s the first time you‟ve entered the Data Tidy settings, or because you have
changed them, you will need to schedule a date for this to take place. Using the Schedule
means that your records are updated on a date of your choice and by default at 18:00 hours.
This ensures that the performance of Junior Librarian.net isn‟t affected.
From the menu bar at the top of the page click on Schedule and then Data Tidy.
Click on Schedule
and then Data Tidy
The Schedule Data Tidy screen will then appear.
Type the start date for when you‟d like the Data Tidy to update your existing records. You can
also click on the
calendar icon to select a date.
Once you‟ve selected a date, click Schedule.
Clicking on Schedule adds Data Tidy to the Schedule as a „Task‟. You can view and edit the
Task by clicking on Schedule, and then View Tasks on the menu bar at the top of the screen.
Type a date for
when you’d like
Data Tidy to take
place or click on the
calendar icon
For more information on Tasks and how to edit the time and date the Data Tidy takes place see
Chapter 11: Customising Junior Librarian.net, section on Schedule.
Junior Librarian.net User Guide
Version 11.4
221
Chapter 14: Viewing Library Data
Chapter 14: Viewing Library Data
This chapter explains the different ways you can view your library data.
The Searching Databases section explains how to do a basic search of your library data and
how to perform a more advanced search using Boolean logic.
The Flagging section tells you how to select more than one record making it possible to view,
delete and print a selection of items all at the same time.
The Page Views section explains what a view is and how to create your own views so that you
can see your data in the way that suits you.
The Sorting Data section explains how you can sort each field within any of the databases i.e.
Resources, Borrowers and Current Loans etc. into ascending or descending order.
The Exporting Data section tells you how you can export your data into a different format.
The Printing Data section tells you how to print out your data from any of the databases.
Searching Databases
You can search any of the databases in Junior Librarian.net to find the information you need.
How do I use quick search?
A Quick Search means you can type a word into the Quick Search box and the system will
perform a search for the word in whichever table you are in.
The Quick Search box is located at the top right of the screen.
Type the word(s)
you’d like to
search for here
and then click Go
Junior Librarian.net User Guide
Version 11.4
222
Chapter 14: Viewing Library Data
Which fields will it search?
The default fields which are searched in the Resources screen are:
Author1
Author2
Author3
Author4
Class
Composer
Director
Editor
Keywords
Level
Manufacturer
Series
Summary
Title
Please Note: If you wish to change the default fields which are searched on a view, please
contact the helpdesk on 0161 449 9357.
If you perform a search in a screen other than Resources, the fields searched will depend on
which ones you have in your view.
For example: If you are performing a Quick Search in your Borrowers screen and the fields
which are visible in this view are Barcode, Surname, Group Name and Year Group, only these
fields will be searched.
Note how, after
performing a search for a
Year Group of 8, only
borrowers with a 8 Year
Group are shown
Junior Librarian.net User Guide
Version 11.4
223
Chapter 14: Viewing Library Data
How is the search performed?
Not all fields are searched in the same way.
The Barcode and EAN/ISBN fields are searched on an „Equal to‟ basis which means that it
searches for the whole of the number and not part of it.
For example: If you search for the number „1‟, it won‟t return a match for „21‟ just because it has
a „1‟ in it.
All other fields are searched on an „Including‟ basis. This means that when a search is done, it
will return matches for part of the word.
For example: If you search for the word „plane‟, it will return matches for any words which
include „plane‟ i.e. „planets‟, „aeroplane‟.
Tip: If you just want to find the word „plane‟ you can use quotes with spaces around the word,
e.g. “ plane “. Please see Quotes (“) below for more information.
Refining a search using symbols
You can refine your Quick Search by using the following symbols:
Quotes (“)
Using these enables you to search for the whole of the text between the quotes. Without quotes,
each individual word is searched regardless of whether they appear together or not.
Example search with quotes
If you want to find resources which have the words „Planet Earth‟ together, type in the Quick
Search box “ Planet Earth ” and then click Go. As you can see from the screenshot below, the
search has brought up 6 resources, where the words Planet and Earth appear together.
Type “Planet
Earth” here and
then click Go
Junior Librarian.net User Guide
Version 11.4
224
Chapter 14: Viewing Library Data
Tip: If you are doing a single word search and don‟t want to find other words which include your
searched word (e.g. searching for plane and its returning planets) you can put quotes and
spaces around the word, e.g. “ plane “.
Example search without quotes
If you want to find all resources where the words „Planet‟ and „Earth‟ appear but not necessarily
together, type in Quick Search „Planet Earth‟ and then click Go. In the screenshot below, the
search has brought up 10 resources where the words Planet and Earth appear together and
separately.
Type Planet
Earth here and
then click Go
Minus (-)
Using the minus symbol in front of a word enables you to exclude that word from the search
results.
Example search using minus
If you want to find all of your „Non-Fiction History‟ books, type in the Quick Search box
„History –Fiction‟ and then click Go. When the search is performed (see screenshot below), it
will bring up all resources which have the word „History‟ in them, but will ignore all resources
where the word „Fiction‟ appears in any of the default search fields.
Type History Fiction here and
then click Go
For a list of the default search fields, please see the beginning of this section.
Junior Librarian.net User Guide
Version 11.4
225
Chapter 14: Viewing Library Data
How do I use advanced search?
The Advanced Search option enables you to perform a more detailed search of your library
data using Boolean logic. Boolean logic uses the words „and‟ and „or‟ to allow you to perform
more complex searches of your library data.
To access the Advanced Search click on Advanced Search at the top right of the screen.
Click on
Advanced
Search here
The Advanced Search box will then appear. Select the arrow underneath Boolean to change
the Boolean search criteria and then select which Field you‟d like to search by clicking on the
blue box at the end of the field. Select the Operator type by clicking on the drop down arrow and
then lastly type in the search criteria in the Value box. The examples below will give you a better
understanding of how Boolean logic works.
Click this arrow to
change the
Boolean search
option
Type the word/s
you’d like to
search for here
Use these arrows
to change the
order of the
searches you’ve
requested
Once you’ve
clicked Add, the
search criteria
will appear here
Click Add to add
your search
criteria
Junior Librarian.net User Guide
Click Apply when
you are happy
with the search
criteria within the
box
Version 11.4
226
Chapter 14: Viewing Library Data
Boolean „And‟
When using AND in your search, the results you get will contain all of the words you have
entered. The results will not include those records which contain only one of the words.
For example: You may want to conduct a search of your resources to find all books which have
both a keyword of magic and wizard.
Under the Boolean drop down menu, select And.
In the Field box, click the blue box and select Keywords from the list.
Under the Operator field, click the drop down arrow and select Equal to. By selecting Equal to,
you are saying that you only want to search for the exact word you specify and not any words
which include that word.
Please note the Is
Empty field. This is
useful if you want to
find items where
the Location is
empty for example.
Junior Librarian.net User Guide
Version 11.4
227
Chapter 14: Viewing Library Data
In the Value box, type magic.
Click Add to add this search criterion. It will now appear in the white box.
The search
criteria appears
here after you
click Add
Repeat the above instructions but type the word wizard in the Value box. You‟ll see both search
criteria is now detailed in the white box. To perform your search, click on Apply.
When using Boolean „And‟ only the resources with both keywords of magic and wizard will be
shown. If a resource contains the keyword of magic but not wizard it won‟t be shown. Likewise,
if a resource contains the keyword of wizard but not magic, it won‟t be shown.
Click Apply to
perform your
search
Junior Librarian.net User Guide
Version 11.4
228
Chapter 14: Viewing Library Data
Boolean „Or‟
When using Or in your search, the results you get will contain either or all of the words you
have entered.
For example: You may want to conduct a search of your resources to find all books which have
a keyword of magic or wizard and resources which have both of these keywords.
Under the Boolean drop down menu, select Or.
In the Field box, click the blue box and select Keywords from the list.
Under the Operator field, click the drop down arrow and select Equal to. By selecting Equal to,
you are saying that you only want to search for the exact word you specify and not any words
which include that word.
Junior Librarian.net User Guide
Version 11.4
229
Chapter 14: Viewing Library Data
In the Value box, type magic.
Click Add to add this search criterion. It will now appear in the white box.
The search
criteria appears
here after you
click Add
Repeat the above instructions but type the word wizard in the Value box. You‟ll see both search
criteria is now detailed in the white box. To perform your search, click on Apply.
When using Boolean „Or‟, the resources with both the keywords of magic and wizard will be
shown, and also the resources which have either of those keywords.
Click Apply to
perform your
search
Junior Librarian.net User Guide
Version 11.4
230
Chapter 14: Viewing Library Data
Flagging:
What is flagging?
Flagging is a way of selecting more than one record at a time. Usually, if you click on a record
and then on another, the first one you clicked on will be de-selected. When you turn on Flagging,
you can select as many records as you like all at the same time. Flagging is available on all of
the databases.
icon under the Tools tab on the right of the
To turn on Flagging, click on the
screen. A small menu will appear, click on flagging by mouse.
Once flagging is
turned on,
select whether
you are going to
flag by mouse
or flag by
barcode reader
Click on the Flagging
icon to turn on
Flagging
Once Flagging is enabled, the icon will be highlighted.
Click on each
resource that you’d
like to flag
When Flagging is
selected, it appears
highlighted here
Junior Librarian.net User Guide
Version 11.4
231
Chapter 14: Viewing Library Data
When would I use flagging?
There may be occasions when you want to print out a bibliography of selected titles for some or
all of your library users. For example, if you are asked to produce a list of books dealing with
astronomy, it may be that all the books listed in a keyword search for astronomy are not
relevant to your needs. You will then need to flag the items required before printing the final list.
Firstly, using the Advanced Search, search for a list of records which will form the basis for your
final list e.g. Keywords including Astronomy.
icon under the Tools tab on the right of the screen. A Small
Then click on the
menu will appear, click on flagging by mouse.
Click on each record that you‟d like to select. As you do this, the record will become highlighted.
If you change your mind, simply click on the record again and it will be de-selected.
Once the flagged items show, click on Show Flagged Only under the Records tab on the right
of the screen. This will remove any un-flagged records from the screen, leaving you with just the
flagged ones.
Click on each
resource that you’d
like to select
Click on Show
Flagged Only
When Flagging is
selected, it appears
highlighted as
shown here
Junior Librarian.net User Guide
Version 11.4
232
Chapter 14: Viewing Library Data
To print the list of Flagged items, click on the
right of the screen.
icon under the Records tab on the
Click Print to print
a list of the
flagged records
Flagging using the Barcode Reader
There may be times when you wish to flag using the barcode reader, e.g. selecting a number of
resources which require deletion from the system.
Click on the icon
flagging by barcode reader.
under the Tools tab on the right of the screen and select
The flagging by barcode reader window will appear. Scan your resources and click Apply.
Click Apply to
show only the
scanned
resources on the
main resource
table.
Junior Librarian.net User Guide
Version 11.4
233
Chapter 14: Viewing Library Data
Page Views
What is a View?
A View is a screen containing the fields and data of your choice. The views, both standard and
ones you have created, will vary depending on the database you are in.
The Page Views facility in Junior Librarian.net allows you to customise the display in each of
the databases by setting your own default view. MLS have already set up a number of standard
views within each database for you to utilise, these are called System Page Views. However,
you can create your own Views containing the fields and data you wish to display.
How do I create new views?
For information on how to create a new view, see Chapter 11: Customising Junior
Librarian.net, section on Page Views.
Sorting Data
How do I sort the databases into a different order?
To sort any of the databases into a particular order, click on the Column heading.
Example: To sort the Class column into ascending order, click on Class once. To sort Class into
descending order, simply click on Class again.
If you want to sort by more than one column, click on the
tab on the right of the screen.
icon under the Records
For example: You could sort by Class and Author, which would mean all the „200‟
Classifications would be shown together but would be in alphabetical order by Author.
Highlight each field in turn that you want to sort and use the
field into the right hand box.
icon to move the selected
Once the field is listed, click on it to highlight it and then choose whether you‟d like the column
data to be listed in Ascending or Descending order by clicking
Junior Librarian.net User Guide
Version 11.4
234
Chapter 14: Viewing Library Data
If you want to move a field back, highlight it from the list in the right hand box and then click on
the
icon.
Highlight the field
you’d like to sort
and then click here
to select the order
Select the field
you’d like to sort
and use the arrows
to move it to the
right hand column
Click Apply when
you have finished.
Use these arrows to move up and down your selected fields.
Junior Librarian.net User Guide
Version 11.4
235
Chapter 14: Viewing Library Data
Exporting Data
Whilst you are in any of the databases, you can export the data on screen to a different format.
Currently the options are Comma Separated Values (CSV) and Tab Separated Values (TSV).
How do I export data into a different format?
Search the database for the information you want to export and then click on the
icon under the Records tab on the right of the screen.
The Export screen will then appear. Highlight the format you‟d like to export to and then click
Export.
Highlight the
format you’d like
to export to and
then click Export
When you have clicked Export, you will need to select a location for the file to be saved to by
clicking on Save, or if you want to view it you can select Open.
Select Open to see
the file or Save to
choose a location to
save it to
Junior Librarian.net User Guide
Version 11.4
236
Chapter 14: Viewing Library Data
Printing Data
You can print data from any of the databases in Junior Librarian.net.
How do I print data?
Search the database for the information you want to print and then click on the
icon under the Records tab on the right of the screen.
It‟s possible for you to restrict the pages which are printed from Enquiry. Please see Chapter 3:
Settings, section on Printing for more information.
Junior Librarian.net User Guide
Version 11.4
237
Chapter 15: Silverlight Home Page
Chapter 15: Silverlight Home Page
This chapter will explain how your borrowers can use Junior Librarian.net by using the Silverlight
Home Page application.
The Launching Silverlight Home Page section explains what Silverlight Home Page is and how
to open it.
The Using Silverlight Home Page section explains how your borrowers use all of the functions of
Silverlight, as well as how to view their own borrower account details.
Launching Silverlight Home Page
What is Silverlight Home Page?
Silverlight Home Page is the general home page for Junior Librarian.net. It requires Microsoft
Silverlight to run; this is covered in the Prerequisites section of Chapter 1: Getting Started. As
long as Silverlight is installed on the computer, this page can be accessed by the students from
any computer in the world.
You‟ll notice that there are only limited options available in Silverlight Home Page for students;
compared to the Grown Ups login, which have access to Grown Ups; Multi Issue ; Multi Return
etc. This is because student login permissions are designed to be used by any students wanting to
view the library‟s resources, as opposed to wanting to make any changes to it. User account
security is covered in great detail in Chapter 13: Security.
How do I open Silverlight Home Page?
Once you have launched Junior Librarian.net (See the Getting Started with Junior
Librarian.net section of Chapter 1: Getting Started) you are in the Silverlight Home Page.
Without logging in, you will have access to Search the library catalogue; view News items (by
clicking on the Newspaper), Top Ten resources (by clicking on the books on the towel), and New
Resources added to the system (by clicking on the hot air balloon).
In order for the student to start using the library in a more interactive way, they need
to
Students may login either by using their barcode; a username and password; or the identikit.
Junior Librarian.net User Guide
Version 11.4
238
Chapter 15: Silverlight Home Page
Using Silverlight Home Page
How do borrowers view resources?
Once the borrower has logged into My Account there are various different ways in which they can
view resources. Read the captions below for further details.
Please Note: The information shown in Search / Views depends on the views which have been
created specifically for the Silverlight Home Page. For more information on Views see Chapter
12: Customising My Library Software, section on Page Views.
Enter search
criteria to
locate
resources
Click on Search to
view various
available page
views for searching
Click on
Reviews to
see resources
you have
reviewed or
are waiting to
be reviewed
Click on My Books
to view books you
have chosen to save
for future loaning or
reservations
Click here to see
newly added
resources
Click
here to
view
details of
Book of
the
Week
Click here to
see the Top
Ten resources
To view a resource from the Home Page, simply click on the resource once to expand the view,
and then click on the More icon to open the record.
Junior Librarian.net User Guide
Version 11.4
239
Chapter 15: Silverlight Home Page
If you like the resource and would like to add it to My Stuff, simply click and drag the resource into
the My Stuff treasure chest.
Then click on the treasure chest to enter My Books, where you can Reserve the resource, or put it
in your queue for Reviews.
Drag the
resource into
one of these
treasure chests
Junior Librarian.net User Guide
Version 11.4
240
Chapter 15: Silverlight Home Page
What other information is shown on a resource record in Silverlight Home
Page?
The Summary pane will be populated with information from that resource record. Click on What
Other People Have Said.... to read any reviews written for that resource.
Also click on I want to write a review to write a review for that resource; or Show me where it is
to view where the resource is in the library via means of a floor plan.
Summary
The Summary pane gives a brief description of the resource; usually taken from the synopsis on
the back of the book.
Reviews
There are two Reviews icons:
which allows you to write a review for that resource; and...
which allows you to read reviews which
written for that resource; simply click on
student who has written the review.
have been
the name of the
Only once a written review has been approved within Grown Ups is it available for the rest of the
students to view (discussed in greater detail in Chapter 10: Reviews)
Junior Librarian.net User Guide
Version 11.4
241
Chapter 15: Silverlight Home Page
Floor Plan
The Floor Plan button
located.
shows where the resource is
How do borrowers use quick search?
Simply type in the desired search criteria into the Search box. Once entered, either click on the
magnifying glass, or press enter on your keyboard.
To clear the search, click on the white X within the red circle.
Junior Librarian.net User Guide
Version 11.4
242
Chapter 15: Silverlight Home Page
How do borrowers use advanced search?
The Search facility is quick and simple to use. Simply click on the Search link
displayed on the Home page.
Use the Picture search facility to search under topics, which are illustrated in picture
form. For example; Food and Drink
The A to Z search facility allows you to search for all
Resources in an alphabetical order.
Distinguish the search between Author; Title; Series and Genre. Then simply click on the letter of the
alphabet that you wish to search by. For example; All Authors beginning with the letter V
Use the Views search to search by particular Page Views. These Page Views are created
by your librarian; it may be an idea to ask her to create specific page views for a project
you may be doing. For Example; a page view for Monet, to display all resources linked to
Monet.
Junior Librarian.net User Guide
Version 11.4
243
Chapter 15: Silverlight Home Page
How do borrowers view their loan history?
Once the borrower has logged into their individual area of the Junior Librarian.net site which
details all of their loan information, reservations and reviews, it is possible for them to click on My
Books.
The All link displays all resources saved in the My Books area.
The Current link lists all of the resources the borrower currently has on loan.
The Past link lists all of the resources they have previously borrowed
How do borrowers reserve resources?
If a borrower would like to reserve a resource they simply need to drag a resource into the Reserve
treasure chest. Please note, this chest is only available on the My Books / My Stuff page.
Junior Librarian.net User Guide
Version 11.4
244
Chapter 15: Silverlight Home Page
How do borrowers review resources?
There are two Reviews icons:
which allows you to write a review for that resource; and...
which allows you to read reviews which
written for that resource; simply click on
student who has written the review.
have been
the name of the
Only once a written review has been approved within Grown Ups is it available for the rest of the
students to view (discussed in greater detail in Chapter 10: Reviews)
Type the review in here;
using the toolbar to make
text more interesting, or
insert smiley‟s to show
your approval / disapproval
Give the
resource a
star
rating
Click Save
When the review is finished, click Save. The review will then be listed in the Grown Ups section in
the Reviews database. It will need to be approved by the librarian before it can be viewed by other
borrowers in SearchStar. (See Chapter 10: Reviews; section How Do I Approve a Review)
How do borrowers read reviews?
Simply by clicking on the Read Review link displayed on the Search and My Stuff pages
Junior Librarian.net User Guide
Version 11.4
245
Chapter 16: Reports
Chapter 16: Reports
This chapter tells you how to access and view the various reports which have been created for you
in Junior Librarian.net.
Accessing Reports
How do I view reports?
From the menu bar at the top of the screen select Modules and then Reporting.
Click Reporting
Highlight the report from the list that you wish to view and then click Generate.
Highlight the report
from the list that
you want to view
Junior Librarian.net User Guide
Click Run
Version 11.4
246
Chapter 16: Reports
Specify a date range for your report enter your start date and then click on Run to enter your end
date.
Enter a Start Date
and End Date for
the report
Click Run
Shown below is an example of the report 10 Most Popular Books by Gender from 08/09/2008 to
20/04/2009
Click on the
Print button to
print this report
Junior Librarian.net User Guide
Version 11.4
247
Chapter 17: Label Print
Chapter 17: Label Print
This chapter explains how to use Label Print.
The Technical Information section tells you what you‟ll need before being able to use Label Print.
The Printing Labels section tells you how to print the different types of barcode labels for your
resources and borrowers.
Technical Information
What will Label Print do?
LabelPrint is a program designed to offer users of Junior Librarian.net a facility to print their own
bar code labels for resources and borrowers. These can be replacement labels for those lost or
damaged or extra labels for new stock. It will also print labels without bar codes, for example
classification spine labels.
Which printers will it work on?
Any laser, ink jet or bubble jet printer, but please ensure your printer is working with the correct
driver installed. We recommend your printer is set to 'Best Quality' and not economy or draft mode.
See your own technical support if this is not the case.
Which labels should I buy?
It is assumed you are printing on to A4 sheets with removable sticky labels. There are many
different shapes and sizes of labels available from any stationers or office supplies outlets.
„Avery‟ labels are probably the most common and several of the more popular configurations of
Avery labels are automatically selectable within the software.
However any label type should work, but may have to be described in terms of the dimensions etc.
before they are added to the built-in list (see below). LabelPrint comes with various predefined label
templates. Please note if you are using style J8658 this is not suitable for barcodes.
When buying labels we advise:
Buy labels which are suitable for your printer
If you are printing barcodes make sure you use labels with a white background
To guard against wastage, print a test page first or use plain paper (the test page will show
guidelines which will not actually be printed when you print the labels.)
Scan the test barcode label to make sure that it beeps
Ensure you insert your labels in the printer the correct way round!
(If it prints over the label borders, then this is probably the case)
Junior Librarian.net User Guide
Version 11.4
248
Chapter 17: Label Print
Printing Labels
How do I print library cards for borrowers?
When Label Print is launched, if the background list displays your whole catalogue or borrower
database, then the entire range will be printed.
Within Grown Ups open the Modules menu from the top menu options. Place your mouse over
Labelprint to expand the sub-menu. From the sub-menu click on Card Print.
Click on Card Print to
print library cards for
your borrowers.
In the General tab of the Card Print screen below, either individually select the groups for which
you wish to print cards by selecting Selected Groups and individually ticking the group boxes. Or
choose to print for all groups by leaving All Groups selected.
Use these options
to choose
whether you wish
to print a few
Selected Groups,
or All Groups
It is within the Options tab in the Card Print screen that customisation of the library cards is
available. Below is a list of available formatting options.
Borrower Drop down (000) = this defines how many digits you would like the barcode to be. I.e.
borrower „1‟ in this instance will show as „001‟.
No Formatting = greys out the above option, giving no formatting to borrower barcodes.
Include Photograph = will include the pupil‟s photograph on each card, if entered on the system.
System Default = keeps the school name as the default (entered when you register this product)
Custom School Name = enter your own customer school name in the box below.
Junior Librarian.net User Guide
Version 11.4
249
Chapter 17: Label Print
Once all details are as you would like them to be, click Generate to generate the library cards.
Click on the
Print button to
print the cards
How do I generate new or existing barcode labels for resources and
borrowers?
Within Grown Ups open the Modules menu from the top menu options. Place your mouse over
Labelprint to expand the sub-menu. From the sub-menu click on Generate Barcodes.
Click on Generate
Barcodes to print
barcodes for your
resources.
Junior Librarian.net User Guide
Version 11.4
250
Chapter 17: Label Print
On the Generate Barcodes screen below, there is the option to choose From which barcode
number you would like to begin printing. The amount of Pages you would like to print. What Label
Style you would like to choose. To tick Unused number only which will print brand new numbers
not yet on the system, or to leave it un-ticked so you may print existing numbers on your system.
There is even the option to Include School Name
Tick this option
to Include
School Name
Click Generate
to generate
the barcodes.
We strongly recommend that in the Label Style box, you select Avery – Mini Laser Labels
(L7651).
Shown below is the Options screen. It is quite similar to that of the Card Print screen (Page 215),
in the way that there is a drop down list of barcode lengths to choose from, along with a tick box
option to choose No Formatting. Because the Generate Barcodes function allows you to
generate both Resource and Borrower barcodes, there is the option to select the length for each
of these below.
The System Default school name enters the school name entered when registering the software.
The Custom School Name allows you to type your own custom school name in the box below.
Please note: The school name will only be included if you tick Include School Name on the above
screen.
Select the
format by
choosing from
these drop
down lists.
Click on Save to
return back to the
Generate
Barcodes page
Select preferred
school name
here
Junior Librarian.net User Guide
Version 11.4
251
Chapter 17: Label Print
After clicking Save on the Options screen, click Generate to generate your page of Borrower
barcodes or Resource Barcodes.
Please Note: In order to print Resource Barcodes, you need to be on the
screen
In order to print Borrower Barcodes, you need to be on the
screen
Click on the Print
button to print
these labels
Junior Librarian.net User Guide
Version 11.4
252
Chapter 17: Label Print
How do I print book labels?
Whether you wish to generate Spine Labels showing the Dewey number, or Renaissance
Learning labels showing the Quiz Number, all of these label templates are accessible from the
Labels option on the Label Print sub-menu.
Click on Labels
In the Label Print window, shown below, there is a large selection of label templates to choose
from.
Click Run to run the
selected template
Available Label
Print templates
are listed here.
Options allows
modification of formatting
Import to import a
new template
Click Delete to
delete a selected
Label Print template
Please Note:
Label Print will generate exactly what is shown on either the Resources or
Borrowers screen behind. Therefore, if you only wish to print labels for a
certain amount of Resources or Borrowers, perform either an Advanced
Search; or flag items and Show flagged only.
Junior Librarian.net User Guide
Version 11.4
253
Chapter 17: Label Print
The Label Print Options screen is exactly the same as the Generate Barcodes Options screen.
Because the Label Print function allows you to generate both Resource and Borrower barcodes,
there is the option to select the length for each of these below.
The System Default school name enters the school name entered when registering the software.
The Custom School Name allows you to type your own custom school name in the box below.
The Start from label allows you to specify from which label you would like to start printing.
Please Note:
Only edit the options page if you choose to print barcode labels from
LabelPrint.
Select the
format by
choosing from
these drop
down lists.
Specify from
which label you
would like to start
printing
Select
preferred
school name
here
Click on Save to
return back to the
LabelPrint
screen
Below is an example of Renaissance Learning labels.
Click on the
Print button to
print the labels
Junior Librarian.net User Guide
Version 11.4
254
Chapter 17: Label Print
Depending on whether Label Print is accessed from the
screen, the label print templates differ.
screen, or the
This is an example of Label Print in the Borrowers screen:
Note how only templates relating to Borrowers are available.
Below is an example of Label Print in the Resources screen:
Note how there are many more available templates when accessed from the Resources screen.
Junior Librarian.net User Guide
Version 11.4
255
Chapter 18: StockCheck
Chapter 18: StockCheck
This chapter explains how you can StockCheck all of your resources by using the StockCheck
facility.
About StockCheck
Scanning the bar code labels of shelved items will enable StockCheck to produce details of
Missing items by comparing those scanned with the full „official‟ catalogue list. Items currently onloan are kept as a separate list, but are effectively treated as „in-stock‟.
You can identify shelved (i.e. in-stock) items by scanning the accession number bar code label
which was fixed in the resource when it was catalogued (NOT the ISBN bar code on the back
cover!). If this label is missing or unreadable, you can use the keyboard to enter the resource
barcode manually.
StockCheck do‟s & don‟ts
Don‟t catalogue any new resources whilst a stock-take is in progress
Don‟t issue any resources whilst a stock-take is in progress
Do read through all this documentation before you start
Do ensure you are using the latest version of your library system
If you have bought or hired a Portable Bar Code Reader, do ensure you read through all the
separate documentation for this
If possible, do try to complete a stock-take without stopping or being interrupted
Junior Librarian.net User Guide
Version 11.4
256
Chapter 18: StockCheck
Creating a New StockCheck
To create a new StockCheck, click on Modules and then StockCheck from the menu bar at the
top of the screen within Management.
Click Module,
StockCheck
Click on New on the right of the screen.
Click New
Junior Librarian.net User Guide
Version 11.4
257
Chapter 18: StockCheck
Today‟s date will show in the Description field. To rename the StockCheck to something else
simply type over the text in this box.
It is possible to StockCheck different sections of your catalogue at a time. Under the StockCheck
Criteria option, specify which resources you would like to StockCheck by placing a tick in the
relevant box.
Once you have selected which resources you would like to StockCheck, click Create at the bottom
of the screen.
Today‟s date will be the
default Description for
your StockCheck.
Rename by typing in
your own Description
Choose which
resources you would
like to StockCheck
Click Create to create a
new StockCheck
Ticking this option means
that any resources which
are on loan won‟t be
included in the
StockCheck.
Note: This option is not
ticked by default
Junior Librarian.net User Guide
Version 11.4
258
Chapter 18: StockCheck
Once you have clicked on Create, the main StockCheck screen will appear.
StockCheck starts from the standpoint that everything is missing until scanned.
Please Note: Only resources which you have chosen to StockCheck will appear in the StockCheck
screen. All other resources will be ignored.
On the main StockCheck screen there are 3 tabs, each showing different sections of your
StockCheck:
Checked Items (default tab) – shows which resources you have scanned; this tab is empty upon
creation of the StockCheck as it assumes that all books are missing until scanned.
Lists the
resources you
have checked or
scanned
Missing Items – shows resources which haven‟t yet been scanned
Lists resources
which have not yet
been checked or
scanned
Please Note: The Missing Items screen only shows the resources which you have chosen to
StockCheck and which haven‟t yet been checked or scanned.
Junior Librarian.net User Guide
Version 11.4
259
Chapter 18: StockCheck
All Items - shows all the resources included in the StockCheck, both scanned and not scanned.
Lists all of the resources
you have chosen to
StockCheck. The date
and time they were
checked or scanned is
also shown
Please Note: The All Items screen only shows the resources you have chosen to StockCheck. If
you have chosen to StockCheck all of your resources, they will all be listed on this screen.
In each tab under Totals at the top of the screen, you can see how many resources have been
Checked and Not Checked.
Shows the
number of
checked and
not checked
resources
here
These three
tabs show
different
sections of
your
StockCheck
Junior Librarian.net User Guide
Version 11.4
260
Chapter 18: StockCheck
Scanning resources into StockCheck
When you are ready to start scanning your resources, firstly ensure you are in the Checked Items
screen.
Each scanned
resource will
be listed here
Click on Bulk
Scan to begin
scanning
resources
Click on Bulk Scan to begin scanning your resources, 25 at a time. As you are on a hosted system,
adding the resources a few at a time aids system speed.
Scan or type
resource
barcodes
Click Apply to
check them in
StockCheck
Junior Librarian.net User Guide
Version 11.4
261
Chapter 18: StockCheck
Once you have clicked Apply on the Bulk Scan screen, the screen will go blank but remain open
so that you may scan the next batch of resources and all checked resources will display in the
Checked Items screen behind.
Once you have completed scanning resources into Bulk Scan click on Apply for the last time,
followed by Close. This will return you to the Checked Items tab of the StockCheck screen,
displaying all checked items.
Shows the
number of
checked and
not checked
resources
here
The time and
date that the
resource was
scanned is
shown here
Junior Librarian.net User Guide
Version 11.4
262
Chapter 18: StockCheck
What if I do not have the resource barcode to scan?
There are two options if you do not have a barcode reader or a barcode to scan.
First, open the Bulk Scan screen by clicking on the
icon.
Type the barcode into the box and press Enter on the keyboard. Click Apply and Save to check
the resource.
Scan or type
resource
barcodes
Click Apply to
check them in
StockCheck
Alternatively, type the barcode into the Quick Search field and click Go.
Once the resource has been found you may manually check the resource by highlighting the
resource the list and then click on the
icon.
The resource will be added to the list in the Checked Items screen.
Junior Librarian.net User Guide
Version 11.4
263
Chapter 18: StockCheck
How do I un-check a resource?
If you change your mind and wish to remove a resource from the list of Checked Items, simply
highlight it from the list in the Checked Items screen and then click on the
icon.
The resource will then be removed from the checked list and placed in the Missing Items list.
How do I remove a resource from the StockCheck?
You may wish to completely remove a resource from the StockCheck, perhaps because you do not
want to include it at this time.
You can remove a resource whilst in any of the screens (Checked Items, Missing Items and All
Items). Highlight the resource which you want to remove and then click on the
icon.
Please Note: The resource will only be deleted from the StockCheck.
How does Flagging work?
It is possible to select more than one resource at a time in StockCheck by turning on the Flagging
function. You can use Flagging in all three screens (Checked Items, Missing Items and All Items)
and it enables you to either check, un-check or remove multiple resources from the StockCheck
(depending on which screen you are in).
Click on the
icon.
Then simply highlight each resource on which you would like to perform the action. Once all
resources are highlighted, click the Check; Un-check; or Remove button, depending on the action
you wish to take.
Junior Librarian.net User Guide
Version 11.4
264
Chapter 18: StockCheck
How can I search for resources in StockCheck?
It is possible to search for specific resources in StockCheck by using the Quick Search function.
At the top right of the main StockCheck screen type the search criteria into the Quick Search box
and then click Go.
For more information on Quick Search please see Chapter 15: Viewing Library Data.
Type the
search criteria
and then click
Go
When a search is done, it is done in all three StockCheck screens (Checked Items, Missing Items
and All Items) which means that the results shown will vary depending on which screen you are in.
For example: If you are in the Checked Items screen and you do a search for „Jacqueline Wilson‟,
it will only bring up any Jacqueline Wilson resources if they have been checked in. See screenshot
below:
Tells you the
total number of
checked and
un-checked
resources
according to the
search results
Junior Librarian.net User Guide
Version 11.4
265
Chapter 18: StockCheck
If you then go into the Missing Items screen, the same search criteria has already been applied
and will show you any Jacqueline Wilson resources which haven‟t yet been checked (scanned).
Tells you the
total number of
checked and
not checked
resources
according to the
search results
Going into the All Items screen will show you all Jacqueline Wilson resources, regardless of
whether they have been checked (scanned) or not.
Tells you the
total number of
checked and
not checked
resources
according to the
search results
Please Note: Only resources which you have chosen to StockCheck will show in a search.
If you want to cancel the search, simply click on the
Junior Librarian.net User Guide
Version 11.4
icon.
266
Chapter 18: StockCheck
How do I download data from a portable barcode reader?
The most efficient method of scanning your resources is by using a portable bar code reader. The
main advantage of a portable bar code reader is that you scan the barcode label whilst the book is
still on the shelf so you do not have to bring the book to the computer to be scanned. All the
numbers stored in the portable barcode reader can then be „downloaded‟ through a cable (included
in the package).
Portable bar code readers can be bought outright or hired for one week, which is usually enough for
most libraries. Please contact MLS for the prices and availability of portable bar code readers for
sale or hire.
Once you have finished scanning the barcodes with your portable barcode reader, you will need to
download the information into StockCheck. You should download after each scanning session.
From the main StockCheck screen click on the
icon.
Follow the instructions on screen and then click OK.
Your data will then be downloaded into StockCheck. Once the download is complete click OK.
If you have scanned any barcodes which haven‟t been recognised in your StockCheck, you will be
presented with a list. Click Copy to Clipboard to enable you to „paste‟ the list into a document i.e.
word. Click OK to exit this screen.
Lists the
barcodes it was
unable to find in
your
StockCheck
Click Copy to
Clipboard to
enable you to
paste the results
into a document
Click OK to exit
this screen
Junior Librarian.net User Guide
Version 11.4
267
Chapter 18: StockCheck
How do I edit a previously started StockCheck?
From the menu bar at the top of the screen in Management click on Modules and then
StockCheck.
Click
Modules,
StockChec
k
Highlight the StockCheck that you would like to edit and then click Edit on the right of the screen.
This will then take you into the main StockCheck screen.
Click Edit to
edit the
highlighted
StockCheck
Note: You can also delete an uncompleted StockCheck from this screen if it is no longer needed.
Highlight the StockCheck to be deleted and then click on Delete and then Yes.
Junior Librarian.net User Guide
Version 11.4
268
Chapter 18: StockCheck
How do I complete a StockCheck?
Please Note: Once you have completed a StockCheck, it is not possible to make any further
changes; so be absolutely sure you have nothing further to do on the StockCheck before you
Complete.
Once you have finished entering the barcodes, you are ready to complete the StockCheck.
From the main StockCheck screen click on the
icon.
By default any resources which you haven‟t checked in will be marked as „Missing‟ and placed in
the resource Recycle Bin. If you have checked or scanned any resources which were previously
placed in the resource recycle bin, these will be restored into the main Resource table.
If you wish to deselect any of these options, un tick the relevant option(s). When you are happy to
proceed click Complete.
Your StockCheck is then finished.
Junior Librarian.net User Guide
Version 11.4
269
Chapter 18: StockCheck
What happens to completed StockChecks?
Once a StockCheck has been completed, it stays listed in the Tools, StockCheck screen for you to
view when you wish. Highlight the StockCheck and click Edit on the right of the screen.
Highlight the
StockCheck
and click Edit
You can view the list of checked, missing and all items in the StockCheck.
If you want to have a paper copy of each list, click the
icon.
Click each tab
to view and/or
print the list of
resources
Click the
Print icon to
print a list of
resources
Junior Librarian.net User Guide
Version 11.4
270
Chapter 19: Third Party Products
Chapter 19: Third Party Products
This chapter explains how third party products can be used in conjunction with Junior
Librarian.net.
The Accelerated Reader Quizzes section tells you how to import the quizzes you‟ve purchased
from Renaissance Learning into Junior Librarian.net, and how to view the quiz list information.
Accelerated Reader Quizzes
What are Accelerated Reader Quizzes?
Accelerated Reader (AR) is a daily progress monitoring software assessment in wide use by
primary and secondary schools for monitoring the practice of reading, and it is created by
Renaissance Learning. Currently there are two versions: a desktop version and a web-based
version (Renaissance Place).
Please Note: Renaissance Learning no longer support the desktop version of Accelerated Reader.
Because of this, Junior Librarian.net is only compatible with Renaissance Place.
Once a book has been read, the borrower has the option of taking a quiz. Junior Librarian.net
doesn‟t store the Accelerated Reader quizzes; however it does give you a list of the books in your
library which do have quizzes available.
Please Note: in order to use quizzes from Accelerated Reader, it is imperative that you have
purchased these quizzes; they do not come as part of the package when purchased with Junior
Librarian.net, only the list of the books which have quizzes available are free. If there have been no
quizzes purchased, no quizzes will be available.
How do I find out which of my resources have quizzes?
To find out which of your books have quizzes, all you need to do is import the Accelerated Reader
master quiz list into Junior Librarian.net.
The master quiz list is a list of all Accelerated Reader Quizzes provided by Renaissance Learning.
By importing this list into Junior Librarian.net, it adds the Accelerated Reader information to all of
the books in your catalogue which have quizzes. You are then able to view a list of your books
which have quizzes, and also search for books which have, for example, specific book levels.
Please contact MLS on 0161 449 9357 to obtain the latest master quiz list. Once you have the
master quiz list, follow the instructions below.
Junior Librarian.net User Guide
Version 11.4
271
Chapter 19: Third Party Products
Make sure you are in the Resources screen.
Click on Tools and then Import from the menu bar at the top of the screen.
Click on Tools and
then Import
Select Accelerated Reader – Quiz List from the list of file types and then click Browse to browse
to where your quiz list file is stored. Click Import.
Select this file type
Click Browse to select
the location of the
quiz list file
Click Import to import
the quizzes
Once you‟ve clicked on Import, it will be added to the Schedule as a task.
Junior Librarian.net User Guide
Version 11.4
272
Chapter 19: Third Party Products
For more information on the Schedule, please see Chapter 11: Customising Junior
Librarian.net, section on Schedule.
Once the task has run click on More… under the Page Views tab in the Resources screen.
Click More…
Under the System Page Views, highlight the Books with Quizzes view and then click on Select.
Click Select to show
the highlighted view
Highlight the Books
with Quizzes view
The list of books which have quizzes is then shown along with the Book Level.
Shows the Book
Level
Junior Librarian.net User Guide
Version 11.4
273
Chapter 19: Third Party Products
How do I print out Accelerated Reader labels?
From the Resources screen, click on More… under the Page Views tab on the right of the screen.
Highlight and select the Books with Quizzes view from the list of page views. This will bring up all of
the books in your catalogue which have Accelerated Reader quizzes.
Click on the Modules menu along the top of the Resources screen. Then Label Print / Labels.
In the Label Style box, make sure that – Avery Mini Labels (L7651) is selected.
From the list of label types, highlight Renaissance Learning and then click on Run.
Select Avery – Mini
Laser Labels
Click Run
Highlight Renaissance
Learning
A Preview of the labels will then be shown. Click on the Printer icon to print the labels.
Click on the Printer
icon to print
Junior Librarian.net User Guide
Version 11.4
274
Chapter 19: Third Party Products
How do I find Resources with AR Quizzes in the Home Page?
Highlight the Books with Quizzes Page View, and click Copy. Enter the description and category
as shown below. Please note, selecting the Enquiry category makes the view available to students
on the Home Page; selecting the General category only makes the view available within
Management.
To modify the appearance of this view, select the newly created Books with Quizzes view beneath
the Enquiry heading in the Page Views list. Once selected, click on Edit and navigate to the
Appearance tab.
Set the Font
and Size of
the view here
Select System from
the Categories drop
down to choose the
correct Icon
Once all
changes have
been made
click Save
Choose the
Accelerate
d Reader
icon
Junior Librarian.net User Guide
Version 11.4
275
Chapter 19: Third Party Products
Once you are happy with the appearance of the page view, navigate to the Home Page and click
on Search on the signpost.
Click on
to bring up the Books with Quizzes view you have just created.
Click on the Books with Quizzes view.
All the resources with corresponding quizzes will be displayed. These resources are easily
distinguishable by the Accelerated Reader icon, which is displayed in the bottom left hand corner.
Accelerated
Reader icon
Junior Librarian.net User Guide
Version 11.4
276
Chapter 19: Third Party Products
Importing Book Data
How do I import resource records into my catalogue?
You can import resource records in MARC21 or UK MARC format.
Click Tools and
then Import
Make sure you are in the Resources screen. From the menu bar at the top of the screen, click on
Tools and then Import.
Select Marc 21 from the list of file types and then click Browse to browse to where your quiz list file
is stored. Click Import.
Select Marc 21
Click Browse to
select the location
of the marc file
Click Import to
import resources
Junior Librarian.net User Guide
Version 11.4
277
Chapter 19: Third Party Products
The records will then be imported.
How do I import resource records into my custom catalogue?
You can import resource records in MARC21 or UK MARC format.
Make sure you are in the Custom Catalogue screen by clicking on Database and then Custom
Catalogue.
Click Database and
then Custom
Catalogue
Junior Librarian.net User Guide
Version 11.4
278
Chapter 19: Third Party Products
From the menu bar at the top of the screen click on Tools and then Import.
Click Tools and
then Import
Select Marc 21 from the list of file types and then click Browse to browse to where your quiz list file
is stored. Click Import.
Select Marc 21
Click Browse to
select the location
of the marc file
Click Import to import
resources
The records will then be imported.
Junior Librarian.net User Guide
Version 11.4
279
Chapter 19: Third Party Products
LinksPlus
What is LinksPlus?
LinksPlus is a comprehensive directory of the websites most frequently requested by learners when
researching in the library.
To purchase LinksPlus you‟ll need to contact Carel Press either by email to [email protected] or
telephone 01228 538928.
How do I import a LinksPlus (WebLinks) file?
Make sure you are in the Resources screen. From the menu bar at the top of the screen, click on
Tools and then Import.
Click Tools and
then Import
Select Carel Press Links - Plus from the list of file types and then click Browse to browse to
where your quiz list file is stored. Click Import.
Select Carel Press LinksPlus
Click Browse to
select the location
of the LinksPlus
file
Click Import to
import the links
A message will then show, telling you how many records were imported.
Junior Librarian.net User Guide
Version 11.4
280
Chapter 19: Third Party Products
ITV Signed Stories
What are ITV Signed Stories?
ITV Signed Stories have made hundreds of children‟s stories available in British Sign Language,
and in text, pictures and sound. They believe that the reading of books with a child is one of the
most important and enjoyable ways of spending time together
With Signed Stories deaf children can watch and listen to wonderful books with their family, friends,
or teachers; allowing them to share all the joy of stories together.
How do I get ITV Signed Stories?
ITV Signed Stories are freely available to everyone on the internet, however Micro Librarian
Systems have integrated ITV Signed Stories with your Junior Librarian.net library system for
easily accessible use in and around your school via SearchStar.
To import ITV Signed Stories simply go to Schedule / External Media.
Go to
Schedule
and External
Media
Tick both options displayed in the screen below, and click Schedule to begin the Signed Stories
import now.
Junior Librarian.net User Guide
Version 11.4
281
Chapter 19: Third Party Products
To check the status of this task, click on Schedule and View Tasks
Once the download has completed successfully, navigate back to the Resources screen and click
on More.... beneath the Page Views heading on the right hand toolbar.
Scroll through the available list of page views to find the newly created Signed Stories view
beneath the SearchStar sub-heading.
Junior Librarian.net User Guide
Version 11.4
282
Chapter 19: Third Party Products
How Can the Children View Signed Stories in the Silverlight Home Page?
Simply by clicking on the Signed Stories icon wherever available
If the icon is greyed out, it means that that particular resource does not have a signed story linked
to it.
To search specifically for Signed Stories click on Search and Views to locate the view containing
all resources with Signed Stories
Please note; this page view is created as described through Grown Ups
By clicking on the pair of sign hands, the story will launch onto the computer screen, as shown
below.
Junior Librarian.net User Guide
Version 11.4
283
Chapter 19: Third Party Products
Text Message Alerts
What are Text Message Alerts?
Junior Librarian.net is now compatible with Text Message alerts. This allows the sending of Text
Messages to borrowers regarding their loans. Text Message Alerts will then send reminders to
your Borrowers via text messages, reminding them of over-dues; outstanding balances and
reservations. Text Message Alerts work through third party companies. MLS are currently
partners with Truancy Call.
How do I Setup Text Message Alerts?
In order to use this service, please go to the following website to set up a free account. (Please
note: Although the account is free, you will be charged a fee per text message sent. Please
discuss this fee with Truancy Call.)
http://www.truancycall.com/messagegateway
Once you have set up an account with Truancy Call, you will be sent an email containing your
username and password for the truancy call service. Once you receive this email, log into Junior
Librarian.net and access the Grown Ups area. Navigate to Settings / Module Settings / SMS
Settings.
Click on Settings
/ Module
Settings / SMS
Settings
Use the Forms tab to choose Truancy Call – SMS Provider from the Select SMS Provider drop
down list. Tick the boxes to enable the relevant SMS options; e.g. SMS Reminders and SMS
statements. And choose a display name that the messages should appear to be from; in this
example the default value Library has been chosen.
Junior Librarian.net User Guide
Version 11.4
284
Chapter 19: Third Party Products
The billing tab allows the choice of whether the Borrowers should be billed for receiving SMS
Messages. Simply place a tick in the Charge borrower for sent SMS if Borrowers should be
charged; or leave blank if this is not required.
If Borrowers are to be charged, then the charges and maximum cost need to be set in the Charge
per text message and Maximum message cost boxes.
The Housekeeping tab is used to set preferences for truncating the SMS log. This means
deleting entries in the log which are older than a certain amount of days. The default is set to 365.
The Define sending limits tab is used to define between which hours SMS Messages will be sent
to Borrowers. This is in place so that Borrowers don‟t receive text messages from the library in the
middle of the night. When setting these times, remember to give the server enough time to go
through all the SMS messages that need to be sent.
Junior Librarian.net User Guide
Version 11.4
285
Chapter 19: Third Party Products
Lastly, enter the SMS account settings which were provided from Truancy Call when the account
was setup. Without these settings SMS Messages will not work in the Junior Librarian.net
software.
Once all these settings have been entered correctly, click Save.
In order for SMS messages to be sent to borrowers, they need to have their Mobile Numbers
entered into the borrower record. These numbers have to be entered in a specific format, with the
leading „0‟ replaced with a „44‟. E.g. 07123456789 would become 447123456789, they must also
contain only numeric characters with no spaces.
Enter the Mobile
Number into the
Mobile field
If assistance is required in changing the format of mobile numbers in Junior Librarian.net please
contact the MLS Help Desk .
Junior Librarian.net User Guide
Version 11.4
286
Chapter 19: Third Party Products
How do I Schedule Text Message Alerts?
Go to Settings / Module Settings / SMS Settings. On the Forms tab, select the options for which
you would like Text Message Alerts to be sent. In the example below, Enable SMS Reminders
and Enable SMS Statements have been chosen.
Click Save
Next you need to ensure that the layout for SMS Reminders is set out as you require it to be.
Navigate to Tools / Edit Reminders.
Select Reminder 1 and click Edit.
Junior Librarian.net User Guide
Version 11.4
287
Chapter 19: Third Party Products
Click on the SMS tab; shown below is the default format for a Text Message Reminder. Please
modify as you see fit. Note the approximate length of the message is detailed on the top right hand
corner; this length is only approximate because the actual data replacing the values (i.e. resource
title) may be longer than the value itself, thus resulting in additional text messages being sent.
Approximate
message
length shown
here
Insert Fields;
Date; Time
here
Type any
additional text
in here
Information on text
message length
Click Save
Do the same for all other Reminders (Reminder2; Reminder3; Reminder4).
Before setting up the SMS Scheduled Task, ensure that your Reminders Scheduled Task and
Statements Scheduled Task are set up correctly. For further information see the Schedule
section in Chapter 11: Customizing Junior Librarian.net.
To set up the SMS Scheduled Task go to Schedule / SMS; tick the SMS Reminders box and the
Run Now box if required. Click Schedule.
Junior Librarian.net User Guide
Version 11.4
288
Chapter 19: Third Party Products
Once scheduled, SMS Reminders will show as a scheduled task within the Schedule / View
Tasks page.
To schedule this task to run on a regular basis, highlight the task and click on
Modify settings as required, and click Save when complete.
Junior Librarian.net User Guide
Version 11.4
289
Chapter 19: Third Party Products
To run SMS
Reminders once a
week, change
Interval Type to
Week and ensure
Interval Period is
set to 1
Set required
Start Date and
Start Time
Click Save
How do I check if the messages have been sent successfully?
View the SMS Log by navigating to Database / Logs / SMS, as shown below
Junior Librarian.net User Guide
Version 11.4
290
Chapter 19: Third Party Products
This will display a list of SMS messages with the status of each along side.
Status:
Pending – Junior Librarian.net is waiting to send message
Sent – Junior Librarian.net has sent the message to Truancy Call
Delivered – Truancy Call have marked the message as sent
Failed – Message failed to Send / Deliver
ClickView
What is ClickView?
Junior Librarian.net User Guide
Version 11.4
291
Chapter 19: Third Party Products
ClickView is a 3rd party software solution designed to assist learning in the classroom by providing a
simple and complete solution for watching digital video and other digital media within a school.
ClickView allows teachers and Borrowers free access to all of the digital video resources in the
ClickView library from any computer in the school removing the possibility of restrictions due to the
availability of AV equipment.
Junior Librarian.net software can now provide links to the videos from the Home Page simply by
importing the ClickView data into Junior Librarian.net.
For more information on ClickView please visit the following link:
http://www.ClickView.co.uk/
How do I Import ClickView into Junior Librarian.net?
Log into Junior Librarian.net and enter the Grown Ups area. Go to Tools / Import, as shown
below
Select ClickView from the File Type list, and click on Browse to browse to the location of the
ClickView file you need to import. This file is usually available from the following location:
[ClickView Server] c:\Program Files\ClickView\ClickView Library\ClickViewDataFeed.xml
Once this file has successfully been located, click on Import to begin the import.
Junior Librarian.net User Guide
Version 11.4
292
Chapter 19: Third Party Products
The below notification box will then display, informing that the import has been scheduled to run.
To check on the status of the import, navigate to Schedule / View Tasks.
The best way to find and play a video, if you know what you are looking for, is to search for it.
Junior Librarian.net User Guide
Version 11.4
293
Chapter 19: Third Party Products
How do Borrowers view ClickView Videos in Junior Librarian.net?
On the Home Page click on the Search option on the signpost.
This will take you to the Search box, click on the Views button to display page views available for
searching. See Page Views section in Chapter 11: Customising Junior Librarian.net for further
information.
Click on the ClickView page view displayed above, which will navigate you to all available
ClickView videos.
Junior Librarian.net User Guide
Version 11.4
294
Chapter 19: Third Party Products
How do Borrowers search ClickView Videos in Junior Librarian.net?
Enter your search criteria in the Search box as displayed below.
Turn off all other media types in the Filter area by clicking on them, in order for just ClickView
media types to be displayed.
Simply click on the resource and Go to Site to start playing the video.
Junior Librarian.net User Guide
Version 11.4
295