1
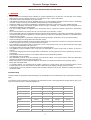
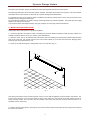
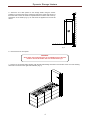
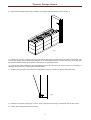
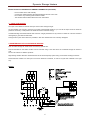
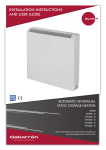
INSTALLATION INSTRUCTIONS
AND USER GUIDE
IECEE
CB
SCHEME
DYNAMIC STORAGE HEATERS
ADL 5030
ADL 4024
ADL 3018
ADL 2012
Please read these instructions before installing or
using this appliance for the first time
Dynamic Storage Heaters
INSTALLATION INSTRUCTIONS AND USER GUIDE
1.- WARNING
•
•
•
•
•
•
•
•
•
•
•
•
•
•
•
•
•
•
•
•
•
•
Please read these instructions before installing or using this appliance for the first time. The warranty of the storage
heater will not cover any damage caused by non observance of any of these instructions.
This Guide must be kept and given to any new owner.
This appliance should not be used by disabled persons of any kind (children included) or without notice or knowledge
of its use, except in case they are instructed and supervised by a responsible person.
Should the heater be moved and reinstalled it is essential that the work is carried out by a fully qualified engineer.
If during any installation the thermal insulation shows any sign of damage, it is necessary for the faulty part to be
removed and replaced by an identical part.
The use of storage heaters is forbidden in any area where there is a presence of gases, explosives or inflammable
objects.
Do not use this heater to dry clothes. Do not cover this heater or put objects in contact.
The air outlet grill at the top of the heater cabinet and the air inlet at the bottom of the heater are provided to ensure the
most efficient operation of the appliance. They also protect the heater from overheating; therefore, it is essential that at
no time are they covered.
Surfaces of this appliance could be hot. Children should be supervised to ensure they do not play with the heater.
Check the voltage in the rating label is the same than supply.
This heater should be switched off at the isolating switch before any repair work is carried out. This action should also
be taken during the times of the year when heat is not required.
The installation of the heaters must be carried out in such a way that each pole can be disconnected from the supply
having a contact separation of at least 3 mm.
The storage heater should not be installed just below an electrical socket.
The appliance must be installed in such a way that it is impossible for anyone using a bath or shower, to touch the
controls.
The nominal charging time of this storage heater is indicated on its rating plate and must be controlled by means of a
programmer.
The installation must be carried out in accordance with the current electrical regulations.
This appliance must be earthed.
After installation a survey of the first charging cycle should be carried out to ensure that the main input thermostat
switches off. Ventilate the room during this first cycle.
Before carrying out any work inside the appliance, the heater must be disconnected from the electricity supply.
Never open a charged heater.
To maintain stability, it is essential that the heater is placed on a level surface and care should be taken to avoid
irregular surfaces, such as may result from carpets or tiled surrounds partially protruding under the heater.
The presence in the air of particles of smoke, dust and other pollutants could, in time, discolour the walls and surfaces
around the heater.
INTRODUCTION
Storage heaters are designed to take advantage of the considerable economical benefits of any restricted hour electricity
tariff.
The heaters consume electricity only during the off-peak tariff, but due to the highly efficient storage medium, give you a
truly economical 24 hours of comfort temperatures.
Model
ADL 2012
ADL 3018
ADL 4024
ADL 5030
Input
2000W
3000W
4000W
5000W
220 – 240V~
220 – 240V~
220 – 240V~
220 – 240V~
8h
8h
8h
8h
Charge
16 kWh
24 kWh
32 kWh
40 kWh
Weight
123 kg
173 kg
225 kg
277 kg
Length
63 cm
81 cm
99 cm
117 cm
Wide
24 cm
24 cm
24 cm
24 cm
Height
66 cm
66 cm
66 cm
66 cm
Bricks
12
18
24
30
Voltage
Max. Charging time
2
Dynamic Storage Heaters
The input control operates a highly sensitive thermostat which regulates the amount of heat stored.
The discharge takes place when the built-in blower operates. The blower drives fresh air through the core and is heated.
A bimetallic device mixes the hot air with fresh air to provide homogeneous temperature.
It is important that the correct rating of heater is installed to provide the selected level of heat. This will ensure the best
possible running costs against other fuels.
To avoid transport problems, the heater casings and storage bricks are packed separately. The bricks with some slight
defects in the corners can be used.
You should be aware that storage heaters, when fully charged, can have high surface temperatures.
2.- INSTALLATION INSTRUCTIONS
Please follow these instructions for a properly installation.
1.- Chose the right place to install the heater, considering the minimum distances between heater and other objects. It is
needed a minimum distance of 50 cm to assure a good heat delivery.
2.- Open the carton box by the indicated side, and remove the box containing the accessories, electrical elements and
parts to fix to the wall. Turn upside down the box so the heater stands up on its feet and remove the shipping carton.
Check the type is the asked and it is O.K.
3.- Screw on the wall the fixing part, making drills at 61 cm over de floor (Fig. 1).
fig. 1
This device prevents the heater overturning when a force of up to 20kg is applied to the upper parts to the exterior. The
function of the device is not to hang the heater. If there is any doubt as to the strength of the wall, please consult an
expert. Storage heaters are very heavy and the installer must ensure that they are securely fixed and there is no
possibility of them overturning.
4.- Remove the front outlet grill by removing the four screws. Remove also the front panel by removing the two screws at
the bottom of the heater.
3
Dynamic Storage Heaters
5.- Attach the LH & RH spacers to the storage heater using the screws
supplied, in the same way as the screws are fixed in the upper rear section of
the heater side. Check the heater is separated 25mm from the wall at the top
and bottom of the heater (Fig. 2). Fit and screw the appliance to the anti-tilt
device.
fig. 2
6.- Remove the inner front panel.
WARNING!
At the other side of this part there is a breakable panel of thermal
isolation. It must be handle with care. Avoid touching it.
7.- Place a row of storage bricks carefully, with the flat side heading the bottom of the heater. Insert one of the heating
elements in the holes in the right side insulation (Fig. 3).
4
Dynamic Storage Heaters
8.- Check that the heating element rests completely on the bricks without restricting a new row (Fig. 4).
fig. 4
9.- Arrange two new rows of bricks, ensuring the flat side of each bricks is facing towards the bottom of the heater, and
insert a new heating element. Repeat the operation for the third heating element. Place the last row of bricks also with
the flat side toward the bottom of the heater. Check there is no gap between bricks.
10.- Connect the heater following the enclosed diagram. Ensure all connections are correct and that no connection is
damaged. Do not leave any remaining wire inside the heater.
11.- Refit the inner front panel. If the bricks have been fitted correctly you will find no difficulty during this action.
fig. 5
12.- Attach the front panel by hanging it on the “V” in the upper part and securing it at the bottom with the two screws.
13.- Finally, fit the outlet grill with the four screws.
5
Dynamic Storage Heaters
INSTALLATION OF THE WIRELESS AMBIENT THERMOSTAT (OPTIONAL).
- Fix the module to the wall vertically.
- Connect the module following the attached diagram and the color code.
- Do not leave any remaining wire inside the heater.
- The wireless ambient thermostat has its own instructions.
3.- USING THE HEATER
The input control allows to lead the heat you want to store during the night.
On mild weather it is enough to set the input control at intermediate positions, you can set the input control at maximum
position if necessary. In this position the heater stores the maximum energy.
Controlled storage fan heaters deliver their heat from a highly insulated core by means of a silent fan. This fan should be
managed by a good remote thermostat.
During the first cycles some odors are possible; in this case ventilate the room until they disappear.
4.-MAINTENANCE OF YOUR STORAGE HEATER
This controlled storage fan heater does not need any special care.
Dust accumulated on the heater surface can be removed using a wet cloth when the controlled storage fan heater is
cold.
Do not use solvents or abrasive products.
Night storage heaters ADS are manufactured under an assured quality system using environment friendly procedures.
Please take the heaters to a clean point once their useful life is finished, in order to recycle their materials in the right
way.
WIRING
6
Dynamic Storage Heaters
WARNING:
In order to avoid overheating do not cover the heater.
The symbol on the product or in its packaging indicates that this product may not be treated
as household waste. Instead it shall be handed over to the applicable collection point for the
recycling of electrical and electronic equipment. By ensuring this product is disposed of
correctly, you will help prevent potential negative consequences for the environment and
human health, which could otherwise be caused by inappropriate waste handling of this
product. For more detailed information about recycling of this product, please contact your
local city office, your household waste disposal service or the shop where you purchased the
product. These instructions are only valid in the EU member states.
7
ELNUR UK Ltd.
Unit 1, Brown Street North
Leigh, Lancashire
WN7 1BU
www.elnur.co.uk
Customer Service Department:
Telephone +44(0)1942 670119
[email protected]
Manufactured by:
ELNUR, S.A.
Madrid, Spain
www.elnur-global.com
[email protected]
Management System International Certifications:
As a part of the policy of continuous product improvement Elnur reserves the right to alter specifications without notice.
INSTALLATION INSTRUCTIONS AND USER GUIDE WEB VERSION