1
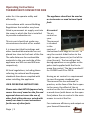
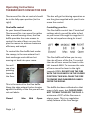
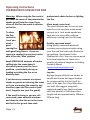
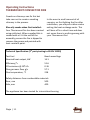
SECOND GENERATION
THERMOVENT CONVECTOR FIRE
OPERATING INSTRUCTIONS FOR UK CLIENTS
READ THE THESE INSRUCTIONS CAREFULLY BEFORE USING THE FIRE.
IF YOU HAVE ANY QUESTIONS REGARDING YOUR THERMOVENT
FIRE CALL 01905 820181 OR EMAIL [email protected]
Copyright Camelot Real fires 2011
Document No.15
Issue date: 21 Sept 2011
Issue No 4
Operating Instructions
THERMOVENT CONVECTOR FIRE
WARNING NOTE
IMPORTANT NOTES
Properly installed, operated and
maintained this stove will not emit
fumes into the dwelling. Occasional
fumes from de-ashing and re-fuelling
may occur. However, persistent fume
emission is potentially dangerous and
must not be tolerated. If fume
emission does persist, then the
following immediate action should be
taken:-
CO Alarms
Your installer should have fitted a CO
alarm in the same room as the
appliance. If the alarm sounds
unexpectedly, follow the instructions
given under “Warning Note” above.
(a) Open doors and windows to
ventilate the room and then leave the
premises.
(b) Let the fire go out.
(c) Check for flue or chimney blockage
and clean if required
(d) Do not attempt to relight the fire
until the cause of the fume emission
has been identified and corrected. If
necessary seek expert advice.
The most common cause of fume
emission is flueway or chimney
blockage. For your own safety these
must be kept clean at all times.
If the fire is left unattended when lit
then a spark guard should be placed in
front of the open fire. A spark guard
manufactured to BS 3248 specification
should be used.
Page | 1
General
Before lighting the fire check with the
installer that the installation work and
commissioning checks described in the
installation instructions have been
carried out correctly and that the
chimney has been swept clean, is
sound and free from any obstructions.
As part of the fires’ commissioning and
handover the installer should have
tested the fire and shown you how to
operate the fire correctly.
The appliance is capable of intermittent
operation
Use of fireguard
When using the fire in situations where
children, aged and/or infirm persons
are present a fireguard must be used to
prevent accidental contact with the
fire. The fireguard should be
manufactured in accordance
with BS 8423.
Operating Instructions
THERMOVENT CONVECTOR FIRE
Chimney cleaning
To sweep the chimney ensure the left
and right hand flue baffle plates are
removed by reaching up into the flue
on the left and right and taking them
out. Move the flue baffle control to the
OPEN position on the far right.
The chimney should be swept at least
once a year. It is important that the
flue connection and chimney are swept
prior to lighting after a prolonged
period of not using the fire.
In situations where it is not possible to
sweep through the fire the installer will
have provided alternative means, such
as a soot door. After sweeping the
chimney, the fire flue outlet and the
flue pipe connecting the fire to the
chimney must be cleaned with a flue
brush.
Should the brush stick in the flue
gather turn the brush anti-clockwise.
This will allow the bristles to pass by
the gather and the baffle. Repeat this
process to remove the brush.
Replace both flue baffle plates either
side of the flue openings.
Extractor fan
NO extractor fan should be fitted in the
same room as the fire as this can cause
Page | 2
the fire to emit smoke and fumes into
the room.
Aerosol sprays
Do not use an aerosol spray on or near
the fire when it is alight.
Use of operating tools
Always use the operating tools / gloves
provided when handling parts likely to
be hot when the fire is in use.
Chimney Fires
If the chimney is thoroughly and
regularly swept, chimney fires should
not occur. However, if a chimney fire
does occur close the flue baffle fully,
rake out the fire and allow it to go out.
The chimney and flueways should then
be cleaned.
If the chimney fire does not go out
when the above action is taken then
the fire brigade should be called
immediately.
After a chimney fire the chimney
should be carefully examined for any
damage. Expert advice should be
sought if necessary.
Permanent air vent
The fire requires a permanent and
adequate air supply in
Operating Instructions
THERMOVENT CONVECTOR FIRE
order for it to operate safely and
efficiently.
In accordance with current Building
Regulations the installer may have
fitted a permanent air supply vent into
the room in which the fire is installed
to provide combustion air.
This air vent should not under any
circumstances be shut off or sealed.
It is important that furnishings and
other combustible materials are not
placed too close to the front of the fire.
The safe distances for combustible
materials to the rear and side of the
appliance are 500 mm and 400 mm
respectively
All local regulations, including those
referring to national and European
standards have been complied with
when installing the appliance
USER OPERATING INSTRUCTIONS
Please note that HETAS Approval only
covers the use of wood on the fire and
approval does not cover the use of
other fuels either alone or mixed with
wood, nor does it cover instructions
for the use of other fuels.
Page | 3
The appliance should not be used as
an incinerator or used to burn liquid
fuels
Air control
The air
control on
your
Thermovent
is situated
in the
centre of
the bottom front edge of the fire. To
vary the control slide the bar to the
right to open (more air) or the left to
close (less air). The bar will get hot
during operation so use gloves or the
poker tool supplied with the fire to
move the control. The bar is marked C
for CLOSED and O for OPEN.
Having an air control is a requirement
to meet European standards your
Thermovent fire has achieved. In
practice, as the face of the fire is open
to the room, the effect of the air
control on the fire is much less than on
a wood stove (with doors on the open
face) where the air control is the main
means to control the fire.
For maximum efficiency and output on
your Second Generation
Operating Instructions
THERMOVENT CONVECTOR FIRE
Thermovent fire the air control should
be in the fully open position (to the
right)
The bar will get hot during operation so
use the glove supplied with your fire to
move the control.
Flue baffle control
As your Second Generation
Thermovent fire is an open fire rather
than a wood burning stove, the flue
baffle provides the main means to
control the rate of burn on your fire
plus the means to achieve maximum
efficiency and output.
Controlling your fire.
The flue baffle control has 4 ‘knotched’
settings which you will be able to feel
as you move it through its range but it
can be set anywhere along its travel.
To control the flue baffle look under
the canopy in the area where the 4
heat exchange vents deliver hot
moving air back into your room.
You will
see a bar
pointing
towards
the floor.
This is the control for the flue baffle.
Along the edge where the bar locates
against the body of the fire you will see
cut out labels:
Closed
Page | 4
Max
Mid
Open
The flue baffle will allow you to vary
the rate of burn of the fire. To control
the rate of burn move the lever to the
left towards MAX. To increase the rate
of burn move the lever to the right
towards OPEN. DO NOT USE THE FIRE
WITH THE FLUE BAFFLE IN THE CLOSED
POSITION. THIS WILL CAUSE THE FIRE
TO SMOKE AND DANGEROUS GASES
ENTER THE ROOM.
The baffle has been calibrated so that
open is fully open, but CLOSED DOES
NOT TOTALLY CLOSE OFF THE FLUE. A
minimum of 15% of the flue area is
always open. This is as regulation
safety feature of the fires design.
Operating Instructions
THERMOVENT CONVECTOR FIRE
Warning: When using the flue control
you must be aware of the potential for
smoke to spill into the room if you
close off the flue too much in relation
to the fire.
To close
the flue
control to
‘max’ you
need a
good
roaring fire
with good long flames. If you are
running a smaller fire you may not be
able to use the ‘Max’ position.
Small IRREGULAR amounts of smoke
spilling into the room doesn’t
neccasarily mean your fire has a
problem – particularly during reloading or stoking the fire or on
blustery days.
If you have any concerns or suspect
smoke or gasses are entering the room
or if you are leaving the room for any
duration, open the flue control (and
don’t forget to use your fire guard).
If the smell is strong or you are still
concerned, open external windows
and doors to clear the air in the room
and let the fire go out then seek
Page | 5
professional advice before re-lighting
the fire.
More wood, more heat.
The most obvious way to control your
open fire is to vary how much wood
you put on it. Less wood equals less
heat but you may suffer reduced
efficiency running your fire this way.
Quality, seasoned wood
Using quality seasoned wood will
increase your enjoyment when using
your fire and the heat and efficiencies
you achieve. Good wood is the
lifeblood of a fire. You can source wood
from local suppliers or there are a
number of national suppliers including
Certainly Wood
(www.certainlywood.co.uk).
Log size
Big logs (long and thick) are harder to
handle and create less opportunities
for air gaps within the fire itself. As
such, in an open fire, they often burn
less well. We suggest using well
seasoned quality logs that have been
split into quarter or half down their
length and are approximately 200mm –
250mm long.
Operating Instructions
THERMOVENT CONVECTOR FIRE
Getting Maximum output or
performance.
room and do not close the flue beyond
this point.
Your Second Generation Camelot
Thermovent fire has been lab tested to
establish where its best performance
lies and calibrate its controls.
Lighting your fire
Over time you’ll develop your own
knack of lighting your fire which is all
part of the fun, but below are a few
pointers to get you going:
To achieve
the best
efficiency
and output
build a
good fire
with 5 or 6
pieces of split log burning in a wig wam
like formation leaning against the back
face of the fire on a good bed of red
embers. The air control should be in
the open position.
Once the logs have taken and are
burning well move the flue baffle
control to the MAX position.This will
achieve the best peformance.
IMPORTANT Note: If your chimney has
suffered poor performance in the past,
closing the flue control in this way may
cause the fire to smoke. Also the
position may vary depending upon the
size of fire you have built. Experiment
with your fire in your chimney at what
point there is no smoke entering the
Page | 6
Place some firelighters or paper and
dry kindling wood on the bed of the fire
and cover with a small amount of fuel
in a wigwam formation against the
back face of the fire. We would suggest
you allow ash to build up to within 1
inch of the top of the lower front plate
as a bed for the fire.
Set the flue control and air control to
OPEN and set light to firelighters or
paper.
Building a good fire:
Allow the fire to burn until the wood is
well alight then load with more fuel to
create a wigwam style structure against
the back face of your Thermovent fire
and adjust flue controls to the required
rate of burn.
Refuel or let the fire die down?
If you want your fire to continue at this
level of performance re-load with a
similar amount of logs
Operating Instructions
THERMOVENT CONVECTOR FIRE
whilst still retaining a wig wam
structure. Be sure to refuel before the
fire burns down to just embers or
output will drop whilst the fire rebuilds.
Note: Nominal re-fuelling intervals
based on 3rd party efficiency test results
are 30 mins for a load of 5-6 quality,
well seasoned logs with a moisture
content of 15-20%.
Do not allow fuel to spill over the top
of or through the front fire grate.
If you are letting the fire die down,
move the flue baffle control to the
OPEN position. This is particularly true
at the end of a night infront of the fire.
(and don’t forget to use your fire
guard!).
Stoking the fire
Unlike a wood stove, an open fire
needs to be built as described (wigwam
shape) to let more air between the logs
for it to burn well.
As the wood burns it changes shape
and thus the fires behaviour changes.
You stoking the fire with a poker
improves the fires ability to burn down
logs fully but also make the fire ready
for the next load of logs.
Page | 7
Don’t worry too much about this –
experiment with your techniques and
have fun. The main thing is to avoid
dismantling the heart of the fire where
the logs meet and the main heat is.
Ash clearance
Ash in the base of the fire can be tidied
up regularly but ensure the air control
does not become blocked with spilled
ash. Use a small shovel and brush to
remove surplus ash around the fire.
In addition ensure ash does not build
up in front of the aperture at the base
of the fire. This is the inlet for the heat
exchangers at the back and top of the
fire. If blocked they will be unable to
draw in and heat room temperature
air. Sweep away and clear ash in this
area regularly.
If removal of hot ash is to be
undertaken then the use of a special
ash carrier is recommended. This may
be purchased from a local hardware
store or fire specialist.
Care should be taken to ensure that
any hot ash is cool before emptying it
into plastic bins or liners.
Operating Instructions
THERMOVENT CONVECTOR FIRE
Flueway cleaning
It is important that the baffle plate and
all the fire flueways are kept clean.
When burning wood they should be
cleaned at least once a week, and more
frequently if necessary.
your Camelot Second Generation
Thermovent fire please call 01905
820181 or email
[email protected] with
details of the parts required or your
query.
Remove any sooty deposits from the
baffle plate until they fall off into the
fire.
The only items that will require
periodic replacement are the
Vermiculite board liners on the inside
of each side of the fire and across the
lower part of the base.
More soot will be deposited on the
baffle plate and in the flueways if the
fire is run at low levels for long
periods. If this is the case then more
frequent cleaning will be necessary.
The appliance is not suitable for
installation in a shared flue system
Maintenance
It is advisable that the appliance is
maintained regularly by a competent
engineer
There should be no unauthorised
modification of the appliance
If any parts need replacing then they
should only be those recommended by
the manufacturer.
Parts
Should any new parts be required for
Page | 8
Cleaning
The main fire, grate and dog irons them
self requires nothing more than a
regular light brush with graphite paste.
Steel canopies simply require gentle
clean with a clean cloth and rebrushing with the same brush used to
brush up the graphite on the grate/dog
irons (but don’t add more graphite
paste or marks will appear).
Copper and brass canopies can be
brought back as new with Brasso (or
similar) and a clean cloth. Take an area
of no more than 500mm square at a
time and apply Brasso. Once dry
remove the cream with a second cloth
and the finish will be restored.
Operating Instructions
THERMOVENT CONVECTOR FIRE
TROUBLE SHOOTING
We want our customers to enjoy a
lifetime of open fires with our
products. If you have any issues do not
hesitate to contact us on 01905
820181. Whilst we are not experts in
chimney repairs or construction issues
we may well know someone who can
help or provide advice on your
situation.
Fire won’t draw:
If the fire won’t draw ensure the flue
control is set to open. Also check for
obstructions in the flue / chimney –
when was the chimney last swept? A
build up of soot will reduce the draw
on the chimney.
On damp or cold nights you may suffer
from a pocket of static, cold air in the
chimney when trying to light the fire –
particularly if your chimney is built on
the outside of your house. If you can
get this air warm and moving the fire
will draw. (we do not recommend using
a lit piece of paper as pieces can float
up the chimney and cause chimney
fires).
No heat in the fire:
If you find poor heat is coming from the
fire check you are using split logs rather
than just large whole logs. Split logs
Page | 9
increase the air inlets within the fire
and improve the burn and thus heat.
Another cause can be the use of unseasoned wood which will have a
higher moisture content. Effectively the
heat of you fire is being used to burn
off this moisture before you get the
benefit of the heat that’s left.
If the fire is burning well, check that the
gap along the front bottom edge of the
fire has not become clogged with ash. If
it has the heat exchange system will be
unable to draw room temperature air
into the heat exchange system and the
output of the fire will be reduced.
Constantly smokes:
Check for obstructions in the flue or
chimney. Has the flue baffle been left
closed during lighting? If the situation
persists open windows / doors to the
outside and let the fire out then seek
advice from an expert or call ourselves
on 01905 820181.
Fire puffs out smoke intermittently:
Many chimneys with open fires will
puff smoke occasionally – especially
during stoking or re-fueling. Moving the
flue control baffle to the OPEN position
will reduce the possibility of puffing.
Operating Instructions
THERMOVENT CONVECTOR FIRE
On blustery days, if you have trees or a
bank near your chimney top at a high
level, the swirl of the wind can create
downward pressure on your chimney
periodically and hence puffing in the
room. If you believe this could be the
case, contact an expert for advice re
potential solutions or call ourselves on
01905 820181.
Fire creates cold drafts:
When lit your fire needs an air supply
to burn the wood. When going well the
amount of air it requires is not small. If
your room has insufficient external air
supply near the fire (typically an air
brick) it will draw air under doors from
other rooms – thus creating a cool
draft.
Can’t light the fire:
Many people struggle lighting a fire in
the early days. Firstly ensure the air
control and the flue control are fully
open.
Ensure you are using dry paper that is
not treated to prevent it burning
(newspapers aren’t – many magazines
are) or use a quality firelighter and
don’t skimp – use 3 or 4 until you get
the hang of it. Make sure you are using
small kindling wood to get the fire
Page | 10
going with small split logs to burn on
the kindling.
If you just throw the wood on top of
the kindling your reducing the chance
of the fire taking. Build the kindling and
the smaller logs in a wigwam shape
against the back face of the fire.
Stains on the hearth / Canopy
In the past most chimneys were built
with a dog-leg in the flue to prevent
rain falling directly down it. In addition
chimneys were lined with bricks or a
kind of mortar which was not smooth
and absorbed water.
Today many flues are built, or re-lined,
with red clay pots or steel. This is
smooth and does not absorb water.
All this means rainwater can travel
down your chimney more quickly.
When it reaches the fire it will have
collected colour from the soot in the
chimney.
Flues & connectors are designed to seal
in an downward direction so most
water should stay inside the chimney /
fire, but it is possible a small amount
could leak out and may leave small
stains on your hearth.
Operating Instructions
THERMOVENT CONVECTOR FIRE
Cowels on chimneys can fix this but
take care not to create a smoking
chimney in the process.
Blue oily smoke when first installed:
Your Thermovent fire has been created
using mild steel. When supplied this is
coated with oil. At the end of the
assembly process the fire is dipped to
remove the grease and painted with
heat resistant paint.
In the event a small amount of oil
remains, on first lighting the fire after
installation, you may see a blue smoke
exiting the heat exchange vents. This
will burn off in a short time and does
not mean there is anything wrong with
your Thermovent fire.
Technical Specification (3rd party testing to BS EN 13229)
Test fuel
Nominal heat output, kW
Efficiency,%
CO emissions @ 13% O2
Flue gas mass flow, g/s
Flue temperature, °C
Beech wood logs
14.1
51.6
0.26
57.1
228
Safety distances from combustible materials
Rear, mm
500
Side, mm
400
The appliance has been tested for intermittent burning
Page | 11
Operating Instructions
THERMOVENT CONVECTOR FIRE
Notes:
Camelot Real Fires is a trading name of
Hunt & Gather Sales + Marketing Ltd
Hatfield Bank
Norton
Worcestershire
WR5 2PZ
Registered in England No. 6705070
Tel 01905 820181
[email protected]
www.camelotrealfires.co.uk