1
mx4500_gb_trb.book
1 ページ
2005年12月1日 木曜日 午後1時56分
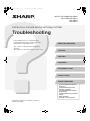
MODEL: MX-2300N MX-3500N
MX-2700N MX-3501N
MX-4500N
MX-4501N
DIGITAL FULL COLOUR MULTIFUNCTIONAL SYSTEM
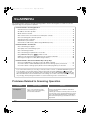
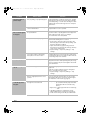
Troubleshooting
In the unlikely event of you experiencing a
problem with this product, please refer to this
manual before requesting service.
REMOVING MISFEEDS
The contents of this manual are grouped by
situation.
The chapters of the manual appear on the cover.
COPYING
PRINTING
SCANNING
DOCUMENT FILING
INSTALLATION
OTHER PROBLEMS
Problems Related to Machine
Operation
Problems Related to Paper
Feeding and Output
Problems Related to Quality /
Print Results
Problems Related to Peripheral
Device
Other Problems
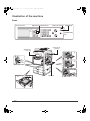
Illustration of the machine
Keep this manual close at hand for reference
whenever needed.
mx4500_gb_trb.book
2 ページ
2005年12月1日 木曜日 午後1時56分
mx4500_gb_trb.book
1 ページ
2005年12月1日 木曜日 午後1時56分
ABOUT THIS MANUAL
This manual provides solutions to possible problems in a question and answer format. The questions are grouped into
the chapters "REMOVING MISFEEDS", "COPYING", "PRINTING", "SCANNING", "DOCUMENT FILING",
"INSTALLATION", and "OTHER PROBLEMS". Locate the question that relates to your problem and use the answer to
help correct the situation. If you are unable to solve a problem using this manual, please contact your dealer or nearest
authorised service representative.
Conventions used in this manual
• System settings
Descriptions of system settings similar to the following example appear in this manual.
Example: ➞ System Settings (Administrator) > "Copy Settings" > "Rotation Copy Setting" >
This is an abbreviated description of the procedure for selecting the setting. ">" indicates a level in the settings and
indicates the state of the setting after it has been enabled. Use these descriptions as a quick manual to help you configure the
settings.
For detailed explanations of the system settings, see the System Settings Guide.
• References to other sections
Some of the explanations in this manual refer to other pages. Refer to these pages as well to help solve your problem.
Example: ☞ Illustration of the machine (A) (page 36)
Please note
• For information on installing the drivers and software cited in this manual, please refer to the separate Software Setup Guide.
• For information on your operating system, please refer to your operating system manual or the online Help function.
• The explanations of screens and procedures in this manual are primarily for Windows® XP in Windows® environments, and
Mac OS X v10.3.9 in Macintosh environments. The screens may vary depending on the version of the operating system.
• Wherever "MX-xxxx" appears in this manual, please substitute your model name for "xxxx".
• Where this manual shows the "MX-2300/2700 series" or the "MX-3500/4500 series", the following models are indicated:
MX-2300/2700 series: MX-2300N, MX-2700N
MX-3500/4500 series: MX-3500N, MX-3501N, MX-4500N, MX-4501N
• This manual contains references to the fax function. However, please note that the fax function is not available in some
countries and regions.
• Considerable care has been taken in preparing this manual. If you have any comments or concerns about the manual, please
contact your dealer or nearest authorised service representative.
• This product has undergone strict quality control and inspection procedures. In the unlikely event that a defect or other problem
is discovered, please contact your dealer or nearest authorised service representative.
• Aside from instances provided for by law, SHARP is not responsible for failures occurring during the use of the product or its
options, or failures due to incorrect operation of the product and its options, or other failures, or for any damage that occurs due
to use of the product.
Warning
• Reproduction, adaptation or translation of the contents of the manual without prior written permission is prohibited, except as
allowed under copyright laws.
• All information in this manual is subject to change without notice.
Illustrations and the operation panel and touch panel shown in this manual
The peripheral devices are generally optional, however, some models include certain peripheral devices as standard equipment.
The explanations in this manual assume that a right tray and stand/2 x 500 sheet paper drawer are installed on the MX-2700N
(equipped standard with an automatic document feeder).
To further explain certain functions and uses, some explanations assume that additional peripheral devices are installed.
The display screens, messages, and key names shown in the manual may differ from those on the actual machine
due to product improvements and modifications.
1
mx4500_gb_trb.book
2 ページ
2005年12月1日 木曜日 午後1時56分
MANUALS PROVIDED WITH THE MACHINE
This manual provides solutions to possible problems. For the detailed procedures for using the machine, see the
following manuals.
Printed manuals
Manual name
Contents
Safety Guide
This manual contains instructions for using the machine safely and lists the specifications of the machine
and its peripheral devices.
Software Setup
Guide
This manual explains how to install the software and configure settings to use the machine as a printer or
scanner.
Quick Start Guide
This manual provides easy-to-understand explanations of all the functions of the machine in a single
volume.
Detailed explanations of each of the functions can be found in the manuals in PDF format.
Troubleshooting
(This manual)
This manual explains how to remove paper misfeeds and provides answers to frequently asked questions
regarding the operation of the machine in each mode. Refer to this manual when you have difficulty using
the machine.
Facsimile Quick
Reference Guide
This manual explains the basic procedures for using the fax function of the machine, and provides an
overview of the features of the fax function, troubleshooting procedures, and specifications.
For detailed information on using the fax function and the system settings for fax, see the "Facsimile
Guide" in PDF format.
Operation manuals in PDF format
The manuals in PDF format provide detailed explanations of the procedures for using the machine in each mode. To
view the PDF manuals, download them from the hard drive in the machine. The procedure for downloading the manuals
is explained in "How to download the manuals in PDF format" in the Quick Start Guide.
Manual name
Contents
User's Guide
This manual provides information, such as basic operation procedures, how to load paper, and machine
maintenance.
Copier Guide
This manual provides detailed explanations of the procedures for using the copy function.
Printer Guide
This manual provides detailed explanations of the procedures for using the printer function.
Facsimile Guide
This manual provides detailed explanations of the procedures for using the fax function and the "System
Settings" that are related to fax.
Scanner Guide
This manual provides detailed explanations of the procedures for using the scanner function and the
Internet fax function.
Document Filing
Guide
This manual provides detailed explanations of the procedures for using the document filing function. The
document filing function allows you to save the document data of a copy or fax job, or the data of a print
job, as a file on the machine's hard drive. The file can be called up as needed.
System Settings
Guide
This manual explains the "System Settings", which are used to configure a variety of parameters to suit
the aims and the needs of your workplace. Current settings can be displayed or printed out from the
"System Settings".
2
mx4500_gb_trb.book
3 ページ
2005年12月1日 木曜日 午後1時56分
REMOVING MISFEEDS
This chapter explains what to do when a paper misfeed occurs in the machine.
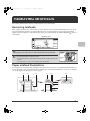
Removing misfeeds
When a paper misfeed occurs, "A misfeed has occurred." appears in the touch panel and printing stops. In this event,
touch the [Information] key in the touch panel. When the key is touched, instructions for removing the misfeed will
appear. Follow the instructions. (The approximate locations of possible misfeeds are indicated by blinking
marks as
shown below.)
Misfeed location
0
A misfeed has occurred.
Full Color
Turning M/C off now causes data loss.
Color Mode
2-Sided Copy
Output
Job Detail
Settings
Special Modes
Auto
Exposure
Information
100%
Copy Ratio
File
Quick File
Caution
Fusing
area
The fusing unit is hot. Take care not to burn yourself when removing a misfeed.
• When removing misfed paper, do not touch or damage the transfer belt.
• Carefully pull the paper out without tearing it.
Transfer
belt
• A misfeed may have occurred inside the machine. Check carefully and remove the
misfeed.
• If the paper tears, be sure to remove all pieces from the machine.
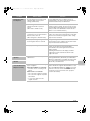
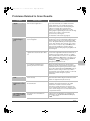
Paper misfeed illustrations
If you require more information when reading the instructions in the touch panel, see the paper misfeed illustrations on
the following pages. Refer to the illustration below and then go to the appropriate illustration (1 to 14) for your situation.
☞ (1)-(4): page 4, (5)-(10): page 5, (11)-(14): page 6
(11)
(12)
(13)
(1)
(2)(3)
(10)
(4)
(5)
(6)
(7)
(14)
(8)
(9)
3
mx4500_gb_trb.book
4 ページ
2005年12月1日 木曜日 午後1時56分
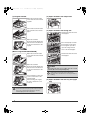
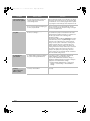
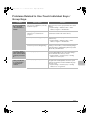
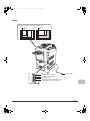
(1) Original misfeed
(2) Paper misfeed in the output area
Open the document feeder
cover and remove the misfed
originals.
Pull out the document feeder
tray and remove the misfed
paper.
(3) Paper misfeed in the fusing unit
Rotate knob and remove the
misfed paper.
Open the automatic
document feeder. Rotate the
transfer roller in the direction
of the arrow and remove the
original.
If the misfed paper is inside
the fusing area, turn down
the fusing unit open tab to
open the fusing unit and
remove the misfed paper.
(When using the MX-3501N/4501N)
Rotate knob and remove the
misfed paper.
Open the document feeder
cover and remove the misfed
originals.
Open the automatic
document feeder. Rotate the
transfer roller in the direction
of the arrow and remove the
original.
A
Press switch A to release the
cover lock and remove the
misfed original.
After removing the original,
be sure to attach the cover
securely.
After removing the misfeed, open and close the
automatic document feeder (or the document feeding
area cover or document feeder tray) to clear the
misfeed display from the touch panel.
4
Caution
The fusing unit area is hot. Take care not to burn
yourself. (Do not touch any metal parts.)
Unfused toner may remain on the paper that is
removed. Take care that it does not soil your hands or
clothing.
(4) Paper misfeed in the exit tray unit (right
tray)
mx4500_gb_trb.book
5 ページ
2005年12月1日 木曜日 午後1時56分
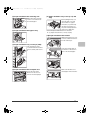
(5) Paper misfeed in the reversing unit
Open the Paper reversing
section cover and remove
the misfed paper.
(6) Paper misfeed in the bypass tray
(9) Paper misfeed in tray 1 to tray 4 (in the
tray)
Before pulling the tray out,
open the right cover and
check if there is a paper
misfeed. If you pull the tray
out without checking, you
may tear misfed paper and
make it more difficult to
remove the pieces that remain in the machine.
☞ (7) Paper misfeed in tray 1 to tray 4 (side)
(10) Paper misfeed in the finisher
While pressing the lever over
to the left, slide the finisher to
the left until it stops.
(7) Paper misfeed in tray 1 to tray 4 (side)
The misfeed may have
occurred inside the machine.
Check carefully and remove
it.
(8) Paper misfeed in the transport area
Lower the lever in the
direction of the arrow to
remove the misfed paper.
Turn roller rotating knob in
the direction of the arrow to
remove the misfed paper.
Make sure that there is no
misfed paper in the machine.
5
mx4500_gb_trb.book
6 ページ
2005年12月1日 木曜日 午後1時56分
(11) Paper misfeed in the saddle stitch
finisher (top)
Open the top cover and
remove the misfed paper.
(14) Paper misfeed in the saddle stitch
finisher (bottom)
(12) Paper misfeed in the paper pass unit
Pull out the paper pass unit
and remove the misfed
paper.
While pulling the lever, slide
the saddle stitch finisher to
the left until it stops.
Turn knob until a blue
indication is seen.
Check the paper reversing
section inside the tray and
remove any misfed paper.
*A misfeed has occurred
inside the machine. Look
inside to check.
Open the finisher right cover
and remove the misfed
paper.
Rotate knob and remove the
misfed paper.
(13) Paper misfeed in the large capacity tray
While holding the tray
release lever, carefully slide
the large capacity tray away
from the main unit until it
stops.
6
mx4500_gb_trb.book
7 ページ
2005年12月1日 木曜日 午後1時56分
COPYING
This chapter provides solutions to possible copying problems. See the following table of contents to locate the
appropriate page for your question or problem.
Problems Related to Copying Operation
• Copying does not take place. . . . . . . . . . . . . . . . . . . . . . . . . . . . . . . . . . . . . . . . . . . . . . . . . . . . . . . . . . 7
• Auto selection of the colour mode does not take place. . . . . . . . . . . . . . . . . . . . . . . . . . . . . . . . . . . . . . 7
• Image rotation does not take place. . . . . . . . . . . . . . . . . . . . . . . . . . . . . . . . . . . . . . . . . . . . . . . . . . . . . 8
• Two-sided copying does not take place.. . . . . . . . . . . . . . . . . . . . . . . . . . . . . . . . . . . . . . . . . . . . . . . . . 8
• The paper size of a tray cannot be set.. . . . . . . . . . . . . . . . . . . . . . . . . . . . . . . . . . . . . . . . . . . . . . . . . . 8
Problems Related to Copy Results
• The image is too light or too dark.. . . . . . . . . . . . . . . . . . . . . . . . . . . . . . . . . . . . . . . . . . . . . . . . . . . . . . 9
• Colours are off. . . . . . . . . . . . . . . . . . . . . . . . . . . . . . . . . . . . . . . . . . . . . . . . . . . . . . . . . . . . . . . . . . . . . 9
• Part of the image is cut off. . . . . . . . . . . . . . . . . . . . . . . . . . . . . . . . . . . . . . . . . . . . . . . . . . . . . . . . . . . . 9
• Copies come out blank. . . . . . . . . . . . . . . . . . . . . . . . . . . . . . . . . . . . . . . . . . . . . . . . . . . . . . . . . . . . . . 9
• If you cannot find the item that you are looking for in the above table of contents, see "OTHER PROBLEMS" (page 27).
• If you are unable to solve a problem using the solutions in this manual, switch off the [POWER] key (
) and the
main power switch. Wait at least 10 seconds, and then switch on the main power switch and the [POWER] key (
)
in that order.
* When the LINE indicator is lit or the DATA indicator is lit or blinking, do not switch off the main power switch or unplug
the power plug. This may damage the hard drive or cause the data being stored or received to be lost.
Problems Related to Copying Operation
Problem
Point to check
Solution
Copying does not take
place.
Have functions been disabled by the
administrator?
When user authentication is enabled, the functions that
you can use may be restricted in your user settings.
Check with your administrator.
Auto selection of the
colour mode does not
take place.
Are you using one of the following types
of originals?
Black & White is not selected
When the colour mode is set to "Auto", the machine
detects whether the original is black and white or colour
when the [COLOUR START] key (
) is pressed.
However, when an original similar to one of those at left
is used, automatic detection may not give the correct
result. In this event, specify the colour mode manually.
• Are there colours or colouring in the
paper?
Colour is not selected
• The colour in the original is very light.
• The colour in the original is very dark,
almost black.
• Is only a very small area of the
original coloured?
7
mx4500_gb_trb.book
8 ページ
Problem
Image rotation does
not take place.
Two-sided copying
does not take place.
The paper size of a
tray cannot be set.
8
2005年12月1日 木曜日 午後1時56分
Point to check
Solution
Did you select the paper size or copy
ratio manually?
Copy using automatic paper selection and automatic
ratio selection.
Are you copying using settings that do
not allow rotate copying?
Rotate copying can generally be combined with other
special modes, however, some combinations are not
possible. If a prohibited combination is selected, a
message will appear in the touch panel.
Is "Rotation Copy Setting" disabled in
the system settings (administrator)?
Check with your administrator.
If you are the administrator, enable "Rotation Copy
Setting".
➞ System Settings (Administrator) > "Copy Settings" >
"Rotation Copy Setting" >
Does the paper type setting of the
selected tray specify a type of paper that
cannot be used for two-sided copying?
Check "Tray Settings" in the system settings. If the
[Disable Duplex] checkbox is selected
, two-sided
copying using that tray will not be possible. Change the
paper type setting to a type that can be used for
two-sided printing.
➞ System Settings > "Paper Tray Settings" > "Tray
Settings"
Are you using a special size or type of
paper?
For the paper types and sizes that can be used for
two-sided copying, see "SPECIFICATIONS" in the
Safety Guide.
Are you copying using settings that do
not allow two-sided copying?
Two-sided copying can generally be combined with
other special modes, however, some combinations are
not possible. If a prohibited combination is selected, a
message will appear in the touch panel.
Have functions been disabled by the
administrator?
Some functions may have been disabled in the system
settings (administrator). Check with your administrator.
When user authentication is enabled, the functions that
you can use may be restricted in your user settings.
Check with your administrator.
Have functions been disabled by the
administrator?
Some functions may have been disabled in the system
settings (administrator). Check with your administrator.
mx4500_gb_trb.book
9 ページ
2005年12月1日 木曜日 午後1時56分
Problems Related to Copy Results
Problem
The image is too light
or too dark.
Point to check
Solution
Is the image too light or too dark?
Select an appropriate exposure mode for the original
being copied and adjust the exposure level manually.
Has an appropriate exposure mode for
the original type been selected?
A satisfactory copy result can be obtained by selecting a
suitable exposure mode for the original type. Select one
of the following modes depending on the original type.
• Text
Use this mode for regular text documents.
• Text/Prtd.Photo
This mode provides the best balance for copying an
original which contains both text and printed
photographs, such as a magazine or catalogue.
• Text/Photo
This mode provides the best balance for copying an
original which contains both text and photographs,
such as a text document with a photo pasted on.
• Printed Photo
This mode is best for copying printed photographs,
such as photos in a magazine or catalogue.
• Photo
Use this mode to copy photos.
• Map
This mode is best for copying the light colour shading
and fine text found on most maps.
• Light original
Use this mode for originals with light pencil writing.
Colours are off.
Did you perform "Registration
Adjustment"?
Ask your administrator to perform "Registration
Adjustment".
➞ System Settings (Administrator) > "Device Control" >
"Registration Adjustment" > "Auto Adjustment"
If the colour tones are off, perform "Auto Colour
Calibration". (If the colours are still off after calibration,
repeating calibration may improve the results.)
➞ System Settings (Administrator) > "Copy Settings" >
"Auto Colour Calibration"
Part of the image is
cut off.
Has an appropriate ratio been selected
for the original size and paper size?
Select an appropriate ratio setting.
Are you using an Inch (AB) paper size?
When copying on an Inch (AB) paper size, specify the
original size manually.
Is the original placed face up or face
down correctly?
When using the document glass, the original must be
placed face down. When using the automatic document
feeder, the original must be placed face up.
Copies come out
blank.
9
mx4500_gb_trb.book
10 ページ
2005年12月1日 木曜日 午後1時56分
PRINTING
This chapter provides solutions to possible printing problems. See the following table of contents to locate the
appropriate page for your question or problem.
Problems Related to Printing Operation
• Printing does not take place.. . . . . . . . . . . . . . . . . . . . . . . . . . . . . . . . . . . . . . . . . . . . . . . . . . . . . . . . . 10
• Colour printing does not take place. . . . . . . . . . . . . . . . . . . . . . . . . . . . . . . . . . . . . . . . . . . . . . . . . . . . 12
• Two-sided printing does not take place. . . . . . . . . . . . . . . . . . . . . . . . . . . . . . . . . . . . . . . . . . . . . . . . . 12
• A tray, finisher, or other peripheral device installed on the machine cannot be used. . . . . . . . . . . . . . 13
Problems Related to Print Results
• The image is grainy. . . . . . . . . . . . . . . . . . . . . . . . . . . . . . . . . . . . . . . . . . . . . . . . . . . . . . . . . . . . . . . . 13
• The image is too light or too dark.. . . . . . . . . . . . . . . . . . . . . . . . . . . . . . . . . . . . . . . . . . . . . . . . . . . . . 13
• Colours are off. . . . . . . . . . . . . . . . . . . . . . . . . . . . . . . . . . . . . . . . . . . . . . . . . . . . . . . . . . . . . . . . . . . . 13
• Text and lines are faint and difficult to see.. . . . . . . . . . . . . . . . . . . . . . . . . . . . . . . . . . . . . . . . . . . . . . 13
• Part of the image is cut off. . . . . . . . . . . . . . . . . . . . . . . . . . . . . . . . . . . . . . . . . . . . . . . . . . . . . . . . . . . 14
• The image is upside down. . . . . . . . . . . . . . . . . . . . . . . . . . . . . . . . . . . . . . . . . . . . . . . . . . . . . . . . . . . 14
• Many nonsense characters are printed. . . . . . . . . . . . . . . . . . . . . . . . . . . . . . . . . . . . . . . . . . . . . . . . . 15
• If you cannot find the item that you are looking for in the above table of contents, see "OTHER PROBLEMS" (page 27).
• If you are unable to solve a problem using the solutions in this manual, switch off the [POWER] key (
) and the
main power switch. Wait at least 10 seconds, and then switch on the main power switch and the [POWER] key (
)
in that order.
* When the LINE indicator is lit or the DATA indicator is lit or blinking, do not switch off the main power switch or unplug
the power plug. This may damage the hard drive or cause the data being stored or received to be lost.
Problems Related to Printing Operation
Problem
Point to check
Solution
Printing does not take
place.
Is your computer connected correctly to
the machine?
Make sure that the cable is connected securely to the
LAN connector or the USB connector on your computer
and the machine.
If you are on a network, check the connections at the
hub as well.
☞ Illustration of the machine (L) and (M) (page 37)
Is the machine connected to the same
network (LAN, etc.) as your computer?
The machine must be connected to the same network
as your computer.
If you do not know which network the machine is
connected to, ask the network administrator.
10
mx4500_gb_trb.book
11 ページ
2005年12月1日 木曜日 午後1時56分
Problem
Printing does not take
place.
Point to check
Solution
Is the IP address selected correctly?
(Windows)
If the machine does not have a permanent IP address
(the machine receives an IP address from a DHCP
server), printing will not be possible if the IP address
changes. Print the "All Custom Setting List" in the
system settings and check the IP address of the
machine. If the IP address has changed, change the
port setting in the printer driver.
➞ System Settings > "List Print (User)" > "All Custom
Setting List"
☞ Software Setup Guide
If the IP address changes frequently, it is recommended
that a permanent IP address be assigned to the machine.
➞ System Settings (Administrator) > "Network Settings"
> "IP Address Setting"
Is AppleTalk active?
(Macintosh)
In Mac OS X, click [Network] in [System Preferences]
and select "Built-in Ethernet" in "Show". Click the
[AppleTalk] tab and make sure that [Make AppleTalk
Active] is selected.
In Mac OS 9.0 to 9.2.2, open the [Chooser] from the
Apple menu and make sure that [Active] is selected.
Printing is not possible if [Active] is not selected.
Ask your administrator to check if "Enable EtherTalk" is
enabled in the system settings (administrator). (The
factory default setting is "Enable".)
➞ System Settings (Administrator) > "Network Settings"
> "Enable EtherTalk" >
Is "Connect via" set to [Ethernet] for
AppleTalk?
(Mac OS 9.0-9.2.2)
Open [AppleTalk] from the [Control Panels] and make
sure that [Ethernet] is selected in the "Connect via"
menu. Printing is not possible if [Ethernet] is not selected.
Is your computer in an unstable state?
Printing is sometimes not possible when you run
multiple applications at once or there is insufficient
memory or hard drive space. Restart your computer.
Is the machine specified correctly in the
software application that you are using
for printing?
Make sure that the printer driver of the machine is
selected in the Print window of the application.
If the printer driver does not appear in the list of
available printer drivers, it may not be installed correctly.
Remove the printer driver and then install it once again.
☞ INSTALLATION (page 24)
Are the network connection devices
operating normally?
Make sure that the routers and other network
connection devices are operating correctly. If a device is
not powered on or is in an error state, see the manual of
the device to correct the problem.
Is the I/O timeout setting too short?
If the I/O timeout setting is too short, errors may occur
while writing to the printer. Ask the administrator of the
machine to configure an appropriate time in "I/O Timeout".
➞ System Settings (Administrator) > "Printer Settings" >
"Interface Settings" > "I/O Timeout"
11
mx4500_gb_trb.book
12 ページ
2005年12月1日 木曜日 午後1時56分
Problem
Printing does not take
place.
Point to check
Was a Notice Page printed?
Solution
A Notice Page will be printed to indicate the cause of the
problem if a print job cannot be performed as specified
and the cause is not shown in the display. Read the
printed page and take appropriate action.
For example, a notice page will be printed in the
following situations.
• The print job is too large to fit in memory.
• A function that has been prohibited by the
administrator is specified.
* By factory default, Notice Pages are not printed.
Colour printing does
not take place.
Two-sided printing
does not take place.
12
Have functions been disabled by the
administrator?
When user authentication is enabled, the functions that
you can use may be restricted in your user settings.
Check with your administrator.
Is the colour mode set to "Color"?
Select "Automatic" or "Color" for the colour mode
setting.
The colour mode setting is configured as follows:
Windows:
On the [Color] tab of the printer driver.
Macintosh:
In the [Color] menu of the print window.
(In Mac OS X v10.1.5, the [Color] tab of [Printer
Features].)
In Windows, [Black and White Print] can also be
selected on the [Main] tab of the printer driver. If you
wish to print in colour, make sure that the [Black and
White Print] checkbox on the [Main] tab is not selected
.
Have functions been disabled by the
administrator?
When user authentication is enabled, the functions that
you can use may be restricted in your user settings.
Check with your administrator.
Does the paper type setting of the
selected tray specify a type of paper that
cannot be used for two-sided printing?
Check "Tray Settings" in the system settings.
If the [Disable Duplex] checkbox is selected
,
two-sided printing using that tray will not be possible.
Change the paper type setting to a type that can be
used for two-sided printing.
➞ System Settings > "Paper Tray Settings" > "Tray
Settings"
Are you using a special size or type of
paper?
For the paper types and sizes that can be used for
two-sided printing, see "SPECIFICATIONS" in the
Safety Guide.
Have functions been disabled by the
administrator?
Some functions may have been disabled in the system
settings (administrator). Check with your administrator.
When user authentication is enabled, the functions that
you can use may be restricted in your user settings.
Check with your administrator.
mx4500_gb_trb.book
13 ページ
2005年12月1日 木曜日 午後1時56分
Problem
A tray, finisher, or
other peripheral
device installed on the
machine cannot be
used.
Point to check
Have the peripheral devices that are
installed on the machine been
configured in the printer driver?
Solution
Open the printer properties and click the [Auto
Configuration] button on the [Configuration] tab.
(Windows)
* If auto configuration cannot be executed, see the
Software Setup Guide.
Problems Related to Print Results
Problem
Point to check
Solution
The image is grainy.
Are the printer driver settings
appropriate for the print job?
(Windows)
If you are using the PCL printer driver, you can set the
resolution to [600 dpi] or [300 dpi] in the print settings at
the time of printing. When you need a very clear image,
select [600 dpi].
If you are using the PS printer driver, you can set the
resolution to [600x600 dpi] or [1200x600 dpi] (only for
black and white printing).
The resolution setting is selected in the [Advanced] tab
of the printer driver properties window.
The image is too light
or too dark.
Does the image (particularly a photo)
need correction?
(Windows)
Brightness and contrast can be corrected by performing
[Color Adjustment] on the [Color] tab of the printer
driver. These settings can be used for simple
corrections when you do not have image editing
software installed on your computer.
Colours are off.
Did you perform "Registration
Adjustment"?
Ask your administrator to perform "Registration
Adjustment".
➞ System Settings (Administrator) > "Device Control" >
"Registration Adjustment" > "Auto Adjustment"
If the colour tones are off, perform "Auto Colour
Calibration". (If the colours are still off after calibration,
repeating calibration may improve the results.)
➞ System Settings (Administrator) > "Printer Settings" >
"Colour Adjustments" > "Auto Colour Calibration"
Text and lines are faint
and difficult to see.
Was colour data printed in black and
white?
(Windows)
When colour text and lines are printed in black and
white, they may become faint and difficult to see. To
have colour text or lines (areas) that are faint converted
to black, select [Text To Black] or [Vector To Black] on
the [Color] tab of the printer driver. (Raster data such as
bitmap images cannot be adjusted.)
13
mx4500_gb_trb.book
14 ページ
Problem
Part of the image is
cut off.
The image is upside
down.
14
2005年12月1日 木曜日 午後1時56分
Point to check
Solution
Does the paper size specified by the job
match the size of paper loaded in the
tray?
Make sure that the paper size setting matches the size
of paper loaded in the tray.
The paper size setting is selected as follows:
Windows:
On the [Paper] tab of the printer driver.
If [Fit to Paper Size] is selected, check the loaded
paper and the paper size setting.
Macintosh:
In the [Page Setup] menu.
Is the print orientation setting (portrait or
landscape) correct?
Set the print orientation to match the image.
The print orientation is selected as follows:
Windows: On the [Main] tab of the printer driver.
Macintosh: In the [Page Setup] menu.
Are the margins set correctly in the
layout settings of the application?
If the edge of the image extends outside the printable
area of the machine, the edge will be cut off. Select an
appropriate paper size and margins in the layout
settings of the application.
Are you using a type of paper (tab
paper, punch paper, etc.) that can only
be loaded in a fixed orientation?
When the image size and paper size are the same but
the orientations are different, the orientation of the
image is automatically rotated to match the paper.
However, when the paper can only be loaded in a fixed
orientation, this may result in the image being printed
upside down. In this event, rotate the image 180
degrees before printing.
The 180 degree rotation setting is selected as follows:
Windows:
On the [Main] tab of the printer driver.
Macintosh (OS X v10.3.3 to 10.4):
On the [Page Setup] menu. (Landscape orientation
only.)
(In Mac OS 9.0 to 9.2.2, in the [PostScript Options]
menu of the [Page Setup] menu.)
Is the correct binding position selected
for two-sided printing?
When two-sided printing is performed, every other page
is printed upside down when tablet binding is selected
for the binding position. Be sure to set the appropriate
binding position.
The binding position is selected as follows:
Windows:
On the [Main] tab of the printer driver.
Macintosh:
In the [Layout] menu of the print window. (In Mac OS
X v10.1.5, in the [Duplex] menu of the print window; in
Mac OS 9.0 to 9.2.2, in [Output/Document Style].)
mx4500_gb_trb.book
15 ページ
2005年12月1日 木曜日 午後1時56分
Problem
Many nonsense
characters are printed.
Point to check
Is your computer or the machine in an
unstable state?
Solution
If little free space remains in the memory or hard drive of
your computer, or many jobs have been spooled on the
machine and it has little free memory remaining, printed
text may turn into nonsense characters. In this situation,
cancel printing, restart your computer and the machine,
and try printing again.
To cancel printing
Windows:
Double-click the printer icon that appears at the lower
right of the task bar and click "Cancel All Documents"
(or "Purge Print Documents") in the [Printer] menu.
Macintosh:
Double click the name of the machine in the printer
list, select the job that you wish to delete, and delete
it. (In Mac OS 9.0 to 9.2.2, double click the printer icon
on the desktop, select the print job that you wish to
delete, and delete it.)
At the machine:
Press the [JOB STATUS] key on the operation panel,
touch the [Print Job] key to change the screen, touch
the key of the print job that you wish to delete, and
touch the [Stop/Delete] key. A message appears to
confirm the cancellation. Touch the [Yes] key.
If nonsense characters are still printed after restarting,
ask your administrator to lengthen the timeout setting of
"I/O Timeout" in the system settings (administrator).
➞ System Settings (Administrator) > "Printer Settings" >
"Interface Settings" > "I/O Timeout"
* If nonsense characters are still printed after taking the
above measures, remove and then reinstall the printer
driver.
15
mx4500_gb_trb.book
16 ページ
2005年12月1日 木曜日 午後1時56分
SCANNING
This chapter provides solutions to possible scanning problems. See the following table of contents to locate the
appropriate page for your question or problem.
Problems Related to Scanning Operation
• Transmission does not take place. . . . . . . . . . . . . . . . . . . . . . . . . . . . . . . . . . . . . . . . . . . . . . . . . . . . . 16
• An address cannot be specified.. . . . . . . . . . . . . . . . . . . . . . . . . . . . . . . . . . . . . . . . . . . . . . . . . . . . . . 17
• Mode cannot be selected.. . . . . . . . . . . . . . . . . . . . . . . . . . . . . . . . . . . . . . . . . . . . . . . . . . . . . . . . . . . 17
• Auto selection of the colour mode does not take place correctly.. . . . . . . . . . . . . . . . . . . . . . . . . . . . . 17
• The received image file cannot be opened. . . . . . . . . . . . . . . . . . . . . . . . . . . . . . . . . . . . . . . . . . . . . . 18
• Transmission takes a long time. . . . . . . . . . . . . . . . . . . . . . . . . . . . . . . . . . . . . . . . . . . . . . . . . . . . . . . 18
• A destination is pre-selected. . . . . . . . . . . . . . . . . . . . . . . . . . . . . . . . . . . . . . . . . . . . . . . . . . . . . . . . . 18
• Cannot write to USB memory. (When using USB Memory Scan.) . . . . . . . . . . . . . . . . . . . . . . . . . . . . 18
Problems Related to Scan Results
• The scanned image is clipped. . . . . . . . . . . . . . . . . . . . . . . . . . . . . . . . . . . . . . . . . . . . . . . . . . . . . . . . 19
• The quality of the scanned image is poor. . . . . . . . . . . . . . . . . . . . . . . . . . . . . . . . . . . . . . . . . . . . . . . 19
• The scanned image is blank. . . . . . . . . . . . . . . . . . . . . . . . . . . . . . . . . . . . . . . . . . . . . . . . . . . . . . . . . 19
• The scanned image is upside down or on its side. . . . . . . . . . . . . . . . . . . . . . . . . . . . . . . . . . . . . . . . . 19
• The [COLOUR START] key (
) indictor is not lit. . . . . . . . . . . . . . . . . . . . . . . . . . . . . . . . . . . . . 19
• JPEG was selected for the file type but the file was created as a TIFF file. . . . . . . . . . . . . . . . . . . . . . 20
• The image is too light or too dark. (When using PC Scan.) . . . . . . . . . . . . . . . . . . . . . . . . . . . . . . . . . 20
Problems Related to One-Touch Individual Keys / Group Keys
• A one-touch individual key or group key cannot be edited or deleted. . . . . . . . . . . . . . . . . . . . . . . . . . 21
• You wish to delete or edit an individual key but do not know which group key it is stored in. . . . . . . . 21
• You wish to delete or edit a group key but do not know which program key it is stored in. . . . . . . . . . 21
• If you cannot find the item that you are looking for in the above table of contents, see "OTHER PROBLEMS" (page 27).
• If you are unable to solve a problem using the solutions in this manual, switch off the [POWER] key (
) and the main
power switch. Wait at least 10 seconds, and then switch on the main power switch and the [POWER] key (
) in that order.
* When the LINE indicator is lit or the DATA indicator is lit or blinking, do not switch off the main power switch or unplug
the power plug. This may damage the hard drive or cause the data being stored or received to be lost.
Problems Related to Scanning Operation
Problem
Transmission does
not take place.
16
Point to check
Did you select the correct destination?
Is the correct information (e-mail
address or FTP server information)
stored for that destination?
Solution
Make sure that the correct destination information is
stored for the destination and that the destination is
correctly selected.
If delivery by e-mail (Scan to E-mail) is unsuccessful, an
error message such as "Undelivered Message" may be
sent to the designated administrator's e-mail address.
This information may help you determine the cause of
the problem.
mx4500_gb_trb.book
17 ページ
2005年12月1日 木曜日 午後1時56分
Problem
Transmission does
not take place.
An address cannot be
specified.
Point to check
Does the image file exceed the e-mail
attachment limit set in the system
settings (administrator)?
If your administrator has set a limit on the size of
transmitted files, a file that exceeds the limit cannot be
transmitted. Check with your administrator.
Did the image file exceed the file
attachment size limit of your mail
server?
(When Scan to E-mail is used.)
Reduce the size of the file attachment (reduce the
number of pages scanned). The size of the file can also
be reduced by scanning using a lower resolution setting.
(Ask your mail server administrator what the file size
limit is for one e-mail transmission.)
Has the folder on the destination
computer been set as a shared folder so
that files can be sent to it?
(When using Scan to Network Folder.)
If the destination folder is not configured as a shared
folder, select "share" in the folder properties. If the folder
was moved or otherwise changed, the "share" setting
may have been cancelled.
Did you place a long size original on the
document glass when it is scanned?
A long size original cannot be scanned from the
document glass. Place originals in the document feeder
tray of the automatic document feeder.
Did you place an original that is folded?
If a folded original is placed in the automatic document
feeder, an error will occur and scanning will be
cancelled when the actual original size is detected
during scanning.
Following the instructions in the display, unfold the
original, place it in the automatic document feeder
again, and rescan.
Have functions been disabled by the
administrator?
Some functions may have been disabled in the system
settings (administrator). Check with your administrator.
When user authentication is enabled, the functions that
you can use may be restricted in your user settings.
Check with your administrator.
Are you scanning one of the following
types of originals?
When Black & White is not selected:
When the colour mode is set to "Auto", the machine
detects whether the original is black and white or colour
when the [COLOUR START] key (
) is pressed;
however, in the cases at left, automatic detection may
not give the correct result. In this event, specify the
colour mode manually.
Mode cannot be
selected.
Auto selection of the
colour mode does not
take place correctly.
Solution
• Are there colours or colouring in the
paper?
When Colour is not selected:
• The colour in the original is very light.
• The colour in the original is very dark,
almost black.
• Is only a very small area of the
original coloured?
17
mx4500_gb_trb.book
18 ページ
2005年12月1日 木曜日 午後1時56分
Problem
The received image
file cannot be opened.
Point to check
Solution
Does the viewer program used by the
recipient support the format of the
received image data?
The recipient may be able to open the file if you change
the file type and compression mode selected at the time
of transmission. Use a software program that is capable
of opening the selected file type and compression mode.
Does a message appear prompting you
to enter your password?
The received file is an encrypted PDF file. Ask the
sender for the password, or have the image sent again
in a non-encrypted format.
Transmission takes a
long time.
Is the resolution setting appropriate at
the time of scanning?
To select resolution and data compression settings that
are suited to the purpose of transmission and create
image data that is balanced in terms of resolution and
file size, pay attention to the following points:
Resolution settings
The default resolution setting is [200X200dpi] in scanner
and USB memory mode, and [200X100dpi] in Internet
fax mode. If the original does not contain a halftone
image such as a photo or illustration, scanning at the
default resolution will create a practical and useful
image. A higher resolution setting or the "Half Tone"
setting (in Internet fax mode) should only be selected if
the original contains a photo and you wish to give
priority to the quality of the photo image. Exercise
caution in this case as a larger file will be created than
when the default setting is used.
A destination is
pre-selected.
Is "Default Address Setting" enabled in
the system settings (administrator)?
If you wish to send to a destination other than the
default destination, touch the [Cancel] key.
If you are the administrator and wish to change or
disable the default destination, change the settings as
appropriate in "Default Address Setting".
➞ System Settings (Administrator) > "Image Send
Settings" > "Scan Settings" > "Default Address
Setting"
Cannot write to USB
memory.
(When using USB
Memory Scan.)
Is the USB memory device connected
securely to the machine?
Make sure that the USB memory device is connected
securely.
18
mx4500_gb_trb.book
19 ページ
2005年12月1日 木曜日 午後1時56分
Problems Related to Scan Results
Problem
Point to check
Solution
The scanned image is
clipped.
Is the original scan size setting smaller
than the actual original size?
Set the scan size to the actual original size.
If you have intentionally set a smaller size than the
actual original size, note carefully the placement
position of the selected scan size when placing the
original. For example, when scanning an A4
(8-1/2" x 11") original using a B5 (5-1/2" x 8-1/2")
setting, align the original using the scale at the left edge
to fit the area you wish to scan into the B5
(5-1/2" x 8-1/2") scanning area.
☞ Illustration of the machine (I) (page 37)
The quality of the
scanned image is
poor.
Is the original printed matter such as a
book or magazine?
When the original is printed matter, vertical patterns
(moiré) may occur. Touch the [Image Settings] key and
then the [Exposure] key to open the exposure setting
screen. The [Moiré Reduction] checkbox appears in this
screen. This checkbox can be selected
to reduce
the moiré effect. It may also be possible to reduce the
moiré effect by changing the resolution setting or
shifting the original (or changing its angle) slightly on the
document glass.
When scanning a colour or greyscale
original, is the colour mode set to "Mono
2"?
Setting the colour mode to "Mono 2" replaces the
colours in the original with either black or white. This is
suitable for text-only originals; however, for originals
that contain illustrations, it is best to use the [BLACK &
WHITE START] key (
) with the colour mode set to
[Greyscale], or set the colour mode of the [COLOUR
START] key (
) to [Full colour] or
[Auto]-[Greyscale] and then scan.
Is a destination included that has
[TIFF-S] selected for the format?
When a broadcast transmission is performed that
includes both scan mode destinations and Internet fax
destinations that have [TIFF-S] selected for the format,
the resolution will remain fixed at [200X200dpi] even if a
different resolution setting is selected. If you wish to
send an image scanned at high resolution to scan mode
destinations, send the image in a separate
transmission.
The scanned image is
blank.
Is the original placed face up or face
down correctly?
When using the document glass, the original must be
placed face down. When using the automatic document
feeder, the original must be placed face up.
The scanned image is
upside down or on its
side.
Are Internet fax addresses included in
the transmission?
When both scan mode and Internet fax destinations are
included in a broadcast transmission, the original
transmission orientation of Internet fax takes
precedence, and thus the file may not appear in the
correct orientation when viewed on a computer. In this
event, send the image to the scan mode destinations in
a separate transmission.
The [COLOUR START]
key (
) indictor
is not lit.
Are Internet fax or fax destinations
included?
If Internet fax or fax destinations are included in the
destinations, only the [BLACK & WHITE START] key
(
) can be used.
19
mx4500_gb_trb.book
20 ページ
2005年12月1日 木曜日 午後1時56分
Problem
Point to check
Solution
JPEG was selected for
the file type but the file
was created as a TIFF
file.
Did you press the [BLACK & WHITE
START] key (
) to begin scanning?
When [JPEG] is selected for the file type and the image
is scanned in Mono 2, the file will be created as a TIFF
file. To create the file as a JPEG file, change the colour
mode to [Full Colour] and then press the [COLOUR
START] key (
).
The image is too light
or too dark.
(When using PC
Scan.)
Is the threshold value suitable?
When scanning from the TWAIN driver with [Mono 2
gradation] selected from the [Colour Mode] of the
"Professional" window, check the "B/W Threshold"
setting. A large threshold value makes the image darker
and a small threshold value makes the image brighter.
To adjust the "B/W Threshold" automatically, click the
[Auto Threshold] button on the [Image] tab of the
"Professional" window.
Are the brightness and contrast settings
suitable?
When the brightness and contrast settings are not
suitable (for example, the scanned image is too bright),
click the [Auto Brightness / Contrast Adjustment] button
on the [Colour] tab of the "Professional" window. You
can also click the [Brightness / Contrast] button to set
the brightness and contrast while viewing the scanned
image.
20
mx4500_gb_trb.book
21 ページ
2005年12月1日 木曜日 午後1時56分
Problems Related to One-Touch Individual Keys /
Group Keys
Problem
Point to check
Solution
A one-touch individual
key or group key
cannot be edited or
deleted.
If the key is an individual key, is the key
included in a group?
Remove the key from the group and then edit or delete
the key.
➞ System Settings > "Address Control" > "Direct
Address / Program" > "Amend/Delete"
Is the key being used in a reserved
transmission or a transmission in
progress?
Wait until the transmission is finished or cancel the
transmission and then edit or delete the key.
Is the key included in a program key?
Remove the key from the program and then edit or
delete the key.
➞ System Settings > "Address Control" > "Direct
Address / Program" > "Amend/Delete"
Has your administrator enabled a
function that prevents editing/deleting?
If your administrator has enabled "Default Address
Setting" (on the machine) or "Inbound Routing Settings"
(in the Web pages), editing/deleting will not be possible.
Check with your administrator.
You wish to delete or
edit an individual key
but do not know which
group key it is stored
in.
Are multiple group keys stored?
If multiple group keys have been stored, print the Group
List in "Sending Address List" in the system settings.
The list will show where the key is stored.
➞ System Settings > "List Print (User)" > "Sending
Address List" > "Group List"
You wish to delete or
edit a group key but
do not know which
program key it is
stored in.
Are multiple program keys stored?
If multiple program keys have been stored, print the
Program List in "Sending Address List" in the system
settings. The list will show where individual and group
keys are stored.
➞ System Settings > "List Print (User)" > "Sending
Address List" > "Program List"
21
mx4500_gb_trb.book
22 ページ
2005年12月1日 木曜日 午後1時56分
DOCUMENT FILING
This chapter provides solutions to possible document filing problems. See the following table of contents to locate the
appropriate page for your question or problem.
• Document filing does not take place. . . . . . . . . . . . . . . . . . . . . . . . . . . . . . . . . . . . . . . . . . . . . . . . . . . 22
• A filed data can not be printed. . . . . . . . . . . . . . . . . . . . . . . . . . . . . . . . . . . . . . . . . . . . . . . . . . . . . . . . 22
• A job cannot be stored in a custom folder. . . . . . . . . . . . . . . . . . . . . . . . . . . . . . . . . . . . . . . . . . . . . . . 22
• A stored file has disappeared. . . . . . . . . . . . . . . . . . . . . . . . . . . . . . . . . . . . . . . . . . . . . . . . . . . . . . . . 23
• A file cannot be deleted. . . . . . . . . . . . . . . . . . . . . . . . . . . . . . . . . . . . . . . . . . . . . . . . . . . . . . . . . . . . . 23
• The property of a file cannot be set to [Confidential]. . . . . . . . . . . . . . . . . . . . . . . . . . . . . . . . . . . . . . . 23
• A file name cannot be stored or changed. . . . . . . . . . . . . . . . . . . . . . . . . . . . . . . . . . . . . . . . . . . . . . . 23
• A custom folder name cannot be stored or changed. . . . . . . . . . . . . . . . . . . . . . . . . . . . . . . . . . . . . . . 23
• A file name is cut off.. . . . . . . . . . . . . . . . . . . . . . . . . . . . . . . . . . . . . . . . . . . . . . . . . . . . . . . . . . . . . . . 23
• If you cannot find the item that you are looking for in the above table of contents, see "OTHER PROBLEMS" (page 27).
• If you are unable to solve a problem using the solutions in this manual, switch off the [POWER] key (
) and the
main power switch. Wait at least 10 seconds, and then switch on the main power switch and the [POWER] key (
)
in that order.
* When the LINE indicator is lit or the DATA indicator is lit or blinking, do not switch off the main power switch or unplug
the power plug. This may damage the hard drive or cause the data being stored or received to be lost.
Problem
Document filing does
not take place.
Point to check
Solution
Did you select document filing settings
in the printer driver?
In print mode, enable document filing on the [Job
Handling] tab of the printer driver.
In copy mode or image send mode, touch the [Quick
File Folder] key or the [File] key and then use the
document filing function.
Have functions been disabled by the
administrator?
Some functions may have been disabled in the system
settings (administrator). Check with your administrator.
When user authentication is enabled, the functions that
you can use may be restricted in your user settings.
Check with your administrator.
A filed data can not be
printed.
Have functions been disabled by the
administrator?
Some functions may have been disabled in the system
settings (administrator). Check with your administrator.
When user authentication is enabled, the functions that
you can use may be restricted in your user settings.
Check with your administrator.
A job cannot be stored
in a custom folder.
Do custom folders appear in "Folder
Information"?
(When printing)
Click the [Get Folder Name] button in the document
filing save screen of the printer driver to call up the
custom folders that have been created on the machine.
Does the custom folder have a
password?
Enter the password configured in the machine in the
document filing save screen.
22
mx4500_gb_trb.book
23 ページ
2005年12月1日 木曜日 午後1時56分
Problem
Point to check
Solution
A stored file has
disappeared.
Did you touch the [Print and Delete the
Data] key to print a stored file?
A file that is printed using the [Print and Delete the Data]
key is automatically deleted after being printed. To print
a file without deleting it, use the [Print and Save the
Data] key.
A file cannot be
deleted.
Is the property of the file set to
[Protect]?
A file cannot be deleted when its property is set to
[Protect]. Change the property to [Sharing] and then
delete the file.
The property of a file
cannot be set to
[Confidential].
Is the file in the Quick File folder?
"Confidential" cannot be specified for a file in the Quick
File folder. Move the file to a different folder and then
specify "Confidential". (Note that "Protect" can be
specified for a file in the Quick File folder to prevent it
from being easily deleted.)
A file name cannot be
stored or changed.
Does the name include characters that
cannot be used in a file or folder name?
The following characters cannot be used in a file or
folder name:
\?/";:,<>!*&#|
Was the file name stored in the
advanced transmission settings during a
scan or Internet fax transmission?
If the name was stored in the advanced transmission
settings before Quick File or File settings were
configured, that name will be used for the stored file. If
the number of characters in the name exceeds the
maximum number of characters allowed for a Quick File
name (30 characters), the characters after the 30th
character will be discarded.
A custom folder name
cannot be stored or
changed.
A file name is cut off.
23
mx4500_gb_trb.book
24 ページ
2005年12月1日 木曜日 午後1時56分
INSTALLATION
This chapter provides solutions to possible installation problems. See the following table of contents to locate the
appropriate page for your question or problem.
• The software cannot be installed. . . . . . . . . . . . . . . . . . . . . . . . . . . . . . . . . . . . . . . . . . . . . . . . . . . . . . 24
• The machine is not detected (when connected to a network). . . . . . . . . . . . . . . . . . . . . . . . . . . . . . . . 24
• The plug and play screen does not appear (USB connection in Windows). . . . . . . . . . . . . . . . . . . . . . 25
• The printer driver is not installed correctly by plug and play (USB connection in Windows). . . . . . . . . 25
• The printer driver cannot be installed (Windows 2000/XP/Server 2003) . . . . . . . . . . . . . . . . . . . . . . . 26
• Removing the software . . . . . . . . . . . . . . . . . . . . . . . . . . . . . . . . . . . . . . . . . . . . . . . . . . . . . . . . . . . . . 26
Problem
The software cannot
be installed.
The machine is not
detected (when
connected to a
network).
24
Point to check
Solution
Is there sufficient free space on your
hard drive?
Delete any unneeded files and applications to increase
free space on your hard drive.
Are you using an operating system that
is not supported?
Make sure that the software can run on your operating
system.
For detailed information on installation requirements for
each software program in Windows, click the [Display
Readme] button in the installer.
☞ Software Setup Guide
Is the IP address of the machine
configured?
If the IP address of the machine is not configured, the
machine will not be detected. Make sure that the IP
address is configured correctly in "IP Address Setting"
in the machine's system settings (administrator).
➞ System Settings (Administrator) > "Network Settings"
> "IP Address Setting"
Is your computer connected to the same
network as the machine?
Windows:
If the machine and your computer are not connected
to the same local area network, the machine will not
be detected. If the two are connected to different
sub-networks, click the [Specify condition] button and
enter the machine's name (host name) or IP address
to search for the machine.
Macintosh:
If multiple AppleTalk zones exist, select the zone to
which the machine is connected from the menu.
Is the machine power on?
If the machine is powered off, it will not be detected.
Switch on the main power switch and the [POWER] key
(
) in that order. (In Windows, search again after
powering on the machine.)
Is your computer connected correctly to
the machine?
Make sure that the cable is connected securely to the
LAN connectors on your computer and the machine.
Check the connections at the hub as well.
☞ Illustration of the machine (M) (page 37)
mx4500_gb_trb.book
25 ページ
2005年12月1日 木曜日 午後1時56分
Problem
The plug and play
screen does not
appear (USB
connection in
Windows).
Point to check
Solution
Is the machine power on?
When a USB cable is connected, make sure the power
of the machine is "ON" and then connect a USB cable to
the machine. When the machine is not powered on,
switch on the main power switch and the [POWER] key
(
) in that order.
Can your computer use a USB
connection?
Check your computer whether or not a USB interface
can be used on the Device Manager in your computer.
(For information on "Device Manager", see Help in
Windows.)
If USB can be used, your controller chipset type and
root hub will appear in "Universal Serial Bus controllers"
in "Device Manager". (The items that appear will vary
depending on your computer.)
If these two items appear, USB should be useable. If a
yellow exclamation point appears next to "Universal
Serial Bus controllers" or the two items do not appear,
refer to your computer manual or check with the
manufacturer of your computer to enable USB and then
reinstall the printer driver.
The printer driver is
not installed correctly
by plug and play (USB
connection in
Windows).
Did you connect the machine to your
computer before installing the printer
driver?
In Windows 2000/XP/Server 2003, if the machine was
connected to your computer with a USB cable before
the printer driver was installed from the installer, check if
information on the unsuccessful installation remains in
"Device Manager". (For information on "Device
Manager", see Help in Windows.)
If the model name of the machine appears in "Other
devices" in "Device Manager", delete it, restart your
computer, and install the printer driver again.
25
mx4500_gb_trb.book
26 ページ
2005年12月1日 木曜日 午後1時56分
The printer driver cannot be installed (Windows 2000/XP/Server 2003)
If the printer driver cannot be installed on Windows 2000/XP/Server 2003, follow the steps below to check your
computer settings.
1
Click the [start] button and then click
[Control Panel].
4
In Windows 2000, click the [Start] button, point to
[Settings], and click [Control Panel].
2
Check the settings in "What action do
you want Windows to take?" ("File
signature verification" in Windows
2000).
Click [Performance and Maintenance]
and then [System].
In Windows 2000, double click the [System] icon.
3
Click the [Hardware] tab and then the
[Driver Signing] button.
If [Block] is selected, the printer driver cannot be installed.
Select [Warn] and install the printer driver again.
Removing the software
To remove the printer driver or software installed using the installer, follow the steps below.
Windows
1
1
Insert the "Software CD-ROM" into your
CD-ROM drive.
2
Double-click the [CD-ROM] icon (
the desktop and double-click the
[MacOS] folder.
) on
In Windows 98/Me/NT 4.0/2000, double-click the
[Add/Remove Programs] icon.
3
Double-click the [Installer] icon (
).
Select the program or driver that you
wish to delete.
4
Select [Remove] in the Install menu and
click the [Remove] button.
Click the [start] button and then click
[Control Panel].
In Windows 98/Me/NT 4.0/2000, click the [Start] button,
point to [Settings], and click [Control Panel].
2
3
Macintosh (Mac OS 9.0 to 9.2.2)
Click [Add or Remove Programs].
For more information, see the manual for the operating
system or Help.
4
Restart your computer.
26
There is no deletion tool for Mac OS X.
The PPD file of Mac OS X has been copied to the
following folder on the startup disk.
[Library] - [Printers] - [PPDs] - [Contents] [Resources] - [en.lproj]
Delete the PPD file of the machine from this folder.
mx4500_gb_trb.book
27 ページ
2005年12月1日 木曜日 午後1時56分
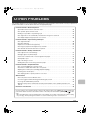
OTHER PROBLEMS
This chapter explains how to resolve problems related to the general operation of the machine. Locate your question or
problem in the table of contents below and refer to the appropriate page.
Problems Related to Machine Operation
• Specified machine functions cannot be used.. . . . . . . . . . . . . . . . . . . . . . . . . . . . . . . . . . . . . . . . . . . . 28
• The operation panel cannot be used. . . . . . . . . . . . . . . . . . . . . . . . . . . . . . . . . . . . . . . . . . . . . . . . . . . 28
• Printing is not possible or stops during a job. . . . . . . . . . . . . . . . . . . . . . . . . . . . . . . . . . . . . . . . . . . . . 29
• The original size is not automatically selected or the wrong size is selected. . . . . . . . . . . . . . . . . . . . 29
• The displayed bypass tray paper size is not correct. . . . . . . . . . . . . . . . . . . . . . . . . . . . . . . . . . . . . . . 30
Problems Related to Paper Feeding and Output
• The original misfeeds.. . . . . . . . . . . . . . . . . . . . . . . . . . . . . . . . . . . . . . . . . . . . . . . . . . . . . . . . . . . . . . 30
• The paper misfeeds. . . . . . . . . . . . . . . . . . . . . . . . . . . . . . . . . . . . . . . . . . . . . . . . . . . . . . . . . . . . . . . . 30
• Paper does not feed from the paper tray. . . . . . . . . . . . . . . . . . . . . . . . . . . . . . . . . . . . . . . . . . . . . . . . 31
• The image on paper from the bypass tray is skewed. . . . . . . . . . . . . . . . . . . . . . . . . . . . . . . . . . . . . . 31
• The automatic document feeder does not operate. . . . . . . . . . . . . . . . . . . . . . . . . . . . . . . . . . . . . . . . 31
Problems Related to Quality / Print Results
• Lines appear in the scanned image. . . . . . . . . . . . . . . . . . . . . . . . . . . . . . . . . . . . . . . . . . . . . . . . . . . . 31
• Smudges appear on printed output. . . . . . . . . . . . . . . . . . . . . . . . . . . . . . . . . . . . . . . . . . . . . . . . . . . . 31
• Toner does not adhere well or creases appear in the paper. . . . . . . . . . . . . . . . . . . . . . . . . . . . . . . . . 32
• Print quality is poor. . . . . . . . . . . . . . . . . . . . . . . . . . . . . . . . . . . . . . . . . . . . . . . . . . . . . . . . . . . . . . . . 32
• Part of the image is cut off. . . . . . . . . . . . . . . . . . . . . . . . . . . . . . . . . . . . . . . . . . . . . . . . . . . . . . . . . . . 32
• Printing takes place on the wrong side of the paper. . . . . . . . . . . . . . . . . . . . . . . . . . . . . . . . . . . . . . . 32
Problems Related to Peripheral Devices
• The connected USB device cannot be used. . . . . . . . . . . . . . . . . . . . . . . . . . . . . . . . . . . . . . . . . . . . . 33
• The finisher / saddle stitch finisher does not operate.. . . . . . . . . . . . . . . . . . . . . . . . . . . . . . . . . . . . . . 33
• Stapling does not take place (including pamphlet stapling). . . . . . . . . . . . . . . . . . . . . . . . . . . . . . . . . . 33
• Punching does not take place. . . . . . . . . . . . . . . . . . . . . . . . . . . . . . . . . . . . . . . . . . . . . . . . . . . . . . . . 34
• The stapling position or punch position is not correct. . . . . . . . . . . . . . . . . . . . . . . . . . . . . . . . . . . . . . 34
Other Problems
• The touch panel screen is difficult to view. . . . . . . . . . . . . . . . . . . . . . . . . . . . . . . . . . . . . . . . . . . . . . . 35
• You were logged out without having performed logout yourself. . . . . . . . . . . . . . . . . . . . . . . . . . . . . . 35
• You forgot the administrator password. . . . . . . . . . . . . . . . . . . . . . . . . . . . . . . . . . . . . . . . . . . . . . . . . 35
• When the main power is switched off, the main power indicator on the operation panel does not
turn off. . . . . . . . . . . . . . . . . . . . . . . . . . . . . . . . . . . . . . . . . . . . . . . . . . . . . . . . . . . . . . . . . . . . . . . . . . 35
Illustration of the machine . . . . . . . . . . . . . . . . . . . . . . . . . . . . . . . . . . . . . . . . . . . . . . . . . . . . . . . . . . . . 36
If you are unable to solve a problem using the solutions in this manual, switch off the [POWER] key (
) and the main
power switch. Wait at least 10 seconds, and then switch on the main power switch and the [POWER] key (
) in that
order.
* When the LINE indicator is lit or the DATA indicator is lit or blinking, do not switch off the main power switch or unplug
the power plug. This may damage the hard drive or cause the data being stored or received to be lost.
27
mx4500_gb_trb.book
28 ページ
2005年12月1日 木曜日 午後1時56分
Problems Related to Machine Operation
Problem
Point to check
Solution
Specified machine
functions cannot be
used.
Have functions been disabled by the
administrator?
Some functions may have been disabled in the system
settings (administrator). Check with your administrator.
When user authentication is enabled, the functions that
you can use and page counts may be restricted in your
user settings. Check with your administrator.
The operation panel
cannot be used.
Is the main power indicator lit?
If the main power indicator is not lit, make sure that the
power plug is firmly inserted in the power outlet, switch
the main power switch to the "on" position, and press
the [POWER] key (
) to turn on the power.
☞ Illustration of the machine (A), (D), and (J) (pages
36 and 37)
Did you just power on the machine?
After the [POWER] key (
) is turned on, the machine
requires about 80 seconds to complete warmup
operation.
During this time functions can be selected, however, a
job cannot be run. Wait until a message appears
indicating that the machine is ready.
Is the [POWER SAVE] key (
blinking?
Auto Power Shut-Off mode has activated. To return the
machine to normal operation, press the [POWER SAVE]
key (
).
☞ Illustration of the machine (A) (page 36)
28
)
Is a cover open or a device separated
from the machine?
A warning message will appear when a cover is open or
a device is separated from the machine. Read the
message and take appropriate action.
Did login fail three times in a row?
When "A Warning when Login Fails" is enabled in the
system settings (administrator) and login fails 3 times in
a row, a warning will be displayed and operation will
lock for 5 minutes. After operation unlocks, log in using
the correct user information.
If you do not know your user information, contact your
administrator.
Does a message appear indicating that
Auto Login failed?
Auto Login failed due to a problem on the network.
Contact your administrator.
If you are the administrator, touch the [Admin Password]
key, log in as an administrator, and temporarily change
the auto login settings in the system settings
(administrator). (Restore the changed settings to their
original state after the network problem has been
solved.)
mx4500_gb_trb.book
29 ページ
2005年12月1日 木曜日 午後1時56分
Problem
Point to check
Solution
The operation panel
cannot be used.
Does the message "Call for service.
Code:xx-xx*." appear in the display?
*Letters and numbers appear in xx-xx.
Make sure that the LINE indicator is not lit and that the
DATA indicator is not blinking or lit and then switch off
the [POWER] key (
) and the main power switch.
Wait at least 10 seconds and then switch the main
power switch and the [POWER] key (
) back on in
that order.
☞ Illustration of the machine (A) and (D) (page 36)
If the message still appears after switching the
[POWER] key (
) and main power switch off and on
several times, it is likely that a failure has occurred that
requires service. In this event, stop using the machine,
unplug the power plug, and contact your dealer or
nearest authorised service representative. (When
contacting your dealer or nearest authorised service
representative, inform them of the displayed error code.)
Printing is not
possible or stops
during a job.
Is a tray out of paper?
Add paper as instructed by the message in the display.
Is the machine out of toner?
When toner runs low, a message will appear to inform
you that the toner cartridge must be replaced. To
replace the toner cartridge, see "5. MAINTENANCE" in
the User's Guide.
Has a paper misfeed occurred?
Remove the misfeed as instructed by the message in
the display.
☞ REMOVING MISFEEDS (page 3)
Is the Output tray (centre tray) or Exit
tray unit (right tray) full?
When the Output tray (centre tray) or Exit tray unit (right
tray) becomes full, a detector activates and stops
printing.
Remove the output from the tray and resume printing.
☞ Illustration of the machine (B) and (C) (page 36)
Is the waste toner box full?
Replace the waste toner box as instructed by the
message in the display.
☞ "5. MAINTENANCE" in the User's Guide
In the Paper Tray Settings of the system
settings, are restrictions placed on the
trays that can be used in each mode
(copy, print, fax, Internet fax, and
document filing)?
Check the Paper Tray Settings and see if checkmarks
appear in the checkboxes of each mode. Functions
without a checkmark cannot be used for printing using
that tray.
➞ System Settings > "Paper Tray Settings" > "Tray
Settings" >
(Each mode)
Is the original curled or folded?
The correct original size cannot be detected if the
original is curled or folded. Straighten the original.
Did you place an original smaller than
A5 (5-1/2" x 8-1/2") size?
Original sizes smaller than A5 (5-1/2" x 8-1/2") cannot
be detected. Enter the original size manually.
* When scanning a small original on the document
glass, it is convenient to place a blank sheet of paper
on top of the original which is the same size (A4
(8-1/2" x 11"), B5 (8-1/2" x 11"R), etc.) as the paper
that you wish to use for printing.
The original size is not
automatically selected
or the wrong size is
selected.
29
mx4500_gb_trb.book
30 ページ
2005年12月1日 木曜日 午後1時56分
Problem
Point to check
The displayed bypass
tray paper size is not
correct.
Is the bypass tray extension pulled out?
Solution
When loading paper in the bypass tray, be sure to pull
out the extension to enable the paper size to be
detected correctly.
☞ Illustration of the machine (H) (page 36)
Problems Related to Paper Feeding and Output
Problem
The original misfeeds.
The paper misfeeds.
30
Point to check
Solution
Is the original on thin paper?
(When the automatic document feeder
is used.)
Use the document glass to scan the original. If you need
to use the automatic document feeder, use slow scan
mode in the special modes to scan the original.
Is the feed roller dirty?
Clean the surface of the original feed roller.
☞ "5. MAINTENANCE" in the User's Guide
Is a torn piece of paper remaining in the
machine?
Make sure all paper is removed.
☞ REMOVING MISFEEDS (page 3)
Is too much paper loaded in the tray?
Make sure that the stack of paper in the tray is not
higher than the indicator line.
☞ Illustration of the machine (E) (page 36)
Are multiple sheets feeding at once?
Fan the paper well before loading it.
Are you using paper that is not within
the specifications?
Use SHARP-recommended paper. Using paper that is not
supported may result in misfeeds, creases, or smudges.
☞ "SUPPLIES" in the Safety Guide
* For paper that is prohibited or not recommended, see
"USEABLE PAPER" in the User's Guide.
Has the paper in the tray absorbed
moisture?
If you will not be using paper in a tray for a long time,
remove the paper from the tray and store it in a bag in a
dark and dry location.
Are the bypass tray guides adjusted to
the width of the paper?
Adjust the bypass tray guides to the width of the paper.
☞ Illustration of the machine (F) (page 36)
Is the bypass tray extension pulled out?
When loading a large size of paper, pull out the
extension.
☞ Illustration of the machine (H) (page 36)
Is the bypass tray feed roller dirty?
Clean the surface of the bypass tray feed roller.
☞ "5. MAINTENANCE" in the User's Guide
mx4500_gb_trb.book
31 ページ
2005年12月1日 木曜日 午後1時56分
Problem
The paper misfeeds.
Point to check
Solution
Is A5 (5-1/2" x 8-1/2") size paper
loaded?
Load A5 (5-1/2" x 8-1/2") size paper in tray 1 (the first
tray), in tray 2 (the second tray), or in the bypass tray.
* When loading A5 (5-1/2" x 8-1/2") size paper in tray 1
or tray 2, place the paper in the horizontal (A5R
(5-1/2" x 8-1/2"R)) orientation.
Has the correct paper size been set?
If you are using a special size, be sure to specify the
paper size.
If the size of paper loaded in a tray was changed, be
sure to check the paper size setting.
➞ System Settings > "Paper Tray Settings" > "Tray
Settings"
Did you add paper to the bypass tray?
When adding paper, remove any paper remaining in the
tray, combine it with the paper to be added, and reload
as a single stack. If paper is added without removing the
remaining paper, a misfeed may result.
☞ Illustration of the machine (G) (page 36)
Paper does not feed
from the paper tray.
Is the paper loaded correctly in the
paper tray?
Set the guides to the size of the paper. Make sure the
height of the paper does not exceed the indicator line.
☞ Illustration of the machine (E) (page 36)
The image on paper
from the bypass tray
is skewed.
Is too much paper loaded in the tray?
Do not load more than the maximum number of sheets.
The maximum number of sheets varies depending on
the paper type setting. For more information, see
"SPECIFICATIONS" in the Safety Guide.
Are the bypass tray guides adjusted to
the width of the paper?
Adjust the bypass tray guides to the width of the paper.
☞ Illustration of the machine (F) (page 36)
Have functions been disabled by the
administrator?
Some functions may have been disabled in the system
settings (administrator). Check with your administrator.
The automatic
document feeder does
not operate.
Problems Related to Quality / Print Results
Problem
Lines appear in the
scanned image.
Smudges appear on
printed output.
Point to check
Solution
Are the scanning areas of the document
glass or automatic document feeder
dirty?
Clean the scanning areas of the document glass or
automatic document feeder?
☞ "5. MAINTENANCE" in the User's Guide
Is the bypass tray feed roller dirty?
Clean the surface of the bypass tray feed roller.
☞ "5. MAINTENANCE" in the User's Guide
Is the feed roller dirty?
Clean the surface of the original feed roller.
☞ "5. MAINTENANCE" in the User's Guide
Are you using paper that is not within
the specifications?
Use SHARP-recommended paper. Using paper that is
for other models or special paper that is not supported
may result in misfeeds, creases, or smudges.
☞ "SUPPLIES" in the Safety Guide
31
mx4500_gb_trb.book
32 ページ
2005年12月1日 木曜日 午後1時56分
Problem
Smudges appear on
printed output.
Toner does not adhere
well or creases appear
in the paper.
Point to check
Solution
Are you printing on pre-punched paper?
If the printed image overlaps the punch holes, smudges
may appear on the reverse side of the paper following
one-sided printing, or on both sides following two-sided
printing. Take care that the image does not overlap the
punch holes.
Does a message appear indicating the
need for maintenance?
Contact your dealer or nearest authorised service
representative as soon as possible.
Are you using paper that is not within
the specifications?
Use SHARP-recommended paper. Using paper that is
for other models or special paper that is not supported
may result in misfeeds, creases, or smudges.
☞ "SUPPLIES" in the Safety Guide
Did you set the correct paper type?
Set the correct paper type in the tray settings. Make
sure that the following has not occurred:
• Heavy paper is being used, but a paper type other
than heavy paper is selected in the tray settings. (The
image may disappear if rubbed.)
• Paper other than heavy paper is being used, but
heavy paper is selected in the tray settings. (This may
cause creases and misfeeds.)
➞ System Settings > "Paper Tray Settings" > "Tray
Settings"
Is the paper loaded so that printing
takes place on the reverse side?
If printing takes place on the wrong side of label sheets
or transparency film, the toner may not adhere well and
a clear image may not be obtained.
Print quality is poor.
Is toner save mode enabled?
When "Toner Save in Printer Mode" or "Toner Save in
Copy Mode" mode is enabled, printing takes place using
less toner and thus the print result is lighter. Check with
your administrator.
Part of the image is
cut off.
Has the correct paper size been set?
If you are using a special size, be sure to specify the
paper size.
If the size of paper loaded in a tray was changed, be
sure to check the paper size setting.
➞ System Settings > "Paper Tray Settings" > "Tray
Settings"
Was the original placed in the correct
position?
If you are using the document glass, be sure to place
the original in the far left corner of the document glass.
☞ Illustration of the machine (I) (page 37)
Printing takes place
on the wrong side of
the paper.
Is the paper loaded with the print side
facing in the correct direction?
• Paper tray: Load the paper with the front side facing
up. (Load "Pre-Printed" paper and "Letter
Head" paper with the front side facing
down*.)
• Bypass tray: Load the paper with the front side facing
down.
* If "Disabling of Duplex" is enabled in the system
settings (administrator), load the paper front side up.
For the current setting, check with your administrator.
32
mx4500_gb_trb.book
33 ページ
2005年12月1日 木曜日 午後1時56分
Problems Related to Peripheral Devices
Problem
Point to check
Solution
Is the USB device compatible with the
machine?
A non-compatible device cannot be used. Make sure
that the device is compatible with the machine.
Is the connected USB device
recognized correctly?
Use "USB-Device Check" in the system settings to
check whether or not the device can be recognized.
➞ System Settings > "USB-Device Check"
If it is not recognized, connect it once again.
The finisher / saddle
stitch finisher does
not operate.
Does a message appear indicating that
you need to remove paper from the
stapler compiler?
Remove all remaining paper from the stapler compiler.
Stapling does not take
place (including
pamphlet stapling).
Does a message appear instructing you
to check the staple unit?
Remove jammed staples.
☞ "4. PERIPHERAL DEVICE" in the User's Guide
Does a message appear instructing you
to add staples?
Replace the staple cartridge. Do not forget to replace
the staple case.
☞ "4. PERIPHERAL DEVICE" in the User's Guide
Is a different width of paper mixed in?
Stapling is not possible when paper of different widths
are mixed together. To perform mixed size stapling, use
paper of the same width and select the [Same Width]
setting. When copying, select [Same Width] from [Mixed
Size Original] in the special modes.
Are there more sheets than can be
stapled at once?
For the maximum number of sheets that can be stapled,
see "SPECIFICATIONS" in the Safety Guide.
Is a paper size that cannot be stapled
included in the print job?
For the paper sizes that can be stapled, see
"SPECIFICATIONS" in the Safety Guide.
Is the paper type setting of the tray
selected in the printer driver set to a
paper type that cannot be stapled?
Check the paper type settings in the machine and select
a tray that has paper that can be used for stapling. Click
the [Tray Status] button in "Paper Selection" on the
[Paper] tab of the printer properties window and check
the paper type setting of each tray.
* Stapling is not possible on labels, tab paper,
transparency film, or envelopes. In addition, if "Disable
Staple" is selected in the user type, stapling will not be
possible.
The connected USB
device cannot be
used.
33
mx4500_gb_trb.book
34 ページ
2005年12月1日 木曜日 午後1時56分
Problem
Point to check
Solution
Stapling does not take
place (including
pamphlet stapling).
Is the paper type setting of the selected
paper tray set to heavy paper?
Pamphlet stapling is not possible on heavy paper.
(However, when cover insertion is selected, pamphlet
stapling is possible when a single sheet of heavy paper
is inserted for use as a cover.)
Have functions been disabled by the
administrator?
Some functions may have been disabled in the system
settings (administrator). Check with your administrator.
Does a message appear instructing you
to check the punch module?
Dispose of punch scraps.
☞ "4. PERIPHERAL DEVICE" in the User's Guide
Is a different size of paper mixed in?
Punching is not possible when different widths of paper
are mixed together. To perform mixed size punching,
use paper of the same width and select the [Same
Width] setting. When copying, select [Same Width] for
[Mixed Size Original] in the special modes.
Is a paper size that cannot be punched
included in the print job?
For the paper sizes that can be punched, see
"SPECIFICATIONS" in the Safety Guide.
Is the tray selected in the printer driver
set to a paper type that cannot be
punched?
Check the paper type settings in the machine and select
a tray that has paper that can be used for punching.
Click the [Tray Status] button in "Paper Selection" on
the [Paper] tab of the printer properties window and
check the paper type setting of each tray.
* Punching is not possible on labels, tab paper,
transparency film, and envelopes. In addition, if
"Disable Punch" is selected in the user type, punching
will not be possible.
Have functions been disabled by the
administrator?
Some functions may have been disabled in the system
settings (administrator). Check with your administrator.
Is the stapling position set correctly?
Check the stapling position setting.
☞ "OUT PUT" in the Copier Guide
Are the punching positions set
correctly?
Check the punch position settings.
☞ "OUT PUT" in the Copier Guide
Punching does not
take place.
The stapling position
or punch position is
not correct.
34
mx4500_gb_trb.book
35 ページ
2005年12月1日 木曜日 午後1時56分
Other Problems
Problem
Point to check
Solution
The touch panel
screen is difficult to
view.
Is the display contrast properly
adjusted?
Adjust the contrast using "Display Contrast" in the
system settings.
➞ System Settings > "Default Settings" > "Display
Contrast"
You were logged out
without having
performed logout
yourself.
Did Auto Clear activate?
When user authentication is used, the currently logged
in user will be automatically logged out if Auto Clear
activates. (Except when in PC scan mode.)
Log in again.
If you are the administrator, you can change the time
setting of Auto Clear or disable Auto Clear in "Auto
Clear Setting".
➞ System Settings (Administrator) > "Operation
Settings" > "Auto Clear Setting"
You forgot the
administrator
password.
Was the administrator password
changed from the factory default
setting?
Contact your dealer or nearest authorised service
representative.
* For the factory default administrator password, see "TO
THE ADMINISTRATOR OF THE MACHINE" in the
Safety Guide. After changing the password, take special
care to remember it.
When the main power
is switched off, the
main power indicator
on the operation panel
does not turn off.
Has the power has been turned off by
pressing the [POWER] key (
) on
the operation panel and has a certain
amount of time elapsed since then?
If the main power is switched off more than
approximately one minute after the power has been
turned off by pressing the [POWER] key (
) on the
operation panel, the main power indicator on the
operation panel will not turn off immediately. (The
indicator will remain on for approximately another
minute. This is normal and does not indicate a failure.)
35
mx4500_gb_trb.book
36 ページ
2005年12月1日 木曜日 午後1時56分
Illustration of the machine
Front
LINE indicator / DATA indicator
(A) Operation panel
DOCUMENT
FILING
IMAGE SEND
COPY
Main power indicator
[POWER] key
PRINT
READY
DATA
LINE
DATA
[POWER SAVE]
key
SYSTEM
JOB STATUS SETTINGS
LOGOUT
(B) Output tray
(centre tray)
(C) Exit tray unit
(right tray)
(F)
"On"
position
"Off"
position
(G)
(D) Main power switch
(H)
(E) Indicator
line
36
Bypass tray
mx4500_gb_trb.book
37 ページ
2005年12月1日 木曜日 午後1時56分
Back
(I) Original placement position on the document glass
Mark
A5 or
5-1/2" x 8-1/2"
B4 or
B5
8-1/2" x 14"
A4 or 8-1/2" x 11" A3 or 11" x 17"
Mark
B5R
A4R or 8-1/2" x 11"R
(J) Power plug
(K) USB connector (A type)
(L) USB connector (B type)
(M) LAN connector
The part indicated in the illustration is only
to be handled by a service technician.
37
mx4500_gb_trb.book
38 ページ
2005年12月1日 木曜日 午後1時56分
mx4500_gb_trb.book
39 ページ
2005年12月1日 木曜日 午後1時56分
mx4500_gb_trb.book
40 ページ
2005年12月1日 木曜日 午後1時56分
mx4500_gb_trb.book
1 ページ
2005年12月1日 木曜日 午後1時56分
mx4500_gb_trb.book
2 ページ
2005年12月1日 木曜日 午後1時56分
Troubleshooting
MODEL: MX-2300N MX-3500N
MX-2700N MX-3501N
MX-4500N
MX-4501N
PRINTED IN FRANCE
TINSE3247GHZZ