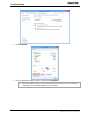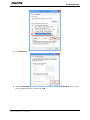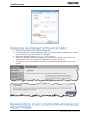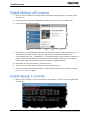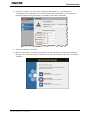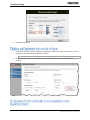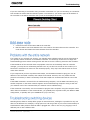
1
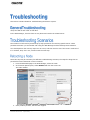
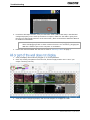
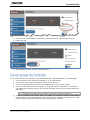
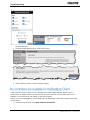
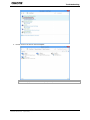
020-101186-01 020-101186-01 이 기기는 업무용 급 으로 전자파적합등록을 한 기기이오니 판매자 또는 사용자는 이점을 주의하시기 바라며 가정 외의 지역에서 사용하는 것을 목적으로 합니다 Table of Contents About this Document ............................................................................................................ 1 Document Conventions ...................................................................................................... 1 Audience ............................................................................................................................ 1 Related Documents ............................................................................................................ 1 System Overview .................................................................................................................. 3 Quick Facts......................................................................................................................... 3 Troubleshooting .................................................................................................................... 5 General Troubleshooting .................................................................................................... 5 Troubleshooting Scenarios ................................................................................................. 5 Rebooting a Node ............................................................................................................ 5 Source does not display on a wall.................................................................................... 6 Cannot hear audio from a source ..................................................................................... 7 Cannot interact with a source on a wall........................................................................... 9 All or part of the wall does not display .......................................................................... 10 Cannot access the Controller ......................................................................................... 11 No controllers are available for the Desktop Client ........................................................ 12 No sources are displayed on the wall simulator ............................................................ 16 Received a Sorry, an error occurred while processing your request message ............... 16 A Still Source is not working.......................................................................................... 17 A VNC Source is not working ......................................................................................... 17 A Remote Desktop source is not working ...................................................................... 19 A RTSP source is not working ........................................................................................ 21 Video is Pixelated or Green ........................................................................................... 21 Unable to interact with a source .................................................................................... 22 Unable to assign a controller ......................................................................................... 22 Display wall appears torn or out of sync ........................................................................ 24 IP address for the controller is not available in the Desktop Client ............................... 24 Add a new node ............................................................................................................. 25 Problems with the entire network ................................................................................. 25 Troubleshooting switching devices ................................................................................ 25 Technical Notes ................................................................................................................... 27 Refresh Thumbnails ......................................................................................................... 27 Internet Information Server (IIS) Setup for Web Manager .............................................. 27 Index .................................................................................................................................. 29 Phoenix System Troubleshooting Guide 020-101186-01 Rev. 1 (09-2013) i This page has been left intentionally blank. ii Phoenix System Troubleshooting Guide 020-101186-01 Rev. 1 (09-2013) This manual provides general troubleshooting instructions for the Phoenix system. The instructions assume the user is adequately familiar with the software and hardware interfaces for this product and with networking. The procedures in this document assume a certain level of knowledge of electronics and safety guidelines. The following format conventions are used in this document to identify special information: Caution statements identify conditions or practices that could result in personal injury. Notice statements identify conditions or practices that could result in damage to equipment or loss of data. The graphical illustrations in this document are for example purposes only and the hardware illustrated may differ from your hardware. Variable text that is entered by a user is italicized in this document (for example, in the text, Phoenix6-digit serial number, the 6-digit serial number would be replaced by the actual serial number). The primary audience for this document is the person who troubleshoots the Phoenix system. The following documents may be useful references: Phoenix System Reference Guide, document number MAN-10115 Phoenix System Quick Start Guide, document number MAN-10116 Phoenix System External Control Protocol Reference Manual, document number MAN-10117 Phoenix System Troubleshooting Guide 020-101186-01 Rev. 1 (09-2013) 1 About this Document This page has been left intentionally blank. 2 Phoenix System Troubleshooting Guide 020-101186-01 Rev. 1 (09-2013) The Phoenix system is a content management system that enables users to securely access and control audio-visual data from anywhere, at any time, via standard IP networking technology. The Phoenix system is based on a single hardware appliance, the Phoenix Node, and a robust multitiered software environment. The Phoenix-managed content is distributed throughout an organization via standard IP networking technology, providing comprehensive tools to view, listen, and interact with any source or information. The Phoenix system consists of one or more Phoenix hardware nodes as well as software connected through your Ethernet network. The Phoenix System encodes and decodes sources. It accepts an input source, such as from a Blu-Ray player or a remote computer, and encodes it into the H.264 industry standard for media. It then transmits the signal over the network via multicasting to its destination and then decodes it back to a raw video signal over DVI. These facts should help you understand some of the capabilities of the Phoenix system: A node can perform more than one role; it can be a controller, decoder, and encoder. One node is assigned as the controller for a Phoenix system. A controller manages up to 64 nodes. A wall supports up to 128 outputs. A wall can display 12 sources per node. Sources are shared between all nodes. Each node has two DVI inputs and two outputs. One node can decode to two displays. The Phoenix system has three user interfaces: Controller Manager, Web Manager, and Desktop Client. Only users that are assigned with the administrator role can access the Web Manager. A Phoenix system can be configured to encode DVI sources, RTSP sources, Remote Desktop sources, VNC sources, and Still images. The maximum resolution supported for sources that are encoded by a Phoenix node is 1080p @30Hz. The maximum output resolution supported is 2560x1600 @60Hz. DVI sources are connected to the Phoenix node via DVI cables, all other source types are connected via a network. Audio is supported on Phoenix DVI sources and RTSP sources. Wall audio is available through all of the audio-enabled decoding sources on the wall; but you can only listen to one audio source. The audio source for the wall can be changed at any time. Phoenix System Troubleshooting Guide 020-101186-01 Rev. 1 (09-2013) 3 System Overview This page has been left intentionally blank. 4 Phoenix System Troubleshooting Guide 020-101186-01 Rev. 1 (09-2013) This section contains details for troubleshooting the Phoenix system. Verify the LED on each node is solid blue. In the Web Manager, check if there are any alerts and resolve the related issues. The scenarios in this section provide step-by-step procedures for resolving specific issues. These procedures assume you are familiar with using the Web Manager and the Desktop Client software. You should perform the recovery steps one at a time, and then check to see if the issue is resolved. If it is resolved, stop. If it is not, continue with the next step. Since this step may be necessary for different troubleshooting scenarios, the steps for doing this are provided here and referenced in other scenarios. 1. From the Edit Node page in the Web Manager, select the node. 2. In the Power Options pane, select Restart and click the arrow icon. The node restarts. 3. If the problem persists, call technical support. Phoenix System Troubleshooting Guide 020-101186-01 Rev. 1 (09-2013) 5 Troubleshooting 1. Make sure the source is powered on and operating normally. 2. From the Sources list in the Desktop Manager, double-click the source that is not being displayed. 3. Verify the source is being played (encoded) on your computer. 4. Navigate to the Source page in the Web Manager. 5. Click on the source and verify the source is configured properly. a. Check the associated input node and verify it is online and assigned to your controller. b. Verify the node is encoding. 6. Check the DVI connections and adapters from the source to the input connectors of the node. 7. Reset the Decoder Network Stream in the Desktop Manager. 6 Phoenix System Troubleshooting Guide 020-101186-01 Rev. 1 (09-2013) Troubleshooting 8. Reboot the node associated with the source. Refer to Rebooting a Node, page 5. Audio is supported on RTSP Stream and Phoenix DVI Input sources. 1. Verify the source is selected as the audio source for the wall. 2. Open the audio for the source and verify you can hear it. Phoenix System Troubleshooting Guide 020-101186-01 Rev. 1 (09-2013) 7 Troubleshooting 3. Verify the source is configured for audio and the settings are correct. 4. Verify the audio cabling/adapters are configured properly for audio input and output. Refer to the Phoenix Reference Manual for more information. Tip: If audio can be heard from other sources on the wall, there is a problem between your source and the node. If audio cannot be heard from any source, there is a problem between the node and the speakers/amplifier. 5. Verify the settings and the volume controls on all audio devices are set correctly. 8 Phoenix System Troubleshooting Guide 020-101186-01 Rev. 1 (09-2013) Troubleshooting Tip: A source, such as a desktop computer, may have its own volume control that is simply turned down too low. Check if the computer source has a set of speakers that may have a volume knob. On larger systems, check any attached amplifiers. 6. Reboot the node associated with the source. Refer to Rebooting a Node on page 5. Interaction is supported on Phoenix DVI Input, Remote Desktop, and VNC sources. 1. Verify Interaction is allowed for the source. 2. Verify you are in Interaction Mode and engaged in a session with the source. 3. Once engaged in Interaction Mode, click on the mouse cursor icon located on the top right corner of the source on the actual wall. This will allow you to interact with the source. Phoenix System Troubleshooting Guide 020-101186-01 Rev. 1 (09-2013) 9 Troubleshooting 4. For Phoenix DVI Input sources, verify an interaction cable (USB to Mini USB) is installed and configured properly on the node (if the DVI is on input B, make sure the cable is going from the source to the KVM B connector on the same node.) Refer to the Phoenix Reference Manual for additional information. Tip: As with all computers, USB devices and drivers often fail. Unplugging a USB from the device and plugging it back in often resolves the issue. You can also try plugging the USB into a different port on the computer or workstation. 5. Reboot the node associated with the source. Refer to Rebooting a Node on page 5. 1. Verify all displays and nodes are plugged in, on, and operational. 2. Clear any existing test patterns from the wall, and then apply another one to see if your output is working correctly. 3. Verify the wall is configured properly and the node outputs are mapped to a wall. 10 Phoenix System Troubleshooting Guide 020-101186-01 Rev. 1 (09-2013) Troubleshooting 4. Verify the DVI cabling/adapters are properly configured and the signal strength is good. 5. Reboot the wall. 6. If the problem persists, contact technical support. If you cannot connect to a controller in the Desktop Manager, Controller Manager, or Web Manager: 1. Verify all devices in the system are plugged in, on, and operational. 2. Your network may be down temporarily. Verify you can access it. 3. Verify your IP settings as well as other IP configurations on your network devices. 4. If you are connected wirelessly (using Wi-Fi), verify your wireless connection is connected to your LAN and not another network. The wireless connection cannot be your preferred Internet connection. Tip: Multicasting over Wi-Fi can be sensitive, and must be configured properly. 5. Verify your software is up to date. When you update your controller software via the Update System option on the Global Settings page, you should be prompted to download the most current software when you attempt to use the Desktop Client software. Phoenix System Troubleshooting Guide 020-101186-01 Rev. 1 (09-2013) 11 Troubleshooting 6. If the versions do not match, download the Desktop Client software from the sign in page in the Web Manager. 7. From the Global Settings page, restart the system. 8. If the problem persists, contact technical support. If the computer you are using to run the Desktop Client has multiple network adapters and is connected to an adapter that is not connected to the correct network, the controller may not be available or the sources may not display on the wall simulator. Change your network adapter for the Desktop Client by disabling the automatic configuration of the routing metric: 1. From the Control Panel, click View network connections. 12 Phoenix System Troubleshooting Guide 020-101186-01 Rev. 1 (09-2013) Troubleshooting 2. Double-click on the active network adapter. Tip: To verify your active network adapter, view your basic network information. Phoenix System Troubleshooting Guide 020-101186-01 Rev. 1 (09-2013) 13 Troubleshooting 3. Click Properties. 4. Click the appropriate TCP/IP version, and then click Properties. Tip: 14 Select by clicking the text, not the check box to the left of the text. If you clear the checkmark, you will disable TCP/IP on your computer. Phoenix System Troubleshooting Guide 020-101186-01 Rev. 1 (09-2013) Troubleshooting 5. Click Advanced. 6. Clear the Automatic metric check box, add a priority in the Interface metric field (1 is the first and highest priority), and then click OK. Phoenix System Troubleshooting Guide 020-101186-01 Rev. 1 (09-2013) 15 Troubleshooting 1. Verify there are sources on the physical display wall. 2. From the Nodes list in the Web Manager, select the controller that is controlling your system. If you receive an error, the controller is unavailable. 3. Reboot the controller. Refer to Rebooting a Node on page 5. 4. Verify the controller is operating normally by viewing the node profile. Verify there are no communication errors or critical alerts (temperature, memory, load, etc.). 5. If all appears to be normal with the controller, from the Global Settings page, restart the system. 16 Phoenix System Troubleshooting Guide 020-101186-01 Rev. 1 (09-2013) Troubleshooting If you received this message in the Web Manager when attempting to view a node profile, possible causes are: When displayed on the… Probable Cause Metrics tab The background diagnostics results where unavailable for the node. Utilization tab One of the following: Decoding tab Encoding or Notes tab The node could not be found on the network. The utilization for the node was unavailable. One of the following: The node could not be found on the network The output configuration for the node was unavailable. The decoding information for the node was unavailable. The node could not be found on the network. To recover from this condition: 1. Check the network connector on the node. 2. Verify the node is available on the network (e.g., use a ping command). 3. Check the configuration for the node. It is possible the image was corrupted. Edit the source profile and upload the image file. 1. Verify the source is on and operational. 2. Verify the VNC server is running on the source. You can check this by logging onto the source machine and using the task manager to verify the TightVNC Server is running on the machine. Phoenix System Troubleshooting Guide 020-101186-01 Rev. 1 (09-2013) 17 Troubleshooting 3. Attempt to login to the VNC machine from your computer. 4. In the Web Manager, verify all information (IP address, password or port number) is correct on the source page and verify interaction is allowed. 5. After everything has been verified, reboot the Phoenix system. 18 Phoenix System Troubleshooting Guide 020-101186-01 Rev. 1 (09-2013) Troubleshooting 1. Verify the source is powered on and operating normally. 2. Verify there is no other user currently logged into the remote machine. Remote computer only allows one user at a time to connect. 3. Verify Remote Desktop is enabled on the source machine (from the control panel, click System, and then click on Remote Settings.) Phoenix System Troubleshooting Guide 020-101186-01 Rev. 1 (09-2013) 19 Troubleshooting 4. Verify all information (user name, password, address, and port) is correct on the Source page and verify interaction is allowed. 5. Check your Windows firewall settings to make sure it is not blocking the Remote Desktop Protocol. If it is, you can manually add an exception to the firewall exceptions list. 6. Attempt to connect to the source using Remote Desktop software from your computer. 7. If all steps have been verified, reboot the node associated with the source. Refer to Rebooting a Node, page 5. 20 Phoenix System Troubleshooting Guide 020-101186-01 Rev. 1 (09-2013) Troubleshooting 1. Verify the source is on and operating normally. 2. Attempt to login to the source by typing the IP address of the source in your browser’s address field. 3. Verify the settings for the source. This will differ for each manufacturer. You should verify the main settings (including the IP addresses, username, and password) and verify any multicast settings on the camera are enabled. 4. Verify the settings for the source page in the Web Manager. The settings should have the correct information from step 3. 5. Verify the Video File Name from the manufacturer matches the file name in the source profile. The file name can usually be found in the product’s documentation. Often an administrator is required to configure the product. The file name provides a path to the RTSP stream. 6. Reboot the source. 7. Reboot the node associated with the source. Refer to Rebooting a Node, page 5. This is usually caused by a faulty connection. Possible causes include: The cable run could be too long. The DVI adapters may be faulty. There may be noise from high voltage devices or power inductions from faulty grounds. The EDID configuration may be incorrect. 1. Check all connections between the node and the source and the controller. 2. Verify the video display resolution is set correctly. 3. Verify the resolution of the source. 4. Verify your EDID configuration. 5. Restart the source. Phoenix System Troubleshooting Guide 020-101186-01 Rev. 1 (09-2013) 21 Troubleshooting 1. Verify you are in interaction mode and have selected the interaction icon on the wall (Green Mouse Icon). 2. From the Source List in the Web Manager, select the source you wish to interact with. 3. Verify interaction mode is enabled. 4. If the source is a HID-capable device that is configured as a Phoenix DVI Input source (e.g., a workstation connected via DVI), verify the USB to Mini USB cable is connected to the corresponding input (e.g., if workstation 1 is connected through a DVI connector on Node 2 on input B, make sure the USB is also connected from the USB port from the source to Node 2, input B KVM). Refer to the Phoenix Reference Manual for additional details. 5. If hardware is connected properly, restart the source. 6. After the source is back online, attempt to interact with the source. 7. If you still cannot interact with the source, reboot the node the source is connected to. Refer to Rebooting a Node on page 5. 1. Make sure the controller is on and connected to the network. You can use the ping command to verify this. 22 Phoenix System Troubleshooting Guide 020-101186-01 Rev. 1 (09-2013) Troubleshooting 2. Verify the controller is on the correct network ID and subnet (e.g., your laptop and environment are on 192.168.xxx.xxx with a subnet mask of 255.255.0.0). The nodes and network should be configured properly, preferably on the same network ID. 3. Verify the software is up to date. 4. Make sure the node is not already a controller. You can verify this by opening the Controller Manager, then select Un-assign a Controller. If you see the controller in the list, it is already a controller. Phoenix System Troubleshooting Guide 020-101186-01 Rev. 1 (09-2013) 23 Troubleshooting 5. Restart the controller. 1. Verify the nodes are synched together using the sync cable in the right configuration. Refer to the Phoenix System Reference Manual for details. Tip: VESA format is recommended when frame synchronization is enabled. 2. On the Edit Wall page in the Web Manager, verify the Enable Frame Synchronization is enabled. 24 Phoenix System Troubleshooting Guide 020-101186-01 Rev. 1 (09-2013) Troubleshooting If you are connecting to a controller using a wireless connection or if you are connecting to a controller from outside the subnet that the Phoenix system is connected to, you need to type the IP address of the controller in the Select Controller field (it will not be displayed in the list). 1. Connect the node to the same LAN as the controller. 2. Edit the Node to set the IP address of the new node to the same subnet as the controller. The node reboots and obtains the latest software from the controller. If no nodes on your network can connect, you probably have problems with the server functioning as your primary domain controller or the Phoenix controller. You should go to this server to begin the troubleshooting process. When existing issues with the server are resolved, proceed to the controller. If the IP address of the controller does not populate in the lists in the desktop client or controller manager, you may have a multicasting network issue. If you don’t see a node on the node list, it is because the nodes did not connect to the network properly. They may have subnet issues or issues within their network. If you suspect that you have a problem with TCP/IP, use the PING command to ping your own IP address. If the command succeeds, then TCP/IP is functional. However, this only means that the protocol is functional; it doesn't necessarily mean that TCP/IP can communicate with the rest of the world. If the PING command is successful for the malfunctioning computer, use the PING command to ping another computer on the same network segment as the malfunctioning computer. Doing so will test your network card. If the command fails, the network card is malfunctioning. If the command is successful, use the command to ping the same computer using the computer name rather than its IP address. If the command fails, you probably have a problem with your WINS or DNS configuration, or possibly with your LMHOSTS file (if you use one). Switching device failures usually affect groups of network devices, although it is possible for only one device to be affected. For example, a single port on a hub can go bad. If you've tried unsuccessfully to troubleshoot a cable problem and that cable is plugged into a hub on one end, try plugging it into a different port or into a different hub. Phoenix System Troubleshooting Guide 020-101186-01 Rev. 1 (09-2013) 25 Troubleshooting This page has been left intentionally blank. 26 Phoenix System Troubleshooting Guide 020-101186-01 Rev. 1 (09-2013) This section contains useful information that describes some of the technical details for the Phoenix system. The refresh interval for updating thumbnails is relative to the system load. The thumbnails are updated for up to 25 sources at one time. If you have more than 25 sources to refresh, the thumbnails will be refreshed in batches of 25. Valid values are never, less frequently (every 75 seconds), normal (every 60 seconds), or more frequently (every 45 seconds). For example, if you have 50 sources with a refresh interval of normal, the first 25 sources will be updated every 60 seconds and the remaining sources will be updated after the first 25 complete the update. Windows Features: .NET Framework 4.5 Advanced Services -ASP.NET 4.5 -WCF Services -HTTP Activation -TCP Port Sharing Internet Information Services Word Wide Web Services Application Development Features .NET Extensibility 4.5 ASP.NET 4.5 ISAPI Extensions ISAPI Filters WebSocket Protocol Common HTTP Features Default Document HTTP Errors Static Content Internet Information Services Hostable Web Core Phoenix System Troubleshooting Guide 020-101186-01 Rev. 1 (09-2013) 27 Technical Notes IIS Configuration: Application Pools -> DefaultAppPool->Advanced Settings Process Model->Identity: should be an admin account for the box (something like PHOENIX….). Requires username/password Sites->DefaultWebSite Authentication->Anonymous Authentication Set to Application pool identity Authentication->Forms Authentication Set to Enabled Permissions: C:\Applications\Phoenix\Version x.x.x\WebClient Right Click->Properties->Security (Tab) Add: IIS_IUSRS IIS AppPool\DefaultAppPool 28 Phoenix System Troubleshooting Guide 020-101186-01 Rev. 1 (09-2013) audio, 7 interaction, 9 controller no audio, 7 assignment, 22 Desktop Client, 12 IP address, 24 no access, 11 display wall out of sync, 24 torn, 24 document conventions, 1 error processing request, 16 IIS, 27 not displayed on wall, 6 source VNC, 17 source Remote Desktop, 19 source RTSP, 21 source interaction, 22 sources wall simulator, 16 interaction, 9, 22 still source, 17 network, 25 switches, 25 network adapter, 12 thumbnails no access to UI, 11 node refresh, 27 troubleshooting, 5 add, 25 UI, 11 reboot, 5 video, 21 reboot node, 5 green, 21 references, 1 pixelated, 21 Remote Desktop source, 19 VNC source, 17 routing metric, 12 wall RTSP source, 21 not displayed, 10 source source not displayed, 6 still, 17 source Phoenix System Troubleshooting Guide 020-101186-01 Rev. 1 (09-2013) wall simulator sources, 16 29 Index This page has been left intentionally blank. 30 Phoenix System Troubleshooting Guide 020-101186-01 Rev. 1 (09-2013) Index 32 Phoenix System Troubleshooting Guide 020-101186-01 Rev. 1 (09-2013)