1
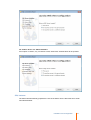
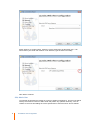
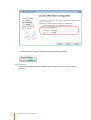
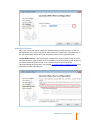
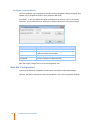
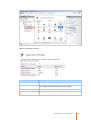
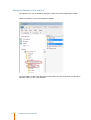
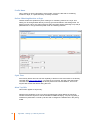
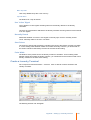
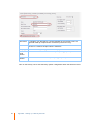
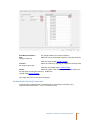
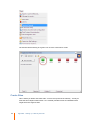
Laundry Monitor
Installation and User Guide
www.monitorbm.com
Laundry Monitor Installation and User Guide
Copyright © 2014 Monitor Business Machines Ltd
The software contains proprietary information of Monitor
Business Machines Ltd. It is provided under a license
agreement containing restrictions on use and
disclosure and is also protected by copyright law.
Reverse engineering of the software is prohibited.
Information in this document is subject to change
without notice. Companies, names, and data used in
examples herein are fictitious unless otherwise noted.
No part of this document may be reproduced or
transmitted in any form or by any means, electronic or
mechanical, for any purpose, without the express written
permission of Monitor Business Machines Ltd.
All rights reserved. No part of this work may be
reproduced in any form or by any means - graphic,
electronic, or mechanical, including photocopying,
recording, taping, or information storage and retrieval
systems - without the written permission of the
publisher.
While every precaution has been taken in the
preparation of this document, the publisher and the
author assume no responsibility for errors or
omissions, or for damages resulting from the use of
information contained in this document or from the use
of programs and source code that may accompany it. In
no event shall the publisher and the author be liable for
any loss of profit or any other commercial damage
caused or alleged to have been caused directly or
indirectly by this document.
Monitor Business Machines Ltd.
31a Normanby Road,
Mt Eden, Auckland 1024,
NEW ZEALAND
Published: 3/04/2014
The Monitor Logo and Supervisor™ are registered
trademarks of Monitor Business Machines Ltd.
Any other products that are referred to in this document
may be either trademarks and/or registered trademarks
of the respective owners. The publisher and the author
make no claim to these trademarks.
Contents
Introduction
1
Product Requirements
................................................................................................................................... 1
Installation and Configuration
2
Installing the Laundry Monitor Website................................................................................................................................... 2
SQL Configuration Wizard
......................................................................................................................................................... 7
SQL Server Location.................................................................................................................................................. 7
SQL Instance
.................................................................................................................................................. 8
SQL Admin User
.................................................................................................................................................. 9
SQL Database
.................................................................................................................................................. 11
Application SQL User
.................................................................................................................................................. 12
Confirm Settings .................................................................................................................................................. 14
Configure Laundry Monitor
......................................................................................................................................................... 15
Web Site Configuration
................................................................................................................................... 15
Altering the Website's.........................................................................................................................................................
Look and Feel
17
Appendix - Setting up a laundry terminal
Create Laundry Profiles
18
................................................................................................................................... 18
Create Wash and Dryer
.........................................................................................................................................................
Profiles
18
Profile Name
.................................................................................................................................................. 19
Define if Washing Machine
..................................................................................................................................................
or Dryer
19
Cycle Time
.................................................................................................................................................. 19
Allow Top Offs
.................................................................................................................................................. 19
Max Top Offs ........................................................................................................................................... 20
Top Off Time
........................................................................................................................................... 20
Use 'In Use' Signal .................................................................................................................................................. 20
Normally Closed .................................................................................................................................................. 20
Start Pulses
.................................................................................................................................................. 20
Pulse Width
.................................................................................................................................................. 20
Create a Laundry Terminal
................................................................................................................................... 20
Confirm ActiveTerminal
.........................................................................................................................................................
Connection
22
Create Sites
Create Locations
................................................................................................................................... 23
................................................................................................................................... 24
Contents
i
Introduction
Laundry Monitor is a web page that allows a user to view available laundry machines at any
time.
The default location for the web site is http://ServerName/LaundryMonitor. however this can be
manually configured as required.
Product Requirements
The product requires the following:
· Windows 7 or later OS
· Supervisor Net 7.3.0 or later
· 1 x LWV - Laundry Monitor Supervisor Net registration
1
Introduction
Installation and Configuration
Installing the Laundry Monitor Website
Run the setup file Laundry Monitor Setup.exe.
Click Next to continue.
Installation and Configuration
2
During the installation process, you can choose to install the files to a different location or as
recommended.
3
Installation and Configuration
By default the setup will be saved in the Supervisor Net folder. Select Next to continue.
Tick the following additional tasks to allow the wizard to automatically configure Firewall
settings, Server and SQL Connection settings.
· It is recommended that Configure Windows Firewall and Configure SQL Connection both be
ticked..
By ticking Configure Windows Firewall, the wizard will automatically create the firewall security
of Inbound and Outbound rules for window firewall with the Laundry Monitor software.
Installation and Configuration
4
Select Install to continue.
When prompted by the Configuration pop-up click on TEST to check that the default setting is
connection is working.
5
Installation and Configuration
Click on OK once successful connection is confirmed.
Click on Finish to complete the Setup Wizard.
Installation and Configuration
6
SQL Configuration Wizard
The Monitor SQL Configuration wizard walks you through the process to connect to the SQL
database.
SQL Server Location
Choose the server that SQL Server is installed on. Note that for this to work, the firewall on the
SQL Server must be configured correctly, the SQL browser service should be running, and
SQL Server configured to allow incoming connections.
This Server
Tells the wizard that SQL Server is running on the same server as the Laundry Monitor web
site.
On another sever in the same domain
If this option is chosen, connection to SQL Server via Trusted Authentication as well as SQL
Authentication will be possible.
7
Installation and Configuration
On another server in a different domain
If this option is chosen, only connection to SQL Server SQL Authentication will be possible.
SQL Instance
The wizard will automatically populate the name of the Server into the field if the same server
was selected earlier.
Installation and Configuration
8
If SQL Server is on another server, select the correct server from the drop down box. If for
some reason your server and instance is not detected, type the value in manually.
Click Next to continue.
SQL Admin User
You will then be prompted to choose an account to perform maintenance. This account will be
used by the wizard to connect to SQL server and perform any updates necessary, such as
creation of accounts and adding the correct permissions to those accounts. This is not the
9
Installation and Configuration
account used by the application during normal operation. That account is chosen later on.
Trusted Authentication - The account currently logged into the PC will be used to connect to
SQL Server. If this option is used, you have to ensure that your current login has 'DB Owner'
rights to the SupervisorNet database.
This option will appear grayed out if you selected On another server in a different domain in the
SQL Server Location step earlier on.
SQL Username/ Password - This allows you to use an existing SQL account Username and
Password for maintenance access. This account must have 'DB Owner' rights to the
SupervisorNet database.
Installation and Configuration
10
The wizard will then proceed to validate the credentials before proceeding.
SQL Database
Select the desired Supervisor Net database from the drop down menu, then click Next to
continue.
11
Installation and Configuration
Application SQL User
This is the account that will be used by the application during normal operation. As this is a
web application, the account used will be determined by the configuration of the application in
IIS. The wizard will by default use the IIS APPPOOL account for the application pool.
Trusted Authentication - Will automatically configure SQL Server to grant access to the IIS
APPOOL\Supervisor AppPool Net4 account (If installed on the same server as SQL Server), or
the domain\machine$ account if SQL is on a separate server in the same domain.
This option will appear grayed out if you selected On another server in a different domain in the
SQL Server Location step earlier on.
Installation and Configuration
12
SQL Username/ Password - This allows you to enter a SQL account Username and
Password.
If the account does not already exist, the wizard will give you the option of creating it.
When prompted re-enter the new SQL user password then click OK. The wizard will
automatically create this user account in SQL with the correct permissions.
13
Installation and Configuration
Confirm Settings
At the completion of the wizard steps a confirmation will be displayed showing the Server,
Database and User that Laundry Monitor will connect to SQL.
Example of Trusted Authentication
Example of SQL Username/ Password
If correct, click on Finish. If you wish to modify any of the details click Back .
Installation and Configuration
14
Configure Laundry Monitor
Once the installation has completed, the Laundry Monitor configuration dialog will appear. This
enables you to configure the location of the Supervisor Net server.
If necessary, un-tick Use Default and enter the desired Server and Port. (This is not usually
necessary, and we recommend you leave this as default unless there's a very good reason!)
Option
Description
Server
The name of the Supervisor Net server
Port
The port that Supervisor Net is listening to requests on. It
is advised to leave this as default
Use Default (Port)
Uses the system default value (16000) for the port
Test Button
Tests the connection to Supervisor Net
Click OK to apply changes and to close the configuration tool.
Web Site Configuration
To access the website's configuration install Internet Information Services (IIS) Manager.
Open IIS, drill down to site level to locate Laundry Monitor, then click on Application Settings.
15
Installation and Configuration
Open the Application Settings.
Parameter
Description
ClientValidationEnabled
Reserved - Do not alter
SupervisorPort
The port number that Supervisor Net is listening on. By default
this is 16000 and should normally not be changed.
SupervisorServer
The server name of the server running Supervisor Net.
UnobtrustiveJavaScriptEnabl Reserved - Do not alter
ed
Installation and Configuration
16
Altering the Website's Look and Feel
The website's look can be altered by editing the custom.css file and replacing the images.
These are located in c:\mbm\LaundryMonitor\Content
The other folders contain more advanced content and it is not recommend that you attempt to
alter this unless you are a web developer.
17
Installation and Configuration
Appendix - Setting up a laundry terminal
The following are required to be created in Supervisor Net Administrator
· Terminal - The physical terminal record that the laundry controller uses when connected to
Supervisor Net
· Laundry Profiles - Configuration parameters for the laundry device which is connected to the
laundry controller. Contains information such as the session duration and number of pulses
required to start the laundry machine, etc.
Create Laundry Profiles
Go to Supervisor Net Administrator > Laundry. Click on Laundry Profiles to create washer and
dryer profiles.
Create Wash and Dryer Profiles
Click on New to create a Wash Profile.
You can create multiple wash or dryer profiles to reflect the different laundry machines
connected to the laundry controller. Usually a single controller only has a couple of different
device types connected to it, so only a couple of profiles are required.
Appendix - Setting up a laundry terminal
18
Profile Name
This is where you enter a description of the Profile, such as the fact that it's a washing
machine or dryer, or a particular family of laundry machines.
Define if Washing Machine or Dryer
Choose whether this profile that you're creating is for a washing machine or a dryer. This
setting can be changed either directly in the top grid or down below in the settings area. If a
device is set as a dryer, the option Allow Top Offs (And other options pertaining to top offs) is
paid attention to. It is ignored if the profile is set as a washing machine.
Cycle Time
If the laundry device does not have the capability to feed its in-use status back to the laundry
controller (See Use 'In Use' Signal), you must set a cycle time. This will cause the laundry
controller to keep track of how long the laundry device has been activated for, and not let
anyone else activate that device during this time.
Allow Top Offs
This function applies to dryers only.
Following the completion of the cycle time (set above) this setting defines the maximum
number of times the dryer time can be extended for additional drying. A top off is typically a
smaller time period than a normal cycle time and is charged at a different rate in the pricing
model.
19
Appendix - Setting up a laundry terminal
Max Top Offs
How many additional top offs a user can buy.
Top Off Time
The duration for a top off session.
Use 'In Use' Signal
Tick to define if 'In Use' signals are being sent from the laundry devices to the laundry
controllers.
Un-tick if any of the devices attached to the laundry terminals are using session timers instead
of 'in use' signals.
Normally Closed
Determines whether or not the In Use Signal is normally open circuit or normally closed
circuit. 'Normally' refers to the not in use state.
Start Pulses
The number of pulses that the laundry controller must send to the laundry machine to activate
it. As this setting varies between makes and models of laundry machine, you should refer to
the service manual of that laundry machine for the value of this setting.
Pulse Width
The duration of the pulses sent to the laundry machine to activate it. As this setting varies
between makes and models of laundry machine, you should refer to the service manual of that
laundry machine for the value of this setting.
Create a Laundry Terminal
Go to Supervisor Net Administrator > Terminal. Click on New to create a Terminal to the
Laundry Controller.
The following General Tab will appear.
Appendix - Setting up a laundry terminal
20
Terminal ID
A mandatory key field which is a unique identifier for the terminal. This is a 3
digit field made up of alpha numeric characters (0-9 and A-Z only).
Name
A field that is used to descriptively indicate where the terminal is and/or what it’s
function is. Limited to 20 alpha numeric characters.
Setup Type Select the Laundry Setup type from the Setup options.
Terminal
Serial
Number
Enter the Serial Number of the Terminal. (For reporting purposes)
Device Serial Enter the Device Serial Number. (For reporting purposes)
Number
Click on the Laundry Tab to view the laundry specific configuration within the terminal's record.
21
Appendix - Setting up a laundry terminal
First Machine Number:
Any 2-digit number in the start of sequence
Site:
using the arrow key.
Select the site by selecting an option from the drop down list
Sites are created under Laundry Profiles.
Location:
list using the arrow key.
Select the location by selecting an option from the drop down
Locations are created under Laundry Profiles.
Profile:
Select the profile of the machine by selecting an option from
the drop down list using the arrow key. Profiles are
created under Laundry Profiles.
Click Apply then Save to exit terminal settings
Confirm ActiveTerminal Connection
To test that the created terminal in Supervisor Net is connecting successfully, go to
Supervisor Net Administrator > Tools > Terminal Console.
Appendix - Setting up a laundry terminal
22
The terminal will be showing as a green icon once the connection is active.
Create Sites
This is where you define and create sites. A site is the top level of the heirachy - usually an
area that has multiple location within it. It is however possible to have an installation with a
single site and a single location.
23
Appendix - Setting up a laundry terminal
Click on the Locations Tab under Supervisor Net Administrator > Laundry Profiles. Then click
on New to create a Site.
The Create New Site dialog will appear. Enter in the Site name, description and optionally a
picture.
Create Locations
This is where you define and create Locations within a site. An example of a location is a floor
in a building, or a laundry room on a campus.
Highlight the site first, then click on New to create a New Location.
Appendix - Setting up a laundry terminal
24
The Create New Location dialog will appear. Enter in the location name and description. Then
click OK to save.
25
Appendix - Setting up a laundry terminal
Appendix - Setting up a laundry terminal
26
Monitor Business Machines Ltd
31a Normanby Road,
Mt Eden, Auckland 1024,
New Zealand.
Phone: +64 9 623 5000
Web: www.monitorbm.com