1
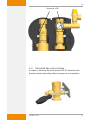
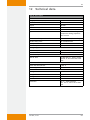
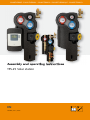
SOLARTHERMIE - SOLAR THERMAL - SOLAR TÉRMICO- SOLAIRE THERMIQUE - SOLARE TERMICO Assembly and operating instructions TPS-5 Solar station EN 70.88 | Z01 | 07.03 EN Contents 1 1.1 1.2 1.3 2 2.1 2.2 2.3 2.4 2.5 3 3.1 3.2 4 4.1 5 6 7 8 9 10 11 12 About this manual....................................................................3 Applicability.............................................................................3 Users........................................................................................3 Description of symbols.............................................................3 Safety.......................................................................................4 Proper usage............................................................................4 Improper usage........................................................................5 Dangers during assembly and commissioning..........................6 Detecting faults........................................................................7 Exclusion of liability..................................................................7 Installation and operating instructions.....................................8 Work steps / installation...........................................................8 Uninstall the solar station.........................................................9 Commissioning.......................................................................10 Filling, flushing and commissioning the solar system.............10 Draining the solar system.......................................................12 TPS 25 valves..........................................................................13 Optional: Flow display TPA F-25.............................................14 Optional: Air separator TPA A-25............................................15 Optional: Cutting ring screw connection TPA SVS..................16 Assembly instruction..............................................................16 Pressure drop and pump characteristics.................................17 Individual parts / spare parts..................................................18 Technical data.........................................................................19 These operating instructions are part of the product. Read these operating instructions carefully before use. Keep them over the entire lifetime of the product and pass them on to any future owner or user of this product. 720.882 | 07.03 EN 1 About this manual 1.1 Applicability This manual describes the installation, commissioning, function, operation and dismantling of the solar station for solar thermal energy systems. When installing the remaining components, e.g. the solar collectors, the storage unit, be sure to observe the appropriate installation instructions provided by each manufacturer. 1.2 Users Installation, commissioning, operation and dismantling of the solar station may only be performed by trained professional personnel. Before commissioning, the solar station must be professionally assembled and installed by professional personnel in accordance with the applicable regional and transregional regulations as well as the safety instructions and general instructions within this installation and instruction manual. The professional personnel must be familiar with this operation manual. The solar station is maintenance-free. Use the solar station only after first thoroughly reading and understanding this instruction manual and the safety instructions. Adhere to all safety instructions. In the event of any ambiguities regarding the operation and alteration of parameters or functions, consult professional personnel. 1.3 Description of symbols 1.3.1 The structure of the warning notices SIGNAL WORD Type, source and consequences of the danger! Measures for avoiding danger. 720.882 | 07.03 EN 1.3.2 Danger levels in warning notices Danger level Likelihood of occurrence Imminent threat of danger Possible WARNING threat of danger Possible CAUTION threat of danger CAUTION Possible threat of danger 1.3.3 Notes DANGER Consequences resulting from noncompliance Death, serious bodily injury Death, serious bodily injury Minor bodily injury Property damage Note Notes on easier and safer working habits. Measures for easier and safer working habits. 1.3.4 Other symbols and markings Symbol ✓ Meaning Condition for action Call to action Result of action • List Emphasis on issue at hand Emphasis on issue at hand 2 Safety 2.1 Proper usage The usage of the solar station is limited to solar thermal systems within valid ambient conditions (see chapter 12). • The distance between the fitting group and the collectors must be sufficient (because of the possible high temperatures near the collectors). If the fitting group is installed in the attic it must be ensured that the fittings do not overheat (e.g. by using a intermediate tank)! • For installing and mounting the solar station the standard DIN EN 12976-1 must be observed. • The expansion tank must be checked regularly according to DIN 4807. • Solar stations must be earthed to protect them from lightning. 720.882 | 07.03 EN • Electrical and technical connections of the solar system may only be made by qualified experts. The relevant regulations (VDE 0100, VDE 0185, VDE 0190, etc.) must be observed, as must special local (building) regulations. • The solar station is equipped with a solar diaphragm safety valve which complies with the relevant regulations. • The safety valve must be easily accessible. The function of the valve may not be affected or rendered ineffective by any obstruction. • Strainers or other constrictions between the collector field and the safety valve are inadmissible. • The diameter of the discharge line must be the same as the diameter of the valve outlet. Its length may not exceed 2 metres. More than 2 bends are inadmissible. If these maximum values (2 metres line, 2 bends) are exceeded, the line shall be increased in size. However, more than 4 metres line and 3 bends in total are inadmissible. • If the discharge line is routed into a funnel with a drain line, the size of the drain line must be at least double the cross section of the valve inlet. The discharge line must be laid at a gradient. The point of discharge must be clearly visible and terminate in a safe place so that there is no risk to persons in the vicinity of the point of discharge. • It is recommended to place a temperature-resistant container under the discharge line. If the safety valve is activated, the liquid is collected and can top up the system if the pressure drops too low. 2.2 Improper usage The solar station must not be operated in the following environments: • outdoors • in damp rooms • in rooms where highly flammable gas mixtures can occur • in rooms in which the operation of electrical and electronic components may cause dangers to arise 720.882 | 07.03 EN 2.3 Dangers during assembly and commissioning The following dangers exist during assembly / commissioning of this solar station and during operation (in case of assembly errors): • Risk of death by electrocution • Risk of fire due to short-circuit • Damage to any of the constructional fire safety measures present in the building due to incorrectly installed cables • Damage to the solar station and connected devices due to improper ambient conditions, inappropriate power supply and connecting prohibited devices or faulty devices and incorrect assembly or installation Therefore, all safety regulations apply when working on the mains supply. All electronic installations (e.g. the connection of a controller or a pump) only electricians may perform work. When laying cables, ensure that no damage occurs to any of the constructional fire safety measures present in the building. Make sure that the permissible ambient conditions at the installation site are not exceeded (see chapter 12). Be sure to comply with the specified degree of protection. Factory labels and markings may not be altered, removed or rendered unreadable. Before connecting the device, make sure that the power supply matches the specifications on the type plate. Make sure that all devices which are connected to the controller conform to the technical specifications of the controller. Secure the device against unintentional commissioning. For all electronic installations please always disconnect from the mains. Protect the controller against overloading and shortcircuiting. 720.882 | 07.03 EN 2.4 Detecting faults Check the solarstation. In case of faults, isolate the cause. As soon as it becomes evident that safe operation is no longer possible (e.g. visible damage), remove the device from the mains supply immediately. Have professional personnel remedy the fault. 2.5 Exclusion of liability The manufacturer cannot monitor the compliance to this manual as well as the conditions and methods during the installation, operation, usage and maintenance of the solar station. Improper installation of the system may result in damage to property and, as a result, in bodily injury. Therefore, we assume no responsibility and liability for loss, damage or costs which result from or are in any way related to incorrect installation, improper operation, incorrect execution of installation work and incorrect usage and maintenance. Similarly, we assume no responsibility for patent right or other right infringements of third parties caused by usage of this solar station. The manufacturer reserves the right to make changes to the product, technical data or assembly and operating instructions without prior notice. 720.882 | 07.03 EN 3 Installation and operating instructions 3.1 Work steps / installation Determine the position of the solar station. Consider the space for the expansion tank. Pull the thermometers off. Pull off the front insulation of the solar station. Hold the solar station in position on the wall and mark the position of the wall holder. Drill the holes, put the dowels into the holes, fix the solar station to the wall using the wall bracket. Install a circulation pump if necessary (if pump was not included in delivery). Place, assemble and connect the expansion tank. Pipe the whole system and connect the solar station. In order to prevent gravity circulation in the flow it should be pulled downwards to the lowest point (siphon type). Firmly tighten all union nuts and screws connections. The manometer does not need to be sealed with hemp or other sealants before inserting it into the valve. Handtighten the manometer and loosen it until you can read the indication properly. Electrical and technical connections – controller, pump, sensor, etc. – may only be made by qualified experts. The relevant regulations (VDE 0100, etc.) must be observed. Fill and flush the solar system (see „4 Commissioning“). Check the system for leaks and commission the system. Attach the front insulation of the solar station after commissioning the system. Then insert the thermometers (red thermometer in the flow - left, blue thermometer in the return - right). All screws were tightened in the factory. Therefore, in general, it is not necessary to tighten them again. However, it is important to carry out a pressure test when commissioning the system and to check it for leaks. 720.882 | 07.03 EN Screws 6 x 60 3.2 Uninstallthesolarstation In order to unscrew the solar station TPS 5 from the wall bracket remove the safety clips by means of a screwdriver. 70.88 | 07.03 9 EN 4 Commissioning 4.1 Filling, flushing and commissioning the solar system Connect the pressure hose to the fill valve (3) of the filling and flushing unit and open this valve. Connect the flush hose to the flush valve (5) of the filling and flushing unit and open this valve. Close the ball valve in the middle of the filling and flushing unit (4), so that the handle is in a horizontal position. Open both TPS 25 valves in the ball valves (above the pump and in the flow) by turning the thermometers or use a combinationswrench SW 14 to a 45° position (half open - half closed). Pour sufficient solar fluid into the container of a flushing and filling station (not included in delivery) and fill the system. Flush the solar system for station at least 15 minutes by means of the filling and flushing unit. In order to deaerate the solar system it is necessary to briefly open the ball valve in the middle of the filling and flushing unit (4) when flushing the system. The handle of the ball valve is in a vertical position if the ball valve is open. NOTE Never flush the solar station or carry out a pressure test with water only. As it is generally not possible to drain the system completely, there is a risk of frost damage! Close the flush valve (5) when the filling pump is running and increase the system pressure to approx. 5 bar / 87 psi. You can read the pressure on the manometer. Close the fill valve (3) and shut off the pump of the filling and flushing station. Open the ball valve in the middle of the filling and flushing unit (4) so that the handle is in a vertical position. Deaerate the system until the solar fluid exits without bubbles. Again increase the system pressure to approx. 5 bar / 72,5 psi and check the system for leaks. If the manometer indicates a high pressure drop there are leaks in the system. Set the operating pressure in accordance with the data of the system manufacturer. Switch on the circulation pump and select the highest speed (see pump and controller operating instructions) and allow it to circulate for at least 15 minutes. 10 720.882 | 07.03 EN Then select the required speed of the circulation pump. If necessary, regulate the volume flow rate in accordance with the collector manufacturer’s instructions by limiting the flow rate with the ball valve in the middle of the flushing and filling unit (4) (flow rate can be read on the TPA F-25 [optional]). Remove the hoses of the filling and flushing station and screw the caps on the fill and flush valves. Again check the system for leaks. Then set all ralves to operating position. Attach the front insulation of the solar station and insert the thermometers (red thermometer in the flow – left, blue thermometer in the return – right). 720.882 | 07.03 11 EN 5 12 Draining the solar system Open the TPS 25 valves in the flow and return ball valves (1 and 2) by turning the thermometers to a 45° position (see section ‘6 TPS 25 valves’). Open the deaerators at the highest point. Open the drain valve at the lowest point of the installation, if possible near the connection of the storage tank (not included in delivery) or open the flush valve (5) of the filling and flushing unit (3-5) below the pump. 720.882 | 07.03 EN 6 TPS 25 valves The TPS 25 valves are integrated in the thermometer ball valves and have an opening pressure of 200 mm water column each. In order to fill, flush and drain the solar station, the TPS 25 valves must be open. For this purpose, turn the thermometers to a 45° position (see illustration) - by turning the thermometers or use a combinationswrench SW 14.. The ball inside the ball valve opens the TPS 25 valves. During the operation the ball valves must be open completely (left stop, upright position of thermometer). 720.882 | 07.03 13 EN 7 Optional: Flow display TPA F-25 TPA F-25 is a flowmeter. Depending on the type the flowmeter indicates at 5-40 l/min. In order to limit the flow rate the ball valve in the flushing and filling unit (4) can be shut off partly (higher pressure drop – lower flow rate). Another possibility to reduce the maximum flow rate is to reduce the pump speed using the speed switch. It must be checked if the starting torque is sufficient with reduced pump rotation speed. When regulating the flow rate the collector manufacturer’s instructions must be considered. In order to guarantee a smooth operation of the TPS 25, the system must be flushed and free from contaminants! The lower end of the propeller is the reading mark for values between 35 and 40 l/min (on the right side of the scale). Flow direction The upper end of the propeller is the reading mark for flow rates up to 30 l/min (on the left side of the scale. Example indicates approx. 27 l/min Technical data scale Type: TPA F-25 - 1-20 l/min or 5-40 l/min Materials Body Brass MS 58 Seal EPDM Sight glass Boronsilicateglass Technical data Nominal dimension DN 25 Indication range 5-40 l/min Max. pressure 10 bar Max. temperature 120 ºC Measurements Connections 1“ male thread flat sealing / with compression fitting - 1“ male thread with counter nut Total height 135 mm 14 720.882 | 07.03 EN 8 Optional: Air separator TPA A-25 The Air separator has been designed to permanently deaerate the heat transfer fluid of the solar system. The separated air collects in the Airstop and can be released through an air bleed valve if necessary. Operation The gases separated from the heat transfer fluid collect in the upper part of the Airstop (see illustration). From time to time (directly after commissioning daily, then – depending on the quantity of air separated – every week or month) these gases must be released through the air bleed valve on the side. In order to achieve optimal efficiency of the solar system the air should be released every six months. Please note! After the system has been deaerated the system pressure must be checked and increased to the operating pressure, if necessary. The collector circuit can only be deaerated properly if the flow speed in the flow is at least 0.3 m/s. The pipe dimensions must be adapted to the flow speed. 720.882 | 07.03 15 EN 9 Optional: Cutting ring screw connection TPA SVS Assembly instruction 16 Put the union nut (2) on the copper pipe (1). Then put the brass olive (3) on the copper pipe (1). In order to ensure a safe force transmission and sealing, the pipe must stick out at least 3 mm / 0.28 in out of the olive. Insert the support sleeve (4) into the copper pipe (1). The copper pipe (1) and its components (2, 3 and 4) must be inserted as far as possible into the connection nozzle. Tighten the union nut by hand. Then tighten the union nut it at least one full turn with an open-end spanner. 720.882 | 07.03 EN 10 Pressure drop and pump characteristics 720.882 | 07.03 17 EN 11 Individualparts/spareparts Pos. Description 1 Space for controller (optional) Thermometer set, red and blue, 0-160°C 3 Insulation set 4 Wall holder, steel 5 Air separator TPA A-5 (optional) 6 Flushing and filling unit 7 Flow display TPA F-5 (optional), 1-0 l/min or 5-40 l/min 8 Circulation pump (optional) 9 Safety cross 10 Flow ball valve 1“ male thread - female thread, with check valve 11 Return ball valve 1“ flange - female thread, with check valve 1 Union nut 1½“ male thread 13 Solar manometer 0-6 bar with valve 14 Solar safety valve 6 bar 15 Connection set for expansion tank (optional) 16 Cutting ring screw connection TPA SVS (optional) 18 70.88 | 07.03 EN 12 Technical data TPS 25 solar station Dimensions Heigth (with insulation) 550 mm Width (w/o controller) 280 mm Depth 200 mm Distance axis / wall 63 mm Axis Distance flow - return 90 mm Pipe connections 1“ male thread flat sealing, compression fitting (optional) 18 or 22 mm Connection for expansion tank 3/4“ male thread, flat sealing Outlet safety valve 3/4“ female thread Max. pressure 6 bar Max. temperature 120 °C, 160 °C for a short time Safety equipment Solar safety valve 1/2“ x 3/4“ - 6 bar Solar manometer 0-6 bar, to 130 °C Circulation preventer TPS 25 valve 2 x 200 mm w.c., brass, can be opened, in flow and return ball valve Indication elements Solar dial thermometer 0-160 °C TPS 25 (optional) 5-40 l/min Material Fittings Case: brass Flat gaskets Klingersil - max. 200 °C O-rings VITON / EPDM - max. 160 °C TPS 25 valves brass - max. 180 °C Insulation EPP, λ = 0.041 W/(m*K) max. 120 °C, 160 °C for a short time 720.882 | 07.03 19 720882