1
Operating Instructions
Network Camera Recorder
16 Cameras Version
Please read this manual before using and save this manual for future reference.
Please note that since this software is a trial version, it has the following restrictions.
࣭camera registration is restricted to only 16 cameras
࣭support services are not available
The following features also cannot be performed: converting the recorded images, alarm
recording, searching the recorded images by specified keyword, and automatically backing
up recorded images.
Please purchase the BB-HNP11A/CE for sale to remove these restrictions.
Operating Instructions
Main Features
Recording or Playing Images with Audio
This software records or plays images with audio from the camera*1 (see page 59).
Since you can record images with audio, recorded images become impressive. For
example, you can use the images with audio for training employee after you record
your shop scene. This software can also record multiple cameras simultaneously.
*1 Audio supported cameras are BB-HCM311A, etc. See Panasonic Network
Camera support website at http://panasonic.net/pcc/products/netwkcam/
for details.
Advanced Motion Detection Recording
Motion detection recording is improved from BB-HNP60. You can set a time (1—
60 seconds) to record before or after motion detection (see page 35). You can
check the detail condition when the motion was detected.
Advanced Timer Recording and Search Ability
You can set a keyword in timer recording (see page 56). You can manage images
by keyword. 10 settings can be set in timer recording for each camera. Additionally,
you can search images by time, recording method (such as timer recording and
motion detection recording), or keyword (see page 63).
Other Features
•
•
•
•
2
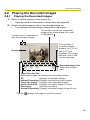
Layout Feature of Operation Window (see page 39 to page 41)
You can change size or location of camera list or operation bar for the camera,
or you can display them separately.
Camera List (see page 66)
The registered cameras can be listed, and the camera preview size can be set
in 6 levels.
Recording Capacity Limit (see page 34)
If you set the maximum value, you can limit the recording capacity.
Automatic Backup (see page 26)
This software starts backing up images at the set time.
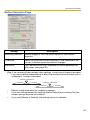
Operating Instructions
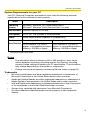
System Requirements for your PC
Your PC (Personal Computer) and network must meet the following technical
specifications for this software to work properly.
Items
Operating
System
Description
Microsoft Windows XP Professional Edition
Microsoft® Windows® 2000 (Service Pack 2 or later)
®
®
Web Browser Internet Explorer 6.0 or later
File System
NTFS (NT File System) is recommended.
Audio*1
Audio output feature (Speaker or Headphones)
Hardware
Specification
Connecting 10 Cameras
*1
Connecting 4 Cameras
CPU: Pentium® 4 3 GHz or
CPU: Pentium 4 1.8 GHz or
higher, or compatible processor higher, or compatible processor
Memory: 512 MB or higher
Memory: 256 MB or higher
Using the camera with audio.
Notes
•
•
The information above is based on 640 x 480 resolution, favor clarity,
motion detection recording, recording interval: Not Specify, recording
capacity limited settings to decide your PC specification. The information
may change depending on the system or composition.
Change the hard disk capacity considering file size shown on page 23.
Trademarks
•
•
•
•
•
Microsoft and Windows are either registered trademarks or trademarks of
Microsoft Corporation in the United States and/or other countries.
Adobe and Adobe Reader are either registered trademarks or trademarks of
Adobe Systems Incorporated in the United States and/or other countries.
Intel and Pentium are trademarks or registered trademarks of Intel Corporation
or its subsidiaries in the United States and other countries.
Screen shots reprinted with permission from Microsoft Corporation.
All other trademarks identified herein are the property of their respective
owners.
3
Operating Instructions
Table of Contents
1
1.1
Included Accessories ..................................................................... 6
1.2
Important Information..................................................................... 7
1.2.1
1.2.2
Audio and Video Recording Notice ............................................................ 7
Security Cautions ...................................................................................... 7
1.3
End-User License Agreement........................................................ 8
1.4
Looking at Installation Procedure................................................. 11
1.5
Installing This Software................................................................ 12
1.5.1
Modifying or Deleting This Software ........................................................ 18
1.6
Starting or Closing This Software ................................................ 19
1.6.1
1.6.2
Starting This Software ............................................................................. 19
Closing This Software.............................................................................. 20
1.7
Performing License Registration .................................................. 21
1.7.1
Registering a New License ...................................................................... 21
2
4
Product Introduction.....................................................6
Software Operation .....................................................23
2.1
Selecting a Folder to Save Images .............................................. 23
2.2
Automatically Backing up Recorded Images................................ 26
2.3
Using a Proxy Server ................................................................... 28
2.4
Registering the Camera ............................................................... 30
2.4.1
2.4.2
Creating New Camera ............................................................................. 30
Editing Camera Information ..................................................................... 38
2.5
Network Camera Recorder Window ............................................ 39
2.5.1
2.5.2
2.5.3
Monitoring Page....................................................................................... 45
Recorded Image Page ............................................................................. 46
Timer List Page........................................................................................ 47
2.6
Monitoring the Camera ................................................................ 48
2.6.1
2.6.2
2.6.3
Monitoring the Camera ............................................................................ 48
Using Operation Bar ................................................................................ 49
Using Preset Buttons ............................................................................... 52
2.7
Recording the Image.................................................................... 53
2.7.1
2.7.2
2.7.3
Manually Recording the Image ................................................................ 53
Motion Detection Recording .................................................................... 55
Timer Recording ...................................................................................... 56
2.8
Playing the Recorded Images ...................................................... 59
2.8.1
2.8.2
Playing the Recorded Images.................................................................. 59
Searching the Recorded Images ............................................................. 63
Operating Instructions
2.9
Using Camera List........................................................................ 66
2.10
Enabling or Disabling the Cameras.............................................. 68
2.11
Deleting the Registered Cameras ................................................ 69
2.12
Converting the Recorded Images ................................................ 70
2.12.1 Converting the Recorded Images to JPEG files ...................................... 70
2.13
Other Features ............................................................................. 72
2.13.1
2.13.2
2.13.3
2.13.4
2.13.5
Importing the Camera Information........................................................... 72
Exporting the Camera Information .......................................................... 72
Copying the Recorded Images ................................................................ 73
Changing the Keyword of the Recorded Images ..................................... 73
Deleting the Recorded Images ................................................................ 74
2.14
Error Message List ....................................................................... 75
2.15
Troubleshooting............................................................................ 93
2.16
Default Setting List ....................................................................... 96
Index....................................................................................98
5
Operating Instructions
1
Product Introduction
1.1
Included Accessories
The following items are provided.
•
•
•
CD-ROM ...................................................... 1 pc.
Operating Instructions (This Manual) ........... 1 pc.
Registration code stickers............................. 1 set (3 pcs.)
Note
User registration requires registration code shown on registration code
stickers. Affix the stickers to the case, the front or the back of Operating.
Instructions to remember registration code and license key.
CD-ROM Notice
•
Do not scratch, smudge, write or label either CD-ROM surfaces. It may
become unreadable because of a scratch.
•
Do not touch the CD-ROM surface and avoid leaving fingerprints on it. It may
become unreadable because of dust.
•
Do not place the CD-ROM in any place where it will be subjected to direct sunlight or high temperature such as around a heater. CD-ROM may become
unreadable because of change in shape.
•
Do not throw or bend CD-ROM. CD-ROM may become unreadable because
of a scratch or change in shape.
•
Do not play this CD-ROM in an audio CD player. Ear-splitting volume may
damage its speakers.
6
Operating Instructions
1.2
Important Information
1.2.1
Audio and Video Recording Notice
PLEASE NOTE that under certain circumstances, audio/video recording may be
PROHIBITED by law. This software should be used only in compliance with all
applicable federal, state and local statutes.
1.2.2
Security Cautions
When using this software, take appropriate measures to avoid the following
security breaches.
•
•
•
Leaks of private information via this software
Illegal use of this software by a third party
Interference or suspension of the use of this product by a third party
Take the following measures to avoid security breaches:
•
•
•
To prevent malicious attack to your PC or recorded images, keep newly
updating the installed software on your PC such as operating system, web
browser, antivirus software or Network Camera Recorder. (Perform the
version update to intensify the security).
If you receive data from the Internet, perform the scan for malicious
program or removal of the computer virus.
You are responsible for this product’s user information such as registered
camera information and recorded images. This information should not be
made available to any third parties outside the user group.
Panasonic Communications Co., Ltd.
7
Operating Instructions
1.3
End-User License Agreement
THIS IS A LEGAL AGREEMENT BETWEEN YOU AND PANASONIC
COMMUNICATIONS CO., LTD. ("PANASONIC") WITH RESPECT TO THE
PANASONIC NETWORK CAMERA RECORDER 16 CAMERAS VERSION
("SOFTWARE"). CAREFULLY READ ALL THE TERMS AND CONDITIONS OF
THIS AGREEMENT PRIOR TO INSTALLING THE SOFTWARE. THE
SOFTWARE INCLUDES A PROGRAM LICENSED UNDER THE GNU LESSER
GENERAL PUBLIC LICENSE ("LGPL PROGRAM"). AS FOR LGPL PROGRAM,
GNU LESSER GENERAL PUBLIC LICENSE SET FORTH IN THE FILE
"COPYING" UNDER THE DIRECTORY NAMED "SOURCE" WHICH CAN BE
FOUND IN THIS PROGRAM SHALL BE APPLIED. INSTALLING THE
SOFTWARE INDICATES YOUR ACCEPTANCE OF THESE TERMS AND
CONDITIONS.
If you do not agree to these terms and conditions, do not install the SOFTWARE.
1. COPYRIGHT:
The SOFTWARE is protected by copyright laws and international treaty
provisions, and all other applicable laws. You acknowledge that you are
receiving only a LIMITED LICENSE TO USE the SOFTWARE and related
documentation, and that you shall obtain no title, ownership nor any other
rights in or to the SOFTWARE and its related documentation, all of which title
and rights shall remain with PANASONIC or its licensor.
2. LICENSE:
(1)
(2)
(3)
8
You may use the SOFTWARE solely for the purpose of recording and
processing images from the PANASONIC Network Camera (up to 16
cameras) which is compatible with the SOFTWARE.
You may make a copy of the SOFTWARE for the use defined in
subparagraph (1) above, or for internal back-up purpose only.
You may transfer your rights under this License Agreement on a
permanent basis, provided that you transfer this Agreement, all copies
of the SOFTWARE, all related documentation and your PANASONIC
Network Camera, and the recipient thereof agrees to the terms of this
Agreement.
Operating Instructions
3. RESTRICTIONS:
You may not reverse engineer, decompile or disassemble the SOFTWARE,
except as expressly permitted by applicable laws or GNU Lesser General
Public License. You may not use, copy, modify, alter, rent, lease or transfer
the SOFTWARE, its related documentation, or any copies thereof, in whole or
in part, except as expressly provided in this Agreement. You may not export
the SOFTWARE in contravention of any applicable U.S. or foreign export laws
and regulations.
4. TERM:
This license is effective until terminated. You may terminate this Agreement
at any time by destroying the SOFTWARE and related documentation and all
copies thereof. This license will be terminated if you fail to comply with any
term or condition of this Agreement. Upon such termination, you agree to
destroy the SOFTWARE, all copies thereof and related documentation.
5. LIMITATION OF LIABILITY:
THE SOFTWARE IS PROVIDED "AS IS" WITHOUT ANY WARRANTY.
PANASONIC DOES NOT MAKE OR PASS ON TO YOU OR OTHER THIRD
PARTY, ANY WARRANTY OR REPRESENTATION INCLUDING, BUT NOT
LIMITED TO, THE IMPLIED WARRANTIES OF MERCHANTABILITY AND
FITNESS FOR A PARTICULAR PURPOSE. WITHOUT LIMITING THE
GENERALITY OF THE FOREGOING, PANASONIC MAKES NO
WARRANTY THAT THE SOFTWARE WILL BE ERROR-FREE OR THAT IT
WILL MEET YOUR REQUIREMENTS. PANASONIC SHALL NOT BE
LIABLE FOR ANY DAMAGES SUFFERED BY YOU INCLUDING, BUT NOT
LIMITED TO, CONSEQUENTIAL, INCIDENTAL, SPECIAL OR PUNITIVE
DAMAGES, EVEN IF PANASONIC HAS BEEN ADVISED OF THE
POSSIBILITY OF SUCH DAMAGES. NOTWITHSTANDING THE
FOREGOING, IF THE TERMS AND CONDITIONS HEREOF CONTRADICT
THE LAWS OF THE JURISDICTION IN WHICH YOU LIVE, THIS LICENSE
AGREEMENT SHALL BE MODIFIED TO THE EXTENT SUCH LAWS
REQUIRE.
9
Operating Instructions
6. U.S. GOVERNMENT RESTRICTED RIGHTS LEGEND:
The SOFTWARE and related documentation are "commercial item", as that is
defined at FAR 2.101, consisting of "commercial computer software" and
"commercial computer software documentation", as such terms are used in FAR
12.212 and DFARS 227.7202. Consistent with FAR 12.212 or DFARS 227.7202,
as applicable, the Software and related documentation are licensed to U.S.
Government end users as a commercial item, with only those rights as are granted
to all other end users pursuant to the terms and conditions of this Agreement.
10
Operating Instructions
1.4
Looking at Installation Procedure
You must perform the following steps to use this software.
Read the End-User License Agreement (see page 8).
You cannot install this software if you disagree.
(The legal agreement is required when installing this software.)
Install this software (see page 12).
Perform the license registration (see page 21).
Perform the license registration to use this software.
The attached registration code stickers are required to perform license
registration.
Select the folder to save images (see page 23).
Configure the camera (see page 30).
Operate recording and monitoring the camera.
11
Operating Instructions
1.5
Installing This Software
It is recommended that you create an administrator account user on your PC to
securely manage recorded images. After logging in as the set user, install this
software.
1. Insert the CD-ROM to the CD-ROM drive.
•
Installation Selection window automatically appears.
Notes
•
•
If Installation Selection window does not appear, open the CD-ROM
and double-click "autorun.exe" file.
Adobe® Reader® must be installed on your PC.
It can be downloaded without charge from the Adobe website.
2. Click [Install Network Camera Recorder].
•
12
If this software has been installed, the following window is displayed.
Install this software after removing this software at
[Start] [Settings] [Control Panel] [Add/Remove Programs] window.
Operating Instructions
Note
If you do not log in as an administrator account user, you cannot install this
software and the following windows will be displayed. Log in as an
administrator.
or
•
Installation window appears.
13
Operating Instructions
3. Click [Next>].
•
License Agreement window appears.
4. Check [I Agree] and click [Next>].
•
Choose Destination Location window appears.
Notes
•
•
14
To securely manage recorded images, selecting [Just me] is
recommended.
[Everyone] means users having an administrator account.
Operating Instructions
•
•
•
Click [Browse...] to change the destination folder.
The destination must have more than 200 MB free capacity.
If you click [Disk Cost...], installable drives, each drive disk size and free
capacity are displayed.
5. Select the destination folder, and click [Next>].
•
Installation Confirmation window is displayed.
15
Operating Instructions
6. Click [Next>].
16
•
This software starts installation.
•
After the installation, Installation Complete window is displayed.
Operating Instructions
7. Click [Close].
•
•
is displayed on the desktop.
After the restart,
is displayed on the system tray.
lights red during recording.
Notes
•
If the operation window is started but
is displayed, this software
is working. Timer recording is also working.
•
To close this software, right-click
will be deleted from the system tray.
and select [Exit]. The button
17
Operating Instructions
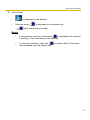
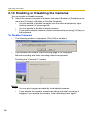
1.5.1
Modifying or Deleting This Software
To modify or delete this software, follow the steps below.
1. Insert the CD-ROM to the CD-ROM drive.
•
•
Installation Selection window automatically appears.
If Installation Selection window does not appear, double-click "setup.exe"
file on the CD-ROM.
2. Click [Install Network Camera].
•
If this software have been installed, the following window is displayed.
3. Check [Repair Network Camera Recorder] or [Remove Network Camera
Recorder], and click [Finish].
•
If the modification or deletion is complete, the confirmation window is
displayed.
Note
If you delete this software, the camera settings and recorded images are
not deleted. To delete them, manually delete NCR2 folder at the
destination.
18
Operating Instructions
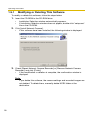
1.6
Starting or Closing This Software
1.6.1
Starting This Software
Double-click
on the desktop to start this software.
•
Initial window of this software is displayed.
Notes
•
•
•
These softwares cannot work at the same time. Use only a software.
This software can be started from the program menus. Clicking "ncr2.exe"
file at the destination also starts this software.
If the license is not registered, the License Registration window is
displayed. Register a license by following the procedure on page 21.
19
Operating Instructions
1.6.2
Closing This Software
Click [File]
20
[Exit] on the menu bar.
Operating Instructions
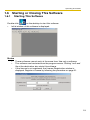
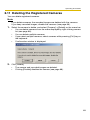
1.7
Performing License Registration
If the license is not registered, the License Registration window is displayed.
Click [Issue a license key on online registration] to register a license.
Follow the steps below to register a license.
1.7.1
Registering a New License
1. Display the License Registration window.
•
•
If the license is not registered, the License Registration window is
displayed.
You can also display the window by selecting [Help] [License
Registration].
2. Enter the supplied registration code and license key, and click [OK].
•
•
•
The registration code and license key are included on the attached
registration code stickers.
Characters are case sensitive.
The following window is displayed.
21
Operating Instructions
3. Click [OK].
Note
If the following window is displayed, the registration code or license key is
incorrect. Confirm them, and enter them again.
Note
If the registration is complete, [License Registration] on the menu bar is grayed
out.
Note
The registration code and license key cannot be reissued even if they are lost.
Please keep them secure.
22
Operating Instructions
2
Software Operation
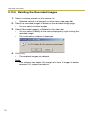
2.1
Selecting a Folder to Save Images
This software records camera images to the hard disk on your PC. The folder can
be changed. After the camera is registered, destination folders are automatically
created in the selected folder. The recorded images are saved in the destination
folders.
•
If the destination folder is not selected, the recorded images are saved into the
destination folders at the destination folder where Network Camera Recorder
is installed.
•
You can change the destination folder to another folder or external hard disk
drives.
Notes
•
The folder must have more than 100 MB free capacity.
•
The level of the folder-hierarchy depth must be within 6 to prevent the system
from getting unstable.
•
The recorded images in the destination folder are displayed on the screen. If
you change the destination folder, the recorded images in the former folder are
not displayed.
•
File sizes of recorded images listed below can be used as a baseline. (1 frame
size)
•
Resolution
Items
Favor
Clarity
Standard
Favor
Motion
640 x 480
File Size
About
50 KB
About
33 KB
About
20 KB
320 x 240
File Size
About
25 KB
About
16 KB
About
8 KB
160 x 120
File Size
About
7 KB
About
5 KB
About
3 KB
Recorded capacity can be calculated by
Size (KB) x Frame Rate (frames per second) x time (second).
E.g.
640 x 480 resolution, Favor Clarity and 12 frames per second for an hour
settings
50 (KB) x 12 (fps) x 3,600 (s) = 2,160,000 (About 2.06 GB)
If the audio is attached, add 4 KB per second.
2,160,000 (KB) + 4 (KB) x 3,600 (s) = 2,174,400 (About 2.08 GB)
23
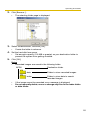
Operating Instructions
1. Start this software and select [Tools]
[Preferences]
on the menu bar.
•
The destination folder page is displayed.
24
[Destination Folder]
Operating Instructions
2. Click [Browse...].
•
The selecting folder page is displayed.
3. Select the destination, and click [OK] .
•
Create the folder in advance.
4. Set the hard disk free space.
•
Set enough capacity (100 MB or greater) as your destination folder to
prevent the system from getting unstable.
5. Click [OK].
Notes
•
Recorded images are saved in the following folder.
NCR2
•
•
Destination folder
data
Folder to store recorded images
index
Folder to store data to search
recorded images
If the image cannot be recorded, error message is displayed.
Do not manually delete, move or change any files in the index folder
or data folder.
25
Operating Instructions
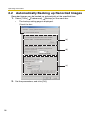
2.2
Automatically Backing up Recorded Images
Recorded images can be backed up automatically at the specified time.
1. Select [Tools]
•
[Preferences] [Backup] on the menu bar.
The backup setting page is displayed.
Check the box.
(a)
(b)
(c)
2. Set the parameters, and click [OK].
26
Operating Instructions
Parameters
(a) Select your destination folder for backup. See page 24 for how to
access the backup page.
•
Create the folder in advance.
•
The level of the folder-hierarchy depth must be within 6 to prevent
the system from getting unstable.
(b) Set the hard disk free space to stop backing up before the system
becomes full.
•
Set enough capacity (100 MB or greater) as your destination
folder to prevent the system from getting unstable.
(c) Set the date and time to execute backup.
Notes
•
•
•
•
•
•
•
Backup feature automatically creates the last dated folder, and copies the
recorded images and data for search in the destination folder.
Backup feature backs up only newly-recorded images after the last
backup was executed.
If the capacity has reached the limit, the backup is stopped, and error
message is displayed (see page 91).
The backup images can be searched. Select [Backup Image] on the
search page (see page 63).
The recording operation of this software may be delayed during backup.
If images are recorded during backup, the recorded images will be backed
up next time.
Do not manually delete, move or change any files in the index folder
or data folder in the backup folder.
27
Operating Instructions
2.3
Using a Proxy Server
You need to set the following settings to monitor the camera on the Internet you
using a proxy server. (You cannot connect to the camera without the proxy
settings.)
If you do not use a proxy server, this setting is not required.
1. Select [Tools]
•
[Preferences] [Network Connection] on the menu bar.
The proxy setting page is displayed.
2. Check [Use a proxy server], set the parameters, and click [OK].
28
Operating Instructions
Setting
Description
Proxy Address and
Port
Enter the IP address of proxy server and port number. Enter
them after asking your administrator.
•
Enter the alphanumeric characters. (Enter only the
numeric character for port number.)
Proxy User Name
and Proxy
Password
Enter the user name and password for the proxy server, if
required. Enter them after asking your administrator.
•
Enter the alphanumeric characters.
29
Operating Instructions
2.4
Registering the Camera
Before you can view or record images, each camera must be configured on this
software.
•
If you change the destination folder from the default folder of this software,
select a folder to save images in advance (see page 23).
•
The camera information can be imported and exported (see page 72).
2.4.1
Creating New Camera
1. Select [Camera]
•
•
[Create New Camera] on the menu bar.
You can create a camera on the menu displayed by right-clicking on the
camera list (see page 66).
The create new camera page is displayed.
Page Selection Tab
Basic Settings
: Displays the setup page for the camera name and IP
address (see page 31).
Image Settings
: Displays the setup page for the image size and
recording method (see page 33).
Recording Capacity
Limit
: Displays the setup page for the recording capacity limit
value (see page 34).
Motion Detection
: Displays the setup page for the motion detection
recording (see page 35).
Keyword
: Displays the setup page for recorded image keyword
(see page 37).
2. Set the parameters and click [OK].
•
30
The camera preview is displayed on the camera list.
Operating Instructions
Basic Settings Page
Setting
Description
Camera Name
Enter the camera name (mandatory). The camera name is
displayed on the screen (see page 45).
•
Maximum 250 characters.
Comment
Enter the information of the camera such as a location. The
comment is displayed on the screen (see page 45).
•
Maximum 128 characters.
Camera Address
Enter the IP address (or domain name) (mandatory).
•
Enter the alphanumeric characters.
Port
Enter the port number.
•
When port number is 80 (default), you do not need to enter
port number.
•
Enter the numeric characters.
31
Operating Instructions
Setting
Description
User Name/
Password
If you set security setting (authentication setting), enter
administrator user name and password of the camera.
•
Enter the alphanumeric characters.
•
4 to 15 characters.
•
Password is saved in encryption.
Use a proxy server
If you enable the proxy settings (see page 28), [Use a proxy
server] is enabled. If the camera is using a proxy server, check
[Use a proxy server].
Note
If this software cannot access the camera, the following message is displayed.
Confirm the camera setting and try again.
Note
The number of connections from software to the camera is limited.
Up to 3 connections can be established with the camera.
32
Operating Instructions
Image Settings Page
Setting
Description
Resolution
Select 640 x 480, 320 x 240 (default) or 160 x 120.
Image Quality
Select Favor Clarity, Standard (default) or Favor Motion.
Recorded
Frequency
Set the interval to record images.
[Not Specify*1, Specify*2 or Setting Intervals*3]
Recording Setting
Select to record the image with audio or only images.
*1
*2
*3
If you record images as they are set on the camera, set to [Not Specify]. Images are recorded
as the camera sends images through its max. bandwidth.
If you select [Audio and Image], you cannot specify the intervals.
Due to the network environment, you may not monitor the camera at the set intervals or max.
bandwidth.
•
•
•
Default is displayed when you register a camera.
If you can change default by checking [Set to Default] and clicking [OK], the
current settings become as a default.
If you click [Return to Default], the settings return to a default.
Note
If the camera disables setting changes, resolution or image quality settings
may not work properly.
33
Operating Instructions
Recording Capacity Limit Page
Setting
Limit Recording
Capacity
•
•
•
•
34
Description
To limit the capacity, check [Limit the recording capacity] and
set the capacity. Select [Stop recording] or [Delete old images
and keep recording] (by 1 minute) when the capacity is full.
Default is displayed when you register a camera.
If you change default by checking [Set to Default] and clicking [OK], the current
settings become as a default.
If you click [Return to Default], the settings return to a default.
If you change the capacity to a smaller value than the current capacity, this
software deletes old images. (E.g. if you change the capacity to 200 MB when
you recorded images up to 250 MB, 50 MB old images are deleted.)
Operating Instructions
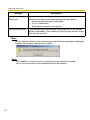
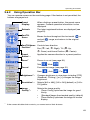
Motion Detection Page
Setting
Description
Recording Method
Record images in the time period before or after motion
detection.
Threshold
Adjust the threshold to start recording. If the threshold is set
low, this software sensitively detects changes.
Sensitivity
If you set sensitivity high, amplitude of motion detection bar
gets jumpy (see page 45).
E.g. If the recording time overlaps other settings, a continuous image is recorded.
•
If you set to record images before or after 5-second period and another motion
is detected, 1 image is recorded.
Motion is detected.
5 seconds
5 seconds
Motion is detected.
5 seconds
•
•
•
5 seconds
Default is displayed when you register a camera.
If you can change default by checking [Set to Default] and clicking [OK], the
current settings become as a default.
If you click [Return to Default], the settings return to a default.
35
Operating Instructions
Notes
•
•
•
Clicking
on the toolbar buttons starts recording, and clicking
recording. If you are clicking
or
while you set recording time period
before or after the motion detection, motion detection recording does not
work.
If you try to capture a exact image when the motion is detected, do not
check the boxes of before motion detection and after motion detection.
Motion detection level is changed depending on resolution, image quality,
object situation and network environment. Confirm the level by performing
motion detection recording.
On the monitoring page, clicking
displays motion detection bar.
Motion Detection Bar
The threshold is the border between green and red. If the
level exceeds the threshold, the motion detection
recording starts.
Indicator lights red during motion detection recording.
36
stops
Operating Instructions
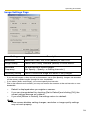
Keyword Page
Setting
Keyword 1/
Keyword 2
Description
Put a keyword to manually-recorded images.
•
2 keywords (keyword 1/keyword 2) can be set.
•
If you set a keyword, you can search recorded images by
it (see page 63).
37
Operating Instructions
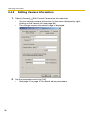
2.4.2
Editing Camera Information
1. Select [Camera]
•
•
[Edit Current Camera] on the menu bar.
You can change camera information on the menu displayed by rightclicking on the camera list (see page 66).
The change camera information page is displayed.
2. Set the parameters and click [OK].
•
38
See page 31 to page 37 for details about parameters.
Operating Instructions
2.5
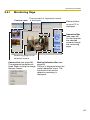
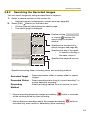
Network Camera Recorder Window
Page Selection tab
Monitoring Image: Displays the current image (see page 45).
Recorded Image: Displays the recorded image list and playback image (see page
46).
Timer List: Displays the timer list (see page 47).
Menu Bar
(see page 42)
Camera List
(see page 66)
Toolbar Buttons
(see page 44)
Operation Bar
(see page 49)
Status Bar
Monitoring Page (see page 45)
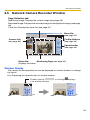
Displays the status.
Window Display
The camera list and operation bar can be displayed on another window, or change
the layout.
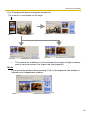
E.g. Displaying the operation bar on another window
Double-clicking
it on another window.
or clicking
displays
39
Operating Instructions
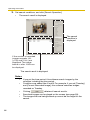
E.g. Changing the layout moving the operation bar
You can move the location by dragging.
The window is embedded by dragging on the page.
Note
If you move the window while pressing [Ctrl] on the keyboard, the window is
located as an independent window.
40
Operating Instructions
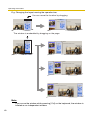
E.g. Changing the layout moving the camera list
The window is embedded on the page.
•
The camera list enables you to simultaneously monitor multiple cameras,
and to view the camera in a larger size (see page 66).
Note
If you move the window while pressing [Ctrl] on the keyboard, the window is
located as an independent window.
41
Operating Instructions
Menu Bar
File
Exit
Close this software.
Edit
Copy
Search...
Copy the image onto clipboard.
Display search page of recorded
images.
View
Display Mode
Image Size on Camera List
Toolbar
Window
Status Bar
Select image display mode.
Select camera preview size.
Select camera move on the toolbar,
display mode, recording button display.
Display or hide camera list, operation
bar or recorded image list.
Display or hide status bar.
Camera
Create New Camera...
Register new camera.
Edit Current Camera...
Previous Camera
Next Camera
Enable or Disable Camera
Edit camera information.
Delete...
Delete registered camera.
Display previous camera image.
Display next camera image.
Enable or disable cameras.
Record
Start Recording
Start Motion Detection
Recording
Stop Recording
Start recording.
Start motion detection recording.
Stop recording.
Playback
Start
Pause
Stop
To Next Image
To Previous Image
42
Play recorded images.
Pause playback.
Stop playback.
Display a next image from displayed
image.
Display a previous image from
displayed image.
Operating Instructions
Recorded Images
Refresh
Display latest recorded image list.
Edit Keyword...
Edit keyword of recorded images.
Delete...
Delete selected recorded images.
Timer
Create New Timer...
Create new timer.
Edit Current Timer...
Edit timer registration information.
Enable or Disable Timer
Enable or disable timers.
Delete...
Delete selected timers.
Tools
JPEG Conversion
Convert recorded image to JPEG file.
Import Camera Settings...
Import camera setting information.
Export Camera Settings...
Export camera setting information
to a file.
Open preference page (Destination,
Backup and Network Connection
page).
Preferences...
Help
License Registration...
Open license registration page.
Open Operating Instructions
Open operating instructions pdf file.
Camera Portal Site
Open camera top page.
Download
Open download website.
Support Information
Open support information website
for this software.
Open version information page of
this software.
About Network
Camera Recorder
43
Operating Instructions
Toolbar Buttons
Selects a previous camera
from the current camera.
Starts recording.
Selects a next camera from the
current camera.
Starts motion detection
recording.
Fits the image to the window.
Stops recording.
Shrinks the image by 25 %
(minimum 25 % of the actual
size).
Displays a scale.
Expands the image by 25 %
(maximum 700 % of the actual
size).
44
Operating Instructions
2.5.1
Monitoring Page
Camera name
The comment of registered camera
is displayed.
Date and time
on your PC is
displayed.
Operation Bar
(see page 49)
You can operate
the selected
camera through
the monitoring
page.
Monitoring page of the
selected camera
Camera List (see page 66)
The registered cameras are
listed. Right-clicking the image
displays menus.
Motion Detection Bar (see
page 55)
The bar is displayed when the
motion detection starts. The
threshold of the motion
detection recording is
displayed.
45
Operating Instructions
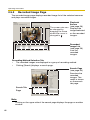
2.5.2
Recorded Image Page
The recorded image page displays recorded image list of the selected cameras
and plays recorded images.
Playback
Screen
The screen size can (see page 59)
Displays the
be changed by
dragging the frame images selected
where the cursor is on the recorded
images.
changed to .
Recorded
Image List
(see page 59)
Lists the
recorded
images.
Recording Method Selection Tab
•
The recorded images are displayed in a group of recording method.
•
Clicking [Search] displays a search page.
Search Page
(see page 63)
Searches the
recorded
images. The
result is shown
on the search
tab page.
Search Tab
Page
Note
Clicking on the upper side of the search page displays the page on another
window.
46
Operating Instructions
2.5.3
Timer List Page
Timer List
List the set timers.
You can set, change, enable/disable or delete timer on the timer list page (see
page 58).
•
Right-click the timer list to display the menu.
•
Select the timer name, and right-click it to display the menu.
•
Select the multiple timer names, and right-click them to display the menu.
47
Operating Instructions
2.6
Monitoring the Camera
2.6.1
Monitoring the Camera
1. Select a camera preview on the camera list.
•
Selected camera image is displayed on the monitoring page.
Clicking [Monitoring] tab
displays the monitoring page.
Selected camera
is displayed in a
blue frame.
Your PC's date and time
settings are displayed.
is displayed if the
camera supports audio.
You can operate the camera
(see page 49).
Notes
•
•
•
•
•
48
Sometimes Audio may be interrupted, or image may be paused.
Camera preview size can be changed (see page 66).
Page layout can be changed (see page 39 to page 41).
If you monitor the camera with audio feature, audio may be interrupted
due to your PC performance or network environment. In this case, lower
the max. bandwidth setting on the Network page of the camera.
If the camera is set to display a static image, the monitoring page displays
a blue screen.
Operating Instructions
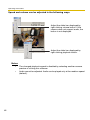
2.6.2
Using Operation Bar
You can operate camera on the monitoring page. If the feature is not permitted, the
buttons are grayed out.
Preset
Display:
When clicking a preset button, the preset name
appears. Camera operation information is also
displayed.
Refresh:
The latest registered buttons are displayed (see
page 52).
Pan/Tilt
Scan*1:
Moves the lens throughout the horizontal (
vertical (
position.
) range, and returns to the original
Pan/Tilt/Home Controls lens direction.
Position*1
Pan ( : Left,
: Right), Tilt (
: Up,
: Down) and Home Position (
: Center)
Preset
Button*1:
Applies the camera direction to a preset position.
Zoom*1
Zooms in or out (see page 50).
Tele
Focus*
1
, Wide
Focuses the image (see page 51).
Near
*1
) or
, Auto
, Far
Brightness*1:
Changes brightness in nine steps including [STD]
(Standard). Clicking [-] or [+] changes the image
brightness.
Resolution*1:
Selects [640 x 480], [320 x 240] (default) or [160 x
120] pixels.
Image
Quality*1:
Selects the image quality.
•
[Favor Clarity] optimizes the image for good
clarity.
•
[Standard] keeps the standard quality. (default)
•
[Favor Motion] optimizes the image for motion
display.
If the camera disables their controls, you cannot control their features.
49
Operating Instructions
Zooming in and out
(Cameras available for the zooming in and out function)
Clicking tele button
zooms in
(maximum 42x*1), clicking wide button
zooms out. The camera zooms in or out at a
regular rate.
*1
50
Optical zoom is 21x and digital zoom is 2x.
Operating Instructions
Focusing
(Cameras available for the focusing function)
The camera has automatic or manual focusing features.
•
Automatic Focus
Click
button. It is recommended to
use automatic focus. You can return to
automatic focus from manual focus
clicking
•
button.
Manual Focus
Clicking
or
to manual focus.
sets the camera
•
button moves the pint closer to the
camera.
•
button moves the pint further from
the camera.
51
Operating Instructions
2.6.3
Using Preset Buttons
The camera preset buttons can be used. Clicking home position or preset buttons
(1-8) changes position to registered position.
Registered buttons are displayed blue.
Unregistered buttons are displayed gray.
1. Click the preset number.
•
Preset name is displayed in the upper side.
Note
If the preset button is changed while this software is being used, the change
is not reflected on this software. Clicking [Refresh] displays the latest preset
buttons.
52
Operating Instructions
2.7
Recording the Image
2.7.1
Manually Recording the Image
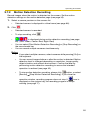
This software allows you to manually record images. Set the image settings on the
camera information page (see page 33).
1. Select a camera preview on the camera list.
•
Selected camera is displayed in a blue frame (see page 66).
2. Click
•
.
Selected camera is recorded.
•
To stop recording, click
•
is displayed during recording (see page 66). (Left: Green,
Center: Red)
You can select [Start Recording] or [Stop Recording] on the record menu
bar.
You can record multiple cameras simultaneously.
•
.
•
Notes
•
If you select multiple cameras, select cameras while pressing [Ctrl] on the
keyboard.
•
File sizes of recorded images listed below can be used as a baseline. (1 frame
size)
Resolution
Items
Favor
Clarity
Standard
Favor
Motion
640 x 480
File Size
About
50 KB
About
33 KB
About
20 KB
320 x 240
File Size
About
25 KB
About
16 KB
About
8 KB
160 x 120
File Size
About
7 KB
About
5 KB
About
3 KB
53
Operating Instructions
•
•
•
•
54
Recorded capacity can be calculated by
Size (KB) x Frame Rate (frames per second) x time (second).
E.g.
640 x 480 resolution, Favor Clarity and 12 frames per second for an hour
settings
50 (KB) x 12 (fps) x 3,600 (s) = 2,160,000 (About 2.06 GB)
If the audio is attached, add 4 KB per second.
2,160,000 (KB) + 4 (KB) x 3,600 (s) = 2,174,400 (About 2.08 GB)
The setting change on operation bar is not reflected to recording. If you change
resolution or image quality of recorded images, change the settings on the
image settings page (see page 33).
To stop recording, always click
button, or select [Record] [Stop
Recording]. If you close the operation window, recording program does not
stop. If
icon is displayed on the system tray, the recording program is
always working (see page 17).
If network is disconnected during recording, recording is paused. When
network is connected, recording starts again.
Operating Instructions
2.7.2
Motion Detection Recording
Record images when the motion is detected on the screen. Set the motion
detection settings on the motion detection page (see page 35).
1. Select a camera preview on the camera list.
•
Selected camera is displayed in a blue frame (see page 66).
2. Click
•
.
Selected camera is recorded.
•
To stop recording, click
•
is displayed during motion detection recording (see page
66). (Left: Green, Center: Red, Right: Red)
You can select [Start Motion Detection Recording] or [Stop Recording] on
the record menu bar.
You can record multiple cameras simultaneously.
•
•
.
Notes
•
•
•
If you select multiple cameras, select cameras while pressing [Ctrl] on
the keyboard.
You can record images before or after the motion is detected. Motion
detection level is changed depending on resolution, image quality,
object situation and network environment. Confirm the level by
performing motion detection recording to assure the intended
operation is realized (see page 35).
To stop motion detection recording, always click
button, or select
[Record] [Stop Motion Detection Recording]. If you close the
operation window, recording program does not stop. If
icon is
displayed on the system tray, the recording program is always
working (see page 17).
55
Operating Instructions
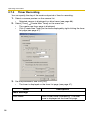
2.7.3
Timer Recording
You can specify the day of the week and period of time for recording.
1. Select a camera preview on the camera list.
•
Selected camera is displayed in a blue frame (see page 66).
2. Select [Timer]
•
•
[Create New Timer] on the menu bar.
The create new timer page is displayed.
Click [Create New Timer] on the menu displayed by right-clicking the timer
list page (see page 47).
3. Set the parameters, and click [OK].
•
The timer is displayed on the timer list page (see page 47).
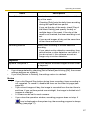
Items
Descriptions
Basic Settings
Timer Name
56
Enter a timer name (mandatory). The timer
name is displayed on the timer list page.
Operating Instructions
Items
Timer Schedule
Descriptions
To set a timer, set start time, end time and the
day of the week.
• Checking [Daily] sets the daily timer recording
during the specified time period.
• If you set the day of the week, check [Day of
the Week Setting] and specify the day or
multiple days of the week. If the day of the
week is not checked, the timer recording is not
set.
• If you record images all day, set the same time
at start time and end time.
Recording Method
Select timer recording or motion detection
recording.
• If you select motion detection recording, time
period before or after detection can be set. If
you do not set it, this software records an
image only at motion detection.
Keyword
Keyword 1/Keyword 2
•
•
You can search recorded images for each timer
by keyword.
If you change default by checking [Set to Default] and clicking [OK], the current
settings become as a default.
If you click [Return to Default], the settings return to a default.
Notes
•
•
•
•
If you click Record Stop button during timer recording, timer recording is
not canceled. To cancel it, disable the timer on the timer list page (see
page 58).
If you record images all day, the image is recorded from the start time to
end time. If you set time period over midnight, the image is divided into 2
images at midnight.
10 timers can be set for each camera.
If you close the operation window, recording program does not stop. If
icon is displayed on the system tray, the recording program is always
working (see page 17).
57
Operating Instructions
•
If network is disconnected during recording, recording is paused with the
indictor on (see page 66). When network is connected, recording starts
again.
Editing Timer Settings
1. Select a camera preview on the camera list, and select the timer to change.
2. Change parameters at [Timer] on the menu bar.
•
•
See page 56 for details about parameters.
Click [Edit Current Camera] or double-click the timer to display the setting
page.
Enabling, Disabling or Deleting Timers
If you create a timer, the timer is enabled. The timer menu bar enables you to
enable, disable or delete timers.
•
Timer recording is available only when the timer is enabled. The disabled
timer is not working.
•
You can enable, disable or delete timers by right-clicking the timer list
page.
•
The disabled timer is grayed out.
If you disable the timer, the timer is grayed out.
58
Operating Instructions
2.8
Playing the Recorded Images
2.8.1
Playing the Recorded Images
1. Select a camera preview on the camera list.
•
Selected camera is displayed in a blue frame (see page 66).
2. Select recorded images to play on the recorded image list.
•
The selected recorded image is displayed on the screen.
Camera name is displayed to
play the recorded images.
The screen size can be changed by
dragging the frame where the cursor
is changed to .
If the number of
recorded images
exceeds 100, [<100]
and [100>] are
displayed. The image
before or after 100th
can be displayed.
Screen
Recorded Image List
Select the image to
play.
Page Selection Tab
Recorded images are listed by the recording method.
All:
Displays all recorded images.
Manual Recording: Displays manually-recorded images.
Timer Recording: Displays timer-recorded images.
Motion Detection Displays recorded images of motion
Recording:
detection recording.
Normal Recording: Displays recorded images during all time.
Clicking
displays the page on another window.
59
Operating Instructions
Note
If you click [Refresh] on the menu displayed by right-clicking the recorded
image list, the recorded image list is refreshed.
3. Play recorded images on the screen.
If the camera does not support audio,
is displayed.
Displays the recorded date and
time. Time is displayed with a
millisecond.
Screen
Jump Button
Displays the time period button by
1 hour. Clicking the time period
displays recorded images from that
time on.
Display a
previous image
Slider Bar
from the
displayed image. The playback position
can be set dragging
the bar.
Displays the next image.
Plays images.
Stops playing images.
Pauses playback. The button is changed to
•
60
To start playing again, click
.
during pause.
Operating Instructions
Notes
•
•
•
Sometimes Audio may be interrupted, or image may be paused.
If you monitor the camera with audio feature, audio may be interrupted
due to your PC performance or network environment. In this case, lower
the max. bandwidth setting on the Network page of the camera.
If you minimize the application during playback, playback will be paused,
and if you change the page to the monitoring, recorded image or timer list
page, playback will be stopped.
Recorded images can be played in the following ways
•
•
Double-clicking the recorded image.
Select [Playback] on the menu displayed by right-clicking the recorded
image list.
•
Select [Playback]
[Start] on the menu bar.
Note
Pause, Stop, Next image or Previous image
can be operated on the menu bar.
61
Operating Instructions
Speed and volume can be adjusted in the following ways.
Adjust the slider bar displayed by
right-clicking volume button. If the
camera does not support audio, the
button is not displayed.
Adjust the slider bar displayed by
right-clicking playback button.
Notes
•
•
62
The changed playback speed is disabled by selecting another camera
preview or closing this software.
Audio cannot be adjusted. Audio can be played only at the medium speed
(default).
Operating Instructions
2.8.2
Searching the Recorded Images
You can search images by using recorded time or keyword.
1. Select a camera preview on the camera list.
•
Selected camera is displayed in a blue frame (see page 66).
2. Select [Edit]
•
•
[Search] on the menu bar.
Clicking [Search] tab displays the search page.
The search page is displayed.
Double-clicking
or clicking
displays the
search page on another
window.
Specifies the time period to
search images (see page 65).
Specifies the day of the week.
•
To search in the day of
the week, check it.
Specifies the keyword you set.
Specifies searching folder, recording status and recording method.
Searched Target : Select destination folder or backup folder to search
images.
Recorded Status : Select recording status from all, normal recording*1 or
Recording
Method
motion detection recording*2.
: Select recording method from all, manual, or timer.
*1: Normal recording means the images recorded by
all the set time period by timer recording.
button or recorded
*2: Motion detection recording means the images recorded by
recorded only when motion is detected by timer recording.
button or
63
Operating Instructions
3. Set search conditions, and click [Search Operation].
•
The search result is displayed.
The search
condition is
displayed.
If the number of recorded
images exceeds 100,
[<100] and [100>] are
displayed. The image
before or after 100th can
be displayed.
The search result is displayed.
Notes
•
•
•
•
•
64
If you set the time period, this software search images by the
condition including the time period.
Conditions are added like A and B. For example, if you set [Tuesday]
and [Current Recorded Image], this software searches images
recorded on Tuesday.
Clicking
deletes all search results.
Searched images can be played on the screen (see page 59).
The images that are being backed up cannot be the target for the
search.
Operating Instructions
Search Time Period
To specify the search time period, check the box and specify the time period.
Time period can be set by directly entering date and time or selecting it from the
calendar.
Entering Date and Time
Directly enter date and time.
If you do not set it, this software search
images after the set time.
Selecting Date and Time from Calendar
Displays the previous month.
Displays the next month.
If you click it, the calendar is displayed.
Select the date from the calendar.
Note
Second cannot be set in the time period.
65
Operating Instructions
2.9
Using Camera List
The camera list displays registered camera previews.
The selected camera is displayed in a blue frame.
If you select multiple cameras, select them while pressing [Ctrl] key on the
keyboard.
The image of the selected camera is displayed
on the monitoring page.
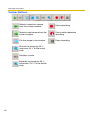
Indicator
: Monitoring
(Left: Green)
: Recording
(Left: Green, Center: Red)
: Motion detection recording
(Left: Green, Center and Right:
Red)
: Stand-by state for motion
detection recording
(Left: Green, Right: Red)
If you select a camera preview and right-click it,
menu is displayed. The camera can be set from
the menu.
Create New
Camera
Image Size
Edit Current
Camera
Enable
Disable
Delete
66
: Displays the create new camera page (see page 30).
: Changes camera preview sizes (320 x 240, 240 x 180,
160 x 120, 120 x 90 (default), 80 x 60, 60 x 45)
: Displays the camera information page (see page 38).
: Enables cameras.
: Disables cameras.
: Deletes cameras.
Operating Instructions
Notes
•
•
Double-clicking
or clicking
displays the camera list on
another window (see page 39).
If the camera is not operated for 15 seconds, the indicator of monitoring
turns off.
67
Operating Instructions
2.10 Enabling or Disabling the Cameras
You can enable or disable cameras.
1. Select the camera to enable or disable, and select [Enable] or [Disable] on the
menu bar [Camera] [Enable or Disable Cameras].
•
You can enable or disable cameras from the menu displayed by rightclicking camera list (see page 66).
•
You can enable or disable multiple cameras.
•
If you select multiple cameras, select cameras while pressing [Ctrl] key on
the keyboard.
To Disable Cameras
•
The following window is displayed. Click [OK] to disable it.
•
If you disable the camera, the monitoring page is not displayed.
Manual recording and timer recording cannot be operated.
Disabling the "Camera01" camera
Notes
•
•
68
You can play images recorded by the disabled cameras.
If you disable the camera, manual recording and timer recording is
stopped. If you enable the camera, timer recording starts again.
Operating Instructions
2.11 Deleting the Registered Cameras
You can delete registered cameras.
Note
If you delete cameras, the recorded images are deleted with the cameras.
If you keep recorded images, disable the cameras (see page 68).
1. Select the camera to delete, and select [Camera]
•
•
•
•
[Delete] on the menu bar.
You can delete cameras from the menu displayed by right-clicking camera
list (see page 66).
You can delete multiple cameras.
If you select multiple cameras, select cameras while pressing [Ctrl] key on
the keyboard.
Confirmation window is displayed.
2. Click [Delete].
•
•
The camera and recorded images are deleted.
Clicking [Disable] disables the camera (see page 68).
69
Operating Instructions
2.12 Converting the Recorded Images
2.12.1 Converting the Recorded Images to JPEG files
1. Select a camera preview on the camera list.
•
Selected camera is displayed in a blue frame (see page 66).
2. Select recorded images to convert to JPEG files on the recorded image page.
•
The selected recorded image is displayed on the screen.
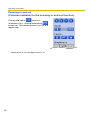
3. Select [Tools]
•
[JPEG Conversion] on the menu bar.
You can select [JPEG Conversion] from the menu displayed by rightclicking the recorded image list.
4. Specify the start time and end time.
5. Set the interval to convert.
6. Click [OK].
•
70
The folder selection window is displayed (see page 25).
Operating Instructions
7. Select the location, and click [OK].
•
JPEG conversion is started.
•
If JPEG conversion is complete, the following window is displayed.
•
JPEG-converted images are saved into the created folder in the location.
The folder is created for each 1,000 images.
Notes
•
•
If you do not set the time, all selected images are converted to JPEG
files.
If it is canceled, images are saved till it is canceled.
71
Operating Instructions
2.13 Other Features
2.13.1 Importing the Camera Information
This software can import the camera information. The camera information can be
imported to this software on another PC.
1. Select [Tools]
•
•
[Import Camera Settings] on the menu bar.
The import file selection window is displayed.
To import the camera information from BB-HNP60, select [BB-HNP60
Camera Definition File] at the file type. To import from this software, select
[Camera Definition File].
2. Select a file and click [Open].
•
The camera information is imported.
Notes
•
This software can import camera information from BB-HNP60 or this
software.
This software:
BB-HNP60:
•
All camera information can be imported.
Basic settings and image settings can be imported.
BB-HNP60 setting information file is saved in the
destination folder.
Setting information cannot be imported if you cannot access the
target camera for the setting information.
2.13.2 Exporting the Camera Information
This software can export the camera information. The camera information can be
exported for this software on another PC.
1. Select [Tools]
•
[Export Camera Settings] on the menu bar.
The export file save window is displayed.
2. Select the location, and click [Save].
•
72
The camera information is exported.
Operating Instructions
2.13.3 Copying the Recorded Images
This software can copy the monitoring image to the clipboard.
1. Right-click the image on the monitoring page.
•
The copy menu is displayed.
2. Click [Copy].
•
This software copies the image to the clipboard.
Notes
•
•
The clipboard is a place to temporarily save in copying or pasting
data. The copied image can be used in the program such as Paint.
You can copy the image by selecting [Edit] [Copy] on the menu bar.
2.13.4 Changing the Keyword of the Recorded Images
You can change the keyword set to the recorded images.
1. Select a camera preview on the camera list.
•
Selected camera is displayed in a blue frame (see page 66).
2. Select an image to change the keyword on the recorded image page.
3. Select [Recorded Images] [Edit Keyword] on the menu bar.
•
•
You can select [Edit Keyword] from the menu displayed by right-clicking
recorded image.
The keyword change window is displayed.
4. Change the keyword, and click [OK].
•
The keyword is changed.
73
Operating Instructions
2.13.5 Deleting the Recorded Images
1. Select a camera preview on the camera list.
•
Selected camera is displayed in a blue frame (see page 66).
2. Select the recorded images to delete on the recorded image page.
•
You can select multiple images.
3. Select [Recorded Images]
•
•
[Delete] on the menu bar.
You can select [Delete] on the menu displayed by right-clicking the
recorded image.
The confirmation window is displayed.
4. Click [OK].
•
The selected images are deleted.
Note
This software can delete 100 images at a time. If images to delete
exceeds 100, repeat the deletion.
74
Operating Instructions
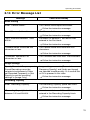
2.14 Error Message List
Message
Cause and Remedy
Basic Setting
Enter "Camera Name".
• The Camera Name space was blank.
Follow the instruction message.
Enter "Camera Address".
• The Camera Address space was blank.
Follow the instruction message.
"Port" should be between 1 and
65535.
• A number not between 1 and 65535 was
entered in the Port blank.
Follow the instruction message.
"Camera Name" should be 250
characters or less.
• The Camera Name was more than 250
characters.
Follow the instruction message.
"Comment" should be 128
characters or less.
• The Comment was more than 128 characters.
Follow the instruction message.
Image Settings
Specify Recorded Frequency and • Image settings are set to [Recorded
Sound Recording cannot be
Frequency Specify], and [Audio and Image]
selected simultaneously. Either
are selected simultaneously. Or if another tab
set Recorded Frequency to [Not
or OK is pressed in this state.
Specify] or set the recording
Follow the instruction message.
settings to [Image Only].
Recording Capacity
Enter "Recording Capacity".
• The Recording Capacity space was blank.
Follow the instruction message.
"Recording Capacity" should be
between 100 and 500000.
• A number not between 100 and 50000 was
entered in the Recording Capacity blank.
Follow the instruction message.
75
Operating Instructions
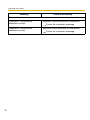
Message
Cause and Remedy
Keyword
76
"Keyword 1" should be 40
characters or less.
• Keyword 1 was more than 40 characters.
"Keyword 2" should be 40
characters or less.
• Keyword 2 was more than 40 characters.
Follow the instruction message.
Follow the instruction message.
Operating Instructions
Message
Cause and Remedy
Parameter Error
An error has occurred in the
• This is a software error.
"XXXX" parameter in "Create New
If same error message appears after trying
Camera (Camera Registration
again, restart your PC.
Information)". Try again.
"XXXX" =
•
Camera ID
•
Camera Name
•
Comment
•
Camera Address
•
Camera Address Port
•
User Name
•
Password
•
Using Proxy
•
Resolution
•
Image Quality
•
Recorded Frequency
•
Audio Recording Settings
•
Limit the Recording Capacity
•
Recording Capacity
•
Motion when Reaching the
Recording Capacity
•
Recording Flag before Motion
Detection
•
Number of Seconds before
Motion Detection
•
Recording Flag after Motion
Detection
•
Number of Seconds after
Motion Detection
•
Sensitivity
•
Threshold
•
Keyword 1
•
Keyword 2
•
Camera Type
77
Operating Instructions
Timer Setting
Message
Cause and Remedy
Basic Setting
Enter "Timer Name".
• Timer Name space was blank.
Follow the instruction message.
Select a day of the week.
• There is a check in the Day Specification
Radio Button but no check in any of the Day
Buttons.
One day or more must be selected.
"Timer Name" should be 24
characters or less.
• Timer Name was more than 24 characters.
Follow the instruction message.
Keyword
78
"Keyword 1" should be 40
characters or less.
• Keyword 1 was more than 40 characters.
"Keyword 2" should be 40
characters or less.
• Keyword 2 was more than 40 characters.
Follow the instruction message.
Follow the instruction message.
Operating Instructions
Message
Cause and Remedy
Parameter Error
An error has occurred in the
• This is a software error.
"XXXX" parameter in "Create New
Check that the correct information is
Timer (Timer Registration
inputted into each error heading.
Information)". Try again.
"XXXX" =
•
Camera ID
•
Timer ID
•
Timer Name
•
Daily/Weekly Setting
•
Day of the Week
•
Start Time
•
End Time
•
Recording Method
•
Recording Flag before Motion
Detection
•
Number of Seconds before
Motion Detection
•
Recording Flag after Motion
Detection
•
Number of Seconds after
Motion Detection
•
Keyword 1
•
Keyword 2
Preferences
Message
Cause and Remedy
Destination
Enter "Minimum Free Disk Space". • Hard Disk Capacity space was blank.
Follow the instruction message.
"Minimum Free Disk Space"
should be between 100 and
50000.
• A number not between 100 and 50000 was
entered in the Hard Disk Capacity blank.
Follow the instruction message.
79
Operating Instructions
Message
Cause and Remedy
"Minimum Free Disk Space"
should be less than the current
free space (*** MB).
• The free space on the disk is larger than the
free space on the drive.
Select "Save Destination Folder".
• Save Destination Folder Path space was
blank.
Follow the instruction message.
Follow the instruction message.
Backup
Enter "Minimum Free Disk Space". • Minimum Free Disk Space field was blank.
Follow the instruction message.
"Minimum Free Disk Space"
should be between 100 and
50000.
• A number not between 100 and 50000 was
entered in the Minimum Free Disk Space
blank.
Follow the instruction message.
"Minimum Free Disk Space"
should be less than the current
free space (XXX MB).
• The free space on the disk is larger than the
free space on the drive.
Select "Backup Folder".
• The Backup Destination Folder Path space
was blank.
Follow the instruction message.
Follow the instruction message.
Network
Enter "Proxy Server Address".
• [Use a proxy server] is checked and the
Address space was blank.
Follow the instruction message.
"Port" should be between 1 and
65535.
• A number not between 1 and 65535 was
entered in the Port blank.
Follow the instruction message.
80
Operating Instructions
Message
Cause and Remedy
Parameter Error
A "XXXX" error has occurred in
• This is a software error.
"Preferences". Try again.
If same error message appears after trying
"XXXX" =
again, restart your PC.
•
Save Destination Folder
•
Save Destination Free Disk
Space
•
Perform Automatic Backup
•
Backup Folder
•
Backup Destination Free Disk
Space
•
Backup Execution Time
•
Backup Period
•
Backup Day of the Week
•
Backup Date
•
Using a Proxy Server
•
Proxy Server Address
•
Proxy Server Address Port
•
Proxy User Name
•
Proxy Password
Search
Message
"Search Keyword" should be 40
characters or less.
Cause and Remedy
• If Search Keyword was more than 40
characters.
Follow the instruction message.
Set the "Start Date and Time" so • If Start Date and Time comes after the End
that it comes before the End Date
Date and Time.
and Time.
Follow the instruction message.
81
Operating Instructions
Message
Cause and Remedy
Parameter Error
An error has occurred in the
"XXXX" parameter in "Search
Recorded Image List". Try again.
"XXXX" =
•
Camera ID
•
Number of Search Results
•
Search Start Number
•
Search Topic
•
Recording Status
•
Recording Type
•
Start Date and Time
•
End Date and Time
•
Day Specification
•
Keyword
•
Folder Specification
• This is a software error.
If same error message appears after trying
again, restart your PC.
Keyword Change
Message
82
Cause and Remedy
"Keyword 1" should be 40
characters or less.
• Keyword 1 was more than 40 characters.
"Keyword 2" should be 40
characters or less.
• Keyword 2 was more than 40 characters.
Follow the instruction message.
Follow the instruction message.
Operating Instructions
Message
Cause and Remedy
Parameter Error
An error has occurred in the
"XXXX" parameter in "Edit
Keyword". Try again.
"XXXX" =
•
Camera ID
•
Recorded Image ID
•
Recorded Image Save
Destination
•
Keyword 1
•
Keyword 2
• This is a software error.
If same error message appears after trying
again, restart your PC.
License Registration
Message
Enter "Registration Code".
Cause and Remedy
• Registration Code space was blank.
Follow the instruction message.
Enter "License Key".
• License Key space was blank.
Follow the instruction message.
An error has occurred in the
"XXXX" parameter in "License
Registration". Try again.
"XXXX" =
•
Registration Code
•
License Key
• This is a software error.
If same error message appears after trying
again, restart your PC.
83
Operating Instructions
JPEG Conversion
Message
Cause and Remedy
"Start Time" should be within the
recording time.
• The start time is not within the recording time.
Set the "Start Time" so that it
comes before the End Time.
• The start time comes after the end time.
Set the "End Time" to within the
recording time.
• The end time is not within the recording time.
"Conversion Interval" should be
between 1 and (the number of
images - 1).
• The frequency is not between 1 and (end time
- start time [seconds]), or the space was blank.
"Conversion Interval" should be
between 1 and (end time - start
time [seconds]).
• The number is larger than the time period
between the start time and end time.
"Conversion Interval" should be
between 1 and 3600.
• The image is recorded for more than 1 hour,
but the converted interval is not between 1 and
3600.
Follow the instruction message.
Follow the instruction message.
Follow the instruction message.
Follow the instruction message.
Follow the instruction message.
Follow the instruction message.
The conversion file is possibly
• The converted file has been opened in
being used in another application.
another application.
Confirm that it is not being used
Close other applications and try again.
and try again.
The recorded images could not be • There is no recorded images.
found. Refresh the Recorded
Refresh the recorded images and try
Image List and try again.
again.
A write error has occurred.
84
• An error has occurred in JPEG conversion.
Operating Instructions
Other Errors
Message
Recording cannot be started
because "XXXX" has reached its
recording capacity. Delete
unnecessary images in order to
start recording.
"XXXX" =
•
Camera Name
Cause and Remedy
• The capacity has reached the recording
capacity limit.
Delete unnecessary images, or change
the settings of recording capacity limit.
Recording cannot be started
• The camera is disabled. (The disabled camera
because "XXXX" has disabled the
cannot be recorded.)
camera. Enable the camera in
Follow the instruction message.
order to start recording.
"XXXX" =
•
Camera Name
Software Startup failed.
Restart this software.
If situation does not improve after
restarting the software, restart
your PC.
• This software fails to start the ncrcore.exe file.
An internal communication error
has occurred. Restart this
software.
If situation does not improve after
restarting the software, restart
your PC.
• The ncrcore.exe file is not started, or this
software cannot open the ncrcore.exe file.
Restart your PC.
Restart your PC.
If camera is disabled, the
• The camera is disabled.
connection is broken and the timer
Follow the instruction message.
and recording functions are also
disabled.
Is it OK to disable all the selected
camera?
Connection to the camera cannot
be confirmed.
The Address, Port Number or
Proxy settings may be incorrect.
Are you sure you want to save?
• The camera cannot be accessed.
Follow the instruction message.
85
Operating Instructions
Message
Cause and Remedy
Camera could not be
authenticated. Check the User
Name and Password and try
again.
• This software do not pass the camera
authentication.
The specified camera does not
support audio. Change the
recording settings to image only.
• The camera is not supporting audio, but the
image setting is set to audio and image.
Follow the instruction message.
Follow the instruction message.
There is insufficient free space on • The destination free disk space is insufficient.
the Save Destination Disk. Delete
Reduce the destination free disk capacity,
unnecessary recorded images and
or change the destination.
try again.
Is it OK to delete all the selected
recorded images?
• The recorded images are deleted.
Follow the instruction message.
Recorded images in use cannot be • You are deleting images during recording.
deleted. Stop the recording and try
Follow the instruction message.
again.
The recorded images could not be • You manually deleted recorded images.
found. Refresh the Recorded
Follow the instruction message.
Image List and try again.
There were recorded images that
could not be deleted. Try again.
• The file has been opened in another
application
Close other applications and try again.
There were timers that could not
be enabled. Try again.
• This software is malfunctioning. (This
message is not normally displayed.)
Restart your PC.
There were timers that could not
disabled. Try again.
• This software is malfunctioning. (This
message is not normally displayed.)
Restart your PC.
Is it OK to delete all the selected
timers?
86
• The timer is deleted.
Follow the instruction message.
Operating Instructions
Message
There were timers that could not
be deleted. Try again.
Cause and Remedy
• This software is malfunctioning. (This
message is not normally displayed.)
Restart your PC.
Is it OK to apply the proxy settings • You checked [Use a proxy server] on the
to all cameras?
network page of the preferences. (The camera
should be registered.)
Follow the instruction message.
All cameras have been set to use
proxy settings.
• You clicked [Yes] in the "Is it OK to apply the
proxy settings to all of the cameras?"
message, and the saving is complete.
Follow the instruction message.
Applying proxy settings to all
cameras has failed. Apply
individually.
• You clicked [Yes] in the "Is it OK to apply the
proxy settings to all of the cameras?"
message, but the saving is failed.
Check the [Use Proxy Server] box for each
camera on the registration information
change or basic settings page.
"XXXX" error occurred during
importing.
"XXXX" =
•
File Type
•
File Size
•
Memory Shortage
•
Open
• This software cannot import from the file at
[Tools] [Import Camera Settings].
The file is broken.
The number of registered cameras • The registered cameras has reached the
reached the maximum of "XXX"
maximum limit during import.
cameras, so importing was
Delete unnecessary cameras.
canceled.
"XXX" =
•
64
Exporting failed.
• This software cannot export to the file at
[Tools] [Export Camera Settings].
The file is broken.
License registration is complete.
• License registration is complete.
87
Operating Instructions
Message
Cause and Remedy
The registration information was
incorrect. Check the registration
code and license key and try
again.
• The registration information was incorrect.
To use this feature, license
registration is essential. Perform
license registration.
• Some features cannot be used without license
registration (JPEG Conversion).
The file could not be found.
• The Operating Instructions file is not in
software folders. (The file may be manually
deleted.)
Check the registration code and license
key and try again.
Perform license registration.
Install this software again.
PDF related applications could not • Install Adobe Reader and try again.
be found. Install Adobe Reader.
Connection with the proxy server • The proxy server cannot be accessed.
could not be confirmed. The
Check the address and port number of the
Address or Port Number settings
proxy server.
may be incorrect. Are you sure you
want to save?
Proxy server could not be
authenticated. Check the User
Name and Password, and try
again.
• This software does not pass the proxy
authentication.
Check the user name and password of the
proxy server.
The web browser could not be
• Web browser could not be started (Download,
started. Start the web browser and
support information and camera portal site).
access the following URL.
Install the web browser (Internet Explorer
6.0 or later).
Network Drive could not be
specified in the Save Destination
Folder. Specify a local drive.
• Network drives or folders on the network could
not be specified as the save destination folder.
Network Drive could not be
specified in the Backup Folder.
Specify a local drive.
• Network drives or folders on the network could
not be specified as the backup destination
folder.
Specify a local drive.
Specify a local drive.
88
Operating Instructions
Message
Cause and Remedy
Network Drive could not be
specified in the Import File.
Specify a local drive.
• Network drives or folders on the network could
not be specified to create an export file.
Network Drive could not be
specified in the Export File.
Specify a local drive.
• Network drives or folders on the network could
not be specified to create an export file.
"Save Destination Free Disk
Space" should be less than the
current free space (XXX MB).
• The disk free capacity set on the preferences
page is larger than the actual capacity.
"Backup Destination Free Disk
Space" should be less than the
current free space (XXX MB).
• The backup disk free capacity set on the
preferences page is larger than the actual
capacity.
Specify a local drive.
Specify a local drive.
Set the disk free capacity smaller than the
actual capacity.
Set the disk free capacity smaller than the
actual capacity.
"XXXX" cannot be accessed.
"XXXX" =
•
Save Destination Folder
•
Backup Folder
•
JPEG Conversion Folder
•
Import File
•
Export File
• The folder or file cannot be accessed because
the drive cannot be found or the path is not
available.
Properly select a folder of file.
If "Set to Default" is checked,
• You checked [Set to Default] on the create
settings are returned to the state in
new camera page, or image, recording
"Create New Camera". The default
capacity limit or motion detection recording
registration information does not
settings on the camera registration
change.
information page.
Follow the instruction message.
If "Set to Default" is checked,
• You checked [Set to Default] on the create
settings are returned to the state in
new timer page, or basic setting on the timer
"Create New Timer". The default
registration information page.
registration information does not
Follow the instruction message.
change.
89
Operating Instructions
Message
Cause and Remedy
There is only XX MB of free space • The save destination free space is less than
remaining in Save Destination
100 MB.
Folder Disk. Either increase the
Follow the instruction message
free space to over 100 MB or
select a disk with over 100 MB of
free space.
There is only XX MB of free space • The backup destination free space is less than
remaining in Backup Folder Disk.
100 MB.
Either increase the free space to
Follow the instruction message.
over 100 MB or select a disk with
over 100 MB of free space.
90
An error has occurred in the
"XXXX" parameter in "Disable
Camera". Try again.
"XXXX" =
•
Camera ID
•
Disable Flag
If same error message appears after trying
again, restart your PC.
An error has occurred in the
"XXXX" parameter in "Delete
Camera". Try again.
"XXXX" =
•
Camera ID
If same error message appears after trying
again, restart your PC.
An error has occurred in the
"XXXX" parameter in "Manual
Recording ON". Try again.
"XXXX" =
•
Camera ID
•
Recording mode
If same error message appears after trying
again, restart your PC.
An error has occurred in the
"XXXX" parameter in "Manual
Recording OFF". Try again.
"XXXX" =
•
Camera ID
If same error message appears after trying
again, restart your PC.
Operating Instructions
Message
Cause and Remedy
Recording has stopped because • The destination free space has reached the
either there is insufficient free disk
limit set on the preferences page, or the save
space or the disk cannot be written
destination folder is not writable and recording
on.
is stopped.
Confirm that there is sufficient free
1. Decrease the save destination free
space on the save destination disk
space.
and that the save destination
folder is in a writable condition,
2. Create enough free space on the
then try recording again.
destination folder.
3. Confirm that there is a folder. If there
is not, create it.
4. Check if the folder is writable, and set
it writable.
Backing up has stopped because • The backup destination free space has
either there is insufficient free
reached the limit set on the preferences page,
backup disk space or the disk
or the backup destination folder is not writable
cannot be written on.
and backup is stopped.
Confirm that there is sufficient free
1. Decrease the backup destination free
space on the backup destination
space.
disk and that the backup
destination folder is in a writable
2. Create enough free space on the
condition, then back up again.
backup destination folder.
3. Confirm that there is a folder. If there
is not, create it.
4. Check if the folder is writable, and set
it writable.
"XXXX" has reached its recording • The recorded images of the camera have
capacity, so recording has been
reached the limit of recording capacity and
stopped. Delete recorded images
recording is stopped.
and try recording again.
Delete the recorded images of the camera,
"XXXX" =
or increase the recording capacity.
•
Camera Name
When the software is shut down, • Right-click and select [Exit].
the camera stops recording. Any
Follow the instruction message.
set timers will also stop operating.
Is it OK to shut down?
91
Operating Instructions
Message
Backup failed.
Cause and Remedy
• Folder creation error occurs during backup.
Confirm that the backup destination folder
is writable. If same error message appears
after trying again, restart your PC.
92
Operating Instructions
2.15 Troubleshooting
Problem
The camera image
is not displayed.
Cause and Remedy
• The camera is not powered up.
Turn the camera on.
• The camera IP address is incorrect.
Set the proper IP address at the basic settings on the
camera registration information page.
• The authentication is required for the camera.
Set the proper user name and password at the basic
settings on the camera registration page.
• Network to which your PC is connected is not working.
Confirm that the network is working.
• The network is congested.
Pages may not be displayed immediately. Wait for a
while.
• The proxy setting is incorrect.
If the camera cannot be accessed without a proxy server,
the proxy setting should be set on this software. Check
[Use Proxy Server] and set the proxy settings at
[Tools] [Preferences] [Network Connection] on the
menu bar.
• More than 4 installations have been connected to the
camera.
The number of connections from software to the camera
is limited. Up to 3 connections can be established with
the camera.
"Register a license
key." is displayed
on the monitoring
page.
• The license registration is not performed.
Perform the license registration entering registration
code and license key at [Help] [License Registration]
on the menu bar.
93
Operating Instructions
Problem
Timer recording is
not working.
Cause and Remedy
• The day of the week is not checked at the day of the week
setting on the timer page.
Check the day of the week to enable timer recording.
• Timer is disabled. (Timer is grayed out on the timer list.)
Select the timer on the timer list, and click [Enable] on the
menu displayed by right-clicking the timer list.
You cannot pan or
tilt the camera.
• Pan/tilt operation is not permitted on the camera settings.
Permit the pan/tilt operation.
• The camera does not support pan/tilt operation.
This software is
unstable or does
not work.
• Your PC specification does not meet the requirement.
The audio cannot
be listened during
monitoring.
• The camera does not support audio.
Close other applications.
The camera should support audio.
• Microphone is not properly connected.
Confirm that microphone is properly connected.
• Volume setting on your PC is muted or set to minimum.
Adjust the volume on the volume control window on your
PC.
• Speaker is malfunctioning.
Confirm that the speaker is working.
Audio cannot be
• [Image Only] is selected at record settings on the camera
listened while
registration information page.
viewing images with
If [Image Only] is selected, the audio is not recorded.
audio.
Select [Image and Audio] to record audio.
Audio is not
synchronized with
images on the
monitoring page or
screen.
94
• Audio delays 1 or 2 seconds after the image. Audio may be
interrupted or the image may be paused. This is not a
problem.
Operating Instructions
Problem
Cause and Remedy
You cannot change • Resolution or image quality control is not permitted on the
resolution or image
camera settings.
quality.
95
Operating Instructions
2.16 Default Setting List
Items
Create New
Camera/
Camera
Registration
Information
Basic
Settings
Image
Settings
Camera Name
-
Comment
-
Camera Address
-
Port
-
User Name
-
Password
-
Use a proxy server
-
Resolution
320 x 240
Image Quality
Standard
Recorded Frequency
Not Specify
Audio Recording Settings
Image Only
Recording
Capacity
Limit
Limit the recording
capacity.
-
Motion
Detection
Before motion is detected:
-
Keyword
Create New
Timer/Timer
Registration
Information
Default
Basic
Settings
After motion is detected:
5 seconds
Keyword 1
-
Keyword 2
-
Timer Name
-
Timer Schedule
Daily
Start Time: 00:00:00
End Time: 00:00:00
Recording Method
Keyword
96
Record images during
all the set time period.
Keyword 1
-
Keyword 2
-
Operating Instructions
Items
Recorded
Images
Preferences
Search
Destination
Time Period Setting
-
Weekly Setting
-
Search Keyword
-
Searched Target
Current Recorded
Image
Recorded Status
All
Recording Method
All
Destination
Maintaining the hard disk
capacity
Backup
Network
Connection
Default
C:\Program
Files\Panasonic\NCR2
100 MB
Perform Automatic Backup
-
Backup Folder
-
Minimum Free Disk Space
-
Backup Schedule
-
Use a proxy server
-
Proxy Address
-
Port
-
Proxy User Name
-
Proxy Password
-
97
Operating Instructions
Index
98
Operating Instructions
A
L
Automatic Backup 26
License Registration 21
B
M
Basic Settings Page 31
Manual Recording 53
Menu Bar 42
Monitoring Page 45
Motion Detection Page 35
Motion Detection Recording 55
C
Camera List 66
CD-ROM Notice 6
Copy 73
Creating New Camera 30
N
Network Camera Recorder Window 39
D
Default Setting List 96
O
Operation Bar 49
E
Editing Camera Information 38
Enabling or Disabling the Cameras 68
End-User License Agreement 8
Error Message List 75
Exporting the Camera Information 72
P
Preset Buttons 52
Proxy Server 28
R
Focus 51
Recorded Image Page 46
Recording Capacity Limit Page 34
Registering the Camera 30
I
S
Image Settings Page 33
Importing the Camera Information 72
Included Accessories 6
Installation Procedure 11
Installing This Software 12
Search Time Period 65
Searching the Recorded Images 63
Security Cautions 7
Selecting a Folder to Save Images 23
System Requirements for your PC 3
J
T
JPEG Conversion 70
Timer List Page 47
Timer Recording 56
Toolbar Buttons 44
Trademarks 3
Troubleshooting 93
F
K
Keyword 73
Keyword Page 37
W
Window Display 39
99
Operating Instructions
Z
Zoom 50
100
PSQX3576WA KK1107RM4019