1
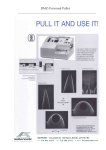
Sutter Operating Instructions
1. Turn On (Lower Left Hand Side)
2. You will then be asked which pre-saved program you would like as shown below
3. Typically select program 1 unless you have saved a program.
RAMP TEST (for new glass)
(i)
If you have a new box of glass pipettes you will need to perform a RAMP TEST to
ascertain the melting point of this glass
(ii)
Press CLR on the keypad
(iii) Press 0 to not clear parameters
(iv)
Select 1 for ramp test
(v)
Install glass and press pull
(vi)
The machine will pull the glass and give a figure for the heat required to melt your
glass.
4. If you wish to adjust the program settings simply type over them, pressing ENT moves onto the
next value, pressing NEXT moves to the next line.
5. Pressing CLR on the keypad gives access to air pressure settings this is used during the cooling
phase of the pull, thick walled glass value:500 thin walled value: 300
6. You will be asked if want to destroy the program, select No (Unless you really do want to wipe
the program
7. Adjust the Heat, Pull, Velocity and Time settings. Here is a sample setting which will pull a
pipette using the GC150 pipettes provided
Heat
Pull
Velocity
Time
530
0
15
150
500
0
10
150
475
0
10
150
Increasing the heat for the last pull will widen the end of the pipette whereas a high heat will result
in a very fine pipette tip. Its best to have settings so that it pulls on the last line and doesn’t go into a
loop as looping reduces the amount of control you have over your pipette diameter.
Low Pull values of 40-75 produce better injection needles whereas values between 120-250
produces good micropipettes
Time values between 150-200, give the pipette a taper depending on the length of time. (Sets cooling
time during slow pull
8. Place your glass pipette into the grove on one of the clamps (blue arrow Fig 1)
9. Carefully pull your pipette clamps together using the bars (red arrows Fig 1) being careful that
the pipette goes through the centre of the filament without damaging it. If you don’t pull clamps
together the puller will not heat
Fig 1
10. Keeping the pipette clamps together with one hand, tighten the clamp screws (green arrow Fig 1)
to hold your pipette in place
11. Press Pull on the keypad (green button.