1
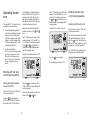
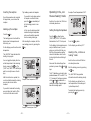
behrotest® ET 2 control unit
Operating instructions
Please read these operating instructions carefully before
commissioning your new behrotest® ET 2 control unit.
These instructions will introduce you to the handling of the ET 2
using clear and simple instructions. Additional information, which is
useful and important for understanding the functioning of the device
is highlighted in the text by means of grey bars.
In the interests of handling the device safely, please take heed of the
safety notes marked with a in these instructions!
We wish you every success in your work with the
behrotest® ET 2
Safety notes
Ensure that no liquids are able to enter the device! Risk of
electric shock!
Before opening the device, the power supply must be
disconnected! Risk of electric shock!
Ensure that all connection cables between the control unit and
the heater are laid in such a way that they do not touch the
heating unit! The cable insulation could become scorched. This
would give rise to a risk of short-circuiting or electric shock!
Table of Contents
behrotest ® ET 2: Overview
behrotest® ET 2: Overview .......................................................... 5
Front view
display
programme LED’s
Setting up and connecting the device ......................................... 6
Setting up the device ................................................................................ 6
Connecting the device .............................................................................. 6
„HEATING“
indicator
lamp
Switching on the device ............................................................... 7
Operating the device ................................................................... 8
Working with the time-controlled programme ........................................ 8
Setting the target temperature and the time .......................................................................... 8
Heating with the time-controlled programme ......................................... 9
Heating up the heating unit ................................................................................................... 9
Inserting the samples .......................................................................................................... 10
Heating up the samples ...................................................................................................... 10
Operating in the „continuous heating“ mode ....................................... 11
Setting the target temperature ............................................................................................. 11
Heating in the „continuous heating“ mode ........................................................................... 11
What to do if ... .......................................................................... 12
mains
switch
key pad
Rear view
connection socket for
temperature sensor
Technical data ........................................................................... 13
power cable
–4–
connection socket for heating unit
–5–
Setting up and connecting the device
Setting up the device
Never set the ET 2 control unit up inside an extraction cabinet as
aggressive gases can damage the device.
Place the device on a dry and level surface.
Both front feet of the ET 2 can be folded out. This allows the front of the
device to be lifted slightly and tilted. This eases operation of the device
and the reading of the values shown on the display.
Connecting the device
Connect the ET 2 control unit to the power supply network.
Insert the mains plug for the heater into the four-pole appliance socket
(„Furnace“) at the rear of the ET 2 and firmly tighten the union nut.
Connect the three-pole diode socket for the sensor in the heater to the socket
labelled „PTl00“ on the rear of the control unit. Now also screw this plug tight.
Switching on the
device
The behrotest® ET 2 mains
switch fulfils two functions. Its
first function is to switch the device on and off. Its second function is provided by the fuse
integrated into the switch.
This fuse operates similarly to an
overload cut-out, which you are
familiar with from domestic applications. It interrupts the circuit in
the event of a current surge or
overload.
Because for this safety function a
spring has to be tensioned, the
mains switch for the ET 2 requires a greater pressure for
switching on than conventional
mains switches.
Switch on the control unit at the
mains switch. The mains switch is
now illuminated, and on the display
the message „OFF“ appears.
–6–
–7–
Operating the device
The behrotest® ET 2 control unit can
operate in 2 operating modes:
1. Time-controlled programme
In the „time-controlled programme“
mode, you select a temperature
and then set a time of your choice
between 1 and 999 minutes. After
this time has expired the ET 2 will
automatically switch off.
2. Continuous heating
In the „continuous heating“ mode,
you select a temperature and
then start the heating process,
which, at the end, is terminated
by you operating the mains
switch.
On the display, the temperature previously set will be shown. If you are using your control unit for the very first
time, the temperature will be shown
that had been set in the factory during
the functional testing of the unit.
The ET 2 will allow you to select a time
between 1 min and 999 min in 1 min.
increments. Continuous pressure on
the
and
keys will lead to a continuous change of time setting with increasing speed.
Heating with the timecontrolled programme
Now select the desired target temand
perature by means of the
keys.
Example: The set time is 90 min.
Switch on the control unit, if this has
not already been done.
Heating up the heating unit
First of all, heat the heating unit up to
the desired temperature. To do this,
key. On the display you
press the
will see the current temperature of the
heating unit („actual temperature“).
The ET 2 will allow you to select a temperature between 20 °C and 450 °C in
1 °C increments. Continuous pressure
and
keys will lead to a
on the
continuous change of target temperature with increasing speed.
The „HEATING“ lamp provides information about the heating activity.
Example: The set temperature is 155 °C
Press the
key once again.
On the display you will see „OFF“.
Working with the timecontrolled programme
Setting the target temperature and the time
Switch on the control unit, if this has
not already been done.
Press the
key. Now the two LED’s
„TIME“ and „PROG“ will be illuminated
on the front panel.
Now select the desired target time by
and
keys.
means of the
Press the . key. Now the two
„TEMP“ and „PROG“ LED’s will be
illuminated on the ET2 front panel.
–8–
–9–
Tip: heating a series of samples
Inserting the samples
If you wish to heat a large number
of samples one after the other,
key immediately afpress the
ter the heating process is completed.
Once the temperature has reached
its target value, you can insert the
samples.
Heating up the samples
Press the
In this case, the heating unit will
maintain the target temperature
and you will avoid the repeated,
time-consuming heating up.
key.
The heating process starts with the
target values for temperature and
time set by you.
On the display you will see the actual
temperature.
After inserting the samples, start the
new heating process by pressing the
key.
The „HEATING“ lamp indicates that
heating is in progress.
You can toggle the display from the
actual temperature to the remaining
key. The
time by means of the
„TIME“ and „TEMP“ LED’s will tell you
what is currently shown on the display.
After the set time has expired, the
control unit will terminate the heating
process and a buzzer will be
sounded.
Example: The set temperature is 155 °C
Operating in the „continuous heating“ mode
Switch on the control unit, if this has
not already been done..
Setting the target temperature
Press the
key. Now the two
„TEMP“ and „PROG“ LED’s will be
illuminated on the ET 2 front panel.
Press the
On the display, the temperature previously set will be shown. If you are
using your control unit for the very
first time, the temperature will be
shown that had been set in the factory during the functional testing of
the unit.
Now select the desired target temand
perature by means of the
keys.
Example: Actual temperature 155 °C
If you wish to terminate the heating
process before that, switch off the
control unit at the mains switch.
key twice.
On the display you will see „OFF“.
Heating in the „continuous
heating“ mode
Switch on the control unit if this has
not already been done.
Start the heating process by pressing
key.
the
The ET 2 will allow you to select a temperature between 20 °C and 450 °C in
1 °C increments. Continuous pressure
on the
and
keyswill lead to a
continuous change of target temperature with increasing speed.
The „HEATING“ lamp provides
information about the heating activity.
On the display you will see the current temperature of the heating unit
(„actual temperature“).
Terminate the heating process by
key.
pressing the
Example: Remaining time 68 min
– 10 –
– 11 –
What to do if ...
Technical data
If a fault occurs during operation of the behrotest® ET 2 control unit, a buzzer
is sounded and a message on the display will inform you about the nature of
the fault.
Fault code
Fault type
Measures for correction of the fault
E03
No signal from
Pt100 temperature sensor
Check that the plug for the temperature
sensor at the rear of the ET 2 is connected and
screwed tight. Switch the control unit off and on
again at the mains switch. If the same fault
message is then displayed, the temperature
sensor in the heating block is probably defective.
Please get in touch with our customer service.
E02
E10
E11
Short circuit in the sensor
Please get in touch with our customer service.
Heating is interrupted
Check that the heating block is connected.
Check the limit switch in the heating block (see
operating instructions for the heating block).
Switch the control unit off and on again at the
mains switch. If the same fault message is then
displayed, the heater in the heating block is
defective probably. Please get in touch with our
customer service.
General fault
External dimensions (w x h x d in mm):
140 x 100 x 270
140 x 135 x 270 with front feet folded out
Weight:
approx. 1.700 g
Material:
powder-coated steel plate
Supply voltage:
230 V/50 Hz
Breaking capacity:
2200 W ohmic load
Connection of the heating devices:
Via integrated four-pole appliance socket. Safety
cut-out is integrated into the mains switch
Sensor:
Pt100 three-wire circuit, three-pole diode socket
with screw connection for sensor
Control behaviour:
PID with anti-drift control
Temperature control range:
20 ... 450 °C,can be set digitally in 1 °C
increments
Control precision:
±1K
Time range able to be set
1 ... 999 min, can be set digitally in 1 min
increments, or unlimited
Switch off the control unit without delay and get
in touch with our customer service.
The address of our customer service is:
behr Labor-Technik GmbH
Spangerstraße 8
D – 40599 Düsseldorf/Germany
Tel.: +49 – 211 – 7 48 47 33
Fax: +49 – 211 – 7 48 47 48
eMail: [email protected]
Internet: http://www.behr-labor.com
– 12 –
– 13 –