1
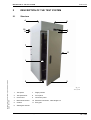
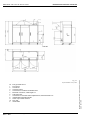
INSTALLATION AND OPERATING INSTRUCTIONS
Test Systems for Pharmaceuticals
VP 600
VP 1300
VP 2000
With Mincon/32-Controller
64567831 GB 04.2006
Table of Contents
INTRODUCTION
CHAPTER 1
1.1
1.2
For your guidance . . . . . . . . . . . . . . . . . . . . . . . . . . . . . . . . . . . . . . . . . . . . . . . . . . . . 1
1.2.1
Symbols . . . . . . . . . . . . . . . . . . . . . . . . . . . . . . . . . . . . . . . . . . . . . . . . . . . . . . 1
1.2.2
Danger warnings . . . . . . . . . . . . . . . . . . . . . . . . . . . . . . . . . . . . . . . . . . . . . . . 1
1.3
Warranty. . . . . . . . . . . . . . . . . . . . . . . . . . . . . . . . . . . . . . . . . . . . . . . . . . . . . . . . . . . . 2
1.4
Normal use and application . . . . . . . . . . . . . . . . . . . . . . . . . . . . . . . . . . . . . . . . . . . . . 3
1.5
Safety . . . . . . . . . . . . . . . . . . . . . . . . . . . . . . . . . . . . . . . . . . . . . . . . . . . . . . . . . . . . . . 4
1.5.1
General information . . . . . . . . . . . . . . . . . . . . . . . . . . . . . . . . . . . . . . . . . . . . . 4
1.5.2
Requirements to be met by the user . . . . . . . . . . . . . . . . . . . . . . . . . . . . . . . . 4
1.5.3
Definition of a skilled person . . . . . . . . . . . . . . . . . . . . . . . . . . . . . . . . . . . . . . 4
1.5.4
Safety symbols . . . . . . . . . . . . . . . . . . . . . . . . . . . . . . . . . . . . . . . . . . . . . . . . 5
1.5.5
Safety instructions . . . . . . . . . . . . . . . . . . . . . . . . . . . . . . . . . . . . . . . . . . . . . . 6
1.5.6
Safety devices . . . . . . . . . . . . . . . . . . . . . . . . . . . . . . . . . . . . . . . . . . . . . . . . . 7
DESCRIPTION OF THE TEST SYSTEM
CHAPTER 2
2.1
2.2
Betriebsanleitung für Prüfschränke für pharmazeutische Produkte
PharmaIVZ.fm GB 04.2006
General information . . . . . . . . . . . . . . . . . . . . . . . . . . . . . . . . . . . . . . . . . . . . . . . . . . . 1
Structure . . . . . . . . . . . . . . . . . . . . . . . . . . . . . . . . . . . . . . . . . . . . . . . . . . . . . . . . . . . 9
Components and their function . . . . . . . . . . . . . . . . . . . . . . . . . . . . . . . . . . . . . . . . . 10
2.2.1
Test space . . . . . . . . . . . . . . . . . . . . . . . . . . . . . . . . . . . . . . . . . . . . . . . . . . . 10
2.2.2
Test space door . . . . . . . . . . . . . . . . . . . . . . . . . . . . . . . . . . . . . . . . . . . . . . . 10
2.2.3
Control unit . . . . . . . . . . . . . . . . . . . . . . . . . . . . . . . . . . . . . . . . . . . . . . . . . . 10
2.2.4
Mechanical section . . . . . . . . . . . . . . . . . . . . . . . . . . . . . . . . . . . . . . . . . . . . 10
2.2.5
Castors . . . . . . . . . . . . . . . . . . . . . . . . . . . . . . . . . . . . . . . . . . . . . . . . . . . . . 10
2.2.6
Entry ports1) . . . . . . . . . . . . . . . . . . . . . . . . . . . . . . . . . . . . . . . . . . . . . . . . . . 10
2.2.7
Switchgear cabinet . . . . . . . . . . . . . . . . . . . . . . . . . . . . . . . . . . . . . . . . . . . . 10
2.2.8
Front panel . . . . . . . . . . . . . . . . . . . . . . . . . . . . . . . . . . . . . . . . . . . . . . . . . . 11
2.2.9
Connector panel . . . . . . . . . . . . . . . . . . . . . . . . . . . . . . . . . . . . . . . . . . . . . . 12
TECHNICAL DATA
CHAPTER 3
3.1
General characteristics . . . . . . . . . . . . . . . . . . . . . . . . . . . . . . . . . . . . . . . . . . . . . . . 13
3.2
Mechanical loads . . . . . . . . . . . . . . . . . . . . . . . . . . . . . . . . . . . . . . . . . . . . . . . . . . . . 13
3.3
Operating data . . . . . . . . . . . . . . . . . . . . . . . . . . . . . . . . . . . . . . . . . . . . . . . . . . . . . . 13
3.4
Noise measurement . . . . . . . . . . . . . . . . . . . . . . . . . . . . . . . . . . . . . . . . . . . . . . . . . . 14
3.5
Humidification system . . . . . . . . . . . . . . . . . . . . . . . . . . . . . . . . . . . . . . . . . . . . . . . . 14
3.6
Climatic tests . . . . . . . . . . . . . . . . . . . . . . . . . . . . . . . . . . . . . . . . . . . . . . . . . . . . . . . 14
3.7
Humidity diagram . . . . . . . . . . . . . . . . . . . . . . . . . . . . . . . . . . . . . . . . . . . . . . . . . . . 15
1) option
I – IV
PREPARATION FOR INITIAL OPERATION
CHAPTER 4
4.1
Preparing the place of installation . . . . . . . . . . . . . . . . . . . . . . . . . . . . . . . . . . . . . . . 17
4.1.1
4.2
Transporting the test system . . . . . . . . . . . . . . . . . . . . . . . . . . . . . . . . . . . . . . . . . . . 21
4.3
Installing the test system . . . . . . . . . . . . . . . . . . . . . . . . . . . . . . . . . . . . . . . . . . . . . . 21
4.4
Supply and discharge connections . . . . . . . . . . . . . . . . . . . . . . . . . . . . . . . . . . . . . . 22
4.5
4.4.1
Overflow/condensate drain . . . . . . . . . . . . . . . . . . . . . . . . . . . . . . . . . . . . . . 23
4.4.2
Automatic water replenishment . . . . . . . . . . . . . . . . . . . . . . . . . . . . . . . . . . . 24
4.4.3
Setting up the power supply . . . . . . . . . . . . . . . . . . . . . . . . . . . . . . . . . . . . . 24
4.4.4
Temperature limiter for the test space . . . . . . . . . . . . . . . . . . . . . . . . . . . . . . 25
Precommissioning check list . . . . . . . . . . . . . . . . . . . . . . . . . . . . . . . . . . . . . . . . . . . 26
PUTTING INTO OPERATION
CHAPTER 5
5.1
5.2
Adding humidification water . . . . . . . . . . . . . . . . . . . . . . . . . . . . . . . . . . . . . . . . . . . . 27
5.1.1
Automatic water replenishment from a network. . . . . . . . . . . . . . . . . . . . . . . 27
5.1.2
Filling by hand . . . . . . . . . . . . . . . . . . . . . . . . . . . . . . . . . . . . . . . . . . . . . . . 27
Preparing the test specimens. . . . . . . . . . . . . . . . . . . . . . . . . . . . . . . . . . . . . . . . . . . 28
5.2.1
5.3
Requirements . . . . . . . . . . . . . . . . . . . . . . . . . . . . . . . . . . . . . . . . . . . . . . . . 28
Adjusting the test specimen protection . . . . . . . . . . . . . . . . . . . . . . . . . . . . . . . . . . . 28
5.3.1
Software temperature and humidity limiter . . . . . . . . . . . . . . . . . . . . . . . . . . 28
5.3.2
Test specimen protection by independent temperature limiter . . . . . . . . . . . 29
5.4
Sealing the entry ports1) . . . . . . . . . . . . . . . . . . . . . . . . . . . . . . . . . . . . . . . . . . . . . . . 31
5.5
Switching on the test system . . . . . . . . . . . . . . . . . . . . . . . . . . . . . . . . . . . . . . . . . . . 31
5.6
5.7
Starting a test . . . . . . . . . . . . . . . . . . . . . . . . . . . . . . . . . . . . . . . . . . . . . . . . . . . . . . . 31
5.6.1
Stability test in manual mode. . . . . . . . . . . . . . . . . . . . . . . . . . . . . . . . . . . . . 31
5.6.2
Tolerance band monitoring. . . . . . . . . . . . . . . . . . . . . . . . . . . . . . . . . . . . . . . 31
Preoperational check list . . . . . . . . . . . . . . . . . . . . . . . . . . . . . . . . . . . . . . . . . . . . . . 32
6.1
After each test . . . . . . . . . . . . . . . . . . . . . . . . . . . . . . . . . . . . . . . . . . . . . . . . . . . . . . 33
6.2
Longer rest periods . . . . . . . . . . . . . . . . . . . . . . . . . . . . . . . . . . . . . . . . . . . . . . . . . . 33
6.3
Final disposal of the test system . . . . . . . . . . . . . . . . . . . . . . . . . . . . . . . . . . . . . . . . 34
FAULT DIAGNOSIS AND RECTIFICATION
CHAPTER 7
7.1
General malfunctions . . . . . . . . . . . . . . . . . . . . . . . . . . . . . . . . . . . . . . . . . . . . . . . . 35
7.2
Messages on the control unit . . . . . . . . . . . . . . . . . . . . . . . . . . . . . . . . . . . . . . . . . . . 35
MAINTENANCE
CHAPTER 8
8.1
General information . . . . . . . . . . . . . . . . . . . . . . . . . . . . . . . . . . . . . . . . . . . . . . . . . . 39
8.2
Consumables . . . . . . . . . . . . . . . . . . . . . . . . . . . . . . . . . . . . . . . . . . . . . . . . . . . . . . . 40
8.3
Maintenance schedule . . . . . . . . . . . . . . . . . . . . . . . . . . . . . . . . . . . . . . . . . . . . . . . 40
8.4
Maintenance work . . . . . . . . . . . . . . . . . . . . . . . . . . . . . . . . . . . . . . . . . . . . . . . . . . . 41
8.4.1
Cleaning the test space . . . . . . . . . . . . . . . . . . . . . . . . . . . . . . . . . . . . . . . . 41
1) option
Betriebsanleitung für Prüfschränke für pharmazeutische Produkte
PharmaIVZ.fm GB 04.2006
PUTTING OUT OF OPERATION
CHAPTER 6
II – IV
Installation requirements . . . . . . . . . . . . . . . . . . . . . . . . . . . . . . . . . . . . . . . . 17
8.4.2
Cleaning the test space seal . . . . . . . . . . . . . . . . . . . . . . . . . . . . . . . . . . . . . 41
8.4.3
Cleaning the air-cooled condenser . . . . . . . . . . . . . . . . . . . . . . . . . . . . . . . . 41
8.4.4
Calibrating the capacitive humidity measuring system . . . . . . . . . . . . . . . . . 41
8.4.5
Cleaning the water reservoir . . . . . . . . . . . . . . . . . . . . . . . . . . . . . . . . . . . . . 42
INTERFACE CONNECTIONS1)
APPENDIX
1.1
Interface RS 2321) . . . . . . . . . . . . . . . . . . . . . . . . . . . . . . . . . . . . . . . . . . . . . . . . . . . . 1
1.2
Interface RS 485 / RS 4221) . . . . . . . . . . . . . . . . . . . . . . . . . . . . . . . . . . . . . . . . . . . . . 2
1.3
Ethernet interface1) . . . . . . . . . . . . . . . . . . . . . . . . . . . . . . . . . . . . . . . . . . . . . . . . . . . . 2
1.4
Analog I/O1) . . . . . . . . . . . . . . . . . . . . . . . . . . . . . . . . . . . . . . . . . . . . . . . . . . . . . . . . . 3
1.5
Potential-free contact for fault signal1) . . . . . . . . . . . . . . . . . . . . . . . . . . . . . . . . . . . . . 3
DEMINERALIZATION UNIT1) TYPE B10DN
APPENDIX
1.1
1.2
1.3
1.4
Description . . . . . . . . . . . . . . . . . . . . . . . . . . . . . . . . . . . . . . . . . . . . . . . . . . . . . . . . . . 1
1.1.1
Design . . . . . . . . . . . . . . . . . . . . . . . . . . . . . . . . . . . . . . . . . . . . . . . . . . . . . . . 1
1.1.2
Function . . . . . . . . . . . . . . . . . . . . . . . . . . . . . . . . . . . . . . . . . . . . . . . . . . . . . . 1
Technical data . . . . . . . . . . . . . . . . . . . . . . . . . . . . . . . . . . . . . . . . . . . . . . . . . . . . . . . 2
1.2.1
Dimensions . . . . . . . . . . . . . . . . . . . . . . . . . . . . . . . . . . . . . . . . . . . . . . . . . . . 2
1.2.2
Connection data . . . . . . . . . . . . . . . . . . . . . . . . . . . . . . . . . . . . . . . . . . . . . . . 2
1.2.3
Performance data . . . . . . . . . . . . . . . . . . . . . . . . . . . . . . . . . . . . . . . . . . . . . . 2
1.2.4
Power supply . . . . . . . . . . . . . . . . . . . . . . . . . . . . . . . . . . . . . . . . . . . . . . . . . 2
Preparation for initial operation . . . . . . . . . . . . . . . . . . . . . . . . . . . . . . . . . . . . . . . . . . 3
1.3.1
Setting up the connections . . . . . . . . . . . . . . . . . . . . . . . . . . . . . . . . . . . . . . . 3
1.3.2
Electrical connection . . . . . . . . . . . . . . . . . . . . . . . . . . . . . . . . . . . . . . . . . . . . 3
Putting into operation . . . . . . . . . . . . . . . . . . . . . . . . . . . . . . . . . . . . . . . . . . . . . . . . . . 4
1.4.1
1.5
1.6
Putting out of operation . . . . . . . . . . . . . . . . . . . . . . . . . . . . . . . . . . . . . . . . . . . . . . . . 4
Malfunctions . . . . . . . . . . . . . . . . . . . . . . . . . . . . . . . . . . . . . . . . . . . . . . . . . . . . . . . . . 5
1.6.1
Betriebsanleitung für Prüfschränke für pharmazeutische Produkte
PharmaIVZ.fm GB 04.2006
1.7
APPENDIX
Venting the cartridge . . . . . . . . . . . . . . . . . . . . . . . . . . . . . . . . . . . . . . . . . . . . 4
Fault diagnosis and rectification . . . . . . . . . . . . . . . . . . . . . . . . . . . . . . . . . . . 5
Maintenance. . . . . . . . . . . . . . . . . . . . . . . . . . . . . . . . . . . . . . . . . . . . . . . . . . . . . . . . . 5
1.7.1
Changing the cartridge . . . . . . . . . . . . . . . . . . . . . . . . . . . . . . . . . . . . . . . . . . 5
1.7.2
Consumables. . . . . . . . . . . . . . . . . . . . . . . . . . . . . . . . . . . . . . . . . . . . . . . . . . 6
1.7.3
behropur station Germany . . . . . . . . . . . . . . . . . . . . . . . . . . . . . . . . . . . . . . . . 6
INDEX
1) option
III – IV
IV – IV
1) option
Betriebsanleitung für Prüfschränke für pharmazeutische Produkte
PharmaIVZ.fm GB 04.2006
INTRODUCTION
GENERAL INFORMATION
1
INTRODUCTION
1.1
General information
This manual shall be read carefully prior to operating the test system in order to avoid malfunctioning and resultant damage.
This manual contains detailed information and directions regarding
– Installation
– Operation
– Mode of operation
– Faults
– Fault rectification
1.2
•
Please observe all separate operating manuals
•
Please observe the operating instructions for options in the appendix
For your guidance
Explanation of the signs and symbols:
1.2.1
Symbols
– A dash is used for enumerations
•
A dot denotes directions which must be followed by operator and user
→ cross-references are preceded by an arrow
1.2.2
Danger warnings
consist of explanatory remarks with a symbol right next to it.
DANGER
is used, if non-compliance with the instructions may endanger living beings or the
environment.
Betriebsanleitung für Prüfschränke für pharmazeutische Produkte
kap1.fm GB 04.2006
WARNING
is used, if non-compliance with the instructions may cause damage to the test system or test specimen.
NOTE
is used to indicate any form of assistance.
1) option
1 – 42
WARRANTY
1.3
INTRODUCTION
Warranty
– The design of the test system as supplied by us must not be altered
– No warranty can be given in case of improper use contrary to the directions in this manual
– The test system has been designed, manufactured and inspected before delivery with
all due care in accordance with the EC directives as per enclosed declaration of conformity
– The test system meets the standards for conducted and emitted interference specified
in the declaration of conformity
– It is imperative for the safety of the test system that the necessary maintenance and repair work should be performed by our service organisation or authorized service outlets
– The user himself can service and clean the test system in accordance with the maintenance schedule
– Only use original spares when performing maintenance or repair work
Betriebsanleitung für Prüfschränke für pharmazeutische Produkte
kap1.fm GB 04.2006
– For translations into other languages the statements and specifications of the German
operating instructions are binding
2 – 42
1) option
INTRODUCTION
1.4
NORMAL USE AND APPLICATION
Normal use and application
This test system has been designed and constructed specifically for stability testing of
pharmaceuticals in compliance with ICH directive Q1A.
You can perform testing methods to determine the effects of temperature and humidity on
the quality of pharmaceuticals.
Other tests involving constant climate are also feasible → 3 (page 13)
DANGER
Improper and inadmissible use of the test system means e.g.:
– Placing inflammable or explosive gases, dusts or fluids inside or in the vicinity of the test
system.
– Placing inflammable, explosive, toxic or corrosive test specimens inside or near the test
system.
– Placing test specimens, which become potentially hazardous when exposed to the temperature range of the test system, in or near the test system.
– Placing substances, which can create an explosive atmosphere with air, inside or in the
vicinity of the test system.
– Endangering living beings by allowing them into the test system
– Using the test system for heating or storing food
Betriebsanleitung für Prüfschränke für pharmazeutische Produkte
kap1.fm GB 04.2006
– Placing heat-emitting or energized test specimens in the test space
1) option
3 – 42
SAFETY
INTRODUCTION
1.5
Safety
1.5.1
General information
Certain basic rules must be observed even for reliable safety devices.
Improper and inadmissible use may represent a danger to life and limb of the operator or
third parties or result in destruction of the test specimen or the test system.
•
Do not remove protective covers
•
Do not render safety devices ineffectual
•
Do not manipulate safety devices
Such manipulations are particularly dangerous as others know nothing about them and
have confidence in the safety of the test system.
1.5.2
Requirements to be met by the user
– Operation of the test system may only be performed by trained personnel
– The user must compile operating instructions on the basis of this manual, taking the relevant local and plant-internal conditions and the language of the operating personnel
into account.
– The user must ensure that all personnel working with the test system know and observe
the safety instructions
– Work on electrical devices and the refrigerating unit must be performed by our service
organisation or a skilled person authorized by us.
The user must ensure that the directions regarding installation and operation of refrigerating plants as per EN 378-1 chap. 5.3, EN 378-2 Appendix C, EN 378-4 chap. 4 and 5, and
national directives are duly observed.
1.5.3
Definition of a skilled person
Betriebsanleitung für Prüfschränke für pharmazeutische Produkte
kap1.fm GB 04.2006
Personnel who, based on their training and experience are in a position to prevent electricity-related potential hazards or dangers connected with the refrigerating unit.
4 – 42
1) option
INTRODUCTION
1.5.4
SAFETY
Safety symbols
Please observe the safety symbols on the test system
OPERATING AND SAFETY INSTRUCTIONS
• Carefully read the operating instructions before putting the test system into operation
• Observe the safety instructions when operating the test system
WARNING ABOUT DANGER AREAS
•
Observe the danger warnings in the operating instructions
WARNING ABOUT DANGEROUS ELECTRICAL VOLTAGE
Work on these devices to be performed by electrical experts only
•
Set the mains switch to »O«
WARNING ABOUT PLUG-AND-SOCKET CONNECTIONS
•
Connectors may only be plugged if the test system is switched off.
WARNING ABOUT HAND INJURIES
The heat exchanger fins are sharp-edged
•
Wear safety gloves
NOT FOR DRINKING
Demineralized water is required for climatic operation
Demineralized water is not drinkable
Betriebsanleitung für Prüfschränke für pharmazeutische Produkte
kap1.fm GB 04.2006
•
1) option
5 – 42
SAFETY
INTRODUCTION
1.5.5
Safety instructions
•
Read first the operating instructions for the control unit
•
Keep the operating instructions near the test system
•
In addition to these operating instructions, the relevant national laws, regulations and
directives must be observed when installing and operating the test system.
•
Prior to closing the test space door, ensure no one is inside.
Maintenance work
•
Set the test system to room temperature
•
Set the mains switch to »O« → 2.2.8 Front panel (page 11)
•
Padlock the mains switch against accidental switching on
•
Provide a safety clearance of > 500 mm between test system and wall, as escape route,
in accordance with VDE 0100 Part 729.
•
Remove the key from the test space door
•
Do not use sharp tools for maintenance work
•
Wear safety gloves
When using the entry ports1)
– Observe the safety standards applicable to electrical systems, e.g. IEC 60364-4-41,
VDE 0100 part 410 and EN 60204 part 1, as well as the relevant accident prevention
regulations.
– Only use lines that are resistant to temperature and humidity
– Seal the used entry ports1) with temperature and humidity-resistant material
Refrigerants
The refrigerants used (→ rating plate) belong to group L1 according to EN 378. They are
not inflammable, nor are they harmful to humans. Refrigerants are heavier than air. Leaking refrigerants will, therefore, accumulate around the floor.
Should refrigerants be released, please notify our service organisation, or a skilled person authorized by us. Ensure that the site is well ventilated.
Betriebsanleitung für Prüfschränke für pharmazeutische Produkte
kap1.fm GB 04.2006
•
6 – 42
1) option
INTRODUCTION
1.5.6
SAFETY
Safety devices
The test systems are equipped with the following safety devices:
Test system and test specimen protection
– Safety temperature limiter (protection against overtemperature in the test system).
Thermal safety class 1 in accordance with EN 60519-2, 1993.
– Independent temperature limiter tmin/tmax (protection against thermal overstressing of
the test specimen). Thermal safety class 2 in accordance with EN 60519-2, 1993.
– Software temperature limiter (protection against non-permissible temperatures in the
test space)
Excess pressure in the refrigeration circuit
– Pressure switch (protection against non-permissible pressure in the refrigeration circuit)
DANGER
The safety devices are only working if the test system is switched on
Betriebsanleitung für Prüfschränke für pharmazeutische Produkte
kap1.fm GB 04.2006
The test systems may be equipped with options. For relevant safety directions see the respective appendices.
1) option
7 – 42
Betriebsanleitung für Prüfschränke für pharmazeutische Produkte
kap1.fm GB 04.2006
SAFETY
8 – 42
INTRODUCTION
1) option
DESCRIPTION OF THE TEST SYSTEM
STRUCTURE
2
DESCRIPTION OF THE TEST SYSTEM
2.1
Structure
4
6
10
9
3
8
7
11
Betriebsanleitung für Prüfschränke für pharmazeutische Produkte
kap2.fm GB 04.2006
1
2
5
Fig. 2-1
Test system
1
Test space
7
Supply section
2
Test space door
8
Front panel
3
Control unit
9
Connector panel
4
Mechanical section
10 Electrical connection, cable length 5 m
5
Castors
11 Entry port
6
Switchgear cabinet
1) option
9 – 42
COMPONENTS AND THEIR FUNCTION
2.2
DESCRIPTION OF THE TEST SYSTEM
Components and their function
Fig. 2-1 (page 9)
2.2.1
Test space
The test space is made of polished high-grade steel material no. 1.4301. The test specimens can be placed on the insert shelves.
2.2.2
Test space door
The test space door can be locked with a key.
2.2.3
Control unit
All control and operating commands can be activated by pressing the function keys on the
control unit.
2.2.4
Mechanical section
The mechanical section is accessible from the top. It contains the equipment necessary for
producing the test conditions.
2.2.5
Castors
The test system is equipped with four castors.
2.2.6
Entry ports1)
Entry ports1) enable the inserting of measuring lines and testing equipment.
•
2.2.7
Observe the relevant safety instructions → When using the entry ports1) (page 6)
Switchgear cabinet
The switchgear cabinet is located in the supply section. It contains the system fuses, control modules and electrical components.
Betriebsanleitung für Prüfschränke für pharmazeutische Produkte
kap2.fm GB 04.2006
The controller design complies with EN 60204 Part 1.
10 – 42
1) option
DESCRIPTION OF THE TEST SYSTEM
2.2.8
COMPONENTS AND THEIR FUNCTION
Front panel
1
2
3
Fig. 2-2
Front panel
The front panel contains:
Independent temperature limiter
2
Mains switch
3
Control unit
Betriebsanleitung für Prüfschränke für pharmazeutische Produkte
kap2.fm GB 04.2006
1
1) option
11 – 42
COMPONENTS AND THEIR FUNCTION
2.2.9
DESCRIPTION OF THE TEST SYSTEM
Connector panel
The connector panel is located on the test system, behind the supply section.
1
5
13
14
6
Fig. 2-3
Connector panel
1
Temperature limiter
5
Centronics interface1)
6
Potential-free contact1) → Appendix: Interface connections1) 1.5 (page 3)
13 RS 232 interface → Appendix: Interface connections1), 1.1 (page 1)
14 RS 485 / RS 4221) interface → Appendix: Interface connections1), 1.2 (page 2)
WARNING
Betriebsanleitung für Prüfschränke für pharmazeutische Produkte
kap2.fm GB 04.2006
Connecting cables may only be plugged if the test system is switched off
12 – 42
1) option
TECHNICAL DATA
3
GENERAL CHARACTERISTICS
TECHNICAL DATA
These figures represent average values of standard test systems, based on an ambient
temperature of +25 °C. Rated voltage → 3.3 (page 13).
Without test specimen, without options.
NOTE
The dimensions are specified in the layout → 4.1 (page 17)
3.1
General characteristics
Test system for pharmaceuticals
600
1300
2000
Test space volume
approx. 600 ltr
approx. 1300 ltr
approx. 2000 ltr
Weight
approx. 150 kg
approx. 250 kg
approx. 350 kg
600
1300
2000
3.2
Mechanical loads
Test system for pharmaceuticals
Maximum load (evenly distributed over the entire surface)
on each insert shelf
40 kg
total load
3.3
300 kg
500 kg
750 kg
600
1300
2000
Operating data
Test system for pharmaceuticals
Emitted interference, interference immunity
see declaration of conformity
Betriebsanleitung für Prüfschränke für pharmazeutische Produkte
kap3.fm GB 04.2006
Rated voltage
1/N / PE AC 230 V ± 10 % 50 Hz or
1/N / PE AC 220 V ± 10 % 60 Hz1)
Rated power
2.5 kW
3 kW
3.5 kW
Rated current
11 A
14 A
15.9 A
On-site fuse protection
16 A slow
Protection switchgear cabinet
IP 20
max. heat dissipation to surroundings
1) option
1 kW
1 kW
1.8 kW
13 – 42
NOISE MEASUREMENT
3.4
TECHNICAL DATA
Noise measurement
in accordance with DIN 45635 (Part 1 accuracy class 2)
Test system for pharmaceuticals
600
1300
2000
Sound pressure level
approx. 52 dB(A)
measured at a distance of 1 m from the front,
1 m in height, free-field measurement
Humidification system
Test system for pharmaceuticals
600
Volume of reservoir
demineralized
pH-value
6 to 7
5 to 20 μS/cm3
Conductivity
Climatic tests
•
→ 3.7 Humidity diagram (page 15).
Test system for pharmaceuticals
Temperature range
600
1300
2000
+10 °C to +50 °C
Humidity range
20 % r.h. to 90 % r.h.
Dew point range
+5 °C to +40 °C
Temperature deviation in space
± 0.5 K to ± 1 K
Temperature deviation in time in centre of working space
Humidity deviation in time in centre of working space
Temperature gradient
± 0.1 K to ± 0.5 K
± 1 % r.h. to ± 2 % r.h.
1 K to 2 K
(according to IEC 60068-3-5)
Humidification water consumption
at constant +25 °C / 60 % r.h.
14 – 42
2000
19 ltr
Water quality
3.6
1300
1) option
approx. 0.5 ltr/24 hrs
Betriebsanleitung für Prüfschränke für pharmazeutische Produkte
kap3.fm GB 04.2006
3.5
TECHNICAL DATA
3.7
HUMIDITY DIAGRAM
Humidity diagram
The humidity range as shown below may be used.
Please note that range 1 is for discontinuous mode only. The heat exchanger must be defrosted every 8 hours by increasing the test space temperature.
A
Test space temperature in °C
B
Relative humidity in % r.h
Betriebsanleitung für Prüfschränke für pharmazeutische Produkte
kap3.fm GB 04.2006
Fig. 3-1
Humidity range
1) option
15 – 42
Betriebsanleitung für Prüfschränke für pharmazeutische Produkte
kap3.fm GB 04.2006
HUMIDITY DIAGRAM
16 – 42
TECHNICAL DATA
1) option
PREPARATION FOR INITIAL OPERATION
PREPARING THE PLACE OF INSTALLATION
4
PREPARATION FOR INITIAL OPERATION
4.1
Preparing the place of installation
4.1.1
Installation requirements
Ensure that the place of installation meets the following requirements:
– Rooms must be dry and ventilated
– A minimum volume of 2.5 m3/kg of refrigerant is necessary.
For quantity of refrigerant → Rating plate.
– If open flames or similarly hot surfaces are used on site, adequate ventilation must be
provided due to potential leaks and decomposition products caused by refrigerants.
– Max. pollution degree 2 according to EN 50178
– Altitude max. 1000 m above mean sea level
– Do not expose the test system to direct sunlight
– Avoid installing in the vicinity of heat sources
– Permissible ambient temperature during operation: +18 °C to +27 °C
– Permissible storage temperature: -25° C to +55 °C
– Relative atmospheric humidity: 75 % max.
WARNING
Observe the directions → chap. 1.4 (page 3)
Floor requirements
– The floor must be suitable for the weight of the test system and the test specimens →
3.2 Mechanical loads (page 13)
– The floor must be horizontal with an even surface. Slight unevenness can be compensated by adjusting the feet1).
Space requirements
Betriebsanleitung für Prüfschränke für pharmazeutische Produkte
kap4.fm GB 04.2006
→ Fig. 4-1 Layout 600-ltr test system (page 18)
→ Fig. 4-2 Layout 1300-ltr test system (page 19)
→ Fig. 4-3 Layout 2000-ltr test system (page 20)
WARNING
Be sure to maintain the required distance from the wall.
1) option
17 – 42
PREPARING THE PLACE OF INSTALLATION
PREPARATION FOR INITIAL OPERATION
Fig. 4-1
Layout 600-ltr test system
R1
1
2
3
4
5
6
7
8
9
10
#
18 – 42
Entry port NW 50 mm
Front panel
Control unit
Connector panel
Connection for overflow/condensate drain
Electrical connection, cable length 5 m
Test space door
Connection for automatic water replenishment, external thread R ¾“
Independent temperature limiter
Screw cap of water reservoir
Door lock
Useful width
1) option
Betriebsanleitung für Prüfschränke für pharmazeutische Produkte
kap4.fm GB 04.2006
R1
PREPARATION FOR INITIAL OPERATION
PREPARING THE PLACE OF INSTALLATION
Betriebsanleitung für Prüfschränke für pharmazeutische Produkte
kap4.fm GB 04.2006
R1
Fig. 4-2
Layout 1300-ltr test system
R1
1
2
3
4
5
6
7
8
9
10
#
Entry port NW 50 mm
Front panel
Control unit
Connector panel
Connection for overflow/condensate drain
Electrical connection, cable length 5 m
Test space door
Connection for automatic water replenishment, external thread R ¾“
Independent temperature limiter
Screw cap of water reservoir
Door lock
Useful width
1) option
19 – 42
PREPARING THE PLACE OF INSTALLATION
PREPARATION FOR INITIAL OPERATION
Fig. 4-3
Layout 2000-ltr test system
R1
1
2
3
4
5
6
7
8
9
10
#
20 – 42
Entry port NW 50 mm
Front panel
Control unit
Connector panel
Connection for overflow/condensate drain
Electrical connection, cable length 5 m
Test space door
Connection for automatic water replenishment, external thread R ¾“
Independent temperature limiter
Screw cap of water reservoir
Door lock
Useful width
1) option
Betriebsanleitung für Prüfschränke für pharmazeutische Produkte
kap4.fm GB 04.2006
R1
PREPARATION FOR INITIAL OPERATION
4.2
TRANSPORTING THE TEST SYSTEM
Transporting the test system
A fork stacker or other suitable lifting equipment with adjustable fork width is necessary for
lifting and transporting the test system.
WARNING
•
Do not apply straps
You can lift the test system from all sides provided the fork is long enough to support the
entire depth or width of the test system.
→ Fig. 4-1 Layout 600-ltr test system (page 18)
→ Fig. 4-2 Layout 1300-ltr test system (page 19)
→ Fig. 4-3 Layout 2000-ltr test system (page 20)
4.3
•
Position the fork under the test system
•
Adjust the fork width
•
Raise the test system by approx. 50 mm
•
Transport the test system to the place of installation
•
The packing material must be disposed of according to regulations
Installing the test system
WARNING
For mobile test systems the floor must be horizontal
•
Apply the wheel brakes
•
Turn the feet 1) to compensate any floor unevenness and to relieve the wheels.
NOTE
Betriebsanleitung für Prüfschränke für pharmazeutische Produkte
kap4.fm GB 04.2006
By raising the test system with a fork stacker the feet1) can be easily turned to facilitate horizontal aligning
1) option
21 – 42
SUPPLY AND DISCHARGE CONNECTIONS
4.4
PREPARATION FOR INITIAL OPERATION
Supply and discharge connections
The connections are located on the test system, behind the supply section
→ Fig. 2-1 (page 9)
To detach the supply section proceed as follows:
•
Turn the turn-lock fasteners (4) anticlockwise
•
Lift the supply section by the recessed grips (5) and place it beside the test system
•
Reassemble in reverse order
5
Fig. 4-4
Supply section
22 – 42
1) option
Betriebsanleitung für Prüfschränke für pharmazeutische Produkte
kap4.fm GB 04.2006
4
PREPARATION FOR INITIAL OPERATION
SUPPLY AND DISCHARGE CONNECTIONS
1
2
3
Fig. 4-5
Supply and discharge connections
4.4.1
1
Connection for overflow/condensate drain, outlet NW 12
2
Connection for automatic water replenishment, external thread R ¾“
3
Hose clamp for draining the reservoir
Overflow/condensate drain
→ Fig. 4-4 (page 22)
Attach hose to the outlet connection (1)
•
Lead the hose to a floor outlet without bending it. The water must flow by gravity.
Betriebsanleitung für Prüfschränke für pharmazeutische Produkte
kap4.fm GB 04.2006
•
1) option
23 – 42
SUPPLY AND DISCHARGE CONNECTIONS
4.4.2
PREPARATION FOR INITIAL OPERATION
Automatic water replenishment
→ Fig. 4-5 (page 23)
•
Use a pressure-proof hose to link the demineralized water network or the demineralization unit1) to connection (2)
•
Secure the hose with a hose clamp
WARNING
When using automatic water replenishment or the demineralization unit1), the
overflow/condensate drain must always be connected to a floor outlet.
– The maximum admissible water pressure is 6 bar
– For quality of humidification water → 3.5 (page 14)
WARNING
It is advisable to install a water stop or sensor device in the humidification water
supply line, as a precaution against damage by water. Such safety devices are
available at your stockist.
4.4.3
Setting up the power supply
•
Ensure that the mains voltage and frequency correspond to the specifications on the
rating plate
•
Ensure that the mains fuse is adequate
•
Connect the test system to the mains supply
WARNING
Betriebsanleitung für Prüfschränke für pharmazeutische Produkte
kap4.fm GB 04.2006
If the on-site mains voltage and frequency differ from our standard values as per
→ 3.3 (page 13), the test system must be connected by a skilled person in accordance with the »Special voltage« manual enclosed.
24 – 42
1) option
PREPARATION FOR INITIAL OPERATION
4.4.4
SUPPLY AND DISCHARGE CONNECTIONS
Temperature limiter for the test space
NOTE
If the control panel displays the fault message »Temp. limiter activate**« check
temperature limiter »STM«. It may have tripped due to shocks during transport or
ambient temperatures <10 °C.
The temperature limiter for the test space is located on the connector panel
→ 2.2.9 (page 12)
Fig. 4-6
Temperature limiter
To rectify the fault proceed as follows:
Detach the supply section
•
Press the green button (1)
•
Acknowledge the message on the control panel → operating manual for the control unit
Betriebsanleitung für Prüfschränke für pharmazeutische Produkte
kap4.fm GB 04.2006
•
1) option
25 – 42
PRECOMMISSIONING CHECK LIST
4.5
PREPARATION FOR INITIAL OPERATION
Precommissioning check list
•
Verify these preparatory steps:
– Does the place of installation meet the requirements? → 4.1 (page 17)
– Does the wall distance comply with the specifications? → Layout
– Is the test system horizontal?
– Are the wheel brakes applied? → 4.3 (page 21)
– Are the supply and discharge connections set up correctly? → 4.4 (page 22)
– Are the hose connections secured with hose clamps?
– Does the humidification water comply with our specifications → 3.5 (page 14)?
– Does the electrical supply comply with our specifications? → 3.3 (page 13)
Betriebsanleitung für Prüfschränke für pharmazeutische Produkte
kap4.fm GB 04.2006
– Have all options been installed correctly?
26 – 42
1) option
PUTTING INTO OPERATION
ADDING HUMIDIFICATION WATER
5
PUTTING INTO OPERATION
5.1
Adding humidification water
You may fill the reservoir by hand or connect it to a demineralized water network.
5.1.1
Automatic water replenishment from a network
WARNING
If you are using demineralization cartridges with ion exchanger resins, please remember to replace exhausted cartridges (i.e. conductivity meter reading
>20 μS/cm) without delay. Failure to do so may result in acidification of the humidification water, which has the potential of damaging the test specimens and the
test system.
•
Open the on-site water supply
•
Detach the supply section
•
Watch the level during the filling process
WARNING
The water level is controlled by a float valve. If the float valve becomes leaky, the
water discharges via the overflow/condensate drain. Be sure to shut the on-site
water supply at the end of operation.
5.1.2
Filling by hand
•
Undo the screw cap of the reservoir at the left side of the test system
•
Pour demineralized water into the reservoir, using e.g. a watering can.
NOTE
The reservoir holds 19 ltr.
Betriebsanleitung für Prüfschränke für pharmazeutische Produkte
kap5.fm D 04.2006
The warning signal for water shortage occurs in two steps:
– One minute after reaching a low water level, a warning signal indicates that the reservoir needs replenishing.
– Another warning signal, i.e. »Reservoir humidity system empty*« is emitted if the reservoir has been empty for more than 1 minute. The climatic system is switched off. The
test system continues with the set temperature values.
1) option
27 – 42
PREPARING THE TEST SPECIMENS
5.2
Preparing the test specimens
5.2.1
Requirements
PUTTING INTO OPERATION
The test specimens can be placed on the insert shelves. They must be distributed evenly
over the entire surface.
•
Ensure that the test specimens are suitable with regard to
– Quality → 1.4 (page 3)
– Corrosive effect → 1.4 (page 3)
– Weight → 3.2 (page 13)
5.3
Adjusting the test specimen protection
5.3.1
Software temperature and humidity limiter
The controller has a software temperature and humidity limiter for setting alarm and
warning limits for permissible minimum and maximum temperature and humidity values.
If no limits are set, the test system will automatically use the limits of the previous test.
Set the limits in accordance with the separate operating manual for the control unit.
WARNING
Betriebsanleitung für Prüfschränke für pharmazeutische Produkte
kap5.fm D 04.2006
On starting a test, ensure that the lower limit to be set is below the actual test space
temperature and the upper limit above the actual test space temperature.
The permissible limits must be at least 5 K higher / lower than the respective setpoints of the test system.
The exact upper and lower limits depend on the temperature sensitivity of the test
specimen.
28 – 42
1) option
PUTTING INTO OPERATION
5.3.2
ADJUSTING THE TEST SPECIMEN PROTECTION
Test specimen protection by independent temperature limiter
The temperature limiter »STMM« which operates independently of the controller protects
the test specimen against thermal overstressing. The temperature sensor is located behind
the cover over the test space.
On exceeding or falling below the set maximum / minimum limits, the test system is switched off permanently by the controller. The control unit displays a fault message. Simultaneously, the respective indicator light (»MIN« / »MAX«) on the temperature limiter lights
up.
The temperature limiter is located on the front panel.
WARNING
The limit for the maximum value must be 5 to 10 K above, the limit for the minimum
value 5 to 10 K below the temperature setpoint.
Fig. 5-1
Temperature limiter
The limits are factory-set in accordance with the temperature range of the test system.
Betriebsanleitung für Prüfschränke für pharmazeutische Produkte
kap5.fm D 04.2006
You can adapt these values to your requirements as follows:
1) option
29 – 42
ADJUSTING THE TEST SPECIMEN PROTECTION
PUTTING INTO OPERATION
Input the maximum temperature value as follows:
•
Use
to select display »AH«
>3s »AH« (alarm limit high) and actual maximum temperature
+
value are displayed alternately
Select the desired temperature value
or
Save the temperature value, return to basic setting.
2x
Input the minimum temperature value as follows:
•
Use
to select display »AL«
>3s »AL« (alarm limit low) and actual minimum temperature
+
value are displayed alternately
Select the desired temperature value
or
Save the temperature value, return to basic setting.
2x
NOTE
Depress the combinations
+
or
+
simultaneously for more than 3 seconds while »AH« or »AL« is being displayed, otherwise the temperature value
cannot be changed. In this case use
again to select display »AH« or »AL«.
If the changed temperature value is not saved with 2 x
, the test system will
return to the previously set temperature value after 30 seconds.
Malfunctions will cause the respective indicator light on the temperature limiter to light up.
In addition, a fault message will be displayed on the control unit.
To eliminate the fault, proceed as follows:
•
Increase the »AH« value or reduce the »AL« value by approx. 10 K. Alternatively, open
the test space door until the temperature in the test space is back within the limit range.
•
Save the new temperature value with 2 x
•
Keep
•
Acknowledge the fault message on the control unit → operating manual for the control
unit.
If the test space temperature is still outside the limit range, the fault signal will occur again.
By pressing
, the actual value can be interrogated on the temperature limiter via
function »INP«.
30 – 42
1) option
Betriebsanleitung für Prüfschränke für pharmazeutische Produkte
kap5.fm D 04.2006
pressed for approx. 3 seconds, the indicator light goes off.
SEALING THE ENTRY PORTS1)
PUTTING INTO OPERATION
5.4
Sealing the entry ports1)
•
Close the entry ports with the sealing plugs supplied
NOTE
Open entry ports will cause high water consumption during climatic tests. As a result, tests with extreme humidity values are not feasible, and low test space temperatures may cause icing of the evaporator.
5.5
Switching on the test system
•
5.6
Set the mains switch to »I«
Starting a test
Tests are started on the control unit. Two modes are available:
– Manual mode
– Automatic mode
•
5.6.1
5.6.2
For further details please refer to the separate operating manual for the control unit.
Stability test in manual mode
→ operating manual for the control unit, chap. »Manual mode«
•
Input the temperature setpoint on the control unit
•
Input the humidity setpoint on the control unit
•
Activate digital channel »Humidity«
•
Start the test
Tolerance band monitoring.
The test system is equipped with tolerance band monitoring.
The tolerances for temperature (± 2 K) and humidity (± 5 % r.h.) are factory-set.
Betriebsanleitung für Prüfschränke für pharmazeutische Produkte
kap5.fm D 04.2006
Monitoring begins automatically 10 minutes after reaching the tolerance band.
If the actual value remains outside the tolerance band for more than 15 minutes, fault
message »Tolerance temperature*« or »Tolerance humidity*« → 7.2 Messages on the
control unit (page 35) is displayed on the control unit.
1) option
31 – 42
PREOPERATIONAL CHECK LIST
5.7
PUTTING INTO OPERATION
Preoperational check list
•
Verify these preparatory steps:
– Has humidification water been added? → 5.1 (page 27)
Has the automatic water replenishment been set up? → 5.1.1 (page 27)
– Is the test specimen suitable for the planned test? → 5.2 (page 28)
– Check settings on software temperature and humidity limiter → 5.3.1 (page 28)
– Check settings on independent temperature limiter → 5.3.2 (page 29)
– Are the entry ports1) sealed? → 5.4 (page 31)
– Maintenance work to be expected during the scheduled test period should be carried
out beforehand → 8.3 (page 40)
Betriebsanleitung für Prüfschränke für pharmazeutische Produkte
kap5.fm D 04.2006
– Have all options been installed correctly?
32 – 42
1) option
PUTTING OUT OF OPERATION
6
AFTER EACH TEST
PUTTING OUT OF OPERATION
The following directions must be observed:
6.1
6.2
After each test
•
Set the test system to room temperature
•
Finish the test
•
Put external systems out of operation
•
Put optional equipment out of operation
•
Open the test space door
•
Remove the test specimen from the test space
•
Clean and dry the test space
Longer rest periods
If a longer rest period is expected, or if the test system is moved to a room with sub-zero
temperatures, the following activities - in addition to those in chapter → 6.1 After each test
(page 33) - must be performed:
Set the mains switch to »O«
•
Pull the mains plug
•
Shut off the automatic water replenishment
•
Detach the supply section
•
Open the hose clamp → 4.4 Supply and discharge connections (page 22)
•
Connect the hose to a floor outlet
•
Empty the reservoir
Betriebsanleitung für Prüfschränke für pharmazeutische Produkte
kap6.fm GB 04.2006
•
1) option
33 – 42
FINAL DISPOSAL OF THE TEST SYSTEM
6.3
PUTTING OUT OF OPERATION
Final disposal of the test system
In the event the test system is no longer needed, please ensure it is disposed of professionally.
DANGER
The following materials represent hazardous waste and must be disposed of separately:
– Refrigerants
– Compressor oil
– Electrical components
If desired, our service organisation can take care of the disposal, at customer’s expense.
Please get in touch with us so that we can arrange for a professional and environmentally
acceptable way of disposal.
If you decide to dispose of the test system yourselves, please take the following precautions:
•
Destroy the door lock to prevent persons from being trapped
•
Ensure that materials like refrigerants, compressor oil and electrical components are
treated as special waste.
Betriebsanleitung für Prüfschränke für pharmazeutische Produkte
kap6.fm GB 04.2006
With regard to the specified materials and the disposal of the remaining components, the
national and local waste disposal regulations, valid at the time of disposal, must be observed.
34 – 42
1) option
FAULT DIAGNOSIS AND RECTIFICATION
7
GENERAL MALFUNCTIONS
FAULT DIAGNOSIS AND RECTIFICATION
Depending on the kind of fault signal, the rectification can be performed by the user, a
skilled person, or our service organisation.
If a warning signal (marked * in chap. 7.2) occurs, the test operation is restricted.
If a fault signal (marked ** in chap. 7.2) occurs, the test operation is interrupted.
7.1
General malfunctions
Fault
Possible cause
Rectification
Temperature and humidity
setpoints cannot be achieved
Lack of refrigerant in the refrigerating unit
Contact our service organisation
Actual humidity value deviates
from setpoint
The water from the reservoir fails to
reach the steam humidifier
(defective pump).
Contact our service organisation
7.2
Messages on the control unit
Malfunctions which occur during operation are signalled by a flashing message on the control unit.
In case of malfunctions please proceed as follows:
Betriebsanleitung für Prüfschränke für pharmazeutische Produkte
kap7.fm GB 04.2006
Code
No.
•
Rectify the fault in accordance with the following table
•
Acknowledge the message → operating manual for the control unit
•
Resume operation
Message
Possible cause
Rectification
* warning signal
** fault signal
1
Act. value defect:EKO/X21**
Temperature sensor defective
Switch off the test system.
Contact our service organisation.
4
Act. value defect:EK3/X24**
Sensor defective
Switch off the test system.
Contact our service organisation.
6
Act. value defect:EK5/X26**
Sensor defective
Switch off the test system.
Contact our service organisation.
13
Communication control unit*
Connection control unit controller is interrupted
Check connectors
15
Chambertype invalid **
Wrong test system parameters
Switch off the test system.
Contact our service organisation.
16
Power fail*
Power failure or tolerance band
outside defined range
Check duration of power failure
and tolerance band values.
Restart the test system.
1) option
35 – 42
MESSAGES ON THE CONTROL UNIT
Message
Possible cause
Rectification
* warning signal
** fault signal
17
Door not closed*
The test space door has been
open for more than 10 minutes
Close the test space door
19
Temp. limiter activate**
Thermal safety device»STM« in
the test space triggered
Switch off the test system.
→ 4.4.4 (page 25)
Contact our service organisation.
20
Thermal specimen protection**
Limits of test specimen
protection exceeded
Press „P“ or „RESET“ on the adjustable temperature limiter to clear
fault. Check limit setting and programmed setpoint.
Switching point hysteresis is 2 K.
Display of temperature limiter is
flashing and reads 1999
Sensor of temperature limiter
is broken or short-circuited
Switch off the test system.
Contact our service organisation.
21
Software specimen
protection**
Actual temperature value is outside the test chamber configuration
Check input values and adjust
setpoint to temperature range
→ 3 (page 13)
22
Communication Datalogging*
Connection to software
SIMPATI1) interrupted
Check connections to PC. Check
test system settings.
23
Tolerance temperature*
The actual temperature value
has been outside the tolerance
band for more than 15 min
Close the door. Clean the condenser. Check if the temperature
deviation is permissible for the
test running. Contact our service
organisation.
24
Tolerance humidity*
The actual humidity value has
been outside the tolerance
band for more than 15 min
Close the door. Make sure the
water supply is ok. Clean the
overflow/condensate drain. Check
if the humidity deviation is permissible for the test running. Contact
our service organisation.
34
High pressure compr.
precooling**
Excess pressure in the refrigerating unit
Switch off the test system. Clean
the condenser.
49
Humidity out of range*
Actual humidity value has been
outside the test chamber configuration for 5 min
Check input on the control unit.
Adjust setpoint to permissible
humidity range → 3 (page 13)
50
Steam temp. limiter activated**
Fault at steam humidifier
Contact our service organisation
54
Refill demin. water*
The humidification water supply is running short
Replenish the reservoir. The test
system continues operating.
55
Reservoir humidity system
empty*
No water in humidity system or
pump not working
Fill reservoir with water. If the
pump is defective, contact our service organisation.
36 – 42
1) option
Betriebsanleitung für Prüfschränke für pharmazeutische Produkte
kap7.fm GB 04.2006
Code
No.
FAULT DIAGNOSIS AND RECTIFICATION
FAULT DIAGNOSIS AND RECTIFICATION
Code
No.
57
MESSAGES ON THE CONTROL UNIT
Possible cause
Message
Rectification
* warning signal
** fault signal
Door not closed*
The test space door is open
This incident is saved in the
SIMPATI 1) report file. Close the
door.
Contact our service organisation if a fault cannot be rectified with the aforementioned
measures, or if a fault occurs repeatedly.
For service agencies → Appendix.
NOTE
To ensure speedy service, please quote the following particulars when reporting a
fault:
– Type of test system / order no.
– ID no.
– Fault message on the control unit
Betriebsanleitung für Prüfschränke für pharmazeutische Produkte
kap7.fm GB 04.2006
You will find this data on the rating plate over the mains switch and on the reverse of the
front cover of this manual.
1) option
37 – 42
Betriebsanleitung für Prüfschränke für pharmazeutische Produkte
kap7.fm GB 04.2006
MESSAGES ON THE CONTROL UNIT
38 – 42
1) option
FAULT DIAGNOSIS AND RECTIFICATION
MAINTENANCE
GENERAL INFORMATION
8
MAINTENANCE
8.1
General information
Regular care and maintenance are essential for optimum operation and long service life of
the test system.
The maintenance schedule → 8.3 (page 40) contains some basic maintenance work which
may be performed on site, by trained personnel only. It does, however, not replace the expert maintenance offered by our service organisation.
The inspection intervals for refrigerating unit, electrical equipment and safety devices are
specified in a maintenance contract with our service organisation. For the address → Appendix.
NOTE
Annual inspection of the pressure limiter is necessary according to EN 378-2, Appendix C.6 Safety Requirements. The inspection must be performed by our service
organisation, or a skilled person authorized by us.
DANGER
Maintenance work on refrigerating unit and electrical equipment must be performed by a skilled person.
•
Contact our service organisation
We will either charge a qualified maintenance specialist to perform the servicing, or name
you authorized experts.
Betriebsanleitung für Prüfschränke für pharmazeutische Produkte
kap8.fm GB 04.2006
Our service organisation has the technical facilities required for expert disposal of the waste material resulting from servicing. If desired, our service organisation will take back the
material to be disposed of, at customer’s expense.
1) option
39 – 42
CONSUMABLES
8.2
MAINTENANCE
Consumables
The following material is used for maintenance:
Ordering code
Designation
60782881
Sealing plug 50 mm
Consumables may be ordered from our service organisation. For the address → Appendix.
Maintenance schedule
Interval
Assembly group / component
Activity
Follow directions in chap.
After each
test
Test space and insert shelves
Clean
→ 8.4.1 (page 41)
Test space seal
Clean
→ 8.4.2 (page 41)
Monthly
Water reservoir
Clean
→ 8.4.5 (page 42)
Quarterly
Fins on air-cooled condenser
Clean
→ 8.4.3 (page 41)
Yearly
Capacitive humidity system
Check
Calibrate
→ 8.4.4 (page 41)
As necessary
Demineralization cartridge1)
Replace
→ separate operating instructions
Betriebsanleitung für Prüfschränke für pharmazeutische Produkte
kap8.fm GB 04.2006
8.3
40 – 42
1) option
42
MAINTENANCE
8.4
Maintenance work
•
8.4.1
MAINTENANCE WORK
Observe the safety instructions → 1.5.5 (page 6) »Maintenance work«
Cleaning the test space
To prevent corrosion, the test space and insert shelves must be cleaned with a damp cloth.
8.4.2
•
Remove impurities with a brush
•
Dry the test space and insert shelves
Cleaning the test space seal
To prevent the test space seal from sticking to the test space door, it must be cleaned with
clear water and subsequently dried after each test. You may use a regular detergent.
8.4.3
Cleaning the air-cooled condenser
DANGER
The fins of the condenser may cause hand injuries
•
Be sure to wear safety gloves
Dust deposits on the fins of the air-cooled condenser will cause non-permissible pressure
increase in the refrigerating unit.
8.4.4
•
Check the air-cooled condenser regularly for dust deposits
•
Clean it every three months, more often in dusty environments.
•
Use a vacuum cleaner, compressed air or brush.
Calibrating the capacitive humidity measuring system
Gas emissions from the test specimens may affect the humidity measuring system, thus
causing deviations. A sight check of the humidity sensor is advisable.
Yearly calibration of the humidity values by our service organisation is advisable.
Betriebsanleitung für Prüfschränke für pharmazeutische Produkte
kap8.fm GB 04.2006
•
1) option
41 – 42
MAINTENANCE WORK
8.4.5
MAINTENANCE
Cleaning the water reservoir
Clean the reservoir as follows:
•
Shut off the automatic water replenishment
•
Detach the supply section
•
Detach hose (1) and (2) from the reservoir, the water drains off.
•
Detach connecting cable (4) of float switch F53 and F54
•
Detach hose (3) of automatic water replenishment
•
Undo screw cap (5)
•
Undo screws (6)
•
Remove the reservoir from its support
WARNING
Be careful not to damage the float switches in the reservoir.
•
Clean the reservoir carefully through the filling hole, using a brush.
•
Rinse the reservoir with water
5
3
6
4
1
Fig. 8-1
Water reservoir
42 – 42
1) option
42
Betriebsanleitung für Prüfschränke für pharmazeutische Produkte
kap8.fm GB 04.2006
2
INTERFACE CONNECTIONS1)
APPENDIX: INTERFACE CONNECTIONS1)
→ 2.2.9 Connector panel (page 12)
1.1
Interface RS 2321)
The RS 232 interface is used for e.g. external control via computer. Depending on the number of poles, the pin assignment is as follows:
PC
25-pole D-SUB / 9-pole D-SUB
Test system
9-pole D-SUB / 25-pole D-SUB
Fig. 1-1
Pin assignment RS 232
Suitable connecting cables and adaptors are available
NOTE
Betriebsanleitung für Prüfschränke für pharmazeutische Produkte
A-schnit.fm GB 04.2006
If the connecting cable is produced by yourselves, be sure that both ends of the
shield are fixed to the metallic enclosure.
1) option
1–4
INTERFACE CONNECTIONS1)
1.2
Interface RS 485 / RS 4221)
The network RS 485/RS 4221) interfaces in connection with mini-Combox 2 are used for
networking several test systems.
The 15-pole D-subminiature sockets are assigned as follows:
Signal Gnd
PC
Pin 1
Test system
Pin 1
Rx Tx -
Pin 11
Pin 9
Pin 11
Pin 9
TxRx -
Rx +
Tx +
Pin 4
Pin 2
Pin 4
Pin 2
Tx +
Rx +
NOTE
The pin assignment for PC is only valid in connection with interface converter1)
RS 232/RS 485, ordering code 63823080.
Interfaces RS 232 and RS 485/4221) cannot be used simultaneously.
1.3
Ethernet interface1)
The connector socket »RJ 45« is located on the connector panel.
The interface enables communication with the SIMPATI1) software (from version 2.04 up)
in LAN (Ethernet LAN). The communication occurs via TCP/IP. A separate IP address
must be assigned to each test system.
NOTE
We would advise you to have the networking done by your network administrator.
Attached please find the necessary software. The description in the appendix in the
installation and operating instructions for theSIMPATI software must be observed.
For setting up the connection, a network cable type patch cable RJ45, Cat.5, STP, 4 x 2 is
required.
NOTE
Betriebsanleitung für Prüfschränke für pharmazeutische Produkte
A-schnit.fm GB 04.2006
The Ethernet and RS 485/4221) interfaces cannot be used simultaneously.
2–4
1) option
INTERFACE CONNECTIONS1)
1.4
Analog I/O1)
The Analog I/O1) connection is used for external acquisition of actual temperature and humidity values.
Outputs 0 - 10 V = 0 °C to +100 °C or 0 to 100 % r.h.
Max. insulation voltage to ground is 1 kV-DC.
The 15-pole D-subminiature socket is assigned as follows:
- actual temperature
+actual temperature
- actual humidity
+actual humidity
- actual humidity
+actual humidity
- actual temperature
+actual temperature
1.5
sensor independent of controller
sensor independent of controller
sensor independent of controller
sensor independent of controller
Pin 1
Pin 9
Pin 2
Pin 10
Pin 4
Pin 12
Pin 5
Pin 13
Potential-free contact for fault signal1)
A potential-free contact is available for alerting an external monitoring system. In case of
power failure, this contact can be used for fault indication.
An audible and visual signal1) is emitted.
The connection for the potential-free contact is taken to a socket
(max. load 24 V, 0.5 A).
Pin 3
Pin 2
In case of malfunction pin 2 and 3 are open.
Betriebsanleitung für Prüfschränke für pharmazeutische Produkte
A-schnit.fm GB 04.2006
If the potential-free contact is used, ensure it is compatible with the on-site measuring
system.
1) option
3–4
Betriebsanleitung für Prüfschränke für pharmazeutische Produkte
A-schnit.fm GB 04.2006
INTERFACE CONNECTIONS1)
4–4
1) option
DEMINERALIZATION UNIT1) TYPE B10DN
APPENDIX: DEMINERALIZATION UNIT1) TYPE B10DN
This appendix contains installation and operating instructions for the demineralization unit.
1.1
Description
1.1.1
Design
Choose a convenient place near the test system. Use flexible hoses to connect the unit to
the on-site water supply and test system.
Betriebsanleitung für Prüfschränke für pharmazeutische Produkte
A-entsal.fm GB 04.2006
Fig. 1-1
Demineralization unit
1.1.2
1
Cartridge
2
Water inlet R ¾“
3
On-site water tap
4
Inlet connection piece
5
Conductivity meter
6
Outlet connection piece
7
Outlet R ¾“
8
Connection for automatic water replenishment
Function
The demineralization unit ensures a reliable supply of demineralized water for the humidification system.
Filling by hand is no longer necessary.
1) option
1–6
DEMINERALIZATION UNIT1) TYPE B10DN
1.2
Technical data
1.2.1
Dimensions
1.2.2
1.2.3
210 [mm]
Height incl. cond. meter
680 [mm]
Height cartridge only
550 [mm]
Connection data
Max. allowable working press.
10 bar
Inlet
R 3/4“
Outlet
R 3/4“
Performance data
Output based on water hardness:
10° dH (approx. 100 mg CaO/ltr)
20° dH (approx. 200 mg CaO/ltr)
1200 ltr
600 ltr
Maximum flow
300 ltr/h
Exhaustion point
20 μS/cm
Power supply
Rated voltage
230 V AC / 50 - 60 Hz
Rated current
5 mA
Protection
IP 65
Betriebsanleitung für Prüfschränke für pharmazeutische Produkte
A-entsal.fm GB 04.2006
1.2.4
Diameter
2–6
1) option
DEMINERALIZATION UNIT1) TYPE B10DN
1.3
Preparation for initial operation
1.3.1
Setting up the connections
Connect the supply hoses as follows:
→ Fig. 1-1 Demineralization unit (page 1)
•
Fix the straight screw connection of the water inlet (2) to the on-site tap (3), size R ¾“
•
Fix the elbow screw connection of the water inlet (2) to the inlet connection piece (4) of
the demineralization cartridge (1)
•
Fix the elbow screw connection of the outlet (7) to the outlet connection piece (6) of the
demineralization cartridge
•
Fix the straight screw connection of the outlet (7) to connection piece (8) on the test system
•
Screw the conductivity meter (5) to the top of the demineralization cartridge
WARNING
For safe operation it is essential to:
– Insert the seals supplied in the hose connections
– Ensure a water pressure between 1.5 and 6 bar
WARNING
Connect the demineralization unit to a cold water tap only
•
Protect the unit against freezing and heat
NOTE
The local plumbing regulations and water board instructions must be observed
•
1.3.2
Keep the cartridge caps and use them when returning the cartridges for regeneration
Electrical connection
Insert the mains plug of the conductivity meter into an on-site socket-outlet
Betriebsanleitung für Prüfschränke für pharmazeutische Produkte
A-entsal.fm GB 04.2006
•
1) option
3–6
DEMINERALIZATION UNIT1) TYPE B10DN
1.4
Putting into operation
WARNING
Prior to switching on, be sure to:
– Put the test system into operation in accordance with → 5 (page 27)
– Close the test space door
Longer rest periods and a weak flow will cause reionization thus increasing the conductivity
value. If this happens, drain water until the conductivity value drops below 20 μS/cm.
If the value fails to drop below 20 μS/cm → 1.7 Maintenance (page 5)
1.4.1
Venting the cartridge
WARNING
Ensure that every new or newly regenerated cartridge is thoroughly vented
1.5
•
Fix the water inlet to the outlet connection piece (on pressure-proof cartridges pull back
the red ring of the quick release coupling)
•
Open the water tap until water comes out of the inlet connection piece
•
Set up the connection again in accordance with → 1.3.1 (page 3)
•
Open the water tap
•
Drain water until the pointer of the conductivity meter is back in the green zone
Putting out of operation
Depending on the scheduled duration of the rest period, the following steps must be taken:
Turn off the on-site water supply
•
Undo the hose screw connections
•
Allow the water to drain off
Betriebsanleitung für Prüfschränke für pharmazeutische Produkte
A-entsal.fm GB 04.2006
•
4–6
1) option
DEMINERALIZATION UNIT1) TYPE B10DN
1.6
Malfunctions
1.6.1
Fault diagnosis and rectification
Fault
Possible cause
Conductivity value
exceeds 20 μS/cm
1.7
1.7.1
Rectification
The resin in the cartridge is
exhausted
Replace the cartridge → 1.7.1 (page 5)
Reionization caused by long rest
periods or weak flow
Drain water until the conductivity value
drops below 20 μS/cm
Maintenance
•
Observe the directions → 1.5.5 (page 6) »Maintenance work«
•
Pull the mains plug of the conductivity meter
Changing the cartridge
On reaching a conductivity limit of 20 μS/cm during operation, the cartridge must be replaced.
NOTE
It is advisable to keep a spare cartridge ready when the conductivity meter reads
10 μS/cm
Betriebsanleitung für Prüfschränke für pharmazeutische Produkte
A-entsal.fm GB 04.2006
To change the cartridge proceed as follows:
•
Turn off the on-site water supply
•
Undo the screw connections on the cartridge
•
Detach the conductivity meter from the cartridge
•
Drain off the residual water in the cartridge
•
Send exhausted cartridges to one of the behropur stations for regeneration
•
Connect a new cartridge → 1.3.1 (page 3)
WARNING
There is still some water left in the hoses
1) option
5–6
DEMINERALIZATION UNIT1) TYPE B10DN
1.7.2
Consumables
The following material is used for maintenance:
Ordering code
Designation
63640241
Cartridge for demineralization unit1)
Consumables may be ordered from our service organisation. For the address → Appendix
1.7.3
behropur station Germany
BEHR
Labor - Technik
Spangerstraße 8
40599 Düsseldorf
Tel.: (0211) 7 48 47 - 0
Betriebsanleitung für Prüfschränke für pharmazeutische Produkte
A-entsal.fm GB 04.2006
Fax: (0211) 7 48 97 72
6–6
1) option
APPENDIX: INDEX
A
Ambient temperature . . . . . . . . . . . . . . . . . . . . . . . . . . . . . . . . . . . . . . . . . . . . . . . . . . . . . . . . . 17
Analog I/O
Appendix Interface connections . . . . . . . . . . . . . . . . . . . . . . . . . . . . . . . . . . . . . . . . . . . . . . 3
Automatic mode . . . . . . . . . . . . . . . . . . . . . . . . . . . . . . . . . . . . . . . . . . . . . . . . . . . . . . . . . . . . 31
Automatic water replenishment . . . . . . . . . . . . . . . . . . . . . . . . . . . . . . . . . . . . . . . . . . . . . . . . . 24
C
Capacitive measuring system . . . . . . . . . . . . . . . . . . . . . . . . . . . . . . . . . . . . . . . . . . . . . . . . . .
Castors . . . . . . . . . . . . . . . . . . . . . . . . . . . . . . . . . . . . . . . . . . . . . . . . . . . . . . . . . . . . . . . . . . .
Connector panel . . . . . . . . . . . . . . . . . . . . . . . . . . . . . . . . . . . . . . . . . . . . . . . . . . . . . . . . . 9,
Control unit . . . . . . . . . . . . . . . . . . . . . . . . . . . . . . . . . . . . . . . . . . . . . . . . . . . . . . . . . . 9, 10,
41
10
12
11
D
Danger warnings . . . . . . . . . . . . . . . . . . . . . . . . . . . . . . . . . . . . . . . . . . . . . . . . . . . . . . . . . . . . . 1
Demineralization unit . . . . . . . . . . . . . . . . . . . . . . . . . . . . . . . . . . . . . . . . . . . . . . . . . . . . . . . . . 24
see Appendix
Disposal of the test system . . . . . . . . . . . . . . . . . . . . . . . . . . . . . . . . . . . . . . . . . . . . . . . . . . . . 34
E
Entry ports . . . . . . . . . . . . . . . . . . . . . . . . . . . . . . . . . . . . . . . . . . . . . . . . . . . . . . . . . . . . . 10, 31
F
Fault diagnosis and rectification . . . . . . . . . . . . . . . . . . . . . . . . . . . . . . . . . . . . . . . . . . . . . . . . 35
Appendix Demineralization unit . . . . . . . . . . . . . . . . . . . . . . . . . . . . . . . . . . . . . . . . . . . . . . 5
Fault and warning signals displayed on the control unit . . . . . . . . . . . . . . . . . . . . . . . . . . . 35
General malfunctions . . . . . . . . . . . . . . . . . . . . . . . . . . . . . . . . . . . . . . . . . . . . . . . . . . . . . 35
Float valve . . . . . . . . . . . . . . . . . . . . . . . . . . . . . . . . . . . . . . . . . . . . . . . . . . . . . . . . . . . . . . . . . 27
Floor requirements . . . . . . . . . . . . . . . . . . . . . . . . . . . . . . . . . . . . . . . . . . . . . . . . . . . . . . . . . . 17
Front panel . . . . . . . . . . . . . . . . . . . . . . . . . . . . . . . . . . . . . . . . . . . . . . . . . . . . . . . . . . . . . 9, 11
Betriebsanleitung für Prüfschränke für pharmazeutische Produkte
PharmaSIX.fm GB 04.2006
H
Humidification system
Automatic water replenishment . . . . . . . . . . . . . . . . . . . . . . . . . . . . . . . . . . . . . . . . . . . . .
Filling by hand . . . . . . . . . . . . . . . . . . . . . . . . . . . . . . . . . . . . . . . . . . . . . . . . . . . . . . . . . .
Technical data . . . . . . . . . . . . . . . . . . . . . . . . . . . . . . . . . . . . . . . . . . . . . . . . . . . . . . . . . .
Humidity diagram . . . . . . . . . . . . . . . . . . . . . . . . . . . . . . . . . . . . . . . . . . . . . . . . . . . . . . . . . . .
27
27
14
15
I
Initial operation . . . . . . . . . . . . . . . . . . . . . . . . . . . . . . . . . . . . . . . . . . . . . . . . . . . . . . . . . . . . . 17
Installation requirements . . . . . . . . . . . . . . . . . . . . . . . . . . . . . . . . . . . . . . . . . . . . . . . . . . . . . . 17
Installing the test system . . . . . . . . . . . . . . . . . . . . . . . . . . . . . . . . . . . . . . . . . . . . . . . . . . . . . . 21
Interface RS 232 . . . . . . . . . . . . . . . . . . . . . . . . . . . . . . . . . . . . . . . . . . . . . . . . . . . . . . . . . . . . 12
Appendix Interface connections . . . . . . . . . . . . . . . . . . . . . . . . . . . . . . . . . . . . . . . . . . . . . . 1
Interface RS 485 / RS 422 . . . . . . . . . . . . . . . . . . . . . . . . . . . . . . . . . . . . . . . . . . . . . . . . . . . . 12
Appendix Interface connections . . . . . . . . . . . . . . . . . . . . . . . . . . . . . . . . . . . . . . . . . . . . . . 2
1) option
I – IV
L
Layout . . . . . . . . . . . . . . . . . . . . . . . . . . . . . . . . . . . . . . . . . . . . . . . . . . . . . . . . . . . . . . . . . . . . 18
Longer rest periods . . . . . . . . . . . . . . . . . . . . . . . . . . . . . . . . . . . . . . . . . . . . . . . . . . . . . . . . . . 33
M
Main switch panel . . . . . . . . . . . . . . . . . . . . . . . . . . . . . . . . . . . . . . . . . . . . . . . . . . . . . . . . . . .
Mains switch . . . . . . . . . . . . . . . . . . . . . . . . . . . . . . . . . . . . . . . . . . . . . . . . . . . . . . . . . . . . . . .
Maintenance . . . . . . . . . . . . . . . . . . . . . . . . . . . . . . . . . . . . . . . . . . . . . . . . . . . . . . . . . . . . . . .
Maintenance schedule . . . . . . . . . . . . . . . . . . . . . . . . . . . . . . . . . . . . . . . . . . . . . . . . . . . . . . .
Maintenance work . . . . . . . . . . . . . . . . . . . . . . . . . . . . . . . . . . . . . . . . . . . . . . . . . . . . . . . . . . .
Manual mode . . . . . . . . . . . . . . . . . . . . . . . . . . . . . . . . . . . . . . . . . . . . . . . . . . . . . . . . . . . . . . .
Mechanical section . . . . . . . . . . . . . . . . . . . . . . . . . . . . . . . . . . . . . . . . . . . . . . . . . . . . . . . 9,
11
11
39
40
41
31
10
N
Networking see Appendix Interface connections . . . . . . . . . . . . . . . . . . . . . . . . . . . . . . . . . . . . 2
O
Overflow/condensate drain . . . . . . . . . . . . . . . . . . . . . . . . . . . . . . . . . . . . . 18, 19, 20, 23, 24
P
Place of installation . . . . . . . . . . . . . . . . . . . . . . . . . . . . . . . . . . . . . . . . . . . . . . . . . . . . . . . . . . 17
Potential-free contact
Appendix Interface connections . . . . . . . . . . . . . . . . . . . . . . . . . . . . . . . . . . . . . . . . . . . . . . 3
Power supply . . . . . . . . . . . . . . . . . . . . . . . . . . . . . . . . . . . . . . . . . . . . . . . . . . . . . . . . . . . . . . . 24
Precommissioning check list . . . . . . . . . . . . . . . . . . . . . . . . . . . . . . . . . . . . . . . . . . . . . . . . . . . 26
Preoperational check list . . . . . . . . . . . . . . . . . . . . . . . . . . . . . . . . . . . . . . . . . . . . . . . . . . . . . . 32
Preparing the test specimen . . . . . . . . . . . . . . . . . . . . . . . . . . . . . . . . . . . . . . . . . . . . . . . . . . . 28
Putting into operation . . . . . . . . . . . . . . . . . . . . . . . . . . . . . . . . . . . . . . . . . . . . . . . . . . . . . . . . 27
Putting out of operation . . . . . . . . . . . . . . . . . . . . . . . . . . . . . . . . . . . . . . . . . . . . . . . . . . . . . . . 33
R
S
Service agencies see Appendix
Space requirements . . . . . . . . . . . . . . . . . . . . . . . . . . . . . . . . . . . . . . . . . . . . . . . . . . . . . . . . .
Special voltage . . . . . . . . . . . . . . . . . . . . . . . . . . . . . . . . . . . . . . . . . . . . . . . . . . . . . . . . . . . . .
Starting a test . . . . . . . . . . . . . . . . . . . . . . . . . . . . . . . . . . . . . . . . . . . . . . . . . . . . . . . . . . . . . .
Storage temperature . . . . . . . . . . . . . . . . . . . . . . . . . . . . . . . . . . . . . . . . . . . . . . . . . . . . . . . . .
Supply and discharge connections . . . . . . . . . . . . . . . . . . . . . . . . . . . . . . . . . . . . . . . . . . . . . .
Supply section . . . . . . . . . . . . . . . . . . . . . . . . . . . . . . . . . . . . . . . . . . . . . . . . . . . . . . . . . . . 9,
Switchgear cabinet . . . . . . . . . . . . . . . . . . . . . . . . . . . . . . . . . . . . . . . . . . . . . . . . . . . . . . . 9,
II – IV
1) option
17
24
31
17
22
22
10
Betriebsanleitung für Prüfschränke für pharmazeutische Produkte
PharmaSIX.fm GB 04.2006
Requirements to be met by the user . . . . . . . . . . . . . . . . . . . . . . . . . . . . . . . . . . . . . . . . . . . . . . 4
Reservoir . . . . . . . . . . . . . . . . . . . . . . . . . . . . . . . . . . . . . . . . . . . . . . . . . . . . . . . . . . . . . . 27, 42
T
Technical data . . . . . . . . . . . . . . . . . . . . . . . . . . . . . . . . . . . . . . . . . . . . . . . . . . . . . . . . . . . . . . 13
Temperature limiter
Independent temperature limiter . . . . . . . . . . . . . . . . . . . . . . . . . . . . . . . . . . . . . . . . . 11, 29
Software temperature limiter . . . . . . . . . . . . . . . . . . . . . . . . . . . . . . . . . . . . . . . . . . . . . . . 28
Test space . . . . . . . . . . . . . . . . . . . . . . . . . . . . . . . . . . . . . . . . . . . . . . . . . . . . . . . . . . . . . 10, 41
Test space door . . . . . . . . . . . . . . . . . . . . . . . . . . . . . . . . . . . . . . . . . . . . . . . . . . . . . . . . . . . . . 10
Test space seal . . . . . . . . . . . . . . . . . . . . . . . . . . . . . . . . . . . . . . . . . . . . . . . . . . . . . . . . . . . . . 41
Test system (structure) . . . . . . . . . . . . . . . . . . . . . . . . . . . . . . . . . . . . . . . . . . . . . . . . . . . . . . . . 9
Transporting the test system . . . . . . . . . . . . . . . . . . . . . . . . . . . . . . . . . . . . . . . . . . . . . . . . . . . 21
W
Betriebsanleitung für Prüfschränke für pharmazeutische Produkte
PharmaSIX.fm GB 04.2006
Warranty . . . . . . . . . . . . . . . . . . . . . . . . . . . . . . . . . . . . . . . . . . . . . . . . . . . . . . . . . . . . . . . . . . . 2
1) option
III – IV
IV – IV
1) option
Betriebsanleitung für Prüfschränke für pharmazeutische Produkte
PharmaSIX.fm GB 04.2006