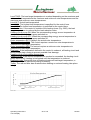
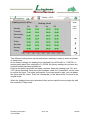
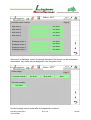
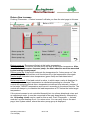
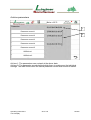
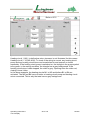
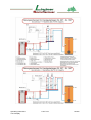
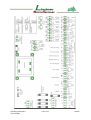
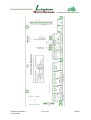
1
Symbol photograph Operating Instructions and Technical Description Rotary Grid System SL 25T/2R to SL 250 T6R and SL-P 30 to SL-P 250 Version: 140305 ENG Operating Instructions Touch display 2 of 123 140305 Table of Contents Table of Contents ......................................................................................................... 3 Safety Provisions: ......................................................................................................... 6 Maintenance and Service ............................................................................................. 7 Warranty ....................................................................................................................... 8 Cleaning Instructions for boilers Cleaning instructions boilers SL 25 T/2R to SL 150 T/4R .................................. 25 SL 199 T/6R to SL 250 T/6R ..................................... 32 Explanation of the Operating Panel........................................................................................ 38 Overview ................................................................................................................................ 41 System Status............................................................................................................. 43 Time ............................................................................................................................ 45 Boiler........................................................................................................................... 47 Storage (optionally only with storage module) ................................................ 47 Boiler ............................................................................................................... 49 Heating circuit ............................................................................................................. 51 Parameter ................................................................................................................... 58 Service ............................................................................................................ 59 Combustion ..................................................................................................... 67 Activate Modules ............................................................................................. 71 Sensor Reconciliation ..................................................................................... 78 Error Storage + Data Logger ........................................................................... 79 Recording ........................................................................................................ 79 Return flow increase ....................................................................................... 80 Transfer Mixer, Network Mixer ........................................................................ 81 System, Network, Programmes ...................................................................... 83 System................................................................................................. 84 Password ............................................................................................. 85 Operator ................................................................................... 86 Installer .................................................................................... 86 Technician................................................................................ 86 Network ............................................................................................... 87 Archive parameters ............................................................................. 90 Programme .......................................................................................... 91 Boiler........................................................................................................................... 93 Manual Operation ....................................................................................................... 95 How to correct any error messages .......................................................................... 101 Operating Instructions Touch display 3 of 123 140305 Remedy of Performance Losses .............................................................................. 110 Keyword list .............................................................................................................. 122 Operating Instructions Touch display 4 of 123 140305 Introduction Congratulations on your decision of purchasing a chopped goods or pellet heating system by Lindner & Sommerauer. You are now the owner of a state-of-the-art furnace operated only with local and renewable fuels. Please read the following introduction and observe the listed items to warrant smooth operation. ● Good heating material quality ● Dry storage space ● Correct operating mode ● Maintenance and cleaning If you need a technician, contact your personal consultant under number: _______________________________________________ Operating Instructions Touch display 5 of 123 140305 Safety Provisions: General: The fully automatic chopped goods and pellet heating system complies with the state of the art and the relevant operating provisions, as well as the TRVB H 118. In the rotary grid combustion system, the fuel is burnt in the combustion chamber at a vacuum. The system complies with the following EU directives and standards: Electrical engineering: 2006/95/EC Machinery directive: 2006/42/EC Boiler inspection: EN 303/5 Declaration of Conformity: See Annex Danger note: Danger The system is operated with 400V rotary current. Repairs must only be performed by SL-service technicians, SL-sales partners and authorised specialists (e.g.: electricians,....). We assume no warranty in case of danger from improper repair attempts. The furnace door or other maintenance openings must not be opened during operation. Intended use: The heating system serves to heat residential rooms. Only fuels according to EN 14961 or comparable international standards must be used We assume no liability from improper use and setup. We recommend taking out a maintenance contract for environmentally compatible operation. Staff and qualification The heating system should be supervised by one person. This person is trained in the system's function by our technician. Furthermore, no additional qualification is needed. Assembly and commissioning The system must only be installed and taken into operation by SL service technicians and sales partners. The setup conditions must be observed. Danger Standard operation: Danger The system is economically designed and insulated. Nevertheless some components (e.g.: flue tube, …) will produce radiation heat. Minimum distances from other components acc. to the local building provisions must be complied with. Operating Instructions Touch display 6 of 123 140305 Maintenance and Service The system is operated with electrical current (400V). Pull the mains plug for all maintenance work. Improper repair attempts may cause danger to life from electric shock. Danger Maintenance work at the activated system is not permitted. Automatically running processes (e.g. cleaning, etc.) may cause danger from crushing. Disclaimer: The heating system has been reviewed according to EN 303-5 "Heating boilers for solid fuels, manually and automatically stoked, nominal heat output of up to 500 kW". SL-Technik GmbH assumes no liability for use for any other than the intended purpose or for improper use. Area of Application: The following operating instructions apply to chopped goods and pellet systems of SL-Technik GmbH. We assume no liability for print and typesetting errors. The operating instructions are the intellectual property of SL-Technik GmbH. Copying or passing on of excerpts to third parties shall only be permitted with the express consent of SL-Technik GmbH. Fuels Your heating system is suitable for the following standard chopped goods types and standard pellets: Standard chopped goods: Water content: W 15 – W 35; chopped goods B1 acc. to EN 303-5 Size: P16B – P45A acc. to EN 14961-4 P16B: max. 3% > 45mm, all less than 120mm; cross-section 1cm2 P45A: max. 6% > 63mm, no more than 3.5 % > 100 mm, all less than 120mm; cross-section 5cm2 Dependent on the space output installed on site! Only untreated wood must be used as fuel! Note Observe the following when using carpentry waste (such as grinding dust, planing saw dust, etc.): Fast gasification may cause fast deflagration at self-ignition of the system. In this case, operate the system in continuous operation. When heating with fuels of inferior quality, there may also be a considerable performance drop of the system, leading to additional consumption of chopped goods! Operating Instructions Touch display 7 of 123 140305 Standard pellets: Pellets with a diameter of 6mm according to EN 14961-2A1 are suitable. Warranty claims shall only apply when using the indicated fuel. We are gladly willing to name manufacturers who comply with these quality claims. Warranty The system requires annual maintenance to warrant secure, environmentally compatible and thus energy-saving operation. Commissioning and annual maintenance by the service partner or the Lindner & Sommerauer customer service are conditions for the warranty. Boiler temperature The boiler should reach a temperature of at least 70°C in operation. By raising the return temperature to 60°C, the boiler is flushed evenly and corrosion of the boiler inner walls from flue gas condensation is prevented. Any boiler warranty claims shall lapse in case of defective function of the return temperature increase (return temperature in controlled operation below 55°C). Chimney A chimney according to provisions, reviewed by the chimney sweep and adjusted to the boiler output is the prerequisite for proper operation of the system. If the chimney is subject to too high a conveyor pressure, the boiler cannot be operated properly in the weak load area anymore! The exhaust routing (smoke collection) must be performed so that it is suitable for an exhaust temperature/room temperature difference of < 160 K (corrosionresilient design). The connection piece (connection between boiler and chimney) and the chimney must have at least the same diameter as the flue tube connection at the boiler. Also observe that the connection piece is placed rising! Operating Instructions Touch display 8 of 123 140305 Connection to the chimney: According to TRVB-H118, a deflagration flap (explosion flap) must be installed in the connection from the boiler to the chimney. At an increased conveyor pressure (chimney draft), it must be designed as a combination energy-saving draft controller with explosion flap. Setting the energy savings draft controller is sensible only at outdoor temperatures of less than +5°C; the system should be in operation for at least 1 hour at this time. Before measurement, observe that the system runs in the rated load area. Measure conveyor pressure between boiler and energy savings draft controller (measuring distance from the boiler 3 x flue tube diameter if possible). Then set the energy savings draft controller to the respective value. (Note: chimney draft changes with changed output. Too high conveyor pressure accelerates combustion. The exhaust temperature is artificially increased. Bad output adjustment and increased discharge of dust are the consequence. Too low conveyor pressure leads to output problems and incomplete combustion conduct! Buffer storage Operation of the Boiler with a Buffer Storage The heating system is also designed for operation with a buffer storage. Observe the local and/or national directives and conveyor programmes for the storage size. Requirements to the Heating/Storage Room Fire protection Austria: The heating room and the storage room must be executed and designed acc. to TRVB H118 and ÖN H 5170. Furthermore, the building-law and fireprotection-technical local provisions must be observed. In many cases, fireresilient walls REI 90 (F90) and usually also fire protection doors EI290-C (T90) for the heating room are prescribed. Fire protection Germany: The heating room and the storage room must be executed acc. to MFeuVO. From 50 kW upwards, special fire protection provisions apply to the heating room. Furthermore, the building-law and fire-protection-technical local provisions must be observed. Operating Instructions Touch display 9 of 123 140305 The most frequent installation version of chopped goods system corresponds to figure 3 acc. to TRVB H118. Heating Fuel storage room Figure 3: Automatic discharge from the fuel storage room (5.1.3) heating output ≤400 kW Storage quantity > 50m3 ≤200m3 – fuel pursuant to item 3.1 (chopped material) The HLE may be dispensed with at a storage amount of ≤50m3 Source: pr TRVB H 118 - Ausgabe 2003 Pressure relief area Fuel storage room (silo) Heating Boiler Figure 6: Automatic discharge from the silo above, heating output >400kW or stored amount >200m3 – fuel pursuant to item 3.1 (chopped material) and 3.3 (other wood residue) Source: pr TRVB H 118 - Edition 2003 Operating Instructions Touch display 10 of 123 140305 An installation version of pellet systems corresponds to figure 8 acc. to TRVB H118. H Figure 8: Automatic discharge from the fuel storage room (5.1.3, loose storage) Heat output ≤150 kW and storage amount ≤50m3 - fuel according to Attention: Acc. to TRVB 118, fuel storage in pellet systems with >150kW or >50m3 is a "special construction that must be separately inspected by a test office! Backburn-proof unit (RSE; Rückbrandsichere Einheit): The backburn-proof units delivered by Lindner & Sommerauer have been inspected by the IBS-Linz with the following test numbers: Type designation Test number Discharge head standard SLH 30 -150 00015201 Discharge head G50-industry G50-industry 10070830 Discharge head for riser screw SLH 12 3432/94 Rotary feeder Rotary feeder SLHZ 11125/2 Temperature monitoring device (TÜB; Temperaturüberwachungseinrichtung): Temperature sensor above the conveyor channel that will start up the warning device(s) when a temperature of 70°C is exceeded (to be installed by the Einstaller) Extinguishing facility to be triggered manually (HLE; Händisch auszulösende Löscheinrichtung): Empty pipes, minimum width DN 20mm; It must be installed right above the conveyor duct for the best extinguishing success in case of fire (to be installed by the heating installer). Operating Instructions Touch display 11 of 123 140305 Independently triggering extinguishing device (SLE; Selbsttätig auslösende Löscheinrichtung): Must be installed to reliably recognise backburning and to start extinguishing without delay; The extinguishing water amount must correspond to three times the supply duct, but at least 20l. The extinguishing water must be introduced so that the supply opening is not clogged by operation. Backburn protection (RZS: Rückzündsicherung): Wood-fuelled systems where there is a danger of backburn from sparks or flammable gases flowing into the conveyor line must be equipped with these facilities. Temperature monitoring facility in the combustion chamber (TÜF: Temperaturüberwachungseinrichtung im Feuerraum): When a specific threshold temperature is undercut, the fuel supply is stopped and the system switches off automatically. Pressure monitoring facility in the combustion chamber (DÜF: Drucküberwachungseinrichtung im Feuerraum): If a defined pressure limit is exceeded or undercut, the system is switched off automatically after a specified time. Escape switch, emergency off switch: → In Austria, an escape or emergency off switch must be installed outside of the heating room in the access area. → In Germany, the legislator does not require an emergency off switch outside of the heating room, but from 50 kW onwards it can be prescribed by the authority in accordance with the rules for oil and gas boilers. Fire extinguishers: → In Austria, at least one ABC fire extinguisher must be installed as first extinguishing aid in the access area (6 kg powder / 12 LE). → In Germany, fire extinguishers for commercial and public buildings are provided for by the law. For heating systems in the private area, fire extinguishers are not required. They are still recommended. Venting and ventilation → In Austria (according to ÖNORM H 5170), 2 cm2 per kW fuel heat output but at least 200 cm2 open cross-section are required for the supply air (rated heat output/efficiency = fuel heat output, e.g.: 30 kW / 93.3 %=32.2 kW). Up to 100 kW rated heat output, the exhaust requires a free cross-section of at least 180 cm2, and another 1 cm2 for every additional kW. For wire grids, there is a surcharge of 20% of the minimum area. If the air is supplied through ducts that are longer than one meter, mathematical proof must be rendered by a specialist. Operating Instructions Touch display 12 of 123 140305 → In Germany (according to the fuel regulation), combustion sites with a rated output of up to 35 kW require a combustion air opening leading directly outside with at least 150 cm2 or 2x 75 cm2, or a door/window leading outside and a volume of at least 4 m3 per kW rated heat output is required. If the site of setup does not border on an outer wall, a combustion air compound is possible instead. For this, the combustion air is supplied to an adjacent room of sufficient size at the outer wall. From 35 – 50 kW, at least 150 cm2 free ventilation cross-section, as of 50 kW, ventilation and venting each at least 150 cm2 free cross-section +2 cm2 per kW across 50 kW are required. For grids at least 20% surcharge; At air guidance through ducts, much larger cross-sections (about 50 – 150% larger) must be calculated. Operating Instructions Touch display 13 of 123 140305 Instructions on Filling of the Storage Space: When filling with fuel, observe the following: The chopped goods are strongly condensed specifically when blowing in. Observe that the chopped goods are blown against a baffle wall and the material falls loosely into the storage room. Proceed as follows when filling the storage room: First only fill in enough material to cover the agitator by approx. one meter. Switch the system to manual operation; open the back fire flap with the button "up”; after approx. 2 minutes, the conveyor motor can be started by pressing the button "Before" can be driven forward for about 3 minutes. This coils the spring blades around the rotor and the screw can turn easily again. Now you can fill the storage room. From a storage size of 3.5 m x 3.5 m onwards, the height of the upper edge of the chamber discharge channel must have a bottom to prevent twisting of the spring blades. Compaction of the material and driving on the chopped material in the storage room are not permitted. 2 Hackgutlagerraum 1 1 2 Hackgutlagerraum Heizraum T 30 Heizraum 100 T30 200 100 200 Hackgutlagerraum 2 a RW 1 RW 2 T30 100 200 Heizraum 1 1.........Heating room 2.........Chopped material storage room RW 1 and RW 2 must be operated separately. RW 2 must only switch on when the storage room at RW 1 is empty. Switch on RW 1 and RW 2 when filling!!! Operating Instructions Touch display 14 of 123 140305 Fuel Value Depending on Water Content (Chopped Material) The more water is contained in the wood, the lower its fuel value, since the water will evaporate in the course of combustion and heat will be consumed. The evaporation heat for 1 kg water is approx. 0.68 kWh (2.44 MJ). Since two expressions are often swapped in practical use, they should be explained. The water content (w) of wood is the mass of water referring to the total mass in percent (conventionally: fresh weight). The wood moisture (u) is the mass of water in relation to the dry mass (absolute dry substance = pure wood mass without water) in percent. The Following Interrelations Apply (Chopped Material): Water content (w) % 10 15 20 25 30 35 40 50 60 Moisture (u) % 11.1 17.6 25.0 33.3 42.9 53.8 66.7 100 150 Moisture (u) % 10 20 30 40 50 60 70 80 100 125 150 Water content (w) % 9.1 16.6 23.1 28.5 33.3 37.5 41.2 44.4 50 55.6 60 Example: Wood "fresh from the forest”, in which it is assumed that half its weight is made up of pure wood mass and water each, thus has a water content (w) of 50 % or a moisture (u) of 100 %. The following will only refer to water content (w). The influence of water content (w) on the fuel value (Hu) can be briefly characterised as follows. Referring to the weight unit, the difference of the individual wood types in the fuel value is negligible. For calculations, the heating value for all wood types can be assumed to have an average of 5.2 kWh/kg = 19 MJ/kg dry substance (AT). The fuel value (Hu) will change according to water content. Operating Instructions Touch display 15 of 123 140305 Condition of the Wood fresh from the forest stored over summer stored over several years Water content (w) Fuel value (Hu) 50 – 60 % 2.0 kWh/kg = 7.1 MJ/kg 25 – 35 % 3.4 kWh/kg = 12,2 MJ/kg 15 – 25 % 4.0 kWh/kg = 14 MJ/kg The graph below shows the fuel value (Hu) in dependence on the water content. The useful energy content drops very clearly with increasing water content! Example: At a water content of 35% the fuel value is at 3,15 kWh per kg wood Fuel value [kWh/kg] Water content in % Operating Instructions Touch display 16 of 123 140305 Technical Data Chopped Material SL T/2R Boiler: SL 25 T/2R Rated output (kW) Output range Efficiency (rated output) Efficiency (smallest output) Test office/no. Width (mm) Depth (mm) Height (mm) Weight with installed burner (kg) Boiler class Water content (litres) Water-side resistance (10K/20K) (mbar) Flue tube connection (mm) Height to flue pipe middle (mm) ø Lead/return (inch) Height to lead middle (mm) Height to return middle (mm) Setting temperature controller (STB) Exhaust mass flow Rated load/partial load (kg/s) Req. conveyor pressure (mbar) Exhaust temperature Rated/partial load (°C) O2 concentration rated load/partial load [%-Vol.] Ash drawer front (litres) Ash drawer rear (litres) Electr. connection Igniter (W) Suction draft (W) Current consumption Wh Rated load/partial load/standby Current consumption % for rated load Noise emission SL 30 T/2R SL 40 T/2R SL 49 T/2R SL 50 T/2R 25 27 44 49 50 7.6 – 25 7.6 – 30 12.9 – 40 14 – 49 14 – 50 90.7 90.7 92.7 92.7 90.9 90.9 94.5 94.5 TÜV Süd TÜV Süd TÜV Süd TÜV Süd TÜV Süd LGA Austria LGA Austria LGA Austria LGA Austria LGA Austria 630 905 1430 515 5 72 630 905 1430 515 5 72 770 905 1530 615 5 96.5 770 905 1530 615 5 96.5 770 905 1530 615 5 96.5 1.40 / 0.35 1.40 / 0.35 1.40 / 0.35 1.40 / 0.35 1.40 / 0.35 180 1225 6/4" 1300 535 180 1225 6/4" 1300 535 180 1330 6/4" 1400 535 180 1330 6/4" 1400 535 180 1330 6/4" 1400 535 90°C 90°C 90°C 90°C 90°C 0.013/0.006 0.015/0.007 0.024/0.012 0.024/0.009 0.024/0.009 0.08 0.08 151 / 80 151 / 80 7.4 / 11.6 34.5 15 1600 32 0.08 0.08 0.08 - 141 / 76 141 / 76 7.4 / 11.6 - 7.4 / 11.6 7.4 / 11.6 34.5 15 34.5 15 35.4 15 35.4 15 400V / 16A / 50Hz / 2800W CCE-socket 1600 1600 1600 32 32 32 1600 32 511 / - / 18 511 / - / 18 - 565 / - / 18 565 / - / 18 0.3 0.3 - 0.19 0.19 < 70dB A < 70dB A < 70dB A < 70dB A < 70dB A Technical changes, typesetting and print errors reserved! Operating Instructions Touch display 17 of 123 140305 Technical Data Chopped Material SL T/4R Boiler: Rated output (kW) Output range Efficiency (rated output) Efficiency (smallest output) Test office/no. Width (mm) Depth (mm) Height (mm) Weight with installed burner (kg) Boiler class Water content (litres) Water-side resistance (10K/20K) (mbar) Flue tube connection (mm) Height to flue pipe middle (mm) ø Lead/return (inch) Height to lead middle (mm) Height to return middle (mm) Setting temperature controller (STB) Exhaust mass flow Rated load/partial load (kg/s) Req. conveyor pressure (mbar) Rated load/partial load Exhaust temperature rated/partial load (°C) O2 concentration rated load/partial load [%-Vol.] Ash drawer front (litres) Ash drawer rear (litres) Electr. connection Igniter (W) Suction draft (W) Current consumption Wh Rated load/partial load/standby Current consumption % for rated load Noise emission SL 30 T/4R SL 40 T/4R SL 49 T/4R SL 50 T/4R SL 65 T/4R 30 40 8,2 – 30 8,2 – 40 93,1 92,7 93,0 93,0 BLT BLT Wieselburg Wieselburg 49 13,8 – 49 92,1 92,6 BLT Wieselburg 50 13,8 – 50,1 92,1 92,6 BLT Wieselburg 65 13,8 – 63,7 91,3 92,6 BLT Wieselburg 630 1050 1330 555 5 73 630 1050 1430 595 5 87,5 770 1050 1430 675 5 110 770 1050 1430 675 5 110 770 1050 1530 740 5 116 1,40 / 0,35 1,40 / 0,35 1,40 / 0,35 1,40 / 0,35 17,2 / 4,3 180 650 6/4“ 1200 535 180 650 6/4“ 1300 535 180 650 6/4“ 1300 535 180 650 6/4“ 1300 535 200 650 6/4“ 1410 535 90°C 90°C 90°C 90°C 90°C 0,026/0,010 0,033/0,017 0,017/011 0,021/0,011 0,026/0,010 0,08 0,08 0,08 0,08 0,08 107 / 60 127 / 60 111 / 68 111 / 68 125 / 68 6,6 / 14,0 6,4 / 12,6 5,6 / 10,3 5,6 / 10,3 5,0 / 10,3 34,5 24,2 34,5 24,2 35,4 24,2 35,4 24,2 35,4 24,2 1600 32 400V / 16A / 50Hz / 2800W CCE-socket 1600 1600 1600 32 32 32 1600 72 167 / - /18 167 / - / 18 167 / - / 18 167 / - / 18 267/ - / 18 0,56 0,41 0,34 0,33 0,41 < 70dB A < 70dB A < 70dB A < 70dB A < 70dB A Technical changes, typesetting and print errors reserved! Operating Instructions Touch display 18 of 123 140305 Technical Data Chopped Material SL T/4R Boiler: SL 80 T/4R SL 99 T/4R SL 110 T/4R SL 150 T/4R Rated output (kW) Output range Efficiency (rated output) Efficiency (smallest output) Test office/no. Width (mm) Depth (mm) Height (mm) Weight with installed burner (kg) Boiler class Water content (litres) Water-side resistance (10K/20K) (mbar) Flue tube connection (mm) Height to flue pipe middle (mm) ø Lead/return (inch) Height to lead middle (mm) Height to return middle (mm) Setting temperature controller (STB) Exhaust mass flow Rated load/partial load (kg/s) Req. conveyor pressure (mbar) Rated load/partial load Exhaust temperature rated/partial load (°C) O2 concentration rated load/partial load [%-Vol.] 80 99 110 150 23.7 – 23.7 – 104.9 43.6 – 154.1 23.7 – 76.3 104.9 92.8 91.3 91.3 90.4 92.7 92.7 92.7 92.2 BLT BLT BLT BLT Wieselburg Wieselburg Wieselburg Wieselburg 870 1265 1520 920 5 120 870 1265 1620 980 5 190 870 1265 1620 980 5 190 1050 1465 1810 1405 5 340 1.40 / 0.35 1.40 / 0.35 1.40 / 0.35 34.4 / 8.6 200 620 6/4" 1390 535 200 620 6/4" 1490 535 200 620 6/4" 1490 535 250 640 2" 1675 545 90°C 90°C 90°C 90°C 0.039/0.021 0.056/0.021 0.056/0.021 0.088/0.036 0.08 0.08 0.08 0.15 / 0.08 127 / 72 159 / 72 159 / 72 159 / 79 6.3 / 12.6 5.8 / 12.6 5.8 / 12.6 7.3 / 11.3 Ash drawer front (litres) Ash drawer rear (litres) 51.2 34.3 51.2 34.3 51.2 34.3 74.1 50.4 Electr. connection Igniter (W) Suction draft (W) Current consumption Wh Rated load/partial load/standby Current consumption % for rated load 400V / 16A / 50Hz / 2800W CCE-socket 1600 1600 1600 1600 72 72 72 72 Noise emission 367 / - / 18 417 / - / 18 417 / - / 18 583 / - /18 0.46 0.42 0.38 0.39 < 70dB A < 70dB A < 70dB A < 70dB A Technical changes, typesetting and print errors reserved! Operating Instructions Touch display 19 of 123 140305 Technical Data Chopped Material SL T/6R Boiler: SL 199 T/6R SL 200 T/6R SL 250 T/6R Rated output (kW) Output range Efficiency (rated output) Efficiency (smallest output) Test office/no. Width (mm) Depth (mm) Height (mm) Weight with installed burner (kg) Boiler class Water content (litres) Water-side resistance (10K/20K) (mbar) Flue tube connection (mm) Height to flue pipe middle (mm) ø Lead/return (inch) Height to lead middle (mm) Height to return middle (mm) Setting temperature controller (STB) Exhaust mass flow Rated load/partial load (kg/s) Req. conveyor pressure (mbar) Rated load/partial load Exhaust temperature rated/partial load (°C) O2 concentration rated load/partial load [%-Vol.] Ash removal Electr. connection Igniter (W) Suction draft (W) Current consumption Wh Rated load/partial load/standby Current consumption % for rated load Noise emission 199 70 – 199 TÜV Süd LGA Austria 200 70 – 200 TÜV Süd LGA Austria 245 70 – 245 91.1 95.3 TÜV Süd LGA Austria 1175 2630 1800 2100 5 390 1175 2630 1800 2100 5 390 1175 2630 1800 2100 5 390 44 / 11 44 / 11 44 / 11 250 1370 2.5” 1630 830 250 1370 2.5” 1630 830 250 1370 2.5” 1630 830 90°C 90°C 90°C 0.165/0.055 0.165/0.055 0.165/0.055 0.08 0.08 0.08 - - 165 / 76 - - 6.8 / 8.6 automatic automatic automatic 400V / 16A / 50Hz / 2800W CCE-socket 1600 1600 1600 2 x 180 2 x 180 2 x 180 - / - / 18 - / - / 18 599 / - / 18 0.46 0.42 0.38 < 70dB A < 70dB A < 70dB A Technical changes, typesetting and print errors reserved! Operating Instructions Touch display 20 of 123 140305 Technical Data Pellets SL-P Boiler: Rated output (kW) Output range Efficiency (rated output) Efficiency (smallest output) Test office/no. Width (mm) Depth (mm) Height (mm) Weight with installed burner (kg) Boiler class Water content (litres) Water-side resistance (10K/20K) (mbar) Flue tube connection (mm) Height to flue pipe middle (mm) ø Lead/return (inch) Height to lead middle (mm) Height to return middle (mm) Setting temperature controller (STB) Exhaust mass flow Rated load/partial load (kg/s) Req. conveyor pressure (mbar) Rated load/partial load Exhaust temperature Rated/partial load (°C) O2 concentration rated load/partial load [%-Vol.] Ash drawer front (litres) Ash drawer rear (litres) Electr. connection Igniter (W) Suction draft (W) Current consumption Wh Rated load/partial load/standby Current consumption % for rated load Noise emission SL-P 30 SL-P 40 SL-P 49 SL-P 50 SL-P 65 30 9.3 – 30.8 92.8 93.9 TÜV Süd LGA Austria 40 9.5 – 40.0 TÜV Süd LGA Austria 630 1050 1330 555 5 73 630 1050 1430 595 5 87.5 770 1050 1430 675 5 110 770 1050 1430 675 5 110 770 1050 1530 740 5 116 1.40 / 0.35 1.40 / 0.35 1.40 / 0.35 1.40 / 0.35 17.2 / 4.3 180 650 6/4" 1200 535 180 650 6/4" 1300 535 180 650 6/4" 1300 535 180 650 6/4" 1300 535 200 650 6/4" 1410 535 90°C 90°C 90°C 90°C 90°C 49 50 65 11.0 – 45.9 14.0 – 50.0 14.0 – 65.0 94.0 92.9 TÜV Süd TÜV Süd BLT LGA LGA Wieselburg Austria Austria 0.016/0.008 0.021/0.010 0.023/0.013 0.023/0.013 0.031/0.012 0.08 0.08 0.08 0.08 0.08 133 / 73 - 90 / 64 - - 7.6 / 12.5 - 5.8 / 11.7 - - 34.5 24.2 34.5 24.2 35.4 24.2 35.4 24.2 35.4 24.2 1600 32 400V / 16A / 50Hz / 2800W CCE-socket 1600 1600 1600 32 32 32 1600 72 59 / - /18 - / - / 18 167 / - / 18 - / - / 18 - / - / 18 0.2 - 0.34 - - < 70dB A < 70dB A < 70dB A < 70dB A < 70dB A Technical changes, typesetting and print errors reserved! Operating Instructions Touch display 21 of 123 140305 Technical Data Pellets SL-P Boiler: SL-P 80 Rated output (kW) Output range Efficiency (rated output) Efficiency (smallest output) Test office/no. Width (mm) Depth (mm) Height (mm) Weight with installed burner (kg) Boiler class Water content (litres) Water-side resistance (10K/20K) (mbar) Flue tube connection (mm) Height to flue pipe middle (mm) ø Lead/return (inch) Height to lead middle (mm) Height to return middle (mm) Setting temperature controller (STB) Exhaust mass flow Rated load/partial load (kg/s) Req. conveyor pressure (mbar) Rated load/partial load Exhaust temperature rated/partial load (°C) O2 concentration rated load/partial load [%-Vol.] SL-P 99 SL-P 110 SL-P 150 80 99 110 150 24.0 – 80.0 24.0 – 99.0 24.0 – 110.0 39.3 – 146.7 92.6 95.6 TÜV Süd TÜV Süd TÜV Süd TÜV Süd LGA Austria LGA LGA LGA Austria Austria Austria 870 1265 1520 920 4 120 870 1265 1620 980 4 190 870 1265 1620 980 4 190 1050 1465 1810 1405 4 340 1.40 / 0.35 1.40 / 0.35 1.40 / 0.35 34.4 / 8.6 200 620 6/4" 1390 535 200 620 6/4" 1490 535 200 620 6/4" 1490 535 250 640 2" 1675 545 90°C 90°C 90°C 90°C 0.038/0.020 0.059/0.021 0.059/0.021 0.079/0.029 0.08 0.08 0.08 0.15 / 0.08 - - - 148 / 77 - - - 7.8 / 11.5 Ash drawer front (litres) Ash drawer rear (litres) 51.2 34.3 51.2 34.3 51.2 34.3 74.1 50.4 Electr. connection Igniter (W) Suction draft (W) Current consumption Wh Rated load/partial load/standby Current consumption % for rated load 400V / 16A / 50Hz / 2800W CCE-socket 1600 1600 1600 1600 72 72 72 72 Noise emission - / - / 18 - / - / 18 - / - / 18 83 / - /18 - - - 0.3 < 70dB A < 70dB A < 70dB A < 70dB A Technical changes, typesetting and print errors reserved! Operating Instructions Touch display 22 of 123 140305 Technical Data Pellets SL-P Boiler: Rated output [kW] Output range [kW] Efficiency rated output [%] Efficiency of smallest output [%] Test office/no. Width [mm] Depth [mm] Height [mm] Weight with installed Burner [kg] Boiler class Water content [litres] Water-side resistance 10K/20K [mbar] Flue tube connection [mm]) Height flue tube [mm] ø Lead/return [inch] Height to lead middle [mm] Height to return middle [mm] Setting temperature controller Exhaust mass flow rated load/partial load [kg/s] Req. conveyor pressure 160 °C [mbar] Rated load/partial load Exhaust temperature rated/partial load [°C] O2 concentration rated load/partial load [%-Vol.] Ash removal Electr. connection Igniter [W] Suction draft [W] Current consumption Wh Rated load/partial load/standby Current consumption % for rated load Noise emission SL-P 199 Pellets SL-P 250 Pellets 199 70-199 TÜV Süd LGA Austria 245 70-245 91.8 95.3 TÜV Süd LGA Austria 1175 2630 1800 2100 5 390 1175 2630 1800 2100 5 390 44 / 11 44 / 11 250 1370 2.5” 1630 830 90°C 250 1370 2.5” 1630 830 90°C 0.150/0.049 0.150/0.049 0.25 / 0.18 0.25 / 0.18 - 154 / 67 - 6.9 / 8.9 automatic automatic 400V / 16A / 50Hz / 2800W CCE-socket 1600 1600 2 x 180 2 x 180 398 / 132 / 18 - 0.16% < 70dB A < 70dB A Technical changes, typesetting and print errors reserved! Operating Instructions Touch display 23 of 123 140305 Connection flange DN65 / PN6 Bolt circle 130 mm / 4 x M12 Safety heat exchanger Attention: A ½” cold water connection must be provided for the safety heat exchanger integrated in the boiler. The heat exchanger must be connected to the cold water network before initial commissioning. At the safety heat exchanger, a water pressure of at least 2 bar and a water temperature of no more than 15°C according to EN 303-5 must be pending. The installer must choose valves to ensure that the discharge of excess heat starts at a boiler temperature of 100°C. The heat discharge must not be impaired in any manner at power failure! Alternatively, the safety heat exchanger may also be installed and connected on the opposite side. Technical changes reserved! Operating Instructions Touch display 24 of 123 140305 Cleaning Instructions for boilers SL 25 T/2R to SL 150 T/4R SL-P 30 to SL-P 150 1. Go into “Dauerbetrieb“ (permanent operation); switch off the heater by pressing the “Aus“ (Off) button. Safeguard the heater against an on-signal sent by an external controller. Let the heater cool down until there are no glowing embers left. 2. Change to “Handbetrieb” (manual operation). 3. Switch off the main power switch and safeguard it against switching it on again (use, for example, a padlock). 4. Clean the combustion chamber. Fig. 1 Fig. 2 Open the heater door only when the heater is cold. at the front Remove the shaped bricks (start with the brick or with the one at the back). Vacuum the light barrier tubes and check if they are clean. Fig. 3 Remove any ash, soot and any other deposits from the combustion chamber using a hand brush. Remove any ash from around the grate using a vacuum cleaner. Otherwise you will not be able to place the shaped bricks back to their correct positions. Operating Instructions Touch display 25 of 123 140305 When placing the shaped bricks back into the heater proceed as follows: Start with the brick at the back, then place the two bricks at the side and finally place the brick at the front. Remove any contamination from the light barrier’s two protecting glasses. Fig. 4 5. Clean the heat exchanger. Fig. 5 Fig. 6 Open the cover plate. Fig. 7 Remove the guide plate. Operating Instructions Touch display Loosen the butterfly nuts. Fig. 8 Scrape the surface with the ash scraper supplied in the accessory equipment. Remove any ash from the heat exchanger using a hand brush or a vacuum cleaner. 26 of 123 140305 Fig. 9 Fig. 10 Remove the cover plate. Fig. 11 Fig. 12 Loosen all three nuts and remove the lid. exchanger Remove any fly ash from under the heat and in the flue gas tube using a vacuum cleaner (dismantle the suction draught fan in the flue gas pipe if there is too much ash). Operating Instructions Touch display 27 of 123 140305 View from below into the heat exchanger Remove any fly ash in the flue gas pipe using a vacuum cleaner. Fig. 13 Fig. 14 Fig. 15 Slightly lift the lid while dismantling. grease. Care must be taken in not rubbing the lid against the cleaning bars. Attention: Close the lid tightly → leak air Grease the lubricating nipples with hot bearing Mount the cover plate again. Operating Instructions Touch display 28 of 123 140305 6. Lubricate with hot bearing grease. Fig. 16 Fig. 17 Lubricate the lower bearing (when there is an ascending screw). Lubricate the upper screw bearing. Lubricate the stoker screw bearing. Fig. 18 7. Check the backfire flap. Fig. 19 Open the cover plate. Operating Instructions Touch display Fig. 20 Check if the motor is tightly connected to the hexagon shaft and make sure that the flap closes properly. 29 of 123 140305 Fig. 21 Fig. 22 Open the cover plate. Fig. 23 Open the backfire flap using an Allen key. Fix to center position using a screwdriver. Remove any chipped wood and dust from the flap rear area. Fig. 24 Remove any coarse dirt from the seal and check it on flexibility. Replace it if need be. When you open the flap further (in the indicated direction of the arrow) fixation is released and the flap closes. Mount all the cover plates. 8. Remove ash from the suction draught fan. Fig. 25 Fig. 26 Loosen the nuts and remove the lid. Remove any ash and mount the lid again. Operating Instructions Touch display 30 of 123 140305 9. Empty the ash box. Fig. 27 Switch on the heater, change to “Handbetrieb“ (manual operation) and proceed with the manual cleaning. Empty the ash box and push it back again. Finally put the heater back into operation after having completed cleaning. Operating Instructions Touch display 31 of 123 140305 Cleaning instructions boilers SL 199 T/6R to SL 250 T/6R and SL-P 199 to SL-P 250 The heater should be allowed to cool prior to cleaning in order to avoid burns. Attention: Do not put hot ash into flammable containers. Danger of fire! Secure heater against automatic start! Repeat the quoted works every 6 month! 1. Go into "Dauerbetrieb" (permanent operation); switch off the heater by pressing the "Aus" (Off) button. Safeguard the heater against an on-signal sent by an external controller. Let the heater cool down sufficiently, in order to prevent danger of burning. 2. Change into "Handbetrieb" (manual operation). 3. Switch off the main power switch and safeguard it against switching it on again (for instance, use a padlock). 4. Clean the combustion chamber. Fig. 1 Fig. 2 Open the heater door only when the Open the maintenance openings below the heater door, heater is cold and then remove the ash from above. remove ash from the front area, then remove the shaped bricks and vacuum any ash. After removing the shaped bricks, take out the grate and check for any damages. Operating Instructions Touch display 32 of 123 140305 On the bottom side of the left and the right post combustion device there is a drilled hole for monitoring the fill level in the combustion chamber. Check that both drilled holes are clean or clean them, if necessary. Remove any encrustations with a scraper or a brush and remove these from combustion chamber. Fig. 3 Note: Remove the shaped brick on the left front area (Fig. 2) first and reinsert this shaped brick at the end! 5. Clean the heat exchanger. Remove the two cover plates at the upper back area, loosen fittings at the lid of the heat exchanger and fold up. Lift up any cleaning turbulators, check for damages and afterwards let them fall back into the oven draughts. Fig. 4 Operating Instructions Touch display 33 of 123 140305 Fig. 5 Remove guide plate Clean the rectangular tube-draughts and remove any ash on the upper side with an ash scraper and a brush. Fig. 6 Check the seal at the heat exchanger cover. Fig. 7 Afterwards close the lid and screw together. Put any covers back in place. 6. Remove ash from the flue gas tube. Open the maintenance openings at the flue gas connection piece between heater and suction draught. Check, if any fly ash has collected in the tube and remove, if necessary. Then close the maintenance openings. Fig. 8 Operating Instructions Touch display 34 of 123 140305 7. Lubricate the counter bearing of the stoker screw. Remove the lids of the ash removal unit-supply unit. Loosen maintenance cover to lubricate the counter bearing of the stoker screw. Lubricate the bearing. Remount the maintenance cover. Check the seals at the supply unit and replace, if necessary. Remove any major encrustations from the screw. The maintenance procedure of ash removal from the heat exchanger is analogous to the procedure of ash removal from the heater. Fig. 9 8. Lubricate the bearing of ash screw. Lubricate the bearing of the ash removal unit. Fig. 10 9. Lubricate the bearings of the heater ash removal unit and the shock absorbers. Fig. 11 Fig. 12 Remove side panel and lubricate the six flange bearings and the shock absorber. Operating Instructions Touch display 35 of 123 140305 Treat the chain with a chain spray and remount the side panel. Fig. 13 10. Lubricate the bearing of the discharge screw. Lubricate the bearing of the discharge screw. Fig. 14 11. Lubricate the bearing of the stoker screw. Lubricate the bearing of the stoker screw. Fig. 15 Operating Instructions Touch display 36 of 123 140305 12. Backfire flap Open the side lid of the discharge device and check if there are any foreign objects in the back area of the fire damper (wood chips, wood pellets etc.), which prevent the complete opening of the flap. If so, remove foreign objects. After the check, remount the side lid. Fig. 16 Open the upper lid of the discharge device and check whether the seal is in good condition. If not, replace the seal. After the check, close the discharge device and screw together. Fig. 17 Check, if all protective devices are mounted and mount, if necessary. Switch on the heater, change to "Dauerbetrieb" (permanent operation) and go to "Reinigen" (cleaning) and carry out the cleaning. After having completed the cleaning, you can put the heater back into operation. Operating Instructions Touch display 37 of 123 140305 Explanation of the Operating Panel Boiler = 65°C Energy request System status Permanent operation Time Time-controlled operation Boiler Boiler operation Heating circuit Time + boiler operation Parameter Manual operation Kettle On Off Fig. 100 The current operating mode is highlighted in green. If the boiler is "Off”, the button is red. For "On”, the button is green. Operating Instructions Touch display 38 of 123 140305 1 2 3 4 Boiler = 65°C Room MIN 15°C m MAX m MIN m influence mode switch Room device Fig. 200 5 6 7 Pushing the green button, e.g. "Room MIN”, opens a dialogue window. The selected parameter (3) is displayed in the upper, dark-green area. In the middle below it there is the current setting (2). The setting can be changed using the keypad or the "+” and "-" buttons. The checkmark (6) saves the entry, the cross (5) deletes individual numbers and the "back arrow” (7) closes the window without saving. The smallest (1) input value is located on the left side of the input field, the largest one (4) on the right side. Operating Instructions Touch display 39 of 123 140305 1 2 Boiler = 65°C Heating circuit 1 Floor heating Fig. 300 3 4 5 Pushing the green button, e.g. "Heating circuit 1”, opens a dialogue window. The selected parameter (2) is displayed in the upper, dark-green area; below it, there is the current designation of the parameter (1). Any name can be assigned via the keyboard. The checkmark (5) saves the entry, the cross (3) deletes individual numbers and the "back arrow” (4) closes the window without saving. Operating Instructions Touch display 40 of 123 140305 Overview After the main switch is first activated, the display looks like figure 400. 1 2 4 3 5 6 Boiler = 65°C Chopped material SL Energy request System status Permanent operation Time 7 8 Time operation Boiler operation 9 Boiler Heating circuit 10 Parameter 11 Kettle 12 Time+Boiler operation Manual operation On Off Fig. 400 14 13 Ad 1: Cleaning mode: If this button is pushed, the screen will turn black for 30 seconds (figure 500) and the glass surface at the display can be cleaned without inadvertently changing any parameters. Once the countdown has expired, the display will work as before again. Touch Cleaningsmodus 29s Fig. 500 Operating Instructions Touch display 41 of 123 140305 Ad 2: Boiler info button: depending on operating mode of the boiler, the number and parameter type may deviate (Fig. 600). Boiler information Boiler temperature Exhaust temperature Lambda Manual operation 50°C 150°C 520 Off Fig. 600 Ad 3: Display of the current boiler temperature Ad 4: Displays that the boiler is heating now (flame) Ad 5: Date and time Ad 6: Start page: When this button is pushed, the boiler will jump from any programme level to the starting page (Fig. 100) Ad 7: System status: overview of all activated boilers and mixing circuits Ad 8: Clock: Setting of the boiler runtimes in time mode Ad 9: Boiler: The current boiler or buffer storage temperatures are displayed here and the different parameters can be adjusted individually. Ad 10: Heating circuit: This displays the current lead temperature. The different parameters can be adjusted individually. Ad 11: Parameter: Description to follow Ad 12: Boiler: Specification of the boiler basic settings Ad 13: Display of the operating condition "On/Off" Ad 14: Display of the boiler's operating mode Operating Instructions Touch display 42 of 123 140305 System Status Boiler = 65°C Heating circuit + Boiler M1 + M2 M3 + M4 M5 + M6 B1+2+3 B4+5+6 B7+8+9 M7 + M8 B10+11+12 Fig. 700 The system status displays all pumps and heating circuit mixers activated in the control. This includes: Heating circuit mixer M1 to M16 Boiler B1 to B24 Transfer mixer 1 to 4 Return increase The heating circuit mixers M9 to M16 and the boilers B13 to B24 can be accessed when pushing the arrow to the right. If the triangle of the pump icon is grey, the pump is standing; if the triangle is green, the pump is running. If the circle in the 3-directional heating circuit mixing valve is grey, the valve is standing. If the circle is red, more hot water is taken from the lead. If the circle is blue, more cold water is taken from the return line to achieve the required temperature. The fire symbol in the heating circuit or boiler indicates that the heating circuit or boiler needs energy. Pushing the "arrow down" will take you to the transfer, network mixers and the return increase (Fig. 800). If transfer, network mixers and storage charging pump (Fig.900) are not present, they are not displayed either. Operating Instructions Touch display 43 of 123 140305 Boiler = 65°C Transfer mixer Transfer 1 Transfer 2 Transfer 3 Transfer 4 Network mixer Network mixer 1 Network mixer 2 Network mixer 3 Network mixer 4 Return increase Fig. 800 Boiler = 65°C Storage Storage 1 Storage 2 Storage 3 Storage 4 Fig. 900 Operating Instructions Touch display 44 of 123 140305 Time Boiler = 65°C Time operation ON OFF ON Monday OFF Copy times Tuesday Wednesday Thursday Friday Saturday Sunday Fig. 1000 If the operating mode is set to time mode, two activation and deactivation points can be specified when pushing the button "Clock" (see Fig. 400 item 8) for each weekday. Attention: The boiler starts at the specified "ON" time and stops at the specified "OFF" time. The boiler does not consider any energy requirements of the hot-water boiler or heating circuits. It will only run within the defined time. In the lower area, the boiler runtime for the current day is displayed with red bars. Operating Instructions Touch display 45 of 123 140305 Boiler = 65°C Monday Tuesday Wednesday Thursday Friday Saturday Sunday Fig. 1100 The second page shows a weekly overview of the respective heating times. They are displayed with a read beam. Operating Instructions Touch display 46 of 123 140305 Boiler Storage (optionally only with storage module) 3 4 5 6 Boiler = 65°C 2 Storage 1 1 1 System status ACT 65°C 70% MIN 70% MAX 70% TARGET 70% Heating circuit 7 HOT COLD 8 Fig. 1200 Ad 1: Display of the source temperature (boiler), charging pump does not run (grey icon) Ad 2: Display of the storage name (see Parameters → Activate modules) Ad 3: Display of the current storage charge conditions in percent Ad 4: Display of the boiler temperature Ad 5: Display that the boiler produces energy Ad 6: Display that you are in storage 1 Ad 7: If several storages and/or boilers are present, this area shows the arrow buttons to switch to the next storage/boiler Ad 8: Push the "back arrow" to move one level up in the menu MIN: Minimum storage filling degree; at this charge condition at the latest, the boiler will run at the full output MAX: Maximum storage filling degree; The heat production will stop at this charge condition. TARGET: Intended charging condition HOT: Upper limit to calculate the storage charging condition COLD: Lower limit to calculate the storage charging condition. Operating Instructions Touch display 47 of 123 140305 Boiler = 65°C Storage 1 1 System status ACT 65°C 70% Charging pump release from to from to Heating circuit Storage increase from to from to Fig. 1300 Charging pump release from/to: Two time windows in which the charging pump runs to charge the storage can be defined here. Storage increase from/to: The storage charging condition can be increased, e.g., by 10% in two time windows here. Operating Instructions Touch display 48 of 123 140305 Boiler 3 4 6 5 Boiler = 65°C 2 Boiler 1st floor 1 1 65°C START Heating circuit Difference energy source Residual temp. use 50 °C System status OFF Hysteresis 7 TAR 35 °C 8 Fig. 1400 9 Ad 1: Display of the source temperature (boiler), loading pump is running (green icon) Ad 2: If a firing symbol is to displayed, the boiler is requesting energy. Ad 3: Display of the boiler starting temperature (green input field; at this temperature, the boiler charging starts) and the current boiler temperature Ad 4: Display of the boiler temperature Ad 5: Display that the boiler produces energy Ad 6: Display that you are in boiler 1 Ad 7: The "arrow to the right" button takes you to the next boiler. Ad 8: Push the "back arrow" to move one level up in the menu. Ad 9: Display of the boiler target temperature (green input field; at this temperature, the boiler charging stops) and the current boiler temperature Boiler 1st floor: The boiler designation can be customised in "Parameter" → "Activate modules". Difference energy source: If the energy source is hotter than the energy requirement (boiler, buffer and/or storage) by, e.g., at least 5°C), charging takes place. Operating Instructions Touch display 49 of 123 140305 Residual temperature utilisation: When the boiler has reached its "target" temperature, the charging pump switches off. If the boiler still holds any energy, the residual energy can be charged into the boiler until the corresponding "temperature source difference" is reached. The lower of two boiler sensors is observed here. Hysteresis: If the boiler, buffer and/or storage has reached its target temperature, the charging pump is stopped. If the temperature drops by the value defined in the hysteresis, the charging pump is started again. The hysteresis works in any operating mode. Boiler = 65°C 1 Boiler 1st floor 65°C Charging pump release 40 °C from to from to System status Heating circuit 50 °C Boiler increase 40 °C 35 °C from to from to Fig. 1500 Charging pump release: When the energy source (boiler, storage or buffer) has reached this temperature, the charging pump starts up. Charging pump release from/to: two time windows can be defined here in which the charging pump runs. If the deactivation time of the parameter "Charging pump release to" is reached during charging of the buffer storage or boiler, charging is discontinued. This happens even if you have defined a boiler with two sensors (buffer storage). The charging pump switches off. This enables the boiler to shut down controlledly as well. Raise boiler: The boiler/buffer temperature can be increased, e.g., by 10°C in two time windows here. Operating Instructions Touch display 50 of 123 140305 Heating circuit 6 7 8 9 Boiler = 65°C 5 Heating circuit On Heating circuit System status 4 Boiler TARGET 45°C 3 10 45°C AT 5°C 2 1 AT MIN 0°C Room MIN 15°C 65°C 11 AT MAX 15°C Room MAX 25°C 12 Fig. 1600 14 13 Ad 1: Display of the current source temperature Ad 2: The heating circuit is currently requesting energy. Ad 3: At the moment, the inlet has a temperature of 45°C. Ad 4: The room unit displays the room temperature and, optionally, the switch position, if present. Ad 5: The heating circuit can be designated individually (see "Parameter" → "Activate modules"). Ad 6: Display of the current boiler temperature. Ad 7: Display that the boiler is producing energy. Ad 8: The heating circuit is activated. Push the green button to open a window; the heating circuit can be switched off manually here. If the heating circuit is set to "Heating circuit off", it is no longer considered by the control until it is manually switched back to "Heating circuit on" again (Fig. 1700). Heating circuit Heating circuit ON Heating circuit OFF Fig. 1700 Operating Instructions Touch display 51 of 123 140305 Ad 9: Display of the heating circuit number Ad 10: The "arrow to the right" button takes you to the next heating circuit. Ad 11: The "Arrow down button" takes you from the selected heating circuit to the next menu page. Ad 12: Push the "back arrow" to move up one level in the menu. Ad 13: The control calculates the lead temperature from the outer and room temperatures. Ad 14: The required lead temperature is calculated from the values for the minimum and maximum outer temperature as well as the values for minimum and maximum room temperature. Boiler = 65°C Heating circuit office Boiler 1 Room MAX Room MIN Room influence Operating mode switch Room device Fig. 1800 Ad 1: Display of the room temperature Room MAX: Maximum room temperature; this parameter is required for calculation of the lead temperature (see Fig.1600) Room MIN: Minimum room temperature; this parameter is required for calculation of the lead temperature (see Fig.1600). Room influence: This parameter defines the scope at which the room temperature is included in calculation of the lead temperature (0% = no consideration of the room temperature; 100% = the lead temperature is only according to the room temperature). Operating Instructions Touch display 52 of 123 140305 Operating mode switch Operation by room unit: The heating circuit is prepared only via the operating selection switch at the room unit. The functions differ depending on the position of the operating selection switch. Operation by operating unit: The present room unit is not considered. The same operating modes as at the room unit can be selected at the operating unit (Fig. 1900, 1800). Operating mode switch Operating unit Room device Fig. 1900 If the parameter "Operation by operating unit” is chosen, the wheel of the operating selection switch disappears at the illustration of the room unit. A green field with the same setting options as in the operating selection switch appears. Touch the field to make the desired settings. Boiler = 65°C Heating circuit Bü Operating mode switch Boiler Heating circuit OFF Heat. circ. OFF → Boiler charge reduced heating mode time-controlled heating mode permanent heating mode m MAX m MIN Room influence Operating mode switch Operating unit Fig. 2000 Operating Instructions Touch display 53 of 123 140305 1 2 3 4 5 Fig. 2100 The following settings are possible at the mode selection switch of the room unit: ● Heating circuit OFF (1) → The heating circuit is switched off. If the mode selection switch is in this position, no hot water will be provided (boiler operation). ● Heating circuit OFF – boiler charging (hot-water operation) (2) → The heating circuit is off; only boiler charging takes place. ● Reduced heating mode (3) → The heating control reduces the calculated lead temperature by the value of the lead reduction. ● Time-controlled heating mode (4) → Heating and reduced operation take place as defined in Fig. 1800. ● Permanent heating mode (5) → Permanent heating takes place; the lead temperature is not reduced. Boiler = 65°C Heating circuit office Boiler Lead TARGET Lead ACT Lead ACT Lead MAX Lead MAX Lead MIN Lead MIN Frost protection Lead reduction Heating circuit OFF at outdoor temp. Heating circ. pump ON Heating mode Heating circ. pump OFF Reduced mode Today Fig. 2200 Operating Instructions Touch display 54 of 123 140305 Vorlauftemperatur Lead TARG: The lead target temperature is reached depending on the maximum and minimum lead temperatures the maximum and minimum outer temperatures and the maximum and minimum room temperatures. Lead ACT: Actual lead temperature Lead MAX: The highest lead temperature is specified for the control here. Lead MIN: The lowest lead temperature is specified for the control here. Lead reduction: If the control is outside of the heating times (Fig. 2200), the lead target temperature is reduced by the lead reduction value. Heating circuit pump ON: When the corresponding energy source temperature is reached, the heating circuit pump switches on. Heating circuit pump OFF: When the corresponding energy source temperature is reached, the heating circuit pump switches off. Outer temperature ACT: Displays the actual outer temperature. Outer temperature MAX: The control requires a maximum outer temperature to calculate the lead target temperature. Outer temperature MIN: The control requires a minimum outer temperature to calculate the lead target temperature. Frost prot.: If the temperature defined in the control is undercut, all heating circuit and boiler pumps start running to prevent possible frost damage. Heating circuit off at outdoor temperature Heating mode: If the defined temperature is reached or exceeded, the heating circuit pump switches off; heating is interrupted until the temperature is undercut. Reduced mode: During the time of heating at reduced lead target temperature, a temperature can be defined according to heating. Today: The red and blue bars illustrate when heating or reduced heating take place today. Vorlauftemperatur 65 45 25 17,5 15 12,5 10 Vorlauftemperatur 7,5 5 2,5 0 ‐2,5 Aussentemperatur Tab. 100 Operating Instructions Touch display 55 of 123 140305 Boiler = 65°C Heating circuit office On Boiler Heating times Off On Monday Off Copy times Tuesday Wednesday Thursday Friday Saturday Sunday Today Fig. 2300 Two different heating times can be defined per weekday; heating is reduced outside of these times. In the factory settings, the heating time is defined from 00:00 AM to 11:59 PM, i.e. heating takes place from midnight to 11:59 AM; the factory settings do not have any reduced heating operation predefined. Pushing the green input fields will open a window where the heating time "On" and "Off" can be specified. When the input has been made, the "checkmark" can be used to confirm the input. The value is accepted. If you have made a typo, you can delete the figure with the "cross". Push the "checkmark" or the "back arrow" to return to the original value. When the heating times are customised, they can be copied to every single day with the command "Copy times". Operating Instructions Touch display 56 of 123 140305 Boiler = 65°C Heating circuit office Heating times Boiler Monday Tuesday Wednesday Thursday Friday Saturday Sunday Fig. 2400 Operating Instructions Touch display 57 of 123 140305 Parameter Boiler = 65°C Service Sensor reconciliation Return flow increase Combustion Error storage + Data logger Transfer mixer Network mixer Activate modules Recording System network Programme Fig. 2500 Pushing "Parameter" will take you from the start page to this one. Operating Instructions Touch display 58 of 123 140305 Service Boiler = 65°C Service Page 1 Cleaning duration Cleaning interval Waiting time before cleaning At system off rotary grid Light barrier Clo closed Cleaning after Alarm light barrier interruption Hard Bridge light barrier Fig. 2600 Cleaning duration: When automatic cleaning is activated, it will take 60 seconds. Cleaning interval: Automatic cleaning is performed after a stoker runtime of 150 min. If the remaining stoker time at system start-up is ≤ 60min, a cleaning is performed before the start. The cleaning intervals are dynamically controlled depending on the output range (rated load, partial load). If the system is operated at a boiler output of 30% to 52%, each stoker runtime is multiplied by the factor 3. If the system is operated at a boiler output of 53% to 75%, each stoker runtime is multiplied by the factor 2. If the system is operated at a boiler output of 76% to 100%, each stoker runtime is multiplied by the factor 1. I.e. if the system is only operated with an output specification of, e.g., 40%, the cleaning interval in the example named is 40min. If the system is only operated with an output specification of, e.g., 80%, the cleaning interval in the example named is 120min. If the system adjusts modulating, any time between 40 min and 120 min may result from the calculations in this example. Waiting time before cleaning: A waiting time of this length follows after cleaning release is reached to burn the heating material still in the burner as completely as possible. Cleaning takes place after this! The parameter "Fan stop suction draft V1 at exhaust temperature" must be undercut as well. Operating Instructions Touch display 59 of 123 140305 At system off-rotary grid: "Closed" or "Open"; after the defined ignition temperature is undercut, the rotary grid moves to "open". This prevents pulling of wrong air through the stoker duct and thus backburn at system "off" Light barrier: Displays whether the light barrier is closed (free) or interrupted. If the light barrier is interrupted, seconds are counted up until the time of parameter "Alarm light barrier interruption" is reached. Cleaning after: If the light barrier is interrupted for at least 20 seconds, the counter counts up. After three interruptions (factory settings), cleaning is performed. One entry is deleted every 60 seconds. Alarm light barrier interruption: If the light barrier is interrupted for longer than the defined parameter, an error message is put out. Bridge light barrier: currently without function. Boiler = 65°C Service Page 2 suction draft V1 lag Fill burner Conveyor time monitoring Backburn flap closed Measured value Suction interval Max. filling time Suction position Fig. 2700 Suction draft V1 lag: If the system is given an off command, the V1 (suction draft) will lag for the intended time. Fill burner: Adjustable time window at which all discharge motors and the stoker screw are running when the backburn flap is open. Conveyor time monitoring: The last three stoker runtimes at the heating system are stopped until the chamber discharge starts. If the current value exceeds the average of the last three values by a certain factor, the backburn flap is closed and opened again. Then a material infeed of, e.g., 20 seconds takes place. Backburn flap: Display of whether the backburn flap is open or closed. Measured value: The three last stoker runtimes until activation of the chamber discharge are logged. Optional, only for SL-P 30 to SL-P 150 Operating Instructions Touch display 60 of 123 140305 Suction interval: After the defined stoker runtime of, e.g.,: 110 min, the pellet storage container is filled. Max. filling time: If the storage container is not filled yet after this filling time, switching to the next suction probe takes place. Suction position: Here, you can choose from which suction position the storage container is filled. Boiler = 65°C Service Page 3 Energy request Output specification External start Output 10 Off External start not active Return increase Fan stop suction draft V1 at exhaust temperature Fill level sensor stoker channel Activation delay Deactivation delay Igition at RB flap closed Operating hours Stoker runtime Fig. 2800 Output specification: Five different specifications permit definition of when and how the boiler will start (see specifications of output; Fig. 2900). External start: Two different specifications permit defining whether the boiler starts or stops (see external start). Output 10: A programmable output (see output 10). Fan stop suction draft V1 at exhaust temperature: Before planned cleaning, the fan V1 must undercut the specified value so that fan V1 switches off and cleaning is performed. Fill level sensor interference channel Activation delay: If the fill level sensor at the stoker channel continually reports empty for, e.g., 8 seconds, chamber discharge commences. Deactivation delay: If the fill level sensor at the stoker channel continually reports full for, e.g., 8 seconds, chamber discharge stops. Ignition at RB flap: Currently without function. Operating hours: Display of the current operating hours. Stoker runtime: Display of the current stoker runtime (is needed, e.g., for multiple boiler control) Operating Instructions Touch display 61 of 123 140305 Power specification Energy request Power specification 0-10V Storage control Multi-boiler control External start Fig. 2900 Energy request: The boiler checks whether a heating circuit or buffer/boiler requests energy. If this is the case, start takes place automatically. Power specification 0-10V: If heat distribution takes place by external control, the boiler's heat output can be specified by this external control via a 0-10V voltage. (10V=100% heat output, 3V=30% heat output, <3V=boiler off) Storage regulation: The required heating output is specified via the storage (only possible with a storage module). Multiple boiler control: The boiler sequence circuit and output specification are provided by multiple boiler control of SL-Technik GmbH. External start: If the contact at the power unit (main PCB, slot 16) is closed by an external control, the boiler will start. External start External start not active External stop from external furnace Fig. 3000 External start not active: If the contact at the power unit (main PCB, slot 16) is closed by an external control, the boiler will stop. External stop from ext. furnace: If this version is active, a thermostat will recognise whether the second furnace is heating. If the second furnace is in operation, our furnace will switch off and only assume the heat distribution. OFF::::::"Secondary furnace" cold → our boiler starts ON:::::::"Secondary furnace" hot → our boiler stops. Operating Instructions Touch display 62 of 123 140305 Output 10 Return increase Alarm System status V1 > 0 Fig. 3100 Return increase: A return increase pump can be connected to the output 10 of the power unit (main PCB). Alarm: An optical or acoustic signal encoder with 230 V can be connected to output 10 of the power unit (main PCB). System status: The "System status" can be requested at output 10 of the power unit (main PCB) (system on or off). V1 > 0: At output 10 of the power unit (main PCB), an additional device that will only run when the suction draft fan V1 is running at a speed of >0% can be operated. Boiler = 65°C Service Page 4 Legionella protection OFF Rust protection OFF Boiler overtemperature avoidance Buffer overtemperature avoidance Storage overtemperature avoidance Fig. 3200 Legionella protection: To avoid germ formation, a weekday on which the boiler is heated to >70°C once can be defined. If the boiler does not need any energy on that day, it also is not charged and legionella protection is not performed. Operating Instructions Touch display 63 of 123 140305 Rust protection: If rust protection is activated on a specific day, it will always start at noon on that day. The charging pumps are activated for one minute and the heating circuit mixers are given an Open signal for five minutes and a Closed signal for six minutes. The Runtime of the heating circuit mixer is considered. Boiler overtemperature avoidance: When the defined temperature is reached, all pumps directly supplied by the boiler are activated: ● Boiler pumps ● Buffer storage pumps ● Heating circuit pumps right at the boiler ● Storage pumps ● Return pump ● Transfer pump (network pump not affected) Buffer overtemperature avoidance: When the defined temperature is reached, all pumps directly supplied by the buffer are activated: ● Boiler pumps at the buffer storage ● Heating circuit pumps right at the buffer storage ● Transfer pump Storage overtemperature avoidance: When the defined temperature is reached, all pumps directly supplied by the storage are activated: ● Boiler pumps ● Buffer storage pumps ● Heating circuit pumps of the storage ● Transfer pump (network pump not affected) Boiler = 65°C Service power unit – maximum current consumption Page 5 Cleaning motor Stoker motor Lag Discharge 1 Discharge 2 Fig. 3300 Operating Instructions Touch display 64 of 123 140305 The current limits can be adjusted tor the different drive motors connected to the power unit (main PCB). Operating Instructions Touch display 65 of 123 140305 Boiler = 65°C Service motor module – Maximum current consumption Page 6 Lag Ash motor 1 Ash motor 2 Ash motor 3 Ash motor 4 Discharge 3 Discharge 4 Discharge 5 Discharge 6 Fig. 3400 The current limits can be adjusted to the different drive motors connected to the motor module. Operating Instructions Touch display 66 of 123 140305 Combustion In our boilers‘ control, the material infeed is predefined in seconds per minute for material infeed at rated load (largest output 100%). It is then calculated automatically across the entire output range. Furthermore, the parameters must be defined at rated, partial load and ignition for suction draft V1 and subsequent combustion V2. When the boiler has reached the specified boiler target temperature, it starts reducing output until it has reached the target parameter partial load. The targets between rated and partial load are calculated automatically as in the chart. If different fuel qualities make it impossible to reach the control parameters (Lambda, exhaust/combustion chamber temperature, vacuum) with the targets, the control can automatically adjust the target control range with plus/minus. The following parameters control the following control parameters: Suction draft V1 Afterburning V2 Conveyor time Break time temperature → Vacuum (excluding series SL-T 6R) → Lambda value → Lambda value → Exhaust temperature or combustion chamber Boiler = 65°C Combustion Page 1 TARGET Boilerl output Material insert 100% 30s/min ACT ignition 30s/min 1,8s Current braek time 1,8s Suction draft V1 90% 90% Afterburning V2 20% 20% Lambda part. load Service 100% Current conveyor time Exhaust temperature nom. load Boiler 198°C 553 Fig. 3500 Boiler output: Display of the target or actual boiler output. The boiler adjusts the actual boiler output to the target boiler output via the parameter "adjustment speed". Material insert: The material infeed is predefined in coordination with the rated output of the boiler. Current supply time, current break time: (the displayed value serves information purposes only; it cannot be edited) Is adjusted automatically at all times according to the current target boiler output Operating Instructions Touch display 67 of 123 140305 Suction draft V1: Freely definable parameters for rated, partial load and ignition; the current target and actual speeds are also displayed in percent. Afterburning V2: Freely definable parameters for rated, partial load and ignition; the current target and actual speeds are also displayed in percent. Exhaust temperature: Freely definable parameters for rated and partial load, as well as display of the current exhaust temperature. Lambda: Freely definable parameters for rated and partial load, as well as display of the current lambda value. Afterburning V2 Combustion chamber temp. Lambda Vacuum Fig. 3500.1 Combustion chamber temperature: If a function module is activated at the system (see Parameter → Activate modules), the combustion chamber temperature is monitored instead of the exhaust temperature. Vacuum: For safety-technical reasons, the vacuum in the combustion chamber of our systems with >150kW rated heat output is monitored. The parameters with a green background are predefined and can be changed within a specific bandwidth. There may be various reasons for some systems having a function module installed to monitor, e.g., the combustion chamber temperature. For this reason, it is possible to remove the checkmark for vacuum. The vacuum monitoring can be deactivated after input of the required password. (see Fig. 3600) Vacuum safety deactivation Safety deactivation Off Safety deactivation On Fig. 3600 Operating Instructions Touch display 68 of 123 140305 Boiler = 65°C Page 2 Combustion Control range Control speed Boiler output Material infeed correction Lambda Exhaust temperature Suction draft V1 Afterburning V2 Exhaust temperature monitoring Material transport STOP at Lambda Fig. 3700 Boiler output: Speed at which the boiler takes up heat provision again e.g. after glow maintenance. Material insert correction: To achieve the best combustion at all times, the control has the option to vary the values: Material infeed, suction V1 and afterburning V2 in a specific bandwidth (control range) and at a specified speed (Control speed). The control range can be added to or subtracted from the calculated target value. Exhaust temperature monitoring: Variable specification for the tolerance range of the exhaust temperature rated load. The exhaust temperature can exceed the defined value by 50% and undercut it by 100%. If the boiler does not reach the tolerance threshold, cleaning is performed. Instead of the exhaust temperature, the combustion chamber monitoring is displayed in operation with a functional module; the function is according to the exhaust temperature monitoring. Material transport STOP at Lambda: Variable specification; if the value is exceeded, the fuel supply will stop until the value is undercut again. Operating Instructions Touch display 69 of 123 140305 Boiler = 65°C Combustion Page 3 Ignition insert Ignition cycle time Maximum ignition duration Ignition temperature Ignition temperature difference Igniter lead Igniter lag Glow maintenance break time Glow maintenance duration Fig. 3800 Ignition insert: After the time of any "ignition lead" has expired, infeed is performed for the specified time. Ignition cycle time: After the first ignition infeed, the control will start the material infeed cycles and add the runtime of the stoker screw. When the specified value is reached, the material supply will stop. Maximum ignition duration: When the maximum ignition time is exceeded, an error message is output. Ignition temperature: If the exhaust or combustion chamber temperature is above the ignition temperature, the control assumes that there are still embers in the combustion chamber. There is no ignition. The system will return to controlled operation. Ignition temperature difference: If the exhaust temperature is ≤ the ignition temperature, the control will assume that there are no embers in the combustion chamber. Ignition will take place and the value of the ignition difference must be exceeded. Ignition lead: To permit fast ignition, the combustion chamber can be preheated before the first material infeed. Ignition lag: For the material to not go out briefly after ignition, the ignition will lag. Glow maintenance pause time: Value for the break time in glow maintenance. Glow maintenance duration: When the maximum time for glow maintenance is reached, the boiler will switch off. Operating Instructions Touch display 70 of 123 140305 Activate Modules Pushing "Parameter → Activate modules" will take you from the start page to this one. Boiler = 65°C Heating circuit activate Page 1 Heating circuit 1 Heating Floor heating Control cycle Heating Return mixer active Control cycle Radiator Control cycle Runtime with room device Control cycle Heating Runtime not active Control cycle Control cycle Runtime Fig. 3900 Heating circuit 1: The return increase with the associated pump, mixer and temperature sensor can be connected to the heating circuit 1. Alternatively, the return increase can also be connected directly to the main PCB. If necessary, heating circuit 1 can be set to the return mixer exclusively. This is done by pushing the green button. Heating circuit 2: Pushing the first green field permits assigning a name. Pushing the second green field will activate the heating circuit (see Fig. 4000). If the option "With room unit" is activated, a third green field will appear. There you can specify, e.g., that the heating circuit 3 refers to the room unit of heating circuit 2. Control cycle: At the distance of the control cycle, the "Lead ACT" and "Lead TARG“ temperatures are compared and all mixers adjust accordingly. If your mixer continually switches from one extreme to the other, increase the time. This gives the inert temperature sensor more time to adjust. Mixer adjustment time: If the "Lead temperature ACT" is more than 15°C above or below the "Lead temperature TARG", the mixer adjustment time is tripled. If the "Lead time ACT" is within ± 15°C, the control cycle has the value in seconds, that is set here. If the "Lead temperature ACT" is in a range of ± 1°C of the "Lead temperature TARG“, the mixer does not need to be adjusted. Runtime: If the mixer only receives "Closer" signals under the time set as runtime because the "Lead time ACT" temperature is above the "Lead time TARG" temperature, it can be assumed that there is no energy demand and the pump is switched off. When the "Lead TARG" temperature is undercut, it is activated again. Operating Instructions Touch display 71 of 123 140305 When the runtime is set to 500 seconds (OFF), the heating circuit pumps will run on permanent operation. Pushing the arrow to the right will take you to the heating circuits 5 to 16. Heating circuit 1 not active active with room device return mixer Fig. 4000 Possible settings for the heating circuits: Not active: Factory setting at delivery: all heating circuits are deactivated. Active: The heating circuit works according to the times defined in heating circuit (start screen). With room unit: If there is a room unit, the control takes place via the room unit. Return mixer: Only heating circuit 1 can be defined as a return mixer. Operating Instructions Touch display 72 of 123 140305 Boiler = 65°C Page 2 Activate boiler Boiler 1 Buffer 1 active Boiler 3 Hot-water boiler active Boiler 4 not active Boiler 5 not active Boiler 6 not active Boiler 7 not active Boiler 8 not active Boiler 9 not active 2 PT100 Fig. 4100 The boiler 1 is activated as buffer 1 with two temperature sensors (2 PT100). The temperature sensor of boiler 2 is used as a second PT100 for boiler 1 and therefore invisible. Boiler 3: Is defined as boiler with a temperature sensor. Pushing the arrow to the right will take you to the boiler overview 10 to 18 or 19 to 24. Only for boilers 1, 4, 7, 10, 13, 16, 19, 22 can the parameters described in figure 4100 be defined. Boiler 1 1 PT100 2 PT100 Start/Stop Fig. 4200 1 PT100: For standard settings, see Start Page → Boiler 2 PT100: The boiler can be switched to two-sensor operation here (is usually used in buffer operation to achieve precise layering). The sensor "B1" is installed as upper activation sensor, sensor "B2" as bottom deactivation sensor. Sensor "B3" is used for an additionally installed process water boiler. Start/Stop: The boiler charge starts when the starting temperature is undercut and stops when the TARGET temperature is reached, independent of operating mode and hysteresis. Operating Instructions Touch display 73 of 123 140305 Boiler = 65°C Activate storage Page 3 Storage 1 active Storage 2 not active Storage 3 not active Storage 4 not active Fig. 4300 If a storage module is present, the storage can be activated here. Boiler = 65°C Service Buffer Assignment Transfer Assignment M1+2 Boiler 1 Transfer 1 Assignment M3+4 Boiler 1 Off Assignment M5+6 Boiler 1 Off Assignment M7+8 Off Off Assignment M9+10 Off Off Assignment M11+12 Off Off Assignment M13+14 Off Off Assignment M15+16 Off Off Page 4 Fig. 4400 In the above example, the heating circuits 1 to 6 are assigned to boiler 1. This means that the heating circuits distribute heat when the required minimum temperature is Operating Instructions Touch display 74 of 123 140305 present in the buffer (boiler 1). This happens independently of the temperatures at the boiler. The buffer provides the heat needed by the heating circuits and requests heat from the boiler when required. It can also be defined here whether any present transfer heating circuit collects energy directly from the boiler (no checkmark) or from the buffer (with checkmark). Only the boilers 1, 4, 7, 10, 13, 16, 19, 22 and storages 1 to 4 can be assigned heating circuits. Boiler = 65°C Activate transfer mixer Page 5 active Transfer 1 Control cycle Control cycle Runtime Transfer 2 not active Transfer 3 not active Transfer 4 not active Fig. 4500 Activate transfer mixer: The transfer and network mixers can be activated according to the heating circuits (fig. 4500). Activated network mixer: Pushing the arrow to the right can activate the network mixers if required. Difference between transfer mixer and network mixer: Transfer mixer: The transfer mixer‘s pump only distributes heat energy when an assigned heating circuit or boiler/buffer requires energy (fig. 5200). Network mixer: The network mixer pump permanently provides the heat energy in the local heating network. The release parameter must be met (fig. 5300). Operating Instructions Touch display 75 of 123 140305 Boiler = 65°C Activate motor module Page 6 Ash motor 1 not active Ash motor 2 not active Ash motor 3 not active Ash motor 4 not active Discharge motor 3 not active Discharge motor 4 not active Discharge motor 5 not active Discharge motor 6 not active Fig. 4600 Ash motor or discharge motor: As already described, the motors can be activated or deactivated. Any name may be assigned in the first green field. Boiler = 65°C Power stage Chopped material Page 7 SL 30-40 Drop shaft 400V Function module not active Fig. 4700 Several settings can be made after the password is entered: Operating Instructions Touch display 76 of 123 140305 Heating material: Selection of the heating material between chopped material and pellets. Rated output: Selection of the rated heat output in several output stages. Material supply: Selection of whether the fuel transport takes place via the drop shaft or a suction system. Voltage: Selection of the operating voltage 400V or 230V. Function module: If a function module is present, it can be activated here (usually for systems with a rated heat output ≥ 199kW). The settings described above are already pre-set! Boiler = 65°C Page 8 Ash motor multi-boiler control Ash motor 1 not active Ash motor 2 not active Ash motor 3 not active Ash motor 4 not active Ash motor 5 not active Ash motor 6 not active Ash motor 7 not active Ash motor 8 not active Fig. 4800 Optional: If a multiple-boiler control with automatic ash discharge is installed, here it can be defined which motors will start working when cleaning starts at the boiler. Operating Instructions Touch display 77 of 123 140305 Sensor Reconciliation Pushing "Parameter → Sensor reconciliation" will take you from the start page to this one. Boiler = 65°C Page 1 Sensor reconciliation Zeroing Standardisation Boiler temperature Exhaust temperature Comb. chamber temp. outer temperature Return temperature Fig. 4900 If the above temperatures are not displayed properly, there is the option to correct the displayed value via zeroing or standardisation. Zeroing corrects the lower limit, standardisation the upper one. If the adjustable value is corrected downwards, the measured temperature increases. If the value is corrected upwards, the measured value reduces. The sensor reconciliation on the following pages works according to the procedure described here as well. Operating Instructions Touch display 78 of 123 140305 Error Storage + Data Logger Pushing "Parameter → Error storage + data logger" will take you from the start page to this one. Boiler = 65°C Date Zeit Meldung Error Storage Fig. 5000 Data logger: The data logger logs processes performed by the system (cleaning, ignition, controlled operation, system off by xxx, etc.). This way, it can be understood, how the system works. Pushing the button "Save" exports the data logger or error storage to a USB drive. Error storage: This only displays error messages, but no status displays. Arrow: Pushing this button takes you one line up or down. Double arrow: Pushing this button takes you one page up or down. Recording Pushing "Parameter → Recording" will take you from the start page to this one. Currently without function: Operating Instructions Touch display 79 of 123 140305 Return flow increase Pushing "Parameter → Return increase" will take you from the start page to this one. Boiler = 65°C Return flow increase System status 65°C Return pump On Return TARGET Return pump Off Boiler lead control 15 min Return pump Lag Fig. 5100 Return pump on: The pump will start at this boiler temperature. Return pump off: The return increase pump will stop at this boiler temperature. After deactivation of the return increase pump, the heat reduction must be warranted by the heating circuit pumps! Return pump lag: If the boiler undercuts the temperature for "return pump on", the pump will lag for a defined time until it switches off or the temperature rises again. Return target: Intended return temperature (green field) and calculated return temperature Boiler lead control: If the lead control is active, in which case a value is displayed in minutes, the return target temperature is calculated according to a formula. The control will review the actual return temperature at defined time intervals, compare it to the boiler TARGET temperature and correct it according to the stored formula. The control will always try to maintain the lead temperature at 2°C below the boiler target temperature. If the return increase is not controlled thermally but via a three-directional mixer and an adjustment motor, it must be connected to the main board directly. Alternatively, the 1st heating circuit may be used for this as well. Push "Parameter → Activate modules" and set heating circuit 1 to return mixer. You can verify this on the start page, item System status, where the return pump group is displayed. Operating Instructions Touch display 80 of 123 140305 Transfer Mixer, Network Mixer Pushing "Parameter → Transfer mixer + network mixer" will take you from the start page to this one. Boiler = 65°C Transfer 1 System status Energy request 45°C TARGET 60°C M1+2 Transfer 1 M3+4 Off M5+6 Off M7+8 Off M9+10 Off 60°C M11+12 Off Difference M13+14 Off Boiler charge M15+16 Off Fig. 5200 TARGET: The calculated target lead temperature according to specification by the heating circuit or fixed value for the boiler charge Difference: To balance out possible line loss, the lead can be increased by the value defined in the difference. Boiler charge: If a boiler must be charged, this is done with a lead temperature of 70°C in the above example. Energy request: The heating circuits 1 and 2 are assigned to the transfer mixer 1. At least one of the heating circuits requests heat at a lead temperature of 50°C. To balance out any heat loss in the line, the TARGET lead temperature is increased by 10°C. At the moment, the lead temperature is 45°C. There is no energy request from the boiler, since the TARGET lead temperature would otherwise have to be 70°C. An energy request from the boiler will not increase the TARGET lead temperature by the difference value. Operating Instructions Touch display 81 of 123 140305 Boiler = 65°C System status Network mixer 1 65°C TARGET Release Fig. 5300 TARGET: Target temperature in the heat network. Release: The network pump will start from this temperature onwards, and only stop when the set temperature is undercut. The activation temperature refers to the top storage sensor. If a temperature of, e.g., ≥ 50°C is present there, the pump will start; if the temperature drops, e.g. to < 50°C, the network pump will stop. The pump will not switch off except if the specified temperature is undercut, and will provide the heat to a local heating network around the clock. Operating Instructions Touch display 82 of 123 140305 System, Network, Programmes Pushing "Parameter → System, network, programmes" will take you from the start page to this one. Boiler = 65°C Parameter System Password Archive parameters Network Programme Fig. 5400 Operating Instructions Touch display 83 of 123 140305 System Pushing "Parameter → System, network, programme → System" will take you from the start page to this one. Boiler = 65°C System Calibrate touch Time System restart Date Factory setting Display saver Display view Display GTO Fig. 5500 Time: The time can be set here. Date: The date can be set here. Display saver: After the defined time has expired, the screen will be black and the screen saver will be active. Pushing the surface of the touch operating panel will make the usual interface visible again. Display view: The display view can be turned by 180° (landscape format or rotated landscape format). A subsequent restart is required for the settings made to become active. Display TO: no function Calibrate touch: If this button is pushed, the buttons at the touch operating panel can be calibrated. Always follow the instructions and the coordinate cross. System restart: This restarts the touch operating panel. Factory settings: After entering the password, the touch operating panel will be reset to the factory condition. ATTENTION: All settings are lost! Operating Instructions Touch display 84 of 123 140305 Password Pushing "Parameter → System, network, programme → Password" will take you from the start page to this one. Boiler = 65°C Password Operator Installer Technician System Fig. 5600 On the password page, you can choose the password to be changed. There are three password levels: 1st level → Operator 2nd level → Installer 3rd level → Technician If you are on the 1st password level (operator), you can only change this one. On the 2nd password level (installer), you can change the password for operator and installer. On the 3rd password level, you can change all 3 passwords. Operating Instructions Touch display 85 of 123 140305 Operator Installer Technician Boiler = 65°C Installer Release password 10 min End release Reset password operator System restart Reset password installer Change password Rest password technician Password VNC Password SMS Fig. 5700 This screen shows the 2nd password level, where you can change the installer password. The operator and installer passwords can be reset to the factory setting. The technician password is greyed out and thus not available. Terminate release: When pushing this button, release is terminated at once. Release is automatically terminated after 10 minutes. The key icon shows that release is active. System restart: Pushing this button restarts the touch operating panel. Change password: Any password can be entered here; the change is made after the password has been entered twice. Password VNC: If online remote monitoring is installed, the access data can be changed here. Password text message: If reporting via the mobile phone network is installed, the access data can be changed here. Operating Instructions Touch display 86 of 123 140305 Network Pushing "Parameter → System, network, programme → Network" will take you from the start page to this one. Boiler = 65°C Page 1 Network The system must be restarted at every change IP address Subnet mask Gateway Restart system Ping VNC Port http VNC Port Preferred DNS Server Alternative DNS Server Fig. 5800 Boiler = 65°C Page 2 Email Email address sender User name sender Email password sender Outbound mail server Port Email subject Email address recipient 1 Email address recipient 2 Test mail 1 Test mail 2 Fig. 5900 The system must be integrated into the local network by a network technician (fig. 5800 and 5700) Operating Instructions Touch display 87 of 123 140305 Boiler = 65°C Remote Modem status Call Text message Page 3 Modem not active Back up call no. 1 Back up call no. 2 not active not Phone number 1 Test call Send SMS Test call Send SMS Phone number 2 Fig. 6000 Modem status: If a mobile phone network modem is connected to the system, the status is displayed here (active, not active). Call: A SIM card (not enclosed) from a mobile phone provider permits making a call in case of interference. Attention: There will only be a call without a speech message! Text message: A SIM card (not enclosed) from a mobile phone provider permits sending a test message with the error text in case of interference. Phone no.: Up to two phone numbers can be entered. Process of call and/or text message alarming: If there is an interference in the system, there will be a call to phone number 1 after 10 minutes a text message to phone number 1 after 11 minutes a call to phone number 2 after 20 minutes a text message to phone number 2 after 21 minutes a call to phone number 1 after 30 minutes a text message to phone number 1 after 31 minutes a call to phone number 2 after 40 minutes a text message to phone number 2 after 41 minutes a call to phone number 1 after 50 minutes a text message to phone number 1 after 51 minutes There will not be any more alarms after this process is completed! Operating Instructions Touch display 88 of 123 140305 Function of the text message communication between the heating system and mobile phone: Factory setting password: 0000; Phone number entered correctly (fig. 5800) Status request of the heating system from the mobile phone: Send password (0000) to heating system: 0000 Answer heating system: System ON or system OFF If the password is not correct, the heating system sends the following text: Password incorrect Enter phone number by text message: Password (0000) phone number 1 or 2; 0000RUFNR1, the heating system assumes the number as phone number 1 from the text message. Reduce or heat heating circuits: Password (0000), select desired action (reduce or heat), select heating circuit (M1 to M16): 0000senkenM1 or 0000heizenM2 Several heating circuits at once can be changed as well: 0000heizenM1,senkenM2,senkenM5,heizenM12 Answer heating system: Night red.M2,R5; the heating system lists all heating circuits that are currently reduced, e.g.: M2 by text message command and M5 by room device 5 (R5). Boiler = 65°C Page 4 Modbus Modbus server not active Table not present Number of clients Modbus active Port Fig. 6100 For instructions, see enclosure. Operating Instructions Touch display 89 of 123 140305 Archive parameters Boiler = 65°C Parameter 1 Parameter record 1 2 Parameter record 2 Parameter record 3 Parameter record 4 Parameter record 5 USB drive 1 USB drive 2 Fig. 6200 Ad item 1: The parameters were revised at the above date. Ad item 2: The parameter records behind which there is a date save the individual settings. The date shows when the saved parameter record was revised or saved. Operating Instructions Touch display 90 of 123 140305 Programme Boiler = 65°C Programme Page 1 Programm Main programmes Basis Operating system Sub processor PCB Additional PCB Language Logo Function module Region Austria Language German Fig. 6400 The upper half and the other pages contain lots of information on the software used. Region: Depending on the language, the respective country-typical characters are stored in the parameter region. Language: If a valid language file is stored, the display language can be changed. Operating Instructions Touch display 91 of 123 140305 Programme/Language/Logo: Push one of these buttons to open a window (fig. 6500), where you can choose (fig. 6500, item 1) whether a present software (fig. 6600, item 1.2) is to be activated or "new" software is to be uploaded from the USB drive (fig. 6600, item 1.1). Pushing the icon "Save" (fig. 6500, item 2) opens another window (fig. 6700), in which you need to select the USB drive to back up the software. 1 2 Activate programme 3 1.1 Activate/back up programme 1.2 Fig. 6500 Fig. 6600 Back up programme Fig. 6700 Operating Instructions Touch display 92 of 123 140305 Boiler Boiler = 65°C Chopped material SL 250 Combustion Boiler TARGET Service Glow maintenance On Glow maintenance Off Initiate cleaning Max. boiler output Initiate suction Min. boiler output Ash counter Bag operation Reset Off Cleaning time Next cleaning in Fig. 6800 Boiler TARGET: Intended boiler temperature Glow maintenance on: The boiler will render its specified output to the boiler TARGET temperature. After the "boiler TARGET temperature" is reached, it starts modulating (power reduction) until the defined temperature of parameter "glow maintenance ON" is reached. The boiler TARGET temperature cannot be set above the glow maint. ON temperature. Glow maintenance off: The boiler remains in glow maintenance until the "Glow maintenance off temperature" is undercut. It will then return to performance mode. Max. boiler output: This parameter limits the maximum boiler output. Min. boiler output: This parameter limits the minimum boiler output. Ash counter: The number of cleaning cycles is counted. When the limit in the field with the green background is reached, the display asks the operator to empty the ash box. The "Reset" button zeroes the counter. Bag operation: Only for pellets systems with a suction module. If this parameter is "On", the storage container is not filled automatically. Filling must be performed manually. Cleaning time: This is the last cleaning of the respective day. This avoids disturbing night rest with the sounds arising during cleaning. Next cleaning in: This parameter displays the remaining runtime of the stoker screw. When zero is reached, automatic cleaning is performed. When starting, cleaning takes place when the residual runtime of the stoker screw is ≤60min. Combustion: See Parameter → Combustion Service: See Parameter → Service Operating Instructions Touch display 93 of 123 140305 Initiate cleaning: Initiation of manual cleaning; the parameter "Next cleaning in" is set to the starting value (see Service → Cleaning interval). Initiate suction: Only for pellets systems with a suction module. Initiation of automatic filling of the supply container. Operating Instructions Touch display 94 of 123 140305 Manual Operation Attention: When moving the screws forward and back or when opening and closing the rotary grid, their cover must not be removed and you must not reach into the rotary grid. Boiler = 65°C Manual Backburn flap closed activate Fill burner On Off Rotary grid Open Closed Cleaning Start Stop Stoker motor Forward Back Cleaning motor Forward Back Suction draft V1 Afterburning V2 Fig. 8000 Fill burner: If the stoker channel and the combustion chamber have been emptied out, you can fill the combustion chamber again with the button "On". If "Burner filling" is activated with the button "On", the stoker screw will start conveying and the backburn flap will start opening at the same time; only when the backburn flap is opened completely will the discharge screw start supply. Rotary grid: Manually open or close the rotary grid. Cleaning: Manually clean the boiler. This cleaning leaves the parameter "Boiler → Next cleaning in" unchanged. There will not be any automatic ash discharge! Stoker motor: Forward and reverse operation of the stoker screw Cleaning motor: Forward and reverse operation of the cleaning motor Suction draft V1: Activation of the suction draft V1 with display of the target and actual rotating speed in percent Afterburning V2: Activation of the afterburning fan V2 with display of the target speed in percent Operating Instructions Touch display 95 of 123 140305 Boiler = 65°C Manual Page 2 Fill level full Discharge motor 1 0mA Forward Back Discharge motor 2 0mA Forward Back Discharge motor 3 0mA Forward Back Discharge motor 4 0mA Forward Back Discharge motor 5 0mA Forward Back Discharge motor 6 0mA Forward Back Fig. 8100 Fill burner: If the stoker channel and the combustion chamber have been emptied out, you can fill the combustion chamber again with the button "On". If "Burner filling" is activated with the button "On", the stoker screw will start conveying and the backburn flap will start opening at the same time; only when the backburn flap is opened completely will the discharge screw start supply. Discharge motor: The present discharge motors can be run forward or backwards here. For safety-technical reasons, reverse operation is limited in time. Operating Instructions Touch display 96 of 123 140305 Boiler = 65°C Blow ventilator Backburn flap Page 3 Backburn flap closed Manual Fan closed Open Alarm On System status On Heating Closed Suction position Suction container not full On Off Power specification 0-10V Fig. 8200 Blow ventilator: Fan and heater are active, i.e. there is currently an ignition. Ignition has been running for 60 seconds. Backburn flap: The backburn flap is currently closed (closed). Can be run into the desired direction by operation of the respective switch Alarm: To test the alarm function at the output 10 or in a basic module System status: To test the output signal; the system status is output as system on or system off. Suction position: Optional, when a suction module is present, e.g. switching from the suction position (suction probe) 1 to suction position 3 is possible Suction container: Optional when a suction module is present; fill level display (full, not full) Power specification 0-10V: If this function is activated, the currently pending voltage is displayed in volt for the output specification. Operating Instructions Touch display 97 of 123 140305 Boiler = 65°C Manual Backburn flap 15 s Page 4 STB Water deficit protection no water deficit Light barrier closed Backburn sensor Drop shaft closed Rotary grid closed Fill level full External start off Vacuum Furnace door closed Fig. 8300 STB: Current status of whether the safety temperature limiter (STB; Sicherheitstemperaturbegrenzer) is measuring an overtemperature. If this is the case, the material supply is stopped and the system stops. After manual unlocking of the STB, the system may start again. Water deficit protection: Optional; if a pressure switch is installed in the hydraulic system; If the system pressure drops below a specific value, the system stops. Light barrier: Status of the light barrier closed (free) or interrupted Backburn sensor: Current status of whether the backburn sensor measures an overtemperature If this is the case, an automatic ignition is initiated with the backburn flap closed. The system runs until the temperature is undercut again. Drop shaft: Optional; status of the drop shaft lid open or closed Rotary grid: Status of the rotary grid open or closed Fill level: Fill level in the drop shaft full or empty External start: Displays whether external starting command is pending. Vacuum: Optional; in case of vacuum monitoring, the measured value is displayed. Furnace door: Optional; if there is a safety switch, the status is displayed. Operating Instructions Touch display 98 of 123 140305 Boiler = 65°C Manual Page 5 B1 On On Open Open Closed Closed B2 B4 Fig. 8400 Heating circuit 1 (M1): Is defined as return increase; is not illustrated for this reason Heating circuit 2 -16 (M2-M16): To check if the wiring is correct, any heating circuit pump and any heating circuit mixer can be switched on and opened or closed separately. If the heating circuit pump is switched on, the triangle in the pump symbol turns green; in the resting condition, the triangle has a grey background. If the heating circuit mixer is has stopped, the circle is grey. Opening turns the circle red, closing it turns it blue. In the above example, the heating circuits M1 to M3 and boilers B1 to B4 are activated. The M3 and B4 have no boiler or heating circuit pump and heating circuit mixer connected. This is why the texts have a grey background. Operating Instructions Touch display 99 of 123 140305 Boiler = 65°C Page 6 Manual Transfer 1 Boiler = 65°C Transfer 2 Transfer 3 Transfer4 Page 7 Manual Storage 1 On Storage 2 Storage 3 Storage4 On Open Closed On Open Closed Fig. 8500 Fig. 8600 The transfer mixer, network mixer and storage functions are according to the procedure as described in figure 8400. Boiler = 65°C Page 8 Manual i On Off Ash motor 1 Forward Back Ash motor 2 Forward Back Ash motor 3 Forward Back Ash motor 4 Forward Back Empty ash Ash flap closed Fig. 8700 Empty ash: All ash motors start and empty the boiler. Ash motor: The present ash motors can be run forward or backwards here. For safety-technical reasons, reverse operation is limited in time. Ash flap: Status of the ash flap open or closed (for systems with a rated heat output >150kW) Operating Instructions Touch display 100 of 123 140305 How to correct any error messages! Warning: risk of injury! Switch off the main power switch, safeguard it against switching it on again and remove the heating system from the wall socket before any maintenance work and any manual manipulation at the heating system. Great care must be taken when the heating system is in manual operation. The manufacturer does not adopt any liability in this case. F1 Only used as a log entry. Power supply was interrupted for Power failure a longer period of time with heating systems which are “ON”. The heating system restarts automatically when the flue gas temperature has dropped below the ignition temperature during switch-off phase. This action will be logged as F1 in the error memory. F2 Press the “Quit” button on the display (the error message Burner error (not automatically acknowledged) will disappear for about 20 sec.). Then switch to “Handbetrieb“ (manual operation). Scroll to the line “Clean.: manual oper.” (Cleaning: manual operation) by using the “V” button. Try to close the open burner grate by shortly pressing the “–“ (minus) button. An asterisk * will appear in line 2 indicating that the burner has been closed. If this action fails proceed as follows: Press the “+“ (plus) button to open the burner grate completely, switch off the heating system (cf. cleaning instructions items 1 – 4) and remove the obstructive object from the rotary grate. Finally switch on the heating system and close the grate by using “–“. F3 Check if the electrical installation or plug connection is in Faulty water sensor mint condition. Watch the temperature in the heating room: The sensor shall not measure in the minus °C range (particularly not during initial operation). Operating Instructions Touch display 101 of 123 140305 F4 Check if there is sufficient heating material in the burner or Ignition error check if the hot air fan is working! (Can be checked in manual operation.) The fill level sensor is probably not set correctly. That is why there is no heating material in the stoker channel. Clean the sensor und feed heating material in manual operation until it will appear in the extension pipe of the burner. When smoke emission has significantly increased you must check the flue gas tube and suction draught and clean them if need be. F5 When this message is given check if there is sufficient Excess temp heater power consumption or if the control and the module are bus-connected. Also check if Safety Temperature Limiter has been set correctly! F6 Check plug connections and correct the setting of the Faulty flueg. sensor additional parameters (sensor adjusting), otherwise contact your personal customer service representative or one of our sales partners. F7 When your heating circuit system is equipped with pressure Water shortage monitoring, this error message is given after undershooting protection of a defined minimal pressure. (Contact closed = system pressure alright) F9 There is probably a piece of wood which is too large or any Stoker motor Excess other obstructive object in the stoker channel. First press current “Quit”. Then switch off the heating system, cf. cleaning instructions items 1 – 4, remove the dropshaft cover plate (cf. cleaning instructions item 7, Fig. 21) and remove the obstructive object. After that mount the cover plate again and switch on your domestic system. Finally move the stoker screw in manual operation by using the “+/–“ buttons (Care must be taken in not moving back too long using “–“, there is danger of damaging gears and bearings). Repeat Operating Instructions Touch display 102 of 123 140305 this procedure if the stoker screw is still stuck. F12 First of all acknowledge this message. Then switch the Removal Excess current heating system to manual operation and press ”+” to open the backfire flap. Try to move the removal screw forward. If this does not help shortly move the screw back. Repeat this procedure as long as the removal screw can be moved forward audibly without any big effort (Care must be taken in not moving the screw back too long using “–“, there is danger of damaging gears and bearings). Finally restart the heating system. Check the cellular wheel gate – if there is any – if it is blocked by any obstructive object. F13 F113 is logged in case of over- or undershooting pressure Low pressure setpoints in the combustion chamber. When low pressure Safety shutdown reaches the defined tolerance values after a certain period of time, there will be a low pressure safety shutdown. Error no. F13 is then logged. Your domestic system will do a “Forced cleaning” and will start anew. F14 The warning “F114 Close heater door” will appear on the Close heater door display when the heater door is open. When the heater door is not closed after a certain period of time, the heating system will shut down. F15 Acknowledge this message. Check if the overfill protection Burner full sensors (light barriers) have triggered due to heating no autom. ignition materials, dust or fly ash. Remove any excess heating material and restart the heating system. Operating Instructions Touch display 103 of 123 140305 F16 The rotary grate could not be opened during cleaning Clean. motor error phase (LED is illuminated permanently). Acknowledge this (rotary grate switch) message and check the correct setting and function of the rotary grate switch (distance 5 mm). If this procedure is not successful, check the cleaning mechanism. Switch off the heating system, cf. cleaning instructions items 1 – 4, dismantle the black cover plate opposite the stoker channel and check the cleaning mechanism. Fasten any loose parts – if any –, mount the cover plate again and put the heating system into operation. F17 Acknowledge this message. This error message is given Clean. motor error when there is excess current at the cleaning motor. Switch (Excess current) off the heating system (cf. cleaning instructions items 1 – 4) and check if there is any obstructive object in the rotary grate. If there is one, remove it and switch on the heating system. If there is none, dismantle the cover plate opposite the stoker channel and check the cleaning mechanism. Fasten any loose parts – if any –, mount the cover plate again and put the heating system into operation. F19 Acknowledge this message. This error occurs when the Temp. dropped heater and flue gas temperatures are below the set return Restart system flow pump – ON for more than 30 minutes. Check quality and quantity of the heating material in the combustion chamber. Restart the heating system. F20 Indicates that the speed monitoring at suction draught fan Check suction draught is not working or that the fan is faulty. Operating Instructions Touch display 104 of 123 140305 F21 If the dropshaft cover is opened, the warning message Dropshaft open "Dropshaft open" appears and the entry F121 is made in the error memory, also, all removal motors are stopped (also in manual operation). If the cover remains open for two more minutes, the unit switches-off automatically, on the display the error message “Dropshaft open“ appears and in the error memory F21 is recorded. F26 If the maximum fill time has run out and the container is still Please check empty on the bottom, this error message appears. Please pellet storage check if there is enough material in the bunker or if any lines are possibly blocked. F27 If the flap for emptying does not open after the shutdown of Flap for emptying jams the suction turbine, this error message appears. Please check, why the flap does not open. F28 If the flap does not close after ten seconds by the low Flap for emptying open pressure during suction, this error message appears. Please check, why the flap does not close. F30 Check, if the backfire thermostat (on the intermediate Intermediate container container) has responded or if it is faulty. In the case of Sensor > 70°C uncertainty, please contact our agent or the factory service! If the backfire thermostat is less than70°C the unit continues working and can be started again. F57 Indicated only when a minimum current has been Phase misses measured: A motor connecting cable, for instance, has not Stoker motor been plugged in or a motor is defective. F60 Indicated only when a minimum current has been Phase misses measured: A motor connecting cable, for instance, has not Removal motor been plugged in or a motor is defective. Operating Instructions Touch display 105 of 123 140305 F75 If the light barrier is interrupted 3 times for 20 seconds, the Check light barrier or unit assumes that the heater is overfilled and switches-off. suction draught If the light barrier remains free for 60 seconds, one value is deleted. F95 Appears, when the connection between heater and suction Suction module missing module has been interrupted. Please check the plug connections and the cables for any damages. If the suction module is no longer required it has to be logged-off manually in the additional parameters “suction module” by pressing the key combination "+" and "-". F96 Appears, when the connection between heater and functional module functional module has been interrupted. Please check the missing plug connections and the cables for any damages. F97 Appears, when the connection between heater and Data link to superordinate superordinate control has been interrupted. Please check control missing the plug connections and the cables for any damages. F98 Appears when a new or additional display, for instance, is Wrong configuration plugged in at the heater. Adjust the correct configuration in Control type! the system. F99 Appears when there is no connection to any of the No power element! mentioned parts. Check all plug connections and cables on damages. F100 Check if the backfire thermostat (mounted on the stoker Sensor > 70° channel) has triggered or is faulty. Contact your personal customer service representative or one of our sales partners when something is unclear. When the backfire thermostat has dropped below 70° again, the heating system will normally continue running automatically or, as the case may be, can be restarted. Operating Instructions Touch display 106 of 123 140305 F105 Most frequently indicated when the heating system is in Light barrier or suct. ignition program and the overfill protection sensors have draught check shortly triggered due to excessive smoke formation. Check if there is too much heating material or any heating material which is too wet in the burner during ignition. F109 Logs a reverse stoker motor move. Stoker motor Reverse move F110 Only occurs when an ash removal has been installed. It is Ash motor Excess current only a message, the heating system will not be switched off. F111 Indicates that the additional metering only works with Dosage motor excess difficulty (foreign object). current Please check for the reason. F112 Logs a reverse move of the removal motor. Removal Reverse move F113 See F13. F114 See F13. F115 When a superordinate control also controls the ash removal Ash motor for the ash motors altogether, this error indicates that the SL superord.control ash motors of the superordinate control have a general problem. Currently no differentiation F116 Check the temperature sensors at the reservoir and Reservoir sensor faulty replace, if necessary. F121 See F21. F180 Appears, when the connection between heater and No connection to heater 1 superordinate control has been interrupted. Please check the plug connections and the cables for any damages. Operating Instructions Touch display 107 of 123 140305 F181 See F180 No connection to heater 2 F182 See F180 No connection to heater 3 F183 See F180 No connection to heater 4 F184 See F180 No connection to heater 5 F185 See F180 No connection to heater 6 F190 Error message F190 is given when a defined boiler Alarm temperature has been over- or undershot over a defined Boiler monitoring period of time (manufacturing setting 45 min). The alarm boiler monitoring sends a call and/or a message to the alarm output. If there are several boilers, the same time window applies to all of them. This error message is also given when a temperature sensor is defective. Manufacturing setting < 0°C F200 Empty the ash box and delete the message with the"+" and Empty ash box "-" buttons. Delete -/+ F201 The unit changes the suction position. Suction position Switching phase F210 Logs a shutdown by the room unit. Shutdown by Room unit Operating Instructions Touch display 108 of 123 140305 211 Logs a shutdown by circulation pump lock times or when Shutdown by unit is “Off” by outside temperature. Cir.pmp lock times or Unit OFF by outs.tmp 220 This message appears on the display when the control’s Error clock clock module is defective. 230 The unit has been switched-off manually at the reservoir External Stop by reservoir module. module Operating Instructions Touch display 109 of 123 140305 Remedy of Performance Losses Performance losses can be due to various different reasons. Cause: Remedy: Heater nominal temperature has been set too low. Combustion chamber Increase the “Heater NOM.” temperature to a minimum of 80 temp. has been set too partial load) in permanent operation between approx. 375 °C low. and 700 °C at nominal load. Stoker screw feeds too Slightly increase the feed nominal time in permanent little heating material into operation or reduce “Idle time MIN“. When chipped wood of the combustion chamber. minor quality is used increase “F1 MAX“ (speed of suction °C in permanent operation. Set “Comb.cham.tmpPL” (combustion chamber temperature draught fan) in steps of five % in permanent operation. Heater and flue gas paths Check of installation When the “Fluegas temp.“ is permanently above the “Fluegas NOM“ temperature and the heater does not achieve the desired nominal temperature at all it can be assumed that the heater cleaning has not been sufficient. (For further details go to chapter 2, cleaning instructions.) When heating is insufficient first check if the power generator (hydraulics). (heater) or the power transportation and distribution facilities are not cleaned. (pumps – mixers) are to blame. If something is unclear please contact your installation engineer. Chipped wood of minor Strictly adhere to any prescribed standard heating materials if quality. you want to achieve reasonable results in terms of power energy. (Cf. pages 2, 5 and 6) You will be satisfied with a heating system from Lindner & Sommerauer when you adhere to these general conditions! Operating Instructions Touch display 110 of 123 140305 Excerpt from TRVB H 118 Edition 2003 Annex 2/1 All reviews, cleanings, operations and events must be entered in this log book according to the following template. Logbook Automatic Wood-fuelled systems System operator: ......................................................................................... ......................................................................................... ......................................................................................... System constructor: ......................................................................................... ......................................................................................... ......................................................................................... Furnace: ......................................................................................... Make: ......................................................................................... Type: ......................................................................................... Year of build: ......................................................................................... Heating output: ......................................................................................... Miscellaneous: ......................................................................................... Operating Instructions Touch display 111 of 123 140305 Excerpt from TRVB H 118 Edition 2003 Annex 2/2 Regular inspection of the automatic wood furnace: (during the heating period/operating time) 1) Weekly visual inspection: The entire furnace, including fuel storage, must be visually inspected once per week. Any defects found must be removed without delay. 2) Monthly inspections: The following inspections must be performed every month: - Function of the backburning protection device RSE, specifically reliable closing - Readiness for operation of the extinguishing facilities, including water supply - Cleanliness of the flue gas paths (flue gas drafts in the boiler, connection piece and smoke collection) - Proper operation of the control - Function of the interference reporting/warning device(s) - Proper operation of the combustion air and suction draft fans - Proper condition of the combustion chamber/lining - Readiness for use of the portable fire extinguisher(s) - Proper ash storage - Heating room free of flammable storage - Roof room free of flammable deposits - Fire protection closures (fire protection doors - self-closing) 3) Maintenance: Depending on heating output, the furnace must be regularly subjected to maintenance by the system installer. Heating output Maintenance intervals ≤ 150kW ≤ 400kW > 400kW every 3 years every 2 years every 1 year Maintenance in the sense of TRVB H 118 edition 2003 Annex 2/2, referring to maintenance of safety-relevant components (e.g.: cell-wheel airlock, backburn flap,.....) by a qualified person. Operating Instructions Touch display 112 of 123 140305 Excerpt from TRVB H 118 Edition 2003 Annex 2/3 Inspections of the automatic wood furnace by the operator: Year:.......2014................ System operator: ........Max Mustermann Responsible operator: ........Max Mustermann monthl. inspection Month Day Backburn protection device Extinguishing device(s) Flue gas paths Control Warning device(s) Fans Combustion chamber/ lining Portable fire extinguishers Ash storage Storage in the heating room Deposits on the roof Fire protection closures Smoke collection Review/Clean. Jan 4. Feb 6. Mar Apr May Jun Jul Aug Sep Oct Nov Dec Note X X 1) Boiler cleaned X X 2) Review on 01 Feb. 2012 1) X X X X X X X X X X 2) X X X X X X X X X X Signature/ Abbreviation Maintenance by specialist: Comment: performed on: Signature Operating Instructions Touch display 113 of 123 140305 Excerpt from TRVB H 118 Edition 2003 Annex 2/3 Inspections of the automatic wood furnace by the operator: Year:............................ System operator: ...................................... Responsible operator: ...................................... Monthl. inspection Month Day Backburn protection device Extinguishing device(s) Flue gas paths Control Warning device(s) Fans Combustion chamber/ lining Portable fire extinguishers Ash storage Storage in the heating room Deposits on the roof Fire protection closures Smoke collection Review/Clean. Jan 4. Feb 6. Mar Apr May Jun Jul Aug Sep Oct Nov Dec Note X X 1) Boiler cleaned X X 2) Review on 01 Feb. 2012 1) X X X X X X X X X X 2) X X X X X X X X X X Signature/ Abbreviation Maintenance by specialist: Comment: Performed on: Signature Operating Instructions Touch display 114 of 123 140305 Excerpt from TRVB H 118 Edition 2003 Annex 2/3 Inspections of the automatic wood furnace by the operator: Year:............................ System operator: ..................................... Responsible operator: ..................................... Monthl. inspection Month Day Backburn protection device Extinguishing device(s) Flue gas paths Control Warning device(s) Fans Combustion chamber/ lining Portable fire extinguishers Ash storage Storage in the heating room Deposits on the roof Fire protection closures Smoke collection Review/Clean. Jan 4. Feb 6. Mar Apr May Jun Jul Aug Sep Oct Nov Dec Note X X 1) Boiler cleaned X X 2) Review on 01 Feb. 2012 1) X X X X X X X X X X 2) X X X X X X X X X X Signature/ Abbreviation Maintenance by specialist: Comment: Performed on: Signature Operating Instructions Touch display 115 of 123 140305 Operating Instructions Touch display 116 of 123 140305 Operating Instructions Touch display 117 of 123 140305 Operating Instructions Touch display 118 of 123 140305 Operating Instructions Touch display 119 of 123 140305 Operating Instructions Touch display 120 of 123 140305 Operating Instructions Touch display 121 of 123 140305 Keyword list V1 > 49 1 PT100 59 2 PT100 59 Activate Modules 57 Activation delay 47 Active 58 Afterburning V2 54, 55, 81 Alarm 49, 83 Alarm light barrier interruption 46 Anlagenstatus 29 Ash counter 79 Ash discharge 63 Ash motor 62, 86 At system off rotary grid 46 Backburn flap 47, 83 Backburn sensor 84 Bag operation 79 Betreiber 72 Blow ventilator 83 Boiler 28, 29, 31, 33, 35, 36, 59 Boiler info button 28 Boiler lead control 66 Boiler load 67 Boiler output 53, 55 Boiler overtemperature avoidance 50 Boiler TARGET 79 Boiler temperature 28 Bridge light barrier 46 Buffer 59, 61 Buffer overtemperature avoidance 50 Calibrate touch 70 Call 74 Change password 72 Charging pump release 36 Charging pump release from/to 34 Charging pump release from/to: 36 Cleaning 81 Cleaning after 46 Cleaning duration 45 Cleaning interval 45 Cleaning mode 27 Cleaning motor 81 Cleaning time 79 Clock 28, 31, 42 Combustion chamber temperature 54 Combustion chamber temperature monitoring 55 Continuous heating operation 40 Control cycle 57 Control range 55 Control speed 55 Conveyor time monitoring: 46 Current limits 51, 52 Data logger 65 Operating Instructions Touch display Date 70 Deactivation delay 48 Difference 67 Difference energy source 35 Discharge motor 62, 82 Display saver 70 Display view 70 Drop shaft 84 Empty ash 86 Energy request 48 Error storage 65 Error storage + data logger 65 Exhaust temperature 54 Exhaust temperature monitoring 55 Extern start 84 External start 47, 48 External start not active 48 External stop from ext. furnace: 49 Factory settings 70 Fan stop suction draft V1 at exhaust temperature 47 Fill burner 46, 81, 82 Fill level 84 Fill level sensor interference channel 47 Frost prot. 41 Furnace door 84 Glow maintenance duration 56 Glow maintenance off 79 Glow maintenance on 79 Glow maintenance pause time 56 Heating circuit 57, 85 Heating circuit off 37 Heating circuit OFF 40 Heating circuit OFF - boiler charge 40 Heating circuit on 37 Heating circuit pump OFF 41 Heating circuit pump ON 41 Heating circuits 28 Heating mode 41 Heizkreis 37 Hot 33 Hysteresis 36 Ignition at RB-flap 48 Ignition cycle time 56 Ignition insert 56 Ignition lag 56 Ignition lead 56 Ignition temperature 56 Ignition temperature difference 56 Initiate cleaning 80 Initiate suction 80 KALT 33 Kessel 79 Lambda 54 122 of 123 140305 Language 78 Lead ACT 41 Lead MAX 41 Lead MIN 41 Lead reduction 41 Lead TARG 41 Legionella protection 50 Light barrier 46, 84 Logo 78 lowered heating operation 40 Material insert 53, 55 Material transport STOP at Lambda 55 MAX 33 Max. boiler output 79 Max. filling time 47 Maximum ignition duration 56 MIN 33 Min. boiler output 79 Mixer adjustment time 57 Modem status 74 Monteur 72 Multiple boiler control 48 Network 69, 73 Network mixer 61, 67, 86 Next cleaning in 80 Not active 58 Operating condition 28 Operating hours 48 Operation by operating unit 39 Operation by room unit 39 Outdoor temperature ACT 41 Outdoor temperature MAX 41 Outdoor temperature MIN 41 Output 10 47, 83 Output specification 47 Parameter 27, 28, 35, 37, 38, 39, 44 Parameter archivieren 76 Password 71 Password text message 72 Password VNC 72 Power specification 0-10V 48, 83 Programm 77 Programme 69, 78 Raise boiler 36 Recording 65 Reduced mode 41 Release 68 Residual temperature utilisation 36 Return flow increase 66 Operating Instructions Touch display Return increase 49, 57 Return mixer 58 Return pump lag 66 Return pump off 66 Return pump on 66 Return target 66 Room influence 38 Room MAX 38 Room MIN 38 Rotary grid 81, 84 Runtime 58 Rust protection 50 Safety temperature limiter 84 Sensor reconciliation 64 Service 45 SMS 74 Start page 28 Start/Stop 59 STB 84 Stoker motor 81 Stoker runtime 48 Storage 86 Storage increase from/to 34 Storage module 60 Storage overtemperature avoidance 51 Storage regulation 48 Suction container 83 Suction draft V1 54, 55, 81 Suction draft V1 lag 46 Suction interval 47 Suction position 47, 83 System 69, 70 System restart 70, 72 System status 28, 29, 49, 83 TARGET 33, 67, 68 Techniker 72 Terminate release 72 Time 70 Time-controlled heating mode 40 Transfer heating circle 61 Transfer mixer 61, 67, 86 Uhr 31 Vacuum 54, 84 Vacuum monitoring 54 Waiting time before cleaning 45 Water deficit protection 84 with room unit 57 With room unit 58 123 of 123 140305