1
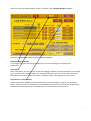
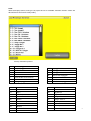
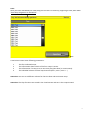
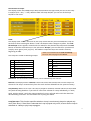
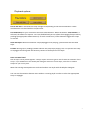
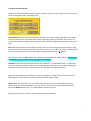
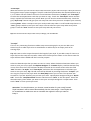
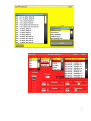
Operating Instructions
Rhythm-Designer
The Rhythm-Designer is available starting from the version 7.1 R36. The
Rhythm-Designer is an extension to the OpenArt Arranger. After the new
software is installed you can start exploring the Rhythm-Designer for as many
as 16 system startups. After 16 startups of your instrument the RhythmDesigner must be activated with a set code.
Version 1 from 24 December 2008
WERSI GmbH – Am Eichelgärtchen 36 – 56283 Halsenbach – (+49) 06747 / 123 0
1
Applications of the Rhythm designer
What is the WERSI Rhythm‐Designer?
The new WERSI Rhythm‐Designer can be used as an Arpeggiator, as a standalone accompaniment
arranger or in combination with the OAA. The Rhythm‐Designer has a built-in library of 600 preprogrammed loops: Guitar‐Loops for Acoustic or Electric Guitar, Piano Accompaniment, Arpeggios
and more. For ease of use the Loops are placed in 15 sub-categories. The Loops are programmed
and optimized by WERSI but you can record your own loops into the Rhythm‐Designer. How to do
this is explained later in this short manual.
Some demos are programmed to give you an impression. You’ll find these demos in the
following presets:
Rhythm‐Designer as Arpeggiator ‐> Total Presets 921 to 930
921
Demo RD Harp Arpeggio
922
Demo RD Piano T100
923
Demo RD Piano 16 Beat
924
Demo RD Strings
925
Demo RD Arpeggio’s Mix 1
926
Demo RD Arpeggio’s Mix 2
927
Demo RD Classic
928
Demo RD Mozart Piano
929
Demo RD Bach Arpeggio
Rhythm‐Designer as a standalone accompaniment ‐> Total Presets 931 to 940
(Here the tracks 1 – 5 are removed from the OAA)
930
931
933
934
935
936
937
938
939
940
Demo RD Beethoven Arpeggio
Demo RD Unplugged
Demo RD BeatPop
Demo RD Its Funky Time
Demo RD Slow Rock
Demo RD Country Shuffle
Demo RD Ballad
Demo RD Brush Swing
Demo RD Big Band
Demo RD Boogie Woogie
After Software R36 is installed, on the Main screen you’ll find a new
display field with the name "Loops".
This field lets you see if the Loops are activated or not. When it is active the field displays the
text "On".
2
After you touch the display button "Loops" the Menu screen Rhythm‐Designer appears:
Here are the individual functions of the Rhythm‐Designer.
Rhythm‐Designer On/Off:
In the upper section of the display window you can turn the Designer on and off with
this button.
Start/Stop:
With "Start/Stop" you can start the Loops and Arpeggios without activating the OAA. You can mark
up to 4 tracks to play simultaneously. An interesting feature is that you can link the Loops to an
Effect Button (1-4) that is normally used for adding an effect. (See appropriate section later)
Loop‐Presets –Load and Save
Under Loop‐Presets "Load" you’ll find some ready-to-use combinations, to give you some idea
how to make your own. At the end of this Tutorial/Manual you’ll find a list of all pre-programmed
combinations. Naturally you can also make your own Loop-Presets and save them.
3
Load:
With the display button Load you can open the list of available Variation Presets. Select the
desired Preset and touch Load [Laden].
Factory Variations presets:
0
1
3
2
4
5
6
7
51
52
53
54
55
56
57
58
59
60
61
Bach Arpeggio
Harp Arpeggio 1
Piano T88 4 Variationen
Piano T100 4 Variationen
Piano T74 4 Variationen
Piano 8 Beat 4 Variationen
Piano 16Beat 4 Variationen
Strings Arpeggios
Beat Guitar 1
Beat 1
Pop 1
Rock Pop 1
60s Rock 1
Disco 1
Funk 1
Slow Rock 1
Ballad 1
Rockn Roll
Shuffle 1
8
9
10
11
12
13
14
Arpeggio Mix 1
Arpeggio Mix 2
Arpeggio Mix 3
Music Box Arpeggios
Mozart Piano
Klassik 1
Beethoven Arpeggio
62
63
64
65
66
67
68
69
70
71
Jive
Blues 1
Big Band 1
Big Band 2
Boogie Time 1
Boogie Time 2
Country 1
Western 1
Country Shuffle
Bossa Nova 1
4
Save:
After you have assembled your new Loop you can save it to memory, beginning at save place 2002.
“Save loop assignment to Variations”.
Save
A Variations Preset saves following parameters:
1
2
3
4
The four indicated Loops
The information about which of the four Loops is active.
The Information if a Loop is set to one-time play (One Shot) or continuously.
The individual volume of the 4 loop channels (ACC 1, ACC 2, ACC 3 ...)
Attention: You can set a different volume for the One Shot and continuous Loop.
Attention: The Play functions are stored in the Total Presets and not in the Loops Presets!
5
Construction of Loops
The display shows the loaded Loops. With the field after the Loop name you can set the Loop
in and out (Tick = On / ‐‐= Off). With the field "All Loops On/Off" you can set all the loops
On/Off in one move.
Load:
The display field "Load" is there for all four Loop tracks and lets you load a different Loop for
each track. After touching the button "Load” the button colour changes to yellow. The Load
Phraseloops screen appears. Search with the wheel for the desired Loop and touch the Load
button to load the selected Loop. In the sub menu “Groups” you can search for your desired
Loop by music genre (rock, pop, etc). Self made or imported Loops are stored in memory
beginning at 2002.
There is a screenshot of the Load Phraseloops
The Loops are sorted in following Groups:
1
2
3
4
5
6
7
8
Arpeggios
Beat/Rock/Pop
Disco/Funk/Soul
Ballade/Slow Rock
Techno/Dance
Rock'n Roll/Gospel
Shuffle/Jive/Fox
Jazz/Swing/Big Band
screen on the final page of this Manual.
9
10
11
12
13
14
15
16
Latin
Schlager
Country
Walzer
Marsch
Specials
Percussion
User
Reference: The Percussions‐Loops (drums) can be loaded only into Track 2.
Remove: The display button "Remove" exists four times and removes the current Loop from
the track. The Loop is removed only from the track and not deleted from the system memory.
Vol (Volume): When set to "OFF" the Loop is played at maximum volume and can be controlled
only with the Song drawbar. If you wish to control the volume of a Loop individually, ie "ACC1,
ACC2, ACC3 or ACC4", touch the appropriate box (it turns red) and select with the wheel the
desired sliding controller. You also select OFF by using the wheel.
Loop/One Shot: This function specifies whether a loop is continuously played or played only
once (One Shot). If One Shot is selected the Loop is played only once, as soon as the Loop is
switched on. Handy to play harp arpeggios.
6
Playback options
Link to Var A-D: If activated the Loops change corresponding to the selected Variation. These
combinations are saved with the Loops Preset.
Link with Effect: On your instrument there are Effect Buttons. When the button “Link to Effect” is
selected, the effects for buttons 1 to 5 are disabled and you can select the Arpeggio/Loop tracks by
pushing the appropriate Effect Button (1 for track 1 and so on). Effect 5 Button toggles the Loops
on and off.
Start with Style: When activated the Loops/Arpeggios start playing, synchronised with the OAA
Style.
Caution: During Intros, Endings, Breaks and Fills the Loop stops playing. This is to prevent the Loop
or Arpeggio interfering with the harmony content of those parts of the Style.
Here are some hints!
Not all Loops can be placed together. Tempo, rhythm and music genre must fit with the selection of the
Loops. If you would like to use the Rhythm‐Designer without a current Style, select first a suitable
tempo for your music piece.
Mute the existing Accompaniment tracks and make a new Style with the Rhythm-Designer.
You can use the Variation buttons even without a running Style in order to select the appropriate
Loop or Arpeggio.
7
Loop-Administration
Within the Loop Administration panel you can import Loops from other Styles. You can also alter
Loops or integrate Loops into other Styles.
Import/Export: with the functions Import and Export you can exchange Loops with other Styles.
You can load and save Loops from other sources like floppy disks or usb sticks. You can use all
sorts of media that are supported by the OAS system. You have 2000 memory places to save your
data.
Edit: With this function you can edit your Loops. Here you can change the Sound, Volume, Pitch,
Reverb, Chorus, Panorama and Velocity (Dynamic) of the Loop. To edit the Loop it must be loaded
into one of the four locations. The text colour must be dark meaning it is selected.
Then push the button "Edit". Make your changes and then push the "Save" button. A screenshot
of the Edit screen is shown on the final page of this Manual.
Attention: Loops which use sounds with the Acc extension, eg "Solid Guitar2 Acc" or "Brass Acc",
cannot be mixed with other sounds without large changes in sound occurring. Also changing the
values for Velocity (Dynamic) and Octave will not then have the expected results.
Tip: The Loops programmed by Wersi in memory locations 1 – 2001 can also be altered. After
altering they can be saved at a memory location between 2002 - 4000.
Delete: With the Delete function you delete the Loops that you have saved. Before you can
delete them they must be loaded into one of the four slots. The text must be dark (selected).
Touch the Delete button. Say “Yes” when asked to delete the Loop.
Tip: The preset Loops in memory places 1-2001 cannot be deleted.
8
"From Style"
With this Function you can extract Loops from the Factory Styles and User Styles. Have you found a
fancy guitar Loop or piano Arpeggio in a Style? Load the Style and select the desired Variation A, B,
C, or D. Select the ACC field on the touch screen between the buttons “to Style” and “from Style”
to select the accompaniment track that you want to copy. Touch the “from Style” button and the
Loop is copied. The field now turns yellow. Now you can save the new extracted Loop. Touch the
grey “Style Loop” button and give your new Loop the name that you want. Complete your action by
touching Enter. Select a Group to save your newly made Loop under. For self made Loops there is a
“User” group in which to save your own Loops. You can also save your Loop under every other
group. Touch the “Save” button to save your Loop and end your action.
Tip: You cannot extract Loops from Intros, Endings, Fills and Breaks.
"To Style"
This is a very interesting function to add a Loop to an existing Style. So you can add a new
Guitar loop to an older Style to let it sound better or add a Loop to an empty track of an
existing Style.
Tip: take care to select Loops that match the length of your Style. If you add a Loop of 2 bars to a
Style of 4 bars the Loop will stop after 2 bars even if the Style uses 4 bars. In the reverse case the
Style will have 2 bars added and that’s not the purpose.
Select the desired Style that you want to store in a Loop. Select the desired Variation where you
want to store your Loop. Open the Rhythm-Designer on the Main display. Load the desired Loop
in one of the four slots. The field must be dark coloured. On the touch screen select the field
“ACC” between “to Styles” and “from Styles” and select the accompaniment track where you
want to save your Loop. Tip: The old track will be deleted. By touching the button “to Style” you
can copy the Loop into the Style. With the Start/Stop button you can test if the process was
successful. If you are satisfied, you can save your work. Quit Rhythm‐Designer and go to "Quick
edit”. Touch the “Load/Save Panel” button and then touch “Save” in the next panel. Select the
desired memory place where you want to save your new Style and give it a unique name. Then
touch “Save” to save your Style. Done!
Attention: You should ensure you choose a new location for your newly formed
Style because it will be stored automatically into the user‐range.. User-Styles can
be overwritten so make sure not to overwrite the original in case you want to
keep it.
9
10