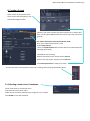
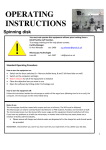
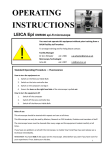
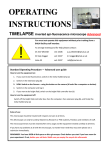
1
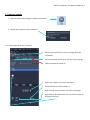
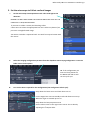
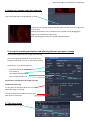
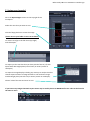
Balm Facility 081111- 510 Meta Inv Guide. Pg 1
OPERATING
INSTRUCTIONS
510 Meta inverted confocal
!
You must not operate this equipment without prior training from a
BALM facility staff member.
To arrange training and for help please contact:
Dr Ann Wheeler
ext: 2406
[email protected]
Standard Operating Procedure — Standard Version
How to turn the equipment on:
1. Switch on the metal halide lamp
2. Switch on the Zeiss remote control
3. Switch on the computer and log in
How to turn the equipment off:
1.
Switch off lasers and wait to cool
2.
Switch off Zeiss remote control once lasers have cooled
3.
Switch off computer
4.
Switch off metal halide lamp
This microscope should be treated with respect and care at all times.
This Microscope can only be used by Masters by Research or PhD students, Postdocs and members of staff.
The microscope lenses must be cleaned after every usage and the equipment treated carefully at all times.
If you have any problems at all with the microscope, no matter how trivial they may seem please see Ann
Wheeler immediately.
REMEMBER: You have 2GB of disk space on this microscope. Check before you start if you have room for your
experiment. If not, delete your old data.
Balm Facility 081111- 510 Meta Inv Guide. Pg 2
1. Find your sample
1. Open the software by clicking the ZEN shortcut button
2. Choose Start System to start the confocal
3. Find your specimen by eye. To do this:
•
Set the system to Ocular so you can see light down the
microscope.
•
Set the microscope to Online (or you won’t see anything)
•
Switch fluorescence shutter on
•
Select which objective you want and clean it
•
Pick which filter you want and open it.
•
Open the fluorescence shutter to see fluorescent light
•
Brightfield can be viewed here click in the box to switch on
and control intensity
Balm Facility 081111- 510 Meta Inv Guide. Pg 3
2. Set the microscope to Collect confocal images
I.
Set the microscope into Acquisition mode. This sends light to the
detectors.
BEWARE: DO NOT LOOK DOWN THE EYEPIECES ONCE YOU HAVE SET THE
CONFOCAL TO ACQUISITION MODE.
If you want to collect a Z stack, do bleaching collect
a time series etc select the appropriate box. Don’t select any boxes if you
just want a straightforward image.
‘Zen works a little like a Japanese book. You work from top to bottom with
the menus.’
II.
Select the imaging configuration you want from the dropdown menu saying configuration. Press the
folder icon to show options
NB. If the configuration you
want isn’t here please see
the BALM staff and we will
set one up for you.
III.
Turn on the lasers required for the configuration (the config menu will ask you).
Drop down the lasers menu and check lasers are on.
For the Argon laser set into Standby mode and allow to warm up.
When the argon is warmed up turn on.
Drop down the laser properties menu
Set the Tube Current in the argon laser to 6.1A. This is done by
adjusting the % output slider.
Balm Facility 081111- 510 Meta Inv Guide. Pg 4
3. Start confocal scanning
i)
Get rough parameters for your imaging conditions press Auto Exposure.
(This may not work but can save time)
ii)
To see your image live press the Live Icon.
Iv) Press the split icon to show
This turns into a Stop button when activated.
Each channel separately.
iii)
Focus your image so its as sharp as possible.
NB Make sure the channel you are interested in is most in focus (this may not be DAPI)
v) Align the detectors to optimise collection of
signal. This is done by pressing the coloured square
under the image area.
The image may go either grey (good, the image is
fully in the dynamic range of the detectors) or Blue
and Red (bad the image is not in the dynamic range of detectors)
Blue = Underexposed pixels
Red = Overexposed pixels
vi) Use the Channels menu to align the detectors so the image goes grey.
Align each channel one at a time. Follow these steps and repeat for each
channel
In the channels menu ensure Show all
and select Select All are selected so the whole menu is visible
Set the pinhole to 1 AU (airy unit)
Alter the Digital offset so the background is no longer blue
Alter the Gain (Master) so there are no Red pixels visible in the structure you
want to image.
If the sample is still underexposed/overexposed alter the laser power
Balm Facility 081111- 510 Meta Inv Guide. Pg 5
4 .Resize your images using the crop tool.
Stop scanning and press Crop (bottom of screen)
Simply put the cropping window (Red box with cross hair) over the region you
want to crop
Change the position, size or rotation of the cropped area by dragging the
edges of the crop box with the cursor
Start scanning again and your cropped image will appear
5. Set up the scanning parameters and selecting the area you want to image
Once you are happy with your image stop scanning
Go to the Acquisition Mode tab on the LHS of the
workspace and float out if not in workspace already.
Generally for a nice detailed picture:
Frame size should be 1024x1024
Scan speed: 7
Data depth should be 16 bit
Scan average should be 4
Ensure this is consistent for all images you take
Optional to refine crop
To alter the scan area drop down the arrow
While the image is scanning:
You can now expand or reduce the scan area
And rotate it if required.
6. Take your image
Hit Snap to take your image
Balm Facility 081111- 510 Meta Inv Guide. Pg 6
7. Saving your Image(s)
Go to the Open Images section on the top right of the
workspace
Select the ones that you want to save
Click the floppy disk icon to save the image
(please save to your folder in Users on E-drive!!)
To convert to tif go to the file menu (top right)
and click Export.
To export just the raw data that you have pick the format (.tif) click
export Raw data Single plane (normal scan) or Series (Z stack or
timelapse)
To export the image display including any overlays or analysis that has
choose export Contents of Image window or Full resolution image
window Single plane (normal scan) or Series (Z stack or timelapse).
Choose 'select file name and save' to save
If you have many images the Batch export macro may be useful please see BALM Staff to use. This can be found in
the macros menu
Balm Facility 081111- 510 Meta Inv Guide. Pg 7
8. To take a Z stack
Check Z stack in the top left menu
The Z stack menu will appear in the
Left hand navigation panel
Choose if you want to select first and last planes or to collect data
from a central point (BALM staff recommend select first and last in
general)
For stacks collected in select First and Last mode
Enter your required interval for z stack
Select Keep interval
Note: use Optimal Interval if you want the best resolved stack (for
3D image generation)
•
•
•
Click Live to start scanning
Move to the bottom your sample and hit set last
Move to the top of your sample and click set first
Click Start experiment to collect the Z stack
You can view the z series (and time series) as it is being collected using the Gallery option
9. Collecting a time series / timelapse
Check Time Series in the top left menu
Drop down the time series menu
Select the time interval and how many image you can to collect.
Click START to start the timelapse