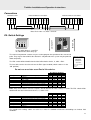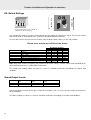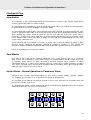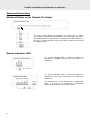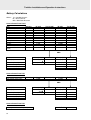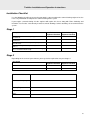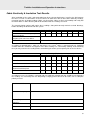
1
INTELLIGENT FIRE TECHNOLOGY
Twinflex - V3
Fire Detection & Alarm System
Installation & Operating Instructions
(TO BE RETAINED BY THE COMMISSIONING ENGINEER)
26-0338 Issue 7
Twinflex Installation and Operation Instructions
Rafiki Protection Limited
Rafiki policy is one of continual improvement and the right to change a specification at any time without notice is reserved. Whilst every care has been
taken to ensure that the contents of this document are correct at time of publication, Rafiki shall be under no liability whatsoever in respect of such
contents.
Due to the complexity and inherent importance of a life risk type system then training on this equipment is essential, and commissioning should only be
carried out by competent persons.
Rafiki cannot guarantee the operation of any equipment unless all documented instructions are complied with, without variation.
E&OE.
Rafiki equipment is protected by one or more of the following patent no’s: GB2426367, GB2370670, EP1158472, PT1035528T, GB2346758,
EP0917121, GB2329056, EP0980056, GB2325018, GB2305284, EP1174835, EP0856828, GB2327752, GB2313690
2
Twinflex Installation and Operation Instructions
Contents
Introduction .
.
.
System design
.
Equipment guarantee
Anti static handling guidelines
Warning
.
.
The Twinflex System
.
.
.
.
.
.
.
.
.
.
.
.
.
.
.
.
.
.
.
.
.
.
.
.
.
.
.
.
.
.
.
.
.
.
.
.
.
6
6
6
6
6
7
Control Panel .
.
.
Mounting the control panel
Physical dimensions
.
Power Supply Unit.
.
General assembly
.
Topology and cabling .
System Wiring Schematic
Control Panel Connections
.
.
.
.
.
.
.
.
.
.
.
.
.
.
.
.
.
.
.
.
.
.
.
.
.
.
.
.
.
.
.
.
.
.
.
.
.
.
.
.
.
.
.
.
.
.
.
.
8
8
8
9
10
10
11
12
Twinflex Multipoint Detector .
.
.
st
Installation 1 stage
.
.
.
nd
.
.
.
Installation 2 stage
Connections
.
.
.
.
Power-up
.
.
.
.
DIL switch settings
.
.
.
Fire detection modes
.
.
.
LED indication .
.
.
.
Sound output levels
.
.
.
Remote Indication LEDs
.
.
Head contamination warnings .
.
Replacing contaminated optical chambers
Testing .
.
.
.
.
.
.
.
.
.
.
.
.
.
.
.
.
.
.
.
.
.
.
.
.
.
.
.
.
.
.
.
.
.
.
.
.
.
.
.
.
.
.
.
.
.
.
.
.
.
.
.
.
.
.
.
.
18
18
18
18
19
19
20
20
20
20
20
21
21
Twinflex Manual Call Point.
.
.
st
Installation 1 stage
.
.
nd
Installation 2 stage
.
.
Power-up
.
.
.
Connections
.
.
.
DIL switch settings
.
.
LED indication
.
.
Reset and test
.
.
Sound output levels
.
.
Weatherproof Manual Call Point .
.
.
.
.
.
.
.
.
.
.
.
.
.
.
.
.
.
.
.
.
.
.
.
.
.
.
.
.
.
.
.
.
.
.
.
.
.
.
.
.
.
.
.
.
.
.
.
.
.
.
22
22
22
22
23
23
24
24
24
24
Twinflex Hatari Sounder.
st
Installation 1 stage
nd
Installation 2 stage
Power-up
.
Connections
.
DIL switch settings.
Sound output levels
.
.
.
.
.
.
.
.
.
.
.
.
.
.
.
.
.
.
.
.
.
.
.
.
.
.
.
.
.
.
.
.
.
.
.
.
.
.
.
.
.
.
.
.
.
.
.
.
.
25
25
25
25
26
26
26
Twinflex Flashpoint .
.
st
Installation 1 stage
.
nd
Installation 2 stage
.
Connections
.
.
Power-up
.
.
DIL switch settings
.
Sound output levels
.
Weatherproof Flashpoint
.
.
.
.
.
.
.
.
.
.
.
.
.
.
.
.
.
.
.
.
.
.
.
.
.
.
.
.
.
.
.
.
.
.
.
.
.
.
.
.
.
.
.
.
.
.
.
.
27
27
27
27
27
28
28
28
3
Twinflex Installation and Operation Instructions
4
Twinflex Soundpoint .
.
st
Installation 1 stage
.
nd
Installation 2 stage
.
Connections
.
.
Power-up
.
.
DIL switch settings
.
Sound output levels
.
Weatherproof Flashpoint
.
.
.
.
.
.
.
.
.
.
.
.
.
.
.
.
.
.
.
.
.
.
.
.
.
.
.
.
.
.
.
.
.
.
.
.
.
.
.
.
.
.
.
.
.
.
.
.
29
29
29
29
30
30
30
30
Twinflex Hipoint
.
st
Installation 1 stage
nd
Installation 2 stage
Connections
.
Power-up
.
DIL switch settings
Sound output levels
Twinflex Output Module
st
Installation 1 stage
nd
Installation 2 stage
Connections
.
Power-up.
.
DIL switch setting
LED indication
Testing
.
.
.
.
.
.
.
.
.
.
.
.
.
.
.
.
.
.
.
.
.
.
.
.
.
.
.
.
.
.
.
.
.
.
.
.
.
.
.
.
.
.
.
.
.
.
.
.
.
.
.
.
.
.
.
.
.
.
.
.
.
.
.
.
.
.
.
.
.
.
.
.
.
.
.
.
.
.
.
.
.
.
.
.
.
.
.
.
.
.
.
.
.
.
.
.
.
.
.
.
.
.
.
.
.
.
31
31
31
31
31
32
32
33
33
33
33
34
34
34
34
Twinflex Repeater Panel
st
Installation 1 stage
nd
Installation 2 stage
Connections
.
Operation
Testing .
.
.
.
.
.
.
.
.
.
.
.
.
.
.
.
.
.
.
.
.
.
.
.
.
.
.
.
.
.
.
.
.
.
.
.
.
.
.
.
.
.
.
.
35
35
35
35
36
36
General Operation
.
.
.
.
.
.
Introduction
.
.
.
.
.
.
Access Levels .
.
.
.
.
.
Access Level 2 (User) operating diagram: 2&4 zone panels
Access Level 2 (User) operating diagram: 8 zone panels .
LED indication .
.
.
.
.
.
Access Level 1 (Normal)
.
.
.
.
Access Level 2 (User) .
.
.
.
.
Access Level 3 (Engineer)
.
.
.
.
Programming summary .
.
.
.
.
.
.
.
.
.
.
.
.
.
.
.
.
.
.
.
.
.
.
.
37
37
37
38
39
40
42
42
45
48
Check Point Plus
.
.
.
.
.
Introduction
.
.
.
.
.
Zone modes
.
.
.
.
.
Instant zones: normal operation in communal areas
Delayed zones: confirmation delay in dwelling areas
Delayed zones: local or zonal confirmation?
Confirmation delay time .
.
.
.
Check point plus setup at access level 3 (Engineer)
.
.
.
.
.
.
.
.
.
.
.
.
.
.
.
.
.
.
.
.
.
.
.
.
49
49
49
49
50
50
51
51
Installation and Commissioning
st
Installation 1 stage
.
nd
Installation 2 stage
.
Commissioning .
.
End user training
.
.
.
.
.
.
.
.
.
.
.
.
.
.
.
.
.
.
.
.
.
.
.
.
.
.
.
.
.
.
53
53
53
53
54
Fault Finding .
.
.
.
.
.
.
55
.
.
Twinflex Installation and Operation Instructions
Summary of faults
Finding zone faults.
.
.
.
.
.
.
55
56
Advanced Connections
.
.
.
.
Monitored relays on the ‘Remote Fire Output’
.
Remote indication LEDs .
.
.
.
Connecting two panels together .
.
.
Connecting more than two Twinflex panels together.
Magnetic door hold units
.
.
.
.
.
.
.
.
.
.
.
.
.
.
.
.
.
.
.
.
.
58
58
58
59
60
61
Technical Data .
.
.
.
.
Control Panel specification
.
.
Twinflex Multipoint detector
.
.
Twinflex manual call point
.
.
Twinflex Hatari .
.
.
.
Twinflex Flashpoint
.
.
.
Twinflex Soundpoint
.
.
.
Twinflex Hipoint .
.
.
.
Twinflex output module .
.
.
Twinflex repeater panel .
.
.
Resistor colour codes .
.
.
Battery calculations
.
.
.
Installation checklist
.
.
.
Commissioning checklist
.
.
Cable continuity and insulation test results
Control panel instruction notice .
.
Apartment notice for checkpoint plus systems.
.
.
.
.
.
.
.
.
.
.
.
.
.
.
.
.
.
.
.
.
.
.
.
.
.
.
.
.
.
.
.
.
.
.
.
.
.
.
.
.
.
.
.
.
.
.
.
.
.
.
.
.
.
.
.
.
.
.
.
.
.
.
.
.
.
.
.
.
62
62
63
63
63
64
64
64
65
65
65
66
67
68
69
70
71
Important Points
.
.
.
.
72 – BACK PAGE
.
.
.
.
.
.
.
.
.
.
.
.
5
Twinflex Installation and Operation Instructions
Introduction
This Manual is intended as a guide to the engineering and commissioning principles of the Twinflex 2-wire Fire
Detection and Alarm system, and covers the system hardware information only.
Due to the complexity and inherent importance of a system covering a ‘Life Protection Risk’, training on this
equipment is essential, and commissioning should only be carried out by competent and approved persons. For
further details of the availability of commissioning services contact your supplier.
System Design
This document does not cover Fire Alarm system design, and a basic understanding is assumed.
!
A knowledge of BS5839: Pt 1: 2002: Fire Detection and Alarm Systems for Buildings is
essential.
It is strongly recommended that a suitably qualified and competent person is consulted in connection
with the Fire Alarm System design and that the entire system is commissioned in accordance with the
current national standards and specifications.
Equipment Guarantee
!
The equipment carries no warranty unless the system is installed, commissioned and serviced in
accordance with this manual and the relevant standards by a suitably qualified and competent person
or organisation
Anti Static Handling Guidelines
!
Immediately prior to handling any PCBs or other static sensitive devices, it is essential to ensure that
a personal connection to earth is made with an anti-static wrist-strap or similar apparatus.
Always handle PCBs by their sides and avoid touching any components. PCBs should also be stored
in a clean dry place, which is free from vibration, dust and excessive heat, and protected from
mechanical damage.
Warning
Do not attempt to install this equipment until you have fully read and understood this manual.
!
Failure to do so may result in damage to the equipment and could invalidate the warranty.
Technical support will not be available if the instruction manual has not been read and understood.
Please have this instruction manual available whenever you call for technical support.
For further technical support please contact your distributor. Do not call the Rafiki Protection
technical support department unless your distributor has first given their advice and attempted to
rectify the issue.
6
Twinflex Installation and Operation Instructions
The Twinflex System
This system is an intelligent ‘2-wire’ system with conventional type cabling format, and is classed as an ‘Analogue
non-addressable’ system due to the architecture used within the system design. All field devices including
sounders on a zone are connected via a common 2-core and earth/screen cable, and communicate with the
control panel using the ‘Twinflex’ data protocol.
The Twinflex panel is able to recognise and separately indicate a detector alarm and a manual call point alarm.
The panel also monitors each zone for detector head removal, device fault, ‘End of line’ fault and open or short
circuit fault.
Every device has an inbuilt ‘End of line’ signal, which may be activated as required.
Do not use a resistor for ‘End of line’ or any other 3rd party ‘End of line’ module.
The Twinflex control panel also provides a single conventional 24v sounder circuit, a monitored conventional 24v
relay circuit, a volt free common fire relay and a volt free common fault relay. There is also a multifunction nonlatching input, programmable with options such as ‘Class-Change’ and ‘Remote fire input’.
The Twinflex control panel also incorporates an integral power supply unit and requires the following standby
batteries to provide up to 72 hour standby times (refer to Technical Data for further information).
2 or 4 zone panel
8 zone panel
2 x 12v 2.1 Ah batteries
2 x 12v 3.3 Ah or 7.2 Ah batteries
Please note that earlier versions (V1 & V2) of the control panel require only one battery, so check the battery
labels in the control panel for clarification, as all the current version 3 control panels are labelled clearly with
‘Battery 1’ and ‘Battery 2’.
Unlike most conventional fire alarm systems, which require separate pairs of cables for detector zones and
sounder circuits, the Twinflex system requires one 2-core and earth/screen cable for each zone to accommodate
both detection devices and sounders. Furthermore sounders are incorporated within the detector to reduce
system components and simplify installation.
7
Twinflex Installation and Operation Instructions
Control Panel
Mounting the Control Panel
Firstly identify the proposed location for the control panel. Ensure that the control panel will be easily accessible,
and that account is taken of any subsequent work that may affect access. It should be located at the most likely
point of access for the fire services.
The control panel should be mounted on a flat, vertical wall at a height where the indicators may be seen without
difficulty.
Do not locate the control panel at high level where stepladders or other access equipment may be
required, in spaces with restricted access, or in a position that may require access panels to be removed.
Do not locate the control panel where extremes of temperature or humidity may occur, or where there is
any possibility of condensation or water ingress.
Like all electronic equipment, the control panel may be affected by extreme environmental conditions. The position
selected for its installation should therefore be clean and dry, not subjected to high levels of vibration or shock and
at least 2 meters away from any pager or radio transmitting equipment. Ambient temperatures should be within
the range given within the Technical Data section, i.e., not directly over a radiator or heater.
In common with all microprocessor-controlled panels, the control panel may operate erratically or may be
damaged if subjected to lightening induced transients. Proper earth/ground connections will greatly reduce
susceptibility to this problem.
Physical Dimensions
2 & 4 Zone Panels
8 Zone Panels
18mm
BOTTOM
76mm
TOP
407mm
18mm
76mm
LEFT
RIGHT
318mm
THIS SIDE HAS KNOCKOUTS FOR
CABLE ENTRY
407mm
HOLE SIZE FOR FLUSH MOUNT
NB/ THIS PANEL REQUIRES AN
OPTIONAL BEZEL FOR FLUSH
MOUNTING
318mm
The 2 & 4 zone control panel back box is designed as a dual-purpose surface or flush unit. The 14mm flange
facilitates flush mounting. To allow installation of the main front moulding, this flange must be flush with the
mounting surface and not recessed into it.
The 8 zone panel is designed for surface mounting only and will require the use of the optional flush mount bezel if
the control panel needs to be flush mounted.
8
Twinflex Installation and Operation Instructions
Power Supply Unit
2
2
The Fire Alarm Panel 230v ac supply requires fixed wiring between 0.75 mm and 2.5 mm , a 3 amp fused unswitched spur with local isolation, to be terminated into the fused terminals provided in the back box. On the 8
zone panel a metal cover, held in place with a locking nut, protects these terminals. The mains supply should be
dedicated to the Fire Alarm Panel and should be clearly labelled ‘FIRE ALARM: DO NOT SWITCH OFF’ at all
isolation points.
The control panel requires standby sealed lead acid batteries to be installed according to the following table.
These are to be sited in the control panel back box in the provided enclosure. The batteries should be connected
in series using the connection leads supplied. See the section entitled Control Panel Connections for panel
connections.
Control Panel
All 2 or 4 zone panels
All 2 or 4 zone panels
All 8 zone panels
All 8 zone panels
Standby Requirements
24 hours & 30 minutes
alarm
72 hours & 30 minutes
alarm
24 hours & 30 minutes
alarm
72 hours & 30 minutes
alarm
in
Batteries required
2 x 12v 2.1 Ah
in
2 x 12v 2.1 Ah
in
2 x 12v 3.3 Ah
in
2 x 12v 7.2 Ah
Note that the charging circuit will be in its high impedance state (approximately 3V DC) if no batteries, faulty
batteries or only one battery is connected. The full 27V DC charging voltage should be present if the correct
batteries are connected.
If the system shows a charger or battery fault on first power up, leave the system to charge it batteries for 5-6
hours.
In order to test for correct operation of the batteries, remove the mains 230V AC fuse and allow the batteries to
settle from their charging voltage for approximately 5 minutes. The battery voltage should then be measured using
an electronic test meter and a voltage greater than 24V DC should be seen.
Note that batteries are electrically live at all times and great care should be taken to ensure that the terminals are
never presented with a short circuit. Care should be taken at all times, especially during transit, installation and
normal use.
Batteries no longer required should be disposed of in a safe and environmentally friendly manner by the
manufacturer or a suitable recycling service. They should never be incinerated or placed in normal rubbish
collection facilities.
9
Twinflex Installation and Operation Instructions
General Assembly
2 & 4 Zone Panels
8 Zone
Panels
Topology & Cabling
All system wiring should be installed to comply with BS 5839 : Pt 1 : 2002 and BS 7671 (wiring regulations) and
any other standards relevant to the area or type of installation. A cable complying with the BS 5839 : Pt 1 : 2002
Category 1 (cables required to operate for prolonged periods during fire conditions) is required. This must be a 22
core 1.5mm screened fire resistant cable (ie. MICC, FP200, Firetuff, Firecell, Lifeline or equivalent).
Each zone requires a separate 2-core radial circuit from the control panel to the furthest point of the zone, to a
maximum of 500 meters.
In order to protect against possible data corruption it is important ensure the following points are adhered to:
1. The cable screen must be connected to earth/ground at the control panel only.
2. The cable screen must not be connected to earth/ground at any point other than the control panel, ie,
do not connect the screen to a device back box.
3. The cable screen continuity must be maintained at every point of the circuit, using the terminals
provided or a suitable connection block.
4. Do not use a 4-core cable as a circuit feed & return due to the possibility of data corruption. It is
essential that two 2-core cables are used if this is required.
Refer to the following System Wiring Schematic for further details.
10
Twinflex Installation and Operation Instructions
System Wiring Schematic
The following schematic may prove useful as an aid to understanding the cable requirements for the system;
11
Twinflex Installation and Operation Instructions
Control Panel Connections
2 & 4 Zone Panels
Battery Connections: BAT+, BATThe battery terminals require 24v from 2 x 2.1Ah sealed lead acid batteries, connected in series, in order
to provide secondary backup power when the primary power fails. This input is protected by the 3A fuse
connected inline with the positive battery lead.
AC Input: AC – A, AC – B, EARTH
The AC input is connected to the yellow leads coming from the transformer mounted within the back box,
and is the primary power supply for the system.
Auxiliary 24v Power: Aux 24v O/P +, Aux 24v O/P 250mA of auxiliary 24v DC power is available here. It is recommended that additional Power Supply Units
be installed to provide power for additional loads.
12
Twinflex Installation and Operation Instructions
Remote Alarm Output: Remote Alarm O/P +/The remote alarm output may be used to connect a standard 24v DC conventional relay. This is
monitored for short circuit and open circuit with a 4K7 ohm ‘End Of Line’ resistor and is rated at 24v DC
250mA. The relay operates when the control panels enters the fire state and deactivates when the system
is reset. Any relays must be dioded. See the section on relays for further information.
Remote Alarm input: Alarm I/P
The Remote alarm input is a non-latching input suitable for interfacing to other fire panels. Simply apply
auxiliary –ve (0v) to this terminal and its chosen function will operate as follows;
Mode 1 – Timed Class Change
On application of a 0v trigger, the sounders will operate for 10 seconds, but the control panel will show no
indication, and neither the ‘Fire Relay’ nor the ‘Remote Alarm Output’ will operate.
Mode 2 – Remote Alarm excluding ‘Remote Alarm Output’
On application of a 0v trigger, the sounders will operate, the control panel will show ‘Common Fire’ and
‘Remote Alarm Input’ indication, the ‘Fire Relay’ will change state, but the ‘Remote Alarm Output’ will not
operate. This will reset when the trigger condition is removed.
Mode 3 – Class Change
On application of a 0v trigger, the sounders will operate until the trigger condition is removed, but the
control panel will show no indication, and neither the ‘Fire Relay’ nor the ‘Remote Alarm Output’ will
operate.
Mode 4 – Remote Alarm
On application of a 0v trigger, the sounders will operate, the control panel will show ‘Common Fire’,
‘Remote Alarm Input’ and ‘Remote Alarm Output’ indication, and the ‘Fire Relay’ and the ‘Remote Alarm
Output’ will change state. This will reset when the trigger condition is removed.
Repeater Outputs: Z1, Z2, Z3, Z4, Flt
The repeater output will change to 0v when the relevant state is present, ie, the ‘Z1’ terminal will become
0v when zone one is in the fire state. An Led or low current relay may be operated if connected between
this terminal and auxiliary 24v positive. Any relays must be dioded. See the section on relays for further
information.
Repeater Inputs: EVAC, SIL, RST
These inputs require that a switched 0v trigger is applied in order for the relevant action to take place as
follows;
EVAC- Evacuate Input
On application of the 0v trigger input the sounders will operate, the control panel will show ‘Common Fire’
and ‘Remote Alarm Output’ indication, and the ‘Fire Relay’ and the ‘Remote Alarm Output’ will change
state. This will latch in place and the control panel must be reset to clear the event.
13
Twinflex Installation and Operation Instructions
SIL – Silence Input
On application of the 0v trigger input the alarm sounders will stop if they were operating.
RST - Reset Input
On application of the 0v trigger input the system will reset.
Fire Relay: NO, COM, NC
The fire relay provides a set of volt free single pole changeover contacts rated at 30v DC 1A. This contact
will change state when the control panel enters the fire state, and remain so until the system is reset.
Fault Relay: NO, COM, NC
The fault relay provides a set of volt free single pole changeover contacts rated at 30v DC 1A. This
contact will change state when the control panel enters the fault state, and remain so until the fault
condition is cleared.
Conventional Sounder Circuit: BELL OUTPUT +/The conventional sounder circuit may be used to connect a standard sounders or strobe circuit. This is
monitored for short circuit and open circuit with a 4K7 ohm ‘End Of Line’ resistor and is rated at 24v DC
500mA. The alarm sounders operate when the control panel enters the fire state and deactivates when
the system is silenced.
Device circuits: ZONE 1/2/3/4 +/The Twinflex devices may be connected in radial circuits utilising the in built ‘End Of Line’ signal within the
last device. NB/ Do not use a resistor for ‘End Of Line’ on the zones. Unused zones must be programmed
off. See the programming section for further details.
Fuses
Bell Fuse - Located on PCB adjacent Bell Output terminals
.
Battery Fuse – Located in line in the positive battery lead .
Mains Fuse – Located in the back box adjacent to the transformer
14
500mA Fast
3A Fast
T315mA Anti Surge
Twinflex Installation and Operation Instructions
8 Zone Panels
POWER SUPPLY:
24V DC SWITCH
MODE PSU LOCATED
IN CONTROL PANEL
BACK BOX
POWER SUPPLY
E
DC DC
DC
DC
Device circuits: ZONE 1/2/3/4/5/6/7/8 +/The Twinflex devices may be connected in radial circuits utilising the in built ‘End Of Line’ signal within the
last device. NB/ Do not use a resistor for ‘End Of Line’ on the zones. Unused zones must be programmed
off. See the programming section for further details.
Remote Alarm Output: Remote Fire O/P +/The remote alarm output may be used to connect a standard 24v DC conventional relay. This is
monitored for short circuit and open circuit with a 4K7 ohm ‘End Of Line’ resistor and is rated at 24v DC
800mA. The relay operates when the control panels enters the fire state and deactivates when the system
is reset. Any relays must be dioded. See the section on relays for further information.
15
Twinflex Installation and Operation Instructions
Conventional Sounder Circuit: SOUNDER +/The conventional sounder circuit may be used to connect a standard sounder or strobe circuit. This is
monitored for short circuit and open circuit with a 4K7 ohm ‘End Of Line’ resistor and is rated at 24v DC
800mA. The alarm sounders operate when the control panel enters the fire state and deactivates when
the system is silenced
Fire Relay: NO, COM, NC
The fire relay provides a set of volt free single pole changeover contacts rated at 30v DC 1A. This contact
will change state when the control panel enters the fire state, and remain so until the system is reset.
Fault Relay: NO, COM, NC
The fault relay provides a set of volt free single pole changeover contacts rated at 30v DC 1A. This
contact will change state when the control panel enters the fault state, and remain so until the fault
condition is cleared.
Remote Alarm input: Alarm I/P / Class Change
The Remote alarm input is a non-latching input suitable for interfacing to other fire panels. Simply apply
auxiliary 0v to this terminal and its chosen function will operate as follows;
Mode 1 – Timed Class Change
On application of a 0v trigger, the sounders will operate for 10 seconds, but the control panel will show no
indication, and neither the ‘Fire Relay’ nor the ‘Remote Alarm Output’ will operate.
Mode 2 – Remote Alarm excluding ‘Remote Alarm Output’
On application of a 0v trigger, the sounders will operate, the control panel will show ‘Common Fire’ and
‘Remote Alarm Input’ indication, the ‘Fire Relay’ will change state, but the ‘Remote Alarm Output’ will not
operate. This will reset when the trigger condition is removed.
Mode 3 – Class Change
On application of a 0v trigger, the sounders will operate until the trigger condition is removed, but the
control panel will show no indication, and neither the ‘Fire Relay’ nor the ‘Remote Alarm Output’ will
operate.
Mode 4 – Remote Alarm
On application of a 0v trigger, the sounders will operate, the control panel will show ‘Common Fire’,
‘Remote Alarm Input’ and ‘Remote Alarm Output’ indication, and the ‘Fire Relay’ and the ‘Remote Alarm
Output’ will change state. This will reset when the trigger condition is removed.
Internal Speaker: INT SPEAKER +/This feature is not currently in use.
16
Twinflex Installation and Operation Instructions
Auxiliary 24v Power: Aux 24v O/P +, Aux 24v O/P 800mA of auxiliary 24v DC power is available here. It is recommended that additional Power Supply Units
be installed to provide power for additional loads.
Power Supply: DC, DC, EARTH
The DC input is connected to the red and black leads coming from the switch mode power supply
mounted within the back box, and is the primary power supply for the system.
Note: Previously the control panel used a 24V AC input, connected to a transformer mounted within the
back box. Ensure that the correct type of power supply is utilised.
Repeater Outputs: Z1, Z2, Z3, Z4, A = FLT O/P, B = RESET O/P
The repeater output will change to 0v when the relevant state is present, ie, the ‘Z1’ terminal will become
0v when zone one is in the fire state. An Led or low current relay may be operated if connected between
this terminal and auxiliary 24v positive. Any relays must be dioded. See the section on relays for further
information.
Repeater Inputs: D = SILENCE, E = RESET, F = EVAUATE
These inputs require that a switched 0v trigger is applied in order for the relevant action to take place as
follows;
F = EVAC - Evacuate Input
On application of the 0v trigger input the sounders will operate, the control panel will show ‘Common Fire’
and ‘Remote Alarm Output’ indication, and the ‘Fire Relay’ and the ‘Remote Alarm Output’ will change
state. This will latch in place and the control panel must be reset to clear the event.
D = SIL – Silence Input
On application of the 0v trigger input the alarm sounders will stop if they were operating.
E = RST - Reset Input
On application of the 0v trigger input the system will reset.
Battery Connections: BAT+, BATThe battery terminals require 24v from 2 x 3.3 Ah or 2 x & Ah sealed lead acid batteries, connected in
series, in order to provide secondary backup power when the primary power fails. This input is protected
by the 3A fuse located on the PCB.
Note that earlier versions of the 8 zone control panel had two sets of battery connections and required a
12v battery on each. With the current versions a link wire is provided to allow the batteries to be
connected in series to the single set of connectors.
Fuses
Sounder Fuse - Located on PCB near center. .
.
.
Remote Fire Fuse - Located on PCB adjacent Fire relay .
.
Battery Fuse – Located on PCB adjacent to battery terminals
.
Mains Fuse – Located in the back box adjacent to the transformer
.
.
.
.
1A Fast
1A Fast
3A Fast
3AT Anti Surge
17
Twinflex Installation and Operation Instructions
Twinflex Multipoint Detector
Installation 1st Stage
The Multipoint Detector is available with or without an integral alarm sounder. If
your device has no sounder then ignore all reference to integral sounders on
these installation instructions. This device is compatible only with Twinflex
control panels and their associated detection and alarm equipment and may be
installed on the same zone as the Manual Call Point, Hatari sounders and
input/output modules.
EART
H
Ov
OUT
Ov IN
- LED
+ LED
Fix the detector base in a suitable position using the two screw holes provided
remembering to allow enough space for the correct termination of the
appropriate fire resistant cable.
+ Line in
+ Line out
Not
Connected
2
The cabling should be 2 core 1.5 mm and earth/screened and fire resistant, of
an MICC or FP200 equivalent type and is to be in the form of a 2-core radial
circuit from the control panel to the last device. Do not spur from the circuit.
Please remember that all high voltage testing must be carried out before the installation of any electronic devices
as this may cause damage. The installer needs to provide proof of zone continuity readings etc., to enable
commissioning to proceed. Use the form provided at the rear of this manual to record your readings.
Installation 2nd Stage
Once all testing has been carried out on the cabling and ‘continuity & integrity’
has been proven, then the Multipoint unit may be assembled. Set the on-board dil
switches as required before inserting the Electronics Module, locating the pins
and gently pushing home. The Electronics Module may be removed by inserting
the Key into the triangular slot adjacent to the LED, twisted to lock and then
pulled to ease the Module out. Do not pull on the optical transmitter and receiver
pair as you may misalign them.
ELECTRONICS MODULE & REMOVAL KEY
The Optical Chamber may then be offered up and twisted to locate until the catch
operates. Remember not to force this item; if the Electronics Module is correctly
located then the Optical Chamber should locate with very little force. The Optical
Chamber may be removed with the Head Removal Tool. Ensure that the Optical
Chamber is installed when the system is powered up, or a fault condition will be
generated. See page 18 for further details.
OPTICAL CHAMBER & HEAD REMOVAL TOOL
Connections
CONTROL PANEL
TWINFLEX MULTIPOINT
EARTH
EARTH
OV
OV
LINE OUT +VE
LINE IN +VE
NOT CONNECTED
NOT CONNECTED
EARTH
EARTH
OV
OV
LINE OUT +VE
LINE IN +VE
NOT CONNECTED
NOT CONNECTED
ZONE +VE
ZONE -VE
EARTH
18
TWINFLEX MULTIPOINT
Twinflex Installation and Operation Instructions
Power Up
The Multipoint detector requires approximately one minute on power up to boot up its processor and settle down
to normal operation. Do not test the detector during this time. Ensure that the Optical Chamber is installed when
the system is powered up, or a fault condition will be generated.
1
2
3
4
5
6
7
8
ON
SWITCH ON
O N
SWITCH OFF
DIL Switch Settings
ie, the switch above is set to EOL
off, logical link off, SM2, SP2,
Volume High
The detector DIL switches may be used to program the operation of the Multipoint Detector. They may be altered
whilst the detector is still powered or the system may be powered down completely.
The last device on the circuit must have the EOL signal enabled (switch number 1 in the ‘ON’ position).
Do not use a resistor as an End of Line device.
If a heat detection mode is selected then use the ‘HEAT’ labels supplied to label the base of the detector clearly.
EOL Signal
Detection Mode
Logical Link *
Sound Pattern
Sounder Volume
Disabled (no end of line signal)
Enabled
Disabled (no detection)
Smoke 1
Smoke 2
Smoke3
Heat 1
Heat 2
Heat 3
Smoke 2 / Heat 2 Combined
Logical link disabled
Logical link enabled
Disabled (no sound)
Sound 1 (Continuous buzz at 970 Hz)
Sound 2 (Alternate tone at 800/970 Hz)
Sound 3 (Sweep up tone at 800 to 970 Hz)
Low – 75dB
High – 90dB
1
OFF
ON
2
DIL SWITCH SETTINGS
3
4
5
6
OFF
ON
OFF
ON
ON
OFF
ON
OFF
OFF
OFF
ON
ON
OFF
ON
ON
OFF
7
8
OFF
OFF
OFF
OFF
ON
ON
ON
ON
OFF
ON
OFF
ON
OFF
ON
OFF
OFF
ON
ON
OFF
ON
* For use with Twinflex Checkpoint Plus Control panels only. The setting will be ignored on standard systems. With Logical Link enabled the
sounder in that device only will operate during the confirmation period, and with the Logical Link disabled all the sounders in the same zone
as the device in alarm will operate during the confirmation period.
19
Twinflex Installation and Operation Instructions
Fire Detection Modes.
Detection
Mode
SM0
SM1
SM2
SM3
HM0
HM1
HM2
HM3
Description
Temp
(oC)
No smoke detection
Standard sensitivity optical with high thermal enhancement. This mode may be classed as
an ionisation equivalent. Ensure environment is clean and suitable for a rapid response.
Standard sensitivity optical with normal thermal enhancement. This is a standard smoke
detector, with standard thermal enhancement to help its stability.
Low sensitivity optical with transient smoke rejection. The smoke density must be kept up
for a longer time period, so this is ideal for bedrooms with en-suite showers, etc.
No heat detection
Standard temperature, rate of rise enhanced, (grade A1/R), Not for use in kitchens.
Standard fixed temperature, normal response, (grade A1/S). Fine for domestic kitchens.
High fixed temperature, (grade C/S). Ideal for boiler rooms and commercial kitchens.
58
58
90
LED Indication.
State
fire
fault
EOL
normal
On
ON
50ms
50ms
0.1ms
Interval
1.3s
5s
20s
Sound Output Levels.
Description
Low
High
Volume dB(A) @
1m
75
90
Quantity
per
zone
32 max
32 max
Loading
zone)
(max 32 per
1 SLU
1 SLU
Note that quantities of other device types need to be included as well, so see the relevant sections on that device
for their loadings.
The above readings are taken at 1 meter in standard reverberant surroundings to simulate field conditions.
Remote Indication LEDs
If a ‘Remote Indication LED’ is required, then an LED may be connected between the
‘Remote LED + / -‘ terminals.
Note that the LED requires no resistor. Most standard LEDs will have various options
and will have connections marked suitable for ‘Intelligent Systems’.
Head Contamination Warnings
If a smoke detector becomes dusty its operation is affected, either making it more prone to false alarms, or in rare
cases reducing its sensitivity.
Warning of head contamination is very simple. The Multipoint LED will flash once approximately every 1.5
seconds. At the control panel, the common ‘Fault’ LED will flash, the buzzer will sound and the relevant ‘Zone
Fault’ LED will flash at approximately twice the speed of the buzzer.
20
Twinflex Installation and Operation Instructions
Replacing Contaminated Optical Chambers
When an optical chamber becomes contaminated we recommend replacing it with a new replacement item.
Cleaning an old chamber will not give satisfactory results and the re-assembly may very easily result in a
misalignment of the optical path. Greasy residues often build up over time, and the optical path could easily be
made worse if an attempt is made to clean it.
We recommend replacing any contaminated units with new ones in order to maintain the correct performance of
your system.
Firstly investigate the control panel indications as above, then check the devices in the relevant zone to locate the
Multipoint detector indicating ‘Fault’.
Remove the Optical Chamber with the Head Removal Tool and replace it with a new one. The fault indication
should clear in 30-45 seconds and return to normal. If this does not happen then consider changing the
Electronics Module as well, remembering to set the dil switches correctly, but this should be a rare occurrence.
It is advisable to disable all of the sounders and fire protection outputs whilst carrying out this routine as the device
may go into the fire state, depending on the way in which the optical chamber affects the optical signal as it is
removed or replaced.
Remember that any alterations to the system should be tested for correct operation before leaving site.
Testing
We recommend the use of suitable smoke test equipment such as the ‘No Climb’ SOLO 300 tester or an
equivalent product. Testing with an aerosol can only may be generally successful, but in some circumstances may
fail to trigger a device due to unseen drafts removing the spray before the device is triggered. The use of the
correct test equipment, or the application of the dust cover will prevent this.
Due to the fact that the smoke detection modes are all ‘thermally enhanced’, it may be noticeable that on test the
devices respond more slowly than may be expected. This is perfectly normal and is due to the fact that during a
normal smoke test we have no heat present to cause the sensitivity to be enhanced.
Smoke mode 3 requires that the concentration of smoke is kept up for a longer period to trigger the device into
alarm, so patience is required. Small regular applications of test smoke are best in order to avoid drenching the
detector as this may result in sticky residues being left behind.
In order to test a detector which has been set to a heat mode we recommend the use of a ‘No Climb’ SOLO 400
tester, or an equivalent product. The SOLO 400 tester will also require a baffle to redirect the airflow (part number
SH32038 - SOLO461-024 Baffle).
21
Twinflex Installation and Operation Instructions
Twinflex Manual Call Point
Installation 1st Stage
The Manual Call Point is available with or without an integral alarm sounder. If
your device has no sounder then ignore all reference to integral sounders on
these installation instructions. This device is compatible only with Twinflex control
panels and their associated detection and alarm equipment and may be installed
on the same zone as the Multipoint detector/sounder, Hatari sounders and
input/output modules.
2
The cabling should be 2 core 1.5 mm screened and fire resistant, of an MICC or
FP200 equivalent type and is to be in the form of a 2-core radial circuit from the
control panel to the last device. Do not spur from the circuit.
Please remember that all high voltage testing must be carried out before
the installation of any electronic devices as this may cause damage. The
installer needs to provide proof of zone continuity readings etc., to enable
commissioning to proceed. Use the form provided at the rear of this
manual to record your readings.
Surface Mounting
Fix the surface back box to a flat vertical surface using at least two of the
four mounting holes provided. The back box may be drilled to allow cable
access as required and a 20mm hole is already provided at the rear. Zone cabling
may be connected to the terminals provided.
Flush Mounting
The Call Point may be flush mounted utilising the optional ‘adapter-plate’, combined
with any standard single gang flush mounting back box (with a minimum internal
depth of 25mm). After installing the back box securely, attach the bezel using the
two screws provided, and terminate your cables directly into a flying terminal block.
NB/ Red = zone +ve, Blue = zone 0V
Installation 2nd Stage
Once all testing has been carried out on the cabling and ‘continuity & integrity’ has been
proven, then the Manual Call Point unit may be installed.
The Call Point is installed by locating the upper mounting spigots into the back box and
then pushing the unit gently home. The single fixing screw may then be tightened as
required.
Power Up
The Manual Call Point requires approximately one minute on power up to boot up its processor and settle down to
normal operation. Do not test the manual call point during this time.
22
Twinflex Installation and Operation Instructions
Connections
TWINFLEX MANUAL CALLPOINT
CONTROL PANEL
TWINFLEX MANUAL CALLPOINT
EARTH
EARTH
OV
OV
LINE OUT
+VE
LINE IN +VE
NOT CONNECTED
NOT CONNECTED
EARTH
EARTH
OV
OV
LINE OUT
+VE
LINE IN +VE
NOT CONNECTED
NOT CONNECTED
ZONE +VE
ZONE -VE
EARTH
Note: Red = zone +ve, Blue = zone 0V
1
2
3
4
ON
SWITCH ON
O N
SWITCH OFF
DIL Switch Settings
ie, the switch above is set to EOL
on, volume low, Slow sweep up
The manual call point DIL switches may be used to program the operation of the manual call
point. They may be altered whilst the detector is still powered or the system may be powered
down completely.
TWINFLEX CALLPOINT
NO SOUNDER
BATCH NO 2771
DATE 24/03/06
The EOL switch will be identified on the label affixed to the device, ie, SW1 = EOL.
46/0400/04/40
SW1 = EOL
The last device on the circuit must have the EOL signal enabled (switch number 1 in the
‘ON’ position).
EOL / KEY TESTED
Made in UK
26/0369
Do not use a resistor as an End of Line device.
EOL Signal
Sounder Volume
Sound Pattern
Disabled (no end of line signal)
Enabled
Low – 75dB
High – 90dB
Sound 1 ( Continuous buzz at 970 Hz)
Sound 2 (Alternate tone at 800/970 Hz)
Sound 3 (Slow Sweep up at 500 to 1200 Hz)
Sound 4 (French Tone at 440 – 550 Hz)
DIL SWITCH SETTINGS
1
2
3
4
OFF
ON
OFF
ON
ON
ON
ON
OFF
OFF
OFF
OFF
ON
Note: Early Rafiki Twinflex manual call points utilised different dil switch settings as below. The EOL switch will be
identified on the label affixed to the device, ie, SW4 = EOL.
Sound Pattern
Sounder Volume
EOL Signal
Sound 1 ( Continuous buzz at 970 Hz)
Sound 2 (Alternate tone at 800/970 Hz)
Sound 3 (Slow Sweep up at 500 to 1200 Hz)
Sound 4 (French Tone at 440 – 550 Hz)
Low – 75dB
High – 90dB
Disabled (no end of line signal)
Enabled
DIL SWITCH SETTINGS
1
2
3
4
ON
ON
OFF
ON
OFF
OFF
ON
OFF
OFF
ON
OFF
ON
The sound level readings above are taken at 1 meter in standard reverberant surroundings to simulate field
conditions.
23
Twinflex Installation and Operation Instructions
LED Indication
State
Fire
EOL
On
50ms
50ms
Interval
0.33s
5s
Reset and Test
The Call Point contains a re-settable element, which latches in position when
operated and does not need to be replaced. Inserting the key as shown and turning it
clockwise until the element clicks back into place will reset the unit. Testing the Call
Point may be carried out either by pressing the element or by using the key in the
same manner as for resetting but without having pressed the element
Sound Output Levels.
Description
Low
High
Volume dB(A) @
1m
75
90
Quantity
per
zone
32 max
32 max
Loading
zone)
(max 32 per
1 SLU
1 SLU
Note that quantities of other device types need to be included as well, so see the relevant sections on that device
for their loadings.
The above readings are taken at 1 meter in standard reverberant surroundings to simulate field conditions.
Weatherproof Manual Call Point
The weatherproof Manual Call Point is similar to the standard Manual Call Point, except that it is rated at IP55.
Fix the surface back box carefully to a flat vertical surface, making sure to not compromise the IP rating of the
housing.
Ensure that you use suitable cable glands to terminate the cables in order to maintain the IP rating
24
Twinflex Installation and Operation Instructions
Twinflex Hatari Sounder
Installation 1st Stage
The Hatari sounder is available in Twinflex or conventional formats. The Twinflex Hatari sounder is compatible
only with Twinflex control panels and their associated detection and alarm equipment and may be installed on the
same zone as the Twinflex Multipoint detector/sounder, Twinflex Manual Call Points and Twinflex input/output
modules. The Conventional Hatari sounder must only be installed on a conventional sounder circuit.
Fix the sounder base to a flat vertical surface using the two mounting holes provided. A 20mm hole is already
provided at the rear for cable entry. Zone cabling may be connected to the terminals provided.
2
The cabling should be 2 core 1.5 mm screened and fire resistant, of an MICC or FP200 equivalent type and is to
be in the form of a 2-core radial circuit from the control panel to the last device. Do not spur from the circuit.
Please remember that all high voltage testing must be carried out before the installation of any electronic devices
as this may cause damage. The installer needs to provide proof of zone continuity readings etc., to enable
commissioning to proceed. Use the form provided at the rear of this manual to record your readings.
Installation 2nd Stage
Once all testing has been carried out on the cabling and ‘continuity & integrity’ has been proven, then the Hatari
sounder may be installed.
Two white plastic anti tamper clips are provided which slot into the base to provide a locking device. The Head
Removal Tool is then required to release the sounder from its base.
The sounder is installed by inserting it into its base, and rotating it gently, until it locks in place.
Connections
Hatari Base
CONTROL PANEL
Rear of Hatari
TWINFLEX HATARI SOUNDER
TWINFLEX HATARI SOUNDER
EARTH
EARTH
OV
OV
LINE OUT
+VE
LINE IN +VE
NOT CONNECTED
NOT CONNECTED
EARTH
EARTH
OV
OV
LINE OUT
+VE
LINE IN +VE
NOT CONNECTED
NOT CONNECTED
ZONE +VE
ZONE -VE
EARTH
Note: Red = zone +ve, Blue = zone 0V
25
Twinflex Installation and Operation Instructions
Power Up
The Hatari Sounder requires approximately one minute on power up to boot up its processor and settle down to
normal operation. Do not test the sounder during this time.
O N
1
ON
SWITCH ON
SWITCH OFF
DIL Switch Settings
ie, the switch above is set to EOL on,
The sounder DIL switches may be used to program the operation of the End of Line signal. They may be altered
whilst the detector is still powered or the system may be powered down completely.
The last device on the circuit must have the EOL signal enabled (switch number 4 in the ‘ON’ position).
Do not use a resistor as an End of Line device.
EOL Signal
DIL SWITCH SETTINGS
1
OFF
ON
Disabled (no end of line signal)
Enabled
Sound Output Levels.
Description
Maximum
Volume dB(A) @
1m
103
Quantity
zone
6
per
Loading
zone)
(max 32 per
6 SLU
The Rotary Volume Potentiometer located on the rear of the sounder may be used to adjust the volume if a lower
volume is required.
Note that quantities of other device types need to be included as well, so see the relevant sections on that device
for their loadings.
One zone will accept a total of 32 ‘Sounder Loading Units’. The Hatari sounder counts for approximately 6 ‘SLU’
whereas the Manual Call Point with sounder and the Multipoint with sounder both count for 1 ‘SLU’ each, eg, a
suitable loading on one zone would be 2 x Hatari sounder, 6 x MCP sounder and 14 x Multipoint with sounder.
The sound level readings above are taken at 1 meter in standard reverberant surroundings to simulate field
conditions.
26
Twinflex Installation and Operation Instructions
Twinflex Flashpoint
Installation 1st Stage
The Flashpoint sounder / beacon is available in Twinflex or
conventional formats. The Twinflex Flashpoint sounder/beacon is
compatible only with Twinflex control panels and their associated
detection and alarm equipment and may be installed on the same
zone as other Twinflex devices. The Conventional Flashpoint
sounder/beacon must only be installed on a conventional sounder
circuit.
Fix the sounder base to a flat vertical or horizontal surface using
the two mounting holes provided. Zone cabling may be connected
to the terminals provided.
2
The cabling should be 2 core 1.5 mm screened and fire resistant,
of an MICC or FP200 equivalent type and is to be in the form of a
2-core radial circuit from the control panel to the last device. Do not
spur from the circuit.
Please remember that all high voltage testing must be carried out before the
installation of any electronic devices as this may cause damage. The installer
needs to provide proof of zone continuity readings etc., to enable
commissioning to proceed. Use the form provided at the rear of this manual to
record your readings.
EART
H
Ov
OUT
Ov IN
- LED
+ LED
+ Line in
Installation 2nd Stage
+ Line out
Not
Connected
Once all testing has been carried out on the cabling and ‘continuity & integrity’
has been proven, then the Flashpoint sounder/beacon may be assembled. To
insert the Electronics Module, locate the pins and gently push it home.
Connections
TWINFLEX FLASH POINT
CONTROL PANEL
TWINFLEX FLASH POINT
EARTH
EARTH
OV
OV
LINE OUT
+VE
LINE IN +VE
NOT CONNECTED
NOT CONNECTED
EARTH
EARTH
OV
OV
LINE OUT
+VE
LINE IN +VE
NOT CONNECTED
NOT CONNECTED
ZONE +VE
ZONE -VE
EARTH
Note: Red = zone +ve, Blue = zone 0V
Power Up
The Flashpoint Sounder requires approximately one minute on power up to boot up its processor and settle down
to normal operation. Do not test the sounder during this time.
27
Twinflex Installation and Operation Instructions
O N
1
2
3
4
ON
SWITCH ON
SWITCH OFF
DIL Switch Settings
ie, the switch above is set to EOL on,
volume low, Slow sweep up
The sounder DIL switches may be used to program the operation of the End of Line signal. They may be altered
whilst the detector is still powered or the system may be powered down completely.
The last device on the circuit must have the EOL signal enabled (switch number 1 in the ‘ON’ position).
Do not use a resistor as an End of Line device.
EOL Signal
Sounder Volume
Sound Pattern
Disabled (no end of line signal)
Enabled
Low – 75dB
High – 90dB
Sound OFF
Dual Tone UK Evac (800/970 Hz)
Slow Sweep up (500 to 1200 Hz)
Dual Tone French Warble (440 – 550 Hz)
DIL SWITCH SETTINGS
1
2
3
4
OFF
ON
OFF
ON
ON
ON
ON
OFF
OFF
OFF
OFF
ON
Note: Early Rafiki Twinflex Flashpoints utilised different dil switch settings. The EOL switch will be identified on the
label affixed to the device, ie, SW4 =EOL or SW1=EOL.
The sound level readings above are taken at 1 meter in standard reverberant surroundings to simulate field
conditions
Sound Output Levels.
Description
Low + Beacon
High + Beacon
Volume dB(A) @ 1m
75
90
Quantity per zone
32 max
32 max
Loading (max 32 per zone)
1 SLU
2 SLU
Note that quantities of other device types need to be included as well, so see the relevant sections on that device
for their loadings.
The above readings are taken at 1 meter in standard reverberant surroundings to simulate field conditions.
Weatherproof Flashpoint
The weatherproof Flashpoint is similar to the standard Flashpoint, except that it has no sounder (ie visual
indication only) and is rated at IP55.
Fix the surface back box carefully to a flat vertical surface, making sure to not compromise the IP rating of the
housing.
Ensure that you use suitable cable glands to terminate the cables in order to maintain the IP rating
28
Twinflex Installation and Operation Instructions
Twinflex Soundpoint
Installation 1st Stage
The Soundpoint is available in Twinflex or conventional formats. The Twinflex
Soundpoint is compatible only with Twinflex control panels and their associated
detection and alarm equipment and may be installed on the same zone as other
Twinflex devices. The Conventional Soundpoint must only be installed on a
conventional sounder circuit.
2
The cabling should be 2 core 1.5 mm screened and fire resistant, of an
MICC or FP200 equivalent type and is to be in the form of a 2-core radial
circuit from the control panel to the last device. Do not spur from the
circuit.
Please remember that all high voltage testing must be carried out before
the installation of any electronic devices as this may cause damage. The
installer needs to provide proof of zone continuity readings etc., to enable
commissioning to proceed. Use the form provided at the rear of this
manual to record your readings.
Surface Mounting
Fix the surface back box to a flat vertical surface using at least two of the four
mounting holes provided. The back box may be drilled to allow cable access as
required and a 20mm hole is already provided at the rear. Zone cabling may be
connected to the terminals provided.
Flush Mounting
For flush mounting, utilise the optional ‘adapter-plate’, combined with any standard
single gang flush mounting back box (with a minimum internal depth of 25mm).
After installing the back box securely, attach the bezel using the two screws
provided, and terminate your cables directly into a flying terminal block.
Installation 2nd Stage
Once all testing has been carried out on the cabling and ‘continuity & integrity’ has
been proven, then the Soundpoint unit may be installed.
The Soundpoint is installed by locating the upper mounting spigots into the back
box and then pushing the unit gently home. The single fixing screw may then be
tightened as required.
Connections
TWINFLEX SOUND POINT
CONTROL PANEL
TWINFLEX SOUND POINT
EARTH
EARTH
OV
OV
LINE OUT
+VE
LINE IN +VE
NOT CONNECTED
NOT CONNECTED
EARTH
EARTH
OV
OV
LINE OUT
+VE
LINE IN +VE
NOT CONNECTED
NOT CONNECTED
ZONE +VE
ZONE -VE
EARTH
Note: Red = zone +ve, Blue = zone 0V
29
Twinflex Installation and Operation Instructions
Power Up
The Soundpoint requires approximately one minute on power-up to boot-up its’ processor and settle down to
normal operation. Do not test the sounder during this time.
1
2
3
ON
SWITCH OFF
O N
4
SWITCH ON
DIL Switch Settings
ie, the switch above is set to EOL
on, volume low, Slow sweep up
The sounder DIL switches may be used to program the operation of the End of Line signal. They may be altered
whilst the detector is still powered or the system may be powered down completely.
The last device on the circuit must have the EOL signal enabled (switch number 1 in the ‘ON’ position).
Do not use a resistor as an End of Line device.
EOL Signal
Sounder Volume
Sound Pattern
Disabled (no end of line signal)
Enabled
Low – 75dB
High – 90dB
Sound OFF
Dual Tone UK Evac (800/970 Hz)
Slow Sweep up (500 to 1200 Hz)
Dual Tone French Warble (440 – 550 Hz)
1
OFF
ON
DIL SWITCH SETTINGS
2
3
4
OFF
ON
ON
ON
OFF
OFF
ON
OFF
OFF
ON
Note: Early Rafiki Twinflex Flashpoints utilised different dil switch settings. The EOL switch will be identified on the
label affixed to the device, ie, SW4 =EOL or SW1=EOL
The sound level readings above are taken at 1 meter in standard reverberant surroundings to simulate field
conditions
Sound Output Levels.
Description
Low
High
Volume dB(A) @
1m
75
90
Quantity
per
zone
32 max
32 max
Loading
zone)
(max 32 per
1 SLU
1 SLU
Note that quantities of other device types need to be included as well, so see the relevant sections for each device
for their loadings.
The above readings are taken at 1 meter in standard reverberant surroundings to simulate field conditions.
Weatherproof Soundpoint
The weatherproof Soundpoint is similar to the standard Soundpoint, except that it is rated at IP55.
Fix the surface back box carefully to a flat vertical surface, making sure to not compromise the IP rating of the
housing.
Ensure that you use suitable cable glands to terminate the cables in order to maintain the IP rating
30
Twinflex Installation and Operation Instructions
Twinflex Hipoint
Installation 1st Stage
The Hipoint is compatible only with Twinflex control panels and their associated detection and alarm equipment
and may be installed on the same zone as other Twinflex devices.
Fix the back box to a flat vertical surface using at least two of the four
mounting holes provided. Cables may have access through the
20mm knockouts at the top & bottom of the box, and may then be
terminated directly into the terminals according to the terminal labels.
2
The cabling should be 2 core 1.5 mm screened and fire resistant, of
an MICC or FP200 equivalent type and is to be in the form of a 2-core
radial circuit from the control panel to the last device. Do not spur
from the circuit.
Please remember that all high voltage testing must be carried out
before the installation of any electronic devices as this may cause
damage. The installer needs to provide proof of zone continuity
readings etc., to enable commissioning to proceed. Use the form
provided at the rear of this manual to record your readings.
Installation 2nd Stage
Once all testing has been carried out on the cabling and ‘continuity & integrity’
has been proven, then the Hipoint unit may be installed.
The Soundpoint is installed by locating using the two fixing screws provided.
Connections
TWINFLEX HI POINT
CONTROL PANEL
TWINFLEX HI POINT
EARTH
EARTH
OV
OV
LINE OUT
+VE
LINE IN +VE
NOT CONNECTED
NOT CONNECTED
EARTH
EARTH
OV
OV
LINE OUT
+VE
LINE IN +VE
NOT CONNECTED
NOT CONNECTED
ZONE +VE
ZONE -VE
EARTH
Note: Red = zone +ve, Blue = zone 0V
Power Up
The Hipoint requires approximately one minute on power-up to boot-up its processor and settle down to normal
operation. Do not test the sounder during this time.
31
Twinflex Installation and Operation Instructions
1
2
3
ON
SWITCH OFF
O N
4
SWITCH ON
DIL Switch Settings
ie, the switch above is set to EOL on,
volume low, Slow sweep up
The sounder DIL switches may be used to program the operation of the End of Line signal. They may be altered
whilst the detector is still powered or the system may be powered down completely.
The last device on the circuit must have the EOL signal enabled (switch number 1 in the ‘ON’ position).
Do not use a resistor as an End of Line device.
EOL Signal
Sounder Volume
Sound Pattern
Disabled (no end of line signal)
Enabled
Low – 75dB
High – 90dB
Sound OFF
Dual Tone UK Evac (800/970 Hz)
Slow Sweep up (500 to 1200 Hz)
Dual Tone French Warble (440 – 550 Hz)
1
OFF
ON
DIL SWITCH SETTINGS
2
3
4
OFF
ON
ON
ON
OFF
OFF
ON
OFF
OFF
ON
Note: Early Rafiki Twinflex Flashpoints utilised different dil switch settings. The EOL switch will be identified on the
label affixed to the device, ie, SW4 =EOL or SW1=EOL
The sound level readings above are taken at 1 meter in standard reverberant surroundings to simulate field
conditions
Sound Output Levels
Description
Low
High
Volume dB(A) @
1m
75
90
Quantity
per
zone
32 max
32 max
Loading
zone)
(max 32 per
1 SLU
1 SLU
Note that quantities of other device types need to be included as well, so see the relevant sections on that device
for their loadings.
The above readings are taken at 1 meter in standard reverberant surroundings to simulate field conditions.
32
Twinflex Installation and Operation Instructions
Twinflex Output Module
Installation 1st Stage
The Output Module is compatible only with Twinflex control panels and their associated detection and alarm
equipment and may be installed on the same zone as Multipoint detectors, Manual Call Points and Hatari
sounders.
Fix the back box in a suitable position using the two screw holes provided remembering to allow enough space for
the correct termination of the appropriate fire resistant cable.
2
The cabling should be 2 core 1.5 mm screened and fire resistant, of an MICC or FP200 equivalent type and is to
be in the form of a 2-core radial circuit from the control panel to the last device. Do not spur from the circuit.
The output module requires a 24V DC supply, which may me derived from the main control panel, or from a
separate Power Supply Unit with a suitable battery backup and fault monitoring.
Please remember that all high voltage testing must be carried out before the installation of any electronic devices
as this may cause damage. The installer needs to provide proof of zone continuity readings etc., to enable
commissioning to proceed. Use the form provided at the rear of this manual to record your readings.
Installation 2nd Stage
Once all testing has been carried out on the cabling and ‘continuity & integrity’ has been proven, then the Output
Module may be assembled. Set the on-board EOL dil switch as required before affixing the unit with the two
screws provided.
Connections
No
Description
Label.
1
2
3
4
5
6
7
8
9
10
11
12
13
Zone +ve core
Zone +ve core
Zone 0v core
Zone 0v core
Cable Screen
Cable Screen
Normally Closed relay contact
Common relay contact
Normally Open relay contact
Fault input (S/C to B to clear)
Fault input (S/C to A to clear)
Power Supply in 24v +ve
Power Supply in Ov
ZONE +ve
Zone +ve
Zone 0v
Zone 0v
Earth
Earth
Relay NC
Relay C
Relay NO
Fault A
Fault B
24V +ve
0V
Note that the relay contacts
are rated at 30VDC, 3A.
33
Twinflex Installation and Operation Instructions
Power Up
The Output Module requires approximately one minute on power up to boot up its processor and settle down to
normal operation. Do not test the module during this time.
O N
1
ON
SWITCH ON
SWITCH OFF
DIL Switch Settings
ie, the switch above is set to EOL on,
The Output Module DIL switches may be used to program the operation of the on board EOL signal. They may be
altered whilst the detector is still powered or the system may be powered down completely.
The last device on the circuit must have the EOL signal enabled (switch number 1 in the ‘ON’ position).
Do not use a resistor as an End of Line device.
EOL Signal
Disabled (no end of line signal)
Enabled
DIL SWITCH SETTINGS
1
OFF
ON
LED Indication.
State
fire
fault
normal
Fault LED
ON
OFF
Active LED
ON
OFF
Testing
The Output Module should first be tested with an electronic test meter set to it’s continuity setting to check that the
relay contacts change state when the Control Panel is set into alarm.
Next prove the operation of the fault input using a wire link to clear the fault and removing the link to generate the
fault.
Finally connect the output module to the equipment to which you wish to interface. The Twinflex control panel may
then be set into the fire state to check that the interface has the desired effect on the equipment to which you have
connected it. A fault should also be generated on this equipment to check that the Twinflex control panel
acknowledges it correctly.
Loading.
Description
Standard
Quantity
per
zone
32 max
Loading
zone)
(max 32 per
1 SLU
Note that quantities of other device types need to be included as well, so see the relevant sections for each device
for their loadings.
34
Twinflex Installation and Operation Instructions
Twinflex Repeater Panel
Installation 1st Stage
This unit is classed as ‘secondary indicating equipment’ (as stipulated in the British Standards). It is available in 8
or 16 zone formats and has the optional functionality to provide system controls (silence, reset and evacuate). The
main control panel controls and indication will not be affected or hidden.
Fix the back box in a suitable position using the three screw holes provided remembering to allow enough space
for the correct termination of the appropriate cables.
The repeater panel requires a multi-core cable from the main control panel, and must consist of the following:
Number of Cores
2
5
1
Function
24V DC power supply
Silence, reset, evacuate, fire and fault
Per zone indication required
Example Total
Example 8 zone
repeater
2
5
8
15
Please remember that all high voltage testing must be carried out before the installation of any electronic devices
as this may cause damage. The installer needs to provide proof of zone continuity readings etc., to enable
commissioning to proceed.
Installation 2nd Stage
Once all testing has been carried out on the cabling and ‘continuity & integrity’ has been proven, then the repeater
panel may be assembled.
Connections
35
Twinflex Installation and Operation Instructions
Operation
In the event of a fire state being active on one of the main control panel zones, the common fire LEDs and the
relevant zone led will light up, and the buzzer will sound.
Turning the key switch to the on position enables the controls buttons for ‘Silence Alarms’, ‘Reset System’ and
‘Sound Alarms’. If these controls are not required then do not connect the terminals labelled ‘EVAC’, ‘SIL’ and
‘RESET’.
Testing
Simply ensure that the relevant zone indications occur by activating each zone in turn at the main control panel
and by creating a fault. The controls may be tested at the same time by silencing and resetting from the repeater
panel.
36
Twinflex Installation and Operation Instructions
General Operation
Introduction
This section describes the operation of the panel in response to fire and fault conditions, operator actions required
to process alarms and restore the panel to the normal state, and engineering functions such as testing and
system configuration.
The panel controls and indicators are largely the same for the 2/4 and the 8 zone panels, but there are a few
differences. Eg, the 8 zone panel uses a key switch for Access Level 2 (User) entry, whereas the 2/4 zone panels
use a code entry.
Access Levels
The system access levels are set into three access levels as follows. For simple indication the status of the
‘Controls Enabled’ LED will show the level selected as follows;
Access
Level
Description
Controls Enabled LED
2/4z Panel
Codes
8z Panel Codes
1
2
3
Normal
User
Engineer
OFF
ON
FLASHING
ACCESS 514
ACCESS 5244
Key Switch
ACCESS 5244
37
DISABLE ALARMS
If button 3 is pressed at Access
Level 2 (User) whilst holding ‘ALT’
the alarm sounders are disabled.
Repeat to enable.
If button 1 is pressed at Access
Level 2 (User) whilst holding ‘ALT’
the ‘Remote Fire Output’ is
disabled. Repeat to enable.
DISABLE
ALARMS
3
2
1
DISABLE
REMOTE FIRE
SOUND
ALARMS
RESET
SYSTEM
SILENCE
ALARMS
DISABLE
ZONE
5
TEST ZONE
LAMP TEST
ALT
ACCESS
FAULT / DISABLE / TEST
CALL POINT ALARM
1
2
3
CONTROLS
ENABLED
This indicates a fault on the
conventional sounder circuit
SOUNDER FAULT
This indicates a CPU reset or a
processor error.
This LED is illuminated when the
alarm sounders are silenced and
goes off when the system is reset.
This indicates that the buzzer has
been silenced. It will switch off if
the buzzer restarts and when the
panel is operating normally.
SYSTEM FAULT
ALARMS SILENCED
BUZZER SILENCED
This LED indicates that an earth
fault has been detected
EARTH FAULT
This LED flashes to indicate a
mains supply fault and is steady
for a battery or charger fault
POWER FAULT
This LED when the panel is
supplied with power from either
the batteries or the mains supply.
POWER
These LEDs indicate the precise
status of both the zonal, and the
remote fire, FAULT/DISABLE/
TEST LEDs
FAULT/DISABLE/TEST
These LEDs indicate the status of
the Remote Fire Input and the
Remote Fire Output.
REMOTE FIRE INPUT & OUTPUT
This LED is illuminated when the
alarm sounders are disabled and
goes off when the alarms are
enabled.
ALARMS DISABLED
FAULT DISABLE TEST
POWER
FAULT/DISABLE
REMOTE FIRE INPUT
ON
REMOTE FIRE OUTPUT
This LED illuminates to indicate
that the controls are on, ie, at
Access Level 2 (User). It flashes in
the Access Level 3 (Engineer).
POWER
FAULT
4
FIRE
CONTROLS ENABLED
BUZZER ALARMS ALARMS
SILENCED SILENCED DISABLED
EARTH
FAULT
ZONE
These LEDs are illuminated when:
1. A device alarm is detected.
2. The SOUND ALARMS button is
pressed.
3. The repeater evacuate input is
active.
They are extinguished when the
system is reset.
FIRE
SOUNDER SYSTEM
FAULT FAULT
If button 5 is pressed at Access Level 2 (User) whilst
holding ‘ALT’, the operator may then specify a zone
to be disabled. The detection is disabled but the
sounders are still operational. Repeat to enable.
DISABLE ZONE
4
SILENCE
BUZZER
ZONE LOCATION
DISABLE REMOTE FIRE
These are the main user functions, and are
active at Access Level 2 (User).
Pressing the button labelled SILENCE
ALARMS will cause the sounders to silence if
they are sounding.
Pressing the button labelled SOUND ALARMS
will cause the sounders to operate if they are
sounding.
Pressing the button labelled RESET SYSTEM
will cause the system to reset as long as all
causes of alarm have been removed.
Pressing the button labelled SILENCE BUZZER
will cause the control panel buzzer to silence if it
is sounding.
SILENCE ALARMS / RESET SYSTEM /
SOUND ALARMS / SILENCE BUZZER
If button 5 is pressed at Access Level 2 (User),
the operator may then specify a zone to put into
test mode. Repeat to remove.
TEST ZONE
If button 6 is pressed at Access Level 2 (User)
for 5s, all LEDs are illuminated.
LAMP TEST
DETECTOR ALARM
A ‘DETECTOR ALARM’ LED
indicates the presence of a
detector alarm on the zone.
A ‘BREAK GLASS ALARM’ LED
indicates the presence of a break
glass alarm on the zone.
In normal conditions this LED is off.
If a fault is present on the zone the
LED pulses.
If a zone is disabled, or on test, the
LED is on.
Pressing ‘ACCESS’ and then your 3 digit code
will take the system from Access Level 1
(Normal) to Access Level 2 (User). Repeating
this will revert to the Normal Level.
Pressing ‘ACCESS’ and then your engineer
code will take the system from Access Level 2
(User) to Access Level 2 (Engineer). Pressing
‘ACCESS’ will revert to User Level.
ZONE ALARM
ZONE FAULT/DISABLE/TEST
38
ACCESS
Access Level 2 (User) Operation Instructions – 2/4 Zone Panel
Twinflex Installation and Operation Instructions
DISABLE ALARMS
If button 3 is pressed at Access
Level 2 (User) whilst holding ‘ALT’
the alarm sounders are disabled.
Repeat to enable.
If button 1 is pressed at Access Level 2 (User)
whilst holding ‘ALT’ the ‘Remote Fire Output’ is
disabled. Repeat to enable.
DISABLE
ZONE
5
TEST ZONE
8
5
6
If button 5 is pressed at Access Level
2 (User), the operator may then
specify a zone to put into test mode.
Repeat to remove.
4
If button 5 is pressed at Access Level 2 (User)
whilst holding ‘ALT’, the operator may then specify
a zone to be disabled. The detection is disabled but
the sounders are still operational. Repeat to enable.
4
SILENCE
BUZZER
7
3
TEST ZONE
DISABLE
ALARMS
2
ZONE
DISABLE ZONE
DISABLE
REMOTE FIRE
3
2
1
LAMP TEST
ALT/6
ACCESS
1
SOUND
ALARMS
FAULT / DISABLE / TEST
REMOTE ALARM
RESET
SYSTEM
CALL POINT ALARM
FAULT / DISABLE
SILENCE
ALARMS
DETECTOR ALARM
8
EARTH
FAULT
This indicates that the buzzer has
been silenced. It will switch off if
the buzzer restarts and when the
panel is operating normally.
This indicates a fault on the
conventional sounder circuit
SOUNDER FAULT
This indicates a CPU reset or a
processor error.
This LED is illuminated when the
alarm sounders are silenced and
goes off when the system is reset.
This LED illuminates to indicate
that the controls are on, ie, at
Access Level 2 (User). It flashes in
the Access Level 3 (Engineer).
SYSTEM FAULT
ALARMS SILENCED
BUZZER SILENCED
This LED indicates that an earth
fault has been detected
EARTH FAULT
This LED flashes to indicate a
mains supply fault and is steady
for a battery or charger fault
POWER FAULT
This LED when the panel is
supplied with power from either
the batteries or the mains supply.
This LED is illuminated when the
alarm sounders are disabled and
goes off when the alarms are
enabled.
ALARMS DISABLED
POWER
These LEDs indicate the precise
status of both the zonal, and the
remote fire, FAULT/DISABLE/
TEST LEDs
These LEDs are illuminated when:
1. A device alarm is detected.
2. The SOUND ALARMS button is
pressed.
3. The repeater evacuate input is
active.
They are extinguished when the
system is reset.
POWER
FAULT/DISABLE/TEST
FIRE
CONTROLS ENABLED
CONTROLS
ENABLED
POWER
FAULT
FAULT DISABLE TEST
BUZZER ALARMS ALARMS
SILENCED SILENCED DISABLED
SOUNDER SYSTEM
FAULT FAULT
7
FIRE
A ‘DETECTOR ALARM’ LED
indicates the presence of a
detector alarm on the zone.
A ‘BREAK GLASS ALARM’ LED
indicates the presence of a break
glass alarm on the zone.
In normal conditions this LED is off.
If a fault is present on the zone the
LED pulses.
If a zone is disabled, or on test, the
LED is on.
These LEDs indicate the status of
the Remote Fire Input and the
Remote Fire Output.
ACTIVE
REMOTE FIRE OUTPUT
DISABLE REMOTE FIRE
These are the main user functions, and are
active at Access Level 2 (User).
Pressing the button labelled SILENCE
ALARMS will cause the sounders to silence if
they are sounding.
Pressing the button labelled SOUND ALARMS
will cause the sounders to operate if they are
sounding.
Pressing the button labelled RESET SYSTEM
will cause the system to reset as long as all
causes of alarm have been removed.
Pressing the button labelled SILENCE BUZZER
will cause the control panel buzzer to silence if it
is sounding.
SILENCE ALARMS / RESET SYSTEM /
SOUND ALARMS / SILENCE BUZZER
If button 6 is pressed at Access Level 2 (User)
for 5s, all LEDs are illuminated.
LAMP TEST
Pressing ‘ACCESS’ and then your engineer
code will take the system from Access Level 2
(User) to Access Level 2 (Engineer). Pressing
‘ACCESS’ will revert to User Level.
Pressing ‘ACCESS’ and then your 3 digit code
will take the system from Access Level 1
(Normal) to Access Level 2 (User). Repeating
this will revert to the Normal Level.
ACCESS
ZONE ALARM
ZONE FAULT/DISABLE/TEST
REMOTE FIRE INPUT & OUTPUT
Access Level 2 (User) Operation Instructions – 2/4 Zone Panel
Twinflex Installation and Operation Instructions
39
Twinflex Installation and Operation Instructions
LED Indication
The operation of the LED indication on the front of the control panel is described below.
Description
Colou
r
State
Reason
1.
‘FIRE’
Red
Continuous
The control panel is in the fire state. Other indicators
will show the origin
2.
‘DETECTOR ALARM’
Red
Flashing
A smoke or heat detector is in the alarm state and
sending an alarm signal to the panel. The Multipoint
LED will be on continuously.
3.
‘CALL POINT ALARM’
Red
Continuous
A manual call point is in the alarm state and sending
an alarm signal to the panel. The manual call point
LED will be flashing.
4.
‘FAULT’
Amber
Continuous
This indicates the status of the multifunction
FAULT/DISABLE/TEST LED.
5.
‘DISABLE’
Amber
Continuous
This indicates the status of the multifunction
FAULT/DISABLE/TEST LED.
6.
‘TEST’
Amber
Continuous
This indicates the status of the multifunction
FAULT/DISABLE/TEST LED.
7.
‘FAULT/DISABLE/TEST’
Amber
Flashing at same
time as buzzer.
No ‘End of Line’ signal is being received, eg:
EOL not switched on
An open or short circuit exists on the wiring.
and
‘FAULT’
Flashing twice in
between buzzer
pulses.
8.
‘FAULT/DISABLE/TEST’
and
9.
Continuous
The zone has been disabled at Access Level 2
(User).
Amber
Continuous
The zone is in test mode.
‘TEST’
10
.
REMOTE FIRE OUTPUT
‘ON’
Red
Continuous
The Remote Fire Output (monitored relay circuit) has
been activated by the control panel.
11
.
REMOTE FIRE OUTPUT
‘FAULT/DISABLE’
Amber
Flashing
The Remote Fire Output (monitored relay circuit) has
detected a fault condition, eg:
An open or short circuit exists on the wiring.
The 4K7 EOL resistor is not fitted.
A device fitted is not dioded for polarisation and
Amber
Continuous
suppression
The Remote Fire Output (monitored relay circuit) is
disabled.
Red
Continuous
The Remote Fire Input is in the fire state.
and
12
.
13
.
‘FAULT’
REMOTE FIRE OUTPUT
‘FAULT/DISABLE’
and
40
Amber
‘DISABLE’
‘FAULT/DISABLE/TEST’
and
A device is signalling a fault condition, or more than
one device is set to ‘End of Line’, eg:
Optical Chamber removed.
Optical Chamber contaminated or dusty.
Output Module fault loop open circuit.
Output Module has no 24V DC supply.
‘DISABLE’
‘REMOTE FIRE INPUT’
Twinflex Installation and Operation Instructions
14
.
‘SOUNDER FAULT’
Amber
Continuous
The Remote Fire Output (monitored relay circuit) has
detected a fault condition, eg:
An open or short circuit exists on the wiring.
The 4K7 EOL resistor is not fitted.
A device fitted is not dioded for polarisation and
Suppression
This only relates to the conventional sounder circuit,
not the 2-wire zones.
15
.
‘SYSTEM FAULT’
Amber
Continuous
The system Fault LED indicates that the processor
has rebooted. It may be cleared with a silence and
reset from Access Level 2 (User)
Or,
A checksum error has been detected. Reprogram all
setting to clear.
16
.
‘EARTH FAULT’
Amber
Continuous
An earth fault has been detected where a path exists
from the circuit wiring to earth. Remove circuits one
at a time to discover which one, and then rectify.
17
.
‘POWER FAULT’
Amber
Continuous
A battery supply or charger fault has been detected.
Check the fuse and the battery voltages.
Flashing
A mains supply fault has been detected. Check for a
24V AC supply on the PCB Ac terminals.
18
.
‘POWER’
Green
Continuous
This indicates that power is being supplied to the
control panel from either the 230V AC mains supply,
or the standby batteries.
19
.
‘BUZZER SILENCED’
Amber
Continuous
The buzzer has been silenced. The indication will
finish when the underlying condition is removed.
20
.
‘ALARMS SILENCED’
Amber
Continuous
The alarm sounders have been silenced, but the
control panel has not yet been reset.
21
.
‘ALARMS DISABLED’
Amber
Continuous
The alarm sounders have been disabled to prevent
their operation.
22
.
‘CONTROLS ENABLED’
Amber
Off
The control panel is at Access Level 1 (Normal). It is
active and the user controls are disabled.
Flashing
The control panel is at Access Level 2 (User). It is
active and the user controls are enabled.
Continuous
The control panel is at Access Level 3 (Engineer). It
is active and thee user controls are replaced with the
engineer controls.
41
Twinflex Installation and Operation Instructions
Access Level 1 (Normal)
In the ‘Normal’ state the panel is active in detecting fire and fault conditions and will sound the alarm
sounders when it is triggered. The ‘User Controls’ are disabled and a code entry is required for any
operation of the system other than the ‘LAMP TEST’
The only indication at this point should be the green ‘POWER’ light, unless any fire or fault conditions are
detected.
To Enter Access Level 2 ‘User’ mode (2 or 4 zone panels)
1.
Press ‘ACCESS’ and then 514
The buzzer will be heard on each key press, and
when successfully entered the ‘CONTROLS
ENABLED’ light will light up continuously.
If an incorrect code is entered, simply start the
above sequence again.
To Enter Access Level 2 ‘User’ mode (8 zone panels)
1.
Insert the key and turn
clockwise
The ‘CONTROLS ENABLED’ light will light up
continuously.
Access Level 2 (User)
In the ‘User’ state the panel is still active in detecting fire and fault conditions and will sound the alarm
sounders when it is triggered. The ‘User Controls’ are enabled and operate as described below.
At this point the control panel indication should include a steady green ‘POWER’ light and a steady yellow
‘Controls Enabled’ light, unless any fire or fault conditions are detected.
The control panel will time out of this mode in approximately 5 minutes from the last key press, returning to
Access Level 1 (Normal).
To Exit Access Level 2 ‘User’ mode (2 or 4 zone panels)
1.
Press ‘ACCESS’ and then 514
A continuous buzzer tone will start when ‘ACCESS’
is pressed, and will continue until the code is
finished. When complete the ‘CONTROLS
ENABLED’ light will turn off.
If an incorrect code is entered, press the ‘ACCESS’
button before starting the above sequence again
To Exit Access Level 2 ‘User’ mode (8 zone panels)
1.
42
Turn the key anti clockwise and
remove it.
The ‘CONTROLS ENABLED’ light will turn off.
Twinflex Installation and Operation Instructions
Silence the Alarms (all panels)
1.
Press ‘SILENCE ALARMS’
(button 1)
The alarm sounders should silence, the buzzer and
the fire indication lights should remain and the
‘ALARMS SILENCED’ light should come on.
Reset the System (all panels)
1.
Press ‘RESET SYSTEM’
(button 2)
The buzzer and the fire indication lights should
switch off.
However, if any Manual Call Points are still
activated or any detector are still in alarm due to
continued presence of smoke or heat, then the
system will re-activate into the fire condition again.
These will need to be cleared before the system
may be reset.
Sound the Alarms (all panels)
1.
Press ‘SOUND ALARMS’
(button 3)
The alarm sounders will activate. The buzzer and
the fire indication lights will also switch on
Silence Buzzer (all panels)
1.
Press ‘SILENCE BUZZER’
(button 4)
The fault buzzer will be silenced and the ‘Buzzer
Silenced LED will light. The ‘Buzzer Silenced’ LED
will extinguish when the faults are cleared, and the
buzzer will start again only if another fault
condition occurs.
Test Mode (all panels)
The ‘Test Zone’ function allows the selection of a single detection zone to operate in a ‘one-man walk test
mode’. On triggering a device the device LED and the sounders operate, and control panel enters the fire
state as normal. After approximately 5 seconds the system will reset, and another may be tested.
1.
Press ‘TEST ZONE’
(button 5)
A continuous buzzer tone will start
2.
Press the button corresponding
to the zone to be selected, ie, 3
for zone 3
The continuous buzzer tone will change to an
intermittent tone if a zone has been selected for
test, or it will stop if the zone has been de-selected
from test.
The ‘Test’ LED and the relevant zone ‘Test’ LED
will light during test
Repeating the above sequence will reverse the
previous option, i.e., ‘on test’ to ‘off test’.
43
Twinflex Installation and Operation Instructions
Disable Remote Fire (all panels)
The ‘DISABLE REMOTE FIRE’ function allows the isolation of the remote fire output. The control panel will
then not activate the remote fire output when the control panel enters the alarm state.
1.
Press and hold the button
marked ‘ACCESS’
A continuous buzzer tone will start
2.
Press the button marked
‘DISABLE REMOTE FIRE’
and then release them both.
The continuous buzzer tone will change to an
intermittent tone if the Remote Fire Output has been
disabled and will stop if the Remote Fire Output has
been enabled.
The remote fire output ‘FAULT’ light and the common
‘DISABLE’ light will also switch on during
disablement.
Repeating the above sequence will reverse the
previous option, i.e., disabled to enabled.
Disable Alarms (all panels)
The ‘DISABLE ALARMS’ function allows the isolation of all of the alarm sounders. The control panel will
then not activate the alarm sounders when the control panel enters the alarm state.
1.
Press and hold the button
marked ‘ACCESS’
A continuous buzzer tone will start
2.
Press the button marked
‘DISABLE ALARMS’
and then release them both.
The continuous buzzer tone will change to an
intermittent tone if the alarms have been disabled
and will stop if the alarms have been enabled.
The ‘Alarms Disabled’ light and the common
‘DISABLE’ light will also switch on during
disablement.
Repeating the above sequence will reverse the
previous option, i.e., disabled to enabled.
Disable Zone (all panels)
The ‘DISABLE ZONES’ function allows the isolation of a detection zone. The control panel will then ignore
all alarm signals from that zone, but the alarm sounders will still activate in alarm.
44
1.
Press and hold the button
marked ‘ACCESS’
A continuous buzzer tone will start
2.
Press the button marked
‘DISABLE ZONES’
and then release them both.
The continuous buzzer tone will continue
Twinflex Installation and Operation Instructions
3.
Press the button corresponding
to the zone to be selected, ie, 3
for zone 3
The continuous buzzer tone will change to an
intermittent tone if a zone has been disabled and
will stop if the zone has been enabled.
The zone ‘Disabled’ light and the common
‘DISABLE’ light will also switch on during
disablement.
Repeating the above sequence will reverse the
previous option, i.e., disabled to enabled.
Lamp Test (all panels).
1.
Press and hold the button
marked ‘LAMP TEST’
The buzzer will sound immediately and after 5
seconds all the indication lights will be switched on.
Release the ‘LAMP TEST’ and both the indication
lights and the buzzer will stop.
To Enter Access Level 3 ‘Engineer’ mode (all panels) Ensure control panel is in Access Level 2 (user)
1.
Press ‘ACCESS’ and then 5244
The buzzer will be heard continually until the code
is
successfully entered, the ‘CONTROLS
ENABLED’ light will flash.
If an incorrect code is entered, simply start the
above sequence again.
Access Level 3 (Engineer)
In the ‘Engineer’ state the panel is still active in detecting fire and fault conditions and will sound the alarm
sounders when it is triggered. The ‘User Controls’ however, are disabled and the controls described below
replace the functions marked on the control panel overlay.
At this point the control panel indication should include a steady green ‘POWER’ light and a flashing yellow
‘Controls Enabled’ light, unless any fire or fault conditions are detected.
To Exit ‘Engineer’ mode (all panels)
1.
Press ‘ACCESS’
The ‘CONTROLS ENABLED’ light will change from
the flashing state to a steady state.
The intermittent buzzer tone will stop.
45
Twinflex Installation and Operation Instructions
To Configure the Number of Active Zones (all panels)
The Twinflex system differs from a standard conventional system by utilising a simple data communication
rather than monitoring of resistance or voltage. Thus, unused zones on the Twinflex system must be turned
off as follows.
Do not use a resistor as an End of Line device on a Twinflex zone.
The factory default will have all zone active and active zones will always start from 1, ie, zones 1,2,3,4 and
5 active if 5 are selected.
1.
A continuous buzzer tone will start.
Press ‘1’
A number of the ‘ZONE/FAULT’ lights will switch
on, corresponding to the current number of zones
that are active, ie lights 1,2&3 mean that 3 zones
are switched on
2.
Press the button corresponding
to the number of active zones to
be selected, ie, 3 for zones 1, 2
& 3.
The continuous buzzer tone will stop and the lights
mentioned above will turn off. Your new setting is
now active.
Or,
If the setting displayed is already
as you require then press
nothing until the system times
out (~15 seconds).
The continuous buzzer tone will stop and the lights
mentioned above will turn off. The original setting is
still active.
To Select the Alarm Sounder Configuration (all panels)
The system will respond to an alarm in one of two ways as follows;
Mode
1
Type
Common Alarm
2
Two
Alarm
1.
Press ‘3’
Stage
Description
All sounders activated in any alarm condition
- Factory
Default
Sounders in the zone of alarm origin will sound continuously, all other
zones will pulse intermittently.
A continuous buzzer tone will start.
A number of the ‘ZONE/FAULT’ lights will switch
on, corresponding to the current mode (shown
above), ie lights 1&2 mean that mode 2 is selected.
2.
Press the button corresponding
to the mode required.
The continuous buzzer tone will stop and the lights
mentioned above will turn off. Your new setting is
now active.
Or,
Press nothing until the system
times out.
46
The continuous buzzer tone will stop and the lights
mentioned above will turn off. The original setting is
still active.
Twinflex Installation and Operation Instructions
To Select the Alarm Input Configuration (all panels)
The system will respond to an input to the ‘ALARM INPUT’ in one of four ways as follows; All these input
modes are non-latching, ie, remove the cause of the trigger to the ‘ALARM INPUT’ and the operation
described below will cease.
Mode
1
2
Type
Class Change – 10s
Default
- Factory
Indication
None
Activations
Sounders
Fire, Remote
Input
None
Fire
3
Remote Alarm – no Remote Fire
Output
Class Change
Sounders, all relays except
Remote Fire Output
Sounders
4
Remote Alarm
Fire, Remote
Input
Fire
Sounders, all relays
1.
Press ‘5’
Time
10 seconds
nonlatching
Nonlatching
Nonlatching
Nonlatching
A continuous buzzer tone will start.
A number of the ‘ZONE/FAULT’ lights will switch
on, corresponding to the current mode (shown
above), ie lights 1&2 mean that mode 2 is selected.
2.
Press the button corresponding
to the mode required.
The continuous buzzer tone will stop and the lights
mentioned above will turn off. Your new setting is
now active.
Or,
Press nothing until the system
times out.
The continuous buzzer tone will stop and the lights
mentioned above will turn off. The original setting is
still active.
Disable Zone (all panels)
The ‘DISABLE ZONES’ function allows the isolation of a detection zone. If this is carried out at Access
Level 3 (Engineer) the control panel will then ignore all alarm signals from that zone, AND the alarm
sounders will NOT activate in alarm (unlike disabling a zone at Access Level 2).
1.
Press and hold the button
marked ‘ACCESS’
A continuous buzzer tone will start
2.
Press the button marked
‘DISABLE ZONES’
and then release them both.
The continuous buzzer tone will continue
3.
Press the button corresponding
to the zone to be selected, ie, 3
for zone 3
The continuous buzzer tone will change to an
intermittent tone if a zone has been disabled and
will stop if the zone has been enabled.
The zone ‘Disabled’ light and the common
‘DISABLE’ light will also switch on during
disablement.
Repeating the above sequence will reverse the
previous option, i.e., disabled to enabled.
47
Twinflex Installation and Operation Instructions
Programming Summary
Relevant Panels
Plus
Access Level 2 – ‘User’ (These functions are described on the control panel overlay adjacent to the relevant button)
Enter ‘AL2’ (User) from
Controls Enabled Light will come on
‘Access’ ‘514.
‘AL1’ (Normal)
continuously.
Enter ‘AL2’ (User) from
Controls Enabled Light will come on
Turn key on.
‘AL1’ (Normal)
continuously.
Exit ‘AL2’ (User) to ‘AL1’
Controls Enabled Light will go off.
‘Access’ ‘514’.
(Normal)
Exit ‘AL2’ (User) to ‘AL1’
Controls Enabled Light will go off.
Turn key off
(Normal)
Silence the alarm
The alarm sounders will silence.
‘Silence’
sounders
Reset the control panel to
The control panel will reset if all devices are
‘Reset’
clear activations
free of alarm.
Silence the fault buzzer
The buzzer will silence and the ‘Buzzer
‘Silence Buzzer’
until a further fault occurs
Silenced’ light will come on.
Set or remove a zone
The zone ‘Fault/disable/test’ light and the
‘Test Zone’ followed by the
from ‘Test Mode’
general ‘Test’ light will come on or go off
number of the required zone, ie,
accordingly.
‘3’.
Disable or enable the
The ‘Remote Fire’ ‘Fault/Disable’ light will
‘Access’ & ‘Disable Remote
Remote Fire Output
come on or go off accordingly.
Fire’
Disable or enable the
The ‘Alarms Disabled’ light will come on or go
‘Access’ & ‘Disable Alarms’
alarm sounders
off accordingly.
Disable or enable a Zone
The ‘Disabled’ light and the relevant
‘Access’ & ‘Disable Zone’,
‘Fault/disable/test’ light will come on or go off
followed by the zone number
accordingly.
required, ie ‘3’
Lamp Test
All the lights will come on until the ‘Lamp Test’
‘Lamp Test’, and hold for 5
button is released
seconds
Access Level 3 - ‘Engineer’ (The functions override those described on the control panel overlay)
Enter ‘AL3’ (Engineer)
Controls Enabled Light will flash and buzzer
‘Access’ 5244
from ‘A2’ (User)
will pulse.
Exit ‘AL3’ (Engineer) to
Controls Enabled Light will come on
‘Access’
‘AL2’ (User)
continuously.
Program the number of
The zone lights will show the existing setting
‘1’ followed by the number of
active zones
before the zone selection is made. The panel
zones required, ie ‘3’ for zones
will turn off the unused zones
1, 2 & 3 active.
Alarm Configuration
The zone lights will show the existing setting
‘3’ followed by;
before the selection is made;
’1’ - common alarm or,
‘2’ - 2 stage alarm
Alarm Input Configuration
The zone lights will show the existing setting
‘5’ followed by;
before the selection is made;
’1’ - timed class change,
‘2’ - remote fire, no output
‘3’ - class change
‘4’ - remote fire
Zone Mode
The zone lights will show the existing setting
‘Access’ & ‘1’, followed by the
before the zone selection is made;
zone number requiring a change
Zone light on – Dwelling Zone
of state, ie ‘3’
Zone light off – Communal Zone
Repeater Configuration
The zone lights will show the existing setting
‘Access’ & ‘2’, followed by; ’1’ –
before the zone selection is made;
Fire alarm outputs,
‘2’ – Confirmation outputs
Confirmation Time
The zone lights will show the existing setting
‘Access’ & ‘3’, followed by 1-5
before the zone selection is made;
minutes, ie ‘2’
Disable or enable a Zone
The ‘Disabled’ light and the relevant
‘Access’ & ‘5’, followed by the
‘Fault/disable/test’ light will come on or go off
zone number required, ie ‘3’
accordingly.
Standard
Notes
8 zone
Action
2/4 zone
Description
48
Twinflex Installation and Operation Instructions
Checkpoint Plus
Introduction
The instructions in this section apply only to the Checkpoint Plus versions of the Twinflex control panels
and are supplementary to the rest of this manual.
The Checkpoint Plus technology has been designed primarily to address the problem of unwanted alarms
in apartment blocks or ‘Houses of Multiple Occupancy’ (HMO).
The Checkpoint Plus facility enables certain detector alarms to be checked, or confirmed, before the entire
system is activated. Further more, a local (at that detector) or zonal ‘Alarm Confirmation Warning’ sound is
given, allowing any persons nearby to check the area for a possible fire. If the cause of the alarm is
removed (i.e., burnt toast or a dust cloud) then the ‘Alarm Confirmation Warning’ will cease and the system
returns to normal. If the cause of the alram is still present at the end of the confirmation time then the entire
system enters a full alarm state.
System planning prior to installation is essential, as certain zones need to be cabled separately, in order
that they may be configured for ‘Dwelling’ (delayed) or ‘Communal’ (instant). I.e., The stairwell and
communal corridors in a block of apartments will need to be wired on separate zones to the apartments.
If there is any doubt please refer to your supplier.
Zone Modes
Each zone on the system can be separately configured as an ‘Instant’ (normal) zone, or as a ‘Delayed’
zone. ‘Instant’ zones should be used for communal areas in apartment blocks and for escape routes such
as stairwells, where normal fire alarm operation is detected. ‘Delayed’ zones introduce an ‘Alarm
Confirmation Delay’ to a smoke or heat detector alarm on a zone, for use within apartments and other
areas where unwanted alarms are likely to be a problem. Manual Call Points always give instant operation,
whichever type of zone they may be a part of.
Instant Zones - Normal Operation in Communal Areas
Communal zones are those covering general access areas such as entrance hallways, corridors, stairwells
etc., including any area which is an escape route for a private or dwelling area.
The activation of any Manual Call Point or detector in these areas generates an immediate alarm and
operates the sounders in all areas.
The drawing below shows a typical arrangement with the communal areas highlighted. This area should be
cabled on it’s own zone and set as an ‘Instant Zone’.
FLAT
FLAT
FLAT
FLAT
FLAT
FLAT
FLAT
FLAT
CORRIDOR
FLAT
FLAT
49
Twinflex Installation and Operation Instructions
Delayed Zones – ‘Confirmation Delay’ for Dwelling Areas
Dwelling zones are those covering apartments or private living areas. The activation of any smoke or heat
detector in these areas generates an ‘Alarm Confirmation Warning’ in that area but no indication shows on
the control panel. At the end of the ‘Alarm Confirmation’ time the system will check the detector again to
see if the activation has cleared. If so then the sounders will silence and no further action need be taken.
If, however, the detector is still activated then the entire system will go into alarm, operating all the
sounders on the system.
The previous drawing shows a typical arrangement with the dwelling areas shown as Bed-Sits. This area
should be set as a ‘Delayed Zone’.
The activation of any Manual Call Point in a delayed (communal) zone generates an immediate alarm and
operates the sounders in all areas.
Delayed Zones – Local or Zonal Alarm Confirmation
Whilst a detector is in the ‘Confirmation State’ it may be configured to give an alarm confirmation warning at
just that detector / sounder (Local Alarm Confirmation), or across that entire zone (Zonal Alarm
Confirmation). This continues until the situation is confirmed or reset.
The drawing below shows a number of small apartments on one zone with just one Multipoint detector with
sounder in each apartment. The Alarm Confirmation should be set to operate in a local manner, so that in
the event of an unwanted alarm, only the one apartment is alerted.
FLAT
FLAT
FLAT
FLAT
FLAT
FLAT
FLAT
FLAT
CORRIDOR
FLAT
FLAT
The Drawing below shows a larger apartment with several Multipoint detectors. The apartment should be
cabled on its own zone and the Alarm Confirmation Alarm should be set to operate in a Zonal manner, so
that all persons within the apartment are alerted.
BED
BED
BATH BED
BATH
HALL
KIT
HALL
CORRIDOR
LOUNGE
BED
KIT
LOUNGE
The detector DIL switch number 2 may be used to enable the ‘Logical Link’ which links the operation of the
sounder to that individual detector whilst in confirmation warning stage. If this is set to the off position the
Alarm Confirmation Warning will sound in the entire zone.
1
Logical Link *
50
Logical link disabled (Zonal Confirmation)
Logical link enabled (Local Confirmation)
2
0
1
DIL SWITCH SETTINGS
3
4
5
6
7
8
Twinflex Installation and Operation Instructions
Alarm Confirmation Delay Time
When a detector on a dwelling zone is activated, the integral sounder (or all the sounders on the same
zone if the systems is configured to do so) will operate for a pre-determined time period. During this period
the control panel carries out a number of alarm confirmation checks, following which it either silences the
sounders if the detector is no longer in the fire state, or generates a full alarm if the detector is still active.
The number of checks carried out by the panel can be in the range of 1 to 5, with each check period having
a duration of approximately one minute. Therefore the maximum checking period is in the order of 5
minutes during which the local sounder (or all the sounders on the same zone if the systems is configured
to do so) is energised.
If a zone fault is detected during the alarm confirmation time, a full alarm will result.
No alarm is shown at the control panel during the alarm confirmation time, but if indication is required then
the control panel repeater outputs may be configured to become active during this alarm confirmation time
rather than in the normal fire state.
It is not possible to silence the Alarm Confirmation warning sounder during the Alarm Confirmation period
of a delayed zone. In order to silence this warning sounder it is necessary to sound the alarm first with the
‘SOUND ALARMS’ button, and then to silence and reset as during normal operation.
Check Point Plus Set-up at Access Level 3 (Engineer)
In the ‘Engineer’ state the panel is still active in detecting fire and fault conditions and will sound the alarm
To Configure the Zone Mode
The ‘ZONE MODE’ function allows the setup of a zone into ‘Local’ or ‘Zonal’ alarm confirmation mode as
follows:
Type
Instant (normal)
Delayed (alarm
confirmation)
Description
All sounders activated in any alarm condition
- Factory Default
Multipoint detector will start the alarm confirmation time when in alarm, with either
local or zonal warning sound depending on the setting of the logical Link (Switch 2)
on that device.
Zone Fault LED
OFF
ON
1.
Press and hold the button
marked ‘ACCESS’
A continuous buzzer tone will start
2.
Press the button marked
‘1’
and then release them both.
The continuous buzzer tone will continue.
3.
Press the button corresponding
to a zone of which you wish to
change mode, ie, 3 if you wish to
change the state of zone 3.
The continuous buzzer tone will change to an intermittent tone,
and the lights mentioned above will turn off. Your new setting is
now active.
4.
Repeat the above sequence until
the ‘ZONE FAULT’ LEDs (at
point 2 above) show the correct
settings for your requirements,
The ‘ZONE FAULT’ lights will switch on, corresponding to the
mode of that zone, ie lights 1&3 on means that zones 2&4 are
‘Instant (normal)’ and zones 1&3 are ‘Delayed (alarm
confirmation)’.
The ‘ZONE FAULT’ lights will switch on, corresponding to the
mode of that zone, ie lights 1&3 on means that zones 2&4 are
‘Instant (normal)’ and zones 1&3 are ‘Delayed (alarm
confirmation)’.
then;
Press nothing until the system
times out.
The continuous buzzer tone will change to an intermittent tone,
and the lights mentioned above will turn off. The original setting
is still active.
51
Twinflex Installation and Operation Instructions
To Configure the Alarm Confirmation Delay Time
The Alarm Confirmation delay time may be set as follows.
The factory default will show a 1 minute Alarm Confirmation delay.
1.
Press and hold the button
marked ‘ACCESS’
A continuous buzzer tone will start
2.
Press the button marked
‘3’
and then release them both.
The continuous buzzer tone will continue.
Press the button corresponding
to the Alarm Confirmation delay
to be selected, ie, 3 for an Alarm
Confirmation delay of 3 minutes.
The continuous buzzer tone will change to an intermittent tone,
and the lights mentioned above will turn off. Your new setting is
now active.
3.
A number of the ‘ZONE/FAULT’ lights will switch on,
corresponding to the current Alarm Confirmation delay time, ie
lights 1,2&3 mean that an alarm confirmation delay of 3 minutes
is selected.
Or,
If the setting displayed is already
as you require then press
nothing until the system times
out.
The continuous buzzer tone will change to an intermittent tone,
and the lights mentioned above will turn off. The original setting
is still active.
To Configure the Operation of the Repeater Outputs
The repeater outputs may be configured as follows.
Mode
1
2
Type
Fire Repeat
Confirmation Repeat
Description
Repeater outputs active in the fire state only
Factory Default
Repeater outputs active in the alarm confirmation state only
-
1.
Press and hold the button
marked ‘ACCESS’
A continuous buzzer tone will start
2.
Press the button marked
‘2’
and then release them both.
The continuous buzzer tone will continue.
Press the button corresponding
to the repeater mode required,
ie, 2 for mode 2 (Alarm
Confirmation repeat).
The continuous buzzer tone will change to an intermittent tone,
and the lights mentioned above will turn off. Your new setting is
now active.
3.
A number of the ‘ZONE/FAULT’ lights will switch on,
corresponding to the current repeater output configuration, ie
lights 1&2 mean that mode 1 (Fire repeat) is selected.
Or,
If the setting displayed is already
as you require then press
nothing until the system times
out.
The continuous buzzer tone will change to an intermittent tone,
and the lights mentioned above will turn off. The original setting
is still active.
See the Programming summary shown previously for more concise instructions.
52
Twinflex Installation and Operation Instructions
Installation and Commissioning
Installation 1st Stage
The installer needs to install the system wiring in the form of a 2-core radial circuits. The cabling should be
2
2 core 1.5mm , screened and fire resistant, of an MICC or FP200 equivalent type. We recommend against
the use of a 4 core cable as a zone feed and return, due to the possibility of data corruption.
The zone should be left with no devices connected, and must be tested for continuity and integrity with a
high voltage tester, as required for general electrical installations.
The control panel back box should be mounted, with the mains supply tested, connected and isolated at the
un-switched fused spur, ready for the commissioning.
The installer needs to provide a set of ‘As-Wired’ drawings and proof of loop continuity and insulation test
readings etc., before commissioning may proceed. This information is essential, and may be entered onto
the forms provided at the rear of the manual.
Installation 2nd Stage
Once the commissioning engineer is satisfied with the continuity / integrity of the loop, the control panel
may be powered up as follow.
1.
Ensure that none of the field wiring is connected. This is not essential but it helps to
build up the system in sections when commissioning a system for the first time.
2.
Apply the 230V AC mains supply, before connecting the batteries.
3.
The control panel takes approximately half a minute to boot up its processor. When
this is complete the empty zones should all indicate a fault. This is correct.
4.
Program the number of active zone required, and any other settings needed.
5.
Add the last device on to each zone, ensuring that its EOL signal is switched on.
Connect the zones into the control panel and ensure that the fault lights clear as each
zone is connected.
6.
Add the additional devices in one at a time, allowing each one to clear from fault
(approximately half a minute).
7.
Connect all other circuits and ensure that they are fault free.
There is no need directly to build the system up in sections in this manner, but we recommend this method
as good engineering practice to provide a controlled process of building up the system in blocks.
Commissioning
Commissioning the Twinflex system involves programming and testing the system for correct operation.
It is essential that every device is tested in every mode of operation, and that all programmed actions are
observed for correct operation. This includes the smoke testing of smoke detectors, heat testing of heat
detectors, testing of Manual Call Points, testing of all inputs, testing of all sounders and outputs, and fault
testing of detectors by head removal.
53
Twinflex Installation and Operation Instructions
We also recommend that all devices, which are set to ‘heat only’, are tested for smoke operation, to ensure
that the smoke detection has been correctly disabled.
Due to the complexity and inherent importance of a life protection type system, training on this equipment is
essential, and commissioning should only be carried out by competent persons.
End User Training.
A Fire Alarm System is of little use if the end user and/or the responsible persons who will be present in the
building do not know how to operate and respond to the system. It is therefore essential that commissioning
includes training for the users of the system and responsible persons.
User instructions and a Zone Chart should be left adjacent to the control panel. As access to the system
must be controlled by responsible persons, it would be unusual to display the access codes on this notice.
These codes must however be available for the responsible persons, so ensure that they know and record
them in a secure place.
The Twinflex User Guide should be explained and left with the responsible person on site, for storage in an
accessible and known location, in order that the responsible person and the service engineer may keep
information records up to date.
A single page user instruction sheet is included at the end of this manual. A copy of this should be mounted
adjacent to the control panel.
54
Twinflex Installation and Operation Instructions
Fault Finding
Summary of Faults
Intermittent Zone Fault
1.
Tighten the unused ‘zone screw terminals’ at the EOL device
2.
Too many Hatari sounders on a zone. Remove some or adjust sound levels down.
3.
EOL resistor has been fitted. Remove and use the correct dil switch on the device.
4.
Interference from old or flickering fluorescent lights, low voltage transformers, or general
(less common). Ensure cable is screened and install a Ferrite core on the zone cables.
Ensure detector is away from light.
5.
Dirty, or contaminated optical chambers (MK3). Replace with a new optical chamber.
6.
Weak EOL signal. Replace the EOL device.
7.
Faulty auto-calibration of EOL signal. Replace the EOL device.
8.
More than one EOL switched on (panel LED flashing faster than buzzer). Remove the EOL
device to see if the system enter fault as normal. If the system stays clear then another device is
set to EOL and this must be found and switched off.
9.
Earth fault. Ensure that all system earths are intact and not shorting to any other cables.
Permanent Zone Faults
1.
More than one EOL switched on (panel LED flashing faster than buzzer). Remove the EOL
device to see if the system enter fault as normal. If the system stays clear then another device is
set to EOL and this must be found and switched off.
2.
No EOL signal detected by panel (LED flashing at the same rate as buzzer). Switch the EOL on
at the last device.
3.
O/C or S/C on zone cables. Remove the zone cable from the control panel and check with an
electrical test meter (not a high voltage insulation test).
4.
Tighten the unused ‘zone screw terminals’ at the EOL device
5.
Interference from old or flickering fluorescent lights, low voltage transformers, or general (less
common). Ensure cable is screened and install a Ferrite core on the zone cables. Ensure
detector is away from light.
6.
Dirty or contaminated optical chambers (MK3). Replace with a new optical chamber.
7.
Output unit with no power or no link in fault input.
8.
Faulty Zone at control panel (20-30 volts healthy, 1-20 volts faulty, 0 volts zone switched off). Re
9.
Weak EOL signal. Replace the EOL device.
55
Twinflex Installation and Operation Instructions
False Alarms
1.
Dirty or contaminated optical chambers. Replace with a new optical chamber.
2.
Incorrectly set smoke detector (smoke is not suitable for kitchens, bathrooms, boiler rooms etc.,
however, SM3 may be suitable outside a bathroom or kitchen but the individual situation needs to
be looked at very carefully). Incorrectly set heat detector (HM1 is not suitable for kitchens, and
HM3 should be kept for hotter areas such as plant rooms)
Faulty detector. Replace with a new one.
3.
st
4.
Detector software crashed (generally only on 1 power up of a new system). Faults and fires
generated rapidly and at random, across whole system (very scary). Power whole system down
for five minutes in order to drain detector capacitors, so that they may reboot on power up.
5.
Ensure that the Optical Chamber is installed when the system is powered up, or a fault
condition will be generated. This could translate into a false alarm, depending on the
state of the detector.
General Faults
56
1.
Sounder fault led – this only activates for a fault on the conventional sounder circuit so check for
O/C, S/C and 4k7 EOL resistor
2.
Remote Fire Output fault led – this only activates for a fault on the Remote Fire Output so check
for O/C, S/C and 4k7 EOL resistor. Check also that the relay used has the correct polarisation
and suppression diodes installed
3.
System Fault LED – This will light after a CPU reset and will be cleared by a ‘silence and reset’ at
AL2. If this does not clear the fault then reprogram all panel settings to a different value and back
again (ie, no of zones to 2, then back to 3) in order to re write all the settings to memory. This will
clear the fault
4.
Power fault flashing (mains fault) – Check that the 230V AC mains supply is live and the fuses
are healthy.
5.
Power fault continuous (battery or charger fault) – Check that the correct batteries are installed,
the fuse has not blown and that the mains supply is live
6.
Earth fault. One of the circuits is connected to ground. Remove them one at a time until the
relevant circuit is found, following which an electronic test meter may be used to track the
problem.
7.
All lights on – possibly water in a detector.
Twinflex Installation and Operation Instructions
Finding Zone Faults
A fault on a zone of the Twinflex system may be found as follows:
1.
In order to prove whether the fault is control panel based or within in the field & wiring, swap the
wires from the zone in fault with those in a clear zone (active but no fault) at the control panel.
If the fault moves with the wiring then the fault is in the field, if the fault stays on the same zone
then the fault is in the control panel.
2.
Examine the LEDs carefully for signs of the fault as follows:
If the buzzer has been silenced create another fault to cause it to return, ie, remove a battery
lead until the buzzer starts again.
Zone Fault LED action
Reason
LED flashing faster than
buzzer
LED flashing at the same
rate as buzzer
The control panel is receiving too many EOL signals or a device is in fault.
Multipoint LED action
Reason
20 second flash
The detector is operating normally and is not set to EOL.
5 second flash
The detector is operating normally and is set to EOL.
1.5 second flash
The detector is in fault, check for dust contamination and that the optical chamber is
locked on correctly.
The detector has triggered into the fire state and is not yet reset. Check for smoke
and contamination.
0.3
second
continuous
or
Manual Call Point LED
action
Reason
No LED
The MCP is operating normally, or is not powered at all. Test the MCP to clarify.
5 second flash
The MCP is operating normally and is set to EOL.
0.3 second flash
The MCP has triggered into the fire state and is not yet reset.
Output Module LED
action
Reason
No LEDs
The O/P module is operating normally, or is not powered at all. Test the module by
making the ‘fault loop’ open- circuit to clarify.
The module is in fault, check for continuity of fault loop, and check 24v DC supply is
present.
The module has been triggered from the control panel and has not yet been reset.
Yellow LED
Red LED
3.
flash
The control panel is not receiving an EOL signal. Could be o/c, s/c or no EOL
If steps 1. and 2. do not clarify the matter then split the zone wiring at a suitable mid point,
removing the outgoing cables from the terminals completely, and then setting the EOL switch to
the on position before reassembling that device.
If the fault clears then it is after that point, but if the fault persists then it is before that point.
The split may then be moved in the relevant direction, halving the remaining devices, and the
procedure repeated until the fault is found.
57
Twinflex Installation and Operation Instructions
Advanced Connections
Monitored Relays on the ‘Remote Fire Output’
The relay must be dioded for polarisation and suppression as shown.
These diodes should be marked 1N4001 or of a similar type, and may be
already located on the relay PCB if it is designed for Fire Alarm Systems. If
the relay is a general-purpose plug-in relay then the diodes may need to
be added externally.
Remote indication LEDs
If a remote indication LED is required to indicate the
operation of a Multipoint detector, you may connect as
shown here.
If a remote indication LED is required to indicate the
activation of a zone at the control panel, then connect as
shown here.
This could also be used to indicate that a ‘Confirmation
Alarm’ is in progress, by selecting the ‘Confirmation
Repeat’ mode. See page 46 for further details.
58
Twinflex Installation and Operation Instructions
Connecting Two Control Panels Together
CONNECT THE ‘COMMON FIRE RELAY’ OF THE 3RD PARTY PANEL INTO THE ‘ALARM
INPUT’ OF THE TWINFLEX V3 PANEL, SELECTING MODE 2 ALARM INPUT OPERATION.
IF THE ALARM ORIGIONATED AT THE 3RD PARTY PANEL, THEN RESETTING THIS WILL
ALSO RESET THE TWINFLEX PANEL.
COM
ALARM I/P
AUX 0V
FIRE RELAY
3RD PARTY
CONTROL
PANEL
FIRE RELAY
TWINFLEX
CONTROL
PANEL
N/O
IF THE 3RD PARTY PANEL HAS A ‘CLASS CHANGE’ CONNECTION THEN CONNECT THIS
TO THE ‘FIRE RELAY’ OF THE TWINFLEX V3 PANEL, SELECTING MODE 2 ALARM INPUT
OPERATION.
IF THE ALARM ORIGIONATED AT THE TWINFLEX PANEL, THEN RESETTING THIS WILL
ALSO RESET THE 3RD PARTY PANEL.
N/O
CLASS
CHANGE
INPUT
COM
.
.
.
OR
.
.
.
N/C
-VE
COM
COIL
--
NC
NO
COM
NC
24V FIRE RELAY
+VE
FR
-VE
ZONE
+
EOL
NO
+VE
4K7
REMOTE FIRE O/P
IF THE 3RD PARTY PANEL DOES NOT HAVE A ‘CLASS CHANGE’ CONNECTION THEN
CONNECT THE ‘REMOTE FIRE OUTPUT’ OF THE TWINFLEX V3 PANEL TO A ZONE ON
THE 3RD PARTY PANEL, SELECTING MODE 2 ALARM INPUT OPERATION.
IF THE ALARM ORIGIONATED AT THE 3RD PARTY PANEL BOTH PANELS WILL NEED TO
BE RESET, BUT IN ANY ORDER AS THE TWINFLEX PANEL WILL NOT OPERATE ITS
RELAY IF IT RECEIVES THE INPUT FROM THE 3RD PARTY PANEL.
FR = FIRING RESISTOR
EOL = EOL RESISTOR
*SEE
3RD
PARTY
PANEL INSTRUCTIONS
FOR FURTHER DETAILS
The second control panel could, of course, be another Twinflex control panel.
Only a maximum of two panels should be connected in this way. If more than two control panels are to be
interlinked contact your supplier for details. However, if all the control panels are Twinflex V3 control panels
then see below.
59
Twinflex Installation and Operation Instructions
Connecting More Than Two Twinflex Control Panels Together
Ensure that the relay is mounted
adjacent to the control panel as
shown, and that the cables are
routed directly within the housing
for protection.
The relays must be dioded for
polarisation and suppression.
These diodes should be marked
1N1004 or of a similar type, and
may be already located on the
relay PCB if it is designed for Fire
Alarm Systems. If the relay is a
general-purpose plug-in relay then
the diodes may need to be added
externally.
See
the
section
entitled
‘Monitored Relays on the Remote
Fire Output’ for further details
and a drawing of how to connect
them.
In order to interconnect a number of Twinflex control panels together connect them as shown above. This
will ensure that all cables are monitored, and system lock-up will be avoided.
This is suitable for all V3 control panels, and the V2 eight zone control panel. If any other versions of
Twinflex control panel are to be interlinked please contact your supplier for further details.
The control panel at which the alarm condition originated will show the relevant zonal fire indication.
Resetting this control panel will reset all control panels.
All other control panels will show common and remote fire indication only. These control panels may be
reset individually if required.
Ensure that the Remote Alarm Input is programmed for Mode 4 operation.
The configuration shown above will cause the entire system to reset when the panel in alarm is ‘Reset’. If it
is required that the system wide reset should follow the ‘Silence’ command then use the conventional
sounder circuit (Bell Output) instead of the Remote Fire Output.
60
Twinflex Installation and Operation Instructions
Magnetic Door Hold Units
If magnetic door hold devices
are
required,
it
is
recommended that they are
connected as shown in the
upper right diagram. This is
suitable if it is convenient to
cable to the control panel.
We recommend the use of 24V
DC Magnetic Door Hold units,
in order to enable them to
operate from a power supply
with a battery standby. This
ensures normal operation in
the event of an interruption to
the power supply.
For assistance in choosing a
suitable power supply unit,
standby
batteries,
and
Magnetic Door Hold units
please contact your supplier.
If this is not convenient, then the
lower left diagram shows how to
connect door hold magnets using
the Twinflex Output Module.
This may be sited on the two-wire
detection circuit, and does not need
to be cabled back to the control
panel if the zone extends to that
area.
The ‘Fault In’ circuit on the output
module should be connected to the
power supply unit fault contacts.
These need to be normally closed
circuit, and open circuit in the event
of a fault.
61
Twinflex Installation and Operation Instructions
Technical Data
Control Panel Specification
2/4 Zone Panel
Dimensions (mm)
Weight (excluding batteries)
Construction
Cable Entry
Cable type
Detection zones
Devices per zone
Device Protocol
Monitored sounder circuits
Monitored relay circuits
Relays on board
Operating standard
Operating temperature
8 Zone Panel
310W x 243H x 85D
315W x 400H x 90D
2.3 Kg
6.2 Kg
V2 rated ABS
Mild Steel
10 x 20mm knockouts in metal
15 x 20mm knockouts in top
insert
11 x 20mm knockouts in back
2
2 core 1.5mm screened fire rated cable, 500m (max per zone)
2 or 4
8
32
Rafiki Twinflex v3
1
1
Common fire and common fault
BS EN54-2 & 4
O
O
5 C to 40 C
Control Panel Ratings
2/4 Zone Panel
Mains voltage
PSU output (4 hour continuous)
Operating voltage (nominal)
Battery charger output
Charger high impedance voltage
Battery voltage
Battery capacity (24hr standby)
Battery capacity (72hr standby)
Zone output (max)
Zone voltage (nominal)
Sounder output load (max, fused)
Sounder output EOL
Remote fire output load (mon
relay)
Remote fire output EOL (mon
relay)
Auxiliary 24V DC supply (max)
Repeater outputs
Common fire relay
Common fault relay
Loading
900 mA
110 mA
2 x 12V 2.1 Ah
2 x 12V 2.1 Ah
250 mA
500 mA
250 mA
8 Zone Panel
230V AC +10% -15%
3A
24V DC
550 mA
<4V DC
O
27.6 V DC @ 20 C
2 x 12V 3.3Ah
2 x 12V 7.2Ah
250 mA
30V DC
1A
4K7
1A
4K7
250 mA
1A
50 mA sink (do not exceed a total of 280 mA)
Volt free SPCO contacts 1A 30V max
Volt free SPCO contacts 1A 30V max
32 SLU max per zone
Control Panel Fuses
Zone output
Sounder output
Remote fire output (mon relay)
Auxiliary 24V DC supply
Mains
Battery
Battery (reverse polarity)
62
2/4 Zone Panel
8 Zone Panel
300 mA trip polyfuse
500 mA F 20mm
300 mA trip ployfuse
300 mA trip polyfuse
T315 mA (Time delayed) 20mm
110 mA current limiter
3.15A F 20mm (in line with leads)
300 mA trip polyfuse
1A F 20mm
1A F 20mm
1A trip polyfuse
3AT (anti surge) 20mm
550 mA current limiter
3.15A F 20mm (on board)
Twinflex Installation and Operation Instructions
Twinflex Multipoint Detector
No Sounder
With Sounder
Dimensions (mm)
105 diameter x 61.5H
Weight
0.27Kg
Operating voltage
18 – 35V DC (28V DC nominal)
Operating current (detector)
60 uA (quiescent), 39mA (alarm)
Operating current (sounder)
0 (quiescent)
0 (quiescent), 7mA (alarm)
O
O
Operating environment
-10 C to +50 C
Ingress Protection
IP21
Sounder alarm levels
90 dB(A) (high), 75 dB(A) (low)
Indication
Red flashing LED: 20s (normal), 5s (EOL), 1.3s (fault), on (active)
Device Protocol
Rafiki Twinflex
Loading
1 SLU (hi or lo volume)
Note: when a detector goes into alarm condition in a particular zone, all the other detectors in that zone are
disabled, so only the sounders in that zone draw extra current.
Twinflex Manual Call Point
No Sounder
Dimensions (mm)
Weight
Operating voltage
Operating current (MCP)
Operating current (sounder)
Operating environment
Ingress Protection
Sounder alarm levels
Indication
Device Protocol
Loading
115W x 115H x 7025D
0.28 Kg
18 – 35V DC (28V DC nominal)
105 uA (quiescent), 5mA (alarm)
0 (quiescent)
16mA (alarm hi), 8 mA (alarm low)
O
O
-10 C to +50 C
Standard IP21
Weatherproof
IP55
90 dB(A) (high), 75 dB(A) (low)
Red flashing LED: 5s (EOL), 0.3s (active)
Rafiki Twinflex
1 SLU (hi or lo volume)
Twinflex Hatari Sounder
Sounder
Dimensions (mm)
Weight
Operating voltage
Operating current (sounder)
Operating environment
Ingress Protection
Sounder alarm levels
Indication
Device Protocol
Loading
105 diameter x 62H
0.35 Kg
18 – 35V DC (28V DC nominal)
2 mA (quiescent), 15mA (alarm)
O
O
-10 C to +50 C
IP21
103 dB(A) (full), rotary pot adjustment
none
Rafiki Twinflex
6 SLU (hi or lo volume)
63
Twinflex Installation and Operation Instructions
Twinflex Flash Point
Note, IP55 version is a beacon
only
105 diameter x 61.5H
0.21 Kg
18 – 35V DC (28V DC nominal)
105 uA (quiescent), 13mA (alarm)
6mA
O
O
-10 C to +50 C
Standard IP21 Weatherproof IP55
90 dB(A) (high), 78 dB(A) (low)
Red flashing LED: 5s (EOL)
Rafiki Twinflex
1 SLU (lo volume), 2 SLU (hi volume)
Sounder / Beacon
Dimensions (mm)
Weight
Operating voltage
Operating current (sounder)
Operating current (Beacon)
Operating environment
Ingress Protection
Sounder alarm levels
Indication
Device Protocol
Loading
Twinflex Sound Point
Sounder
Dimensions (mm)
Weight
Operating voltage
Operating current (sounder)
Operating environment
Ingress Protection
115W x 115H x 7025D
0.21 Kg
18 – 35V DC (28V DC nominal)
105 uA (quiescent), 16mA (alarm)
O
O
-10 C to +50 C
Standard IP21
Weatherproof
IP55
85 dB(A) (high), 75 dB(A) (low)
Red flashing LED: 5s (EOL)
Rafiki Twinflex
1 SLU (lo or hi volume)
Sounder alarm levels
Indication
Device Protocol
Loading
Twinflex Hi Point
Sounder
Dimensions (mm)
Weight
Operating voltage
Operating current (sounder)
Operating environment
Ingress Protection
Sounder alarm levels
Indication
Device Protocol
Loading
64
128W x120H x 110D (flush) or 53D (surface)
0.21 Kg
18 – 35V DC (28V DC nominal)
105 uA (quiescent), 16mA (alarm)
O
O
-10 C to +50 C
IP21
90 dB(A) (high), 75 dB(A) (low)
Red flashing LED: 5s (EOL)
Rafiki Twinflex
1 SLU (lo or hi volume)
Twinflex Installation and Operation Instructions
Twinflex Output Module
Output Module
Dimensions (mm)
Construction
Operating voltage
Operating current
Operating environment
Ingress Protection
Relay output
Power supply required
Indication
Device Protocol
Loading
140W x 85H x 45D (standard 2G format)
Mild steel
18 – 35V DC (28V DC nominal)
450 uA (quiescent), 2mA (alarm)
O
O
-10 C to +50 C
IP21
Volt free SPCO contact, 6A 230V AC
24V DC,
Red LED (active), yellow LED (fault)
Rafiki Twinflex
1 SLU (hi or lo volume)
Twinflex Repeater Panel
8 Zone Repeater
Dimensions (mm)
Weight
Construction
Cable Entry
Cable requirements
Display zones
Operating voltage
Operating current
Operating environment
Ingress Protection
Device Protocol
16 Zone Repeater
310W x 243H x 85D
0.17Kg
V2 rated ABS
10 x 20mm knockouts in metal insert
2 cores (24V DC), 4 cores (controls & fault), 1 core (per zone required)
8
16
20 – 28V DC (24V DC nominal)
10 mA (quiescent with power LED on)
alarm: 30 mA plus 10 mA for each zone in alarm
O
O
-10 C to +50 C
IP21
24V DC switched negative triggering
Resistor Colour Codes
Band
1
2
3
4
5
4 Band Codes
1st Digit
2nd Digit
Multiplier
Tolerance
-
5 Band Codes
1st Digit
2nd Digit
3rd Digit
Multiplier
Tolerance
On colour coded resistors the band at one end
will be spaced further apart than the others. The
resistor should be viewed with this band to the
right as follows, reading from the left and side of
the resistor:
Colour
Black
Brown
Red
Orange
Yellow
Green
Blue
Violet
Grey
White
Gold
Silver
Digit
0
1
2
3
4
5
6
7
8
9
-
Multiplier
1
10
100
1 000
10 000
100 000
1 000 000
0.1
0.001
Technical Support
For further technical support please contact your distributor. Do not call the Rafiki Protection technical
support department unless your distributor has first given their advice and attempted to rectify the issue.
Technical support will not be available if the instruction manual has not been read and understood. Please
have this instruction manual available whenever you call for technical support.
Due to the complexity and inherent importance of a life risk type system then training on this equipment is
essential, and commissioning should only be carried out by competent persons.
65
Twinflex Installation and Operation Instructions
Battery Calculations
Where:
IS = Standby Current
IA = Alarm Current
MP = Multi Point Detector
Current Drawn From Panel
Item
Twinflex 2z Panel
Twinflex 4z Panel
Twinflex 8z Panel
Multipoint no sounder
Multipoint with sounder Hi
MCP no sounder
MCP with sounder
Flashpoint
Soundpoint
Hipoint
Twinflex Hatari Sounder
Output Module (from
panel)
Quantity
IS (mA)
12.000
12.000
30.000
0.065
0.065
0.105
0.105
0.190
0.105
0.105
0.500
0.450
Tot IS (mA)
IA (mA)
62.000
82.000
125.000
39.000
55.000
5.000
16.000
19.000
16.000
16.000
15.000
0.450
Tot IA (mA)
ADD
Totals
Times (hrs)
IAtot (mA) B
Alarm (hrs) D
IStot (mA) A
Standby (hrs)
C
IS (mAh) E
Current required (mAh)
Total Current (mAh)
Total Current (Ah)
Battery requirement (Ah)
IA (mAh) F
E+F=G
G / 1000 = H
H x 1.25 = J
Current Drawn From PSU
Item
O/P module (from PSU)
Quantity
IS (mA)
5.000
Tot IS (mA)
IA (mA)
15.000
ADD
Totals
Times (hrs)
Current required (mAh)
Total Current (mAh)
Total Current (Ah)
Battery requirement (Ah)
IStot (mA) K
Standby
(hrs)M
IS (mAh) O
IAtot (mA) L
Alarm (hrs) D
IA (mAh) P
O+P=R
R / 1000 = S
S x 1.25 = T
Current Drawn From PSU
Total System Current Required (mAh)
66
J+T=U
Tot IA (mA)
Twinflex Installation and Operation Instructions
Installation Checklist
Use the following checklist to ensure that your work is correct and that the commissioning engineer has the
necessary information to complete the commissioning of the system
If you require a commissioning visit the engineer will require this sheet, along with ‘Zone Continuity and
Insulation Test Results’ and correctly marked ‘as-wired’ drawings, before attending site to commission the
system.
Stage 1
Description
Installation
Engineer Checked
Commissioning
Engineer Checked
Zone cables installed correctly, clipped or in
containment.
All device bases and back boxes installed and
terminated.
Cable insulation and continuity testing complete, and
form filled out.
As-wired drawing marked up showing cable runs and
devices.
Control Panel backbox installed with 240v AC supply
live, tested and isolated locally
Stage 2
Depending on the terms of your contract, you may also be required to carry out ‘Stage 2’.
Description
Installation
Engineer Checked
Commissioning
Engineer Checked
Devices installed into bases and back-boxes
Detector dust covers fitted
Site Name & Address:
Installation Company:
Testing Engineer:
Signature:
Date:
67
Twinflex Installation and Operation Instructions
Commissioning Checklist
The following checklist may be used to ensure that all steps are taken. This is not a BS5839 certificate and
serves as a reminder only and may need additional items added to suit your working practices.
Step 1
Description
Panel powered up (240V ac Mains first, then batteries). Nothing else
connected. All zones showing fault.
Program the number of ‘Active’ zones required, check that zones not required
are clear of fault.
Low voltage multimeter test of cables to show no inter-core short circuits.
End of Line device installed with EOL switch in the ON position, and
connected to the relevant zone. The zone fault should clear. Repeat for all
zones.
Remainder of devices added one at a time, with DIL switches set, device
installed and then allowed aprox 30 - 50 secs to clear fault condition.
All faults (device, input, output, EOL, battery, etc,) cleared from control panel.
Step 2
Control panel programmed for any additional features.
All other cables connected and clear of fault
Step 3
Correct operation of all input devices tested, ie, detectors, manual call points
and inputs.
Correct operation of all output devices tested, ie, sounders, relays and
outputs
Correct operation of all programmed actions tested, ie, instant alarms,
confirmation alarms, two stage alarms
Step 4
System Manuals completed, zone chart or zone list displayed.
End user or responsible person trained and user manual issued.
Site Name & Address:
Commissioning
Company:
Commissioning
Engineer:
Signature:
Date:
68
Commissioning
Engineer Checked
Twinflex Installation and Operation Instructions
Cable Continuity & Insulation Test Results
After installation of the cable, and termination into all the relevant back-boxes, install a wire link between
the zone +ve and –ve connections at the last device in order to be able to take cable continuity readings,
removing it to take insulation readings. Make sure that all the cables are dressed smoothly and neatly into
their back-boxes in order that they will not be disturbed after the readings are taken.
The commissioning engineer will require these readings, along with correctly marked ‘as-wired’ drawings,
before attending site to commission the system.
Core
Continuity Reading (ohms)
Z1
Z2
Z3
Z4
Z5
Z6
Z7
Z8
Zone +ve to –ve with a temporary link
at the last device.
Sounder circuit +ve to -ve with a
temporary link at the last device.
Others . .
2
A reading of approximately 1 ohm per 100 meters of 1.5 mm cable is expected and any significant
variation from this should be investigated. If the above readings are satisfactorily showing circuit continuity
then you may also take the reading below, remembering to remove your temporary link at the last device.
Core
Insulation Reading ( M ohms)
Z1
Z2
Z3
Z4
Z5
Z6
Z7
Z8
+ve to -ve
+ve to Earth
-ve to Earth
Screen to mains Earth: with scrn
disconnected from panel
Others . .
A reading in excess of 1 M ohm is expected and any significant variation from this should be investigated. If
the readings are satisfactory then the loop wiring is largely proven other than for faults such as complete
polarity reversal.
Site Name & Address:
Installation Company:
Testing Engineer:
Signature:
Date:
69
Twinflex Installation and Operation Instructions
FIRE ALARM SYSTEM NOTICE
To Enable the Control Panel Keys
If your control panel has a key switch then turn the key, if not then press ‘ACCESS’ followed by
your 3 digit pass code. The ‘Controls Enabled’ LED should then be illuminated. If after entering
the code further action is not taken the ‘Controls Enabled’ light will time out eventually.
To disable the control panel keys turn the key switch off, or press ‘ACCESS’ followed by your 3
digit pass code as appropriate. When disabled the ‘Controls Enabled’ LED should then be
extinguished.
To prevent unauthorised operation the controls should be kept disabled and the key/code
kept secure under the control of the responsible person
To Manually Operate the Fire Alarm Sounders
Press ‘SOUND ALARMS’ (button 3). To silence the alarm press ‘SILENCE ALARMS’ (button 2).
To reset press ‘RESET SYSTEM’.
Following a Detector or Manual Call Point Operation
The ‘FIRE’ LED will illuminate, the fire alarms and the internal buzzer will operate as
programmed. Take appropriate action as defined by the emergency plan for the premises.
To silence the alarm press ‘SILENCE ALARMS’, then establish the cause of the alarm and enter
the details in the log book.
Reset any Manual Call Points which may have been operated, or if a detector has been operated
be sure that the cause of the alarm has been removed, before resetting the system by pressing
‘RESET SYSTEM’.
Following a Fault Condition
The appropriate fault LEDs will illuminate. The internal buzzer will sound. To mute the internal
buzzer press ‘SILENCE BUZZER’. Investigate and rectify the appropriate fault (competent
persons). Once the fault has been rectified the fault indication will clear automatically.
To Test The Lamp Indication LEDs
Press ‘LAMP TEST’ and hold it for at least 5 seconds. The controls must be enabled.
Important Notes
It is a requirement of the Workplace Regulations that your Fire Alarm System must be regularly
serviced by competent persons.
FIRE ALARM COMPANY: _________________________________________________________________________
ADDRESS: _____________________________________________________________________________________
For service phone: _________________________ (Working hours) ________________________(Out of working hours)
CONTROL PANEL INSTRUCTION NOTICE
70
Twinflex Installation and Operation Instructions
FIRE ALARM SYSTEM NOTICE
Note
The Fire alarm system installed in this building has ‘Checkpoint Plus’ technology to help
eliminate false alarms.
Please read and understand the following information in order to make the most use of the
system.
Operation
When the detector within your area activates it will initially only operate the sounders within your
own area for a predetermined ‘Confirmation’ time.
At the end of the ‘Confirmation’ time the system will check the detector again to see if the
activation has cleared. If so then the sounders will silence and no further action need be taken.
If, however, the detector is still activated then the entire system will go into alarm, operating all
the sounders on the system.
Action Required
If you think that you may have accidentally set off the fire alarms then check the following:
If the fire alarm within your area only is sounding, then check your own area for the cause of the
alarm. If this proves to be a false alarm due to dust, cooking fumes, steam, cigarette smoke, etc,
then clear the smoke from the area in order to allow the system to reset itself after a few
minutes. If this happens then no further action is required.
If you discover a genuine fire, or the fire alarms in the communal areas are also sounding, then
follow the buildings fire procedures for evacuation, activating the nearest Fire Alarm manual call
point on the way out.
Do not attempt to put out the fire unless it is safe to do so.
Further Information
Further information will be located adjacent to the Main Fire Alarm Control Panel, or may be
obtained from either the person responsible for building maintenance or from the Fire Alarm
Company responsible for maintaining the Fire Alarm System.
APARTMENT NOTICE FOR CHECKPOINT PLUS SYSTEMS
71
Twinflex Installation and Operation Instructions
Important Points
• Use a 2-core 1.5mm2 and earth/screen fire rated cable similar to
FP200 or MICC (page 10).
• Connect all the devices including sounders in a radial circuit from
the control panel, ending at the last device. Do not spur from this
circuit. (page 11).
• Make sure that the earth cables are sleeved, connected together and
connected to earth at the control panel (page 10).
• Do not use an ‘End Of Line’ resistor, each device generates an
‘EOL’ signal; simply switch it on (page 19).
• Do not use an ‘EOL’ resistor on unused zones; switch the zone off
(page 46).
• How to go about the commissioning (page 53).
• 3 simple steps to fault finding (page 57).
• Keep the detector clean, dust and contamination will result in faults
and false alarms, use the dust cover until the site is clean and dust
free. (page 21).
• Leave a copy of the ‘User Instructions’ by the panel, and make sure
you have explained its operation carefully to the relevant persons
(the User, not contractors or their agents). (page 70).
If you have any further queries, please contact your supplier for further information.
72