1
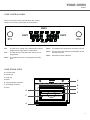
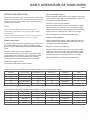
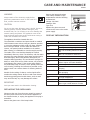
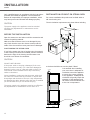
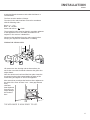
USER
MANUAL
AS35SS
BUILT-IN STEAM OVEN
Customer Care
0344 800 1128
IMPORTANT INFORMATION
AS35SS
CONTENTS
Important Information
Before you start
Safety information
Environment information
Technical and legal information
Your oven
Your control panel
Your steam oven
First use/Setting up your oven
Setting the clock
Water level
Cleaning the oven
Product functions
2
3
4
4
5
5
6
6
6
6
Daily operation of your oven
Steam oven function
7
Pause during cooking
9
Close off steam cooking
9
Demon function & child lock
10
De-scaling10
Care and Maintenance
Replacing the light bulb
11
Display information
11
Installation12
Trouble shooting
14
Guarantee15
Useful contacts
16
BEFORE YOU START
To avoid the risks that are always present when you use
an electrical appliance it is important that this appliance is
installed correctly and that you read the safety instructions
carefully to avoid misuse and hazards. Please keep this
instruction booklet for future reference and pass it on to
any future owners. After unpacking the appliance please
check that it is not damaged. If in doubt, do not use the
appliance but contact Apelson on 0344 800 1128.
Decide on the appropriate location for your product.
Check the package and make sure you have all of the
parts below.
AS35SS Steam Oven x1
Your product contains glass please take care when fitting
or handling to prevent personal injury or damage to the
product.
The specifications plate displays all the necessary
identification information for ordering replacement parts.
If you sell the appliance, give it away, or leave it behind
when you move house, make sure you also pass on this
manual so that the new owner can become familiar with
the appliance and its safety warnings.
Perforated container x1
Non-perforated container x1
2
Rack x1
Fixing screw x4
IMPORTANT INFORMATION
AS35SS
SAFETY INFORMATION
These instructions are for your safety. Please read through
them thoroughly prior to installation and retain them for
future reference.
All installation work must be carried out by a competent
person or qualified electrician.
This appliance must be installed correctly by a suitably
qualified person, strictly following the manufacturer’s
instructions.
This appliance complies with all current European safety
legislation, however, the Manufacturer must emphasise
that this compliance does not prevent the surfaces of the
appliance from heating up during use and remaining hot
during its operation.
Do not allow the electric cables to touch the hot parts of
the appliance.
Make sure that the power cord is not caught under or in
the appliance and avoid damage to the power cable.
Do not remove the plug in the presence of flammable gas.
Do not install the appliance outdoors in a damp place or in
an area which may be prone to water leaks such as under
or near a sink unit. In the event of a water leak allow the
machine to dry naturally.
Please dispose of the packing material carefully.
Do not use flammable sprays in close vicinity to the
appliance.
This appliance can be used by children aged from 8 years
and above and persons with reduced physical, sensory or
mental capabilities or lack of experience and knowledge if
they have been given supervision or instruction concerning
use of the appliance in a safe way and understand the
hazards involved. Children shall not play with the appliance.
Cleaning and user maintenance shall not be made by
children without supervision.
Regularly check the power plug and power cord for
damage. If the supply cord is damaged, it must be replaced
by the manufacturer, its service agent or similarly qualified
persons in order to avoid a danger or injury.
A steam cleaner is not to be used.
The appliance is not intended to be operated by means of
external timer or separated remote-control system.
The appliance is for domestic use only.
The Manufacturer declines all liability for personal or
material damage as a result of misuse or incorrect
installation of this appliance.
Danger of burns! During use the appliance becomes hot.
Care should be taken to avoid touching heating elements
inside the oven.
Warning! Accessible parts may become hot during use.
Children should be kept away.
Warning! If the door or door seals are damaged, the
oven must not be operated until it has been repaired by a
competent person.
If smoke is emitted, switch off or unplug the appliance and
keep the door closed in order to stifle any flames.
Use the appliance exclusively for the preparation of food.
Do not use the appliance to dry clothing, paper or other
objects.
Do not operate the appliance without food in the cooking
compartment. Operating without food can damage the
appliance.
Dishes can become hot due to the heated food. Therefore,
always use oven gloves to take the food out of the
appliance.
Failure to maintain the oven in a clean condition could lead
to deterioration of the surface that could adversely affect
the life of the appliance and possibly result in a hazardous
situation.
Warning! Only allow children to use the oven without
supervision when adequate instructions have been given
so that the child is able to use the oven in a safe way and
understands the hazards of improper use.
Caution! If the appliance operates in combination mode,
it is recommended that children use the oven only under
the supervision of adults because the temperature may be
high.
Connect the power plug to an easily reachable electrical
outlet so that in case of an emergency the appliance can
be unplugged immediately. Pull the power plug out of the
electrical outlet to completely switch off the appliance. Use
the power plug as the disconnection device.
Disconnect the power plug from the electrical outlet when
not in use and before cleaning.
Always turn the appliance off before disconnecting the
power plug.
This appliance is classified as protection class I and must
be connected to a protective ground (Earth).
Means for full disconnection must be incorporated in
the fixed wiring in accordance with the wiring rules. To
achieve this install an appropriate circuit breaker (CB) and
residual current device (RCD). It should be installed in an
easily reachable place so that in case of emergency the
appliance can be disconnected from power immediately.
The fixed wiring must be protected against heat surfaces.
Do not hang an objects to the handle of the oven door.
3
IMPORTANT INFORMATION
AS35SS
Do not store or never use harsh chemicals, sprays,
flammable or non-food in or near the oven. Oven is
designed specifically for heating or cooking food. The use
of corrosive chemicals in heating or cleaning will damage
the unit and may cause injury.
Should any food inside the oven catch fire, keep the
door closed. Switch the oven off and disconnect the power
supply.
Always exercise caution when opening the door. Move
to side, open the door slowly to vent the hot air and/or
steam. Make sure your face is away from the opening and
make sure there are no children or pets near the oven.
ENVIRONMENTAL INFORMATION
TECHNICAL AND LEGAL INFORMATION
Waste electrical products should not be disposed of
with household waste. Please recycle where facilities
exist. Check with your Local Authority or retailer for
recycling advice.
TECHNICAL INFORMATION:
This symbol on the product or its packaging
indicates that this product cannot be treated
as normal household waste. This product must
be handed over to an electric and electronic
equipment collection point for recycling.
On ensuring that this product is disposed of correctly, you
will help to avoid possible negative consequences for the
environment and public health, which could occur if this
product is not handled correctly. To receive more detailed
information about recycling this product, contact your
local government, domestic waste disposal services or the
outlet where the product was bought.
4
Power supply: Power (Steam): Power (Oven): Measurements:
Oven capacity (net): External dimensions (WxHxD): Net weight: 220-240V~, 50/60Hz
1250-1500W
1400-1700W
35L
594x530x455mm
29kg
LEGAL INFORMATION
The Manufacturer declines all liability for damage caused
to persons and objects due to incorrect or improper
installation of the appliance.
YOUR OVEN
AS35SS
YOUR CONTROL PANEL
All the microwaves control and indicators are located
together on the front panel which is shown below.
DSP3
DSP1
DSP2
PT1
PT2
DSP4
PT1. This dial is for setting time, selecting the cooking
length and the high and low temperature.
PT2. This dial sets the operation and start & end of
programmes
DSP1.This displays the time of programme and daily
time
DSP2.This displays the temperature and types of food.
DSP3.This is the function indicator and displays all the
optional functions.
DSP4.Subsidiary function indicator.
YOUR STEAM OVEN
A. Control panel
B. Water box
C. Seal ring
D.Rack
A
E. Non-perforated container
F.Perforated container
B
G.Door
D
C
E
F
G
5
FIRST USE/SETTING UP YOUR OVEN
AS35SS
We recommend that you read the instructions in this owner’s manual carefully before use for the best performance and to
extend the life of your appliance, as it will provide you with all the instructions you require to ensure its safe installation,
use and maintenance. Always keep this owner’s manual close to hand since you may need to refer to it in the future.
Thank you.
SETTING THE CLOCK
PRODUCT FUNCTIONS
When the power is on, “0:00” is flashing on DSP1. Turn
PT1 to adjust hour time, then press and turn PT1 to
set and adjust minute time, at last press PT1 again for
confirming.
Under the standby mode, all of the functions show
on DSP3 after press PT2. Then turn PT2 to select the
function, and the selected function will be displayed on
DSP3, while the preset cooking time will be displayed
on DSP1 and the preset parameters are displayed in
alternation on DSP2.
The appliance uses a 24 hour clock operating system.
Modify the current time: Under the standby mode, press
PT1 for 3 seconds until the current time flashes on DSP1,
then repeat the setting above.
WATER LEVEL
Under initial state, you will hear a “beep” after positioning
the water tank into position, and water level indicator will
light. If the water level in the tank is low, the low water
indicator will light. Please add water to Max position. (Tank
could load 1.2ml water in maximum. A tank full of water
generally is able to cook for about 60-70 minutes)
NOTE:
Remove the water tank to add water. Add water through
the water injection hole. Wipe dry if any water overflows.
To add water when the oven is working. Open the oven
door and let the water tank cool down. Then remove the
water tank to add water.
CLEANING THE OVEN FOR THE FIRST TIME
When the oven is used for the first time, it should be
heated to the maximum temperature for long enough to
burn off any oily residues left during the manufacturing
process, which might contaminate foods with unpleasant
smells.
FUNCTIONS
Steam
Fish
Roast
Defrost
Clock
Cooking time
De-scaling
Low water level
Meat
Vegetables
Pizza
Disinfecting
Child lock
Delay time
Water level
Temperature
6
DAILY OPERATION OF YOUR OVEN
AS35SS
STEAM OVEN FUNCTIONS
MEAT COOKING (AUTO)
In standby mode, press PT2 to select function choice, turn
PT2 to choose function. The chosen function will be shown
on DSP3. Preset the temperature and food type and this
will be shown on DSP2.
NOTE:
When the cavity temperature reaches the preset
temperature, temperature icon will stop flashing and
become light.
Press PT1, PT2 at the same time during working process,
current cavity temperature will be shown on DSP2.
STEAM FUNCTIONS
In standby mode, press PT2 to select function choice, turn
PT2 selected steam function. DSP1 will display default
time 10 minutes, DSP2 display default steam temperature
100°C.
Press PT1, rotate PT1 to set temperature.
Press PT1 again and turn PT1 to set cooking time. After
cooking time is set, Press PT2, the oven begins to work.
Steam function icon and temperature icon will flash,
working time icon and high water level icon will light.
Choose steamed meat function, DSP1 display default time
30:00 minutes, DSP2 default steam temperature is 100°C
and program C1 flash alternately
Press PT1, rotate PT1 set functions
Press PT1 again and turn PT1 to set cooking time. After
cooking time is set, Press PT2, the oven begins to work.
Steam meat function icon and temperature icon will flash,
working time icon and high water level icon will light.
Note: Temperature of foods will flash alternately.
FISH COOKING (AUTO)
Choose steamed fish function, DSP1 display default time
25:00 minutes, DSP2 default steam temperature is 80°C
and program b1 flash alternately
Press PT1, rotate PT1 set functions.
Press PT1 again and turn PT1 to set cooking time. After
cooking time is set, Press PT2, the oven begins to work.
Steam fish function icon and temperature icon will flash,
working time icon and high water level icon will light.
Note: Temperature of foods will flash alternately.
Temperature range: 40-100C
The longest working time: 90:00 minutes
Different meats cook at different temperatures, please use the table below as a guide.
Program
Type of meat
Temperature (°C)
Time (min)
Container
Level
C1
Chicken breast
100
30
Perforated
2
C2
Smoked pork lion
100
45
Perforated
2
C3
Turkey escalope
100
20
Perforated
2
C4
Pork fillet whole
100
25
Perforated
2
C5
Vienna sausage
90
15
Perforated
2
Different fish cook at different temperatures, please use the table below as a guide.
Program
Type of fish
Temperature (°C)
Time (min)
Container
Level
b1
Trout
80
25
Perforated
2
b2
Shrimp
90
15
Perforated
2
b3
Fish Fillet
80
18
Perforated
2
b4
Mussels
100
25
Perforated
2
b5
Lobster
100
30
Perforated
1/2
7
DAILY OPERATION OF YOUR OVEN
AS35SS
VEGETABLE COOKING (AUTO)
Choose steamed vegetables function, DSP1 display default
time 20:00 minutes, DSP2 default steam temperature is
100°C and program A1 flash alternately
Press PT1, rotate PT1 set functions.
Press PT1 again and turn PT1 to set cooking time. After
cooking time is set, Press PT2, the oven begins to work.
Steam vegetable function icon and temperature icon will
flash, working time icon and high water level icon will
light.
Note: Temperature of foods will flash alternately.
Different vegetables cook at different temperatures, please use the table below as a guide.
Program
Type of vegetable
Temperature (°C)
Time (min)
Container
Level
A1
Broccoli
100
20
Perforated
2
A2
Carrots
100
25
Perforated
2
A3
Potatoes and
mixed vegetables
100
25
Perforated
2
A4
Peas
100
15
Perforated
2
A5
Asparagus
100
25
Perforated
2
GRILL FUNCTIONS
(STEAM OVEN FUNCTION)
Choose grill function, DSP1 display default time to
minutes, DSP2 display default steam temperature 200°C.
Press PT1, rotate PT1 temperature setting
Press PT1 again and turn PT1 to set cooking time. After
cooking time is set, Press PT2, the appliance begins to
work. Steam vegetable function icon and temperature icon
will flash, working time icon and high water level icon will
light. Temperature range: 140-200°C
The longest working time: 90:00 minutes
PIZZA FUNCTION
(STEAM OVEN FUNCTION)
Choose pizza function, DSP1 no display, DSP2 display 200g.
Press PT1, and turn PT1 to set weight. Then press PT2,
cooking will start, pizza function icon will flash, work time
icon will light.
Programs will calculate cooking time according to weight
8
Pizza (g)
Time (minutes)
100
0:30
150
1:30
200
2:34
250
3:35
300
4:38
350
5:40
400
6:42
450
7:44
500
8:46
Step weight (g)
50
Pizza (g)
Time (minutes)
600
10:50
650
11:52
700
12:54
750
13:56
800
14:58
Step weight (g)
50
DEFROST FUNCTION (EDIT MENU)
Choose defrost function , DSP1 display default time 10
minutes, DSP2 no show.
Press PT1 again and turn PT1 to set cooking time. After
cooking time is set, Press PT2, the appliance begins to
work. Defrost function icon and temperature icon will
flash, working time icon and high water level icon will
light.
Steam defrost is automatically controlled between
50°C-60°C.
DAILY OPERATION OF YOUR OVEN
AS35SS
REHEATING AND DISINFECTING FUNCTIONS
Press PT1 again and turn PT1 to set cooking time. After
cooking time is set, Press PT2, the appliance begins to
work. Steam disinfecting function icon and temperature
icon will flash, working time icon and high water level icon
will light.
Choose steamed Disinfecting function, DSP1 display
default time 13:00 minutes, DSP2 default steam
temperature is 100°C and program r1 flash alternately
Press PT1, turn PT1 set programme.
Note: Temperature of foods will flash alternately.
Different Disinfecting have different temperature; you can refer to the following table.
Program
Type of Food
Temperature (°C)
Time (min)
r1
Plate dishes
100
13
r2
Ready-made
meals/frozen
100
18
Remove lid
from container
and put on
rack
r3
Beans
100
35
r4
Cherries
80
35
r5
Plums
90
35
r6
Baby bottles
100
12
TIMED
After setting cooking time and parameter, press PT1,delay
time function begins to work, and DSP4 shows, DPS1 will
show current time, DSP2 shows “Auto”. Press PT1 to set
delay time. Then press PT2 to confirm the beginning time
of delay.
DSP1 shows the delayed start time you set and DSP2
shows “AUTO”.
Press PT2 for 3 seconds if you want to cancel the selected
function.
PAUSE DURING OF COOKING
Instructions
Container
Level
Rack
2
Rack
2
Disinfection:
Rack
time and
Rack
temperature
according to 1L
Rack
capacity
2
Rack
2
2
2
Press PT1 once to confirm.
Press PT2 to continue cooking
STANDBY MODE
After choosing function and setting parameter, do not press
PT2 to confirm the setting. Press PT2 for a long time to go
to standby mode.
After choosing function and setting parameter, press PT2
to confirm setting. Press PT2 for a long time, PUMP will
flash on DSP1. Or press PT2 to pause, then press PT2 for a
long time, PUMP will flash on DSP1, turn PT2 to re choose
function.
In standby mode, press PT2 button to enter power off
mode.
PAUSE OR CANCEL COOKING
You can stop the cooking process at any time by pressing
PT2.
CLOSE OFF STEAM COOKING
Open the door in the process of cooking to pause (not be
recommended due to lots of vapours may hurt you)
END PROGRAM WITH STEAM FUNCTION.
Keep pressed PT2 for 3 seconds; you will hear sound and
the process will be cancelled.
Keep a certain distance away when you open the appliance
door due to lots of vapours as they may burn you
MODIFYING PARAMETERS
The operating parameters (time\temperature\weight)
can only be modified when the cooking process has been
interrupted. Proceed as follows:
Press PT1 and turn it to left or right to modify parameters,
When program with steam function is end or when the
program is cancelled, DSP1 will flash “PUMP IN”, and it
will beep for 3 times every 30 seconds in 5 minutes. DSP1
shows “PUMP IN”, which means the pump automatically
pumped water back to boiler. DPS2 shows “PUMP OUT”,
which means pump back is finished and return back to
standby mode.
If water in boiler is higher than 75°C DSP1 and DSP2 will
flash “PUMP OUT”. When the water is lower than 75°C
it shows “PUMP OUT” meaning water is automatically
pumped to water tank from boiler. After the pumping is
finished, it will go to standby mode automatically.
9
DAILY OPERATION OF YOUR OVEN
AS35SS
END PROGRAM WITHOUT STEAM FUNCTION
(GRILL AND PIZZA)
After cooking (pizza and grill function) is finished, it beeps
three times, and shows “End”. And it beeps 3 times every
30 seconds in 5 minutes. End will flash on display. After 5
minutes, it goes to standby mode. If you open the oven
door or press PT2, it will go to standby mode too.
DEMON FUNCTION AND CHILD LOCK
DEMON FUNCTION
When Steam oven is in OFF (closed) mode, it does not
show time, but show only clock icon. Press PT1 until
it shows “OFF SHO” on DSP1 and DSP2, which means
demo function is not activated. Turn PT1 to activate demo
function “ON SHOW”, press PT2 to confirm the setting.
On demo function, the oven does not work including all
heating elements. Only light and cooling fan work under
demo function. If you hope to use the oven, please set it
as “OFF SHO” mode.
Under “ON SHOW” mode, the oven will show “ON SHOW”
and the current function alternately every 5 seconds, no
matter what function is set.
UNLOCK
To unlock temporarily, press PT1 until lock icon on
DSP4 disappear. Then you could choose any function
or revise parameter. After 2 minutes, it goes back to
child lock function. It will go back to child lock function
automatically.
To unlock permanently, go into child lock function, refer
the instruction manual to unlock.
DE-SCALING
WARNING
De-scaling will take 45 minutes and oven can not be
interrupted for your safety. You can either open or close
the oven door when you begin de-scaling procedures are
as follows:
With the appliance in OFF status, keep PT1 pressed until
“OFF SHO” appears on DSP1, press PT1 continuously
until “ENTR CAL” appear on DSP1 and DSP2. De-scaling
indicator light will show.
To cancel the function, press PT1 button to enter standby
mode
NOTE
Press PT2 key, digital tube display “PUMP IN” said back
extraction system open
Demo function has the memory function, If power is cut,
demo function continues to work after power is on.
When “0.5L” appears, that shows you should add 0.5 L descaling solution to water box.
CHILD LOCK
Press PT2 to start de-scaling function, it will take 30
minutes.
When Steam oven is in OFF (closed) mode, it does not
show time, but show only clock icon. Press PT1 until it
shows “OFF SHO” on DSP1 and DSP2. Turn PT1 to activate
child lock function “ON bLOC”. When it shows “ON bLOC”
on DSP1 and DSP2, press PT2 to confirm the setting, and
it shows lock icon.
On demo function, the oven does not work including all
heating elements. Only light and cooling fan work under
demo function. If you hope to use the oven, please set it
as OFF SHO mode.
Under child lock system, it will show bLOC for three
seconds whether you press PT1 or PT2, and it returns to
previous setting.
NOTE
Child lock function has the memory function, if power
is cut; child lock function continues to work after power
is on.
10
When “1.0L” appears, that shows you should empty the
water box and then add 1.0 L cold water to water box.
Press PT2 to start program, when “CAL END” appears and
it beeps 3 times that shows de-scaling function is end.
Press PT2 after de-scaling is finished to return to start
status.
Time interval of de-scaling depends on Hardness of water
and frequency of use. If every week use steam function 4
of x30 minutes, in order to extend our steam furnace life,
we suggest you 6 months after a scale removal function.
NOTE
In the de-scaling function before water in boiler is empty
to smoke; If the boiler inside still withhold water inside, in
the operation scale removal function of time, the program
can’t normally open.
CARE AND MAINTENANCE
AS35SS
WARNING
Always switch off the electricity supply before
performing maintenance work. In the event of a
fault, contact customer services.
DOUBLE POLE SWITCHED
FUSED SPUR OUTLET
FUSE
ON
USE A 30 AMP FUSE
CAUTION
Do not use hot water, dilutents, petrol, alcohol, kerosene,
washing powder, cleanser, alkaline detergent, acid,
chemical cloth, etc. for cleaning so as not to damage the
enamel coating and plastic. The appliance must not be
cleaned directly with water as this could cause rusting or
render the insulation less efficient.
Remove the lamp and replace
with a lamp resistant to high
temperatures with the following
characteristic.
Voltage: 220-240V
Wattage: 25W
Type: E14
Replace the glass cover and
reconnect the oven to the mains
power supply.
DISPLAY INFORMATION
The appliance should be cleaned after use.
The enamelled or stainless steel parts should be washed
with lukewarm water without using any abrasive powders
or corrosive substances which could ruin them ;Stainless
steel could get stained. If these stains are difficult to
remove, use special products available on the market.
After cleaning, it is advisable to rinse thoroughly and dry.
The inside of the oven should preferably be cleaned
immediately after use, when it is still warm, with hot water
and soap; the soap should be rinsed away and the interior
dried thoroughly. Avoid using abrasive detergents (for
example cleaning powders, etc) and abrasive sponges for
dishes or acids (such as lime scale–remover, etc) as these
could damage the enamel. If the grease spots and dirt
are particularly tough to remove, use a special product for
oven cleaning, following the instructions provided on the
packet. Never use a steam cleaner for cleaning inside of
oven.
Display
Description
De-scaling
CAL
The appliance needs to be de-scaled
Flashing - De-scaling program starts
0.5L
Add 0.5L de-scaling solution to water
box
1.0L
Add 1.0L cold water to water box
Water box
TAN
Installation error
LOU
Tank water shortage in the work.
Reduce vapour and water backflow
VRP
Reduce vapour function is running
PUMP IN
Tips are from the tank to the boiler
pumping
PUMP OUT
Tips are from the boiler to the tank
back pumping
Avoid using grinding sand mould cleaner, such as wash
mat, steel wire ball, etc, may damage the surface
Hot
Too high temperature
door
Door not installed
IMPORTANT
Err PUMP
Flow meter sucking water the water
latter to get a small amount of water
Suitable for de-scaling of cleaner, such as liquid coffee
machine de-scaling cleaner. Share not with foam cleaner.
Warning
Don’t put water tank in the dishwasher cleaning.
REPLACING THE OVEN LAMP:
Disconnect the oven from the power supply by means of
the Omni polar switch used to connect the appliance to
the electrical mains ;or unplug the appliance if the plug is
accessible.
Remove the glass cover of the lamp-holder.
11
INSTALLATION
AS35SS
Only a qualified person in compliance with the instructions
provided must install the appliance. The manufacturer
declines all responsibility for improper installation, which
may harm persons and animals and damage property.
CAUTION
INSTALLATION OF BUILT-IN STEAM OVEN
For correct installation this product can be fitted within a
tall oven housing unit.
The air circulation requirements are shown below including
The power supply to the appliance must be switched
off before any adjustments or maintenance work is
undertaken.
100mm
BEFORE THE INSTALLATION
558
- 565
mm
Open the steam oven and take out all the accessories and
remove the packing material.
448 - 453mm
Make sure that the steam oven is not damaged by any
way. Check that the oven door closes correctly and the
inside of the door and front oven panel are not damaged.
550mm
POSITIONING THE STEAM OVEN
If you fit the steam oven into a housing unit, the material
of the housing unit should be insulated, and the clearance
between the edge of the housing and the steam oven
should be over 500mm for ventilation.
100mm
CAUTION!
DO NOT USE THE OVEN
If the power cable or the plug is damaged, if the oven
does not function correctly or if it has been damaged or
dropped. Put the oven on a flat and stable surface. The
oven should not be installed close to any heat source,
radios or televisions.
a slot that should be cut into the plinth if fitted.
It is essential when installing
your oven there is adequate air
circulation around the appliance
to ensure the correct operation
of the appliance. Inadequate air
circulation will greatly impair the
operation of the appliance and
can affect surround cabinets due
to the rise in temperature
100mm
During installation, make sure that the power cable does
not come into contact with any moisture or objects with
sharp edges and the back of the oven. High temperature
can damage the cable. Warning: after the oven is installed
you should make sure you can access the plug.
The power supply to the appliance must be cut off before
any adjustments or maintenance work is done on it.
10mm
550mm
mm
200
550mm
10mm
12
mm
200
INSTALLATION
AS35SS
A Switched Fused Connection Unit to BS 1363 Part 4 is
recommended
The fuse must be rated at 13 Amps.
The wires in the mains lead are coloured in accordance
with the following code:
Brown = L - Live
Blue = N - Neutral
Green and Yellow =
- Earth
The connection point must be placed in a position adjacent
to the appliance so as to be readily accessible for an
engineer in the event of a breakdown.
Disconnect the appliance from the mains supply before
carrying out any kind of maintenance or cleaning.
FIXING THE STEAM OVEN
Lift steam oven into housing unit as shown above, do
not lift the oven with the handle otherwise the glass door
might shatter.
Once the steam oven has been lifted into place insert the
4x screws into the holes located within the sides of the
metal casing and tighten to secure the appliance.
Also ensure that you adjust the furniture doors adjacent to
the sides of the oven so there is a 4 - 6mm gap between
them,
otherwise
heat displaced
from the oven
might damage
the furniture
door.
THE APPLIANCE IS NOW READY TO USE.
13
TROUBLESHOOTING
AS35SS
WHAT SHOULD I DO IF I HAVE NO DISPLAY?
Check the time indicator is on or off.
THE STEAM OVEN CAN’T HEAT OR HEATS VERY
SLOWLY.
NO RESPONSE AFTER PRESSING ANY BUTTON.
Choose cooking time and temperature are set correctly. In
the steam oven is food block too big or too cold.
Check if the child lock is on.
LAMP DOES NOT WORK
STEAM OVEN DOESN’T WORK.
If other functions are working replace bulb.
Check the plug/power supply. Make sure the door is closed
and ensure that nothing is caught between the door and
the cavity of the steam oven.
A STRANGE NOISE WHEN THE STEAM OVEN IS
OPERATING.
Check if a metal object is inside the microwave and
arcing is taking place. Make sure nothing is touching the
microwave cavity.
14
If your appliance is still not functioning properly after
making the above checks, please contact customer
services.
GUARANTEE
AS35SS
This appliance is covered by a full manufacturer’s 2 year
parts and 2 year labour guarantee and covers all parts and
labour costs associated with the repair of the appliance
in a domestic environment. We will repair any defect that
arises due to faulty materials or workmanship and use
genuine manufacturers parts.
All claims must be supported with the original receipt or
other reasonable proof of purchase.
If, during the guarantee period, the appliance becomes
irreparable as agreed by the engineer approved by
Apelson Appliances UK Ltd then we reserve the right, at
our discretion, to exchange the defective product with
a replacement appliance at Apelson Appliances UK Ltd
sole cost. If the same product is no longer available an
alternative will be offered with the same functions as the
faulty item.
After an appliance has been repaired or replaced any
remaining balance of the Apelson Appliances UK Ltd
guarantee will be valid and any further call outs during this
prescribed period will be covered by Apelson Appliances
UK Ltd on the replacement appliance.
Should any person other than an authorized engineer
modify or attempt to repair the appliance then the
warranty will be invalid.
The guarantee applies to the UK mainland, Scotland and
Ireland but is not transferable between EU countries.
This guarantee is non-transferable to any other person or
product.
The guarantee is covered by UK law and is in addition to
and does not diminish your legal rights.
EXTENDED PARTS ONLY WARRANTY
As testimony to our commitment to you as a valued
customer of Apelson Appliances UK Ltd, we will offer you
an additional 3 years parts warranty absolutely free.
If during the extended parts warranty period the
appliance fails and it is considered uneconomical to repair
our Customer Service Department will offer you the
opportunity to purchase the same or equivalent model at a
discounted price.
All parts supplied free of charge under the extended
warranty must be fitted by our approved engineers and
will be subject to a call out charge to fit the part.
EXCLUSIONS TO THE GUARANTEE
This guarantee does NOT cover:
Appliances that have been damaged or neglected as a
result of failure to store, assemble, install, use or care
of the products in accordance with the manufacturer’s
instructions - Apelson Appliances UK Ltd will not accept
responsibility under this guarantee if a product is damaged
or becomes defective due to, misuse, neglect, wilful or
accidental damage or act of god.
Normal wear and tear.
Consumable items such as carbon filters and bulbs.
Claims arising from non-domestic use or commercial
environment.
Any gas appliance not fitted by a gas safe qualified
installer.
If no fault is found then Apelson Appliances UK Ltd
reserves the right to charge for the call out at the going
rate of £55.00 plus VAT.
In the course of the service work carried out it may be
necessary to remove the built in appliance from its fitted
position. If the appliance is glued, grouted or tiled in such
a manner that it cannot be removed, it is the responsibility
of the customer/installer to remove and reinstall the
appliance to facilitate the repair.
This Guarantee does not affect your statutory rights.
The guarantee is offered by Apelson Appliances UK Ltd,
8QLW1RUPDQG\/DQGLQJV3RSH6WUHHW&DVWOHIRUG:$$*
15
Guarantee
GB
IE
IE
Customer Service
To arrange an in guarantee service call, please contact customer services
on the following numbers.
Republic of Ireland (ROI) – myappliances Customer Care Centre
T: 1-800 535542 E: [email protected]
In more detail...
UK and N.Ireland – myappliances Customer Care Centre
T: 0344 8001128 E : e n q u i r i e s @ m y a p p l i a n c e s . c o . u k
www.myspareparts.co.uk
23
GB
IE
MYAPPLIANCES
Unit 3 Normandy Landings,
3 Pope Street
NORMANTON
West Yorkshire
WF6 2AG