1
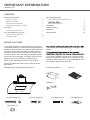
USER
MANUAL
CURVA60_70_90_IM_v1
CURVA60/70/90
CURVED BLACK GLASS HOOD
Customer Care
0344 800 1128
IMPORTANT INFORMATION
CURVA60/70/90
CONTENTS
Important Information
Before you start
Safety information
Environment information
Technical and legal information
Your hood
Your hood control panel
First use/Setting up your oven
Accessories not supplied
Product function
2
3
4
4
5
Care and Maintenance
Active charcoal filter replacement
7
7
7
8
11
12
13
Active charcoal filters
Installation
Trouble shooting
Guarantee
Useful contacts
6
6
BEFORE YOU START
To avoid the risks that are always present when you use
an electrical appliance it is important that this appliance is
installed correctly and that you read the safety instructions
carefully to avoid misuse and hazards. Please keep this
instruction booklet for future reference and pass it on to
any future owners. After unpacking the appliance please
check that it is not damaged. If in doubt, do not use the
appliance but contact Apelson on 0344 800 1128.
Decide on the appropriate location for your product.
Check the package and make sure you have all of the
parts below.
CURVA60/70/90 Curved Black Glass Hood x1
or handling to prevent personal injury or damage to the
product.
If you sell the appliance, give it away, or leave it behind
when you move house, make sure you also pass on this
manual so that the new owner can become familiar with
the appliance and its safety warnings.
Decorative chimney x1
Filter x1
Bracket x1
[01] Ø3.9x35mm x6
[05] washer x6
2
[02] Ø3.5x9.5mm x2
[03] Ø4x10mm x2
[04] Wall plug x6
IMPORTANT INFORMATION
CURVA60/70/90
SAFETY INFORMATION
These instructions are for your safety. Please read through
them thoroughly prior to installation and retain them for
future reference.
All installation work must be carried out by a competent
This appliance must be installed correctly by a suitably
instructions.
This appliance complies with all current European safety
legislation, however, the Manufacturer must emphasise
that this compliance does not prevent the surfaces of the
appliance from heating up during use and remaining hot
during its operation.
Accessible parts may become hot during use. Young
children should be kept away. Care should be taken to
avoid touching the appliance (e.g hob, cooker).
The Manufacturer highly recommends that this appliance
be kept out of the reach of babies and small children.
Children should be supervised to ensure that they do not
play with the appliance.
external timer or separated remote-control system.
The appliance is for domestic use only.
Consult local regulations regarding fumes outlets. Do not
connect the hood to a fume, ventilation or hot air duct.
rate for the appliances in the room does not exceed 4 Pa
(0.04 mbar). The room must have adequate ventilation if
an extractor hood is used simultaneously with appliances
that run on gas or other fuels. The air must not be
from appliances burning gas or other fuels. Regulations
regarding air extraction must be complied with.
Before connecting the hood: switch off the electricity
supply and check that the supplied voltage and frequency
coincide with that indicated on the appliance nameplate.
The hood may stop working during an electrostatic
discharge (e.g. lightning). This involves no risk of damage.
Switch off the electricity supply to the hood and reconnect
after one minute.
This appliance is not intended for use by persons
(including children) with reduced physical sensory, or
mental capabilities, or by those who lack experience and
knowledge, unless they have been given supervision
and instruction concerning the use of the appliance by a
person responsible for their safety.
closely watch and regulate pans containing hot oil.
Means for disconnection must be incorporated in the
When installing the appliance, make sure that the following
distances between the top of cooker or hob and the lowest
part of the cooker hood must be observed:
> Gas hobs: 350mm
> Electric hobs: 350mm
pole disconnection switch having a contact separation of
wiring.
Do not allow the electric cables to touch the hot parts of
the appliance.
Make sure that the power cord is not caught under or in
the appliance and avoid damage to the power cable.
Do not use the hood if it shows signs of damage or
imperfection. Contact customer services.
Flammable cooking must not be carried out underneath
this appliance.
The Manufacturer declines all liability for personal or
material damage as a result of misuse or incorrect
installation of this appliance.
Do not install the appliance outdoors in a damp place or in
an area which may be prone to water leaks such as under
or near a sink unit. In the event of a water leak allow the
machine to dry naturally.
Please dispose of the packing material carefully.
appliance.
We also recommend that great care be taken during use
and cleaning. Read the cleaning and maintenance sections
for this appliance carefully.
A steam cleaner is not to be used.
The appliance is not intended to be operated by means of
3
IMPORTANT INFORMATION
CURVA60/70/90
ENVIRONMENTAL INFORMATION
TECHNICAL AND LEGAL INFORMATION
Waste electrical products should not be disposed of
with household waste. Please recycle where facilities
exist. Check with your Local Authority or retailer for
recycling advice.
TECHNICAL INFORMATION:
This symbol on the product or its packaging
indicates that this product cannot be treated
as normal household waste. This product must
be handed over to an electric and electronic
equipment collection point for recycling.
On ensuring that this product is disposed of correctly, you
will help to avoid possible negative consequences for the
environment and public health, which could occur if this
product is not handled correctly. To receive more detailed
information about recycling this product, contact your
local government, domestic waste disposal services or the
outlet where the product was bought.
4
Power
Power
Power
Power
supply:
consumption - Fan:
consumption - Light:
consumption - Total:
Light bulb:
220-240V~, 50Hz
198W
2x 20W Max.
238W
Max. 20W (Halogen)
LEGAL INFORMATION
The Manufacturer declines all liability for damage caused
to persons and objects due to incorrect or improper
installation of the appliance.
YOUR HOOD
CURVA60/70/90
YOUR HOOD CONTROL PANEL
A
B
C
A. Filter cleaning alert indicator/switch. Icon
can be deactivated with a single press.
D
E
F
G
will flash when you need to clean the aluminium grease filters and
Clock setting. Press icon
to turn on the LED display and then press icon
for 3 seconds, the clock will be on
and the minute time will flash then press icon
and icon
to adjust the minute time, press icon
to confirm
the minute time, then the hour time will flash then press icon
and icon
to adjust the hour time, the clock
time is confirmed after 3 seconds. The max clock setting time is 23:59.
B. Control for setting the timer of motor. When the motor is on, press icon
to turn on the timer and the minute time
will flash then press icon
and icon
to adjust the minute time, press icon
to confirm the minute time, then
the hour time will flash then press icon
and icon
to adjust the hour time, the timer time is confirmed after
3 seconds. The max setting time is 9:59. The extractor will operate at current speed for the duration set on the timer.
C. Extractor fan speed and time "-" control.
D. Digital display
E. Extractor fan speed and time "+" control.
F. Alarm on and off. Press icon
to turn on alarm and the minute time will flash then press icon
and icon
adjust the minute time, press icon
to confirm the minute time, then the hour time will flash then press icon
icon
to adjust the hour time, the alarm time is confirmed after 3 seconds. The max setting time is 9:59.
Press icon
for 3 seconds can cancel the alarm setting.
to
and
G. Lighting on and off.
5
FIRST USE/SETTING UP YOUR HOOD
CURVA60/70/90
We recommend that you read the instructions in this owner’s manual carefully before use for the best performance and to
extend the life of your appliance, as it will provide you with all the instructions you require to ensure its safe installation,
use and maintenance. Always keep this owner’s manual close to hand since you may need to refer to it in the future.
Thank you.
ACCESSORIES NOT SUPPLIED
PRODUCT FUNCTION
You will need to supply the following items to complete
your installation and be able to use your cooker hood.
This appliance extracts the air of the kitchen to remove the
odours and keep an optimum level of the air quality inside
the room, it also allows you to illuminate the cooking area.
A vent pack with a Ø150mm hose and self adhesive
aluminum tape.
6
To obtain the best results from your cooker hood it is
recommended that you leave it switched on for 15 minutes
CARE AND MAINTENANCE
CURVA60/70/90
WARNING
Always switch off the electricity supply before
performing maintenance work. In the event of a
fault, contact customer services.
DOUBLE POLE SWITCHED
FUSED SPUR OUTLET
FUSE
ON
ALUMINIUM FILTERS
Exterior cleaning: use non-corrosive, liquid detergent and
avoid the use of abrasive cleaning products.
USE A 30 AMP FUSE
CAUTION
Do not use hot water, dilutents, petrol, alcohol, kerosene,
washing powder, cleanser, alkaline detergent, acid,
chemical cloth, etc. for cleaning so as not to damage the
enamel coating and plastic. The appliance must not be
cleaned directly with water as this could cause rusting or
.
ACTIVE CHARCOAL FILTER REPLACEMENT:
improve the cleaning process.
ACTIVE CHARCOAL FILTERS
Replace every 3 months.
IMPORTANT
hood is used for more than 2 hours a day. Always use
7
INSTALLATION
CURVA60/70/90
provided must install the appliance. The manufacturer
declines all responsibility for improper installation, which
may harm persons and animals and damage property.
CAUTION
Mark on the wall the hole positions as shown in diagram.
CAUTION
The Wall Plugs supplied are suitable for solid walls only.
When fixing to any other type of wall use suitable
alternative fixings
The power supply to the appliance must be switched
off before any adjustments or maintenance work is
undertaken.
You can choose choose two type of installation:
-Ducted option
-Recirculation option
[01] X2
[04] X2
[05] X2
CARBFILT 7
(UK & IE)
Drill six holes, and then insert the wall plugs in all the holes.
Now insert long screws with washers in the middle two holes.
Maximum gap between top two holes and middle two holes
should be no more than 945mm, depending on the ceiling
height.
VENT PACK 2
(UK + IE)
Ducted option
Recirculation option
160
[01] X2
MAX.9 4 5
260
450
180
MAX 945mm
350
[05] X2
DIM.B
Min. 350mm
from gas cooker
Min. 350mm
from electric cooker
8
Fix the top bracket to the wall using two long screws and
washers.
INSTALLATION
CURVA60/70/90
Fix the lower decorative chimney using two screws.
[05] X2
Position the hood over the top two screws then insert
the bottom long screws and washers from inside the
hood, tighten top two screws to secure then fix inner
decorative glass.
[03] X2
Fix the decorative chimney to the bracket. Connect top
of the vent pack to vent kit.
Fix the vent pack using self adhesive aluminum tape.
Remove the protector film.
Attach the decorative chimney to the main unit.
9
INSTALLATION
CURVA60/70/90
ELECTRICAL REQUIREMENTS
Any permanent electrical installation must comply with
the latest I.E.E. Regulations and local electricity company
contractor who is on the roll of the National Inspection
Council for Electrical Installation Contracting (NICEIC)
should undertake the electrical installation.
ELECTRICAL CONNECTION
Before connecting the mains supply ensure that the mains
voltage corresponds to the voltage on the rating plate
inside the appliance.
WARNING: THIS APPLIANCE MUST BE EARTHED
The appliance is supplied with a 3-core mains cable and
must be connected to the electricity supply via a double
pole switch having a 3mm minimum contact gap on each
connector.
A Switched Fused Connection Unit to BS 1363 Part 4 is
recommended.
The fuse must be rated at 3 Amps.
The wires in the mains lead are coloured in accordance
with the following code:
Brown = L - Live
Blue = N - Neutral
Green and Yellow =
- Earth
The connection point must be placed in a position adjacent
to the appliance so as to be readily accessible for an
engineer in the event of a breakdown.
Disconnect the appliance from the mains supply before
carrying out any kind of maintenance or cleaning.
THE APPLIANCE IS NOW READY TO USE.
10
TROUBLESHOOTING
CURVA60/70/90
FAULT
CAUSE
Hood doesn’t work
No power supply
SOLUTION
Check the plug
Check the main switch
Contact customer service.
High temperature safety device
activated
After running for a while, motor stop
working
Distance between the cooker hood
and the hob is too small
Works normally but cooking smells
linger
Whirring sound
the manufactures instructions
Readjust the distance to:
Gas hobs:350mm
Electric hobs:350mm
is full of grease
Fan blade problem
Contact customer service.
11
USEFUL CONTACTS
CURVA60/70/90
USEFUL CONTACTS
TECHNICAL SUPPORT
Apelson Appliances UK LTD
Phone: 0344 800 1128
Email: [email protected]
Web: www.spareszone.co.uk
SPARES
Apelson Appliances UK LTD
Phone: 0344 800 1128
Email: [email protected]
Web: www.spareszone.co.uk
SERVICE AND GUARANTEE
Apelson Appliances UK LTD
Phone: 0344 800 1128
Email: [email protected]
Web: www.spareszone.co.uk
12
APELSON APPLIANCES UK LTD
Unit 3 Normandy Landings
Pope St
Castleford
WF6 2AG