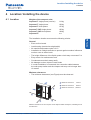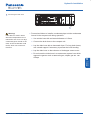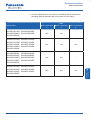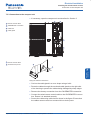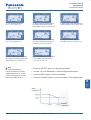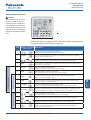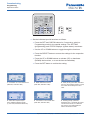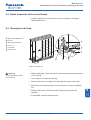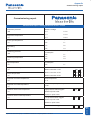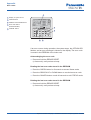
1
Order Nr. A2W-SPX-130305-021 Aquarea Air / Water Heat Pump – Heating and Cooling Systems INSTALLATION MANUAL for Compact Systems 2013 Service Nationwide service organisation 24/7 emergency service For any questions on Commissioning Commissioning Maintenance Malfunctions Professional service processing Technical support our hotline is available around the clock at 01344 853182 If required, cooling system installation support Central spare part supply Central call centre number for: - Commissioning - Malfunctions - Technical support Table of contents 1 Introduction ........................................................................................................ ............................................................................................ 5 .............................................................................................. 5 1.1 About this manual 1.2 Target audience 5 ............................................................................................ 5 1.4 Symbols used ................................................................................................. 6 1.5 Tools required ................................................................................................. 6 1.3 Products covered ................................................................................ 6 ........................................................................................ 7 ............................................................................................... 8 1.6 To be provided by customer 1.7 Installation sequence 2 Safety instructions 2.1 General hazard instructions for avoiding electric shocks ............................................. 8 2.2 General hazard instructions to avoid damage to health . . . . . . . . . . . . . . . . . . . . . . . . . . . . . . . . . . . . . . . . . . . . . . . 8 ........................................... 9 ................................................................................. 9 2.3 General hazard instructions for avoiding material damage 2.4 General further information 3 Device overview .................................................................................................. 10 3.1 Components ................................................................................................. 10 3.2 Dimensions diagram ........................................................................................ 3.2.1 Mini compact unit with a nominal output of 6 to 9 kW ......................................... 11 11 3.2.2 Compact unit with a nominal output of 9 to 16 kW . . . . . . . . . . . . . . . . . . . . . . . . . . . . . . . . . . . . . . . . . . . . . 11 3.3 Accessories .................................................................................................. 12 4 Location / Installing the device . . . . . . . . . . . . . . . . . . . . . . . . . . . . . . . . . . . . . . . . . . . . . . . . . . . . . . . . . . . . . . . . . . . . . . . . . . . . . . . . 13 4.1 Location ....................................................................................................... 4.2 Installation .................................................................................................... 5 Opening the device .............................................................................................. 6 Hydraulic installation ........................................................................................... Aquarea air/water heat pump – Installation manual for compact systems 03 / 2013 13 15 16 17 7 Electrical installation . . . . . . . . . . . . . . . . . . . . . . . . . . . . . . . . . . . . . . . . . . . . . . . . . . . . . . . . . . . . . . . . . . . . . . . . . . . . . . . . . . . . . . . . . . . . 22 7.1 Mains connections .......................................................................................... ................................................................ 26 ....................................................................... 29 ........................................................................... 31 ................................................................................ 32 7.2 Inputs and outputs (external interfaces) 7.3 Installing the wired remote control 7.3.1 Laying concealed cables 7.3.2 Laying visible cables ................................................................... 33 ................................................................................................... 34 7.3.3 Connection to the compact unit 8 Commissioning 23 8.1 Commissioning .............................................................................................. 34 8.1.1 Setting the standard pump . . . . . . . . . . . . . . . . . . . . . . . . . . . . . . . . . . . . . . . . . . . . . . . . . . . . . . . . . . . . . . . . . . . . . . . . . 35 6HWWLQJWKHKLJKHIÀFLHQF\SXPS . . . . . . . . . . . . . . . . . . . . . . . . . . . . . . . . . . . . . . . . . . . . . . . . . . . . . . . . . . . . . . . . . . 36 .......................................................................... 36 ................................................................................................ 37 ....................................................................................................... 46 8.1.3 Handover and instruction 8.2 Programming 9 Maintenance 9.1 Checking the water pressure ............................................................................. 9.2 Checking the pressure relief valve ....................................................................... 46 .................................................................... 47 ....................................................................................... 47 .......................................................................................... 48 9.3 Visual inspection of the circuit board 9.4 Cleaning the dirt trap 9.5 Checking the RCD 46 9.6 Resetting the temperature limit switch .................................................................. 9.7 Venting the system/Checking the quick vent ........................................................... 48 49 10 Recycling . . . . . . . . . . . . . . . . . . . . . . . . . . . . . . . . . . . . . . . . . . . . . . . . . . . . . . . . . . . . . . . . . . . . . . . . . . . . . . . . . . . . . . . . . . . . . . . . . . . . . . . . . . . 49 11 Appendix ........................................................................................................... ............................................................................................ 50 ................................................................................................... 55 Commissioning report Handover report 50 $FFHSWDQFHFHUWLÀFDWH . . . . . . . . . . . . . . . . . . . . . . . . . . . . . . . . . . . . . . . . . . . . . . . . . . . . . . . . . . . . . . . . . . . . . . . . . . . . . . . . . . . . . . . . . . . . 56 Error codes 1–4 ......................................................................................................... Aquarea air/water heat pump – Installation manual for compact systems 57 03 / 2013 Introduction 1 Introduction 1.1 About this manual This manual provides you with information on simple and correct mounting, as well as hydraulic and electric installation. Ensure that you have read and understood the installation and safety instructions in this manual before you start work. Incorrect installation due WRDIDLOXUHWRIROORZLQVWUXFWLRQVLQWKLVPDQXDORULQVXIÀFLHQWFRPSOLDQFH with the instructions, can result in damage. If you are unsure about the installation, please contact our service team IRUFODULÀFDWLRQ01344 853182. 1.2 Target audience 7KLVPDQXDOLVLQWHQGHGIRUTXDOLÀHGLQVWDOODWLRQHQJLQHHUVDQGHOHFWULFLDQV,WLVQRWLQWHQGHGIRUXQTXDOLÀHGSHUVRQV Electrical and plumbing installation work must be performed by a qualiÀHGHOHFWULFLDQRUSOXPEHU 1.3 Products covered 1 Introduction About this manual | Target audience | Products covered This manual covers the following Aquarea heat pump systems: Aquarea LT WH-MDF06E3E5*, WH-MDF09E3E5*, WH-MDF09C3E5, WH-MDC09C3E5, WH-MDF09C3E8, WH-MDC09C3E8, WH-MDF12C6E5, WH-MDC12C6E5, WH-MDF12C9E8, WH-MDC12C9E8, WH-MDF14C6E5, WH-MDC14C6E5, WH-MDF14C9E8, WH-MDC14C9E8, WH-MDF16C6E5, WH-MDC16C6E5, WH-MDF16C9E8, WH-MDC16C9E8 Aquarea T-CAP WH-MXF09D3E5, WH-MXC09D3E5, WH-MXF09D3E8, WH-MXC09D3E8, WH-MXF12D6E5, WH-MXC12D6E5, WH-MXF12D9E8, WH-MXC12D9E8 Aquarea HT WH-MHF09D3E5, WH-MHF09D3E8, WH-MHF12D6E5, WH-MHF12D9E8 'HYLFHVKDYHDKLJKHIÀFLHQF\SXPSDQGIXOÀOOWKHFULWHULDRIWKH(FRGHVLJQ'LUHFWLYH valid from 2015 for energy related products (ErP) Aquarea air/water heat pump – Installation manual for compact systems 03 / 2013 1–5 Introduction Symbols used | Tools required 1.4 Symbols used The warnings in this manual absolutely must be heeded, as they are safety-critical. The symbols have the following meanings: Danger! Danger of fatal injury from electric shock if not observed Danger! Danger of fatal injury or damage to health if not observed Warning! Material damage if not observed NOTE Further information ³ 1.5 Tools required ,GHQWLÀFDWLRQRIDVWHS We recommend that you use the following tools: 1.6 To be provided by customer 1–6 Phillips-head screwdriver Spirit level Electric drill Set of spanners Knife Tape measure Multimeter Torque wrench, 39.2 Nm Torque wrench, 58.8 Nm Gas leak detector The following components must be provided by the customer: 2-way directional valve set 3-way directional valve set Analogue room thermostat (e.g. RAA20 Siemens) or programmable room thermostat (e.g. REV200 Siemens) Anchoring to prevent tipping over Dirt trap (mesh width at least 500 to 600 μm) Propylene glycol antifreeze mixture )OXVKPRXQWHGER[IRUÀWWLQJ the wired remote control Heating circuit mixer closedloop control Dew point monitor Device for draining the system Insulation for pipelines Aquarea air/water heat pump – Installation manual for compact systems 03 / 2013 Introduction 1.7 Installation sequence This installation manual is written so that the sequence of sections corresponds to the sequence of installation steps to be performed. These are primarily as follows: POWER SUPPLY 1 5 LA1 6 TIMER OUTDOOR LA3 N 4 3 7 HEAT COOL TANK QUIET HEATER FORCE OPERATION LA2 ACTUAL HEATER BOOSTER DEFROST SETTING STATUS SERVICE WATER OUTLET OFF/ON SETTING STATUS TIMER SET MODE CHECK OFF/ON SELECT QUIET HEATER SEARCH CLOCK CANCEL ERROR RESET FORCE 2 SERVICE 1 No. Installation step Section no. 1 Installing the device 4 2 Connecting the water pipes 6 3 Filling and venting the system 6 4 Connecting the device to the electricity mains 7.1 5 Connecting inputs and outputs (interfaces) 7.2 6 Installing the wired remote control 7.3 7 Commissioning Aquarea air/water heat pump – Installation manual for compact systems 8 03 / 2013 1 Introduction Installation sequence 1–7 Safety instructions Hazard instructions for avoiding electric shock and damage to health 2 Safety instructions 2.1 General hazard instructions for avoiding electric shocks Danger! Observe and comply with the following hazard instructions. ,I\RXIDLOWRGRVRWKHUHLVDGDQJHURIHOHFWULFVKRFNRUÀUH 2QO\TXDOLÀHGHOHFWULFLDQVPD\SHUIRUPWKHHOHFWULFDOLQVWDOODWLRQZRUN All service and maintenance work must also be performed by a certiÀHGHOHFWULFLDQRUDQDXWKRULVHGGHDOHU Keep children and persons who are unfamiliar with the system clear of the working area. When working on the device, comply with the national and local standards and regulations. The cables and electricity connections, including existing connections, must be suitable for the electrical capacity of the heat pump. 'RQRWXVHQRQDSSURYHGPDLQVFDEOHVPRGLÀHGFDEOHVRUH[WHQVLRQ cables to connect to the electricity mains. The device must be earthed correctly. It may not be earthed to gas or water pipes, lightning conductors or the earthing of the telephone system. Comply with the respective national wiring rules and safety precautions for fault current. Panasonic recommends that you use a RCD. 2.2 General hazard instructions to avoid damage to health Danger! Observe and comply with the following hazard instructions. If you fail to do so, there is a risk of fatal injury or damage to health. The refrigerant can cause freezing if it comes in contact with skin. 2QO\XVHWKHUHIULJHUDQWVSHFLÀHG7KHUHIULJHUDQWPD\QRWEHPL[HG with other types of refrigerant or replaced with other types of refrigerant. Using other refrigerants can damage the device and result in safety problems. The manufacturer accepts no responsibility or warranty if refrigerants of types other than R410A are used for the Aquarea LT series and T-CAP or R407C for the Aquarea HT series. 2–8 Aquarea air/water heat pump – Installation manual for compact systems 03 / 2013 Safety instructions Hazard instructions for avoiding material damage | Information 'RQRWLQVWDOOWKHGHYLFHLQORFDWLRQVZKHUHOHDNVRIÁDPPDEOHJDVHV FDQRFFXU2WKHUZLVHWKHUHLVDULVNRIÀUHRUH[SORVLRQV 2.3 General hazard instructions for avoiding material damage Warning! Observe and comply with the following instructions. If you do not, there LVDULVNRIPDWHULDOGDPDJHHJYLDYLEUDWLRQZDWHUOHDNVRUÀUH All installation work for the water circuit must comply with all relevant European and national regulations (including EN 61770). The compact unit is only intended for external installation and may not be installed indoors. 8VHRQO\HQFORVHGRUVSHFLÀHGSDUWV If the compact unit is to be installed close to the sea, in highly sulphurous regions or regions with high oil-contents (e.g. machine oil etc.), its service life may be reduced. 2.4 General further information NOTE The following information provides recommendations or advanced assistance. Air / water heat pumps require planning permission in Wales and Northern Ireland and must meet certain criteria in England and Scotland to be classed as a permitted development. If in doubt, check with \RXUORFDOSODQQLQJRIÀFH For details on preventing water pipes freezing and heat and cold protection, see the WRAS guidelines and BS EN 806 and BS 6700. The design handbook for split systems and compact systems contains further information on the device. Aquarea air/water heat pump – Installation manual for compact systems 03 / 2013 2–9 2 Safety instructions Only use the device in sealed systems. Use in an open-vented system can result in excessive corrosion of the water pipes and increase the risk of bacteria colonies forming in the water, legionella in particular. Device overview Components 3 Device overview 3.1 Components 9 1 6 14 2 4 8 13 10 11 3 12 5 7 b a Connection name Component name 1 Electronic circuit board (view without upper cabinet panel) 2 Pressure relief valve (view without cover) 3 Flow rate cut-out 4 Manometer 5 3-phase water recirculation pump (Figure shows standard pump) 8 Front panel 9 Upper cabinet panel a Water return Ø R 1¼ b Water supply Ø R 1¼ 10 Temperature limit switch (differs from model to model) 11 Additional electric heater (3, 6 or 9 kW) 12 Expansion tank 6 RCD (differs from model to model) 13 Cover 7 Cable gland 14 Quick vent Components of the compact unit with two fans 3 – 10 Aquarea air/water heat pump – Installation manual for compact systems 03 / 2013 Device overview Dimensions diagram | Mini compact unit, with nominal output from 6 to 9 kW | Compact unit with nominal output from 9 to 16 kW 3.2 Dimensions diagram 3.2.1 Mini compact unit with a nominal output of 6 to 9 kW 1,283 39 320 2 3 Device overview 795 865 3 175 275 220 187 154 1 110 83.5 355.5 400 320 135 4 160 1 Front view 185 2 Side view 3 Rear view 150 980 150 4 Top view 'LPHQVLRQVRIFRPSDFWXQLWZLWKRQHIDQLQPP7KHDLUÁRZLVLQGLFDWHGE\DUURZV 3.2.2 Compact unit with a nominal output of 9 to 16 kW 1,283 320 1,410 1,340 39 275 175 220 3 187 2 154 1 110 320 355.5 400 135 4 83.5 160 1 Front view 185 2 Side view 3 Rear view 150 980 150 4 Top view 'LPHQVLRQVRIFRPSDFWXQLWZLWKWZRIDQVLQPP7KHDLUÁRZLVLQGLFDWHGE\DUURZV Aquarea air/water heat pump – Installation manual for compact systems 03 / 2013 3 – 11 Device overview Accessories 3.3 Accessories No. Component Quantity Comments Included 1 Drain elbow 1 × 2 Cable ties 3 × 3 Cable bush 2 × 4 Wired remote control 1 × 5 Add-on circuit board for solar thermal connection CZ-NS2P 1 Add-on circuit board for solar thermal connection (compact systems) 6 Add-on circuit board for solar thermal connection CZ-NS2P 1 Add-on circuit board for solar thermal connection (mini compact systems) 1 Stainless steel tank 1 Enamelled 1 Enamelled 1 Sensor with cable and immersion sleeve for installation in third party tanks 1 Heating band attached on the ÁRRUSODWHLQVLGHWKHXQLW VFDVLQJ to prevent the water incurred during defrosting from freezing Hot-water tank 7 WH-TD20B3E5 200 litres WH-TD20B3E5 300 litres Hot-water tank 8 HR 200 200 litres HR 300 300 litres Hot-water tank 9 HR 300 300 litres HR 500 500 litres 10 Temperature sensor installation set CZ-TK1 for third party tanks Additional casing heater unit CZ-NE1P for series: 11 3 – 12 Aquarea T-CAP, Aquarea HT, Aquarea LT series mini compact units Aquarea air/water heat pump – Installation manual for compact systems 03 / 2013 Location / Installing the device Location 4 Location / Installing the device 4.1 Location Weights of the compact units Aquarea LT single-phase (one fan) 112 kg Aquarea LT single-phase 153 kg Aquarea LT three-phase 157 kg Aquarea T-CAP single-phase 155 kg Aquarea T-CAP three-phase 158 kg Aquarea HT n. a. The installation location must meet the following criteria: 4 Location / Installation General Even and horizontal Load-bearing (see device weight table) No outside temperature under -20 °C ,QVWDOODWLRQDWDKHLJKWVXIÀFLHQWWRSURWHFWDJDLQVWZHDWKHULQÁXHQFHV such as snow or water levels The height difference of the liquid system circuit may not exceed 7 m Easy access for maintenance work Condensate must drain away easily No damage to other objects if water leaks If a solar installation is connected, the connection cable between the solar pump station and the compact unit may not be longer than 10 metres Minimum clearances The minimum clearances (see Figure) must be observed. 2 1 Minimum clearance 100 mm 2 Minimum clearance 300 mm 3 Minimum clearance 1,000 mm 1 3 2 Minimum clearances of the compact unit to adjacent walls and objects, indicating the air ÁRZGLUHFWLRQ Aquarea air/water heat pump – Installation manual for compact systems 03 / 2013 4 – 13 Location / Installing the device Location Air circulation In general, choose an installation location with good air circulation No additional guards such as awnings etc. No sources of heat or steam nearby No objects nearby which could short circuit the exhaust air No direct wind impact on the suction side of the unit If multiple units are used, observe the minimum clearance between units Incorrect Incorrect Correct 1 1 Minimum clearance 100 mm Correct alignment of multiple external or compact units Note The design handbook for split systems and compact systems contains further information on VRXQGSURRÀQJ 4 – 14 6RXQGSURRÀQJ The operating noise of the compact unit must not bother the user or neighbours. The compact unit sound output direction should face the street side if possible, as neighbouring rooms which require protection seldom face in this direction. Aquarea air/water heat pump – Installation manual for compact systems 03 / 2013 Location / Installing the device Installation 4.2 Installation Danger! At least four persons are required for installation work. Otherwise, the weight of the device can lead to injuries. Transport and lifting equipment must be suitable for the device weight. If possible, the device should only be moved with the appropriate transport and lifting equipment. The lifting equipment can be attached to the base structure of the device using lugs. ³ Transport the device to the planned installation location. 4 Location / Installation ³ Remove the packaging carefully. ³ Fasten the device with four M12 anchor bolts (tightening force > 15,000 N) Transport the device carefully to avoid damage. That includes placing / lowering the device in the installation location. 1 2 Stone / gravel ≥ 60 mm 4 Floor 1 3 ≥ 300 mm 3 &RQFUHWHRUÁRRUSODWH 4 4 2 3 80 mm > 20 mm Anchor bolt 320 980 1,280 355.5 0LQLPXPUHTXLUHPHQWVIRUDQFKRULQJWKHFRPSDFWXQLWWRWKHÁRRURUDIRXQGDWLRQOHIWRUGLUHFWO\WRDEDVHSODWHULJKW Compact unit drilling template For installation locations which can be impacted by strong winds, e.g. wind between buildings, including building roofs, the compact unit must be secured on-site with additional anchoring to prevent it toppling over. Protection against toppling over via anchoring Aquarea air/water heat pump – Installation manual for compact systems 03 / 2013 4 – 15 Opening the device 5 Opening the device 7KHZRUNPD\RQO\EHSHUIRUPHGE\TXDOLÀHGRUFHUWLÀHGSHUVRQQHO Danger! Ensure that the device is disconnected from the power supply before you perform the steps listed below. Remove the front panel ³ Remove the 5 fastening screws ³ Push the front panel of the cabinet downwards to release the safety catches. 1 ³ Pull the front panel forwards to remove it. 1 1 Fastening screws 1 Removing the upper cabinet panel ³ Remove the 11 fastening screws. ³ Lift the upper cabinet panel from the device. Reverse the steps accordingly to close the device. 1 Fastening screws 5 – 16 Aquarea air/water heat pump – Installation manual for compact systems 03 / 2013 Hydraulic installation 6 Hydraulic installation Danger! 7KHZRUNFDQRQO\EHSHUIRUPHGE\TXDOLÀHGRUFHUWLÀHGSHUVRQQHO Follow these instructions to prevent damage to the compact unit and the other components of the system: Flush the pipelines before connecting the device, to remove impurities. Impurities can damage the components of the device. Ensure that the components installed in the wet circuit can withstand high operating water pressures. Use only suitable sealants which can withstand the pressure and temperature of the system. Never use worn pipes. Do not use a pipe wrench to mount the connections. Use two adjustable wrenches to tighten the connection. There must be at least 50 litres (for 12.0 to 16.0 kW devices) or 30 litres (for 6 to 9.0 kW devices) of liquid in the system. If these values are not reached, an additional storage tank must be installed. The standard expansion tank can be used for heating systems with a total water quantity in the system of less than 200 litres (without a hot-water tank) and a static system height of no more than 7 metres (difference of the highest point of the system to the expansion tank). If the total water quantity is greater than 200 litres or greater static heights are required, pressure retention must be ensured via an expansion tank to be installed by the customer. In general, the pressure level of the pressure relief valve must be observed. See the technical details for the pressure level, to a maximum of 3 bar. Aquarea heat pumps may only be installed as sealed systems without direct contact of the heating water to the ambient air. NOTE The compact units feature an expansion tank as standard (approx. 10 litres of air capacity, initial pressure of 1 bar). By contrast, the mini compact units WH-MDF06E3E5 and WH-MDF09E3E5 with heating capacities of 6 and 9 kW have an expansion tank with only 6 litres of volume. Accordingly, these devices can only be used for heating systems with a total water quantity in the system of under 150 litres. See the design handbook for split systems and compact systems for connection variants. Aquarea air/water heat pump – Installation manual for compact systems 03 / 2013 6 – 17 6 Hydraulic installation Warning! Hydraulic installation Description of the functions of the sample hydraulic installation with water heating and heating The hot-water tank 5 is supplied with heat as an alternative to the heating circuits. For this purpose, the heat pump controller opens the three-way directional valve towards the hot-water tank. Then, the hot-water tank is charged to the target temperature with appropriate supply temperature. N CLOSE OPEN N 8 9 10 11 12 13 14 15 16 17 18 19 20 21 22 23 OPEN OPEN 7 CLOSE 6 N 5 HEAT 4 COOL 3 N 2 L 1 CLOSE Schematic diagram – the relevant standards and directives must be observed! In heating mode, the heat pump controller opens the three-way directional valve towards the heating circuits and supplies them with heat. The supply temperature is controlled based on the outside temperature 3 and corresponds to the required temperature of the hottest heating circuit for mixed heating circuits. Heating circuits with lower supply temperatures must be adjusted to the right temperature using heating circuit mixers 4 (to be provided by the customer) by adding return heating water. A room thermostat 2 (to be provided by customer) deactivates heating mode of the heat pump when it reaches the target room temperature and prevents IXUWKHUDFWLYDWLRQDQGGHDFWLYDWLRQRIWKHKHDWSXPS$QRYHUÁRZYDOYHEHWZHHQWKHVXSSO\DQGUHWXUQSLSHV HQVXUHVWKDWWKHPLQLPXPYROXPHÁRZRIWKHKHDWSXPSLVJXDUDQWHHGHYHQZLWKWKHUPRVWDWLFUDGLDWRUYDOYHV and heating circuit mixers. 2 M 4 5 3 M 1 min. 50 l Vessel for increasing the total water volume to be used when the total volume is lower than the minimum volume. 1 Cold water connection 2 Room thermostat 3 Outside temperature sensor (integrated in outdoor unit) 4 Heating circuit mixer closed-loop control (to be provided by customer) 5 Hot-water tank WH-TD20B3E5 Sample hydraulic installation with water heating and heating system (see Aquarea design handbook for other examples) Legend M min. 50 l 6 – 18 Manometer Thermostatic radiator valve / Single room controller valve 3-way directional valve/ 3-way mixer Pump Drain funnel Non-return valve Shutoff valve Dirt trap Pressure-reducing valve Pressure relief valve Storage tank for minimum volume Supply Temperature sensor Control wire 2YHUÁRZYDOYH Water tapping point Return Aquarea air/water heat pump – Installation manual for compact systems 03 / 2013 Hydraulic installation ³ Open the compact unit as described in Section 5. ³ Install the pipes, valves, dirt trap and other components in accordance with the design documents. 1 Water supply WATER OUT 2 Dirt trap 1 3 Water return WATER IN 4 Union nut 5 Connection 2 6 Shutoff valve 3 5 4 6 Position of the dirt trap ³ Install a dirt trap (to be provided by the customer) upstream of the water inlet (water return) of the compact unit (grid width at least 500 to 600 μm) to protect the heat pump. We recommend installing a shutoff valve upstream and downstream of the dirt trap, to make subsequent maintenance work on the dirt trap easier. Warning! In cooling mode, humid air can condense on the surface of the heat transfer systems if the temperature drops below the dew point. This can damage WKHEXLOGLQJRUPDNHWKHÁRRU slippery. As a result, you must install suitable positioned dew point sensors to ensure that temperatures lower than the dew point do not occur or drain any condensate which forms reliably. In addition, the pipelines affected must be insulated impermeably. ³ If a heat pump with a cooling function is used, install a 2-way directional valve to deactivate the heating circuits in cooling mode, where applicable. ³ ,QVWDOODQRYHUÁRZYDOYHLIQRK\GUDXOLFGHFRXSOLQJHJK\GUDXOLF VZLWFKRUVWRUDJHWDQNLVSODQQHG(QVXUHWKDWWKHRYHUÁRZYDOYH LVQRWGHVLJQHGIRUWKHPLQLPXPYROXPHÁRZEXWIRUWKHQRPLQDO YROXPHÁRZRIWKHUHVSHFWLYHKHDWSXPS ³ Install the 3-way directional valve (to be provided by the customer) to switch from heating mode to water heating mode and vice versa. As standard, the valve should be open towards the heating circuit (contacts 4 and 6 are closed). The valve must also be CE compliant and may not exceed the peak load of 12 VA. ³ Use Rp 1¼" nuts to connect the water inlet (labelled WATER IN) and water outlet (labelled WATER OUT). Use a torque wrench to tighten it, and apply the correct torque: 117.6 Nm . ³ Close the supply (water outlet) and return (water inlet) of the compact unit at the heat exchanger of the hot-water tank. Ensure that you do not confuse the connections (supply = top, return = bottom). ³ Install a device for draining the system (to be provided by the customer). Aquarea air/water heat pump – Installation manual for compact systems 03 / 2013 6 – 19 6 Hydraulic installation Warning! Hydraulic decoupling between the heat pump circuit and heat emitter circuit is always required when using Aquarea heat SXPSVZLWKKLJKHIÀFLHQF\ SXPSV²RYHUÁRZYDOYHVPD\ not be used. Hydraulic installation ³ Insulate the pipes in accordance with the latest UK building regulations, although the below is recommended: Type of pipes/Fittings Minimum thickness of insulation layer Internal diameter up to 22 mm 40 mm Internal diameter from 22 mm to 35 mm 60 mm Internal diameter from 35 mm to 100 mm 2 × internal diameter Recommended thermal insulation of heat distribution and hot water pipes Warning! In compact systems, there is a risk of freezing if the heating cirFXLWLVÀOOHGZLWKZDWHUDQGWKH outside temperature falls below &7KDWFDQFDXVHVLJQLÀFDQW damage to the device. The customer is responsible for ensuring that the device does not freeze. Please use one of the following options to do so: The heating circuit is operated with a food safe antifreeze mixture (40 % propylene glycol mixture) for temperatures down to -20 °C) An additional heater unit in the compact unit prevents the heating circuit freezing. The heating circuit is drained by a system to be provided by the customer (manual or automatic). Warning! To prevent damage to the heat pump from lime scale, please consult BS 7593 “Code of practice for treatment of water in domestic hot water central heating systems”. ³ Fill the system as follows: ³ Open all thermostatic radiator valves of the heating system, and all other shutoff valves where applicable. ³ &RQQHFWDÀOOLQJKRVHHYDFXDWHGLISRVVLEOHWRWKHV\VWHP 1 1 Manometer ³ Keep adding water or antifreeze mix until the manometer reaches the nominal pressure. ³ Vent the system (see the Commissioning section). Then check the pressure again and add liquid if necessary 6 – 20 Aquarea air/water heat pump – Installation manual for compact systems 03 / 2013 Hydraulic installation 1 Connecting the drain hose 1 Warning! If the device is used in areas where the temperature can remain below zero for 2 to 3 days, condensate pipes should not be used, as the condensate could freeze, which can cause malfunctions. ³ Proceed as follows to install a condensate pipe to drain condensate formed in the compact unit during operation: ³ Use a drain hose with an internal diameter of 15 mm. ³ Connect the drain hose to the compact unit. ³ Lay the drain hose with a downward slope. For long drain hoses, use a metal support if necessary to prevent the hose bending. ³ Lay the drain hose so that closures or blockages cannot occur. 6 Hydraulic installation ³ Do not insert the drain hose in a waste water system from which aggressive gasses such as ammonia gas, sulphur gas etc. can escape. Aquarea air/water heat pump – Installation manual for compact systems 03 / 2013 6 – 21 Electrical installation 7 Electrical installation Danger! 7KHZRUNPD\RQO\EHSHUIRUPHGE\TXDOLÀHGRUFHUWLÀHGSHUVRQQHO Ensure that you have disconnected the power supply before you perform installation work. Secure the power supply to prevent unintentional reactivation. Ensure that all cables have the correct polarity. If this is not the case, HOHFWULFVKRFNVRUÀUHFDQUHVXOW Ensure that the cables can never come into contact with hot objects such as the water pipes. High temperatures can damage the insulation. 2EVHUYHWKHIROORZLQJVSHFLÀFDWLRQVIRULQVWDOODWLRQ Correct Incorrect Incorrect 10 mm ± 1 Correct Incorrect min. 5 mm The clearance The insulation must be at least 10 mm +/- 1 mm in length. Ensure that all strands are clamped. between the cables must be at least 5 mm. 7 – 22 Clamping screw connection Tightening torque (NM) M4 157 – 196 M5 196 – 245 Aquarea air/water heat pump – Installation manual for compact systems 03 / 2013 Electrical installation Mains connections 7.1 Mains connections Mains connection for compact unit, 9 kW (three-phase) LA1 Mains connection for compact unit, 6 to 9 kW (single-phase) 1 2 1 2 POWER SUPPLY 1 POWER SUPPLY 2 POWER SUPPLY 1 POWER SUPPLY 2 LA2 LA3 N L 3 N L N 3 L N 3 LA1 LA2 LA3 N L N L1 N 1 L N LA1 LA2 LA3 N L N L1 N 1 L N Power supply 1 Power supply 1 Power supply 2 1 Compact unit and 2 Electric immersion heater for heat pump 1 Compact unit for hot-water tank additional electric heater 2 Additional electric heater for heat pump and 3 Strain relief Mains connection for compact unit, 12 to 16 kW (three-phase) Power supply 2 electric immersion heater for hot-water tank 3 Strain relief Mains connection for compact unit, 12 to 16 kW (single-phase) LA1 1 2 3 1 2 3 POWER SUPPLY 1 POWER SUPPLY 3 POWER SUPPLY 2 POWER SUPPLY 1 POWER SUPPLY 2 POWER SUPPLY 3 LA2 LA3 N LA1 LA2 LA3 4 N L N L N 4 L 4 LA1 LA2 LA3 N LC1 LC2 LC3 N L N L N L1 N1 LC1 LC2 LC3 N L N L N L1 N1 Power supply 3 Power supply 2 1 Compact unit 2 Additional electric heater for heat pump Power supply 1 3 Electric immersion heater for hot-water tank 4 Strain relief Aquarea air/water heat pump – Installation manual for compact systems L N 4 LA1 LA2 LA3 N Power supply 1 N Power supply 2 L2 N 2 L2 N 2 Power supply 3 1 Compact unit 2 Electric immersion heater for hot-water tank 03 / 2013 Electrical installation 7 3 Additional electric heater for heat pump 4 Strain relief 7 – 23 Electrical installation Mains connections ³ Open the compact unit as described in Section 5. ³ Use cables compliant with 60245 IEC 57 or thicker for the mains connections. 1 Mains connections 2 Cable ties 3 Cable gland 1 2 3 Laying the cables inside the device ³ Cut into the cable gland in a cross shape using a knife. ³ Route the cables through the enclosed cable gland on the right side of the housing to prevent the cables being damaged by sharp edges. ³ Connect the mains connection cable as shown in the diagrams. Ensure that the earthing cable is slightly longer than the other cables. ³ Use the strain reliefs to secure the mains connection cables. ³ Connect the other end of the mains connection cable to the fuses. 7 – 24 Aquarea air/water heat pump – Installation manual for compact systems 03 / 2013 Electrical installation Mains connections ³ Use the following fuses to protect the individual mains connections (isolating distance between the pins at least 3.0 mm each): Fuse Device name Mains connection 1 Mains connection 2 Mains connection 3 WH-MDC09C3E8, WH-MDF09C3E8, WH-MXC09D3E8, WH-MXF09D3E8, WH-MHF09D3E8 20 A 16 A – WH-MDC12C9E8, WH-MDC16C9E8, WH-MDF14C9E8, WH-MXC12D9E8, WH-MHF12D9E8 WH-MDC14C9E8, WH-MDF12C9E8, WH-MDF16C9E8, WH-MXF12D9E8, 20 A 16 A 16 A WH-MDF06E3E5, WH-MDF09C3E5, WH-MXC09D3E5, WH-MXC12D6E5, WH-MHF09D3E5 WH-MDC09C3E5, WH-MDF09E3E5, WH-MXF09D3E5, WH-MXF12D6E5, 30 A 30 A – 30 A 30 A 16 A Aquarea air/water heat pump – Installation manual for compact systems 7 Electrical installation WH-MDC12C6E5, WH-MDC14C6E5, WH-MDC16C6E5, WH-MDF12C6E5, WH-MDF14C6E5, WH-MDF16C6E5, WH-MHF12D6E5 03 / 2013 7 – 25 Electrical installation Solar pump station OPEN CLOSE Solar 3-way directional valve N 13 14 15 16 17 18 19 20 21 7.2 Inputs and outputs (external interfaces) 22 23 Inputs and outputs (external interfaces) Ext. control signal Temperature sensor for hot-water tank 9 10 11 12 Temperature limit switch for hot-water tank HEAT COOL Room thermostat N 7 8 L 7 – 26 6 N 5 OPEN 4 CLOSE 3 N 2 OPEN 1 Electric immersion heater for hot-water tank CLOSE 3-way directional valve 2-way directional valve Aquarea air/water heat pump – Installation manual for compact systems 03 / 2013 Electrical installation Inputs and outputs (external interfaces) Number Cable Comments Solar pump station Input of the ON signal from solar pump 2 (230 V AC) Use additional circuit board CZ-NS1P, CZ-NS2P or CZ-NS3P 2 Connect the 3-way directional valve VRWKDWLWSUHYHQWVÁRZWKURXJKWKH solar circuit and heat exchanger of the hot-water tank when closed. 3 Solar 3-way directional valve Output for triggering the solar 3-way directional valve CLOSE N 2 17 18 These two terminals are jumpered on delivery. Connection: 1-pin (min. 3 mm contact clearance) OPEN M 19 to 21 Function 22 23 22 to 23 Connection 19 20 21 Terminals When the contacts are open, the device is switched off and the remote control is disabled. Ext. control signal Input for external control signal Temperature sensor for hotwater tank Input for temperature sensor of the hot-water tank Use an NTC sensor 2 15 to 16 Temperature limit switch for hot-water tank Input for temperature limit switch of the hot-water tank Terminals 13 / 14 must be jumpered if no temperature limit switch is used for the hot-water tank 2 13 to 14 The jumper between terminal 17 and 18 must be removed, if the external control device (optional) is connected to the hydro module. The max. operating current of the control device must be less than 3 Ams. L1 L2 9 10 11 12 L/L1 L/L 2 Room temperature > Target temperature Circuit open (heating off) Circuit closed (cooling on) Room temperature < Target temperature Circuit closed (heating on) Circuit open (cooling off) Operating mode heat pump Heating Cooling The maximum output capacity of the electric immersion heater for hot-water storage tanks should not exceed 3 kW 3 N 2 OPEN (AB -> B) OPEN 1 Heating circuit CLOSE (AB -> A) CLOSE 3 B 3 N N 2 A 3 OPEN CLOSE M 2-way directional valve Connection on automatic deactivation of heating circuits in cooling mode 230 V output for controlling via a 2-way directional valve the 2-way directional valve Top: Motorised 2-way directional valve HJIRUÁRRUKHDWLQJFRROLQJ Bottom: Spring-loaded 2-way directional valve, normally open Hot-water tank AB M 230 V output for control of the 3-way directional valve (e.g. for heating, hot-water tank) 7 3 M 3-way directional valve 1 1 to 3 230 V output for activating / deactivating the electric immersion heater for hot-water storage tanks Condition 6 4 to 6 Electric immersion heater for hot-water tank Input for external room thermostat 5 Mass to 8 Room thermostat 4 9 to 12 4 For exclusive control of heating HEAT mode via the external room thermoCOOL N stat, only phases L and L1 are conL nected to the terminal strip. This also applies for devices without a cooling function. This connections do not permit switching between heating and cooling mode. Electrical installation 17 to 18 Terminal strip and table of inputs and outputs with functions Aquarea air/water heat pump – Installation manual for compact systems 03 / 2013 7 – 27 Electrical installation Inputs and outputs (external interfaces) 1 Terminal strip 2 Cable ties 3 Cable gland 1 2 3 Laying the cables inside the device 1 Cable gland 2 Chamber front panel 1 3 Power supply (3-core or 5-core for three-phase 400 V compact units) 2 6 4 Cable for 3-way directional valve (3-core) 5 5 Cable for 2-way directional valve (3-core) 6 Optional cable Note The outside temperature sensor is in the compact unit and does not have to be installed or connected as the measurements are transferred via an internal connection. 3 4 Laying the cable into the device ³ If necessary, open the compact unit as described in Section 5. ³ Cut into the cable gland in a cross shape using a knife. ³ Route the cables through the enclosed cable gland on the right side of the housing to prevent the cables being damaged by sharp edges. ³ Connect the cables to the terminal strips as in the above overviews. Make sure you use the correct connections. ³ Secure the cable using adhesive tape and cable ties as shown in WKHÀJXUH(QVXUHWKDWWKHFDEOHVFDQQRWFRPHLQWRFRQWDFWZLWKKRW device parts. 7 – 28 Aquarea air/water heat pump – Installation manual for compact systems 03 / 2013 Electrical installation Installing the wired remote control 7.3 Installing the wired remote control Warning! Please follow these instructions to prevent damage and problems: Do not change the length of the cable for the wired remote control. Install the wired remote control cable at least 5 cm away from other electric cables. Do not install the wired remote control cable in the immediate vicinity of water or condensate pipes. The installation location must be dry. The wired remote control must be installed so that it is not exposed to direct sunlight. Mount the wired remote control in as level a location as possible to prevent the wired remote control bending. Observe the minimum clearances as shown in the following diagram: Component Quantity Comment 1 Remote control cable 1 15 m long Screw (M4 × 30 mm machine screw) 3 For installing the remote control on an outlet (embedded connection cable) Screw (M4 × 14 mm self-tapping screw) 3 Installing the remote control on the wall (exterior connection cable) Included accessories Aquarea air/water heat pump – Installation manual for compact systems 7 Electrical installation Remote control 03 / 2013 7 – 29 Electrical installation Installing the wired remote control 1 Upper cover 2 Lower cover 3 3 Clearance 30 mm 4 Clearance 120 mm 3 1 3 2 4 Minimum clearances to be observed for the wired remote control ³ If necessary, open the compact unit as described in Section 5. 1 Upper cover 2 Lower cover 1 3 Screw, M4 × 30 or M4 × 14 2 3 Opening the wired remote control ³ 5HPRYHWKHORZHUFRYHURIWKHZLUHGUHPRWHFRQWUROE\SODFLQJDÁDW head screwdriver or similar tool in the lower slots and carefully leverLQJWKHXSSHUDQGORZHUFRYHUVDSDUW(QVXUHWKDW\RXGRQ WGDPDJH the housing. ³ Remove the lower cover. Ensure that the protective tape between the circuit board and the upper cover is not removed. 7 – 30 Aquarea air/water heat pump – Installation manual for compact systems 03 / 2013 Electrical installation Installing the wired remote control Laying concealed cables You can lay the wired remote control cable so that it is concealed or visible: 7.3.1 Laying concealed cables Laying concealed cables 2 1 Upper cover 1 2 Upper clamp 3 Plug connector (CON1) 4 Lower cover 3 5 Screw 6 Lower clamp 4 8 7 Flush-mounted box 8 Remote control cable 7 5 6 Laying cables in the wired remote 1 Upper cover control 1 6 3 Lower cover 4 Tabs 2 5 Upper cover 6 Cable connection (CON1) Danger! Lay the cable as shown in WKHÀJXUHDERYHVRWKDWWKH housing of the wired remote control can be closed securely. Warning! In cavity walls, use a bushing for the wired remote control cable to prevent rodents biting the wire. 5 3 4 7 ³ ,QVHUWDÁXVKPRXQWHGER[WREHSURYLGHGE\WKHFXVWRPHULQWRWKH wall (medium-sized rectangular socket, Panasonic part no. DS3744 or similar). ³ Insert the wired remote control cable into the socket. ³ Route the concealed wired remote control cable to the wired remote FRQWURODVVKRZQLQWKHÀJXUH ³ Use the two supplied M4 × 30 screws WRIDVWHQWKHORZHUFRYHURIWKHUHPRWHFRQWUROWRWKHÁXVKPRXQWHG socket. Ensure that the lower cover is not under strain and do not tighten the screws excessively. Use only the supplied screws. ³ Fasten the connection of the remote control cable to the plug connector (CON1) in the upper cover of the circuit board. Ensure that is securely attached. ³ Secure the upper cover to the lower cover of the remote control using the clamps provided. Aquarea air/water heat pump – Installation manual for compact systems 03 / 2013 7 – 31 Electrical installation 2 Cable outlet to the rear Electrical installation Installing the wired remote control Laying visible cables 7.3.2 Laying visible cables 1 Remote control cable 2 Upper clamp 1 2 3 Upper cover 4 Plug connector (CON1) 5 Lower cover 6 Screw 3 4 5 7 Lower clamp 6 7 Laying visible cables 1 4 1 Cable outlet to the top 5 2 Lower cover 3 Tabs 4 Remote control cable 2 5 Notches 3 Danger! Lay the cable as shown in WKHÀJXUHDERYHVRWKDWWKH housing of the remote control can be closed securely. ³ Use the two supplied M4 × 14 screws to secure the lower cover of the remote control to the wall. When tightening the screws, ensure that the screw heads not sitting proud. Use only the supplied screws. ³ Select an outlet direction of your choice for the remote control cable and use a wire cutter to open one of the notches provided for this purpose in the upper cover in accordance with the outlet direction. ³ Route the remote control cable in the lower cover as shown in the ÀJXUHEDVHGRQWKHRXWOHWGLUHFWLRQVHOHFWHG ³ Fasten the connection of the remote control cable to the plug connector (CON1) in the upper cover of the circuit board. Ensure that is securely attached. ³ Secure the cover to the lower cover of the remote control using the clamps provided. 7 – 32 Aquarea air/water heat pump – Installation manual for compact systems 03 / 2013 Electrical installation Installing the wired remote control Connection to the compact unit 7.3.3 Connection to the compact unit ³ If necessary, open the compact unit as described in Section 5. 1 2 1 Remote control cable 2 CNREMOTE2 connection 3 Cable ties 4 Cable gland 3 4 1 Remote control cable 2 Chamber front panel 2 1 Electrical installation 7 Laying the cable into the device ³ Cut into the cable gland in a cross shape using a knife. ³ Route the cables through the enclosed cable gland on the right side of the housing to prevent the cables being damaged by sharp edges. ³ Remove the dummy connection from the CN-REMOTE2 connection. ³ Connect the wired remote control cable to the CN-REMOTE2 connection. Ensure it is attached securely. ³ 6HFXUHWKHFDEOHXVLQJFDEOHWLHVDVVKRZQLQWKHÀJXUH(QVXUHWKDW the cables cannot come into contact with hot device parts. Aquarea air/water heat pump – Installation manual for compact systems 03 / 2013 7 – 33 Commissioning Commissioning 8 Commissioning 8.1 Commissioning Danger! 2QO\TXDOLÀHGRUFHUWLÀHGSHUVRQQHOPD\ZRUNRQWKHRSHQGHYLFH The device carries potentially fatal voltage when open. Ensure that you do not touch any live device parts. 1 Manometer 2 Water recirculation pump (Figure shows standard pump) 1 2 1 Fastening screws 3 2 Lever 2 3 Pressure relief valve 4 Raise lever 1 4 Pressure relief valve ³ Open the compact unit as described in Section 5. ³ Vent the heating system. Proceed as follows to do so: ³ /RRVHQWKHIDVWHQLQJVFUHZVDVVKRZQLQWKHÀJXUHDQGUHPRYH the cover. ³ Set the lever of the pressure relief valve to the horizontal position (open). The enclosed air can now escape. 8 – 34 Aquarea air/water heat pump – Installation manual for compact systems 03 / 2013 Commissioning Commissioning Setting the standard pump ³ Return the lever of the pressure relief valve to the basic setting (closed) after a few seconds. ³ Repeat the process until you can no longer hear air bubbles moving. ³ Check the system pressure on the manometer. In normal operation, the system pressure should be between 0.5 bar and 3 bar. If necessary, set the target pressure. ³ Check the cooling circuit in the compact unit for leaks. Any leaks must be repaired. ³ Perform a test run to ensure that no malfunctions occur after installation. Proceed as follows to do so: ³ Switch the RCD to ON. ³ Switch on the compact unit (OFF/ON button) on the operator control panel or wired remote control). See the next section for operation and programming. 0 5 10 15 20 25 Flow rate [l / min] Warning! Ensure that the minimum ÁRZUDWHGRHVQRWIDOOEHORZ 19 l / min or 10 l / min for Aquarea Mini compact devices. 90 80 70 60 50 40 30 20 10 0 0 10 20 30 40 50 Flow rate [l / min] 60 Characteristic curve of the Characteristic curve of the standard standard circulation pump for circulation pump of the Aquarea heat the Aquarea heat pump 7 and pumps 9 kW (three phase) and 12, 14 9 kW, single-phase and 16 kW single and three-phase. ³ The circulation pump offers three speed levels. If necessary, set the FLUFXODWLRQSXPSWRDKLJKHUVSHHGOHYHOHJLIWKHÁRZUDWHLVWRR low) or a slower speed level (e.g. to decrease noise). If setting the speed of the circulation pump does not solve the problem, contact an authorised dealer. ³ After the test run, clean the dirt trap (see Section 9.4). Aquarea air/water heat pump – Installation manual for compact systems 03 / 2013 8 – 35 8 Commissioning Pump level 3 Pump level 2 Pump level 1 70 60 50 40 30 20 10 0 Pump operating head [kPa] 8.1.1 Setting the standard pump ³ Set the water circulation pump. Please note that settings differ for VWDQGDUGSXPSVDQGKLJKHIÀFLHQF\SXPSVDVGHVFULEHGLQWKHWZR following sections. Pump operating head [kPa] Indication 'HYLFHVZLWKKLJKHIÀFLHQF\ SXPSVDUHLGHQWLÀHGVHSDUDWHO\ in the overview on page 5. ³ Check the system pressure on the manometer again. In normal operation, the system pressure should be between 0.5 bar and 3 bar. If necessary, set the target pressure. Commissioning Commissioning 6HWWLQJWKHKLJKHIÀFLHQF\SXPS_+DQGRYHUDQGLQVWUXFWLRQ 6HWWLQJWKHKLJKHIÀFLHQF\SXPS Note $VVWDQGDUGWKHKLJKHIÀFLHQF\ pump is preset to control type 6 p-c, level 4. Panasonic recommends control type 6 p-c. 7KHKLJKHIÀFLHQF\SXPSVLQ$TXDUHDKHDWSXPSVKDYHWZRFRQWURO types which can be set on the pump. 6p-c – constant differential pressure: The electronic system holds the differential pressure target to be maintained by the pump at the value set (level 1 to 7) as per the curve below. 6p-v – variable differential pressure: The electronic system changes the differential pressure target to be PDLQWDLQHGE\WKHSXPSFRQÀJXUDEOHEHWZHHQOHYHOVWRZKHUHE\ WKHGLIIHUHQWLDOSUHVVXUHGHFUHDVHVVLPXOWDQHRXVO\ZLWKWKHYROXPHÁRZ to max. half of the differential pressure target. 6HWWKHSXPSOHYHORIWKHKLJKHIÀFLHQF\SXPSE\WXUQLQJWKHUHG DGMXVWLQJNQREWRHQVXUHWKDWWKHPLQLPXPYROXPHÁRZLVSUHVHQW Pump operating head [kPa] 6p-c – constant differential pressure 70 6p-v – variable differential pressure 50 7 6 5 60 50 4 3 40 30 10 40 7 6 4 30 4 4 3 20 2 2 1 20 6 5 1 ext. in 2 10 0 0 10 20 30 Flow rate [l / min] 40 50 0 10 20 30 40 Pump operating head [kPa] Warning! Hydraulic decoupling between the heat pump circuit and heat consumer circuit is always required when using Aquarea KHDWSXPSVZLWKKLJKHIÀFLHQF\ SXPSV²RYHUÁRZYDOYHVPD\ not be used. If hydraulic decoupling is not implemented, the ÁRZFRXOGIDOOEHORZWKHPLQLPXPYROXPHÁRZZKLFKUHVXOWV in error messages on the heat pump. See also the instructions in the design handbook. 50 Flow rate [l / min] 3XPSFKDUDFWHULVWLFFXUYHRIWKHKLJKHIÀFLHQF\ZDWHUFLUFXODWLRQSXPSIRUWKH$TXDUHD Mini compact devices WH-MDF06E3E5 and WH-MDF09E3E5 8.1.3 Handover and instruction ³ Complete the commissioning report (see Appendix). Check again that all installation work has been performed completely and correctly. ³ Pass all documents to the end customer and instruct them to store the documents in a safe place. Explain to them how to operate the XQLWDQGVLJQWKHKDQGRYHUUHSRUWDQGDFFHSWDQFHFHUWLÀFDWHVHH Appendix) together with the customer. 8 – 36 Aquarea air/water heat pump – Installation manual for compact systems 03 / 2013 Commissioning Programming Display | Button assignment 8.2 Programming Note As the same operator control panel is used for different devices, some functions may not apply for your device. 9 10 11 12 13 8 14 7 TIMER 6 5 4 3 HEAT COOL TANK QUIET HEATER FORCE OPERATION OUTDOOR ACTUAL HEATER BOOSTER DEFROST SETTING STATUS SERVICE WATER OUTLET OFF/ON SETTING 18 STATUS TIMER SET MODE CHECK OFF/ON SELECT QUIET HEATER SEARCH CLOCK CANCEL ERROR RESET FORCE 23 22 Displays 1 Operation LED 16 17 19 2 1 15 SERVICE 2 Display of external room thermostat 26 3 Display of solar installation 25 24 21 20 4 Display of operation of additional 5 Display for quiet mode Button assignment 17 Operation button (ON / OFF) (ON / OFF) 6 Hot-water tank operation display (ON / OFF) 7 Cooling operation display (ON / OFF) (The operator control panel of the SDF models has no display for cooling mode) 8 Heating operation display (ON / OFF) 9 Display of timer setting and time 10 Display of outside temperature 11 Display of water outlet temperature 12 Display of additional electric heater for the heat pump and the electric immersion heater for the hot-water tank (ON / OFF) 13 Display for defrosting (ON / OFF) 14 Display for system program- ming (ON / OFF) 15 Display for system status (ON / OFF) 16 Display for service (ON / OFF) 21 Button for enabling the additional elec- tric heater for the heat pump. The addition18 Operating mode selection button Use this button to select the operating mode required. al electric heater can only be user if this button is pushed. Note: If this button is not pressed, the additional electric heater for 19 System status buttons the heat pump is only used for: These buttons are used for a series of Defrosting status queries. Proceed as follows: Device startup ³ Press the CHECK button for 5 seconds Frost protection mode 22 Emergency heating mode button to switch to Status mode. ³ Press the UP or DOWN button to open This button allows the device to be operated in emergency heating mode with the the following values: 1. Compressor operating frequency 8 additional electric heater for the heat 2. Error code pump, e.g. if the heat pump is defective. 3. Water inlet temperature Press the ON / OFF button to switch off 4. Water tank temperature emergency heating mode. ³ Press the CANCEL button or wait 30 seconds to quit Status mode. 23 Error reset button 24 Quiet mode button 25 System programming buttons 20 Service button This button takes you to menu items Sr:01 These buttons are used to set temperature for pump down mode and Sr:02 for values. circulation pump. You can toggle 26 Timer programming buttons between the two menu items using These buttons are used to set the time and the SEARCH arrow buttons. the weekly timer. Aquarea air/water heat pump – Installation manual for compact systems 03 / 2013 8 – 37 Commissioning electric heater for heat pump and emergency heating mode (ON / OFF) Commissioning Programming Weekday and time | Temperature values Setting the weekday and time Note The current weekday and time must be set when: TIMER HEAT COOL TANK QUIET HEATER FORCE OPERATION the power supply is switched RQIRUWKHÀUVWWLPH a long interruption to the power supply. OUTDOOR DEFROST SETTING STATUS SERVICE WATER OUTLET OFF/ON SETTING The current time set is the time basis for all timer functions. ACTUAL HEATER BOOSTER STATUS TIMER SET MODE CHECK OFF/ON SELECT QUIET CLOCK CANCEL ERROR RESET SETTING TIMER SET HEATER SEARCH OFF/ON SELECT FORCE CLOCK CANCEL SERVICE ³ Set the weekday and time as follows: ³ Press the CLOCK button. ³ Press the UP or DOWN button to set the current weekday. ³ 3UHVVWKH6(7EXWWRQWRFRQÀUPWKHVHWWLQJ ³ Repeat steps 2 and 3 to enter the current time. Setting the temperature values TIMER HEAT COOL TANK QUIET HEATER FORCE OPERATION OUTDOOR DEFROST SETTING STATUS SERVICE WATER OUTLET OFF/ON SETTING TIMER ACTUAL HEATER BOOSTER SET STATUS SETTING SET MODE CHECK HEATER SEARCH SELECT FORCE CANCEL OFF/ON SELECT QUIET CLOCK CANCEL ERROR RESET SERVICE ³ Set the temperature values as follows: ³ Press the SET button for 5 seconds to switch to Setting mode. ³ Press the UP or DOWN buttons to access the following 8 temperature parameters. 8 – 38 Aquarea air/water heat pump – Installation manual for compact systems 03 / 2013 Commissioning Programming Temperature values COOL COOL DEFROST SETTING STATUS SERVICE DEFROST SETTING STATUS SERVICE 1. Low outside temperature (-15 to +15 °C, Std. 0 °C) COOL 4. Water supply target temperature for heating mode at high outside temperature (25 to 55 °C, Std. 32 °C) COOL 7. Water supply target temperature in cooling mode (5 to 20 °C, Std. +16 °C) COOL COOL DEFROST SETTING STATUS SERVICE DEFROST SETTING STATUS SERVICE DEFROST SETTING STATUS SERVICE 2. High outside temperature (-15 to +15 °C, Std. 15 °C) DEFROST SETTING STATUS SERVICE 5. Target temperature for switching off heating mode (limit heating temperature, 5 to 35 °C, Std. 24 °C) 8. Target temperature of the hotwater tank (40 to 75 °C, Std. +55 °C) COOL DEFROST SETTING STATUS SERVICE 3. Water supply target temperature for heating mode at low outside temperature (25 to 55 °C, Std. 55 °C) Note No target temperatures can be entered for the water supply temperature in cooling mode on the operator control panel of the SDF versions. DEFROST SETTING STATUS SERVICE 6. Outside temperature for switching on the additional electric heater (-15 to +20 °C, Std. 0 °C) ³ Press the SELECT button to select the parameter. ³ Use the UP or DOWN button to set the required temperature. ³ 3UHVVWKH6(7EXWWRQWRFRQÀUPWKHVHWWLQJ ³ Press the CANCEL button or wait 30 seconds to exit Setting mode. Commissioning 8 Water temperature Outside temperature Aquarea air/water heat pump – Installation manual for compact systems 03 / 2013 8 – 39 Commissioning Programming Weather compensation settings | Operating mode Weather compensation settings Water temperature TIMER Value of temperature target value shift HEAT COOL TANK QUIET HEATER FORCE OPERATION OUTDOOR ACTUAL HEATER BOOSTER DEFROST SETTING STATUS SERVICE WATER OUTLET OFF/ON Outside temperature SETTING out Lo out Hi H2O Lo H2O Lo Low outside temperature High outside temperature Water target temperature at low outside temperature Water target temperature at high outside temperature TIMER SET OFF/ON CLOCK STATUS SETTING SET MODE CHECK SELECT QUIET HEATER SEARCH SELECT CANCEL ERROR RESET FORCE CANCEL SERVICE ³ Set the temperature shift as follows: ³ Press the SET button (> 5 seconds). SETTING is shown on the display. ³ Press the SELECT button to select the temperature shift. ³ Use the UP or DOWN buttons to enter the required value (-5 to +5°C). ³ 3UHVVWKH6(7EXWWRQWRFRQÀUPWKHVHWWLQJ ³ Press the CANCEL button or wait 30 seconds to close the entry. Setting the operating mode TIMER HEAT COOL TANK QUIET HEATER FORCE OPERATION OUTDOOR ACTUAL HEATER BOOSTER DEFROST SETTING STATUS SERVICE WATER OUTLET OFF/ON SETTING STATUS TIMER SET MODE CHECK OFF/ON SELECT QUIET HEATER SEARCH CLOCK CANCEL ERROR RESET FORCE MODE SERVICE ³ Set the operating mode as follows: ³ Press the MODE button. The operating mode changes as follows every time the button is pressed: Heat Heat + Tank Tank SDC model: Heat Heat + Tank Tank SDF model: 8 – 40 Cool + Tank Aquarea air/water heat pump – Installation manual for compact systems Cool 03 / 2013 Commissioning Programming Special functions Setting special functions Danger! During sterilisation, do not remove hot water, as this can lead to burns or overheating. The sterilisation function settings must be made by an authorised dealer in accordance with the local laws and guidelines. TIMER HEAT COOL TANK QUIET HEATER FORCE OPERATION OUTDOOR DEFROST SETTING STATUS SERVICE WATER OUTLET OFF/ON SETTING TIMER SET OFF/ON CLOCK ACTUAL HEATER BOOSTER STATUS MODE CHECK SELECT QUIET HEATER SEARCH CANCEL ERROR RESET FORCE OFF/ON SERVICE ³ Switch the device off using the OFF / ON button before setting special functions (operation LED does not light up). Step Display on operator Description control panel External room thermostat (YES / NO, Standard: NO) Setting whether an external room thermostat is connected. 1 2 HEATER Water antifreeze function (YES / NO, Standard: YES) Activation or deactivation of the antifreeze function when the device is switched off. Sterilisation only appears if the TANK is set to YES. 4 TANK Connection of a hot-water tank (YES / NO, Standard: NO) Setting whether a hot-water tank is connected. Note: If “Hot-water tank connected” is set to NO, steps 5 to 14 are skipped. 5 SOLAR Solar priority (YES / NO, Standard: NO) Setting the priority of the solar installation for water heating. 6 HEAT Heating priority (YES / NO, Standard: NO) Setting the heating as a priority over hot water. Note: If “Heating priority” is set to YES, steps 7 to 8 are skipped. 7 HEAT Duration of heating period Setting the duration of heating mode in the heating and water operating mode. (30 min. to 10 hours, Standard: 3 hours). 8 TANK Water heating duration Setting the duration for water heating in the heating and water heating operating mode (5 min. to 1 hour 35 min., Standard: 30 min.). 9 BOOSTER Hot water immersion heating function (YES / NO, Standard: YES) Activation or deactivation of hot water immersion heater. Note: If the “Hot water immersion heating function” is set to NO, step 10 is skipped. 10 BOOSTER Switch-on delay of the electric immersion heater for hot water Setting the delay period before the immersion heater is switched on for the hot-water tank if the tank temperature is not reached (20 min. to 1 hour 35 min., Standard: 1 hour). 11 Sterilisation (YES / NO, Standard: YES) Setting for sterilisation of the hot water. Note: If “Heating priority” is set to YES, steps 12 to 14 are skipped. 12 Day and time of sterilisation (Standard: Monday 12:00 noon) Setting the day and time of weekly sterilisation (even when the device is switched off). 13 Sterilisation temperature 6HWWLQJWKHWHPSHUDWXUHWREHXVHGIRUVWHULOLVDWLRQWRʝ6WDQGDUGʝ 14 Sterilisation duration Setting of the period required to retain the tank temperature needed for sterilisation (5 min. to 1 hour, Standard 10 min.). Aquarea air/water heat pump – Installation manual for compact systems 03 / 2013 8 Commissioning Only displayed if HEAT PRIORITY is set to NO 3 These menu items are only displayed if TANK is set to YES. Select the required output of the additional electric heater (3, 6 or 9 kW, Standard: Maximum). The output of the additional electric heater can be reduced if higher power is not needed. This will depend on model selected. 8 – 41 Commissioning Programming Special functions TIMER TIMER HEAT HEAT COOL COOL TANK TANK QUIET QUIET HEATER HEATER FORCE FORCE OPERATION OPERATION OUTDOOR OUTDOOR ACTUAL ACTUAL HEATER HEATER BOOSTER BOOSTER DEFROST DEFROST SETTING SETTING STATUS STATUS SERVICE SERVICE WATER WATER OUTLET OUTLET OFF/ON OFF/ON SETTING SETTING STATUS STATUS SETTING TIMER TIMER SET SET MODE MODE CHECK CHECK OFF/ON OFF/ON SELECT SELECT QUIET QUIET SEARCH HEATER HEATER SEARCH SELECT CANCEL CANCEL ERROR ERROR RESET RESET FORCE FORCE SERVICE SERVICE CANCEL CLOCK CLOCK SET STATUS CHECK HEATER SEARCH ³ Set the individual special functions as follows: ³ Press the SET and CHECK buttons for 5 seconds to switch to Programming mode for the special settings. The SETTING (programming) and STATUS displays (system status) are shown. ³ Use the UP or DOWN buttons to toggle through the functions. ³ Press the SELECT button to access the settings for the respective function. ³ Press the UP or DOWN buttons to activate (UP) or deactivate (DOWN) the functions, or to set the time and weekday. ³ 3UHVVWKH6(7EXWWRQWRFRQÀUPWKHVHWWLQJ DEFROST SETTING STATUS SERVICE DEFROST SETTING STATUS SERVICE 1. Connection of a room thermostat (YES / NO, Standard: NO) 3. Water antifreeze function (YES / NO, Standard: YES) DEFROST SETTING STATUS SERVICE 2. Select the required output of the additional electric heater (3, 6 or 9 kW, Standard: Maximum) 8 – 42 4. Connection of a hot-water tank (YES / NO, Standard: NO) 5. Solar priority (YES / NO, Standard: NO) If a solar thermal system is used, this value should always be set to YES. DEFROST SETTING STATUS SERVICE 6. Heating priority (YES / NO, Standard: NO). If possible, this value should be left as NO, as otherwise hot water is only heated with the electric immersion heater. Aquarea air/water heat pump – Installation manual for compact systems 03 / 2013 Commissioning Programming Special functions | Reset to factory settings DEFROST SETTING STATUS SERVICE 7. Duration of heating period (30 min to 10 hours, Standard: 3 hours). Setting the duration for heating mode in the heating and water heating operating mode. DEFROST SETTING STATUS SERVICE 10. Switch-on delay of the electric immersion heater for hot water (20 min to 1 hour 35 min , Standard: 1 hour) Setting the delay period before the immersion heating is switched on for the hot-water tank if the tank temperature is not reached DEFROST SETTING STATUS SERVICE 8. Water heating duration (5 min to 1 hour 35 min, Standard: 30 min) Setting the duration for water heating in the heating and water heating operating mode DEFROST SETTING STATUS SERVICE 13. Sterilisation temperature WRʝ6WDQGDUGʝ Setting the temperature to be used for sterilisation. DEFROST SETTING STATUS SERVICE DEFROST SETTING STATUS SERVICE 11. Sterilisation (YES / NO, Standard: YES) Setting for sterilisation of the hot water. 14. Sterilisation duration (5 min. to 1 hour, Standard: 10 min.) Setting the period required to retain the tank temperature required for sterilisation. DEFROST SETTING STATUS SERVICE 9. Hot water immersion heating function (YES / NO, Standard: NO) 12. Day and time of sterilisation (Standard: Monday 12:00 noon) Setting day and time of the weekly sterilisation. Reset to factory settings TIMER HEAT COOL TANK QUIET HEATER FORCE OPERATION OUTDOOR HEATER BOOSTER DEFROST SETTING STATUS SERVICE WATER OUTLET OFF/ON SETTING TIMER SET OFF/ON CLOCK 8 ACTUAL Commissioning Note All settings are preserved in the event of a power failure (stored in EPROM). The weekday and time are buffered by a battery for roughly 36 hours, after which they must be set again. STATUS MODE CHECK SELECT QUIET HEATER SEARCH CANCEL ERROR RESET FORCE SEARCH SERVICE ³ Press the three marked operating buttons simultaneously for 5 seconds to reset to the factory settings. Aquarea air/water heat pump – Installation manual for compact systems 03 / 2013 8 – 43 Commissioning Programming Setting the weekly timer Setting the weekly timer TIMER HEAT COOL TANK QUIET HEATER FORCE OPERATION OUTDOOR DEFROST SETTING STATUS SERVICE WATER OUTLET OFF/ON SETTING TIMER ACTUAL HEATER BOOSTER SET STATUS MODE CHECK HEATER SEARCH OFF/ON SELECT QUIET CLOCK CANCEL ERROR RESET FORCE SETTING TIMER SET OFF/ON SELECT SERVICE ³ Open the timer by pressing the TIMER button. ³ Set the date and time. ³ Press the UP or DOWN button until the required weekday is displayed. ³ 3UHVVWKH6(/(&7EXWWRQWRFRQÀUPWKHVHWWLQJ ³ ´µÁDVKHVRQWKHGLVSOD\3UHVVWKH6(/(&7EXWWRQWRVHW Program 1. ³ Press the OFF / ON button to select the activation/deactivation timer. ³ Use the UP or DOWN buttons to set the required time. In addition to the switching time, you can also set other modes using the MODE or QUIET buttons. ³ 3UHVVWKH6(7EXWWRQWRFRQÀUP3URJUDP7KHZHHNGD\VHOHFWHG LVLGHQWLÀHGZLWKWKH symbol. After 2 seconds, the display switches to the next program. ³ Repeat the above steps, starting with the OFF / ON button, to set programs 2 to 6. If no buttons are pressed for 30 seconds during timer setting, or if you press the SET button, the current setting is saved and the setting process is closed. 8 – 44 Aquarea air/water heat pump – Installation manual for compact systems 03 / 2013 Commissioning Programming Setting the weekly timer Changing or adding timer programs ³ Repeat the above-mentioned steps Deactivating the timer ³ Press the TIMER button, then the CANCEL button. Activating the timer ³ Press the TIMER button, then the SET button. Checking the timer program ³ Press the TIMER button. ³ Press the UP or DOWN button until the required weekday is displayed. ³ 3UHVVWKH6(/(&7EXWWRQWRFRQÀUPWKHVHWWLQJ ³ Press the UP or DOWN buttons to check the programs set. Deleting timer programs ³ Press the TIMER button. ³ Press the UP or DOWN button until the required weekday is displayed. ³ Press the SELECT button to access the program setting. ³ Press the UP or DOWN button until the required weekday is displayed. ³ Press the CANCEL button to delete the program setting. Commissioning 8 Aquarea air/water heat pump – Installation manual for compact systems 03 / 2013 8 – 45 Maintenance Checking the water pressure | Checking the pressure relief valve 9 Maintenance Danger! The maintenance work may RQO\EHSHUIRUPHGE\TXDOLÀHG RUFHUWLÀHGSHUVRQQHO The device carries potentially fatal voltage when open. Ensure that you have disconnected the power supply, if the maintenance steps require this, before you perform maintenance work. ³ Open the compact unit as described in Section 5. ³ The following maintenance steps must be performed annually: Check water pressure Check pressure relief valve Visual inspection of circuit board Clean dirt trap Check RCD Check the quick vent 9.1 Checking the water pressure ³ Check the system pressure on the manometer. If the system pressure is less than the target pressure, add liquid. 9.2 Checking the pressure relief valve 3 1 Fastening screws 2 Lever 2 3 Pressure relief valve 4 Raise lever 1 4 Pressure relief valve ³ 2SHQWKHIDVWHQLQJVFUHZVDVVKRZQLQWKHÀJXUH ³ Check the function of the pressure relief valve by moving the lever RIWKHSUHVVXUHUHOLHIYDOYHWRWKHKRUL]RQWDORSHQSRVLWLRQEULHÁ\ Escaping air or liquid must be clearly audible. If not, contact an authorised dealer. ³ Return the lever of the pressure relief valve to the basic setting (closed). 9 – 46 Aquarea air/water heat pump – Installation manual for compact systems 03 / 2013 Maintenance Visual inspection of the circuit board | Cleaning the dirt trap 9.3 Visual inspection of the circuit board ³ Visually inspect the circuit board for loose connections, damaged cable insulation etc. 9.4 Cleaning the dirt trap 1 Water outlet WATER OUT 2 Dirt trap 1 3 Water inlet WATER IN 4 Union nut 5 Connection 2 6 Shutoff valve 3 5 4 6 Position of the dirt trap Warning! Do not damage the mesh of the dirt trap. ³ Where applicable, close the shutoff valves upstream and downstream of the dirt trap. ³ Use a spanner to open the dirt trap. ³ Remove the insert, ensuring not to damage the mesh of the insert. ³ Rinse the insert with tap water. Use a soft brush to remove stubborn dirt. 9 Maintenance ³ Replace the insert in the dirt trap and seal the dirt trap with the spanner. ³ If applicable, open the shutoff valves. Aquarea air/water heat pump – Installation manual for compact systems 03 / 2013 9 – 47 Maintenance Checking the RCD | Resetting the temperature limit switch 9.5 Checking the RCD Danger! The device carries potentially fatal voltage. Ensure that you do not touch any live device parts. Only touch the buttons of the RCD. ³ If applicable, set the RCD to ON. ³ Switch on the power supply of the compact unit. ³ Press the TEST button on the RCD. The lever must move down to the OFF (green) position, if the RCD works properly. If not, contact an authorised dealer. ³ Switch off the power supply of the compact unit. ³ Set the lever of the RCD back to ON. 9.6 Resetting the temperature limit switch a 1 1 Temperature limit switch Singlephase, 9 kW (differs from model to model, see Detail A) Singlephase, 12 to 16 kW Threephase 9 to 16 kW ³ If the temperature limit switch was triggered at a high water temperature, perform the following steps to reset it: ³ Remove the cover. ³ Reset the temperature limit switch by pressing the middle button gently with a test pen. Resetting the temperature limit switch 9 – 48 Aquarea air/water heat pump – Installation manual for compact systems 03 / 2013 Recycling 9.7 Venting the system / Checking the quick vent 1 Quick vent 1 1 ³ Turn the valve cap on the quick vent one full turn counter-clockwise DQGDOORZDQ\DLULQWKHKHDWLQJV\VWHPWRHVFDSHXQWLOÁXLGÁRZVRXW 2 ³ Repeat the process until you can no longer hear air bubbles moving. ³ Close the quick vent again by turning it clockwise. 1 Quick vent 2 Valve cap 10 Recycling $IWHUWKHHQGRIWKHSURGXFW VVHUYLFHOLIHLWPXVWEHGLVSRVHGRIDSSURpriately. When disposing of the packaging, the device or individual components, please observe the local recycling regulations. The respective environmental protection regulations must be observed. Recycling 10 Aquarea air/water heat pump – Installation manual for compact systems 03 / 2013 10 – 49 Appendix Commissioning report 11 Appendix Commissioning report Company name: System operator: Order number: Machine type: Serial number: Buyer / Invoice address Refrigerant: Fill quantity: Hydraulic system Supply / return connected correctly Yes No 6\VWHPÁXVKHGDQGYHQWHG Yes No Filter in return Yes No Hydraulic compensation performed Yes No Filter lockable Yes No Expansion tank set Yes No AB return water Yes No B to tank Yes No System depressurised Yes No A to heating Yes No Electrical connections 2-way directional valve installed correctly Yes No Mains connection 1 Storage tank / vessel Yes No Connected Yes No Yes No Directional valve set correctly Volume in l: Input pressure in bar: Cable cross-section in mm²: Water circulation pump set Pump level: Control type IRUKLJKHIÀFLHQF\SXPSVRQO\ Yes Hydraulic switch / decoupling Yes No Hot-water tank installed Yes No Yes No No Mains connection 2 Connected Cable cross-section in mm²: Type: Volume in l: With solar integration 11 – 50 Aquarea air/water heat pump – Installation manual for compact systems 03 / 2013 Appendix Commissioning report Commissioning report Electrical connections Mains connection 3 Yes No 2-way directional valve connected Terminals 1 / 2 / 3 Yes No 3-way directional valve connected Terminals 4 / 5 / 6 Yes No Electric immersion heater for hot-water tank connected Terminals 7 / 8 + earth, 3 kW max. output Yes No Room thermostat connected Terminals 9 / 10 / 11 / 12 Yes No OLP hot-water tank connected Terminals 13 / 14 Programming: Connection of hot-water tank to Yes Important: If the hot-water tank is connected to Yes and no OLP is used, then jumper terminals 13 / 14 Yes No Hot-water tank connected Terminals 15 / 16 Programming: Connection of hot-water tank to Yes Yes No Ext. control signal connected Remove jumper from terminals 17 / 18! Yes No Solar 3-way directional valve connected Terminals 19 / 20 / 21 Programming: Connection of hot-water tank to Yes Yes No Solar pump station connected Terminals 22 / 23 Yes No Can condensation drain freely? Yes No Are all minimum clearances observed? Yes No connected Cable cross-section in mm²: Compact unit installation Aquarea air/water heat pump – Installation manual for compact systems 03 / 2013 11 – 51 Appendix 11 Appendix Commissioning report Commissioning report Parameter list Low outside temperature Out Lo in °C Function Operating mode/ Operating display High outside temperature Out Hi in °C Pry HEAT Water supply target temperature at out Lo H2O Lo in °C Note: Setting heating priority Water supply target temperature at out Hi H2O Hi in °C int Target temp. to deactivate heating mode Heating limit temperature in °C int Outside temperature for activating the additional electric heater in °C Booster Water supply target temperature in cooling mode in °C dly BOOSTER Switch-on delay for electric immersion heater for hot-water tank in hours Yes Heating priority No over hot water heating HEAT Duration of heating in heating and hot water mode in hours TANK Duration of hot water heating in heating and hot water mode in h Yes Water heating Fun Target temperature of the hot-water tank in °C htr No StrL Yes Sterilisation No Str Function Operating mode / Operating display con room Yes External room thermostat Heater No cap Selection of the output of the additional electric heater for the heat pump 3 kW con 6 kW TANK Connection of hot-water tank Pry Solar priority Yes SOLAR Yes boi StrL Sterilisation temperature in °C Note: At sterilisation temperatures over 55 °C, the electric immersion heater for the hot-water tank is always used oPr Str Sterilisation period in min 9 kW The parameters from Pry on are only shown if TANK is set to Yes The parameters int to dly are only shown No if Heating priority is set to No The parameters Fun to oPr are only for FRQÀJXULQJVWHULOLVDWLRQ No Note: Set to Yes where possible, as otherwise the service water is mainly heated by the heat pump instead of solar thermal energy 11 – 52 Day and time of sterilisation Pump level Level 1 Yes No Level 2 Yes No Level 3 Yes No Aquarea air/water heat pump – Installation manual for compact systems 03 / 2013 Appendix Commissioning report Commissioning report Measurement report in heating mode after 20 min. runtime Evaporation pressure in bar Machine voltage in V L1-L2 Evaporation temperature in °C in V L1-L3 in V L2-L3 Suction gas temperature in °C Compressor current consumption in A L1 Overheating in K in A L2 in A L3 Condensing pressure in bar Condensing temperature in °C Liquid temperature in °C Additional electric heater for heat pump current consumption in A in A L1 L2 in A L3 Electric immersion heater for hot-water tank current consumption in A L1 Compressor end temperature in °C RCD test Mains connection 1 OK Yes No Outside temperature in °C Mains connection 2 OK Yes No Mains connection 3 OK Yes No Evaporator air intake temperature in °C Tank temperature in °C Evaporator air outlet temperature in °C Pressure drop in hydraulic system in bar Condenser water inlet temperature in °C High pressure switch triggers Yes No Yes No Yes No Condenser water outlet temperature in °C Switch-off point in bar Switch-on point in bar Low pressure switch triggers Switch-off point in bar Switch-on point in bar Flow rate cut-out triggers Aquarea air/water heat pump – Installation manual for compact systems 03 / 2013 11 – 53 Appendix 11 Appendix Commissioning report Commissioning report Measurement report in cooling mode after 20 min. runtime Evaporation pressure in bar Machine voltage in V L1-L2 Evaporation temperature in °C in V L1-L3 in V L2-L3 Suction gas temperature in °C Compressor current consumption in A L1 Overheating in K in A L2 in A L3 Condensing pressure in bar Faults found: Condensing temperature in °C Liquid temperature in °C Compressor end temperature in °C Outside temperature in °C Condenser air intake temperature in °C Condenser air outlet temperature in °C Evaporator water inlet temperature in °C Evaporator water outlet temperature in °C Date 11 – 54 Customer signature Contractor signature Aquarea air/water heat pump – Installation manual for compact systems 03 / 2013 Appendix Handover report Handover report Company name: System operator: Order number: Machine type: Serial number: Buyer/Invoice address Refrigerant: Instruction completed with &RQÀUPHGE\VLJQDWXUH Mr Ms Mr Ms Instruction completed with: Place Date Name Signature Aquarea air/water heat pump – Installation manual for compact systems 03 / 2013 11 – 55 Appendix 11 Appendix $FFHSWDQFHFHUWLÀFDWH $FFHSWDQFHFHUWLÀFDWH Company name: System operator: Order number: Machine type: Serial number: Buyer/Invoice address We commissioned the above-mentioned system today, instructed the operating staff/owner and handed over the GRFXPHQWDWLRQ7KHV\VWHPLVIUHHRIIDXOWVDQGWKHZDUUDQW\VWDUWVRQWRGD\ VGDWH Comments: Place Date Customer signature Contractor signature 11 – 56 Aquarea air/water heat pump – Installation manual for compact systems 03 / 2013 Appendix Error codes Error codes Error code Error/Protection triggered Error recording F12 Pressure switch triggered 4 times within 20 minutes F14 Incorrect compressor speed 4 times within 20 minutes F15 Incorrect speed of the outdoor unit fan Twice within 30 minutes F16 Protection against excessive total operating current 3 times within 20 minutes F20 Compressor overheating guard 4 times within 30 minutes F22 Power transistor module overheating guard 3 times within 30 minutes F23 Direct current peaks in the outdoor unit Occurred 7 times F25 Problem switching between heating and cooling 4 times within 30 minutes F27 Pressure switch 60 seconds long F36 Outside temperature sensor 5 seconds long F37 Return temperature sensor in indoor unit 5 seconds long F40 Hot gas temperature sensor in the outdoor unit 5 seconds long F41 PFC circuit 4 times within 10 minutes F42 Temperature sensor of the heat exchanger in the outdoor unit 5 seconds long F43 Outdoor unit defrosting temperature sensor 5 seconds long F45 Supply temperature sensor in indoor unit 5 seconds long F46 Current converter open in outdoor unit – F95 Cooling high pressure guard in outdoor unit – H12 Unsuitable output between the indoor and outdoor unit 90 seconds after supply of current H15 Compressor temperature sensor 5 seconds long H23 Liquid temperature sensor 5 seconds long F24 Problems in the cooling circuit Twice within 20 minutes H42 Compressor low pressure H62 :DWHUVLGHÁRZUDWHFXWRXW 10 seconds long H64 High-pressure sensor 5 seconds long H70 OLP additional electric heater for heat pump 60 seconds long H72 Hot water tank temperature sensor 5 seconds long H76 &RPPXQLFDWLRQÀHOGVIRURSHUDWRUFRQWUROSDQHORQLQGRRUGHYLFH H90 Communication errors between indoor and outdoor unit 60 seconds after start of operation H91 OLP electric immersion heater for hot-water tank 60 seconds long H95 Indoor/outdoor unit incorrectly connected – H98 High pressure guard in outdoor unit – H99 Antifreeze for indoor unit heat exchanger – – – Aquarea air/water heat pump – Installation manual for compact systems 03 / 2013 11 – 57 Appendix 11 Appendix Error codes 1 1 Display of system errors 2 CHECK button 3 SEARCH UP/ DOWN buttons 4 Error reset button TIMER HEAT COOL TANK QUIET HEATER FORCE OPERATION (ERROR RESET) 5 CANCEL button OUTDOOR ACTUAL HEATER BOOSTER DEFROST SETTING STATUS SERVICE WATER OUTLET OFF/ON SETTING 2 STATUS 3 TIMER SET MODE CHECK OFF/ON SELECT QUIET HEATER SEARCH CLOCK CANCEL ERROR RESET 5 4 FORCE SERVICE If an error occurs during operation, the system stops, the OFF/ON LED ÁDVKHVDQGDQHUURUPHVVDJHLVVKRZQRQWKHGLVSOD\7KHHUURUFRGH is stored in the EEPROM of the indoor unit. Acknowledging the error code ³ Press and hold the ERROR RESET (< 8 seconds), until you hear a beep. Reading the last error code stored in the EEPROM ³ Press the CHECK button for 5 seconds to access Status mode. ³ Press the SEARCH UP or DOWN button to see the last error code. ³ Press the CANCEL button or wait 30 seconds to exit STATUS mode. Deleting the last error code stored in the EEPROM ³ Press and hold the ERROR RESET (> 8 seconds), until you hear a beep. 11 – 58 Aquarea air/water heat pump – Installation manual for compact systems 03 / 2013 7RÀQGRXWKRZ3DQDVRQLFFDUHVIRU\RX log on to: www.panasonic.eu Contact Details: Telephone: 01344 853182 www.panasonic.co.uk Address: Panasonic Air Conditioning Panasonic House Willoughby Road Bracknell Berkshire RG12 8FP Due to the ongoing innovation of our products, the specifications of this catalogue are valid barring typographic errors, and may be subject to minor modifications by the manufacturer without prior warning in order to improve the product. The total or partial reproduction of this catalogue is prohibited without the express authorisation of Panasonic UK Ltd.