1
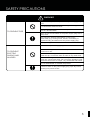
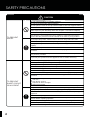
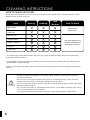
USER KitchenExpress FP32 MANUAL CONTENTS SAFETY PRECAUTIONS PRODUCT PARTS 2-4 5 CLEANING INSTRUCTIONS How to Remove Each Part --------------------------------------------------------------------- 6 - 7 How to Wash Each Part ------------------------------------------------------------------------- 8 - 9 WHAT YOU CAN DO WITH THIS PRODUCT 10 - 11 HOW TO USE Speed Dial/Safety Switch/Thermal Motor Protection/Adjustable Blade --------- 12 - 13 Chopping/Kneading/Whipping ------------------------------------------------------------- 14 - 17 Slicing/Shredding/Grating ------------------------------------------------------------------ 18 - 21 Juicing -------------------------------------------------------------------------------------------- 22 - 29 Blending ----------------------------------------------------------------------------------------- 30 - 32 Grinding/Crushing ----------------------------------------------------------------------------- 33 - 34 RECOMMENDED PROCESSING SPEED & TIME Chopping/Mashing/Mincing ---------------------------------------------------------------- 35 - 36 Making Paste (Grinding) --------------------------------------------------------------------- 37 - 38 Making Dough --------------------------------------------------------------------------------------- 39 Making Whipped Cream/Meringue -------------------------------------------------------------- 40 Slicing/Shredding ----------------------------------------------------------------------------------- 41 Julienning --------------------------------------------------------------------------------------------- 42 Grating/Shaving -------------------------------------------------------------------------------------- 43 Juicing Fruits or Vegetables ----------------------------------------------------------------- 44 - 46 Blending Juices and Milkshakes ----------------------------------------------------------------- 47 Grinding/Crushing ----------------------------------------------------------------------------------- 48 STORING BLADE/DISC SET TROUBLESHOOTING SPECIFICATIONS 49 50 - 51 52 1 SAFETY PRECAUTIONS Please carefully read these safety precautions before using this product. This explains the instructions to be observed in order to prevent any injury to oneself or other persons using this product and to prevent damages to property arising from use of the product. The extent of hazards or the damages arising from incorrect handling are preceded by the following symbols. WARNING This includes the risks that can lead to death or serious injury. CAUTION This includes the risks that can lead to minor injury and damage to property. Instructions to be observed are preceded by the following symbols. Be sure to follow instructions. Be sure not to do. WARNING Only use this appliance for its intended domestic use and similar applications. This appliance is not intended for use by persons (including children) with reduced physical sensory or mental capabilities, or lack of experience and knowledge, unless they are being supervised or have been given instructions concerning use of the appliance by a person responsible for their safety. GENERAL If the supply cord is damaged, it must be replaced by the manufacturer, its service agent or similarly qualified persons in order to avoid a hazard. Ensure that the appliance is switched off before removing the container from the main unit. Switch off the appliance and disconnect from power supply before changing accessories or touching parts that move while in use. Care should be taken when handling the sharp cutting blades, emptying the bowl and during cleaning. 2 SAFETY PRECAUTIONS WARNING Do not scratch, pull, or tamper with the power supply plug or cord. Do not exceed the rated alternate voltage of the appliance or overload the electrical circuit. TO PREVENT FIRE Do not wind the cord around main body or do not use the cord in a bundled state. Wipe off dust accumulated on the power supply plug with a damp cloth. Stop using the product immediately in case of any abnormality (e.g. burning smell, smoke, overheating of appliance body) and disconnect the power supply plug. Unplug the appliance when not in use. Do not handle power supply plug with wet hands. TO PREVENT ELECTRIC SHOCKS AND INJURIES Do not insert fingers into inlet of the cap or cover while product is in use. Do not rinse main appliance body and food processor base under the tap, or immerse them in water or any other fluid. Do not use the appliance near fire or in places where it can come into contact with water. Do not use the appliance near flammable items such as carpet, vinyl, dishcloths and towels. Do not disassemble or remodel the product. If there is water on the power supply plug, wipe dry before inserting into power socket. 3 SAFETY PRECAUTIONS CAUTION Do not operate product on unstable surfaces. Do not move the product during operation. Do not open the cover or the cap until the blade or disc has stopped rotating. Do not touch the sharp edge of the blade or disc. Do not operate the safety switch except when the bottle and cover are properly attached (do not push the safety switch with chopstick / screwdriver/ toothpick). Do not use this product for material other than foodstuff. TO PREVENT INJURY This product is not intended for use by children or inexperienced persons. Ensure that the product is used and stored out of reach of young children. To transport the product, hold the base of the main body with both hands. Disconnect the power cord before putting on or taking off the bottle or blade. During operation, push down on the cover to prevent the appliance from shifting or toppling. Use the spatula provided to extract cooked food. Always remove the blades or discs before emptying the container of its contents. Never use your fingers to push food down the feed tube. Always use the pushers provided. Be careful if hot liquid is poured into the food processor or blender. The liquid may be ejected from the appliance due to sudden steaming. Do not use power supply plug or cord if damaged or plug socket connection is loose. Avoid rapid heating or cooling. Do not process ingredients exceeding 40 oC. Do not fill the jug beyond the marking indicated "MAX". Do not heat the jug or other parts in microwave or oven. Do not rinse the jug or containers with water exceeding 40 oC. Do not switch on the appliance when the container or jug is empty. Do not insert objects besides foodstuff into the appliance while it is in operation. TO PREVENT SHORT CIRCUIT OR ACCIDENT 4 Avoid storing the product in places near fire. high above ground. exposed to direct sunlight. with high humidity. Do not soak the blender and mill blades. Wash after use and air dry. Fully insert the power plug into the socket before operating the appliance. Unplug the power cord from the socket by pulling out the plug and not the cord. Ensure silicone seal is inserted into blender/grinder base before operating the appliance. Do not blend very large ice cubes. Observe the recommended amount of time for each operation. Keep a 3-minute interval before repeating operation. Do not operate the appliance beyond the recommended timing. Do not subject the main body and components to strong impact or pressure. Do not clean main body in dish washer. PRODUCT PARTS 1 2 3 4 5 1 2 6 7 3 8 9 10 11 8 4 12 13 9 14 15 5 10 13 BLADE/SPATULA/ TAMPER 16 14 11 6 15 12 Pusher (A) Pusher (B) Food Processor Lid Extension Shaft Food Processor Jug Food Processor Gear Box Main Body Blender Cup Blender Lid Blender Jug Blender Silicon Seal Blender Base Grinder Cup Grinder Silicon Seal Grinder Base 17 18 19 20 Knife Blade Dough Blade Whipping Blade Spatula Tamper DISC SET 21 7 22 16 17 18 19 23 20 24 Adjustable Blade Disc Vegetable Stick/ Julienne Disc Shredding Disc (reversible) Grating Disc JUICE SET 22 21 24 23 25 26 27 25 27 29 28 29 30 26 28 30 31 31 Citrus Blade Citrus Filter Juicer Filter Juicer Cup Juicer Pusher Juicer Lid Accessory Box 5 CLEANING INSTRUCTIONS HOW TO REMOVE EACH PART SAFETY PRECAUTIONS Food Processor Gear Box and Food Processor Jug. Remove the Food Processor Jug by turning in the direction of the arrow mark, as shown in picture. SAFETY PRECAUTIONS Food Processor Jug and Food Processor Lid (Blender Lid/Juicer Lid). Remove the Lid by turning in the direction of the arrow mark, as shown in picture. 6 CLEANING INSTRUCTIONS HOW TO REMOVE EACH PART Blender Jug and Blender Base. The Blender Base has the Blender Silicone Seal inserted at the bottom. If you want to wash the Blender Silicone Seal, take the Blender Base out by pushing it up while turning it in the direction of the arrow mark, as shown in picture. Blender Silicone Seal Grinder Base and Grinder Cup. Grinder Silicone Seal Turn the Grinder Cup upside down and remove the Grinder Base by turning it in the direction of the arrow mark, as shown in picture. The Grinder Cup has the Grinder Silicone Seal inserted at the bottom. If you want to wash the Grinder Silicone Seal, remove it by using a toothpick. 7 CLEANING INSTRUCTIONS HOW TO WASH EACH PART Some parts of the product cannot be rinsed or immersed in fluid. Please refer to the table below for more details on how to clean each part. Parts Main Body Food Processor Gear Box Rinsing Soaking Dish Washer How To Wash Wipe with a damp cloth. Blender Jug Grinder Base Blade / Spatula Use soft sponge and diluted dishwashing detergent (neutral). Disc set Juicer set 7KHFXWWLQJHGJHRIWKHEODGHDQGWKHGLVFVHWLVYHU\VKDUSZDVKWKHPZLWKDEUXVKDQGDYRLGGLUHFWO\ touching the blades and discs. ,IWKH%OHQGHUDQG*ULQGHUEODGHVDUHVRDNHGZDWHUPD\SHQHWUDWHWKHLQWHUQDOSDUWVRIWKHEOHQGHUDQG JULQGHUEODGHVFDXVLQJGDPDJH 5HPRYHWKHEOHQGHUDQGJULQGHUVLOLFRQHVHDOVEHIRUHZDVKLQJ5HWXUQWKHPWRWKHLURULJLQDOposition after washing. 8QSOXJDQGDOORZWKHDSSOLDQFHWRFRROGRZQEHIRUHFOHDQLQJ3DUWVPD\EHKRWGXHWR continuous operation. 'RQRWXVHWKHQ\ORQKDUGVXUIDFHRIWKHVSRQJHVFUXEELQJEUXVKHVDQGRUFKHPLFDO treated cloths for cleaning. These may damage the product parts. CAUTION 'RQRWXVHEHQ]HQHWKLQQHUDOFRKROFOHDQVHURURWKHUEOHDFKLQJDJHQWV7KHVHPD\FDXVH damage or discolouration. 'RQRWFOHDQWKHSURGXFWLQDGLVKZDVKHUDQGRUGU\HURUZLWKZDWHUH[FHHGLQJoC. Doing so may cause damage and deformation. 'RQRWSHUIRUPXOWUDYLROHWVWHULOLVDWLRQ7KLVPD\FDXVHGLVFRORXUDWLRQRUGHIRUPDWLRQ 8 CLEANING INSTRUCTIONS HOW TO WASH EACH PART Cleaning the Blender. If you have difficulty removing stains from the Blender Jug, please follow the cleaning instructions below: 1 Put a few drops of dishwashing liquid and half a cup of water into the Blender Jug. 2 Place the Blender Jug on the Main Body and cover it with Blender Lid and Cap. 3 Operate for about 30 seconds while gradually increasing the speed from Speed 1 to 8. 4 Unplug the product from the power socket, and rinse the Blender Jug, Lid and Cap with water. ABOUT DISCOLOURATION OF PLASTIC PARTS The rubber parts of the silicon seal or the plastic parts of jug, lid, and blades may change colour due to the adherence of pigments from foods such as carrot, pumpkin, and leafy vegetables. The staining can not be completely removed with the use of a sponge or dishwashing liquid, but will not affect the safety of the product. Staining can be minimised with the immediate cleaning of parts after use. 9 WHAT YOU CAN DO WITH THIS PRODUCT The Ferrano KitchenExpress is a composite food processing device that combines the functions of a dicer, grinder, mixer, shredder, grater, and juicer into one device. The table below shows the 11 functions offered by the appliance and the parts to be used for each function. Method of Food Preparation Page Main Parts to be Used Dicing To cut vegetables into fine pieces To mince meat 14 Knife Blade Kneading To make dough 14 Dough Blade Whipping To whip cream To make meringue 14 Whipping Blade To slice vegetables 18 To shred vegetables Julienning To cut vegetables into thin strips 18 Grating To grate carrots, radish, cheese 18 Juicing To squeeze or blend fruit and extract juice Adjustable Blade Disc Vegetable Stick/ Julienne Disc Grating Disc 22 Citrus Blade 10 Shredding Disc (reversible) Juice Blade WHAT YOU CAN DO WITH THIS PRODUCT Method of Food Preparation Blending To make mixed juices, soup and crushed ice Page Main Parts to be Used 30 Grinding To grind beans, seeds and nuts 33 Crushing To make powder of dried ingredients 11 HOW TO USE SPEED DIAL The appliance is operated by turning the power dial to the left or right of the Off marking. To turn it off, turn the dial back to the Off marking. Pulse Operation Continuous Operation Speed 1 (Low) to Speed 8 (High) Turn the dial to the right to start continuous operation. Continuous Operation (Speed can be adjusted during operation) Depending on the recipe and ingredients used, rotation speed can be increased or reduced as required while the product is in operation. Turn the dial to the left to start pulse operation. If dial is released during operation, it will return to the Off position and operation will stop. This is useful when preparing ingredients that require frequent checking. Pulse Operation SAFETY SWITCH When the jug/cup and lid are attached correctly to the main body, the safety switch located on the main body will be depressed. To start operation, plug the power cord into the socket and turn the dial. Rotating Disc Safety Switch CAUTION Do not push the safety switch. The disc may start rotating if the power dial is engaged by accident while the main body is plugged into the power socket. THERMAL MOTOR PROTECTION The KitchenExpress is equipped with a Thermal Motor Protection device, which protects the motor from overheating during prolonged or heavy use. If your KitchenExpress shuts down after running for a long time or when you are preparing a large amount of food, return the Speed Dial to the Off position and unplug the base unit. You should be able to resume use of the appliance after five minutes. If the base unit does not start up, consult the Troubleshooting section on page 50. 12 HOW TO USE ADJUSTABLE BLADE DISC %HIRUH\RXVWDUWXVLQJWKHVOLFLQJSURFHVVEHVXUHWRDVVHPEOHWKHDGMXVWDEOHEODGHGLVFDVVKRZQEHORZ $GMXVWWKHKHLJKWRIWKHDGMXVWDEOHEODGHGLVFDFFRUGLQJWR\RXUGHVLUHGWKLFNQHVV 1 2 3 ASSEMBLY ,QVHUWEODGHKROGHULQWRWKHFHQWUHRIWKHGLVF /LQHXSWKHLFRQVRQWKHGLVFDQGDGMXVWPHQWNQREWKHQVOLGHWKHNQRERYHUWKHERWWRPRIWKHGLVFWRVHFXUH WKHSDUWV 5RWDWHWKH$GMXVWPHQW.QRE7KHILUVWFOLFNORFNVWKHSDUWVWRJHWKHUZKLOHVXEVHTXHQWFOLFNVDGMXVWWKH KHLJKWRIWKHEODGHWRWKHWKLFNQHVVUHTXLUHG CAUTION %HFDUHIXOZKHQ\RXKDQGOHWKHDGMXVWDEOHEODGHGLVF,WKDVDYHU\VKDUSFXWWLQJHGJH 1HYHUXVHWKLVGLVFWRSURFHVVKDUGLQJUHGLHQWVVXFKDVLFHFXEHV 'RQRWH[HUWWRRPXFKSUHVVXUHRQWKHSXVKHUZKHQ\RXSUHVVLQJUHGLHQWVLQWRWKHIHHG WXEH 0DNHVXUHWKDWWKHFXWWLQJHGJHRIWKHEODGHGRHVQRWFRPHLQWRFRQWDFWZLWKKDUGREMHFWV 7KLVPD\FDXVHWKHEODGHWREHFRPHEOXQWRUGDPDJHG 13 HOW TO USE CHOPPING/KNEADING/WHIPPING Three types of blades are provided for chopping, kneading and whipping. These can be used for fine chopping vegetables, mincing meat, kneading dough and whipping cream. Knife Blade (chopping) INSTALLATION STEPS 1 14 Dough Blade (kneading) Whipping Blade (whipping) HOW TO USE 2 3 15 HOW TO USE 4 5 6 7 8 16 HOW TO USE 9 10 11 12 13 17 HOW TO USE SLICING/SHREDDING/GRATING Four types of discs are provided for slicing, julienning, shredding, and grating. These can be used for preparing ingredients, e.g. vegetable sticks, shredding carrot, and grating cheese. Adjustable Blade Disc INSTALLATION STEPS 1 18 Vegetable Stick/ Julienne Disc Shredding Disc (reversible) Grating Disc HOW TO USE 2 3 19 HOW TO USE 4 5 6 8 7 20 HOW TO USE 9 10 11 12 13 21 HOW TO USE JUICING Two types of blades are used for juicing fruits and vegetables. The Citrus Blade and Filter are used with citrus fruits such as lemon and orange. The Juicer Filter and Cup are used with vegetables and other types of fruit such as carrots and apples. Citrus Blade and Citrus Filter (Citrus fruits) 1 2 22 HOW TO USE 3 4 23 HOW TO USE 5 6 7 8 24 9 HOW TO USE 10 11 12 25 HOW TO USE JUICING For vegetables and non-citrus fruits. Juicer Filter and Juicer Cup (Vegetables and fruits other than citrus fruits) 1 2 26 HOW TO USE 3 5 4 6 27 HOW TO USE 28 7 8 9 10 HOW TO USE 11 13 12 14 29 HOW TO USE BLENDING The Blender Jug and Blender Base are used in mixing fruit and vegetables into juices. 1 2 3 4 30 HOW TO USE 5 6 7 Blender Cup MEMO 1 The appliance will stop if blender lid is removed during operation. 2 While blending, follow the sequence below to move material in the blender using the tamper: - Stop operation and remove the Blender Cup. - Push the tamper until it touches the material (the tamper has a safety guard attached, and will not touch the blade even when fully inserted). - Restart operation from low speed (Speed 1~2) - Push the material with tamper. CAUTION Pushing material in the blender with the tamper too vigorously might activate the motor protection function (see pg12). 31 HOW TO USE 8 9 10 11 32 HOW TO USE GRINDING/CRUSHING The Grinder Base and Grinder Cup are used to grind and crush hard ingredients such as coffee beans into powder form. 1 2 3 4 CAUTION Please note that milling hard ingredients like spices, nuts, sugar, coffee, grains, etc. will cause scratching and clouding to the inside surfaces of the Grinder Cup. This is a cosmetic result from milling these kinds of ingredients, and does not affect the performance of the Grinder Cup. 33 HOW TO USE 5 6 7 8 9 10 34 RECOMMENDED PROCESSING SPEEDS & TIMES MEMO Cut solid ingredients into small pieces for finer processing. Processing time will vary according to the quantity and state of the ingredients being processed. Use a spatula to scrape the processed material off the sides of the Food Processor Jug and move it back to the centre. CHOPPING/MASHING/MINCING Use Knife Blade Preparation Ingredient Method Onion Min-Max Quantity Recommended processing speed & time 100g - 600g For 100g Speed 4-5 for 10-15 secs For 600g Speed 4-5 for 20-30 secs Remarks - Cut onion into 4-6 equal comb-shaped pieces before processing. - If lower speeds are used, the onion pieces may get stuck on the blade and not get chopped up. Cut carrot into equally sized small pieces before processing. Chopping Carrot 100g - 600g For 100g Speed 4-5 for 20-30 secs For 600g Speed 4-5 for 30-45 secs Remove thick stems before processing. Parsley 10g - 50g For 10g Speed 7-8 for 30-60 secs For 50g Speed 7-8 for 60-90 secs 35 RECOMMENDED PROCESSING SPEEDS & TIMES Preparation Ingredient Method Min-Max Quantity Recommended processing speed & time Remarks Remove the skin before processing. White Fish 100g - 600g For 100g Speed 7-8 for 10-15 secs For 600g Speed 7-8 for 45-90 secs Remove the shell before processing. Mashing Lobster 100g - 600g For 100g Speed 7-8 for 15-20 secs For 600g Speed 7-8 for 45-90 secs Cuttlefish Beef or Pork 100g - 400g 100g - 600g Remove the skin and tentacles. Cut into 2cm wide strips before processing. For 100g Speed 7-8 for 30-60 secs For 400g Speed 7-8 for 60-120 secs For 100g Speed 7-8 for 15-20 secs For 600g Speed 7-8 for 60-90 secs Use chopped chunks or leftover pieces of meat. Ensure all bones have been removed before processing. Mincing Remove skin and bones, and cut into small pieces before processing. Chicken 36 100g - 600g For 100g Speed 7-8 for 15-20 secs For 600g Speed 7-8 for 30-60 secs RECOMMENDED PROCESSING SPEEDS & TIMES MAKING PASTE (GRINDING) Use Knife Blade Preparation Ingredient Method Roasted Sesame Seeds Min-Max Quantity Recommended processing speed & time Remarks Adjust the processing time according to the fineness desired. 100g - 500g For 100g Speed 7-8 for 45-90 secs For 500g Speed 7-8 for 60-120 secs Boil spinach and cut into 2-3cm long pieces before processing. Making paste (Grinding) Boiled Spinach For 150g Speed 3-4 for 60-90 secs 150g - 500g For 500g Speed 4-5 for 90-120 secs Cut pumpkin into chunks before processing. Boiled Pumpkin 100g - 500g For 100g Speed 3-4 for 15-20 secs For 500g Speed 3-4 for 30-45 secs 37 RECOMMENDED PROCESSING SPEEDS & TIMES Preparation Ingredient Method Frozen Fruits Min-Max Quantity 300g - 600g Recommended processing speed & time For 300g Speed 3-4 for 60-90 secs For 600g Speed 3-4 for 90-120 secs Making paste (Grinding) Remarks - For bulkier ingredients such as pineapple, hold Grinder Cup and Body firmly to prevent the appliance from moving around while in operation. - Frozen food products may stick to the walls and base of the Cup during grinding. Use a spatula to move the material to the centre of the Grinder Cup occasionally to ensure it is evenly ground. - To make preparation easier, partially defrost ingredients in advance, or add supplementary ingredients such as water, milk or yoghurt. Remove skin and cut into half before processing. Kiwi 38 100g - 600g For 100g Speed 4-5 for 15-20 secs For 600g Speed 4-5 for 20-30 secs RECOMMENDED PROCESSING SPEEDS & TIMES MAKING DOUGH Use Dough Blade Preparation Ingredient Method Making Dough Amount Wheat Flour 250g 2 cups Butter 30g - 2 tablespoons Water / Milk 110 - 150ml Dry Yeast 4g 1 teaspoon Sugar 30g - 2 tablespoons Beaten Egg 25g - half a large egg Salt 3g - half a teaspoon Recommended processing speed & time Speed 7-8 for 45 - 90 secs Remarks - The amount of water needed varies with the temperature of the ingredients, and the temperature and humidity of the room. Adjust the amount of water according to the conditions during preparation. - Hold the Jug and Main Body firmly to prevent the appliance from moving during preparation. 39 RECOMMENDED PROCESSING SPEEDS & TIMES MAKING WHIPPED CREAM/MERINGUE Use Whipping Blade Preparation Ingredient Method Fresh Cream Min-Max Quantity Remarks Please adjust the time of whipping according to your use and preference. 600ml Mix sugar and fresh cream, gradually increasing the speed from 1 to 3-4, and run it until whipped cream consistency is achieved. Making Whipped Cream Sugar Egg White 55g Sugar For dairy milk Speed 3-4 for 120-150 secs For non-dairy milk Speed 3-4 for 180-200 secs 170g Making Meringue 40 Recommended processing speed & time 70g Beat only egg white for 60 seconds by gradually increasing speed from 1 to 4-5. Reduce the speed to 1, add sugar at 90 sec intervals before increasing speed again. Repeat until sugar is fully added and mixture becomes stiff. Please adjust the time of whipping according to your use and preference. In advance, make sure that the Food Processor Jug and the Whipping Blade are free of moisture, oil or dirt, as this would make it difficult for the foam to form. RECOMMENDED PROCESSING SPEEDS & TIMES SLICING/SHREDDING Use Adjustable Blade Disc / Shredding Disc Reversible (Large/Small) Preparation Ingredient Method Adjustable Blade Disc Step 1 to 3 Cucumber Max Quantity Recommended processing speed & time Remarks 600g Speed 2-3 Adjustable Blade Disc Step 4 to 5 Potato 5 to 6 pieces (600g) Speed 3-4 Shredding Disc Small Size Carrot 4 pieces (600g) Speed 2-3 Shredding Disc Large Size Burdock 600g Speed 2-3 41 RECOMMENDED PROCESSING SPEEDS & TIMES JULIENNING Use Vegetable Stick/Julienne Disc Preparation Ingredient Method Slicing Cucumber Min-Max Quantity Recommended processing speed & time 600g Speed 2-3 Slicing Potato (French Fries) 5 to 6 pieces (600g) Speed 3-4 Slicing Carrot 4 pieces (600g) Speed 2-3 Slicing Apple 600g Speed 2-3 42 Remarks RECOMMENDED PROCESSING SPEEDS & TIMES GRATING/SHAVING Use Grating Disc Preparation Ingredient Method Grating Radish Min-Max Quantity Recommended processing speed & time 1500g Speed 3-4 Grating Yam 1500g Speed 4-5 Cutting Cheese Remarks Use pulse function for grating radish as the ingredient may stick to the grating disc and cause it to wobble. Leftover chunks can be removed and grated further. Use pulse function for grating yam as the ingredient may stick to the grating disc and cause it to wobble. Leftover chunks can be removed and grated further. Cut into strips of 2-3cm wide before processing. 600g Speed 2-3 43 RECOMMENDED PROCESSING SPEEDS & TIMES JUICING CITRUS FRUITS Use Citrus Blade and Citrus Filter Preparation Ingredient Method Juicing Juicing 44 Orange Grapefruit Min-Max Quantity Several oranges, cut in half (Juice amount will vary depending on size and type of orange). Several grapefruits, cut in half (Juice amount will vary depending on size and type of grapefruit). Recommended processing speed & time Speed 2-3 Speed 2-3 Remarks - Pressing the orange onto the citrus blade too hard may cause some of the orange skin to be mixed into the juice, causing it to taste bitter. - Juice might splash at higher speeds. - Pressing the grapefruit onto the citrus blade too hard may cause some of the grapefruit skin to be mixed into the juice, causing it to taste bitter. - Juice might splash at higher speeds. RECOMMENDED PROCESSING SPEEDS & TIMES JUICING NON-CITRUS FRUITS OR VEGETABLES Use Juicer Blade Preparation Ingredient Method Apple Min-Max Quantity 3 to 4 Pieces Recommended processing speed & time Start at speed 3 or 4. Hold the Juicer Lid and increase to speed 5 to 6 for a few seconds to complete juicing as required. Remarks - Remove core and cut into four wedges before processing. - The appliance may vibrate when there is a large amount of accumulated fibre. - Stabilise the machine by pushing down on the lid. Juicing Orange 3 to 4 Pieces Start at speed 3 or 4. Hold the Juicer Lid and increase to speed 5 to 6 for a few seconds to complete juicing as required. Alternatively, the Juice Blade can extract extra juice from the pulp made with the Citrus Blade. Insert the pulp and operate at speed 5 or 6 for a few seconds. - Remove skin, and seeds if possible, and cut into four wedges before processing. - The appliance may vibrate when there is a large amount of accumulated fibre. - Stabilise the machine by pushing down on the lid. 45 RECOMMENDED PROCESSING SPEEDS & TIMES Preparation Ingredient Method Juicing 46 Carrot Min-Max Quantity 3 to 4 Pieces Recommended processing speed & time Start at speed 3 or 4. Hold the Juicer Lid and increase to speed 5 to 6 for a few seconds to complete juicing as required. Remarks - Cut carrot into 1cm-wide strips before juicing. - The appliance may vibrate when there is a large amount of accumulated fibre. - Stabilise the machine by pushing down on the lid. RECOMMENDED PROCESSING SPEEDS & TIMES BLENDING JUICES & MILKSHAKES Use Blender Blade and Blender Jug Preparation Ingredient Method Juicing Blending Fruit and Milk Citrus fruits/ tomato Vegetables, fruits, frozen fruits, water, milk Min-Max Quantity Citrus fruits/ tomato 700g + 300 - 500ml water Fruits/ vegetables 500 - 700g + 300 - 500ml water/milk Recommended processing speed & time Speed 3-4 for 30 - 45 secs Remarks - Remove the skin and seeds of citrus fruits and cut into four equal pieces. - Cut tomato into four equal pieces without removing skin or seeds. - Adjust the quantity of fruits, vegetables, and water to your use and preference. - Adjust the quantity of fruits, vegetables, and water to your use and preference. Speed 7-8 for 45 - 60 secs 47 RECOMMENDED PROCESSING SPEEDS & TIMES GRINDING/CRUSHING Use Grinder Base and Grinder Cup Preparation Ingredient Method Grinding Coffee Beans Min-Max Quantity Recommended processing speed & time Remarks Standard quantity 100g Speed 7-8 for 20-30 secs Almonds 10g - 180g For 10g Speed 4-5 for 10-15 secs For 180g Speed 7-8 for 20-30 secs Crushing - Remove heads and guts before processing. Dried Sardines 10g - 60g For 10g Speed 4-5 for 10-15 secs For 60g Speed 7-8 for 15-20 secs 48 STORING BLADE/DISC SET ACCESSORY BOX The appliance set includes an optional accessory storage box. Store appliance parts in their respective compartments after use. Spatula Grating Disc Vegetable Stick/ Julienne Disc Adjustable Blade Disc Shredding Disc (reversible) Whipping Blade Knife Blade Dough Blade Accessory Box The appliance set comprises the standard accessories shown above. - When storing discs, hold edge of disc and avoid touching the blade, as shown below. - Store disc with slicing blade facing downwards to avoid injury when removing from storage box. CAUTION Hold and store with sharp edge down. - Ensure appliance parts are dry after washing before storing. Metal parts may rust or develop an odour if stored when wet. - Store out of reach of children. 49 TROUBLESHOOTING Follow the appropriate troubleshooting measures listed in the table below. If you cannot find the solution to your problem, please contact Customer Support. Condition Part Potential Causes Is the power supply plug plugged in? Insert the power supply plug into a socket Was the appliance under heavy use a short while ago? Under heavy load, the motor stops temporarily to avoid overheating. Unplug the base, wait for 5 minutes, then start again. Is the container overfilled? Reduce the ingredient quantity. Is the ingredient quantity too much or too large in size? Reduce the ingredient quantity or cut the ingredient into small pieces. Is the Food Processor Gear Box firmly attached to the Main Body? Firmly attach the Food Processor Gear Box to the Main Body. Is the Food Processor Jug firmly attached to the Food Processor Gear Box? Firmly attach the Food Processor Jug to the Food Processor Gear Box. Are the Food Processor Lid / Citrus Filter / Juicer Lid firmly attached to the Food Processor Jug? Firmly attach the Food Processor Lid / Citrus Filter / Juicer Lid to the Food Processor Jug. Are the Blender Base and Blender Silicone Seal firmly attached to the Blender Jug? Is the Blender Jug firmly attached to the Main Body? Is the Blender Lid firmly attached to the Blender Jug? Are the Grinder Base and Grinder Silicone Seal firmly attached to the Grinder Cup? Firmly attach the Blender Base and the Blender Silicone Seal to the Blender. Firmly attach the Blender Jug to the Main Body. Firmly attach the Blender Lid to the Blender Jug. Firmly attach the Grinder Base and Grinder Silicone Seal to the Grinder Cup. Is the Grinder Base firmly attached to the Main Body? Firmly attach the Grinder Base to the Main Body. Overall Operation does not start even after turning the speed dial. Food Processor Blender Grinder 50 Measures TROUBLESHOOTING Follow the appropriate troubleshooting measures listed in the table below. If you cannot find the solution to your problem, please contact Customer Support. Condition Appliance stops midway through operation Part Potential Causes Measures Does the material exceed the MAX scale of the Jug or Cup? If there is too much material in the container, the motor stops temporarily to avoid overheating. Unplug the base, wait for 5 minutes, then start again. Does the quantity of ingredients in the Jug or Cup exceed the MAX marking? Reduce the ingredient quantity in the Jug or Cup. Are the Blender Base and Blender Silicone Seal firmly attached to the Blender Jug? Firmly attach the Blender Base and the Blender Silicone Seal to the Blender Jug. Is the Blender Lid firmly attached to the Blender Jug? Is the amount of ingredient quantity too little? Are there too many ingredients in the Jug or Cup? Are the ingredients too bulky? Are there any ingredient parts that cannot be processed? Firmly attach the Blender Lid to the Blender Jug. Fill the Jug or Cup with more of the ingredients. Reduce the ingredient quantity or cut the ingredients into small pieces. Are there too many ingredients in the Jug or Cup? Are the ingredients too bulky? Reduce the ingredient quantity or cut the ingredients into small pieces. Overall Is the product placed on an unstable surface? Does the appliance shift around during operation? Place the product on a stable plain surface. Press down on the lid or appliance during operation. Juice Blade Is there any accumulation of material on the blade? Remove the accumulation from the blade. Overall Overall Ingredients leak out Blender/ Grinder Blades/ Discs spin idle during operation Increased vibration during operation Overall Remove the parts that cannot be processed. 51 SPECIFICATIONS KitchenExpress FP32 Food Processor Food Processor (Juicer Blade) Blender Grinder Electrical Power Consumption 300W 200W 400W 300W No. of Rotations (Maximum ‘No Load’ Speed) 1,500RPM 1,500RPM 16,000RPM 17,000RPM 3,000 ml 300 ml 1,500 ml 100 g 267 mm 252 mm 464 mm 267 mm 252 mm 402 mm 230 mm 252 mm 428 mm 210 mm 252 mm 292 mm 4.4 kg 4.5 kg 3.6 kg 3.1 kg (Including Knife Blade) (Including Juicer Blade and Juicer Filter) Configuration Rated Capacity (Maximum Capacity) Size (Approx.) Width Depth Height Weight Colours Safety Lock Speed Dial Voltage Power Noise Level Warranty Material Jug Material Power Cable Length Ferrano Red, Pearl White, Sparkling Black and Nickel Star Yes Variable speed from 1~8 + Pulse AC 220-240 V, 50/60 Hz 1300 W < 78 dB 12 months RoHS compliant BPA-free 1.6 m This marking indicates that this product should not be disposed off with other household wastes throughout the EU. To prevent possible harm to the environment or human health from uncontrolled waste disposal, recycle it responsibly to promote the sustainable reuse of material resources. To return your used device, please use the return and collection systems or contact the retailer where the product was purchased. They can take this product for environmentally safe recycling. 52 w w w. f e r r a n o . c o m All Rights Reserved, 2015 Due to continued product improvement, the products illustrated/photographed in this brochure may vary slightly from the actual product.