1
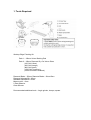
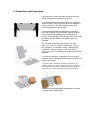
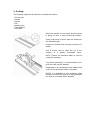
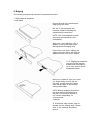
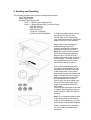
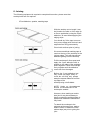
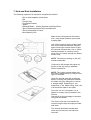
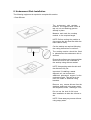
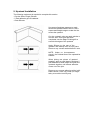
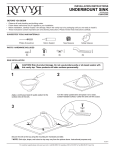
EZYSTONE
WORKSURFACES
Installation & Maintenance Instructions
1. Tools Required
Worktop Edge Finishing Kit
Pack 1 - 100mm Velcro Backing Pad
Pack 2 - 100mm Diamond Dry Cut Velcro Discs
(100 Grit Yellow)
(200 Grit Orange)
(800 Grit Green)
(1500 Grit Turquoise)
(10000 Grit Buff Pad Black)
Diamond Blade - 150mm Diameter Blade – 20mm Bore
Diamond Holesaw Bit - 35mm
Standard Holesaw Bit -35mm
Masonry drill – 6mm
2 Part Adhesive
Clear Silicone
Recommended additional tools – Angle grinder, clamps, square
2. Unpacking and Preparation
Like all granite & quartz worktops Ezystone must be
stored, handled and transported with care.
It must be stored by being laid flat and fully supported
along its length. It must never be thrown or dropped. It
must be stored in a dry well ventilated space with
constant temperature and humidity.
It is recommended that two people are required to
carry the worktops & sink modules. Please observe
the normal manual handling rules when lifting or
moving. The worktops should be carried on their edge
and particular care taken when handling the sink
modules.
The worktop should be removed from its outer
case in a dry and stable environment, where
the humidity is constant before commencing
installation. Treat the product with care when
removing it from it’s packaging to protect the polished
surfaces.
If storing the worktop, remember to lay it flat and
ensure it is fully supported. Never stand it on either the
long or short edge.
“All work surface materials should be checked for any
damage, faults and colour consistency prior to installation.
Any claims after installation relating to damage, faults or
inconsistency are not covered by the product warranty.”
Please ensure the packaging is disposed of in a safe
environmentally friendly way.
3. Cutting
The following equipment is required to complete this section:
- Circular saw
- Clamps
- Square
- Rail
- Masking tape
- Tape Measure
- Dust Mask
Place the worktop on the bench ensuring there
is plenty of room to work around the product.
Using a tape and a pencil mark the worktop at
the required length.
Clamp the worktop down securely ensuring it is
stable.
Use a circular saw to make the cut in the
worktop at a steady controllable pace.
NOTE: Ensure the diamond blade is used for
cutting the worktops.
To prevent splintering it is recommended not to
push too hard onto the worktop.
Depending on the sharpness of the blade being
used, the cut should be made in one pass.
NOTE: It is advisable to use extraction where
possible to reduce the amount of dust generated.
It is best to cut outside where possible.
4. Edging
The following equipment is required to complete this section:
- 2 Part Adhesive & spatula
- Knife Blade
Ensure the end of the worktop and
edging strip are clean.
Mix the 2 part adhesive and
hardener together following the
manufacturers instructions.
NOTE: The 2 part adhesive mix will
set quickly and should be used
immediately.
Apply the 2 part adhesive with a
spatula to the quartz edge of the
worktop and fit the edging strip.
Press fiirmly into place rubbing the
edging strip from side to side until the
adhesive oozes out from the edges.
T h e edging strip should sit
just proud of the worktop
surface and front edge by
up to 1mm, as this can be
sanded back later.
Before the adhesive has fully cured
(no longer tacky to touch but not
fully set), scrape away the excess
from the top edge of the worktop
using a knife blade.
NOTE: Before sanding a chamfer on
the edge, wait for the adhesive to
fully set. This could be around 10 20 minutes depending on
environmental
conditions.
A chamfered edge should now be
sanded into the edging strip. Please
refer to the sanding & finishing
section.
5. Sanding and Finishing
The following equipment is required to complete this section
- Flex/ Orbital Sander
- Water Spray Bottle
- Worktop Edge Finishing Kit
Pack 1 - 100mm Velcro Backing Pad
Pack 2 - 100mm Diamond Dry Cut Velcro Discs
(100 Grit Yellow)
(200 Grit Orange)
(800 Grit Green)
(1500 Grit Turquoise)
(10000 Grit Buff Pad Black)
A chamfered edge should now be
sanded into the top and front
vertical edge of the edging strip.
This should replicate the chamfered
edge on the front of the worktop.
Apply water to the edging strip
before sanding begins and
regularly throughout the sanding
process as the pads are used.
Note. During the sanding process
water should be applied before a
stage begins. This can then be
wiped away using a cloth at the end
of each stage. The water ensures
the edging does not scorch and
cleans away any grit particles.
Fit the velcro backing pad to the
flex sander. Starting with the 100
Grit pad work along the full length
of the edging strip, moving from
side to side creating the chamfered
edge. This pad will remove approx.
90% of the material and form the
finished shape of the chamfer.
Use the glue line as a marker with
the aim of this forming the upper
angle of the chamfer, where it is
less visible.
Work through the sequence of pads
in stages, applying even pressure,
finally using the 10000 Grit pad to
finish off.
Note. Do not sand the finished face
of the edging strip or the worktop
under any circumstances, only the
chamfer should be sanded/finished.
Ensure a mask and eye protection
are worn, and use suitable dust
extraction
6. Joining
The following equipment is required to complete this section, please note that
worktop bolts are not required.
-
2 Part Adhesive, spatula, masking tape
With the worktop cut to length it can
be joined to the side or front edge (in
a corner application) using the 2 part
adhesive, as used when applying the
edging strips.
You should dry fit the tops to ensure
that you are happy with the levels and
angles before fixing permanently.
Clean both surfaces prior to joining.
We recommend that masking tape is
used on the top of the worktop at the
joining edges. This will stop excess
adhesive getting onto the worktop.
Pull the worktops 2-3mm apart and
apply the 2 part adhesive with a
spatula to the edge of the worktops
and fit together. Press the worktops
firmly together until the adhesive
oozes out from the edges.
Before the 2 part adhesive has
fully cured (no longer tacky to
touch but not fully set), scrape
away the excess adhesive from the
top edge of the
worktop using a knife blade.
NOTE: Under no circumstances
should the finished face of the
worktop be sanded.
However, when making an end to
side joint it may be necessary to
lightly roughen the polished edge in
that area to enable the adhesive to
fully bond.
To attach the worktops to the
cabinets at the same time, apply a
bead of silicon or adhesive to the
cabinet tops just prior to gluing the
joint
7. Hob and Sink Installation
The following equipment is required to complete this section:
- Sink or Hob template / dimensions
- Drill
- Circular Saw
- Flex/Orbital Sander
- Jigsaw
- Diamond Blade – 150mm Diameter with 20mm Bore
- 35mm Diamond Holesaw Bit for standard drill
- 35mm Holesaw Bit for wood
- 6mm Masonry Drill
Mark out the cutting area for the Hob or
sink; using a tape measure, pencil and
masking tape.
Use a 6mm masonry drill to make a pilot
hole for the diamond holesaw, and then
again a hole right in each corner to help
the removal of quartz later. Use a 35mm
diamond holesaw to create a hole in
each of the 4 corners through the Quartz
section only.
NOTE: The hammer setting on the drill
should be selected.
Continue to drill through the poplar ply
section of the top using a standard
35mm Holesaw bit.
NOTE: The cutting process takes less
time and is made easier by using the two
types of Holesaw.
Using the circular saw with a diamond
blade, cut along the guidelines between
the holes using the rail/guide to ensure
a straight edge. Depending on the
sharpness of the blade being used, the
cuts should be made in one pass.
Once the cut out is complete, use a
jigsaw to cut way any ply notches in the
corners.
Smooth off any burred edges or notches
using the flex sander.
The sink or hob can now be fiitted as
normal using the tape and clips provided
with them.
The worktop should be handled with
extra care once the cut out has been
removed.
8. Undermount Sink Installation
The following equipment is required to complete this section:
- Clear Silicone
The undermount sink worktop
modules are supplied with a sink &
tap cut out and draining grooves
already in place.
Measure and mark the worktop
module to the required length.
NOTE: Before cutting the module to
size ensure the sink bowl fits within the
base cabinet cavity.
Cut the worktop as required following
the cutting instructions in section 3.
The worktop section should be fitted
in place before the undermount sink is
secured.
Ensure the surfaces are clean and then
secure the sink to the underside of
the worktop using silicone sealant.
NOTE: Use packing under the sink until
the silicone is fully set.
Important: If installing a waste
disposal unit, we recommend
additional permanent support for the
undermount sink. This can be in the
form of a cradle or additional fixing
brackets.
Remove any excess silicone from the
stainless steel bowl using soapy water
and a spatula, before allowing to cure.
Do not use the sink for 24 hours
after installation to allow the silicone to
set.
NOTE: Clean away any excess silicone
using soapy water.
9. Upstand Installation
The following equipment is required to complete this section
- Circular Saw or Angle Grinder
- 2 Part adhesive glue & hardener
- Clear Silicone
Use a pencil and tape measure to mark
where the upstand needs to be cut. Use a
square and straight edge to make the line
across the upstand.
Cut the upstand using an angle grinder or
circular saw. Once this has been
completed, use the Edge Finishing Kit to
smooth the edges of the upstand.
Apply Silicone to the rear of the
upstand and worktop then fiit into place.
Remove any excess sealant before it sets.
NOTE: Under no circumstances
should the finished face of the upstand be
sanded.
When joining two pieces of upstand
together, apply a small bead of worktop 2
part adhesive to both edges and push the
upstands together until excess adhesive
oozes out of the joint.
Remove any excess adhesive with a knife
blade before it has fully cured (no longer
tacky to touch but not fully set)
10. Worktop Fitting – General Points
• Under no circumstances should the finished face of the worktop be sanded.
Only the chamfer should be sanded during installation.
• The worktop face is supplied finished and care should be taken whilst
installing to avoid scratches.
• Joint adhesive can be re-applied if any pulls away from the joint when
removing the excess.
• Worktops can be scribed to the wall if required.
• Ensure the worktops are level before final fixing.
• To hide any imperfections at joins on black worktops use black beeswax
11. Care & Maintenance
• Wipe worktops using soapy water. For stubborn marks use Astonish cleaner or
a similar product on a normal cloth/duster to remove.
• No abrasive cleaners should be used.
• The Ezystone worksurface is scratch resistant but not scratch proof.
We recommend the use of a chopping board when cutting. Do not cut directly
onto the surface.
• Do not place hot pans directly onto the surface of the worktop. Worktop trivets
or hot rods should be used where applicable
• Do not leave spills on the work surface. Always wipe away immediately.
• In particular avoid chemicals such as nail varnish remover, acetone, chlorine,
oven & drain cleaners.
V7