1
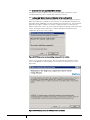
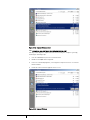
DigiTrace Supervisor Enterprise Edition
Heat-Tracing Controller Configuration
and Monitoring Software
INSTALLATION MANUAL
INSTALL-120 (Europe)
INSTALL-120 (Europe)
THERMAL MANAGEMENT SOLUTIONS
EN-DigiTraceSupervisorEnterprise-IM-H57989
06/13
1/73
Table of Contents
Section 1 – Introduction ...........................................................................................................................4
1.1 Welcome ................................................................................................................................................4
1.2 Vital Information..................................................................................................................................4
1.3 User Responsibilities .........................................................................................................................5
1.4 Safety Warnings ..................................................................................................................................5
1.5 Technical Support ...............................................................................................................................5
Section 2 – System Overview .................................................................................................................7
2.1 System Requirements .......................................................................................................................7
2.1.1 Typical System Architectures................................................................................................... 7
2.1.2 DigiTrace Supervisor (DTS) Master Server ........................................................................ 10
2.1.3 DigiTrace Supervisor (DTS) Slave Server ........................................................................... 10
2.1.4 DigiTrace Supervisor (DTS) Client ........................................................................................10
Section 3 – Installing DigiTrace Supervisor .................................................................................. 11
3.1 Quick Start Guide ..............................................................................................................................11
3.1.1 Enterprise (SQL Server) DTS installations: ....................................................................... 11
3.2 Installing Microsoft SQL Server 2000 .........................................................................................12
3.2.1 Installing the Database Server Components .................................................................... 12
3.2.2 Starting the SQL Server ...........................................................................................................21
3.2.3 Configuration of a Windows Account for use with SQL Server .................................... 21
3.2.4 Windows Server Licensing ......................................................................................................25
3.3 Uninstalling Microsoft SQL Server 2000 ................................................................................... 25
3.4 Installing Microsoft SQL Server 2005 .........................................................................................26
3.4.1 Installing the Database Server Components .................................................................... 26
3.4.2 Starting the SQL Server ...........................................................................................................32
3.4.3 Configuration of a Windows Account for use with SQL Server .................................... 33
3.4.4 Windows Server Licensing ......................................................................................................36
3.5 Uninstalling Microsoft SQL Server 2005 ................................................................................... 37
3.6 Installing Microsoft SQL Server 2008 .........................................................................................37
3.6.1 Installing the Database Server Components .................................................................... 38
3.6.2 Starting the SQL Server ...........................................................................................................44
3.6.3 Configuration of a Windows Account for use with SQL Server .................................... 45
3.6.4 Windows Server Licensing ......................................................................................................48
3.7 Uninstalling Microsoft SQL Server 2008 ................................................................................... 49
3.8 Installing DigiTrace Supervisor ....................................................................................................49
3.8.1 Installing DigiTrace Supervisor (DTS) Master Server .................................................... 50
3.8.2 Configuring the Master Server Software ............................................................................ 55
3.8.3 Configuring Microsoft SQL 2000 with the (DTS) Master Server .................................. 56
3.8.4 Configuring Microsoft SQL 2005 with the (DTS) Master Server .................................. 59
3.8.5 Configuring Microsoft SQL 2008 with the (DTS) Master Server .................................. 63
3.8.6 Starting the dts master server service ............................................................................... 66
3.8.7 Installing the DigiTrace Supervisor (DTS) Slave Server ................................................ 66
3.8.8 Starting the DTS Slave Server Service ................................................................................ 68
3.8.9 Installing DigiTrace Supervisor (DTS) Client ..................................................................... 68
3.9 Uninstalling DigiTrace Supervisor ..............................................................................................70
3.9.1 Uninstalling DigiTrace Supervisor (DTS) Master Server ............................................... 70
3.9.2 Uninstalling DigiTrace Supervisor (DTS) Slave Server .................................................. 70
3.9.3 Uninstalling DigiTrace Supervisor (DTS) Client ............................................................... 71
THERMAL MANAGEMENT SOLUTIONS
EN-DigiTraceSupervisorEnterprise-IM-H57989
06/13
2/73
Section 4 – Software Activation and Registration ....................................................................... 72
Appendix A – Troubleshooting ..............................................................................................................72
A-1 Installation Errors ..........................................................................................................................72
A-2 Communication Errors .................................................................................................................72
A-3 Other Errors .....................................................................................................................................72
THERMAL MANAGEMENT SOLUTIONS
EN-DigiTraceSupervisorEnterprise-IM-H57989
06/13
3/73
Section 1 – Introduction
1.1 Welcome
The DigiTrace Supervisor heat-tracing controller configuration and monitoring software
provides a graphical user interface for DigiTrace communications and controller products.
The software supports the NGC series controllers, 780 Series/GCC-9000 Group
Communications Controllers, DigiTrace T2000 AC 2000+ alarm/communications interface
cards, DigiTrace 910/915/920 Heat Trace Controllers and/or legacy DigiTrace Controllers
(except the DigiTrace 200N) using the Modbus® protocol.
The software allows the user to configure and monitor any DigiTrace controller which has
the appropriate communications interface installed from one central location. The
software also incorporates advanced features such as data logging and trending, batch
and recipe processing, scheduled events, etc.
Please refer to the DigiTrace Supervisor Operations Manual (H57576) for more
information on features and capabilities.
1.2 Vital Information
IMPORTANT: All information, including illustrations, is believed to be reliable. Users,
however, should independently evaluate the suitability of each product for their particular
application. Pentair Thermal Management makes no warranties as to the accuracy or
completeness of the information, and disclaims any liability regarding its use.
Pentair Thermal Management only obligations are those in the Pentair Thermal
Management Standard Terms and Conditions of Sale for this product, and in no case will
Pentair Thermal Management or its distributors be liable for any incidental, indirect, or
consequential damages arising from the sale, resale, use, or misuse of the product.
Specifications are subject to change without notice. In addition, Pentair Thermal
Management reserves the right to make changes—without notification to Buyer—to
processing or materials that do not affect compliance with any applicable specification.
THERMAL MANAGEMENT SOLUTIONS
EN-DigiTraceSupervisorEnterprise-IM-H57989
06/13
4/73
1.3 User Responsibilities
The performance, reliability and safety of your heat-tracing system depend on proper
design, selection and installation. The DigiTrace Supervisor program will help you
configure and monitor a system that meets your requirements, but it is only a tool. It
assumes that your input is accurate, that you are familiar with heat-tracing system design
and configuration, and that you will ensure that all components of the heat-tracing system
are installed, maintained and used as intended. The configuration of the DigiTrace
Supervisor program should be reviewed by a knowledgeable engineer to ensure it is
appropriate for your application. Additional information relating to safety, design and
installation is contained in Design Guides, Installation Manuals, Data Sheets, and other
literature available from Pentair Thermal Management. Be sure to consult these
documents as needed.
1.4 Safety Warnings
There are important safety warnings shipped with our products and printed in our
literature. Be sure to read and follow them to reduce the risk of fire, shock or personal
injury. If you have any questions, contact your local Representative or Pentair Thermal
Management directly.
1.5 Technical Support
In North America, contact Pentair Thermal Management directly at:
North America
Pentair Thermal Management
7433 Harwin Drive
Houston, TX 77036
USA
Tel: 800-545-6258
Tel: 650-216-1526
Fax: 800-527-5703
Fax: 650-474-7711
email: [email protected]
Or for other parts of the world, contact Pentair Thermal Management at:
Europe, Middle East, Africa
Pentair Thermal Management
Romeinsestraat 14
3001 Leuven
Belgium / België / Belgique
Tel: +32 16 213 511
Fax: +32 16 213 603
email: [email protected]
Asia Pacific
Pentair Thermal Management
20F, Innovation Building
1009 Yi Shan Rd,
Shanghai 200233, P.R. China
Tel: +86 21 2412 1688
Fax: +86 21 5426 2917
email: [email protected]
THERMAL MANAGEMENT SOLUTIONS
EN-DigiTraceSupervisorEnterprise-IM-H57989
06/13
5/73
Latin America
Pentair Thermal Management
R. Capitão Francisco Teixeira Nogueira, 233
Água Branca, São Paulo, 05037-030
Brazil
Tel: +1.713.868.4800
Fax: +1.713.868.2333
email: [email protected]
THERMAL MANAGEMENT SOLUTIONS
EN-DigiTraceSupervisorEnterprise-IM-H57989
06/13
6/73
Section 2 – System Overview
The software allows the user to configure and monitor any DigiTrace controller installed
in the field which has the appropriate communications interface installed from one
central location. The software also supports alarm monitoring, with the ability to
acknowledge and clear alarms.
2.1 System Requirements
The DigiTrace Supervisor software is designed to run in a networked environment using
one or more computers. The software is composed of three components, and it is
assumed that all computers are networked together on a corporate intranet.
Implementation details of this type of networking environment are beyond the scope of
this document.
•
DigiTrace Supervisor (DTS) Master Server
•
DigiTrace Supervisor (DTS) Slave Server
•
DigiTrace Supervisor (DTS) Client
The DTS Master Server and DTS Slave Server applications must be installed and run on
separate computers. DTS Slave Servers are optional; however you may add new DTS
Slave Servers to your EHT system as required. Using DTS Slave Servers allows your EHT
system to distribute the communications workload. For example, instead of one computer
providing the monitoring for all devices in your system, one or more slave servers can be
configured to monitor for alarms at the same time.
The DTS Client provides the user interface and can be installed on any computers that
require user interaction with the system. Once the DTS Master Server, DTS Slave
Server(s) and DTS Client(s) are installed, multiple users can access the DigiTrace
Supervisor EHT system from different client computers simultaneously.
The computer hardware required to run DTS Master Server, DTS Slave Server and DTS
Client are outlined in the following sections.
2.1.1 TYPICAL SYSTEM ARCHITECTURES
While many DTS system architectures are possible, they will generally fall into one of
three types, and these in turn will use either SQL Express or SQL Server for their
databases. This installation manual discusses the DTS Enterprise installation only, which
uses SQL Server. For DTS installation which uses SQL Express, refer to the Installation
Manual for DigiTrace Supervisor Standard (H57988).
•
THERMAL MANAGEMENT SOLUTIONS
Single Master Server, no Slave Servers, Single User (Client). This type of
installation will typically use the SQL Express database (“Standard”) version of
DigiTrace Supervisor.
EN-DigiTraceSupervisorEnterprise-IM-H57989
06/13
7/73
HTC
HTC
Master Server with
Client Software
HTC
Figure 2-1-1 Typical single master, single client system
THERMAL MANAGEMENT SOLUTIONS
EN-DigiTraceSupervisorEnterprise-IM-H57989
06/13
8/73
•
Single Master Server, no Slave Servers, Multiple Users (Clients). This
architecture may be SQL EXPRESS -based as long the number of simultaneous users
is limited to a maximum of four. Due to SQL EXPRESS database limitations, no
performance guarantees can be made in all situations with this many Users. For
example, if several data trending or batch jobs are being run simultaneously, only one
or two Users may be able to connect without impacting system performance.
Applications that require more Users or the ability to have a larger number of
batch/trending/configuration jobs must use the SQL-based Enterprise version of
DigiTrace Supervisor.
LAN/WAN
Client #1
HTC
HTC
Client #2
Master Server
with Client
Software
HTC
Client #X
Figure 2-1-2 Typical single master, multiple client system
•
Single Master Server, one or more Slave Servers, Multiple Users (Clients). This
topology represents the largest system type, where multiple computers are used to
distribute the communications and processing workload. This type of installation will
always use the SQL-based Enterprise version of DigiTrace Supervisor and will
support a large number of simultaneous Users and data processing jobs.
Slave Server #1 with
Optional Client
Software
HT
HTC
C
HT
HTC
C
Client #1
HTC
HT
C
Slave Server #2 with
Optional Client
Software
HTC
HT
C
HT
HTC
C
Client #2
HTC
HT
C
Master Server with
Optional Client
Software
Client #X
HTC
HT
C
HT
HTC
C
LAN/WAN
Slave Server #X with
Optional Client
Software
HT
HTC
C
Figure 2-1-3 Typical single master, multi-slave server, multiple client system
THERMAL MANAGEMENT SOLUTIONS
EN-DigiTraceSupervisorEnterprise-IM-H57989
06/13
9/73
2.1.2 DIGITRACE SUPERVISOR (DTS) MASTER SERVER
To effectively use the software, the following configuration is required:
•
A Pentium® 4 – 2.4GHz or faster (Recommended), Pentium III – 500 MHz (Minimum)
IBM-compatible personal computer. Large systems using multiple Slave Servers
should consider the use of a higher speed/multiple processor Master Server
computer for best performance. Consult Pentair Thermal Management Applications
Engineering for guidance.
•
A hard disk with at least 4 gigabytes of free space (Recommended), 2 gigabytes
(Minimum)
•
1 gigabyte of RAM (Recommended), 512 megabytes of RAM (Minimum)
•
CD-ROM Drive
•
1 or more available serial ports
•
A mouse or other compatible pointing device
•
SVGA display with 800x600 resolution
•
Standard configurations using SQL EXPRESS : Windows® XP SP3, Windows Vista®
SP1, Windows Server 2003 SP2, Windows Server 2008, or Windows® 7
•
Multi-User/Server Capable configurations using SQL Server: Windows Server 2008,
Windows Server 2003, Windows Vista SP1, Windows® 7 on the computer where the
SQL Server is installed
•
Microsoft .NET® Framework version 4.0
•
Network connectivity
2.1.3 DIGITRACE SUPERVISOR (DTS) SLAVE SERVER
To effectively use the software, the following configuration is required:
•
A Pentium 4 – 1GHz or faster (Recommended), Pentium III – 300 MHz (Minimum) IBMcompatible personal computer
•
A hard disk with at least 1 gigabyte of free space
•
512 megabytes of RAM (Recommended), 256 megabytes of RAM (Minimum)
•
CD-ROM Drive
•
1 or more available serial ports
•
A mouse or other compatible pointing device
•
SVGA display with 800x600 resolution
•
Windows XP SP3, Windows Server 2003 SP1, Windows Server 2008, Windows Vista
SP1, or
Windows 7
•
Microsoft .NET Framework version 4.0
•
Network connectivity
2.1.4 DIGITRACE SUPERVISOR (DTS) CLIENT
THERMAL MANAGEMENT SOLUTIONS
•
To effectively use the software, the following configuration is required:
•
A Pentium III – 500MHz or faster (Recommended), Pentium II – 300 MHz (Minimum)
IBM-compatible personal computer
•
A hard disk with at least 1 gigabyte of free space
•
512 megabytes of RAM (Recommended), 256 megabytes of RAM (Minimum)
•
CD-ROM Drive
•
A mouse or other compatible pointing device
•
SVGA display with 800x600 resolution
EN-DigiTraceSupervisorEnterprise-IM-H57989
06/13
10/73
•
Windows XP SP3, Windows Server 2003 SP1, Windows Server 2008, Windows Vista
SP1, or
Windows 7
•
Microsoft .NET Framework version 4.0
•
Network connectivity
Section 3 – Installing DigiTrace Supervisor
DigiTrace Supervisor’s (DTS) installation wizard will install the DigiTrace Supervisor
software on your PC’s hard disk drive. You must already have Windows XP, Windows
Server 2003, Windows Server 2008, Windows® Vista, or Windows 7 installed on your
computer. If you are using an SQL database version (DigiTrace Supervisor Enterprise
Edition), the computer on which the SQL Server is installed must have Windows Server
2003 SP1, Windows Server 2008, Windows Vista SP1 or Windows 7 pre-installed.
IMPORTANT: To install Windows, follow the installation procedure provided by Microsoft.
Familiarity with the Windows environment is highly recommended, and it is assumed
throughout this manual. Knowledge of the Windows environment will make this program
easier to use and understand.
If you are upgrading an existing DigiTrace Supervisor installation which is version 1.30 or
earlier, please refer to Section 15.3 “Converting DigiTrace Supervisor Databases” in the
DigiTrace Supervisor Operations Manual (H57576) for information on how to convert your
existing database.
IMPORTANT: Components should be installed in the order in which they are presented in
this document.
3.1 Quick Start Guide
The following provides a brief outline of the installation process for the Enterprise (SQL)
version of DigiTrace Supervisor (DTS). Detailed instructions may be found in each of the
Sections that are referenced within the individual steps:
3.1.1 ENTERPRISE (SQL SERVER) DTS INSTALLATIONS:
1.
2.
3.
Setup the Master Computer:
A.
Install the SQL Server (see Section 3.2, 3.2 or 3.6).
B.
Install the DigiTrace Supervisor Master Server application (see Section 3.8 ).
C.
(Optional but Recommended) Install the DigiTrace Supervisor Client software if
you want the user to be able to interact with the DigiTrace system from the
Master computer (see Section 3.8.9 ).
Setup any Slave Server Computers:
A.
Install the DigiTrace Supervisor Slave Server application (see Section 3.8.7 ).
B.
(Optional) Install the DigiTrace Supervisor Client software if you want the user to
be able to interact with the DigiTrace system from the Slave computer (see
Section 3.8.9 ).
Setup any Client Computers:
A.
4.
Convert an existing database (optional):
A.
THERMAL MANAGEMENT SOLUTIONS
Install the DigiTrace Supervisor Client software (see Section 3.8.9 ).
If you are upgrading from a previous version of DigiTrace Supervisor,
PyroMaster, or TraceMaster software, you may import some of the system setup
EN-DigiTraceSupervisorEnterprise-IM-H57989
06/13
11/73
information into the new software (see Sections 15.3 through 15.4 of the
DigiTrace Supervisor Operations Manual (H57576) as appropriate).
5.
Activate and Register your new software (see Section 4).
3.2 Installing Microsoft SQL Server 2000
To install Microsoft SQL Server 2000, insert the “DigiTrace Supervisor Disk 2 – Microsoft
SQL Server 2000 Standard Edition” CD in your computer’s CD-Rom drive. If the
installation application does not start automatically, navigate to the CD-Rom drive (D:\ for
example) and then double click on Autorun.exe.
IMPORTANT: This section applies to DigiTrace Supervisor Enterprise, version 2.1 and
earlier. If you are installing version 2.2 or newer, you should refer to Section 3.6 of this
guide.
IMPORTANT: If you are upgrading from a standard (SQL EXPRESS ) version of DigiTrace
Supervisor, be sure to follow the procedure in the SQL EXPRESS Installation manual to
uninstall SQL EXPRESS first. Ensure that you have completed all of the steps or SQL
Server may not install properly.
3.2.1 INSTALLING THE DATABASE SERVER COMPONENTS
Once the install screen is displayed, click on “SQL Server 2000 Components” and then
select Install Database Server.
Figure 3-2-1 Install SQL Server 2000 components
THERMAL MANAGEMENT SOLUTIONS
EN-DigiTraceSupervisorEnterprise-IM-H57989
06/13
12/73
Figure 3-2-2 Install database server
Follow the on screen instructions. When the “Computer Name” screen appears, select
Local Computer and then click “Next”.
Figure 3-2-3 Computer name
Choose Create a new instance of SQL Server, or install Client Tools in the “Installation
Selection” window. Click on “Next.”
THERMAL MANAGEMENT SOLUTIONS
EN-DigiTraceSupervisorEnterprise-IM-H57989
06/13
13/73
Figure 3-2-4 Create a new instance
Continue following the on screen directions. When the “Installation Definition” screen
appears, select Server and Client Tools and then click on “Next.”
Figure 3-2-5 Install client and server tools
In the Instance Name screen, leave the installation type selection set to Default. Click on
“Next.”
THERMAL MANAGEMENT SOLUTIONS
EN-DigiTraceSupervisorEnterprise-IM-H57989
06/13
14/73
Figure 3-2-6 Default installation
Choose the Typical setup and then click “Next.”
Figure 3-2-7 Typical Setup
Next, choose Use the same account for each service, Auto start SQL Server Service and
ensure the Service Settings are set to Use the Local System account. Then click on
“Next.”
THERMAL MANAGEMENT SOLUTIONS
EN-DigiTraceSupervisorEnterprise-IM-H57989
06/13
15/73
Figure 3-2-8 Services accounts
In the Authentication Mode window, choose Windows Authentication Mode, and then click
on “Next.”
Figure 3-2-9 Authentication mode
Continue following the on screen directions. When prompted to choose the Licensing
Mode, select the Per Seat mode and enter the total number of devices for which you have
purchased an SQL license.
IMPORTANT: When purchased from Pentair Thermal Management, copies of DigiTrace
Supervisor Enterprise include a SQL Server license and the appropriate number of SQL
device (CALs) with the Supervisor software application. Simply add up the total number of
Servers (Master+Slaves) and Users and enter this total into the devices box. For example,
if you have purchased a package of DigiTrace Supervisor software that includes (1) Master
Server, (2) Slave Servers, and (5) Users, you would enter a total of 8 devices in the box.
Once you have done this, click on “Next.”
THERMAL MANAGEMENT SOLUTIONS
EN-DigiTraceSupervisorEnterprise-IM-H57989
06/13
16/73
Figure 3-2-10 Licensing modes
Follow the on screen instructions until the installation is complete.
If your DTS software package includes an additional CD labeled “DigiTrace Supervisor
Disk 3 – Microsoft SQL Server 2000 Service Pack 3a,” insert this disk into the computer’s
CD-Rom drive. If the installation application does not start automatically, navigate to the
CD-Rom drive (D:\ for example) and then double click on Setup.bat.
The Welcome screen will be displayed. Click on “Next” to continue.
Figure 3-2-11 Install SQL Server SP3
The program may display a license agreement. If you accept the terms of the agreement,
press the Yes button and the installation will proceed. If you press the No button, the
installation will terminate.
THERMAL MANAGEMENT SOLUTIONS
EN-DigiTraceSupervisorEnterprise-IM-H57989
06/13
17/73
If you installed SQL Server by following the instructions earlier in this Section (see Figure
2-3-1-6), check the Default check box to select the instance name. If you have more than
one instance of SQL Server installed on the computer, specify which instance to update by
entering the instance name into the space provided. Click on “Next” to continue.
Figure 3-2-12 Select the instance name to update
Next, select how to connect to the SQL Server. Choose Windows Authentication and click
on “Next.”
Figure 3-2-13 Connect using Windows authentication
The installation program will attempt to authenticate the password. This may take a few
minutes to complete. A Password Warning window may be displayed. Choose Ignore the
security threat warning, leave password blank and click on “OK.”
THERMAL MANAGEMENT SOLUTIONS
EN-DigiTraceSupervisorEnterprise-IM-H57989
06/13
18/73
Figure 3-2-14 Leave SA password blank
When the SQL Server SP3 Setup window is displayed, check the Upgrade Microsoft Search
and apply SQL Server 2000 SP3 box and click on “Continue.”
Figure 3-2-15 Apply SQL Server 2000 SP3
When the Error Reporting screen is displayed, ensure that the check box is not selected
and then click on “OK.”
THERMAL MANAGEMENT SOLUTIONS
EN-DigiTraceSupervisorEnterprise-IM-H57989
06/13
19/73
Figure 3-2-16 Error reporting
This will complete the setup required to allow the Service Pack to be installed. Click on
“Next” to begin the installation process.
Figure 3-2-17 Start the installation
The setup software may ask you to perform a backup of your database. This is not
required for new installations and may be ignored. Click on “OK” to continue.
Figure 3-2-18 Backup notification
Once the installation process is finished, you may be prompted to reboot the computer to
complete the process. Remove the CD from the drive and click on Finish to complete the
setup process.
THERMAL MANAGEMENT SOLUTIONS
EN-DigiTraceSupervisorEnterprise-IM-H57989
06/13
20/73
Figure 3-2-19 Reboot the computer
3.2.2 STARTING THE SQL SERVER
In order for the DigiTrace Supervisor software to install and run, you must start the SQL
Server database service. This can be accomplished by simply rebooting the computer or
you may start the Server manually as follows:
Go to START → SETTINGS→ CONTROL PANEL→ ADMINISTRATIVE TOOLS→
COMPONENT SERVICES→ SERVICES (LOCAL).
Perform a right click on the MSSQLSERVER entry and click on “start.”
Figure 3-2-20 Manually starting the SQL server service
3.2.3 CONFIGURATION OF A WINDOWS ACCOUNT FOR USE WITH SQL SERVER
Now that you have successfully installed and started SQL Server, you must create an
account that will allow the DigiTrace Supervisor Master Server to access the service.
To accomplish this, go to START → SETTINGS→ CONTROL PANEL→ ADMINISTRATIVE
TOOLS→ COMPUTER MANAGEMENT→ LOCAL USERS & GROUPS→ USERS.
THERMAL MANAGEMENT SOLUTIONS
EN-DigiTraceSupervisorEnterprise-IM-H57989
06/13
21/73
Figure 3-2-21 Creating a new local user
Right click in the Name area (right-hand side) of the window and click on New User. You
may choose any name that you wish for the account, but a name that is representative of
the account’s use is recommended. For example, “DigiTrace Master” could be used.
Complete each field making specific note of the User name and Password, as these
parameters will be required when setting up the Master Server Software. Click “Create”
to complete the operation.
Figure 3-2-22 New user setup
Once the user has been created, it will appear in the user list. Right click on the new user
name and go to Properties. Once in the Properties window, choose the General tab and
ensure that User cannot change password and Password never expires are both selected.
THERMAL MANAGEMENT SOLUTIONS
EN-DigiTraceSupervisorEnterprise-IM-H57989
06/13
22/73
Figure 3-2-23 New user properties
Next, choose the Member Of tab and click on the Add button.
Figure 3-2-24 New user group assignment
THERMAL MANAGEMENT SOLUTIONS
EN-DigiTraceSupervisorEnterprise-IM-H57989
06/13
23/73
In the list of groups, choose Administrators and then click on “Add”. This step will ensure
that the DigiTrace Master Server user will have the access it needs to interact with the
SQL Server service.
Figure 3-2-25 Set the new user as an administrator
Once the Administrators group has been added, the new user should be a member of both
the Administrators and Users groups.
Figure 3-2-26 User Membership List
THERMAL MANAGEMENT SOLUTIONS
EN-DigiTraceSupervisorEnterprise-IM-H57989
06/13
24/73
Click on “Apply” and then “OK.” The new user name should be added to the list.
Figure 3-2-27 Addition of the new user
3.2.4 WINDOWS SERVER LICENSING
The computer on which SQL Server is installed must use Microsoft Windows® 2003 Server
or Windows® 2000 Server as the operating system. The user is responsible for ensuring
that the proper licensing following the latest requirements is obtained from
Microsoft for legal use of Windows® Server and User or Device connections.
A number of options for Windows Server Client Access Licenses (CALs) are available from
Microsoft. For a detailed description of the various options, see the Microsoft Website at
www.microsoft.com/resources/sam/lic_cal.mspx .
Typical DigiTrace Supervisor systems will use a mix of Device and User CALs. You will
need to purchase a separate Windows Server Device CAL for each Master and Slave
Server and a separate Windows Server User CAL for each user in your DigiTrace system.
3.3 Uninstalling Microsoft SQL Server 2000
You may remove Microsoft SQL Server 2000 from your computer system by following
these steps:
THERMAL MANAGEMENT SOLUTIONS
1.
Click the START button, then Select Control Panel.
2.
Double-Click Add/Remove Programs.
3.
In the list of installed programs, select Microsoft SQL Server. Click on the Remove
button.
4.
Follow the instructions that appear on the screen.
EN-DigiTraceSupervisorEnterprise-IM-H57989
06/13
25/73
Figure 3-3-1 Remove Microsoft SQL Server
3.4 Installing Microsoft SQL Server 2005
To install Microsoft SQL Server 2005, insert the “Microsoft SQL Server 2005 Standard
Edition – Disc 1” CD in your computer’s CD-Rom drive. If the installation application does
not start automatically, navigate to the CD-Rom drive (D:\ for example) and then double
click on Autorun.exe.
IMPORTANT: This section applies to DigiTrace Supervisor Enterprise, versions 2.2 and
later. If you are installing version 2.1 and earlier, you should refer to Section 3.2 of this
guide.
IMPORTANT: If you are upgrading from a standard (SQL EXPRESS ) version of DigiTrace
Supervisor, be sure to follow the procedure in the SQL EXPRESS Installation manual to
uninstall SQL EXPRESS first. Ensure that you have completed all of the steps or SQL
Server may not install properly.
3.4.1 INSTALLING THE DATABASE SERVER COMPONENTS
Once the install screen appears, click on “Install Server components, tools, Books Online,
and samples”. The Microsoft SQL Server 2005 End User License Agreement will appear.
You must accept the licensing terms and conditions before you can move on with rest of
the installation.
THERMAL MANAGEMENT SOLUTIONS
EN-DigiTraceSupervisorEnterprise-IM-H57989
06/13
26/73
Figure 3-4-1 Install SQL Server 2005 Startup menu
Figure 3-4-2 Microsoft SQL Server 2005 End User License Agreement
Once the “Installing Prerequisites” screen appears, click on “Install” to start the
Installation.
THERMAL MANAGEMENT SOLUTIONS
EN-DigiTraceSupervisorEnterprise-IM-H57989
06/13
27/73
Figure 3-4-3 Microsoft SQL Server 2005 Installing Prerequisites
For the next couple of screens, follow the on screen instructions. When the “Components
to Install” screen appears, select the SQL Server database Services and Workstation
components, Books Online and development tools, then click on “Next”.
Figure 3-4-4 Components to Install
When the “Instance Name” screen appears, select Default Instance then click on “Next”.
THERMAL MANAGEMENT SOLUTIONS
EN-DigiTraceSupervisorEnterprise-IM-H57989
06/13
28/73
Figure 3-4-5 Instance name
Choose Local System for the “Use the build-in System account”, and for “Start services at
the end of setup” select SQL Server. Click on “Next.”
Figure 3-4-6 Service Account
When the “Authentication Mode” screen appears select Windows Authentication Mode
then click on “Next”.
THERMAL MANAGEMENT SOLUTIONS
EN-DigiTraceSupervisorEnterprise-IM-H57989
06/13
29/73
Figure 3-4-7 Authentication Mode
In the “Collation Settings” screen, select SQL collations (used for compatibility with
previous versions of SQL Server) option. Click on “Next.”
Figure 3-4-8 Collation Settings
Choose the Error and Usage report settings if required then click on “Next.”
THERMAL MANAGEMENT SOLUTIONS
EN-DigiTraceSupervisorEnterprise-IM-H57989
06/13
30/73
Figure 3-4-9 Error and Usage Report Settings
Finally the “Ready to Install” screen should appear, click on “Install” to start the
installation.
Figure 3-4-10 Ready to Install
Once the installation has started the “Setup Progress” screen appears. The installation
will take some time to complete and you will be prompted to insert Disc 2 during the
installation process.
THERMAL MANAGEMENT SOLUTIONS
EN-DigiTraceSupervisorEnterprise-IM-H57989
06/13
31/73
Figure 3-4-11 Setup Progress
Once the installation has completed, the “Completing Microsoft SQL Server 2005 Setup”
appears. Click on “Finish” to complete the installation.
Figure 3-4-12 Complete Microsoft SQL Server 2005 Setup
3.4.2 STARTING THE SQL SERVER
The SQL Server Service should already be started by the installation. If there is a need to
manually start the SQL Server Service, this can be accomplished by simply rebooting the
computer or you may start the Server manually as follows:
THERMAL MANAGEMENT SOLUTIONS
EN-DigiTraceSupervisorEnterprise-IM-H57989
06/13
32/73
Go to START → SETTINGS→ CONTROL PANEL→ ADMINISTRATIVE TOOLS→
COMPONENT SERVICES→ SERVICES (LOCAL).
Perform a right click on the SQL Server (MSSQLSERVER) entry and click on “start.”
Figure 3-4-13 Manually starting the SQL server service
3.4.3 CONFIGURATION OF A WINDOWS ACCOUNT FOR USE WITH SQL SERVER
Now that you have successfully installed and started SQL Server, you must create an
account that will allow the DigiTrace Supervisor Master Server to access the service.
To accomplish this, go to START → SETTINGS→ CONTROL PANEL→ ADMINISTRATIVE
TOOLS→ COMPUTER MANAGEMENT→ LOCAL USERS & GROUPS→ USERS.
Figure 3-4-14 Creating a new local user
Right click in the Name area (right-hand side) of the window and click on New User. You
may choose any name that you wish for the account, but a name that is representative of
the account’s use is recommended. For example, “DigiTrace Master” could be used.
THERMAL MANAGEMENT SOLUTIONS
EN-DigiTraceSupervisorEnterprise-IM-H57989
06/13
33/73
Complete each field making specific note of the User name and Password, as these
parameters will be required when setting up the Master Server Software. Click “Create”
to complete the operation.
Figure 3-4-15 New user setup
Once the user has been created, it will appear in the user list. Right click on the new user
name and go to Properties. Once in the Properties window, choose the General tab and
ensure that User cannot change password and Password never expires are both selected.
Figure 3-4-16 New user properties
THERMAL MANAGEMENT SOLUTIONS
EN-DigiTraceSupervisorEnterprise-IM-H57989
06/13
34/73
Next, choose the Member Of tab and click on the Add button.
Figure 3-4-17 New user group assignment
In the list of groups, choose Administrators and then click on “Add”. This step will ensure
that the DigiTrace Master Server user will have the access it needs to interact with the
SQL Server service.
Figure 3-4-18 Set the new user as an administrator
THERMAL MANAGEMENT SOLUTIONS
EN-DigiTraceSupervisorEnterprise-IM-H57989
06/13
35/73
Once the Administrators group has been added, the new user should be a member of both
the Administrators and Users groups.
Figure 3-4-19 User Membership List
Click on “Apply” and then “OK.” The new user name should be added to the list.
Figure 3-4-20 Addition of the new user
3.4.4 WINDOWS SERVER LICENSING
The computer on which SQL Server is installed must use Microsoft Windows® 2003 Server
or Windows® 2000 Server as the operating system. The user is responsible for ensuring
that the proper licensing following the latest requirements is obtained from
Microsoft for legal use of Windows® Server and User or Device connections.
THERMAL MANAGEMENT SOLUTIONS
EN-DigiTraceSupervisorEnterprise-IM-H57989
06/13
36/73
A number of options for Windows Server Client Access Licenses (CALs) are available from
Microsoft. For a detailed description of the various options, see the Microsoft Website at
www.microsoft.com/resources/sam/lic_cal.mspx .
Typical DigiTrace Supervisor systems will use a mix of Device and User CALs. You will
need to purchase a separate Windows Server Device CAL for each Master and Slave
Server and a separate Windows Server User CAL for each user in your DigiTrace system.
3.5 Uninstalling Microsoft SQL Server 2005
You may remove Microsoft SQL Server 2005 from your computer system by following
these steps:
1.
Click the START button, then Select Control Panel.
2.
Double-Click Add/Remove Programs.
3.
In the list of installed programs, select Microsoft SQL Server 2005. Click on the
Remove button.
4.
Follow the instructions that appear on the screen.
Figure 3-5-1 Remove Microsoft SQL Server 2005
3.6 Installing Microsoft SQL Server 2008
To install Microsoft SQL Server 2008, insert the “Microsoft SQL Server 2008 Standard
Edition” CD in your computer’s CD-Rom drive. If the installation application does not start
automatically, navigate to the CD-Rom drive (D:\ for example) and then double click on
Autorun.exe.
IMPORTANT: This section applies to DigiTrace Supervisor Enterprise, versions 2.2 and
later. If you are installing version 2.1 and earlier, you should refer to Section 3.2 of this
guide.
IMPORTANT: If you are upgrading from a standard (SQL EXPRESS ) version of DigiTrace
Supervisor, be sure to follow the procedure in the SQL EXPRESS Installation manual to
THERMAL MANAGEMENT SOLUTIONS
EN-DigiTraceSupervisorEnterprise-IM-H57989
06/13
37/73
uninstall SQL EXPRESS first. Ensure that you have completed all of the steps or SQL
Server may not install properly.
3.6.1 INSTALLING THE DATABASE SERVER COMPONENTS
Once the SQL Server installation Center screen appears, click on “Installation” menu
item, and select “New SQL Server stand-alone installation or add features to an existing
installation”. The Microsoft SQL Server 2008 License Terms will appear. You must accept
the license terms before you can move on with rest of the installation.
Figure 3-6-1 SQL Server 2008 Installation Center
THERMAL MANAGEMENT SOLUTIONS
EN-DigiTraceSupervisorEnterprise-IM-H57989
06/13
38/73
Figure 3-6-2 Microsoft Software License Terms for Microsoft SQL Server 2008 Standard Edition
Once the “Setup Support Files” screen appears, click on “Install” to start the Installation.
Figure 3-6-3 SQL Server 2008 Setup Support files
For the next couple of screens, follow the on screen instructions. When the “Feature
Selection” screen appears, use the “Select All” for a full installation or manually select
the feature that is needed. Click on “Next” to continue.
THERMAL MANAGEMENT SOLUTIONS
EN-DigiTraceSupervisorEnterprise-IM-H57989
06/13
39/73
Figure 3-6-4 SQL Server 2008 Feature Selection screen
When the “Instance Configuration” screen appears, select Default Instance then click on
“Next”.
Figure 3-6-5 Instance Configuration screen
Continue until the Server Configuration screen is reached. In this screen, you must setup
an account name for reach Service displayed. Click on the “Collation” tab and check the
Collation settings, edit them if required.
THERMAL MANAGEMENT SOLUTIONS
EN-DigiTraceSupervisorEnterprise-IM-H57989
06/13
40/73
Figure 3-6-6 Server Configuration screen
When the “Database Engine Configuration” screen appears select Windows Authentication
Mode. You must also have to specify a SQL Server administrator on this screen. This
should be someone with admin privileges. Click on “Next” to continue.
Figure 3-6-7 Database Engine Configuration screen
In the “Analysis Services Configuration” screen, specify a user that has permission to
perform analysis services. Click on “Next.”
THERMAL MANAGEMENT SOLUTIONS
EN-DigiTraceSupervisorEnterprise-IM-H57989
06/13
41/73
Figure 3-6-8 Analysis Services Configuration screen
On the “Reporting Services Configuration” screen, select a reporting service option, click
on “Next.”
Figure 3-6-9 Reporting Services Configuration screen
Continue on with the next few screen, until the “Ready to Install” screen appear, click on
“Install” to start the installation.
THERMAL MANAGEMENT SOLUTIONS
EN-DigiTraceSupervisorEnterprise-IM-H57989
06/13
42/73
Figure 3-6-10 Ready to Install screen
Once the installation has started the “Setup Progress” screen appears. The installation
will take some time to complete. When the installation completes, the “Installation
progress” screen will be displayed. If there are no errors encountered click on “Next”.
Figure 3-6-11 Setup Progress
The “Complete” appears. Click on “Close” to exit the installation.
THERMAL MANAGEMENT SOLUTIONS
EN-DigiTraceSupervisorEnterprise-IM-H57989
06/13
43/73
Figure 3-6-12 Complete Microsoft SQL Server 2008 Setup
3.6.2 STARTING THE SQL SERVER
The SQL Server Service should already be started by the installation. If there is a need to
manually start the SQL Server Service, this can be accomplished by simply rebooting the
computer or you may start the Server manually as follows:
Go to START → SETTINGS→ CONTROL PANEL→ ADMINISTRATIVE TOOLS→
COMPONENT SERVICES→ SERVICES (LOCAL).
Perform a right click on the SQL Server (MSSQLSERVER) entry and click on “start.”
Figure 3-6-13 Manually starting the SQL server service
THERMAL MANAGEMENT SOLUTIONS
EN-DigiTraceSupervisorEnterprise-IM-H57989
06/13
44/73
3.6.3 CONFIGURATION OF A WINDOWS ACCOUNT FOR USE WITH SQL SERVER
Now that you have successfully installed and started SQL Server, you must create an
account that will allow the DigiTrace Supervisor Master Server to access the service.
To accomplish this, go to START → SETTINGS→ CONTROL PANEL→ ADMINISTRATIVE
TOOLS→ COMPUTER MANAGEMENT→ LOCAL USERS & GROUPS→ USERS.
Figure 3-6-14 Creating a new local user
Right click in the Name area (right-hand side) of the window and click on New User. You
may choose any name that you wish for the account, but a name that is representative of
the account’s use is recommended. For example, “DigiTrace Master” could be used.
Complete each field making specific note of the User name and Password, as these
parameters will be required when setting up the Master Server Software. Click “Create”
to complete the operation.
THERMAL MANAGEMENT SOLUTIONS
EN-DigiTraceSupervisorEnterprise-IM-H57989
06/13
45/73
Figure 3-6-15 New user setup
Once the user has been created, it will appear in the user list. Right click on the new user
name and go to Properties. Once in the Properties window, choose the General tab and
ensure that User cannot change password and Password never expires are both selected.
Figure 3-6-16 New user properties
Next, choose the Member Of tab and click on the Add button.
THERMAL MANAGEMENT SOLUTIONS
EN-DigiTraceSupervisorEnterprise-IM-H57989
06/13
46/73
Figure 3-6-17 New user group assignment
In the list of groups, choose Administrators and then click on “Add”. This step will ensure
that the DigiTrace Master Server user will have the access it needs to interact with the
SQL Server service.
Figure 3-6-18 Set the new user as an administrator
Once the Administrators group has been added, the new user should be a member of both
the Administrators and Users groups.
THERMAL MANAGEMENT SOLUTIONS
EN-DigiTraceSupervisorEnterprise-IM-H57989
06/13
47/73
Figure 3-6-19 User Membership List
Click on “Apply” and then “OK.” The new user name should be added to the list.
Figure 3-6-20 Addition of the new user
3.6.4 WINDOWS SERVER LICENSING
The computer on which SQL Server is installed must use Microsoft Windows® 2003 Server
or Windows® 2008 Server as the operating system. The user is responsible for ensuring
THERMAL MANAGEMENT SOLUTIONS
EN-DigiTraceSupervisorEnterprise-IM-H57989
06/13
48/73
that the proper licensing following the latest requirements is obtained from
Microsoft for legal use of Windows® Server and User or Device connections.
A number of options for Windows Server Client Access Licenses (CALs) are available from
Microsoft. For a detailed description of the various options, see the Microsoft Website at
www.microsoft.com/resources/sam/lic_cal.mspx .
Typical DigiTrace Supervisor systems will use a mix of Device and User CALs. You will
need to purchase a separate Windows Server Device CAL for each Master and Slave
Server and a separate Windows Server User CAL for each user in your DigiTrace system.
3.7 Uninstalling Microsoft SQL Server 2008
You may remove Microsoft SQL Server 2008 from your computer system by following
these steps:
5.
Click the START button, then Select Control Panel.
6.
Double-Click Add/Remove Programs.
7.
In the list of installed programs, select Microsoft SQL Server 2008. Click on the
Remove button.
8.
Follow the instructions that appear on the screen.
Figure 3-7-1 Remove Microsoft SQL Server 2008
3.8 Installing DigiTrace Supervisor
The installation program will start up the Installation Wizard, which will guide you through
the installation process. You are required to read and accept the Software License
Agreement. Once you read and agree with the license agreement, click the Yes button and
the installation will continue. If you do not agree with the license agreement, click No and
the installation will terminate.
THERMAL MANAGEMENT SOLUTIONS
EN-DigiTraceSupervisorEnterprise-IM-H57989
06/13
49/73
IMPORTANT: The following Sections assume that you have already installed a database
application (either SQL EXPRESS or SQL Server) on the same computer as the one where
the DigiTrace Supervisor Master Server software will be installed. If you have not yet
completed this step, refer to Sections 3.2 for additional information on how to do this.
3.8.1 INSTALLING DIGITRACE SUPERVISOR (DTS) MASTER SERVER
To start the DigiTrace Master Server installation, insert the “DigiTrace Supervisor Disk 1 –
Application and Utilities” CD (SQL versions) into the PC’s CD-Rom drive. Navigate to the
Installation folder and double click on the DTSMasterServerSetup.exe file. The
installation begins by checking the computer for software components that are required
to run DigiTrace Supervisor. If there are components missing, it will install them for you.
You may be asked to reboot your computer during the installation of those components,
please select Yes to reboot.
Figure 3-8-1 Setup screen showing missing components to be installed
If there are no missing components the “Welcome to the DigiTrace Supervisor Master
Server Setup Wizard” screen will appear. Click on “Next” to continue to the License
Agreement.
Figure 3-8-2 Welcome screen for DTS Master Server installation
THERMAL MANAGEMENT SOLUTIONS
EN-DigiTraceSupervisorEnterprise-IM-H57989
06/13
50/73
Figure 3-8-3 License Agreement for DTS Master Server
Continue with the next few screens until the Installation complete screen. At this point,
the DTS Master Server software is already installed in your computer, however the next
step is to associate the SQL Server that will be used by the DTS Master Server. The DTS
Master Server Configuration Utility will guide you from this point on.
Figure 3-8-4 DTS Master Server Installation Complete
THERMAL MANAGEMENT SOLUTIONS
EN-DigiTraceSupervisorEnterprise-IM-H57989
06/13
51/73
Figure 3-8-5 DTS Master Server Configuration Utility
You will be prompted to enter a Database Server Name – enter the name that was defined
during the database installation process (see Figures 3.2.1 ). If you did not enter a specific
database Instance name as instructed, then the name will simply be the Master Server
computer name. If you do not recall your computer name, you can find it by performing a
right click on My Computer and going to Properties. Once the window opens, click on the
Computer Name tab.
Once you know your Computer Name enter it into the Database Server Name field and
click on “Next.” (Refer to Error! Reference source not found.-6)
THERMAL MANAGEMENT SOLUTIONS
EN-DigiTraceSupervisorEnterprise-IM-H57989
06/13
52/73
Figure 3-8-6 DTS database server information screen
If you are installing over an existing DTS installation, you will be prompted to choose an
Existing System Database option, otherwise the Confirm Configuration screen will be
displayed.
Figure 3-8-7 DTS database server information screen
Click “Next” to continue.
THERMAL MANAGEMENT SOLUTIONS
EN-DigiTraceSupervisorEnterprise-IM-H57989
06/13
53/73
Figure 3-8-8 DTS database server information screen
If there are errors encountered during the installation, please refer to section Appendix –
B Troubleshooting on how to correct the problem, otherwise the installation Complete
screen is displayed. Make sure the checkbox for the “Restart DTS Master Server for the
new configuration to take effect” is checked, then click “Close” to exit the installation.
Figure 3-8-9 DTS database server information screen
THERMAL MANAGEMENT SOLUTIONS
EN-DigiTraceSupervisorEnterprise-IM-H57989
06/13
54/73
3.8.2 CONFIGURING THE MASTER SERVER SOFTWARE
After installing the Master Server Software, perform the following steps to configure the
Master Server:
For SQL Server-based installations perform the following additional steps:
You must configure the Master Service to automatically log in to Windows Server. To do
this, go to START → SETTINGS→ CONTROL PANEL→ ADMINISTRATIVE TOOLS→
COMPONENT SERVICES→ SERVICES (LOCAL)→ DIGITRACE SUPERVISOR MASTER
SERVER SERVICE.
Figure 3-8-10 Configure the master server
Right click on DigiTrace Supervisor Master Server Services and select Properties. Once in
the Properties window, choose the Log On tab. Select Log On as: and This account. Click
on the “Browse” button and choose the new user account that was created in Section 3.2.3
. Enter the same password that you used when the account was created.
IMPORTANT: You must re-enter the password into both the Password and the Confirm
Password fields.
Click on “Apply” and then “OK.”
THERMAL MANAGEMENT SOLUTIONS
EN-DigiTraceSupervisorEnterprise-IM-H57989
06/13
55/73
Figure 3-8-11 Set the log on account
If successful, you will be granted access to the Windows Server.
Figure 3-8-12 Access granted to the Windows Server
3.8.3 CONFIGURING MICROSOFT SQL 2000 WITH THE (DTS) MASTER SERVER
SQL Server 2000 must be configured to allow the Master Server to connect to it. Do this by
clicking on START→ PROGRAMS→ MICROSOFT SQL SERVER→ ENTERPRISE
MANAGER→ MICROSOFT SQL SERVERS→ SQL SERVER GROUP→ MASTERSVR-SQL1→
DATABASES→ EHTPLUS→ USERS.
IMPORTANT: In the example above, the Database Server name is “MASTERSVR-SQL1”. In
your application, this will be replaced by the Database Server name that was assigned
during the database server installation process (refer to Section 3.2.1 ).
THERMAL MANAGEMENT SOLUTIONS
EN-DigiTraceSupervisorEnterprise-IM-H57989
06/13
56/73
Figure 3-8-13 Database users
Right Click on the right hand side of the screen and choose New Database User. In the
Database User Properties window, choose the Login name that was created in Section 3.2
(see Figure 3-2-6). If the name does not appear in the list, click on “<new>” to add it.
Figure 3-8-14 Select the database user
In the SQL Server Login Properties – New Login window, click on the “…” button to browse
and pick the user name that was previously created in Section 3.2 (Figure 3-2-6). Click
“Add” and then “OK.”
THERMAL MANAGEMENT SOLUTIONS
EN-DigiTraceSupervisorEnterprise-IM-H57989
06/13
57/73
Figure 3-8-15 Add a new database user
The Authentication and Defaults fields will automatically be populated with the
appropriate information once the new user has been added. Do not modify these settings.
Click “OK” to accept.
Figure 3-8-16 Add new database user
After the Login name has been chosen, ensure that both the public and db_owner
selections are enabled in the Database role membership area. Then click “OK.”
THERMAL MANAGEMENT SOLUTIONS
EN-DigiTraceSupervisorEnterprise-IM-H57989
06/13
58/73
Figure 3-8-17 Set database role
The SQL Server Enterprise Manager should now show the DigiTrace Master Server as a
database user.
Figure 3-8-18 New database user created
Close the SQL Server Enterprise Manager window.
3.8.4 CONFIGURING MICROSOFT SQL 2005 WITH THE (DTS) MASTER SERVER
SQL Server 2005 must be configured to allow the Master Server to connect to it. Do this by
clicking on START→ PROGRAMS→ MICROSOFT SQL SERVER 2005→ SQL SERVER
MANAGEMENT STUDIO. You will be prompted to login to the SQL database Server.
THERMAL MANAGEMENT SOLUTIONS
EN-DigiTraceSupervisorEnterprise-IM-H57989
06/13
59/73
Figure 3-8-19 Connect to Server
Once the connection is successful navigate to WINSERVER2003→ DATABASES→
EHTPLUS→ SECURITY→ LOGINS.
IMPORTANT: In the example above, the Database Server name is “WINSERVER2003”. In
your application, this will be replaced by the Database Server name that was assigned
during the database server installation process (refer to Section 3.2.1 ).
Figure 3-8-20 Microsoft SQL Server Management Studio Logins
Right Click on the right hand side of the screen and choose New Logins. Enter the name
that was previously created in section 3.6.3 (i.e. DigiTrace Master). The Authentication
and Defaults fields will automatically be populated with the appropriate information once
the new login has been added. Do not modify these settings. Click “OK” to accept.
THERMAL MANAGEMENT SOLUTIONS
EN-DigiTraceSupervisorEnterprise-IM-H57989
06/13
60/73
Figure 3-8-21 New Login
After you’ve successfully added the new Login, navigate to WINSERVER2003→
DATABASES→ EHTPLUS→ SECURITY→ USERS and add a new user. Enter a new user
name such as DigiTrace Master and use the browse button to select the previously
created Login name “DigiTrace Master” for the Login name field. Select db_accessadmin
and db_owner for both Owned Schemas and Role Members field. Click “OK” to save the
new user.
THERMAL MANAGEMENT SOLUTIONS
EN-DigiTraceSupervisorEnterprise-IM-H57989
06/13
61/73
Figure 3-8-22 Add a new database user
After you successfully added the new user, it will appear in the Users screen.
Figure 3-8-23 Users
You can now close the Microsoft SQL Server Management Studio.
THERMAL MANAGEMENT SOLUTIONS
EN-DigiTraceSupervisorEnterprise-IM-H57989
06/13
62/73
3.8.5 CONFIGURING MICROSOFT SQL 2008 WITH THE (DTS) MASTER SERVER
SQL Server 2008 must be configured to allow the Master Server to connect to it. Do this by
clicking on START→ PROGRAMS→ MICROSOFT SQL SERVER 2008→ SQL SERVER
MANAGEMENT STUDIO. You will be prompted to login to the SQL database Server.
Figure 3-8-24 Connect to Server
Once the connection is successful navigate to WIN-432TYFQNQKB→ DATABASES→
EHTPLUS→ LOGINS.
IMPORTANT: In the example above, the Database Server name is “WIN-432TYFQNQKB”.
In your application, this will be replaced by the Database Server name that was assigned
during the database server installation process (refer to Section 3.6, Figure 3-6-6).
Figure 3-8-25 Microsoft SQL Server Management Studio Logins
THERMAL MANAGEMENT SOLUTIONS
EN-DigiTraceSupervisorEnterprise-IM-H57989
06/13
63/73
Right Click on the right hand side of the screen and choose New Logins. Enter the name
that was previously created in section 3.6.3 (i.e. DigiTrace Master). The Authentication
and Defaults fields will automatically be populated with the appropriate information once
the new login has been added. Do not modify these settings. Click “OK” to accept.
Figure 3-8-26 New Login
After you’ve successfully added the new Login, navigate to WIN-432TYFQNQKB→
DATABASES→ EHTPLUS→ SECURITY→ USERS and add a new user. Enter a new user
name such as DigiTrace Master and use the browse button to select the previously
created Login name “DigiTrace Master” for the Login name field. Select db_accessadmin
and db_owner for both Owned Schemas and Role Members field. Click “OK” to save the
new user.
THERMAL MANAGEMENT SOLUTIONS
EN-DigiTraceSupervisorEnterprise-IM-H57989
06/13
64/73
Figure 3-8-27 Add a new database user
After you successfully added the new user, it will appear in the Users screen.
Figure 3-8-28 Users
You can now close the Microsoft SQL Server Management Studio.
THERMAL MANAGEMENT SOLUTIONS
EN-DigiTraceSupervisorEnterprise-IM-H57989
06/13
65/73
3.8.6 STARTING THE DTS MASTER SERVER SERVICE
The DigiTrace Supervisor Master Server service must now be started. This can be
accomplished by either of the methods described in Section 3.2.2 .
3.8.7 INSTALLING THE DIGITRACE SUPERVISOR (DTS) SLAVE SERVER
To start the DigiTrace Slave Server installation, insert the “DigiTrace Supervisor Disk 1 –
Application and Utilities” CD (SQL versions) into the PC’s CD-Rom drive. Navigate to the
Installation folder and double click on the DTSSlaveServerSetup.exe file. The installation
begins by checking the computer for software components that are required to run
DigiTrace Supervisor. If there are some required components missing, it will install them
for you. You may be asked to reboot your computer during the installation of those
components, please select Yes to reboot.
Figure 3-8-29 Setup screen showing missing components to be installed
If there are no missing components the “Welcome to the DigiTrace Supervisor Slave
Server Setup Wizard” screen will appear. Click on “Next” to continue to the License
Agreement.
Figure 3-8-30 Welcome screen for DTS Slave Server installation
THERMAL MANAGEMENT SOLUTIONS
EN-DigiTraceSupervisorEnterprise-IM-H57989
06/13
66/73
Figure 3-8-31 License Agreement for DTS Slave Server
Continue with the next few screens until the Installation complete screen.
Figure 3-8-32 DTS Slave Server Installation Completed
THERMAL MANAGEMENT SOLUTIONS
EN-DigiTraceSupervisorEnterprise-IM-H57989
06/13
67/73
3.8.8 STARTING THE DTS SLAVE SERVER SERVICE
The DigiTrace Supervisor Slave Server service should now be started. If for some reason
it is not, please follow the methods described in Section 3.2.2, 3.2.2 . The Windows
Services are listed in the Services Applet, under Control Panel->Administrative
Tools\Component Services.
3.8.9 INSTALLING DIGITRACE SUPERVISOR (DTS) CLIENT
To start the DigiTrace Client installation, insert the “DigiTrace Supervisor Disk 1 –
Application and Utilities” CD (SQL versions) into the PC’s CD-Rom drive. Navigate to the
Installation folder and double click on the DTSClientSetup.exe file. The installation begins
by checking the computer for software components that are required to run DigiTrace
Supervisor. If there are some required components missing, it will install them for you.
You may be asked to reboot your computer during the installation of those components,
please select Yes to reboot.
Figure 3-8-33 Setup screen showing missing components to be installed
If there are no missing components the “Welcome to the DigiTrace Supervisor Client
Setup Wizard” screen will appear. Click on “Next” to continue.
Figure 3-8-34 Welcome screen for DTS Client installation
THERMAL MANAGEMENT SOLUTIONS
EN-DigiTraceSupervisorEnterprise-IM-H57989
06/13
68/73
Figure 3-8-35 License Agreement for DTS Client
Continue with the next screens until the Installation complete screen.
Figure 3-8-36 DTS Client Installation Completed
You can now start the DTS Client software by locating the DTSClient icon on your desktop
and double click on it.
THERMAL MANAGEMENT SOLUTIONS
EN-DigiTraceSupervisorEnterprise-IM-H57989
06/13
69/73
Figure 3-8-37 DTS Client Icon
3.9 Uninstalling DigiTrace Supervisor
Prior to removing any DigiTrace Supervisor components from your computer system, back
up your DigiTrace Supervisor database. (Refer to Section 15.2.1 in the DigiTrace
Supervisor Operations Manual (H57576) for instructions on the proper backup procedure.)
3.9.1 UNINSTALLING DIGITRACE SUPERVISOR (DTS) MASTER SERVER
You may remove DigiTrace Supervisor Master Server from your computer system by
following these steps:
1.
Click the START button, then Select Control Panel.
2.
Double-Click Add/Remove Programs.
3.
In the list of installed programs, select DigiTrace Supervisor Master Server. Click on
the Remove button.
4.
Follow the instructions that appear on the screen.
Figure 3-9-1 Remove DTS master server
3.9.2 UNINSTALLING DIGITRACE SUPERVISOR (DTS) SLAVE SERVER
You may remove DigiTrace Supervisor Slave Server from your computer system by
following the following steps:
THERMAL MANAGEMENT SOLUTIONS
1.
Click the START button, then Select Control Panel.
2.
Double-Click Add/Remove Programs.
3.
In the list of installed programs, select DigiTrace Supervisor Slave Server. Click on
the Remove button.
4.
Follow the instructions that appear on the screen.
EN-DigiTraceSupervisorEnterprise-IM-H57989
06/13
70/73
Figure 3-9-2 Remove DTS slave server
3.9.3 UNINSTALLING DIGITRACE SUPERVISOR (DTS) CLIENT
You may remove DigiTrace Supervisor Slave Server from your computer system by
following the following steps:
1.
Click the START button, then Select Control Panel.
2.
Double-Click Add/Remove Programs.
3.
In the list of installed programs, select DigiTrace Supervisor Client. Click on the
Remove button.
4.
Follow the instructions that appear on the screen.
Figure 3-9-3 Remove DTS client
THERMAL MANAGEMENT SOLUTIONS
EN-DigiTraceSupervisorEnterprise-IM-H57989
06/13
71/73
Section 4 – Software Activation and Registration
Please refer to Section 16 in the DTS Operations Manual.
Appendix A – Troubleshooting
A-1 Installation Errors
Cannot install Master Server due to database error
•
Ensure that the Microsoft SQL Server is properly installed and running on the
computer where you are installing DigiTrace Supervisor.
•
Verify that the Master Server name has been typed in correctly.
•
If DTS Master Server does not install, ensure that there is no MSSQL file in the folder
C:\Program Files\Microsoft SQL Server. This may be left over from a previous
installation and will prevent the installation from completing.
Install error 1604 encountered installing Crystal Reports Runtime Engine
•
Try running the installation setup again. This might happen if the installation setup
files are stored in a network drive instead of the local drive.
Unexpected Installation errors encountered
If there are unexpected errors encountered during the installation, check that the
Windows Operating system meets the minimum software requirement needed to install
DigiTrace Supervisor. Upgrade to the latest version if possible.
A-2 Communication Errors
Communication Failures
When DigiTrace Supervisor is connected to GCCs and HTC-direct controllers using a 2wire RS-485 configuration make sure that the Tx Delay setting for each GCC and HTCdirect controller is set to at least 0.06 seconds. This will ensure that the GCC or HTCdirect devices do not start to transmit a reply until DigiTrace Supervisor has turned off its
driver.
A-3 Other Errors
Some text does not display properly in the “Help About” screen
•
THERMAL MANAGEMENT SOLUTIONS
If you are using McAfee Virus Scan software, you may have to disable the “Buffer
Overflow Protection” option in the McAfee setup to eliminate this problem.
EN-DigiTraceSupervisorEnterprise-IM-H57989
06/13
72/73
WWW.THERMAL.PENTAIR.COM
NORTH AMERICA
EUROPE, MIDDLE EAST, AFRICA
ASIA PACIFIC
LATIN AMERICA
Tel: +1.800.545.6258
Fax: +1.800.527.5703
Tel: +1.650.216.1526
Fax: +1.650.474.7711
[email protected]
Tel: +32.16.213.511
Fax: +32.16.213.603
[email protected]
Tel: +86.21.2412.1688
Fax: +86.21.5426.2917
[email protected]
Tel: +1.713.868.4800
Fax: +1.713.868.2333
[email protected]
Pentair and DigiTrace are owned by Pentair or its global affiliates. All other trademarks are the property of their respective owners. Pentair reserves the
right to change specifications without prior notice.
© 2006–2013 Pentair.
THERMAL MANAGEMENT SOLUTIONS
EN-DigiTraceSupervisorEnterprise-IM-H57989
06/13
73/73