1
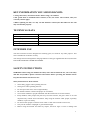
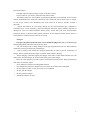
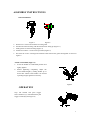
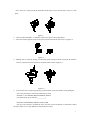
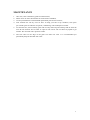
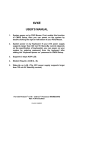
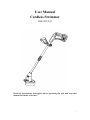
User Manual Cordless Strimmer N0E-2ET-230 Read the instructions thoroughly before operating the tool and keep this manual for future reference! 1 KEY INFORMATION YOU SHOULD KNOW: 1.Charge the battery for about 10 hours before using your trimmer. 2.The guard must be installed before trimmer, if not, the motor will overheat, and your warranty will not apply. 3.When replacing the line, use only 1.6 mm diameter round Nylon line-otherwise the unit may not function properly. TECHNICAL DATA Model No. Voltage No-load speed Cutting width Battery charging time N0E-2ET-230 18VDC 8000 /min 230mm 7-10 hours INTENDED USE Your lawn trimmer has been designed for trimming grass, not used for any other purpose. This tool is intended for consumer use only. Your charger has been designed for charging batteries of the type supplied with this tool, DO NOT USE FOR CHARGING OTHER BATTERIES. SAFETY INSTRUCTIONS WARNING! When using the machine the safety rules must be followed. For your own safety and that of bystanders please read these instructions before operating the machine. Please keep the instructions safe for later use. Safety instructions for lawn trimmer Wear safety goggles when operating this tool. Wear gloves when operating this tool. Do not expose the tool to rain or high humidity. Be familiar with the controls and proper use of trimmer; Never allow children or people unfamiliar with the instructions to use the trimmer; Keep children, other people and pets away from the trimmer; the grass which is cut and dispersed may contain stones and debris. Stop using the trimmer while people, especially children, or pets are nearby; Do not let other people or animals come within 15 feet of the trimmer when in use; Only use the trimmer in daylight or good artificial light; Before using the trimmer and after any impact, check for signs of wear or damage and 2 repair as necessary. Do not use the trimmer if the cutting device is not secured properly or is damaged. Always check that the trimmer is in good working order. If it is not, it could endanger the user. Never operate the trimmer with damaged guards or without the guards in place; Before starting the trimmer, make sure that the nylon line is not touching stones or debris. Keep hands and feet away from the cutting line at all times and especially when switching on the motor; Take care against injury from the cutter blade fitted for trimming the filament line length. After extending new cutter line always return the trimmer to its normal operating position before switching on; Never fit metal cutting elements; Never use replacement parts or accessories not provided or recommended by the manufacturer; Remove the battery before checking, cleaning or working on the trimmer and when it is not in use; Always ensure that ventilation openings are kept clear of debris; To avoid accidental starting, do not carry the machine with a finger on the on/off switch. Remain in a stable and secure position while operating the trimmer. Keep the area being cut free from wires, stones and debris. Do not cut against hard objects. This could cause injury or damage the trimmer; Warning. Cutting line continues to rotate after the motor is switched off; Do not try to stop the cutting device (nylon line) with your hands. Always let it come to a stop by itself. Do not use the trimmer to cut grass which is not in contact with the ground; for example do not cut grass which is on walls or rocks etc. Do not cross roads or gravel paths with the trimmer still running. Safety instructions for batteries and chargers Batteries · Never attempt to open for any reason · Do not expose to water · Do not incinerate the battery pack even if it is severely damaged or is completely worn out. The battery pack can explode in a fire. · Do not store in locations where the temperature may exceed 40℃ · Do not leave the battery pack in the charger when the charging is finished, otherwise battery leakage may occur. · Charge only at room temperature. · Use only the charger supplied to charge the battery (see technical data) · Before charging , make sure that the battery is dry and clean. · Use only the correct type of battery for the tool (see technical data). · When disposing of batteries follow the instructions given in the section "protecting the environment". · Under extreme conditions, battery leakage may occur .When you notice liquid on the battery , 3 proceed as follows: · Carefully wipe the liquid off using a cloth. Avoid skin contact. · In case of skin or eye contact, follow the instructions below. The battery fluid, a 25-30% solution of potassium hydroxide, can be harmful. In case of skin contact, immediately rinse with water. Neutralize with a mild acid such as lemon juice or vinegar. In case of eye contact, rinse abundantly with clean water for at least 10 minutes. Consult a physician. · NOTE: the batteries in your battery charger are the nickel-cadmium type. Cadmium is considered to be a toxic material by the Environmental Protection Agency. Before disposing of damaged or worn out Nickel-Cadmium battery packs, check with your local Environmental Protection Agency to find out about special restrictions on the disposal of these battery packs or return them to a certified service centre for recycling. Chargers · Charger’s plug must match the outlet. Never modify the plug in any way. Unmodified plugs and matching outlets will reduce risk of electric shock. · Use your charger only to charge batteries of the type supplied with your tool. Other batteries could burst, causing personal injury and damage. · Only 2 battery packs should be charged continuously in order to prevent overheating of charger. Time is needed to let the charger cool down before further charging. · When charging is finished, unplug the charger from mains socket outlet and take away the battery pack from the charger, do not leave the battery pack in the charger. · Never carry the charger by its lead or pull it to disconnect from the socket. Keep the lead away from heat, oil and sharp edges. · Never attempt to charge non-rechargeable batteries. · The charger lead cannot be changed. Do not continue to use if the lead is damaged. · Do not expose to water or rain, do not use in wet condition. · Do not open the charger. · Do not probe the charger. · Intended for indoor use only 4 ASSEMBLY INSTRUCTIONS Guard installation Figure 1 Figure 2 a. Remove two screws and washers from the guard. b. Position the motor housing with line head carrier facing up.(Figure 1) c. Slide guard over motor housing.(Figure 1) d. Install two washers 1 in the correct position.(Figure 2) e. Re-insert the screws 2 through the trimmer head and into the guard and tighten as shown in figure 2. Attach assist handle (Figure 3) a. Insert the handle in comfortable position and lightly tighten. b. Before tightening completely, adjust the assist handle height by sliding handle up or down tube. When assist handle is at desired operating height, tighten nut securely. Figure3 OPERATION Grip rear handle and press trigger lock-off button (A) with thumb then pull trigger switch (B).(See Figure 4) 5 STARTING 1. When starting the lawn trimmer for the first time, check that the nylon lines touch or pass over the wire cutting blade. If they are not long enough, (1). press the button (2).pull more nylon wire to lengthen.(Figure 5) 2. The lengthened nylon line will be cut to size automatically by the wire cutting blade once the string trimmer is turned on. 3. During use, the nylon line will become shortened or worn. To automatically lengthen or advance the nylon cutting line, tap the spool button lightly on Figure 5 Figure 6 ground (while the unit is running).(Figure 6) Rthese These operations should be repeated a few times before starting work to make sure that everything is functioning properly and to familiarize yourself with the string trimmer. Start off slowly. When you have gained experience, you will be able to use the grass trimmer to its full potential. 4. The length of the grass trimmer handle can be infinitely varied and therefore adjusted to your individual height (Figure 7): (1). Hold the tube with one hand; then loosen the adjusting bolt. (2).Set the handle to the correct length and tighten the adjusting bolt. Figure 7 REPLACE THE SPOOL OF NYLON LINE 1. Remove the battery. 2. Remove the spool assembly from the trimmer. To do so, hold the outer ribbed part of the assembly with one hand, while pushing down and turning the spool head with the other to unlock it (Figure 8). The spool carrier and spool will now disassemble easily. 6 Note: There is a spring inside the head that could easily be lost. Ensure that it is put in a safe place. Figure 8 2. Choose either OPTION 1 or OPTION 2 below for spool or line replacement. 3. Insert the line through the eyelet in the spool carrier and slide the spool into it. (Figure 9) Figure 9 4. Making sure to insert the spring, assemble the spool and spool carrier back onto the trimmer. To do so, push the head on and turn it clockwise until it locks.(Figure 10) Figure 10 5. To test if the line is advancing properly, push the button with your thumbs while pulling the wire with your fingers. The line should advance freely. OPTION 1: ACCESSORY REPLACEMENT SPOOL Use replacement spool (Part No.__________) OPTION 2: REWINDING SPOOL USING LINE Line for your trimmer is available at extra cost from your local dealer. To install line, follow the steps below (Use 1.6mm diameter round Nylon line only). 7 1. Insert one end of line into the hole in the spool as shown Figure 11 about 3 mm. Figure 11 2. Snugly and evenly wind the line onto the spool in the direction of the arrow on the spool (Figure 11),until the line builds up to the notches in the spool rim. Do not overfill spool. The spool holds about 6.5 m of line. CHARGING THE BATTERY (Fig. 12) Figure 12 These chargers require no adjustment and are designed to be as easy as possible to operate. Simply place your battery pack into the receptacle of a plugged in charger and it will automatically charge the pack. (1). Connect the transformer 1 to the charger station 3. (2). Plug the transformer into an appropriate AC power outlet. The green LED (POWER) 5 lights to tell you that the charger is ready for use. (3) Insert the battery pack 2 into the charger station, as shown in Fig 12, making sure the pack is fully seated in the charger. The red LED (CHARGE) 4 lights to tell you that the battery pack is on charge. (4). The battery pack will be fully charged in about 10 hours. 8 MAINTENANCE 1. 2. 3. 4. After use, remove the battery pack from the trimmer; When not in use store the machine out of the reach of children; Use only manufacturer recommended replacement parts and accessories; Your trimmer line can dry out over time. To keep your line in top condition, store spare pre-wound spools or bulk line in a plastic, sealable bag with a tablespoon of water. 5. To clean the tool, remove battery pack and use only mild soap and a damp cloth to clean the tool. Do not immerse tool in water or squirt it with a hose. Do not allow any liquid to get inside it. Do not clean with a pressure washer. 6. The line cutter on the edge of the guard can dull over time. It is recommended you periodically sharpen the blade with a file. 9