1
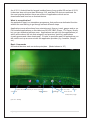
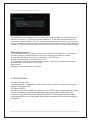
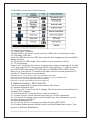
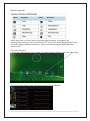
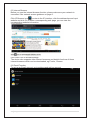
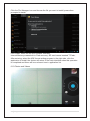
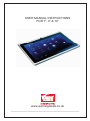
USER MANUAL INSTRUCTIONS FOR 7”, 9” & 10” www.winningdeals.co.uk 1|Page English User Manual for 7”, 9” and 10” Android Tablets Contents 1. Announcements ……………………………………………………………… 2. Introduction …………………………………………………………………… 2.1 What is Android 2.2 Specifications 2.3 Packing Details 2.4 Instructions on Keys 2.5 Features Overview 2.6 Technical Specifications 3. Quick Guidance ………………………………………………………………… 3.1 About Touch Panel 3.2 Switch On/Off 3.3 Power Save Modes and lock screen 3.4 Battery management and charging 3.5 Definition for the icons of the Functions 3.6 USB HOST Function 3.7 TF Card Storage 4. Network Access ………………………………………………………………… 4.1 Network Access by Wi-Fi 4.2 Network Access by 3G 5. Storage File Copy & Delete from PC 2|Page 6. Main Functions Introduction ………………………………………………… 6.1 Audio Function 6.2 Video Function 6.3 Picture Function 6.4 E-book Function 6.5 Internet Browser 6.6 Email Function 6.7 Calculator 6.8 Alarm Clock 6.9 APK Installer 6.10 Camera and Photograph 7. System Settings …………………………………………………………… 8. FAQ ………………………………………………………………. 9. Manual Version …………………………………………………………………. 3|Page 1. Announcements 1. Please keep the device away from moisture and dust. 2. Do not put the device in a high-temperature environment, especially in a closed car in hot weather. 3. Do not drop or strike the device. 4. Do not shake the device violently, especially the LCD Screen part or it will cause abnormal display on the screen. 5. Please select a suitable volume when using earphones so as not to cause any damage to your ears 6. Please charge the device when: (1) The power icon shows lowest power. (2) The device is turned off automatically and when you turn on it, it turns off automatically again. (3) No response when operating the buttons. Attention: Please use the charger supplied by manufacturer to charge, other charges may causes damage to the device. Input: 100-240V ~ 50/60 Hz Output: 5V 2000 mA Certain models will charge using a USB charger and the USB cable provided 7. Do not disconnect the device from PC when downloading, uploading or formatting, or it will cause programming errors of the device. 8. Do not open the device unless under professional supervision. 9. Do not use alcohol, thinner or benzene-chemical to clean the surface of the device. 10. Do not use the device when advised (eg airplane). 11. Please back-up your files in device’s memory. The manufacturer is not responsible for the deletion of files after damage or repair of the device. 12. The manufacturer reserves all right of device’s technology and design, and will have no obligation to inform the user if new versions or designs are developed. 13. The device is NOT water-proof; please keep it away from water. 14. The turn on time of this device is about 20 seconds; please don’t operate the device when it is turned on in 20 seconds. 15. This device is not a toy. 16. Please note specifications are subject to change without notification. 2. Introduction and What is an Android Device 2.1 Packing Details. Each unit of Tablet PC has the following items: Tablet PC device,1 x charger (or USB plug ),1 x earphone,1 x USBcable,1 x OTG cable, user manual. All items are packed in gift box. Android is a mobile operating system (OS), and designed primarily for touchscreen mobile devices such as smartphones and tablet computers, with specialized user interfaces for televisions (Android TV), cars (Android Auto), and wrist watches (Android Wear). The OS uses touch inputs that loosely correspond to real-world actions, like swiping, tapping, pinching, and reverse pinching to manipulate on-screen objects and a virtual keyboard. 4|Page As of 2011, Android has the largest installed base of any mobile OS and as of 2013, its devices also sell more than Windows, iOS, and Mac OS devices combined. As the most popular platform there are millions of applications which can be downloaded and used on an Android device. What is an application? An application (app) is a standalone programme that performs a dedicated function without the user having to go through several different steps. Applications cover all sections from entertainment, finance, travel, games and so on. Pre-installed applications on this tablet are SKYPE, BBC iPlayer, ITV Player, Kindle but you can download millions more. Applications are split into free applications (of which all the above fall into that category) and premium (paid for) applications (mostly games and video downloads). In order to purchase paid for applications you will need to set up an account with the application provider (e.g. Amazon, Google etc). Basic Commands All Android devices work on similar principles. (Model shown is 10”) Opens all screens that you have opened Vol Down App Menu Goes back one step Settings Vol Up Goes to the start/home page (not on 7” model) 5|Page 2.2 Specifications* 10” Version Dimensions Weight Display Ratio Connection Processor Operating System Hard Drive Capacity System Memory Expansion Capacity Music Function Video Function Battery Image Formats Wifi Camera Temperature Thresholds Languages Bluetooth 9.2” Version 260mm x 165mm x 11mm 500g 10.1 inch – 1024 x 600 – multi-point touchscreen 16:9 High-speed Micro USB Quad Core Android 4.4 240mm x 148mm x 12mm 450g 9.2” multi-point touchscreen 800x480p 190mm x 109mm x 12mm 275g 7” multi-point touch screen 800x480p 1GB DDR3 Micro SD Card up to 32GB Format: Mp3, WMA, OGG, AAC, 3GP, WAV Frequency: 20Hz – 20KHz Format: Mp4, MKV, RMVB, AVI Resolution: 1920 x 1080 8GB 512MB Micro SD Card up to 32GB Format: Mp3, WMA, OGG, AAC, 3GP, WAV Frequency: 20Hz – 20KHz Format: Mp4, MKV, RMVB, AVI Resolution: 1920 x 1080 4GB English, French, Spanish, German, Chinese Yes Yes 8GB 6000 Mah JPEG, BMP, JPG, GIF Support: 802.11b/g/n Transmission Rate: Max 54Mbps Frequency:2.4GHz Front: 0.3 Megapixel Rear: 2.0 Megapixel -50ᵒF - 100ᵒF 16:9 High-speed Micro USB Dual Core Android 4.4 3800 Mah JPEG, BMP, JPG, GIF Support: 802.11b/g/n Transmission Rate: Max 54Mbps Frequency:2.4GHz Front: 0.3 Megapixel Rear: 2.0 Megapixel -50ᵒF - 100ᵒF (-45C - 37C) English, French, Spanish, German, Chinese *Please note specification is subject to change 2.2 Instructions on Keys- .Please refer to quick set up guide 6|Page 7” Version 16:9 High-speed Micro USB Dual Core Android 4.4 512MB Micro SD Card up to 32GB Format: Mp3, WMA, OGG, AAC, 3GP, WAV Frequency: 20Hz – 20KHz Format: Mp4, MKV, RMVB, AVI Resolution: 1920 x 1080 3000 Mah JPEG, BMP, JPG, GIF Support: 802.11b/g/n Transmission Rate: Max 54Mbps Frequency:2.4GHz Front: 0.3 Megapixel Rear: 0.3 Megapixel -50ᵒF - 100ᵒF (-45C - 37C) English, French, Spanish, German, Chinese NO Getting Started For a diagram of your tablet, please see additional ‘Getting Started’ Help sheet found with your tablet. Switching Device On/Off To turn on, press and hold ‘Sleep/Wake’ button until the Android Start-up Screen shows. To turn off, while the device is unlocked, press and hold ‘Sleep/Wake’ button till screen turns black. Unlocking the Device Tap and swipe the padlock icon to the right-hand edge of its surrounding circle. To lock, press the Sleep/Wake button. See later on for password locking the device Charging Your Tablet Connect the included power adapter from the DC input to your power supply. Charge the battery for 8-12 hours to make sure it is fully charged. You can charge your device at any time – there is no need to wait until it runs out! Using a Storage Card Insert storage card into slot. To remove, press card back in to slot to release. To access data on storage card, see section headed ‘File Manager’ Connecting to Wi-Fi You will need to be connected to an available Wi-Fi network in order to install apps, download films, stream TV or music and browse the internet. To connect to a W-iFi network: Access the Settings Menu, then select, ‘Wi-Fi’. Settings The device will automatically search for networks in the area. Select your network and enter login details if prompted. Device will then connect to network and will remember this connection. When out and about and where you can get access to Wi-Fi repeat this procedure. 7|Page Figure 1 Make Sure Wi-Fi is switched to ON position Setting up an Account If you already have a Google account you can go the settings page and add this account in the accounts section. Typically you will be asked for your user name and password and then account will be verified. If you do not have an account you can set one up in the same section, and after you have determined what account you want to set up just follow the steps on screen. Please note that you will have to be connected to Wi-Fi in order to complete this. Downloading PlayStore To get the most out of your tablet you will need to install Google PlayStore. This is where you will be able to download apps from, as well as keeping your tablet up to date. To download PlayStore, simply turn on the device’s Wi-Fi function. Access the settings Menu, and Select ‘Wi-Fi On’. The Installation process should automatically begin. Follow the on-screen instructions by selecting ‘Next’ at the bottom of the screen. Select ‘Install’. PlayStore is now installed on your device. 3. Quick Guides 3.1 About Touch Panel The touch screen is capacitive touch screen; you can use five fingers to touch the screen at the same time. 3.2 Switch On/Off. Switch On and Unlock: When the device is in the OFF mode, press and hold “Power” key for 3 seconds to enter the Android start-up progress bar, it takes about 20 seconds to fully start the device. When the screen is under locked mode, please press and pull the icon to the green point, then the screen will unlock automatically, see figure 2 - 8|Page Figure 2 Move Lock symbol to right 3.3 Power Saving Modes and lock screen. Press the “POWER” key shortly after starting up, system enter to power save and lock mode. Press the “POWER” key or tap the touch screen, system will return to bright in 1 second The primary operation of the device will not stop under the power save mode, just the LCD is turned off and the screen goes black. This allows the device to play music, download etc. Switch OFF: When the device is in the OFF mode, press and hold the “POWER” key for 3 seconds, the screen will display the power off interface, choose the power off item to confirm and the system will shut down automatically 【Note】When the device is in a low battery state it will sound a continuous alarm and automatically shut down. If the device does not start up please check if the battery is low and try it again after the battery is charged. 3.4 Battery management and charging. 3.4.1 Charge the battery for 8-12 hours to make sure the battery is fully charged when first used. 3.4.2 Insert the micro port of the battery adaptor into DC slot on the device, and connect the other side with the power socket (alternatively use the USB cable with a USB power source). The desktop icon of the battery will display which shows it is charging. Please wait until the battery is fully charged, do not disconnect the power when charging. (Please note it will charge up to around 95% only – this is normal) Once the battery is fully charged the Icon on the desktop will stop rolling. 【Note】In order to keep the battery working in the best condition, please pay attention as below: Please do not charge the power in high temperatures. There is no need to fully discharge the device. The Li-battery can be charged when there is still some power in the battery. In order to keep the battery in good condition, please make sure to charge the device once every two weeks even when not in use. 9|Page 3.5 Definition for the icons of the Functions 3.6 USB HOST Function 3.6.1 USB- HOST Definition The Mini USB on the device can be used as a USB Host for transferring of data. 3.6.2 Reading USB-disk: Insert the USB-disk into the HOST port, press the File manager and choose USB to display contents. 3.6.3 External 3G USB Dongle. (See network access guidance in item 4) 3.7 TF Card Storage There is a TF card slot in this device, it supports the reading and storage of the files in TF card. Insert the TF card into the card slot in the right way. To remove it safely go to SETTINGS and under STORAGE select to DISMOUNT SD CARD. When taking it out, just push the TF toward to the inside, then the slot will release the TF card, the TF card will pop out automatically [Please insert the TF into the card slot in the right side of the device. Don’t pull out the card when operating (reading, copying), or it may cause data error. Don’t use the TF card under high temperature conditions. Keep the TF card far from liquids and erosive materials.] 4. Network Access – Wi-Fi and 3G The device supports Wi-Fi network and external 3G network. 4.1 Network Access by Wi-Fi 4.1.1 Turn on Wi-Fi, and Press Wi-Fi settings. The device will scan automatically for available Wi-Fi networks. 4.1.2 Choose the Wi-Fi network that you want to connect to. 4.1.3 Press Connect. Some networks may need you to input a password. 4.1.4 On the Wi-Fi settings screen, press the Menu key, touch Advanced, you will get more settings for the Wi-Fi. 4.2 Network Access by 3G 4.2.1 Turn OFF Wi-Fi if it is working by sliding the tab in SETTINGS. 4.2.2 Access Mobile Network Setting, make sure Data Enabled was chosen. Then go back to Wireless & Networks. 10 | P a g e 4.2.3 Insert External 3G dongle by USB host. 4.2.4 Choose Mobile Network then wait for the 3G network connection, so you can access the network via 3G. 5. Storage File Copy A) Connect the device to computer by USB Cable, there will be notification in the status bar that the USB is connected. B) Choose USB Connected C) Then, Turn on USB storage. The left picture shows that device storage content could be viewed and modified from computer. The right picture means that device storage content could NOT be viewed or modified from computer. 6. Main Functions Introduction 6.1 Audio Function Enter the music player: In music player mode, double-click the track in the list to play music as shown in the following picture re 11 | P a g e Button Instruction When there are no music files in the audio player playlist, the system will automatically load the music files from the TF card to the audio player playlist once the audio player has been turned on. Music can still be played whilst the main screen is off. 6.2 Video Function Click the Video player icon to enter the video player interface, open the video files, If you have any video to play then the screen will look like this: 12 | P a g e The device supported audio file format: MKV, AVI, RM, RMVB, MP4, MOV, VOB, DAT, FLV, 3GP, etc. When no video files in the video player playlist, the system will automatically load the video files from the TF card to the video player playlist after turning on video player. 6.3 Picture Function Click the camera Icon to take pictures or click the gallery icon to see saved pictures Image formats supported: BMP,JPG, JPEG, PNG, GIF) When there is no file in the photo list, the system will automatically load the image files from the card to the photo browsing list after opening the photo browser. Open the corresponding folder, find the image file and add the picture you want. Click menu button, the photo can be set as wallpaper. 6.4 File Manager In file manager you can check all files in the device, including files in the built-in Memory and External Card. Also there is a quick view for pictures and videos. File Manager can also be called FILES, File Explorer (but they all have the same function) 13 | P a g e 6.5 Internet Browser Before you use the internet browser function, please make sure your network is connected. See network access guidance on page 6. Click IE Browser icon to enter to the IE interface, click the address bar and input website and click Go to enter a corresponding web page, you can view the corresponding website information. Click menu icon to access settings The device also supports other internet browsers and details functions of those internet browsers which can be downloaded, eg Firefox, Chrome 6.6 Email Function To set up an Email account, go to settings and add an account 14 | P a g e Select the account that you wish to create and complete the form This device supports several accounts working together such as Gmail, MSN, Yahoo, etc. Take Google email account for an example here. 6.7 Calculator: Click Calculator icon to enter calculator interface. 6.8 Alarm Clock: Click Clock icon to enter time interface, then click the clock to access alarm interface; here you can add new alarms or edit former alarms. Long press former alarms to choose turn alarm on/off, edit alarm and delete alarm. Click alarms to edit alarm. You can edit alarms’ time, repeat mode, ringtone, and label them for future reference. 6.9 APK Installer: This device supports the third party’s Application Package (APK format) based on Android OS. Many Application Packages can be downloaded from the internet or copied from other devices into the storage. If the Application Package is not downloaded from Google Android Market, you should operate the following steps before installation. Please check Settings – Applications, make sure Unknown Sources is chosen. 15 | P a g e Click the File Manager icon and choose the file you want to install, press when prompted to install. Click Install, enter into the APK installer interface. Internal Memory means built-in Flash memory, SD card means inserted T-Flash; After entering, select the APK format setting program in the right side, click the application to install, the device will return to the main interface when this operation is completed and there will be a relevant icon in application list. 6.10 Photos and Videos 16 | P a g e Click on the applications tab to display all applications, then click "take photos" or "camera shooting ". Before filming you can click on camera's work environment to change settings, such as: white balance, photos size, photo quality, point mode etc. Click on button to start or end shooting. Press the Camera icon and the photographs or video can be previewed in the preview window. If you want play the video you have shot turn on the Video player and select which video you want to play. If you want to see the photograph you taken, open the Gallery and select which pictures you want to see. 7. System Settings Click Setting icon to enter System Settings, then you can change Wireless & Networks, Sound, Display, Location & Security, Applications, Accounts & Sync, Privacy, Storage, Language & Keyboard, Voice input & output and Date & Time. 7.1 Wireless & Networks Setting, See item 4. 7.2 Sound Setting: you can adjust Silent mode, Volume, Notification ringtone, Audible selection, Screen lock sounds and Haptic feedback. 7.3 Display Setting: you can adjust Brightness, Auto-rotate screen, Animation, Screen timeout. 7.4 Location & Security Setting. In this Setting, you can set up screen lock and device administrators, as well as TF card password. 17 | P a g e Go to SETTINGS and then SECURITY to determine what password you wish to employ 7.5 Applications Setting. You can manage applications here and check storage & battery usage. To uninstall an APPLICATION use a long press and then you will be given an option to uninstall Notice: If you want to install applications which are not downloaded from Google Android Market, you should turn on Unknown Sources in advance. 7.6 Accounts & sync Setting. In this setting, you can manage accounts in the device. 7.7 Privacy Setting. In this setting, you can back up data and reset factory default. 7.8 Storage Setting. In this setting, you can check storage use and Mount & Erase TF cards. 18 | P a g e Notice: Before you fetch out TF Card (if you have inserted TF card), please Unmount TF card first. 7.9 Language & Keyboard Setting. In this setting, you can change the language of system and choose keyboard inputs. Notice: If you have installed an input and you want to use it, please remember to turn it on in this setting (All inputs could be turned on here). Long Press the blank where you want to type, there will be a pop-up from where you can choose inputs. 7.10 Date & Time Setting. In this setting, you can adjust date and time. 7.11 About device. Check device information. 8. FAQ 1) How can I change languages if I mistakenly choose an unknown language? ·Find setting icon in Menu Page to enter Settings. ·Then, choose icon to enter language & keyboard setting, the first option is language setting. 2) How can I change input when I am typing? Long Press the blank where you are typing, there will be popup to choose inputs. 3) I’ve already installed some applications but I cannot find them now, why? By default, some applications are installed in external TF card, so if you have removed the TF card from the device, you will not see these applications. 4) The machine won’t turn on. ·Check the battery and charge it if there is no power. ·Connect the machine to AC Adapter. ·Contact the seller if the machine still cannot be turned on after charging. 5) My battery is not lasting as long as I think it should Try closing applications that are not in use, as even if they are not displayed they can drain the battery 6) There is no voice in the earphone. ·Check if the device is in Mute mode. ·Check the volume setting in case it is set to 0. ·Check the connection of earphone. 7) Why can’t I install applications? Please check Settings – Applications, make sure Unknown sources is chosen. 8) There are Error Codes on the screen. ·System error, restart the device. ·The language you are browsing is not supported by built-in languages, please contact the original manufacturer to debug. 9) There are problems using the device. I am getting error messages. Restart the device by pressing POWER button for 10 seconds, the device will restart. If you have restarted the device and error pop-up still shows, you can check active applications and close them before trying again There may be a virus in the device, please install security applications and protect your device. If you have problems after trying all the above operations, the device’s firmware needs to be rebuilt ( this operation is called “flash”). Notice: Before you flash the device, please back up your storage, the flashing will make all settings and files turn to factory default. Flashing operation needs flashing tool and firmware, please contact original manufacturer for flashing to assist in this operation. 19 | P a g e 9. Version WD280714 Telephone Helpline 01794 526501 www.winningdeals.co.uk 20 | P a g e